2013 MITSUBISHI iMiEV headlamp
[x] Cancel search: headlampPage 116 of 258

Rear fog lamp switch
E00508400569
The
rear fog lamp can be operated when the head-
lamps or front fog lamps (if so equipped) turn on.
An indication lamp in the instrument cluster comes
on when the rear fog lamp is turned on.
[Vehicle without front fog lamps]
Turn the knob once in the “ON” direction to turn
on the rear fog lamp. To turn the rear fog lamp off,
turn the knob once in the “OFF” direction. The
knob will automatically return to its original posi-
tion when you release it.
[Vehicle with front fog lamps]
Turn the knob once in the “ON” direction to turn
on the front fog lamps. Turn the knob once more in
the “ON” direction to turn on the rear fog lamp. To
turn the rear fog lamp off, turn the knob once in the
“OFF” direction. Turn the knob once more in the
“OFF” direction to turn off the front fog lamps.
The knob will automatically return to its original po-
sition when you release it. NOTE
l The
rear fog lamp is automatically turned off
when the headlamps or front fog lamps (if so
equipped) are turned off.
l To turn the rear fog lamp on again, turn the
knob once in the “ON” direction after turn-
ing on the headlamps. (Vehicle without front
fog lamps)
l To turn the rear fog lamp on again, turn the
knob twice in the “ON” direction after turn-
ing on the headlamps. (Vehicle with front
fog lamps) Wiper and washer switch
E00507101667 CAUTION
l
If
the washer is used in cold weather, the
washer fluid sprayed against the glass
may freeze, which may hinder visibility.
Warm the glass with the defroster or rear
window demister before using the washer.
Windscreen wipers E00516900534
The windscreen wipers can be operated with the
electric
motor switch in the “ON” or “ACC” posi-
tion.
If the blades are frozen to the windscreen or rear
window, do not operate the wipers until the ice has
melted and the blades are freed, otherwise the wip-
er motor may be damaged. Instruments and controls
4-16
4
OHAE13E1
Page 132 of 258

Inspection and maintenance
following rough road operation E00606700383
After
operating the vehicle in rough road condi-
tions, be sure to perform the following inspection
and maintenance procedures:
l Check that the vehicle has not been damaged
by rocks, gravel, etc.
l Carefully wash the vehicle with water.
Drive the vehicle slowly while lightly depress-
ing the brake pedal in order to dry out the
brakes. If the brakes still do not function prop-
erly, we recommend you to have the brakes
checked as soon as possible.
l Remove the insects, dried grass, etc. clog-
ging the radiator core.
l Check the inside of the vehicle. If water en-
try is found, dry the carpet etc.
l Inspect the headlamps, If the headlamp bulb
is flooded with water, we recommend you to
have it drained. Acoustic Vehicle Alerting System
(AVAS) E00631600038
The
Acoustic Vehicle Alerting System (AVAS) is
a device that uses sound to alert pedestrians of the
presence of the vehicle. The system operates when
the vehicle speed is about 35 km/h (22 mph) or less.
The sound starts when the AVAS is operated in the
following conditions.
l When the vehicle speed is about 3 km/h
(2 mph) or less and the brake pedal is not de-
pressed.
l When the vehicle speed is about 3 km/h
(2 mph) to 35 km/h (22 mph).
The sound does not start in the following cases. l When the vehicle speed is about 3 km/h
(2 mph) or less and the brake pedal is de-
pressed.
l When the vehicle speed is about 35 km/h
(22 mph) or more.
l When the selector lever is in the “P” (PARK)
position.
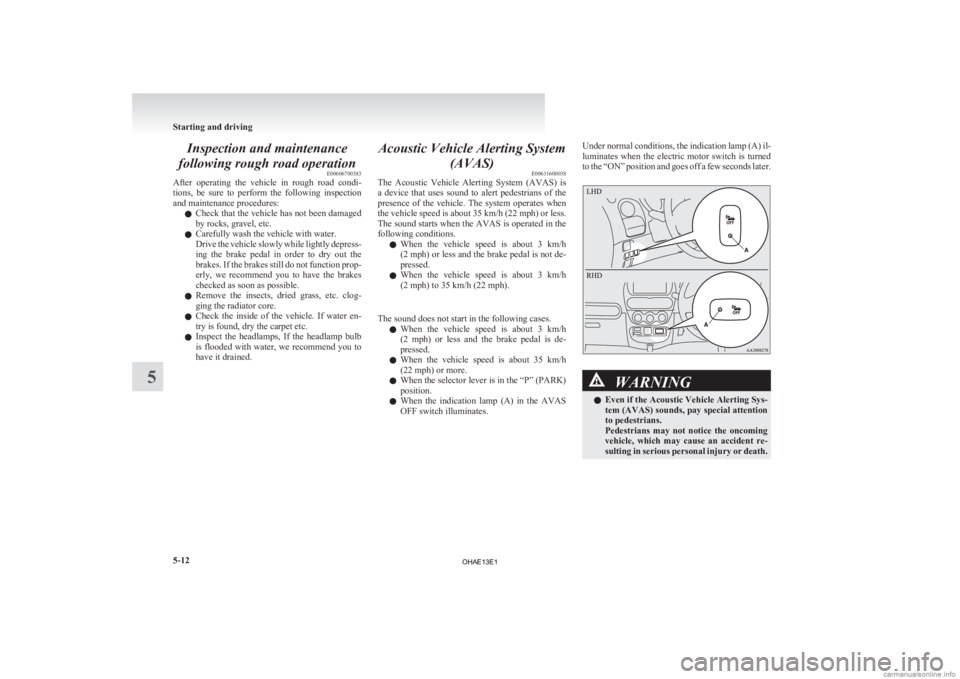
l When the indication lamp (A) in the AVAS
OFF switch illuminates. Under normal conditions, the indication lamp (A) il-
luminates
when the electric motor switch is turned
to the “ON” position and goes off a few seconds later. WARNING
l Even
if the Acoustic Vehicle Alerting Sys-
tem (AVAS) sounds, pay special attention
to pedestrians.
Pedestrians may not notice the oncoming
vehicle, which may cause an accident re-
sulting in serious personal injury or death. Starting and driving
5-12
5
OHAE13E1
Page 137 of 258

After driving on icy roads
E00618800176
After
driving on snowy or icy roads, remove any
snow and ice which may have be left around the
wheels. Be careful not to damage the wheel speed
sensors (A) or the cables located at each wheel.
Front
Rear Electric power steering system
(EPS) E00629200183
The
power steering system operates while the elec-
tric motor unit is running. It helps reduce the effort
needed to turn the steering wheel.
The power steering system has mechanical steering
capability in case the power assist is lost. If the pow-
er assist is lost for some reason, you will still be
able to steer your vehicle, but you will notice it
takes much more effort to steer. If this happens,
have your vehicle inspected at a MITSUBISHI
MOTORS Authorized Service Point. WARNING
l Do
not stop the electric motor unit while
the vehicle is moving. Stopping the elec-
tric motor unit would make the steering
wheel extremely hard to turn, possibly re-
sulting in an accident.
NOTE l During
repeated full-lock turning of the steer-
ing wheel (for example, while you are ma-
noeuvring the vehicle into a parking space),
a protection function may be activated to pre-
vent overheating of the power steering sys-
tem. This function will make the steering
wheel gradually harder to turn. In this event,
limit your turning of the steering wheel for a
while. When the system has cooled down,
the steering action will return to normal. l
If
you turn the steering wheel while the vehi-
cle is stationary with the headlamps on, the
headlamps may become dim. This behaviour
is not abnormal. The headlamps will return
to their original brightness after a short while.
Electric power steering system warn-
ing lamp
Type 1
Type 2 If there is a malfunction in the system, the warning
lamp will come on. Starting and driving
5-17 5
OHAE13E1
Page 220 of 258

l
The table above shows the main equipment
corresponding to each fuse.
Bonnet room fuse location table E08404300015No. Sym-
bol Electrical system Capaci-
ty
1 — ——
2 Auxiliary battery
30 A*
3 Electric motor switch
40 A*
4 Radiator fan motor
40 A*
5 Electric window con-
trol 40 A
*
6 Brake electric vacuum
pump 30 A
*
7 Electric motor unit con-
trol 15 A
8 Stop lamps 15 A
* : Fusible link No. Sym-
bol Electrical system Capaci-
ty
9 Front fog lamps 15 A
10 Water pump (Electric
motor unit) 15 A
11 Charge 10 A
12 Hazard warning flasher 10 A
13 Horn 10 A
14 Daytime running lamps 10 A
15 Traction battery cool-
ing fan motor 15 A
16 Water pump (Air con-
ditioning) 10 A
17 Headlamp low beam
(right) 20 A
18 Headlamp low beam
(left) 20 A
19 Headlamp high-beam
(right) 10 A
20 Headlamp high-beam
(left) 10 A
* : Fusible link l
Some
fuses may not be installed on your ve-
hicle, depending on the vehicle model or spec-
ifications.
l The table above shows the main equipment
corresponding to each fuse. Identification of fuse
E08404400016 Capacity Colour
7.5 A Brown
10 A Red
15 A Blue
20 A Yellow
30 A Green (fuse type) / Pink (fusible
link type)
40 A Green (fusible link type) Fuse replacement
E08404500017
1. Before
replacing a fuse, always turn off the
electrical circuit concerned and turn the elec-
tric motor switch to the “LOCK” position.
2. Remove the fuse puller (A) from the inside of the fuse cover in the passenger compart-
ment. 3. Referring
to the fuse load capacity table,
check the fuse pertaining to the problem. Vehicle care and Maintenance
8-22
8
OHAE13E1
Page 222 of 258

Outside
E08404800010Front1- Headlamps, low beam: 55 W (H11)
2-
Headlamps, high-beam: 60 W (HB3)
3- Front fog lamps*: 35 W (H8) Daytime running lamps*: 13 W (P13W)
4- Front turn-signal lamps: 21 W (W21W)
5- Position lamps: 5 W (W5W)
6- Side turn-signal lamps: 5 W (WY5W) *: if so equipped
Codes in parentheses indicate bulb types.
Rear 7- High-mounted stop lamp: 5 W (W5W)
8-
Stop and tail lamps
9- Rear turn-signal lamps: 21 W (WY21W)
10- Licence plate lamps: 5 W (W5W)
11- Rear fog lamp: 21 W (W21W)
12- Reversing lamps: 21 W (W21W) Codes in parentheses indicate bulb types.
NOTE l The stop and tail lamps use LEDs rather than
bulbs.
For repair and replacement, we recommend
you to contact a MITSUBISHI MOTORS Au-
thorized Service Point.
Inside E08404900011 1- Room lamp (rear): 8 W
2-
Room lamp (front) & map lamps: 8 W Removing and installing the headlamp
unit
E08405000022
Bulbs
for headlamps, position lamps or front turn-
signal lamps are replaced by removing the entire
headlamp unit from the vehicle.
Back side of the headlamp A- Headlamp (low beam)
B-
Headlamp (high-beam)
C- Position lamp
D- Front turn-signal lamp
Refer to the following section for replacement.
Headlamps (low beam) ® p. 8-28
Headlamps (high-beam) ® p. 8-29
Position lamps ® p. 8-30
Front turn-signal lamps ® p. 8-30
Use the following steps to remove the headlamp unit.
To remove
1. Open the bonnet. Refer to “Bonnet” on page8-07.
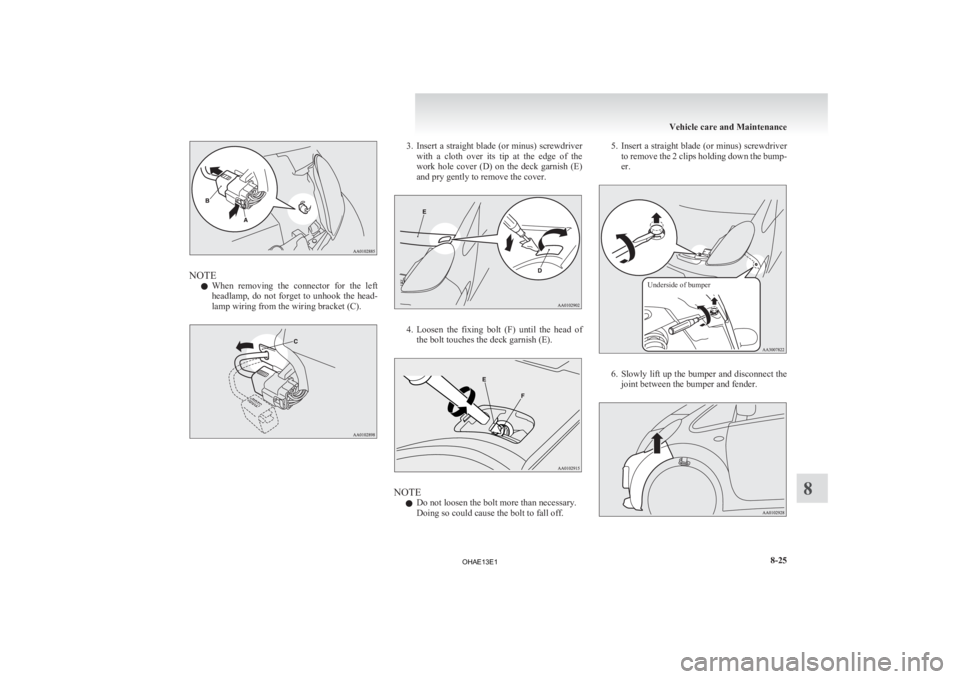
2. Press the tab (A) to remove the connector (B). Vehicle care and Maintenance
8-24
8
OHAE13E1
Page 223 of 258

NOTE
l When
removing the connector for the left
headlamp, do not forget to unhook the head-
lamp wiring from the wiring bracket (C). 3. Insert
a straight blade (or minus) screwdriver
with a cloth over its tip at the edge of the
work hole cover (D) on the deck garnish (E)
and pry gently to remove the cover. 4. Loosen
the fixing bolt (F) until the head of
the bolt touches the deck garnish (E). NOTE
l Do not loosen the bolt more than necessary.
Doing so could cause the bolt to fall off. 5. Insert
a straight blade (or minus) screwdriver
to remove the 2 clips holding down the bump-
er.
Underside of bumper 6. Slowly
lift up the bumper and disconnect the
joint between the bumper and fender. Vehicle care and Maintenance
8-25 8
OHAE13E1
Page 224 of 258

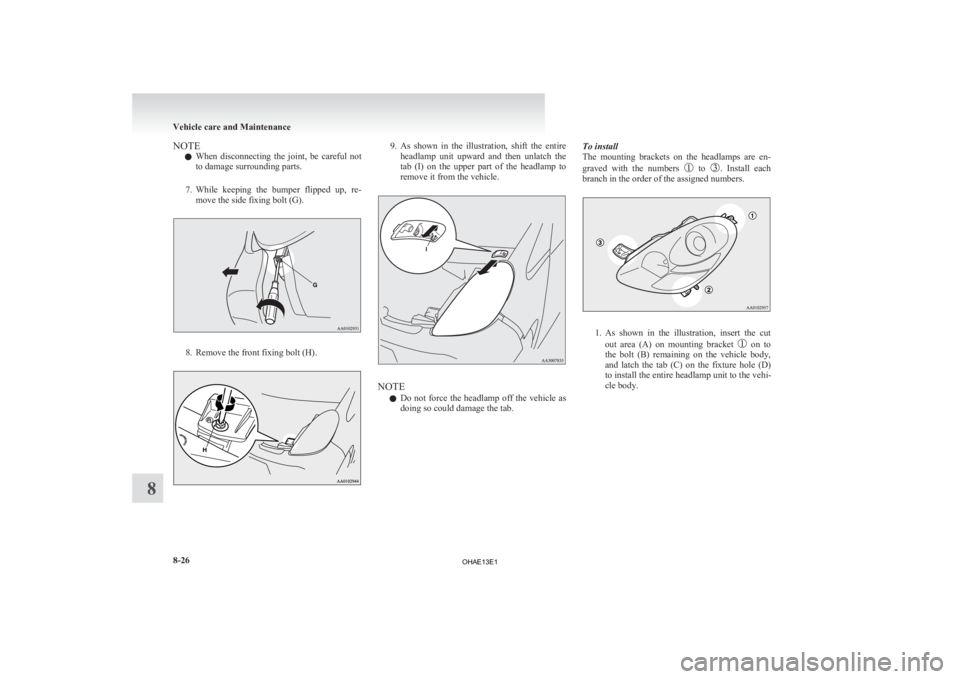
NOTE
l When
disconnecting the joint, be careful not
to damage surrounding parts.
7. While keeping the bumper flipped up, re- move the side fixing bolt (G). 8. Remove the front fixing bolt (H). 9. As shown in the illustration, shift the entire
headlamp unit upward and then unlatch the
tab (I) on the upper part of the headlamp to
remove it from the vehicle. NOTE
l Do
not force the headlamp off the vehicle as
doing so could damage the tab. To install
The
mounting brackets on the headlamps are en-
graved with the numbers to . Install each
branch in the order of the assigned numbers. 1. As
shown in the illustration, insert the cut
out area (A) on mounting bracket on to
the
bolt (B) remaining on the vehicle body,
and latch the tab (C) on the fixture hole (D)
to install the entire headlamp unit to the vehi-
cle body. Vehicle care and Maintenance
8-26
8
OHAE13E1
Page 225 of 258

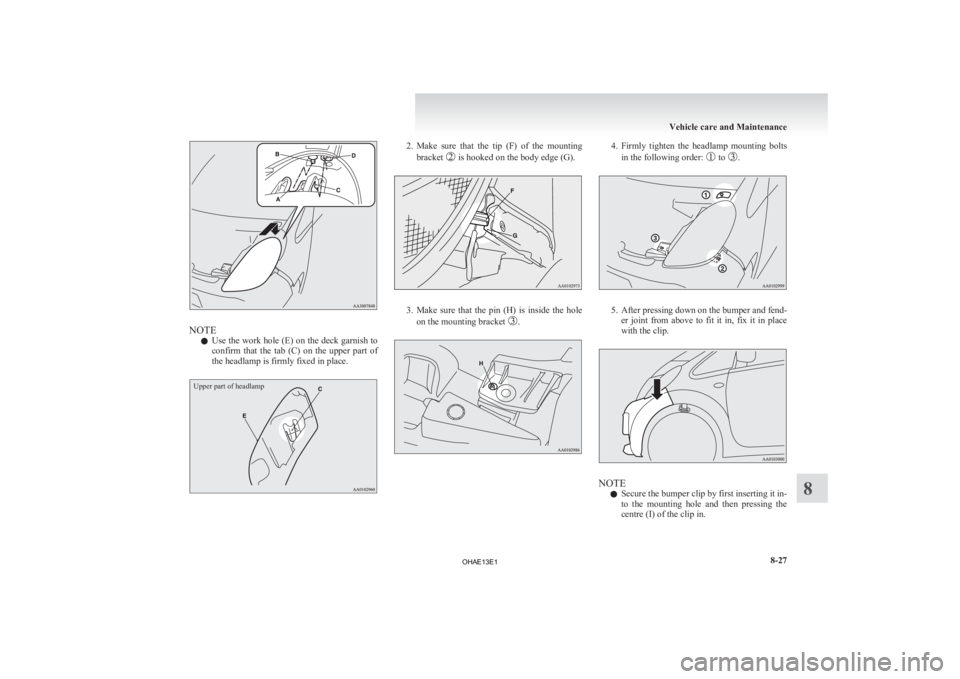
NOTE
l Use
the work hole (E) on the deck garnish to
confirm that the tab (C) on the upper part of
the headlamp is firmly fixed in place.
Upper part of headlamp 2. Make
sure that the tip (F) of the mounting
bracket is hooked on the body edge (G).
3. Make
sure that the pin (H) is inside the hole
on the mounting bracket . 4. Firmly
tighten the headlamp mounting bolts
in the following order: to .
5. After
pressing down on the bumper and fend-
er joint from above to fit it in, fix it in place
with the clip. NOTE
l Secure
the bumper clip by first inserting it in-
to the mounting hole and then pressing the
centre (I) of the clip in. Vehicle care and Maintenance
8-27 8
OHAE13E1