2013 MITSUBISHI iMiEV ECU
[x] Cancel search: ECUPage 90 of 258

3. Push and pull the child restraint in all direc-
tions to be sure it is secure. WARNING
l For
some types of child restraint, the lock-
ing clip (A) should be used to help avoid
personal injury during a collision or sud-
den manoeuvre.
It must be fitted and used in accordance
with the child restraint manufacturer’s in-
structions.
The locking clip must be removed when
the child restraint is removed. Seat belt inspection
E00406300576
l Check
the belts for cuts, worn or frayed web-
bing and for cracked or deformed metallic
parts. Replace the belt assembly if it is defec-
tive.
l A dirty belt should be cleaned with neutral de-
tergent in warm water. After rinsing in water,
let it dry in the shade. Do not attempt to
bleach or re-dye the belts because this will af-
fect their characteristics. WARNING
l We
recommend you to have all seat belt
assemblies including retractors and at-
taching hardware inspected after any col-
lision. We recommend that seat belt as-
semblies in use during a collision be re-
placed unless the collision was minor and
the belts show no damage and continue to
operate properly.
l Do not attempt to repair or replace any
part of the seat belt assemblies; we recom-
mend you to have this work done by a
MITSUBISHI MOTORS Authorized
Service Point. Incorrect repair or replace-
ment could reduce the effectiveness of the
belts and could result in serious injury in
the event of a collision.
l Once the pretensioner has been activated,
it cannot be re-used.
It must be replaced together with the re-
tractor. Supplemental restraint system
(SRS) - airbag E00407202026
The
information for SRS airbags includes impor-
tant information concerning the driver’s and front
passenger’s airbags, the side airbags and the cur-
tain airbags.
The SRS driver and front passenger airbags are de-
signed to supplement the primary protection of the
driver and front passenger side seat belt systems by
providing those occupants with protection against
head and chest injuries in certain moderate-to-se-
vere frontal collisions.
The SRS side airbags are designed to supplement
properly worn seat belts and provide the driver and
front passenger with protection against chest, abdo-
men and hip injuries in certain moderate-to-severe
side impact collisions.
The SRS curtain airbags are designed to supple-
ment properly worn seat belts and provide the driv-
er and passenger with protection against head inju-
ries in certain moderate-to-severe side impact colli-
sions.
The SRS is NOT a substitute for the seat belts. To
ensure the maximum protection during all types of
collisions and accidents, all occupants, including
the passengers as well as the driver, must wear
their seat belts. Seat and seat belts
3-20
3
OHAE13E1
Page 123 of 258

Safe driving techniques
E00600300635
Driving
safety and protection against injury cannot
be fully ensured. However, we recommend that
you pay extra attention to the following:
Seat belts
Before starting the vehicle, make sure that you and
your passengers have fastened your seat belts.
Floor mats WARNING
l Keep
floor mats clear of the pedals by cor-
rectly laying floor mats that are suitable
for the vehicle.
To prevent the floor mats from slipping
out of position, securely retain them us-
ing the hook etc.
Note that laying a floor mat over a pedal
or laying one floor mat on top of another
can obstruct pedal operation and lead to
a serious accident. Carrying children in the vehicle
l Never leave your vehicle unattended with the
key
and children inside the vehicle. Children
may play with the driving controls and this
could lead to an accident.
l Make sure that infants and small children are
properly restrained in accordance with the
laws and regulations, and for maximum pro-
tection in case of an accident.
l Prevent children from playing in the luggage
compartment. It is quite dangerous to allow
them to play there while the vehicle is moving.
Loading luggage
When loading luggage, be careful not to load
above the height of seats. This is dangerous not on-
ly because rearward vision will be obstructed, but
also the luggage may be projected into the passen-
ger compartment under hard braking. Parking brake
E00600501647
To
park the vehicle, first bring it to a complete
stop, fully apply the parking lever sufficiently to
hold the vehicle.
To apply the parking brake 1- Firmly
depress and hold the brake pedal,
then pull the lever up without pushing the but-
ton at the end of hand grip. CAUTION
l
When
you intend to apply the parking
brake, firmly press the brake pedal to
bring the vehicle to a complete stop be-
fore pulling the parking brake lever.
Pulling the parking brake lever with the
vehicle moving could make the rear
wheels lock up, thereby making the vehi-
cle unstable. It could also make the park-
ing brake malfunction. Starting and driving
5-03 5
OHAE13E1
Page 134 of 258

Braking
E00607001869
All
the parts of the brake system are critical to safe-
ty. We recommend you to have the vehicle
checked at regular intervals according to the serv-
ice booklet. CAUTION
l
Avoid
driving habits that cause heavy
braking and never “ride” the brakes by
resting your foot on the brake pedal
while driving.
It causes brake overheating and fading.
Brake system
The
service brake is divided into two brake cir-
cuits. And your vehicle is equipped with power
brakes. If one brake circuit fails, the other is availa-
ble to stop the vehicle. If you should lose the pow-
er assist for some reason, the brakes will still work.
In these situations, even if the brake pedal moves
down to the very end of its possible stroke or re-
sists being depressed, keep depressing the brake ped-
al down harder and further than usual; stop driving
as soon as possible and have the brake system re-
paired. WARNING
l Do
not turn off the electric motor unit
while your vehicle is in motion. If you
turn off the electric motor unit while driv-
ing, the power assistance for the braking
system will stop working and your brakes
will not work effectively. This could lead
to a crash and serious injury. WARNING
l If
the power assist is lost or if either
brake hydraulic system stops working
properly, have your vehicle checked im-
mediately.
Warning lamp
The
brake warning lamp illuminates to indicate a
fault in the braking system. Refer to “Brake warn-
ing lamp” on page 4-09.
When brakes are wet
Check the brake system while driving at a low
speed immediately after starting, especially when
the brakes are wet, to confirm they work normally.
A film of water can be formed on the brake discs
or brake drums and prevent normal braking after
driving in heavy rain or through large puddles, or
after the vehicle is washed. If this occurs, dry the
brakes out by driving slowly while lightly depress-
ing the brake pedal.
When driving downhill
It is important to take advantage of regenerative
braking by shifting to the “B” (BRAKE) position
while driving on steep downhill roads in order to
prevent the brakes from overheating. WARNING
l Do
not leave any objects near the brake
pedal or let a floor mat slide under it; do-
ing so could prevent the full pedal stroke
that would be necessary in an emergency.
Make sure that the pedal can be operated
freely at all times. Make sure the floor
mat is securely held in place.
Brake pad and linings l Avoid hard braking situations.
New
brakes need to be broken-in by moder-
ate use for the first 200 km (125 miles).
l The disc brakes are provided with a warning
device which emits a shrieking metallic
sound while braking if the brake pads have
reached their wear limit. If you hear this
sound, have the brake pads replaced immedi-
ately. WARNING
l Driving
with worn brake pads will make
it harder to stop, and can cause an acci-
dent. Starting and driving
5-14
5
OHAE13E1
Page 141 of 258

CAUTION
l
Before driving and after travelling a
short distance, always check the load to
make sure it is securely fastened to the
roof carrier.
Check periodically during your travel
that the load remains secure.
NOTE l To
prevent wind noise, remove the roof carri-
er when not in use.
l Remove the roof carrier before using an auto-
matic car wash.
l Be sure that adequate clearance is main-
tained for raising the tailgate when installing
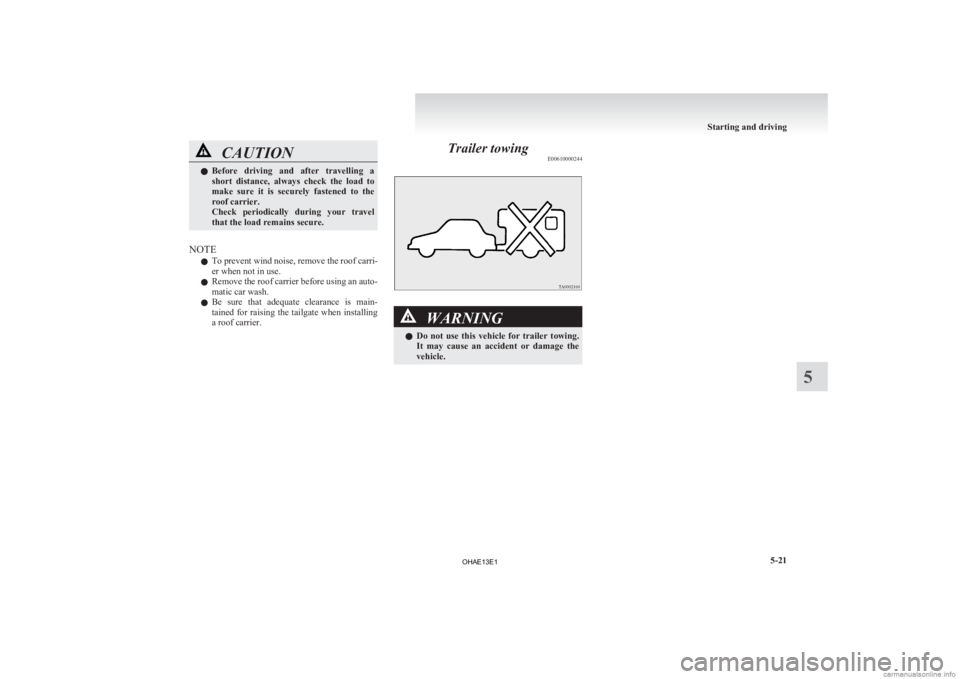
a roof carrier. Trailer towing
E00610000244 WARNING
l Do
not use this vehicle for trailer towing.
It may cause an accident or damage the
vehicle. Starting and driving
5-21 5
OHAE13E1
Page 159 of 258

To listen to a music CD
Push the CD button if a disc is already in the CD
player.
The audio system will enter CD mode and
start playback. The track number and the playing
time will appear on the display. The tracks in the
disc will be played consecutively and continuously. To listen to an MP3 CD
This
CD player allows you to play MP3 (MPEG Au-
dio Layer-3) files recorded on CD-ROMs, CD-Rs
(recordable CDs), and CD-RWs (rewritable CDs)
in ISO9660 Level 1/Level 2, Joliet, and Romeo for-
mats. Each disc may have a maximum of 16 trees,
100 folders and 255 files. During MP3 playback,
the unit can display ID3 tag information. For infor-
mation concerning ID3 tag, refer to “CD text and
MP3 title display” on page 6-19. Push the CD button if a disc is already in the CD
player.
The display shows “READING”, then playback be-
gins.
The folder number, the track number and the
playing time will appear on the display. NOTE
l While
listening to a disc on which CD-DA
(CD-Digital Audio) and MP3 files have both
been recorded, you can switch between read-
ing of the CD-DA, reading of the MP3 files,
and the external audio input mode by press-
ing the CD button for 2 seconds or longer (un-
til you hear a beep).
l With a disc that contains both CD-DA and
MP3 files, the CD-DA files are automatical-
ly played first.
l The playback sound quality differs depend-
ing on the encoding software and the bit rate.
For details, refer to the user manual of your
encoding software.
l Depending on file/folder configurations on a
disc, it may take some time before playback
starts.
l MP3 encoding software and writing software
are not supplied with this unit.
l You may encounter trouble in playing an
MP3 or displaying the information of MP3
files recorded with certain writing software
or CD recorders (CD-R/RW drivers).
l If you record too many folders or files other
than MP3 onto a disc, it may take some time
before playback starts.
l This unit does not record MP3 files.
l For information on CD-Rs/RWs, refer to
“Notes on CD-Rs/RWs” on page 6-29. For pleasant driving
6-17 6
OHAE13E1
Page 172 of 258

l
The unit may not successfully play back a
CD-R/RW that was made by the combina-
tion of writing software, a CD recorder
(CD-R/RW drive) and a disc if they are in-
compatible with one another.
l This player cannot play the CD-R/RW discs
if the session is not closed.
l This player cannot play CD-R/RW discs
which contain other than CD-DA or MP3 da-
ta (Video CD, etc.).
l Be sure to observe the handling instructions
for the CD-R/RW disc. WARNING
l Operating
the CD player in a manner oth-
er than specifically instructed herein may
result in hazardous radiation exposure.
Do not remove the cover and attempt to
repair the CD player by yourself. There
are no user serviceable parts inside. In
case of malfunction, we recommend you
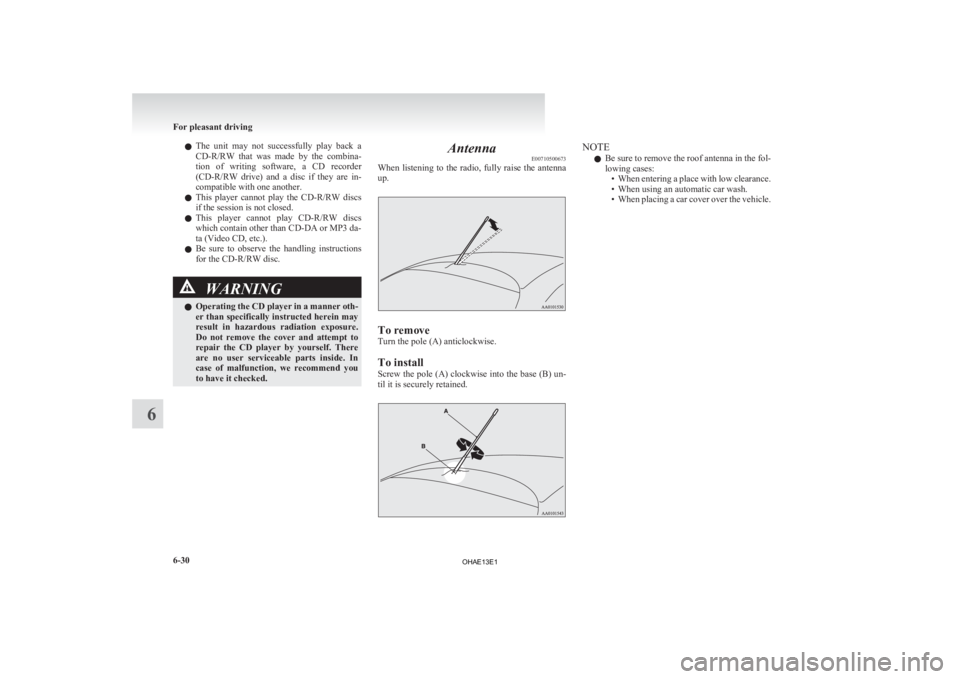
to have it checked. Antenna
E00710500673
When
listening to the radio, fully raise the antenna
up. To remove
Turn the pole (A) anticlockwise.
To install
Screw
the pole (A) clockwise into the base (B) un-
til it is securely retained. NOTE
l Be
sure to remove the roof antenna in the fol-
lowing cases: • When entering a place with low clearance.
• When using an automatic car wash.
• When placing a car cover over the vehicle. For pleasant driving
6-30
6
OHAE13E1
Page 191 of 258

CAUTION
l
If there is any air left in the tyre when
you remove the valve insert, the valve in-
sert may fly out and injure you. Make
sure the tyre contains no air before remov-
ing the valve insert.
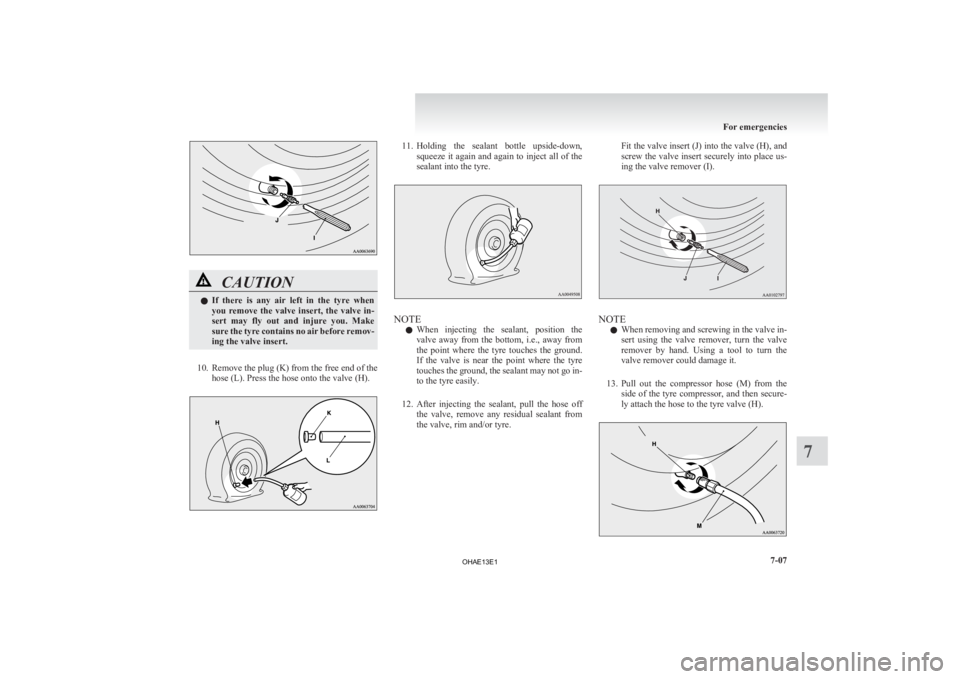
10. Remove the plug (K) from the free end of the hose (L). Press the hose onto the valve (H). 11. Holding
the sealant bottle upside-down,
squeeze it again and again to inject all of the
sealant into the tyre. NOTE
l When
injecting the sealant, position the
valve away from the bottom, i.e., away from
the point where the tyre touches the ground.
If the valve is near the point where the tyre
touches the ground, the sealant may not go in-
to the tyre easily.
12. After injecting the sealant, pull the hose off the valve, remove any residual sealant from
the valve, rim and/or tyre. Fit the valve insert (J) into the valve (H), and
screw
the valve insert securely into place us-
ing the valve remover (I). NOTE
l When
removing and screwing in the valve in-
sert using the valve remover, turn the valve
remover by hand. Using a tool to turn the
valve remover could damage it.
13. Pull out the compressor hose (M) from the side of the tyre compressor, and then secure-
ly attach the hose to the tyre valve (H). For emergencies
7-07 7
OHAE13E1
Page 195 of 258

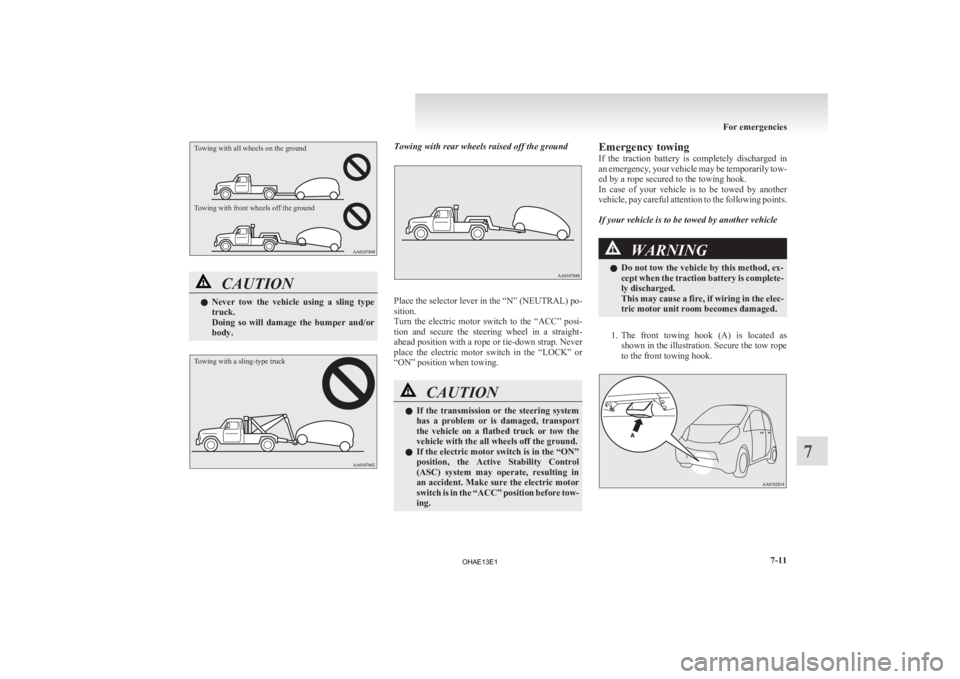
Towing with all wheels on the ground
Towing with front wheels off the groundCAUTION
l
Never
tow the vehicle using a sling type
truck.
Doing so will damage the bumper and/or
body.
Towing with a sling-type truck Towing with rear wheels raised off the ground
Place the selector lever in the “N” (NEUTRAL) po-
sition.
Turn
the electric motor switch to the “ACC” posi-
tion and secure the steering wheel in a straight-
ahead position with a rope or tie-down strap. Never
place the electric motor switch in the “LOCK” or
“ON” position when towing. CAUTION
l
If
the transmission or the steering system
has a problem or is damaged, transport
the vehicle on a flatbed truck or tow the
vehicle with the all wheels off the ground.
l If the electric motor switch is in the “ON”
position, the Active Stability Control
(ASC) system may operate, resulting in
an accident. Make sure the electric motor
switch is in the “ACC” position before tow-
ing. Emergency towing
If
the traction battery is completely discharged in
an emergency, your vehicle may be temporarily tow-
ed by a rope secured to the towing hook.
In case of your vehicle is to be towed by another
vehicle, pay careful attention to the following points.
If your vehicle is to be towed by another vehicle WARNING
l Do not tow the vehicle by this method, ex-
cept
when the traction battery is complete-
ly discharged.
This may cause a fire, if wiring in the elec-
tric motor unit room becomes damaged.
1. The
front towing hook (A) is located as shown in the illustration. Secure the tow rope
to the front towing hook. For emergencies
7-11 7
OHAE13E1