2013 MINI Paceman wheel
[x] Cancel search: wheelPage 81 of 275

CONTROLSTechnology for driving comfort and safety
80
Message for unsuccessful system reset
Yellow warning lamp comes on. A mes-
sage appears on the onboard com-
puter.
The system has detected a wheel change, but
has not yet been reset. It is not possible to pro-
vide a reliable warning about the current infla-
tion pressure.
Check the tire inflation pressure and reset the
system, page 78.
Declaration according to NHTSA/
FMVSS 138 Tire Pressure Monitoring
Systems
Each tire, including the spare, should be
checked monthly when cold and inflated to the
inflation pressure recommended by the vehicle
manufacturer on the vehicle placard or tire infla-
tion pressure label. If your vehicle has tires of a
different size than the size indicated on the vehi-
cle placard or tire inflation pressure label, you
should determine the proper tire inflation pres-
sure for those tires. As an added safety feature,
your vehicle has been equipped with a tire pres-
sure monitoring system TPMS that illuminates a
low tire pressure telltal e when one or more of
your tires are significantly underinflated.
Accordingly, when the low tire pressure telltale
illuminates, you should st op and check your tires
as soon as possible, and inflate them to the
proper pressure. Driving on a significantly
underinflated tire causes the tire to overheat
and can lead to tire fail ure. Underinflation also
reduces fuel efficiency and tire tread life, and
may affect the vehicle's handling and stopping
ability. Please note that the TPMS is not a substi-
tute for proper tire maintenance, and it is the
driver's responsibility to maintain correct tire
pressure, even if underi nflation has not reached
the level at which the TPMS low tire pressure tell-
tale illuminates.
The TPMS malfunction indicator is combined
with the low tire pressure telltale. When the sys-
tem detects a malfunction, the telltale will flash
for approximately one minute and then remain continuously lit. This
sequence will continue
upon subsequent vehicle startups as long as the
malfunction exists. When the malfunction indi-
cator is illuminated, the system may not be able
to detect or signal low tire pressure as intended.
TPMS malfunctions may occur for a variety of
reasons, including the installation of replace-
ment or alternate tires or wheels on the vehicle
that prevent the TPMS from functioning prop-
erly. Always check the TP MS malfunction telltale
after replacing one or mo re tires or wheels on
your vehicle to ensure that the replacement or
alternate tires and wheels allow the TPMS to
continue to function properly.
00320051004F004C00510048000300280047004C0057004C005200510003
Page 83 of 275

CONTROLSTechnology for driving comfort and safety
82
upholstery in the center of the steering wheel,
on the instrument panel, the doors, and the roof
pillars as well as the sides of the headliner. Do
not attempt to remove or dismantle the steering
wheel.<
Do not touch the individual components
immediately after the system has been
triggered, because there is a danger of burns.
Have the testing, repair, removal, and disposal
o f a i r b a g g e n e r a t o r s e x e c u t e d o n l y b y y o u r M I N I
dealer or a workshop that has the required
explosives licenses.
Otherwise, unprofessiona l attempts to service
the system could lead to failure in an emergency
or undesired airbag activation, either of which
could result in personal injury. <
Warning notices and information about the air-
bags can also be found on the sun visors.
Automatic deactivation of the front
passenger airbags
The presence of a passenger in the front passen-
ger seat is detected by measuring the resistance
of the human body. The system correspondingly
activates or deactivates the front, side, and knee
airbags for the front passenger.
Make sure that the front passenger's feet
remain in the footwell; otherwise, it is not
possible to guarantee the function of the front
passenger airbags.<
The indicator lamp above the interior rearview
mirror shows the current st atus of the front pas-
senger airbags, deactivated or activated, refer to
Status of front passe nger airbags below.
Before transporting a child on the front
passenger seat, read the safety informa-
tion and follow the instru ctions under Transport-
ing children safely, page 46.<
Malfunction of the automatic
deactivation
When teenagers and adults assume certain sit-
ting positions, this can cause the front, side, and
knee airbags to deactivate. The indicator lamp for the front passenger airbags lights up when
this occurs. In such case
s, the passenger should
change his or her sitting position so that the
front passenger airbags are activated and the
indicator lamp goes out. If the desired airbag
status cannot be achieved by changing the sit-
ting position, transport the relevant passenger
on a rear seat.
> Do not attach covers, cushions, ball mats or
other items to the front passenger seat
unless they are specif ically recommended
by the manufacturer of your MINI.
> Do not place items on the front passenger
seat.
> Do not place items under the seat which
could press against the seat from below.
Status of front passenger airbags
The indicator lamp for the front passenger air-
bags shows the functional status of the front
passenger's front, side, and knee airbags in
accordance with whet her and how the front
passenger seat is occupied. The indicator lamp
shows whether the front passenger airbags are
activated or deactivated.
> The indicator lamp lights up when a child in
a specially designated child restraint system
is properly detected on the seat or the seat is
unoccupied.
The front, side, and knee airbags for the
front passenger are not activated.
Most child seats are detected by the
system. This particularly applies to
child seats that were required by NHTSA at
the time of manufacture of the vehicle. After
00320051004F004C00510048000300280047004C0057004C005200510003
Page 99 of 275

CONTROLSPractical interior accessories
98
Center armrest front
Opening
Press the button, arrow, and lift the cover.
Center armrest rear
Removing
The center armrest in the rear can be removed
to increase the amount of storage room.
1.Turn handwheel counterclockwise until it
reaches the stop, arrow 1.
2. Push center armrest in the base plate gently
towards the back, arrow 2.
3. Raise the armrest in front and swing out.
Installing
1.Insert center armrest in the back into the
rear recess of the base plate, arrow 1.
2. Push to rear and swing down in front,
arrow 2.
3. Push center armrest in the base plate for-
ward.
4. Tighten handwheel by turning clockwise.
Ensure that the center armrest engages properly
when it is installed; ot herwise, it may be dam-
aged, for example, during braking maneuvers.
Storage compartments
Do not put any unsecured objects into the
interior of the vehicle; otherwise these
may endanger the occupant s, e.g., during brak-
ing and evasive maneuvers. <
Do not use the instrument panel as a shelf,
for example with non-slip mats; other-
wise, it could be damaged. <
In the vehicle interior
Depending on your vehicle's equipment, you
will find storage compartments in the front and
rear doors and in the center console.
Pockets
are provided on the backrest rear pan-
els of the front seats.
00320051004F004C00510048000300280047004C0057004C005200510003
Page 115 of 275

DRIVING TIPSThings to remember when driving
114
Avoid high engine speeds
Use first gear only for driving off. In second and
higher gears, accelerate smoothly to a suitable
engine and road speed. In doing so, avoid high
engine speeds and shift up early.
When you reach your desired traveling speed,
shift to the highest suitable gear and drive at
constant speed.
As a rule: driving at lo w engine speeds lowers
fuel consumption and reduces wear.
Coasting
When approaching a red traffic light, take your
foot off the accelerator and let the car roll to a
stop in the highest gear possible.
On a downhill gradient, take your foot off the
accelerator and let the vehicle coast in a suitable
gear.
Fuel supply is shut off automatically when the
vehicle is coasting.
Switch off the engine during lengthy
stops
Switch off the engine when stopping for lengthy
periods, e.g. at traffic li ghts, railroad crossings or
in traffic jams.
Switch off any features that are not
currently required
Features such as air conditioning, seat heaters
and the rear window defroster require a great
deal of energy and result in greater fuel con-
sumption, especially in city driving and during
Stop & Go operation. For this reason, switch off
these features if they are not really needed.
Have the vehicle serviced
Have your vehicle servic ed regularly to achieve
good economy and a long vehicle life. The man-
ufacturer of your MINI recommends having the
vehicle serviced by a MINI dealer. Also note the
MINI Maintenance System, page 218.
Driving on poor roads
Your MINI with ALL4 drive is at home on any
type of street or road. It combines an all-wheel
drive system with the ad vantages of a normal
passenger car.
Do not drive on unpa ved terrain, as other-
wise the vehicle may be damaged. <
When you are driving on poor roads, there are a
few points which you shou ld strictly observe for
your own safety, for that of your passengers,
and for the safety of the vehicle:
> Familiarize yourself with the vehicle before
beginning to drive and do not take risks
under any circumstances.
> Adapt your speed to road conditions. The
steeper and rougher the road surface is, the
lower the speed should be.
> When driving on very steep uphill or down-
hill grades, make sure in advance that the
engine oil and coolant levels are close to the
maximum mark, refer to page 215.
> While driving, watch carefully for obstacles
such as rocks or holes. Try to avoid these
obstacles whenever possible.
> Make sure that the un dercarriage does not
touch the ground, for example on hilltops
and bumpy roads. The ground clearance of
the vehicle is a maximum of approx. 6.0 in/
15 cm. Please note that the ground clear-
ance can vary depending on loading and the
driving conditions of the vehicle.
> Only drive through road surface water up to
a maximum water depth of 1 ft/30 cm and
only at walking speed ; do not remain sta-
tionary.
> After driving through water at low speed,
lightly press the brake pedal several times to
dry the brakes and to prevent the braking
effect from being reduced by wetness.
00320051004F004C00510048000300280047004C0057004C005200510003
Page 116 of 275

Things to remember when drivingDRIVING TIPS
115
>Depending on the condition of the surface, it
may be practical to briefly activate DTC, refer
to DTC Dynamic Traction Control on
page 73.
> If the drive wheels spin on one side, depress
the accelerator pedal sufficiently so that the
driving stability control systems can distrib-
ute the drive forces to the individual wheels.
After driving on poor roads, please observe the
following points to maintain the driving safety of
the vehicle:
> Clean the coarsest dirt from the body.
> Clean mud, snow, ice, etc. from the wheels
and tires and check the tires for damage.
00320051004F004C00510048000300280047004C0057004C005200510003
Page 141 of 275

EntertainmentOn/off and tone
140
On/off and tone
Vehicle equipment
In this chapter, all production, country, and
optional equipment that is offered in the model
range is described. Equipment is also described
that is not available because of, for example,
selected options or coun try version. This also
applies to safety relate d functions and systems.
General information
The following audio source s have shared control
elements and setting options:
> Radio
> CD player
> External devices, e.g. MP3 player
Controls
The audio sources can be operated using:
>Buttons near the CD player
> Onboard computer
> Buttons on the steering wheel, refer to
page 10
Buttons near the CD player
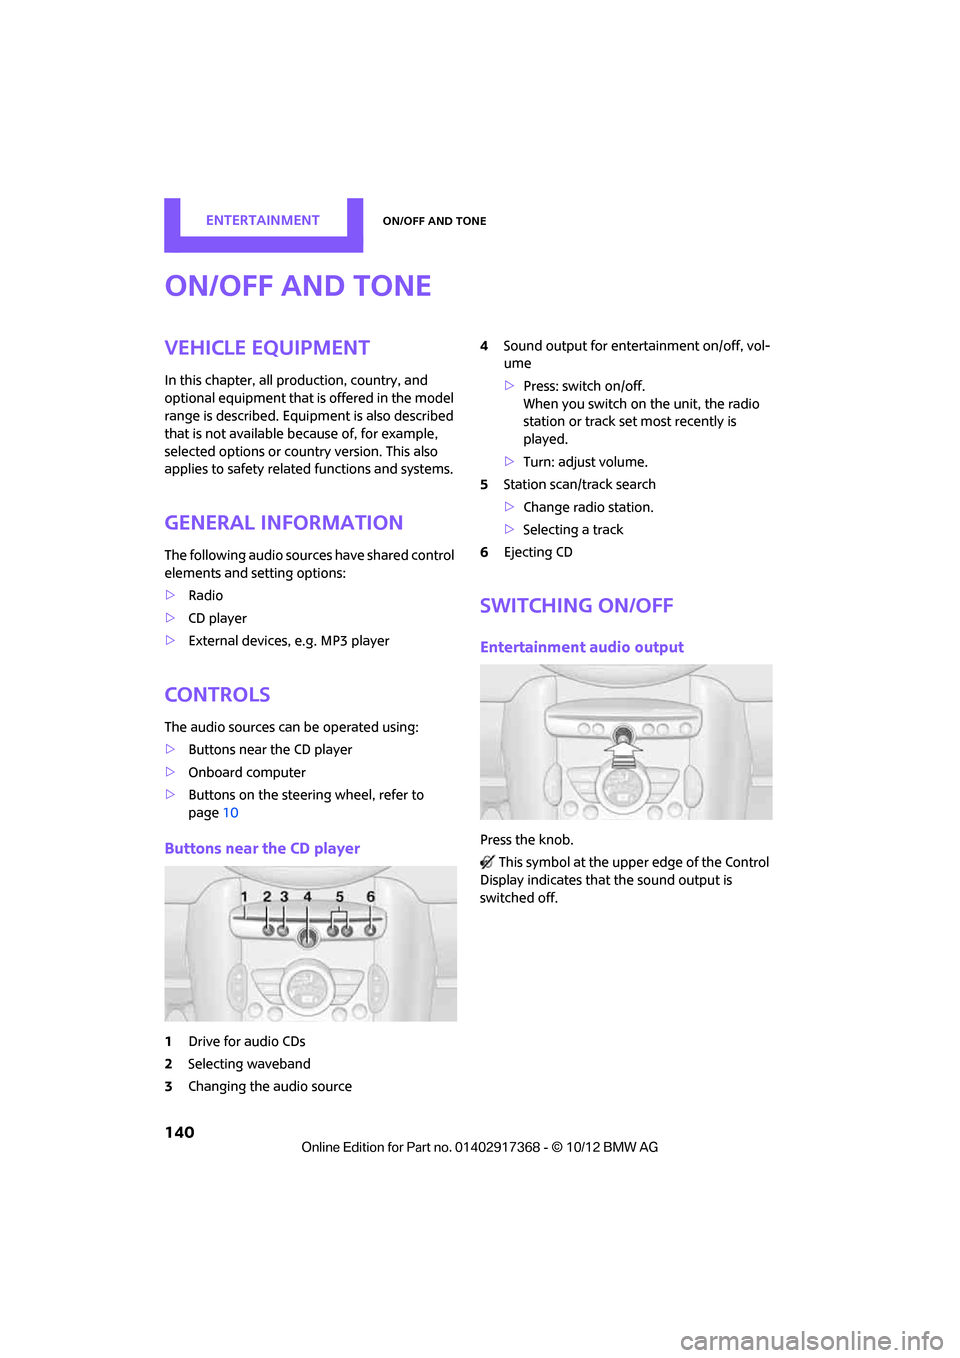
1Drive for audio CDs
2 Selecting waveband
3 Changing the audio source 4
Sound output for ente rtainment on/off, vol-
ume
> Press: switch on/off.
When you switch on the unit, the radio
station or track set most recently is
played.
> Turn: adjust volume.
5 Station scan/track search
>Change radi o station.
> Selecting a track
6 Ejecting CD
Switching on/off
Entertainment audio output
Press the knob.
This symbol at the upper edge of the Control
Display indicates that the sound output is
switched off.
00320051004F004C00510048000300280047004C0057004C005200510003
Page 142 of 275

On/off and toneEntertainment
141
Adjusting volume
Turn the knob to the desired volume.
The volume can also be adjusted on the steering
wheel, refer to page10.
The setting is stored for the remote control cur-
rently in use; refer to Personal Profile, page 26.
Setting tone controls
Various tone settings can be changed, e.g. treble
and bass or the speed-dependent volume con-
trol.
The tone settings are set for all audio sources at
once.
The settings are stored for the remote control
currently in use; refer to Personal Profile,
page 26.
Treble, bass, balance, fader
> "Treble": treble adjustment.
> "Bass": bass adjustment.
> "Balance": volume distribution right/left.
> "Fader": volume distribution front/back.
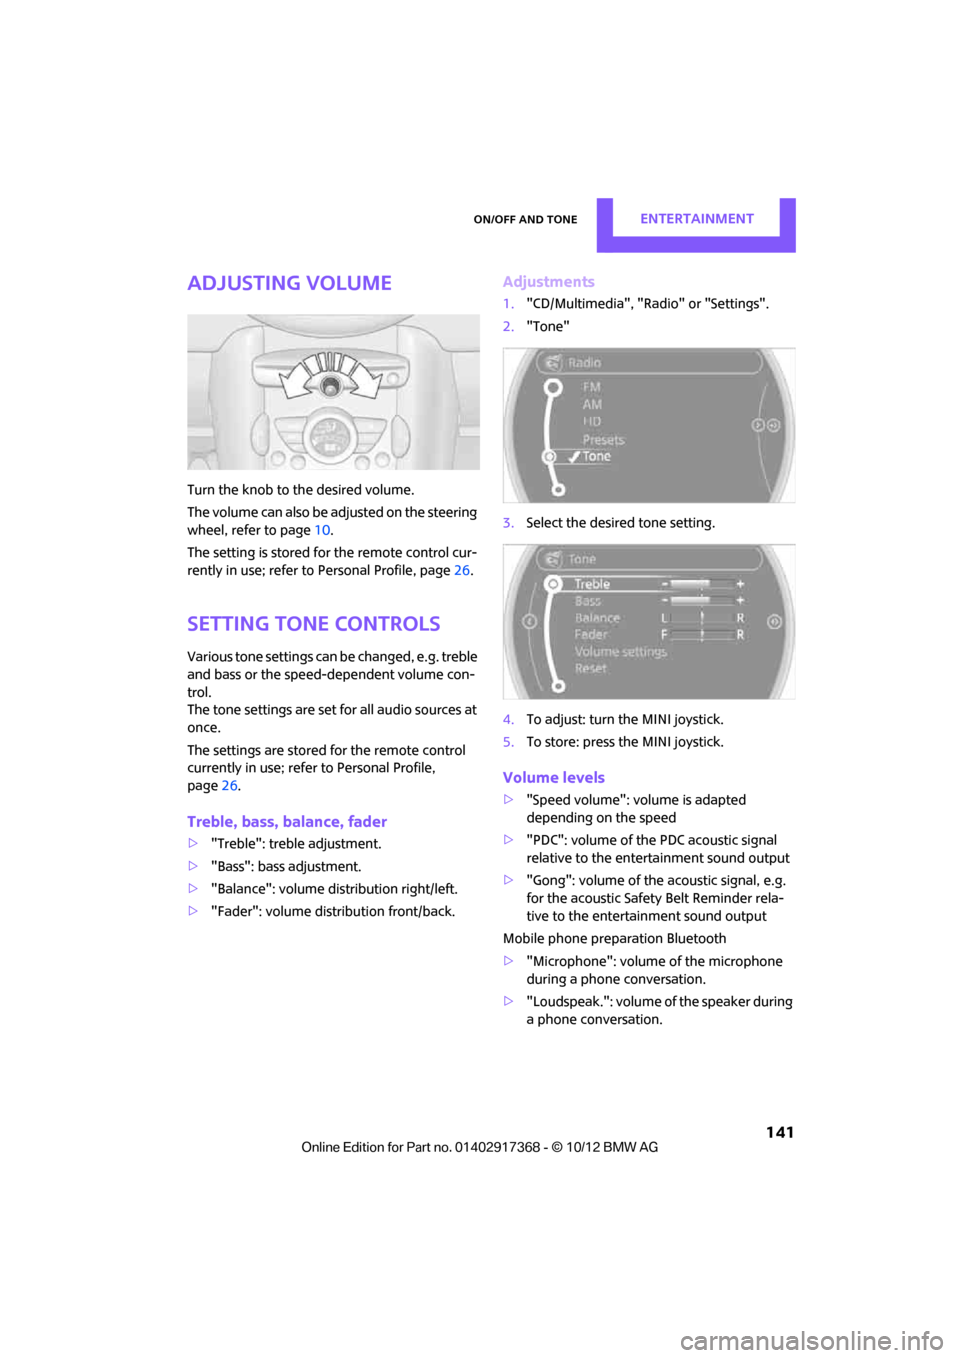
Adjustments
1."CD/Multimedia", "Rad io" or "Settings".
2. "Tone"
3. Select the desired tone setting.
4. To adjust: turn the MINI joystick.
5. To store: press the MINI joystick.
Volume levels
>"Speed volume": vo lume is adapted
depending on the speed
> "PDC": volume of the PDC acoustic signal
relative to the entertainment sound output
> "Gong": volume of the acoustic signal, e.g.
for the acoustic Safety Belt Reminder rela-
tive to the entertainment sound output
Mobile phone preparation Bluetooth
> "Microphone": volume of the microphone
during a phone conversation.
> "Loudspeak.": volume of the speaker during
a phone conversation.
00320051004F004C00510048000300280047004C0057004C005200510003
Page 144 of 275

RadioEntertainment
143
Radio
Vehicle equipment
In this chapter, all production, country, and
optional equipment that is offered in the model
range is described. Equipment is also described
that is not available because of, for example,
selected options or count ry version. This also
applies to safety related functions and systems.
General information
Your radio is designed for reception of the fol-
lowing stations:
> FM and AM
> HD Radio
> Satellite radio
AM/FM station
Selecting a station
Press the knob if the sound output is switched
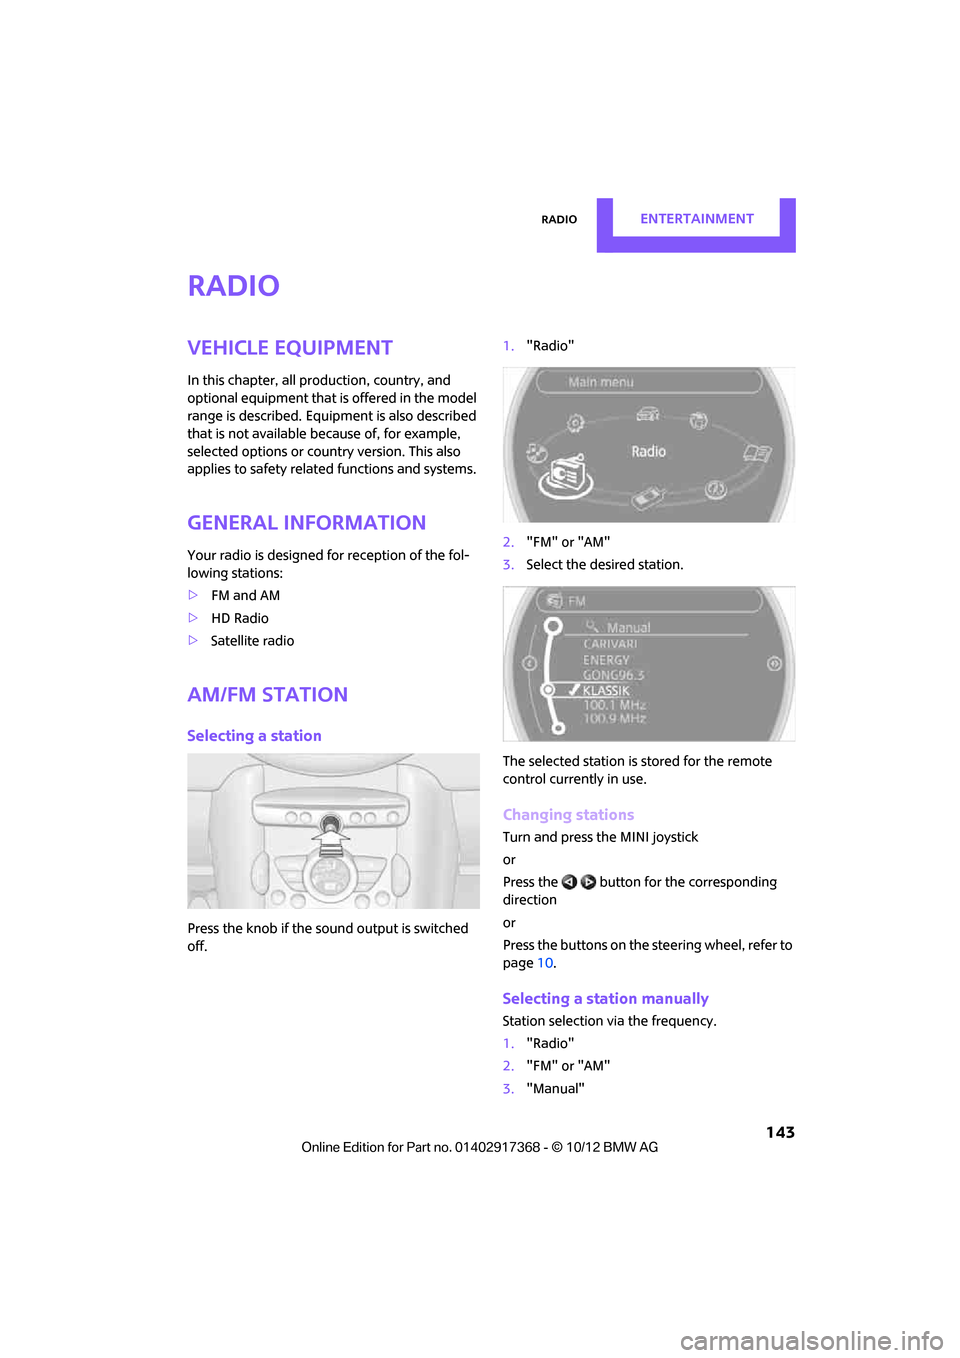
off. 1.
"Radio"
2. "FM" or "AM"
3. Select the desired station.
The selected station is stored for the remote
control current ly in use.
Changing stations
Turn and press the MINI joystick
or
Press the button for the corresponding
direction
or
Press the buttons on the steering wheel, refer to
page10.
Selecting a station manually
Station selection via the frequency.
1. "Radio"
2. "FM" or "AM"
3. "Manual"
00320051004F004C00510048000300280047004C0057004C005200510003