2013 MINI Countryman automatic
[x] Cancel search: automaticPage 79 of 275

CONTROLSTechnology for driving comfort and safety
78
Gray wheels
The system cannot detect a puncture.
Reasons for this may be:
>TPM is being reset.
> Interference from systems or devices with
the same transmission frequency.
> Malfunction.
Resetting system
Reset the system again af ter each correction of
the tire inflation pressure and after every tire or
wheel change.
1. "Vehicle Info"
2. "Vehicle status"
3. "Reset"
4. Start the engine – do not drive away.
5. Select "Reset" to start the initialization.
6. Start to drive.
The tires are shown in gray and "Resetting
TPM..." is displayed.
After driving a few minutes, the set inflation
pressures in the tires are accepted as the target
values to be monitored. The resetting process is
completed automatically as you drive. The tires
are depicted in green on the Control Display and
"Status: TPM active" is displayed again.
The trip can be interrupted at any time. When
driving resumes, resett ing is continued auto-
matically.
If a flat tire is detected while the system is
resetting, all tires on the Control Display
are displayed in yellow. The message "Low tire!"
is displayed. <
Message with low tire inflation pressure
The warning lamps come on in yellow
and red. A message appears on the
onboard computer. An acoustic signal
also sounds.
> There is a flat tire or substantial loss in tire
pressure in the displayed tire.
> The system was not reset after a wheel
change and thus issues a warning based on
the inflation pressures initialized last.
1. Reduce speed and stop the vehicle with cau-
tion. Avoid sudden braking and steering
maneuvers.
2. Check whether the vehicle is equipped with
normal tires or with run-flat tires.
Run-flat tires, refer to page 212, are identi-
fied by a circular symbol containing the let-
ters RSC on the tire sidewall.
When a low inflation pressure is reported, the
Dynamic Stability Cont rol DSC is activated.
Actions in the event of a flat tire
Normal tires
1.Identify the damaged tire.
To do so, check the inflation pressure in all
four tires. The inflatio n pressure display of
the Mobility Kit, page 230, can be used for
this purpose.
If the inflation pressure is correct in all four
tires, then the Tire Pressure Monitor may not
have been reset. The system must then be
reset.
If it is not possible to identify the damaged
tire, contact your MINI dealer.
2. Use the Mobility Kit to remedy the flat tire on
the damaged wheel, refer to page 230.
The use of tire sealant, e.g. Mobility Kit, can
damage the TPM wheel electronics. In this
case, have the electronics checked and
replaced if necessary at your earliest oppor-
tunity.
00320051004F004C00510048000300280047004C0057004C005200510003
Page 80 of 275

Technology for driving comfort and safetyCONTROLS
79
Run-flat tires
You can continue driving with a damaged tire at
speeds up to 50 mph/80 km/h.If the vehicle is not equipped with run-flat
tires, do not continue driving; continuing
to drive can result in serious accidents. <
Continued driving with a flat tire
When driving with a damaged tire:
1.Avoid sudden braking and steering maneu-
vers.
2. Do not exceed a speed of 50 mph or
80 km/h.
3. At the next opportunity, check the air pres-
sure in all four tires.
If the inflation pressure is correct in all four
tires, then the Tire Pressure Monitor may not
have been reset. The system must then be
reset.
Possible driving distance with complete loss of
tire inflation pressure:
The distance it is possible to drive depends on
the load and the stress on the vehicle while driv-
ing.
With an average load, it may be possible to drive
for approx. 50 miles/80 km.
When driving with damaged tires, the handling
characteristics change, e. g. the vehicle will skid
sooner when braking, braking distances will be
longer, or self-steering response will change.
Adapt your driving style accordingly. Avoid turn-
ing abruptly and driving over obstacles such as
curbs, potholes, etc.
Since the possible driving distance depends to a
considerable degree on the strain exerted on
the vehicle while driving, it can be shorter or,
with a gentle dr iving style, can also be longer,
depending on the speed, road condition, exter-
nal temperature, vehicle load, etc. Drive cautiously and do not exceed a
speed of 50 mph/80 km/h.
A loss of tire inflation pressure results in a
change in the handling characteristics, e.g.
reduced lane stability during braking, a longer
braking distance and alte red self-steering prop-
erties. <
Vibrations or loud noises while driving can
indicate complete failure of the tire.
Reduce your speed and bring the vehicle to a
stop; otherwise, pieces of tire may come off,
which could result in an accident. Do not con-
tinue driving and contact your MINI dealer. <
Malfunction
The small warning lamp flashes in yel-
low and then lights up continuously; the
larger warning lamp lights up in yellow.
On the onboard computer, the tires are
shown in gray and a message appears.
No flat tire can be detected.
Display in the following situations:
> Wheel without TPM electronics is mounted:
If need be, have it checked by your MINI
dealer.
> Malfunction:
Have the system checked
> TPM was unable to complete the resetting
procedure; reset the system again.
The small warning lamp flashes in yel-
low and then lights up continuously; the
larger warning lamp lights up in yellow.
On the onboard computer, the tires are
shown in gray and a message appears.
No flat tire can be detected.
Display in the following situation:
> Interference due to sy stems or devices that
use the same radio frequency:
The system automatically reactivates once it
is outside of the field of interference.
00320051004F004C00510048000300280047004C0057004C005200510003
Page 83 of 275

CONTROLSTechnology for driving comfort and safety
82
upholstery in the center of the steering wheel,
on the instrument panel, the doors, and the roof
pillars as well as the sides of the headliner. Do
not attempt to remove or dismantle the steering
wheel.<
Do not touch the individual components
immediately after the system has been
triggered, because there is a danger of burns.
Have the testing, repair, removal, and disposal
o f a i r b a g g e n e r a t o r s e x e c u t e d o n l y b y y o u r M I N I
dealer or a workshop that has the required
explosives licenses.
Otherwise, unprofessiona l attempts to service
the system could lead to failure in an emergency
or undesired airbag activation, either of which
could result in personal injury. <
Warning notices and information about the air-
bags can also be found on the sun visors.
Automatic deactivation of the front
passenger airbags
The presence of a passenger in the front passen-
ger seat is detected by measuring the resistance
of the human body. The system correspondingly
activates or deactivates the front, side, and knee
airbags for the front passenger.
Make sure that the front passenger's feet
remain in the footwell; otherwise, it is not
possible to guarantee the function of the front
passenger airbags.<
The indicator lamp above the interior rearview
mirror shows the current st atus of the front pas-
senger airbags, deactivated or activated, refer to
Status of front passe nger airbags below.
Before transporting a child on the front
passenger seat, read the safety informa-
tion and follow the instru ctions under Transport-
ing children safely, page 46.<
Malfunction of the automatic
deactivation
When teenagers and adults assume certain sit-
ting positions, this can cause the front, side, and
knee airbags to deactivate. The indicator lamp for the front passenger airbags lights up when
this occurs. In such case
s, the passenger should
change his or her sitting position so that the
front passenger airbags are activated and the
indicator lamp goes out. If the desired airbag
status cannot be achieved by changing the sit-
ting position, transport the relevant passenger
on a rear seat.
> Do not attach covers, cushions, ball mats or
other items to the front passenger seat
unless they are specif ically recommended
by the manufacturer of your MINI.
> Do not place items on the front passenger
seat.
> Do not place items under the seat which
could press against the seat from below.
Status of front passenger airbags
The indicator lamp for the front passenger air-
bags shows the functional status of the front
passenger's front, side, and knee airbags in
accordance with whet her and how the front
passenger seat is occupied. The indicator lamp
shows whether the front passenger airbags are
activated or deactivated.
> The indicator lamp lights up when a child in
a specially designated child restraint system
is properly detected on the seat or the seat is
unoccupied.
The front, side, and knee airbags for the
front passenger are not activated.
Most child seats are detected by the
system. This particularly applies to
child seats that were required by NHTSA at
the time of manufacture of the vehicle. After
00320051004F004C00510048000300280047004C0057004C005200510003
Page 85 of 275

CONTROLSLamps
84
Lamps
Vehicle equipment
In this chapter, all production, country, and
optional equipment that is offered in the model
range is described. Equipment is also described
that is not available because of, for example,
selected options or coun try version. This also
applies to safety relate d functions and systems.
Parking lamps/low beams
0Lamps off / daytime running lights
1 Parking lamps and daytime running lights
2 Low-beam headlamps and welcome lamps
3 Automatic headlamp control, daytime run-
ning lights, welcome lamps, and Adaptive
Light Control
When you open the driver's door with the igni-
tion switched off, the exterior lighting is auto-
matically switched off if the light switch is in
position 0, 2 or 3.
Switch on the parking lamps if necessary, switch
position 1.
Parking lamps
Turn the light switch to position 1.
The front, rear and side vehicle lighting is
switched on.
Activation of lights on on e side of the vehicle for
parking, page 86. The parking lamps will discharge the bat-
tery. Therefore, do not leave them on for
unduly long periods of time; otherwise, the bat-
tery might not have enough power to start the
engine. <
Low beams
Turn the light switch to position 2.
The low beams come on when the ignition is on.
Automatic headlamp control
When the switch is in position 3, the low beams
are switched on and off automatically depend-
ing on ambient light condit ions, e.g. in a tunnel,
in twilight, or if there is precipitation. Adaptive
Light Control is active.
The headlamps may also come on when the sun
is sitting low on a blue sky.
When driving into tunnels with bright overhead
lights, there may be a delay before the head-
lamps come on.
The low beams remain switched on indepen-
dent of the ambient lighting conditions when
you switch on the fog lamps.
If the daytime running lights are activated,
page 85, the low beams are always switched on
with the light switch in position 3 and the igni-
tion on. The exterior lamps are automatically
switched off after the vehicle is parked.
The automatic headlamp control cannot
serve as a substitute for your personal
judgment in determining when the lamps
should be switched on in response to ambient
lighting conditions. For example, the system
cannot detect fog or hazy weather. To avoid
safety risks, you should respond to these kinds
of low-visibility situations by switching the head-
lamps on manually. <
00320051004F004C00510048000300280047004C0057004C005200510003
Page 86 of 275

LampsCONTROLS
85
Welcome lamps
If you leave the light switch in the low beam or
automatic headlamp control position when you
switch off the ignition, the parking lamps and
interior lamps come on for a certain time as soon
as the vehicle is unlocked.
Pathway lighting
If you activate the headlamp flasher after
switching off the ignition with the lamps
switched off, the lo w beams come on and
remain on for a certain time.
The setting is stored for the remote control in
use, refer to Personal Profile, page 26.
Setting the duration or deactivating the
function
1. "Settings"
2. "Lighting"
3. "Pathway light.:"
4. Set a time of duration or deactivate the func-
tion.
The setting is stored for the remote control cur-
rently in use.
Daytime running lights
The light switch can remain in the lamps off,
parking lamps or automatic headlamp control
position.
In the lamps off position, the exterior lighting is
automatically switched of f after the vehicle is
parked. In the parking lamps position, the park-
ing lamps will stay on after the ignition is
switched off. Switch on the parking lamps separately if
needed.
Depending on the nation
al-market version, it
may not be possible to deactivate the daytime
running lights.
Activating/deactivating daytime
running lights
The setting is stored for the remote control in
use, refer to Personal Profile, page 26.
1. "Settings"
2. "Lighting"
3. "Daytime running lamps"
The setting is stored for the remote control cur-
rently in use.
Adaptive Light Control
The concept
Adaptive Light Control is a variable headlamp
control system that enables better illumination
of the road surface. Depending on the steering
angle and other parameters, the light from the
headlamp follows the course of the road.
Activating Adaptive Light Control
With the ignition switched on, turn the light
switch to position 3, refer to page 84.
Standstill function: to av oid blinding oncoming
traffic, the Adaptive Light Control does not pivot
toward the driver's side when the vehicle is at a
standstill.
00320051004F004C00510048000300280047004C0057004C005200510003
Page 87 of 275
CONTROLSLamps
86
In reverse, the Adaptive Light Control is not acti-
vated.
Malfunction
A message is displayed.
The Adaptive Light Control is malfunctioning or
failed. Have the system checked as soon as pos-
sible.
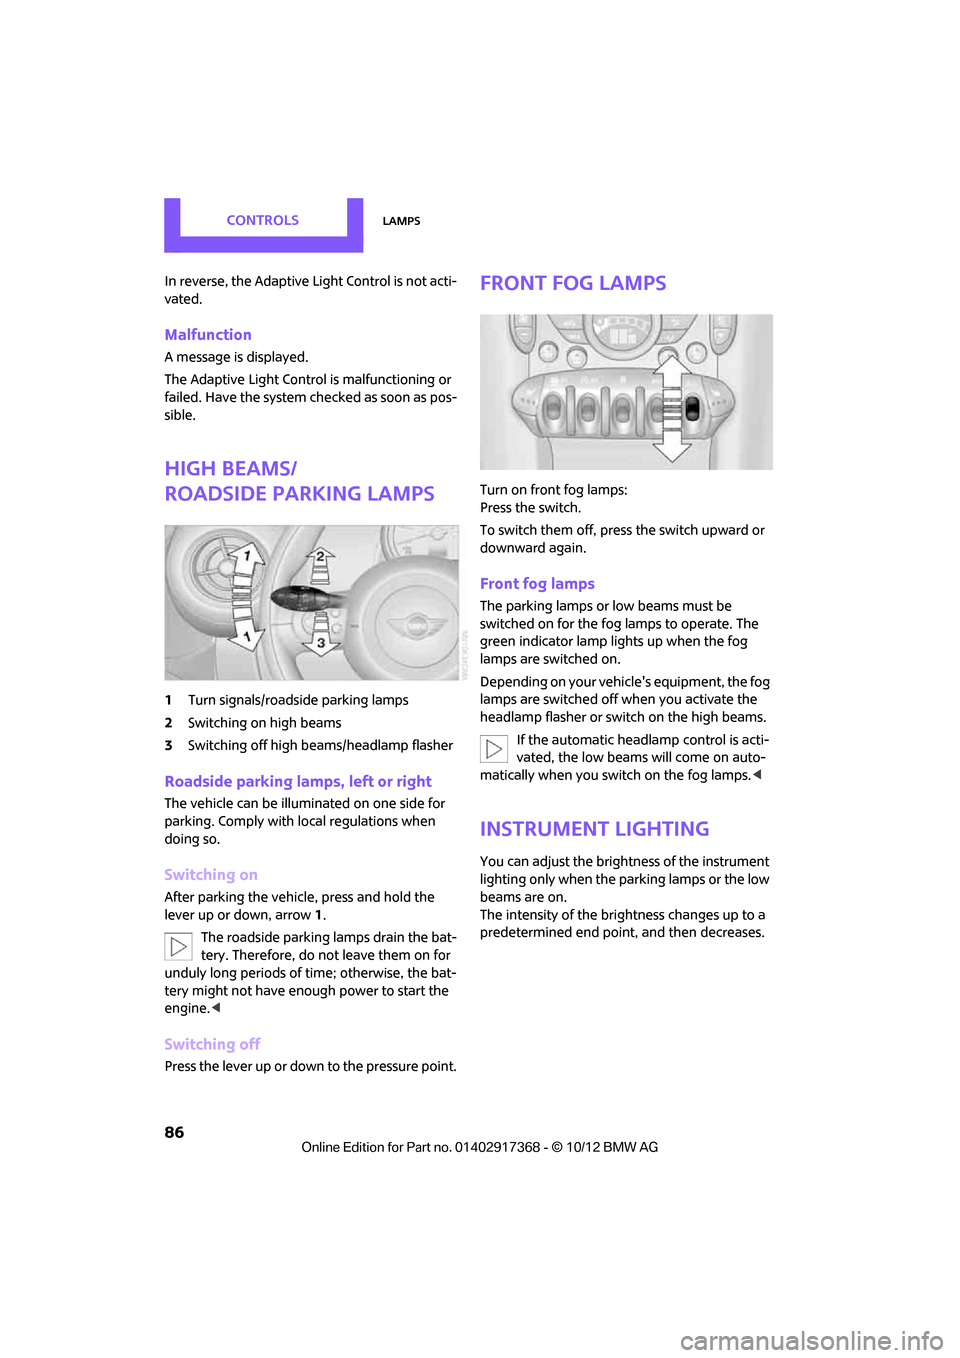
High beams/
roadside parking lamps
1 Turn signals/roadside parking lamps
2 Switching on high beams
3 Switching off high beams/headlamp flasher
Roadside parking lamps, left or right
The vehicle can be illuminated on one side for
parking. Comply with local regulations when
doing so.
Switching on
After parking the vehicle, press and hold the
lever up or down, arrow 1.
The roadside parking lamps drain the bat-
tery. Therefore, do not leave them on for
unduly long periods of time; otherwise, the bat-
tery might not have enough power to start the
engine. <
Switching off
Press the lever up or down to the pressure point.
Front fog lamps
Turn on front fog lamps:
Press the switch.
To switch them off, press the switch upward or
downward again.
Front fog lamps
The parking lamps or low beams must be
switched on for the fog lamps to operate. The
green indicator lamp lights up when the fog
lamps are switched on.
Depending on your vehicle's equipment, the fog
lamps are switched off when you activate the
headlamp flasher or switch on the high beams.
If the automatic headlamp control is acti-
vated, the low beams will come on auto-
matically when you switch on the fog lamps. <
Instrument lighting
You can adjust the brightness of the instrument
lighting only when the parking lamps or the low
beams are on.
The intensity of the brightness changes up to a
predetermined end point, and then decreases.
00320051004F004C00510048000300280047004C0057004C005200510003
Page 88 of 275

LampsCONTROLS
87
Adjusting brightness
>Briefly press button: brightness changes in
stages.
> Press and hold the button. Brightness
changes in a continuous manner.
Interior lamps
The interior lamps, the footwell lamps, the entry
lamps, and the cargo area lamp are controlled
automatically.
To reduce the drain on the battery, a short
while after the ignition is switched off,
refer to Start/Stop button on page 50, all lights in
the vehicle's passenger compartment are
switched off. <
Switching interior lamps on/off manually
To switch the interior lamps on/off.
Press the switch.
To switch off the interior lamps permanently,
press the switch for about 3 seconds.
Reading lamps
Reading lamps are provided in the front and rear
adjacent to the interior lamps.
To switch the readin g lamps on and off.
In the front: press the switch.
In the rear: press the button.
Ambient lighting
The color and brightness of the ambient lighting
can be changed.
> Press the switch forward.
The color changes in stages.
> Press the switch toward the rear.
The brightness changes in stages.
Intermediate settings and colors are possible. For a continuous color change in the
ambient lighting, press and hold the
switch forward for lo nger than 10 seconds. <
00320051004F004C00510048000300280047004C0057004C005200510003
Page 90 of 275

ClimateCONTROLS
89
Recirculated-air mode
If the air outside the car has an
unpleasant odor or contains pollut-
ants, shut off the supply to the inte-
rior of the car temporarily. The system then
recirculates the air curre ntly within the vehicle.
If the windows fog in recirculated-air mode,
switch off the recirculated-air mode and
increase the air volume if necessary. Ensure that
air can flow onto the windshield.
The recirculated-air mode is automatically deac-
tivated at low outside temperatures.
The recirculated-air mode should not be
used over an extended period of time;
otherwise, the air quali ty in the passenger com-
partment will deteriorate continuously. <
Temperature
Turn upward, red, to increase the temper-
ature.
Turn downward, blue, to decrease the
temperature.
Rear window defroster
The defroster is switched off auto-
matically after a certain time.
The rear window he ating is lowered
or switched off entirely to reduce the drain on
the battery.
Air distribution
Direct the flow of air to the
windows , to the upper body
area or to the footwell .
Intermediate settings are possible.
Windshield heating
The windshield heating is switched
off automatically after a short time.
The front window heating is low-
ered or switched off entirely to reduce the drain
on the battery.
Defrosting windows and removing
condensation
1. Set air flow rate to the maximum level.
2. Set air distributi on to position .
Condensation is removed from the windows
more quickly when the cooling function
is
also activated.
3. Set to the highest temperature, red.
4. Deactivate recirculated-air mode.
5. Turn on windshield heating if necessary.
6. Turn on rear window defroster if necessary.
Microfilter
The microfilter captures dust and pollen. The
microfilter is changed by your MINI dealer dur-
ing routine maintenance work.
00320051004F004C00510048000300280047004C0057004C005200510003