2013 MERCEDES-BENZ SLS-CLASS trunk
[x] Cancel search: trunkPage 232 of 286

X
Do not remove any foreign objects which
have penetrated the tire, e.g. screws or
nails.
X Take the TIREFIT kit out of the trunk
(Y page 228). X
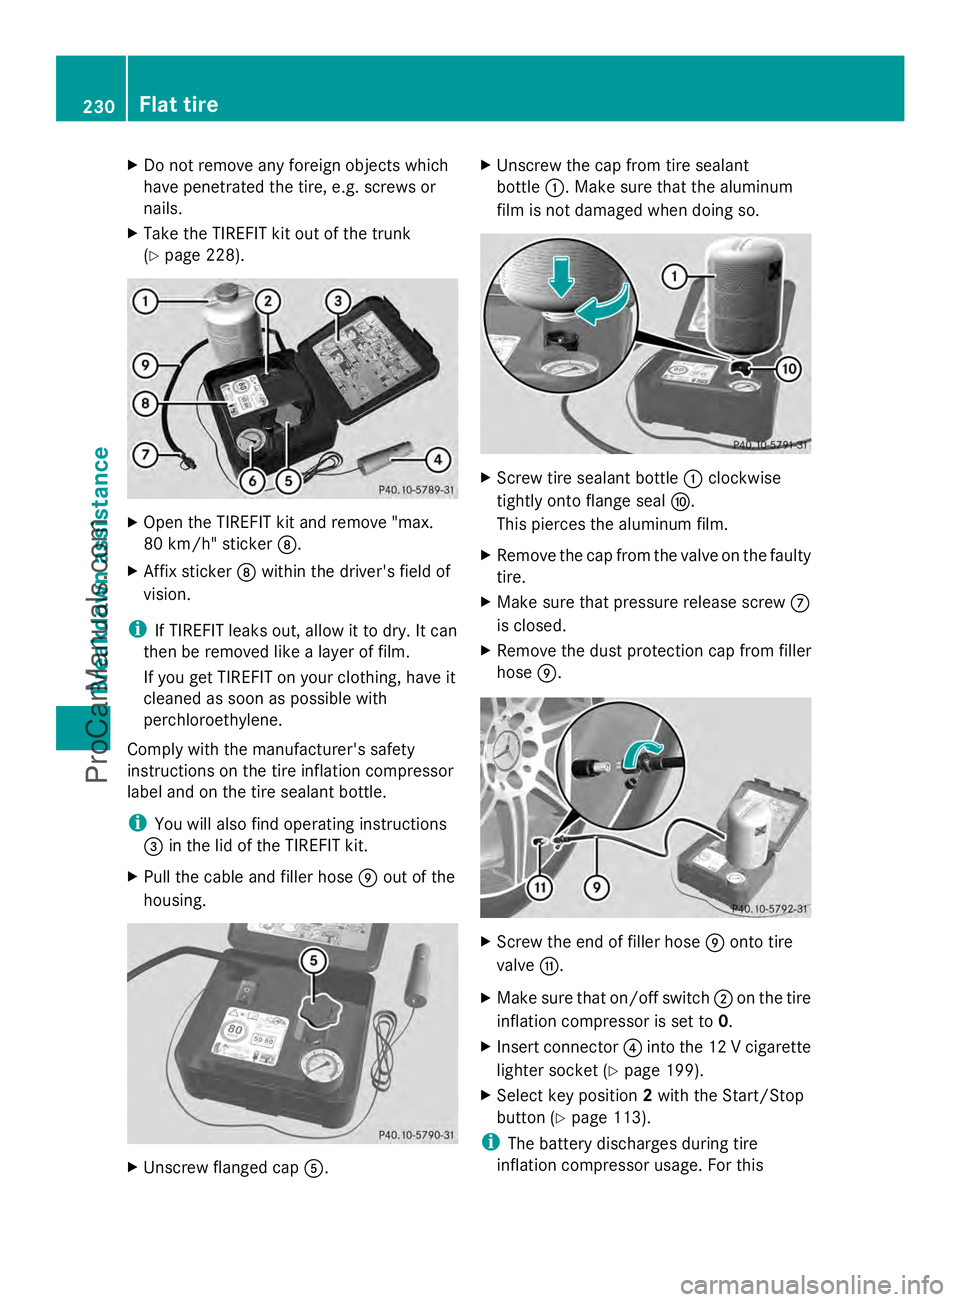
Open the TIREFIT kit and remove "max.
80 km/h" sticker D.
X Affix sticker Dwithin the driver's field of
vision.
i If TIREFIT leaks out, allow it to dry. It can
then be removed like a layer of film.
If you get TIREFIT on your clothing, have it
cleaned as soon as possible with
perchloroethylene.
Comply with the manufacturer's safety
instructions on the tire inflation compressor
label and on the tire sealant bottle.
i You will also find operating instructions
= in the lid of the TIREFIT kit.
X Pull the cable and filler hose Eout of the
housing. X
Unscrew flanged cap A. X
Unscrew the cap from tire sealant
bottle :. Make sure that the aluminum
film is not damaged when doing so. X
Screw tire sealant bottle :clockwise
tightly onto flange seal F.
This pierces the aluminum film.
X Remove the cap from the valve on the faulty
tire.
X Make sure that pressure release screw C
is closed.
X Remove the dust protection cap from filler
hose E. X
Screw the end of filler hose Eonto tire
valve G.
X Make sure that on/off switch ;on the tire
inflation compressor is set to 0.
X Insert connector ?into the 12 V cigarette
lighter socket ( Ypage 199).
X Select key position 2with the Start/Stop
button ( Ypage 113).
i The battery discharges during tire
inflation compressor usage. For this 230
Flat tireBreakdown assistance
ProCarManuals.com
Page 234 of 286

The sticker must be attached on the
instrument cluster where it will be easily seen
by the driver.
Vehicle handling characteristics of a TIREFIT
repaired tire may change. Adapt your driving
accordingly.
X Stop after driving for approximately ten
minutes and check the tire pressure with
the tire inflation compressor.
i On tires that are equipped with a tire
pressure sensor (tire pressure monitor),
the use of sealant can lead to malfunction
messages and incorrect displays.
Therefore, use pressure gauge Bin the
TIREFIT kit to check and correct the tire
pressure. G
WARNING
If tire inflation pressure has fallen below
130 kPa (1.3 bar/26 psi) do not continue to
drive the vehicle.
Park your vehicle safely away from the
roadway and contact the nearest authorized
Mercedes-Benz Center or Roadside
Assistance.
Have the damaged tire replaced.
X Correct the tire pressure if it is still at least
130 kPa (1.3 bar/20 psi) (for the values,
see the Tire and Loading Information
placard on the driver's side B-pillar or tire
pressure table on the fuel filler flap).
To increase the tire pressure: switch on
the tire inflation compressor.
To reduce the tire pressure: open release
screw C.
! The manufacturer does not guarantee
that all tire damage can be repaired using
the TIREFIT kit, particularly in the case of
cuts and punctures with a diameter of more
than four millimeters or on the sidewall. The
manufacturer is not responsible for
damage caused by inappropriate use of the
TIREFIT kit. X
Drive to the nearest workshop and have the
tire changed there.
X Have the tire sealant bottle replaced as
soon as possible at a qualified specialist
workshop, e.g. at an authorized Mercedes-
Benz Center. H
Environmental note
Have the used tire sealant bottle disposed of
professionally, e.g. at an authorized
Mercedes-Benz Center.
X Have the TIREFIT kit replaced every four
years at a qualified specialist workshop,
e.g. an authorized Mercedes-Benz Center. Changing a wheel and mounting the
spare wheel
Preparing the vehicle X
Prepare the vehicle as described
(Y page 229).
X Bring the wheels into the straight-ahead
position.
X Take the following objects from the left-
hand stowage compartment and the left-
hand stowage space in the trunk:
R
lug wrench
R folding wheel chock
R jack
R alignment bolt
X Secure the vehicle to prevent it from rolling
away.
Securing the vehicle to prevent it from
rolling away G
WARNING
Only jack up the vehicle on level ground or on
slight inclines/declines. The vehicle could
otherwise fall off the jack and injure you or
others. 232
Flat tireBreakdown assistance
ProCarManuals.com
Page 238 of 286

X
Place the wheel onto the alignment bolt
and push it on. X
Tighten the wheel bolts until they are
finger-tight.
X Unscrew the alignment bolt.
X Tighten the last wheel bolt until it is finger-
tight.
Lowering the vehicle G
WARNING
The wheels could work loose if the wheel nuts
and bolts are not tightened to the specified
tightening torque. There is a risk of accident.
Have the tightening torque immediately
checked at a qualified specialist workshop
after a wheel is changed.
X Turn the crank of the jack counter-
clockwise until the vehicle is once again
standing firmly on the ground.
X Place the jack to one side. X
Tighten the wheel bolts evenly in a
crosswise pattern in the sequence indicated (:
toA). The specified
tightening torque is 133 lb-ft(180 Nm).
X Turn the jack back to the out-of-use
position and stow it in the trunk again with
the rest of the wheel-changing tools. Battery
Important safety notes
Special tools and expert knowledge are
required when working on the battery, e.g.
removal and installing. You should therefore
have all work involving the battery carried out
at a qualified specialist workshop. G
WARNING
Work carried out incorrectly on the battery
can, for example, lead to a short circuit and
damage your vehicle's electronic system. This
can disrupt driving safety systems such as
ABS (anti-lock braking system) or ESP ®
(Electronic Stability Program).
R If ABS malfunctions, the wheels can lock
during braking. This limits the steerability
of the vehicle when braking and the braking
distance may increase. There is a risk of
accident.
R If ESP ®
malfunctions, the vehicle will not be
stabilized if it starts to skid or a wheel starts
to spin. There is a risk of accident.
You should therefore have all work involving
the battery carried out at a qualified specialist
workshop. G
WARNING
Electrostatic build-up can lead to the creation
of sparks, which could ignite the highly
explosive gases of a battery. There is a risk of
an explosion.
Before handling the battery, touch the vehicle
body to remove any existing electrostatic
build-up. 236
BatteryBreakdown assistance
ProCarManuals.com
Page 247 of 286

in the fuse allocation chart. An authorized
Mercedes-Benz Center will be happy to
advise you.
i If a fuse has blown, contact a breakdown
service or an authorized Mercedes-Benz
Center.
If the newly inserted fuse also blows, have the
cause traced and rectified at a qualified
specialist workshop, e.g. an authorized
Mercedes-Benz Center. Before changing a fuse
X Park the vehicle and apply the electric
parking brake.
X Switch off all electrical consumers.
X Remove the SmartKey from the ignition
lock.
The fuses are located in various fuse boxes:
R fuse box in the footwell on the front-
passenger side
R fuse box in the rear
The "Relay and fuse information sheet" is
located with the wheel-change toolkit in the
trunk. Fuse box in the footwell
X
To open: remove the carpet over the
footrest.
X Loosen screws :on the floor panel using
a suitable tool.
X Remove the floor panel. X
To close: install the floor panel again.
X Screw in and tighten screws :.
X Put in the carpet and press to secure.
! The floor panel must be installed properly,
otherwise moisture or dirt could impair the
function of the fuses. Fuse box in the rear
Coupe X
To open: open the trunk.
X Fold cover :in the center of the rear wall
down in the direction of the arrow.
X To close: fold cover :up in the opposite
direction to the arrow and press to secure.
! The cover must be installed properly,
otherwise moisture or dirt could impair the
function of the fuses.
Roadster Fuses
245Breakdown assistance Z
ProCarManuals.com
Page 284 of 286

At temperatures below freezing:
X
Fill the washer fluid reservoir with a mixture
of water and windshield washer fluid, e.g.
MB WinterFit.
Adapt the mixing ratio to the outside
temperature.
R Down to 14 ‡ ( Ò10 †): mix 1 part MB
WinterFit to 2 parts water.
R Down to Ò4 ‡ (Ò20 †): mix 1 part MB
WinterFit to 1 part water.
R Down to Ò20.2 ‡ (Ò 29 †): mix 2 parts MB
WinterFit to 1 part water.
i Add windshield washer fluid, e.g. MB
SummerFit or MB WinterFit, to the washer
fluid all year round.
Filling capacities Model Capacity
All models
7.4 US qt (7.0 l)
Vehicle data
General notes
Please note that for the specified vehicle
data:
R The heights specified may vary as a result
of:
-Tires
- Load
- Condition of the suspension
- Optional equipment
R The vehicle length specified includes the
front license plate adapter. Vehicle data, Coupe
The data stated here specifically refers to a
vehicle with standard equipment. Consult an
authorized Mercedes-Benz Center for the
data for all vehicle variants and trim levels. Vehicle dimensions
Vehicle length
182.7 in (4640 mm)
Vehicle width
including exterior
mirrors
81.7 in (2075 mm)
Vehicle height
49.7 in (1262 mm)
Wheelbase
105.5 in (2680 mm)
Front track
66.2 in (1682 mm)
Rear track
65.0 in (1651 mm)
Ground clearance
3.9 in (99 mm)
Turning circle
39.0 ft (11.9 m)
Vehicle weight
Maximum trunk
load
137 lb (62 kg)
Vehicle data, Roadster
The data stated here specifically refers to a
vehicle with standard equipment. Consult an
authorized Mercedes-Benz Center for the
data for all vehicle variants and trim levels. Vehicle dimensions
Vehicle length
182.7 in (4640 mm)
Vehicle width
including exterior
mirrors
81.7 in (2075 mm)
Vehicle height
49.6 in (1261 mm)
Wheelbase
105.5 in (2680 mm)
Front track
66.2 in (1682 mm)
Rear track
65.0 in (1651 mm)
Ground clearance
3.9 in (99 mm)
Turning circle
39.0 ft (11.9 m)282
Vehicle dataTechnical data
ProCarManuals.com
Page 285 of 286

Vehicle weight
Maximum trunk
load
137 lb (62 kg)
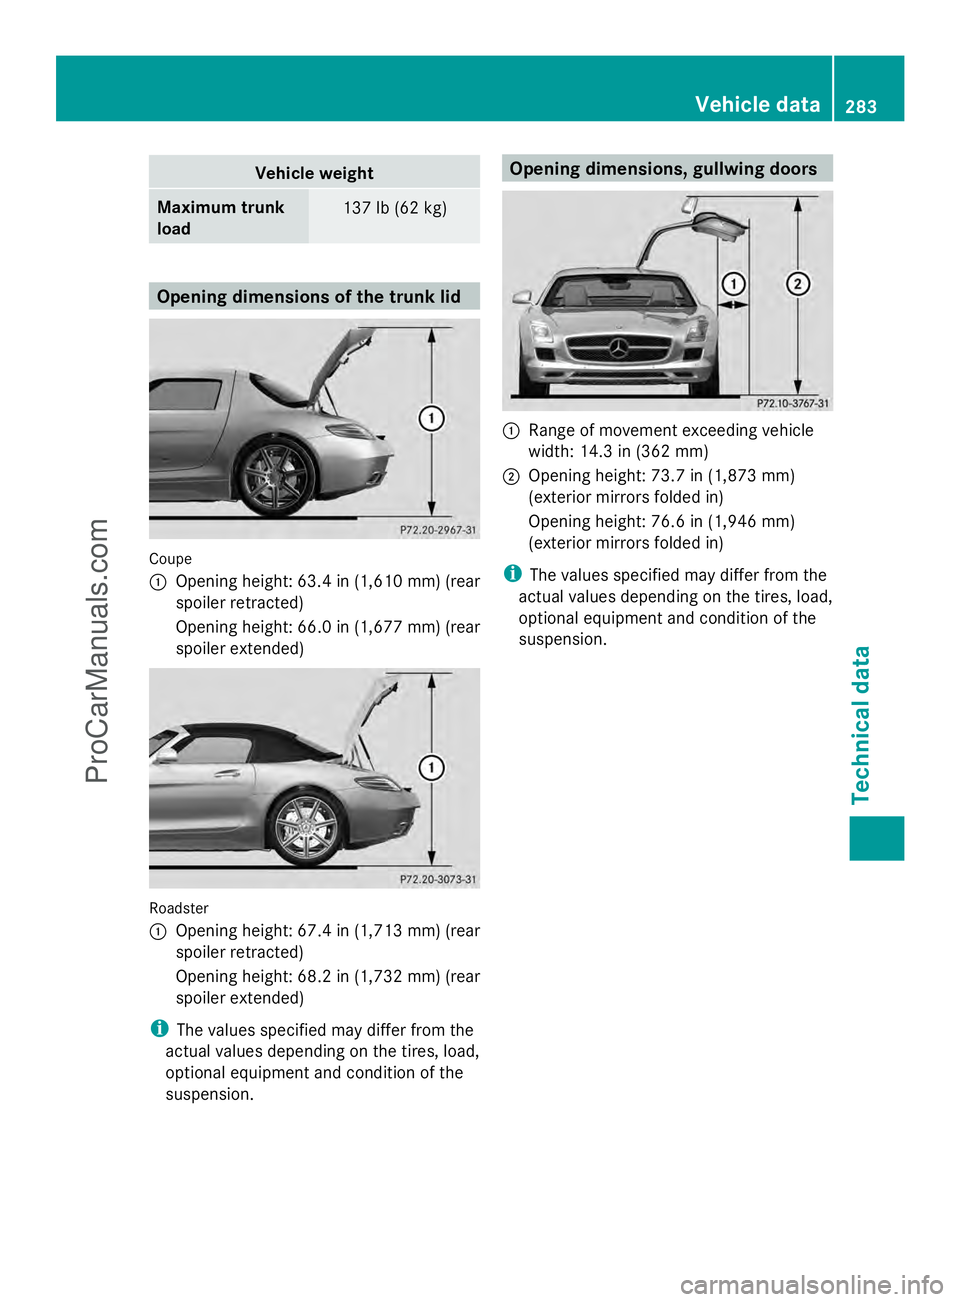
Opening dimensions of the trunk lid
Coupe
:
Opening height: 63.4 in (1,610 mm) (rear
spoiler retracted)
Opening height: 66.0 in (1,677 mm) (rear
spoiler extended) Roadster
:
Opening height: 67.4 in (1,713 mm) (rear
spoiler retracted)
Opening height: 68.2 in (1,732 mm) (rear
spoiler extended)
i The values specified may differ from the
actual values depending on the tires, load,
optional equipment and condition of the
suspension. Opening dimensions, gullwing doors
:
Range of movement exceeding vehicle
width: 14.3 in (362 mm)
; Opening height: 73.7 in (1,873 mm)
(exterior mirrors folded in)
Opening height: 76.6 in (1,946 mm)
(exterior mirrors folded in)
i The values specified may differ from the
actual values depending on the tires, load,
optional equipment and condition of the
suspension. Vehicle data
283Technical data Z
ProCarManuals.com