2013 MERCEDES-BENZ SLS-CLASS brake light
[x] Cancel search: brake lightPage 172 of 286

Display messages Possible causes/consequences and
M
MSolutions b
Check Check
Left
LeftLow
LowBeam
Beam
or
Check Right Low Check Right Low
Beam Beam The left or right-hand low-beam headlamp does not light up. In
addition, the high-beam headlamp is also inoperative.
X
Visit a qualified specialist workshop. b
AUTO AUTO
Lamp
LampFunction
Function
Inoperative
Inoperative The light sensor is defective.
USA only:
X
Switch off the daytime running lamps in the on-board computer
(Y page 154).
X Switch the lights on and off using the light switch. b
Check Rear Left Check Rear Left
Turn Signal Turn Signal
or
Check Rear Right Check Rear Right
Turn Signal Turn Signal The LEDs in the rear left or right-hand indicator lamp do not light
up.
X
Visit a qualified specialist workshop. b
Check Left Mirror Check Left Mirror
Turn Signal Turn Signal
or
Check Check
Right
RightMirror
Mirror
Turn Signal
Turn Signal None of the LEDs in the left or right-hand exterior mirrors light up.
X
Visit a qualified specialist workshop. b
Check Front Left Check Front Left
Turn Signal Turn Signal
or
Check Front Right Check Front Right
Turn Signal Turn Signal The LEDs in the front left or right-hand indicator lamp do not light
up.
X
Visit a qualified specialist workshop. b
Check Check
Center
Center Brake
Brake
Lamp
Lamp None of the LEDs in the high-mounted brake lamp light up.
X
Visit a qualified specialist workshop. 170
Displays and operationOn-board compu
ter and displays
ProCarManuals.com
Page 173 of 286
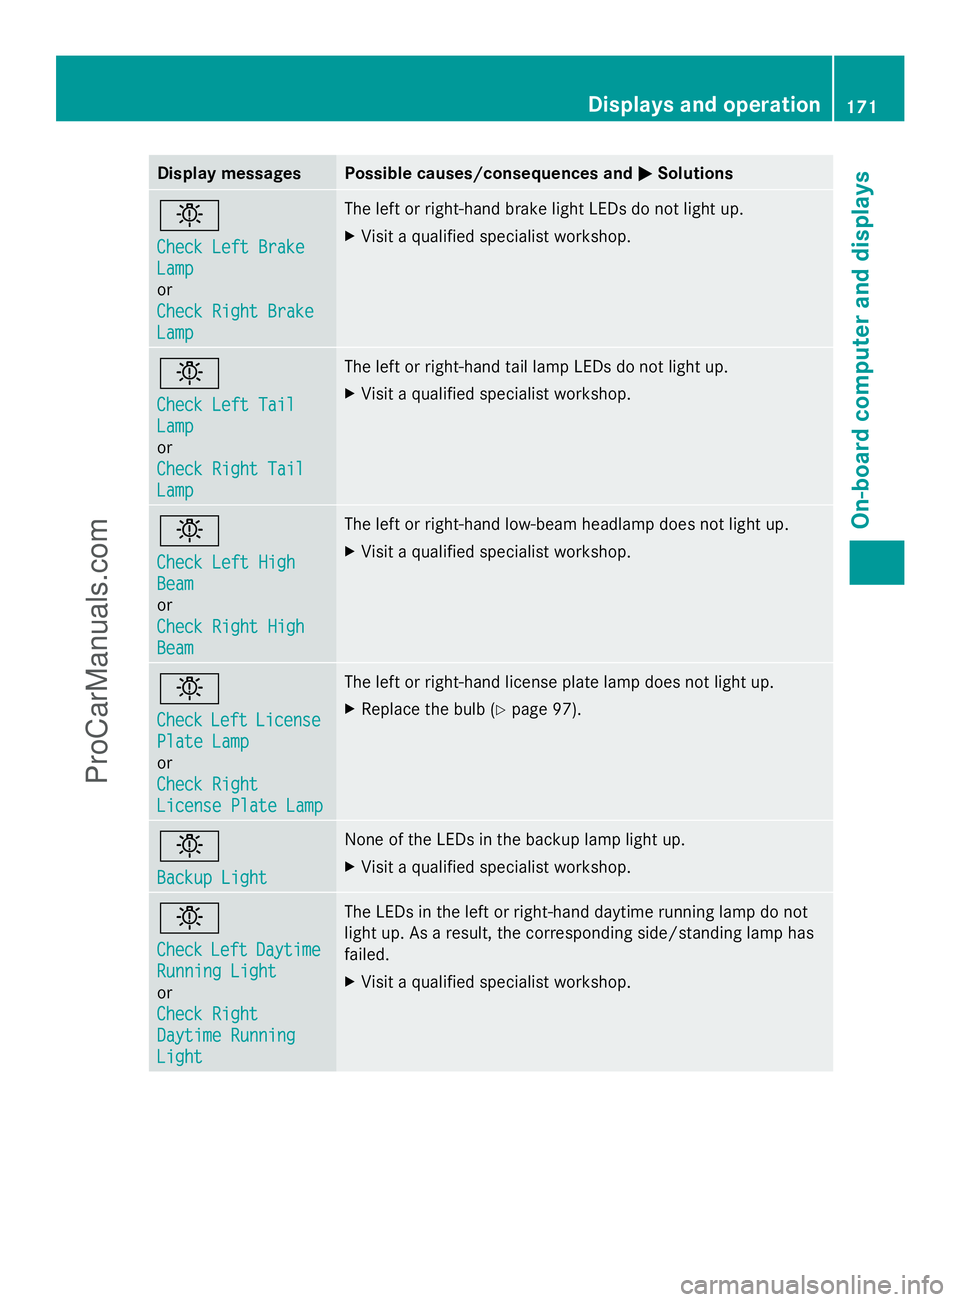
Display messages Possible causes/consequences and
M
MSolutions b
Check Left Brake Check Left Brake
Lamp Lamp
or
Check Right Brake Check Right Brake
Lamp Lamp The left or right-hand brake light LEDs do not light up.
X
Visit a qualified specialist workshop. b
Check Left Tail Check Left Tail
Lamp Lamp
or
Check Right Tail Check Right Tail
Lamp Lamp The left or right-hand tail lamp LEDs do not light up.
X
Visit a qualified specialist workshop. b
Check Left High Check Left High
Beam Beam
or
Check Right High Check Right High
Beam Beam The left or right-hand low-beam headlamp does not light up.
X
Visit a qualified specialist workshop. b
Check Check
Left
LeftLicense
License
Plate Lamp
Plate Lamp
or
Check Right Check Right
License Plate Lamp License Plate Lamp The left or right-hand license plate lamp does not light up.
X
Replace the bulb (Y page 97). b
Backup Light Backup Light None of the LEDs in the backup lamp light up.
X
Visit a qualified specialist workshop. b
Check Check
Left
LeftDaytime
Daytime
Running Light
Running Light
or
Check Right Check Right
Daytime Running Daytime Running
Light Light The LEDs in the left or right-hand daytime running lamp do not
light up. As a result, the corresponding side/standing lamp has
failed.
X
Visit a qualified specialist workshop. Displays and operation
171On-board computer and displays Z
ProCarManuals.com
Page 188 of 286
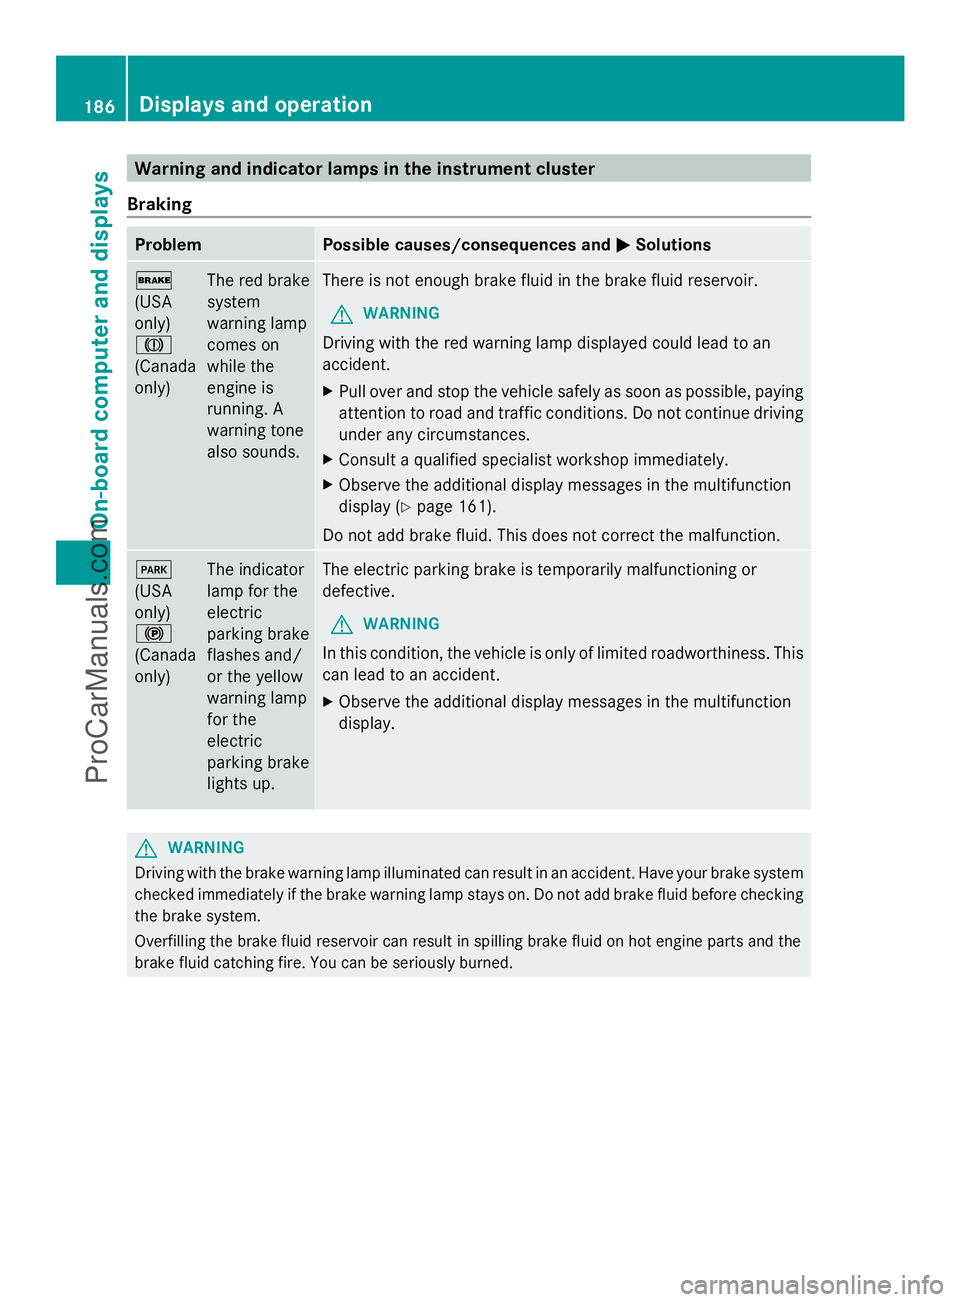
Warning and indicator lamps in the instrument cluster
Braking Problem Possible causes/consequences and
M
MSolutions $
(USA
only)
J
(Canada
only)
The red brake
system
warning lamp
comes on
while the
engine is
running. A
warning tone
also sounds. There is not enough brake fluid in the brake fluid reservoir.
G WARNING
Driving with the red warning lamp displayed could lead to an
accident.
X Pull over and stop the vehicle safely as soon as possible, paying
attention to road and traffic conditions. Do not continue driving
under any circumstances.
X Consult a qualified specialist workshop immediately.
X Observe the additional display messages in the multifunction
display (Y page 161).
Do not add brake fluid. This does not correct the malfunction. F
(USA
only)
!
(Canada
only)
The indicator
lamp for the
electric
parking brake
flashes and/
or the yellow
warning lamp
for the
electric
parking brake
lights up. The electric parking brake is temporarily malfunctioning or
defective.
G WARNING
In this condition, the vehicle is only of limited roadworthiness. This
can lead to an accident.
X Observe the additional display messages in the multifunction
display. G
WARNING
Driving with the brake warning lamp illuminated can result in an accident. Have your brake system
checked immediately if the brake warning lamp stays on. Do not add brake fluid before checking
the brake system.
Overfilling the brake fluid reservoir can result in spilling brake fluid on hot engine parts and the
brake fluid catching fire. You can be seriously burned. 186
Displays and operationOn-board computer and displays
ProCarManuals.com
Page 223 of 286
X
Use plenty of water and rinse out the
sponge frequently.
X Rinse the vehicle with clean water and dry
thoroughly with a chamois.
X Do not let the cleaning agent dry on the
paintwork.
Carefully remove all deposits of road salt as
soon as possible when driving in winter.
Power washers G
WARNING
The water jet from a circular jet nozzle (dirt
blasters) can cause invisible exterior damage
to the tires or chassis components.
Components damaged in this way may fail
unexpectedly. There is a risk of an accident.
Do not use power washers with circular jet
nozzles to clean the vehicle. Have damaged
tires or chassis components replaced
immediately.
! Maintain a minimum distance of
11.8 in (30 cm) between the vehicle and the
power washer nozzle. Information about
the correct distance is available from the
equipment manufacturer.
Move the power washer nozzle around
when cleaning your vehicle.
Do not aim directly at any of the following:
R tires
R door gaps, roof gaps, joints, etc.
R electrical components
R battery
R connectors
R lights
R seals
R trim elements
R ventilation slots
Damaged seals or electrical components
can lead to leaks or failures. Cleaning the wheels !
Do not use acidic wheel cleaning products
to remove brake dust. This could damage
wheel bolts and brake components.
! Do not park the vehicle for an extended
period right after cleaning it, particularly
after having cleaned the wheels with wheel
cleaner. Wheel cleaners could cause
increased corrosion of the brake discs and
brake pads/linings. For this reason, you
should drive for a few minutes after
cleaning. Braking heats the brake discs and
brake pads, thus drying them. The vehicle
can then be parked.
Cleaning the paintwork Scratches, corrosive deposits, areas affected
by corrosion and damage caused by
inadequate care cannot always be completely
repaired. In such cases, visit a qualified
specialist workshop, e.g. an authorized
Mercedes-Benz Center.
X
Remove impurities immediately, where
possible, whilst avoiding rubbing too hard.
X Soak insect remains with insect remover
and rinse off the treated areas afterwards.
X Soak bird droppings with water and rinse
off the treated areas afterwards.
X Remove coolant, brake fluid, tree resin,
oils, fuels and greases by rubbing gently
with a cloth soaked in petroleum ether or
lighter fluid.
X Use tar remover to remove tar stains.
X Use silicone remover to remove wax.
! Do not affix:
R stickers
R films
R magnetic plates or similar items
to painted surfaces. You could otherwise
damage the paintwork.
If water no longer forms "beads" on the paint
surface, use the paint care products
recommended and approved by Mercedes- Care
221Maintenance and care Z
ProCarManuals.com
Page 235 of 286

If your vehicle is equipped with a wheel chock,
it can be found in the vehicle tool kit
(Y page 228).
The folding wheel chock is an additional
securing measure to prevent the vehicle from
rolling away, for example when changing a
wheel. X
Fold both plates upwards :.
X Fold out lower plate ;.
X Guide the lugs on the lower plate fully into
the openings in base plate =.Securing the vehicle on level ground
X
On level ground: place chocks or other
suitable items under the front and rear of
the wheel that is diagonally opposite the
wheel you wish to change. Securing the vehicle on slight downhill gradients
X
On downhill gradients: place chocks or
other suitable items in front of the wheels
of the front and rear axle.
Raising the vehicle G
WARNING
When jacking up the vehicle, only use the jack
which has been specifically approved by
Mercedes-Benz for your vehicle.
The jack is designed exclusively for jacking up
the vehicle at the jacking points built into both
sides of the vehicle. The jack saddle must be
placed centrally under the jacking point. The
jack must always be vertical when in use,
especially on inclines or declines.
The jack is intended only for lifting the vehicle
briefly for wheel changes. It is not suited for
performing maintenance work under the
vehicle. To help avoid personal injury, use the
jack only to lift the vehicle during a wheel
change.
Never get beneath the vehicle while it is
supported by the jack. Keep hands and feet
away from the area under the lifted vehicle.
Always lower the vehicle onto sufficient
capacity jackstands before working under the
vehicle.
Always firmly engage the parking brake and
block the wheels with wheel chocks or other
sizable objects before raising the vehicle with
the jack. Do not disengage the parking brake
while the vehicle is raised. Flat tire
233Breakdown assistance
Z
ProCarManuals.com
Page 243 of 286
R
Do not start the engine if the battery is frozen. Let the battery thaw first.
R Only jump-start from batteries with a 12 V voltage rating.
R Only use jumper cables which have a sufficient cross-section and insulated terminal clamps.
R If the battery is fully discharged, leave the battery that is being used to jump-start connected
for a few minutes before attempting to start. This charges the battery slightly.
R Make sure that the two vehicles do not touch.
Make sure that:
R the jumper cables are not damaged.
R when the jumper cables are connected to the battery, uninsulated sections of the terminal
clamp do not come into contact with other metal sections.
R the jumper cables cannot come into contact with parts such as the V-belt pulley or the fan.
These parts move when the engine is started and while it is running.
X Press the electric parking brake handle.
X Shift the transmission to Pwith the button in the center console.
X Remove the SmartKey from the ignition lock.
X Switch off all electrical consumers (e.g. radio, blower, etc.).
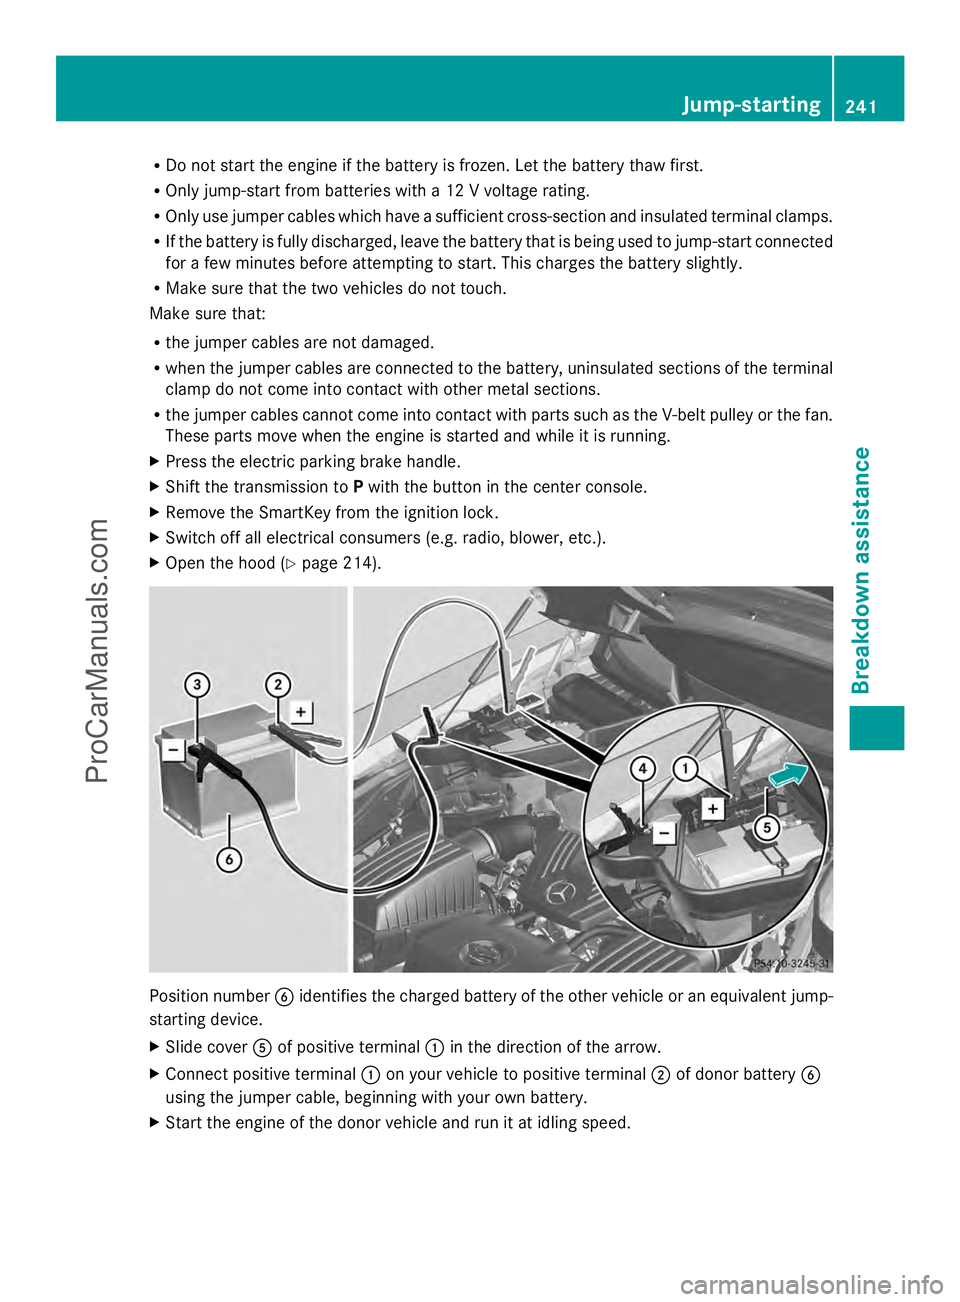
X Open the hood (Y page 214). Position number
Bidentifies the charged battery of the other vehicle or an equivalent jump-
starting device.
X Slide cover Aof positive terminal :in the direction of the arrow.
X Connect positive terminal :on your vehicle to positive terminal ;of donor battery B
using the jumper cable, beginning with your own battery.
X Start the engine of the donor vehicle and run it at idling speed. Jump-starting
241Breakdown assistance Z
ProCarManuals.com
Page 272 of 286
available, the tires should then be replaced
every 3000 to 6000 miles
(5000 to 10,000 km ),or earlier if the tire wear
requires this. Do not change the direction of
wheel rotation.
Clean the contact surfaces of the wheel and
the brake disc thoroughly every time a wheel
is rotated. Check the tire pressures.
Information on changing tires and mounting
the spare wheel (Y page 232).Direction of rotation
Tires with a specified direction of rotation
have additional benefits, e.g. if there is a risk
of hydroplaning. You will only gain these
benefits if the correct direction of rotation is
maintained.
An arrow on the sidewall of the tire indicates
its correct direction of rotation.
You may mount a spare wheel/emergency
spare wheel against the direction of rotation.
Observe the time restriction on use as well as
the speed limitation specified on the spare
wheel/emergency spare wheel. Storing wheels
Store wheels that are not being used in a cool,
dry and preferably dark place. Protect the
tires from oil, grease, gasoline and diesel. Cleaning the wheels
G
WARNING
Do not use power washers with circular-jet
nozzles (dirt grinders) to clean your vehicle, in
particular the tires. You could otherwise
damage the tires and cause an accident. Wheel and tire combinations
Points to remember
! For safety reasons, Mercedes-Benz
recommends that you only use Tires and
wheels which have been approved by
Mercedes-Benz specifically for your
vehicle.
These tires have been specially adapted for
use with the control systems, such as ABS
or ESP ®
, and are marked as follows:
R MO = Mercedes-Benz Original
R MOE = Mercedes-Benz Original Extended
(tires featuring run-flat characteristics)
R MO1 = Mercedes-Benz Original (only
certain AMG tires)
Mercedes-Benz Original Extended tires
may only be used on wheels that have been
specifically approved by Mercedes-Benz.
Only use tires, wheels or accessories
tested and approved by Mercedes-Benz.
Certain characteristics, e.g. handling,
vehicle noise emissions or fuel
consumption, may otherwise be adversely
affected. In addition, when driving with a
load, tire dimension variations could cause
the tires to come into contact with the
bodywork and axle components. This could
result in damage to the tires or the vehicle.
Mercedes-Benz accepts no liability for
damage resulting from the use of tires,
wheels or accessories other than those
tested and approved.
Further information about tires, wheels and
approved combinations can be obtained
from any authorized Mercedes-Benz
Center.
i The Tire and Load Information placard
with the recommended tire pressures is on
the B-pillar on the driver's side. Further
information about driving at high speeds or
driving with vehicle loads that are lighter
than the maximum vehicle load can be
found in the tire pressure table on the
inside of the fuel filler flap. Check tire 270
Wheel and tire combinationsWheels and tires
ProCarManuals.com