2013 MERCEDES-BENZ SLS AMG ECU
[x] Cancel search: ECUPage 234 of 286
The sticker must be attached on the
instrument cluster where it will be easily seen
by the driver.
Vehicle handling characteristics of a TIREFIT
repaired tire may change. Adapt your driving
accordingly.
X Stop after driving for approximately ten
minutes and check the tire pressure with
the tire inflation compressor.
i On tires that are equipped with a tire
pressure sensor (tire pressure monitor),
the use of sealant can lead to malfunction
messages and incorrect displays.
Therefore, use pressure gauge 0084in the
TIREFIT kit to check and correct the tire
pressure. G
WARNING
If tire inflation pressure has fallen below
130 kPa (1.3 bar/26 psi) do not continue to
drive the vehicle.
Park your vehicle safely away from the
roadway and contact the nearest authorized
Mercedes-Benz Center or Roadside
Assistance.
Have the damaged tire replaced.
X Correct the tire pressure if it is still at least
130 kPa (1.3 bar/20 psi) (for the values,
see the Tire and Loading Information
placard on the driver's side B-pillar or tire
pressure table on the fuel filler flap).
To increase the tire pressure: switch on
the tire inflation compressor.
To reduce the tire pressure: open release
screw 006B.
! The manufacturer does not guarantee
that all tire damage can be repaired using
the TIREFIT kit, particularly in the case of
cuts and punctures with a diameter of more
than four millimeters or on the sidewall. The
manufacturer is not responsible for
damage caused by inappropriate use of the
TIREFIT kit. X
Drive to the nearest workshop and have the
tire changed there.
X Have the tire sealant bottle replaced as
soon as possible at a qualified specialist
workshop, e.g. at an authorized Mercedes-
Benz Center. H
Environmental note
Have the used tire sealant bottle disposed of
professionally, e.g. at an authorized
Mercedes-Benz Center.
X Have the TIREFIT kit replaced every four
years at a qualified specialist workshop,
e.g. an authorized Mercedes-Benz Center. Changing a wheel and mounting the
spare wheel
Preparing the vehicle X
Prepare the vehicle as described
(Y page 229).
X Bring the wheels into the straight-ahead
position.
X Take the following objects from the left-
hand stowage compartment and the left-
hand stowage space in the trunk:
R
lug wrench
R folding wheel chock
R jack
R alignment bolt
X Secure the vehicle to prevent it from rolling
away.
Securing the vehicle to prevent it from
rolling away G
WARNING
Only jack up the vehicle on level ground or on
slight inclines/declines. The vehicle could
otherwise fall off the jack and injure you or
others. 232
Flat tireBreakdown assistance
Page 235 of 286
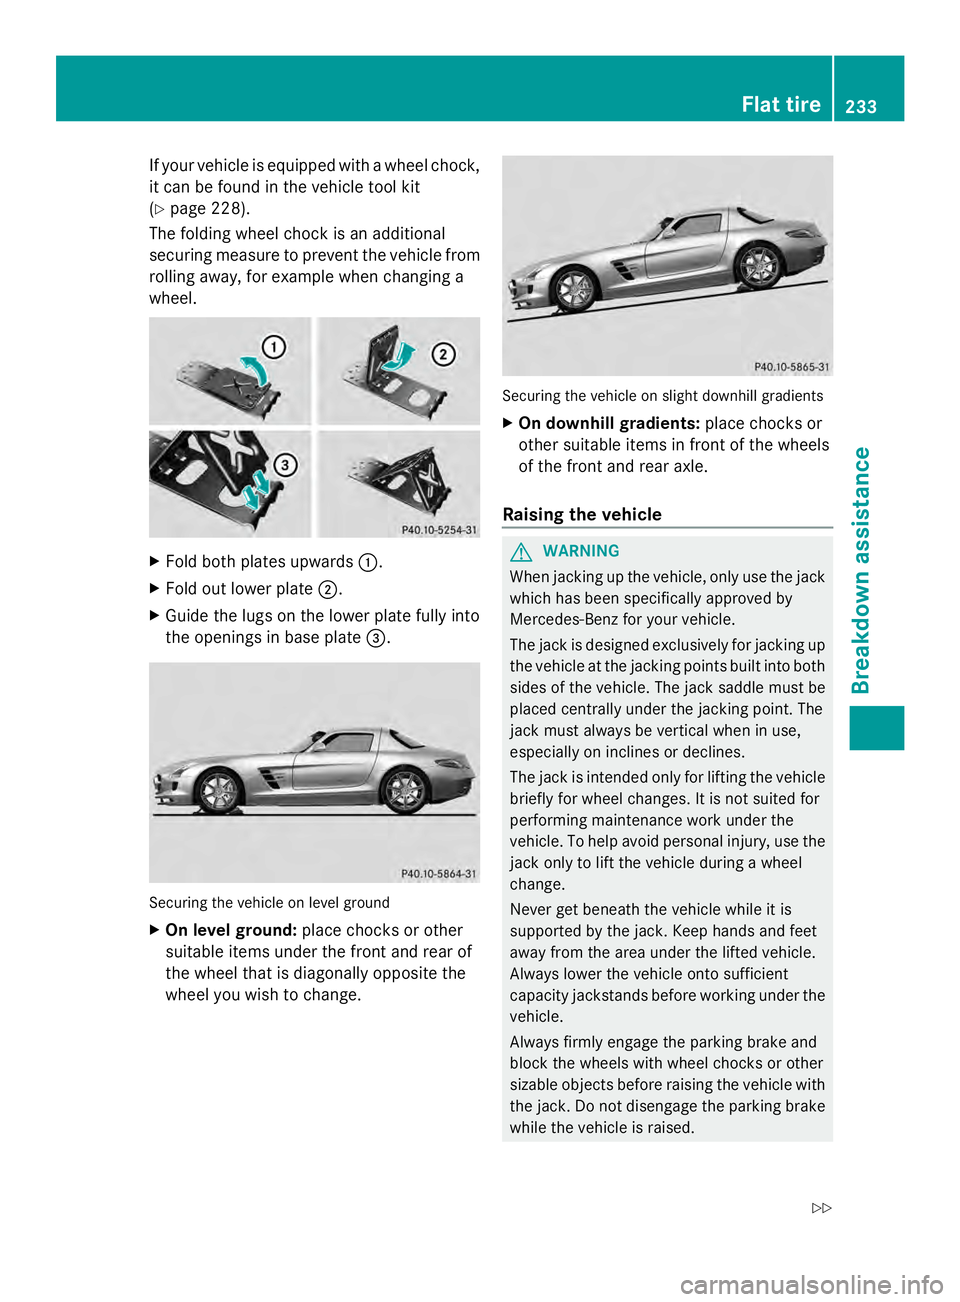
If your vehicle is equipped with a wheel chock,
it can be found in the vehicle tool kit
(Y page 228).
The folding wheel chock is an additional
securing measure to prevent the vehicle from
rolling away, for example when changing a
wheel. X
Fold both plates upwards 0043.
X Fold out lower plate 0044.
X Guide the lugs on the lower plate fully into
the openings in base plate 0087.Securing the vehicle on level ground
X
On level ground: place chocks or other
suitable items under the front and rear of
the wheel that is diagonally opposite the
wheel you wish to change. Securing the vehicle on slight downhill gradients
X
On downhill gradients: place chocks or
other suitable items in front of the wheels
of the front and rear axle.
Raising the vehicle G
WARNING
When jacking up the vehicle, only use the jack
which has been specifically approved by
Mercedes-Benz for your vehicle.
The jack is designed exclusively for jacking up
the vehicle at the jacking points built into both
sides of the vehicle. The jack saddle must be
placed centrally under the jacking point. The
jack must always be vertical when in use,
especially on inclines or declines.
The jack is intended only for lifting the vehicle
briefly for wheel changes. It is not suited for
performing maintenance work under the
vehicle. To help avoid personal injury, use the
jack only to lift the vehicle during a wheel
change.
Never get beneath the vehicle while it is
supported by the jack. Keep hands and feet
away from the area under the lifted vehicle.
Always lower the vehicle onto sufficient
capacity jackstands before working under the
vehicle.
Always firmly engage the parking brake and
block the wheels with wheel chocks or other
sizable objects before raising the vehicle with
the jack. Do not disengage the parking brake
while the vehicle is raised. Flat tire
233Breakdown assistance
Z
Page 237 of 286
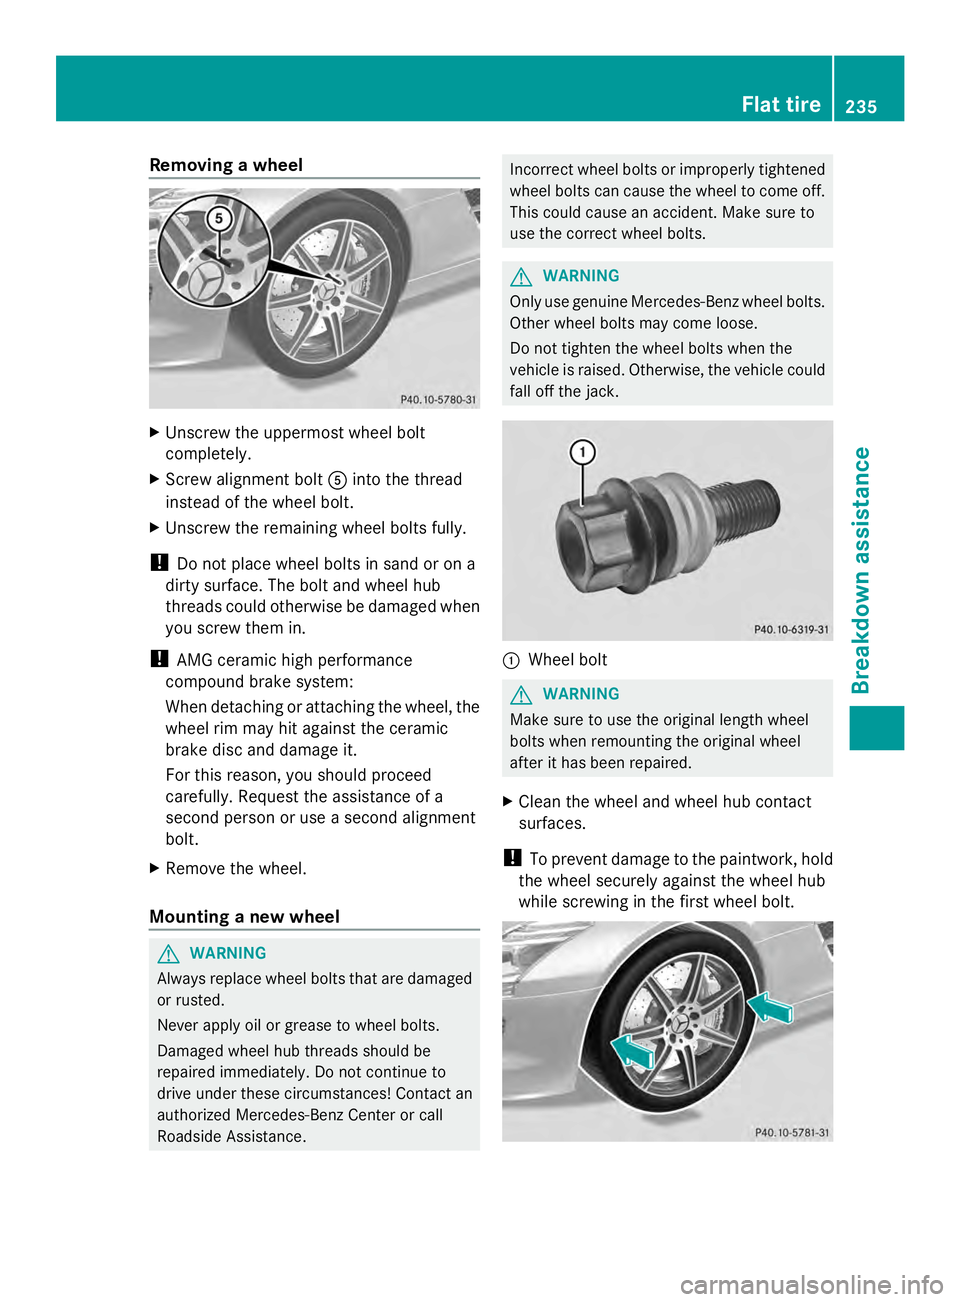
Removing a wheel
X
Unscrew the uppermost wheel bolt
completely.
X Screw alignment bolt 0083into the thread
instead of the wheel bolt.
X Unscrew the remaining wheel bolts fully.
! Do not place wheel bolts in sand or on a
dirty surface. The bolt and wheel hub
threads could otherwise be damaged when
you screw them in.
! AMG ceramic high performance
compound brake system:
When detaching or attaching the wheel, the
wheel rim may hit against the ceramic
brake disc and damage it.
For this reason, you should proceed
carefully. Request the assistance of a
second person or use a second alignment
bolt.
X Remove the wheel.
Mounting a new wheel G
WARNING
Always replace wheel bolts that are damaged
or rusted.
Never apply oil or grease to wheel bolts.
Damaged wheel hub threads should be
repaired immediately. Do not continue to
drive under these circumstances! Contact an
authorized Mercedes-Benz Center or call
Roadside Assistance. Incorrect wheel bolts or improperly tightened
wheel bolts can cause the wheel to come off.
This could cause an accident. Make sure to
use the correct wheel bolts.
G
WARNING
Only use genuine Mercedes-Benz wheel bolts.
Other wheel bolts may come loose.
Do not tighten the wheel bolts when the
vehicle is raised. Otherwise, the vehicle could
fall off the jack. 0043
Wheel bolt G
WARNING
Make sure to use the original length wheel
bolts when remounting the original wheel
after it has been repaired.
X Clean the wheel and wheel hub contact
surfaces.
! To prevent damage to the paintwork, hold
the wheel securely against the wheel hub
while screwing in the first wheel bolt. Flat tire
235Breakdown assistance Z
Page 239 of 286
The highly flammable gas mixture forms when
charging the battery as well as when jump-
starting.
Always make sure that neither you nor the
battery is electrostatically charged. A build-
up of electrostatic charge can be caused, for
example:
R by wearing clothing made from synthetic
fibers
R due to friction between clothing and seats
R if you push or pull the battery across the
carpet or other synthetic materials
R if you wipe the battery with a cloth. G
WARNING
During the charging process, a battery
produces hydrogen gas. If a short circuit
occurs or sparks are created, the hydrogen
gas can ignite. There is a risk of an explosion.
R Make sure that the positive terminal of a
connected battery does not come into
contact with vehicle parts.
R Never place metal objects or tools on a
battery.
R It is important that you observe the
described order of the battery terminals
when connecting and disconnecting a
battery.
R When jump-starting, make sure that the
battery poles with identical polarity are
connected.
R It is particularly important to observe the
described order when connecting and
disconnecting the jumper cables.
R Never connect or disconnect the battery
terminals while the engine is running. G
WARNING
Battery acid is caustic. There is a risk of injury.
Avoid contact with the skin, eyes or clothing.
Do not inhale any battery gases. Do not lean
over the battery. Keep children away from
batteries. Wash battery acid immediately with
water and seek medical attention. H
Environmental note Batteries contain dangerous
substances. It is against the
law to dispose of them with
the household rubbish. They
must be collected separately
and recycled to protect the
environment.
Dispose of batteries in an
environmentally friendly
manner. Take discharged
batteries to a qualified
specialist workshop or a
special collection point for
used batteries.
! Have the battery checked regularly at a
qualified specialist workshop.
Observe the service intervals in the
Maintenance Booklet or contact a qualified
specialist workshop for more information.
! You should have all work involving the
battery carried out at a qualified specialist
workshop. In the exceptional case that it is
necessary for you to disconnect the battery
yourself, make sure that:
R you switch off the engine and remove the
SmartKey. On vehicles with KEYLESS-
GO, ensure that the ignition is switched
off. Check that all the indicator lamps in
the instrument cluster are off. Otherwise,
electronic components, such as the
alternator, may be damaged.
R you first remove the negative terminal
clamp and then the positive terminal
clamp. Never swap the terminal clamps.
Otherwise, the vehicle's electronic
system may be damaged.
R the transmission is locked in position P
after disconnecting the battery. The
vehicle is secured against rolling away.
You can then no longer move the vehicle.
The battery and the cover of the positive
terminal clamp must be installed securely
during operation. Battery
237Breakdown assistance Z
Page 244 of 286
X
Connect negative terminal 0087of donor battery 0084to earth point 0085of your vehicle using
the jumper cable, connecting the jumper cable to donor battery 0084first.
X Start the engine.
X Before disconnecting the jumper cables, let the engine run for several minutes.
X First, remove the jumper cables from earth point 0085and negative terminal 0087, then from
positive clamp 0043and positive terminal 0044. Each time beginning with your vehicle's battery.
X Slide cover 0083of the positive terminal in the opposite direction to the arrow.
X Have the battery checked at a qualified specialist workshop.
i Jump-starting is not considered to be a normal operating condition.
i Jumper cables and further information regarding jump-starting can be obtained at any
qualified specialist workshop. Towing and tow-starting
Important safety notes
If the vehicle can no longer be driven because
of an accident or breakdown, you have the
following options:
R transporting the vehicle
As a rule, you should have the vehicle
transported.
R towing the vehicle with the rear axle raised
Only tow the vehicle with the rear axle
raised in exceptional cases.
R towing the vehicle with a tow rope or tow
bar
Only tow the vehicle in exceptional cases.
The engine must be running if you tow the
vehicle with a tow rope or tow bar. Observe
the following notes. G
WARNING
The rear axle locks when:
R the engine is not running
R the engine stalls while the vehicle is being
towed
R there is a malfunction in the power supply
or the vehicle's electrical system
There is a risk of an accident.
In the event of a breakdown, you should
always have the vehicle transported. G
WARNING
If the brake system or power steering is
malfunctioning and your vehicle is then towed
away, significantly more effort may be
required to steer and brake than is normally
required. There is a risk of an accident.
In such cases, use a tow bar. Before towing,
make sure that the steering moves freely.
! Use the SmartKey instead of the Start/
Stop button when towing the vehicle.
Start the engine and keep it running. Turn
the SmartKey to position 2in the ignition.
Set the transmission to Nusing the E-
SELECT lever. Make sure that you then
leave the SmartKey in position 2.
Check the transmission position in the
instrument cluster.
! Make sure that the electric parking brake
is released. If the electric parking brake is
faulty, visit a qualified specialist workshop.
Mercedes-Benz recommends that you use
an authorized Mercedes-Benz Center for
this purpose.
! When towing, pull away slowly and
smoothly. If the tractive power is too high,
the vehicles could be damaged.
! Only secure the tow rope or tow bar at the
towing eyes. Otherwise, the vehicle could
be damaged. 242
Towing and tow-startingBreakdown assistance
Page 246 of 286
X
Switch on the hazard warning lamps
(Y page 94).
X Make sure that the SmartKey is in position
2 in the ignition and that the engine is
running throughout the towing procedure.
X Move the transmission to Nwith the E-
SELECT lever. Check the transmission
position in the instrument cluster. Towing a vehicle with both axles on
the ground
When having your vehicle towed, observe the
important safety notes ( Ypage 242).
X Switch on the hazard warning lamps
(Y page 94).
i When towing with the hazard warning
lamps switched on, use the combination
switch as usual to signal a change of
direction. In this case, only the turn signals
for the desired direction flash. When the
combination switch is reset, the hazard
warning lamps start flashing again.
X Insert the SmartKey into the ignition lock
(Y page 113).
X Start the engine and leave the SmartKey in
the ignition.
X Move the transmission to Nwith the E-
SELECT lever.
X Check the transmission position in the
instrument cluster display (Y page 119).
X Leave the engine running during the entire
towing procedure. Transporting the vehicle
The towing eye can be used to pull the vehicle
onto a trailer or transporter for transporting
purposes.
! Only lash the vehicle down by the wheels
or wheel rims, not by parts of the vehicle
such as axle or steering components.
Otherwise, the vehicle could be damaged. X
Start the engine.
X Make sure that the SmartKey is in position
2in the ignition and that the engine is
running during the entire loading operation.
X Move the transmission to Nwith the E-
SELECT lever. Check the transmission
position in the instrument cluster.
As soon as the vehicle is loaded:
X Prevent the vehicle from rolling away by
applying the electric parking brake.
X Shift the transmission to Pwith the button
in the center console.
X Turn the SmartKey to position 0in the
ignition lock and remove the SmartKey
from the ignition lock.
X Secure the vehicle. Fuses
Important safety notes
G
WARNING
Only use fuses approved by Mercedes-Benz
with the specified amperage for the system in
question and do not attempt to repair or
bridge a blown fuse. Using other than
approved fuses or using repaired or bridged
fuses may cause an overload leading to a fire,
and/or cause damage to electrical
components and/or systems. Have the cause
determined and remedied by an authorized
Mercedes-Benz Center.
! Only use fuses that have been approved
for Mercedes-Benz vehicles and which
have the correct fuse rating for the system
concerned. Otherwise, components or
systems could be damaged.
The fuses in your vehicle serve to close down
faulty circuits. If a fuse blows, all the
components on the circuit and their functions
stop operating.
Blown fuses must be replaced with fuses of
the same rating, which you can recognize by
the color and value. The fuse ratings are listed 244
FusesBreakdown assistance
Page 247 of 286
in the fuse allocation chart. An authorized
Mercedes-Benz Center will be happy to
advise you.
i If a fuse has blown, contact a breakdown
service or an authorized Mercedes-Benz
Center.
If the newly inserted fuse also blows, have the
cause traced and rectified at a qualified
specialist workshop, e.g. an authorized
Mercedes-Benz Center. Before changing a fuse
X Park the vehicle and apply the electric
parking brake.
X Switch off all electrical consumers.
X Remove the SmartKey from the ignition
lock.
The fuses are located in various fuse boxes:
R fuse box in the footwell on the front-
passenger side
R fuse box in the rear
The "Relay and fuse information sheet" is
located with the wheel-change toolkit in the
trunk. Fuse box in the footwell
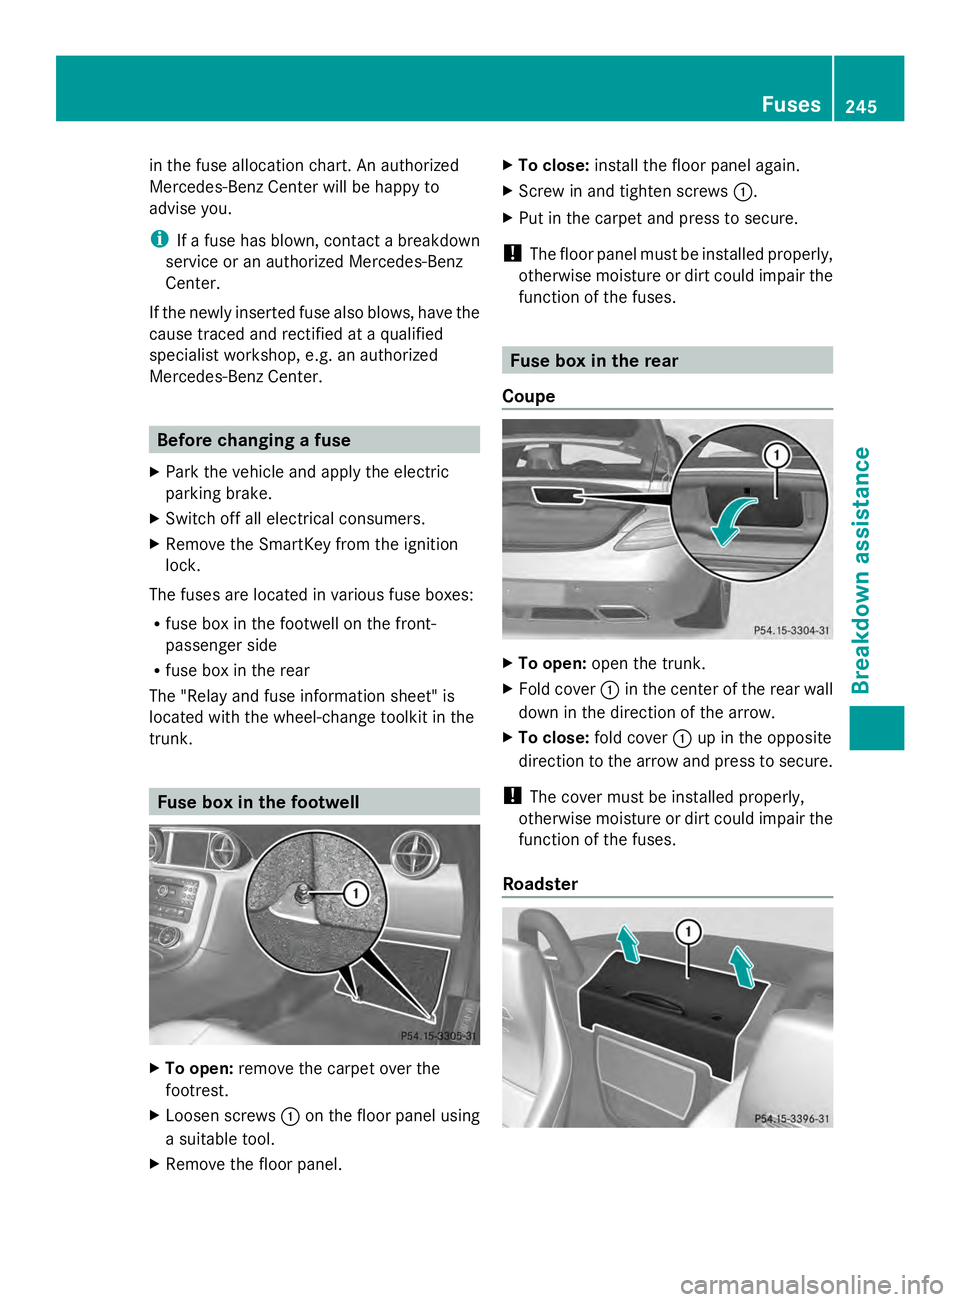
X
To open: remove the carpet over the
footrest.
X Loosen screws 0043on the floor panel using
a suitable tool.
X Remove the floor panel. X
To close: install the floor panel again.
X Screw in and tighten screws 0043.
X Put in the carpet and press to secure.
! The floor panel must be installed properly,
otherwise moisture or dirt could impair the
function of the fuses. Fuse box in the rear
Coupe X
To open: open the trunk.
X Fold cover 0043in the center of the rear wall
down in the direction of the arrow.
X To close: fold cover 0043up in the opposite
direction to the arrow and press to secure.
! The cover must be installed properly,
otherwise moisture or dirt could impair the
function of the fuses.
Roadster Fuses
245Breakdown assistance Z
Page 248 of 286
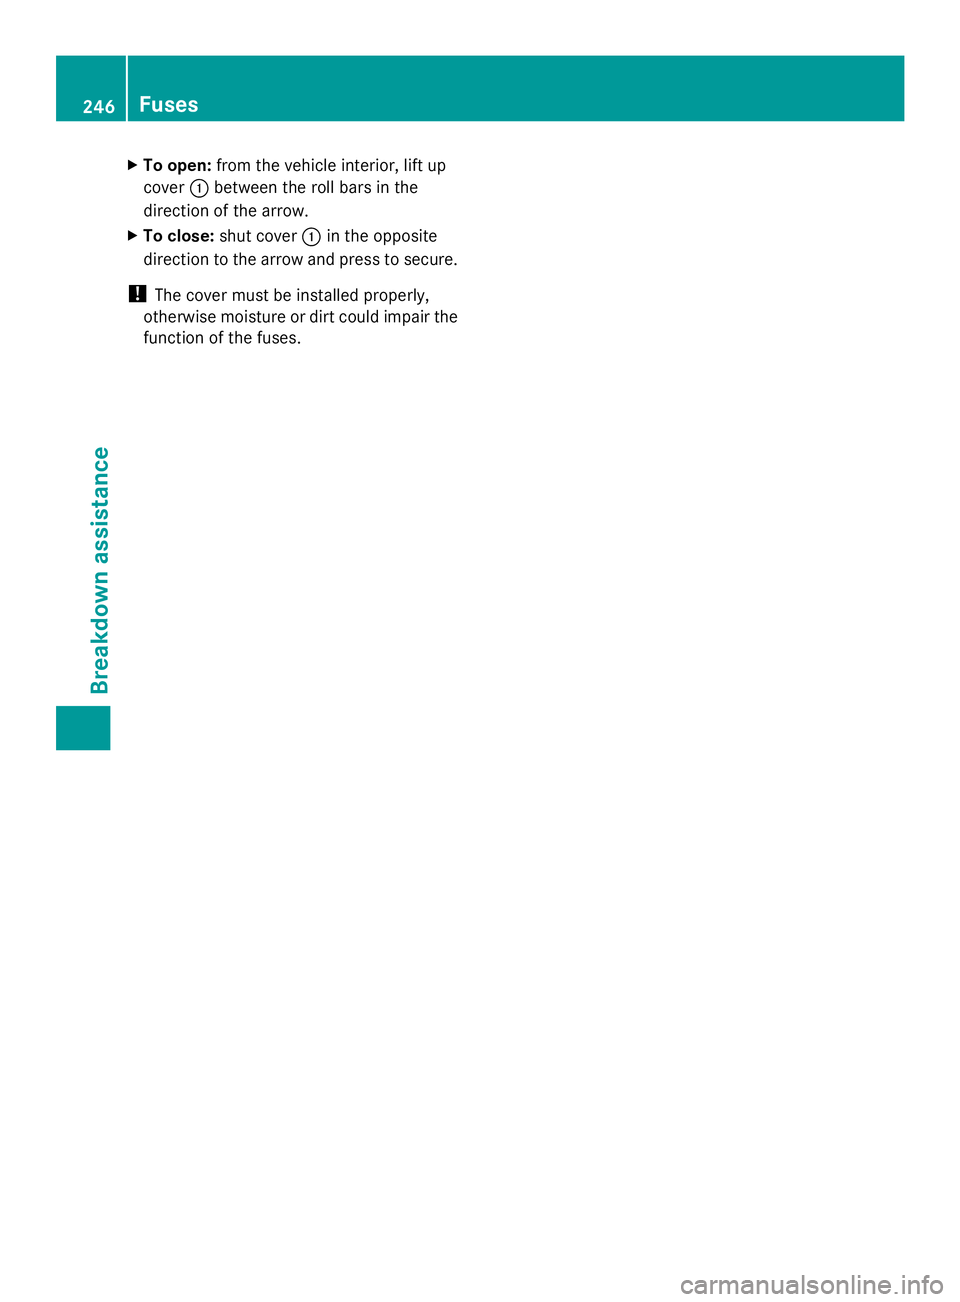
X
To open: from the vehicle interior, lift up
cover 0043between the roll bars in the
direction of the arrow.
X To close: shut cover 0043in the opposite
direction to the arrow and press to secure.
! The cover must be installed properly,
otherwise moisture or dirt could impair the
function of the fuses. 246
FusesBreakdo
wn assis tance