2013 MERCEDES-BENZ SLS AMG ECU
[x] Cancel search: ECUPage 130 of 286
To ensure that the vehicle is secured against
rolling away unintentionally:
R the electric parking brake must be applied.
R the transmission must be in position P.
R the SmartKey must be in position 0in the
ignition lock and then removed from the
ignition lock, or the Start/Stop button must
be pressed.
R on steep uphill or downhill gradients, turn
the front wheels towards the curb.
R on steep uphill or downhill gradients, the
front axle of an empty vehicle must be
secured, for example with a wheel chock.
R on steep uphill or downhill gradients, the
rear axle of a laden vehicle must be
additionally secured, for example with a
wheel chock. Switching off the engine
Important safety notes G
WARNING
When the engine is switched off, the
transmission shifts into neutral position N.
The vehicle may roll away. There is a risk of
an accident.
After switching off the engine, always switch
to parking position P. Prevent the parked
vehicle from rolling away by applying the
parking brake.
! Do not open the driver's door while the
vehicle is in motion. At low speeds in
transmission position Dor R, park position
P is otherwise engaged automatically. This
can damage the transmission.
i Observe the display messages in the
instrument cluster.
AMG SPEEDSHIFT DCT 7-speed sports
transmission X
Shift the transmission to Pwith the button
in the center console. Using the Start/Stop button
X
Press the Start/Stop button (Y page 113).
The engine stops and all the indicator
lamps in the instrument cluster go out.
X Apply the electric parking brake.
i If you switch the engine off with the
transmission in position Ror D, the
transmission automatically shifts to N.
If you move the E-SELECT lever to Nbefore
switching off the engine, the transmission
remains for approximately 30 minutes
in N.
If you open the driver's or front-passenger
door during this period, the transmission
automatically shifts to P.
i The engine can be turned off while the
vehicle is in motion by pressing and holding
the Start/Stop button for about three
seconds.
Using the SmartKey
! Do not remove the SmartKey while the
vehicle is in motion. At low speeds, park
position Pwill otherwise be engaged
automatically.
Do not open the driver's door while the
vehicle is in motion. At low speeds,
transmission position Pis engaged
automatically.
This can damage the transmission.
X Turn the SmartKey to position 0in the
ignition lock and remove it.
The parking lock is activated.
X Apply the electric parking brake.
i If you move the E-SELECT lever to N
before switching off the engine, the
transmission remains for approximately
30 minutes in N. If you open the driver's or
front-passenger door during this period,
the transmission automatically shifts to P.128
ParkingDriving and parking
Page 189 of 286
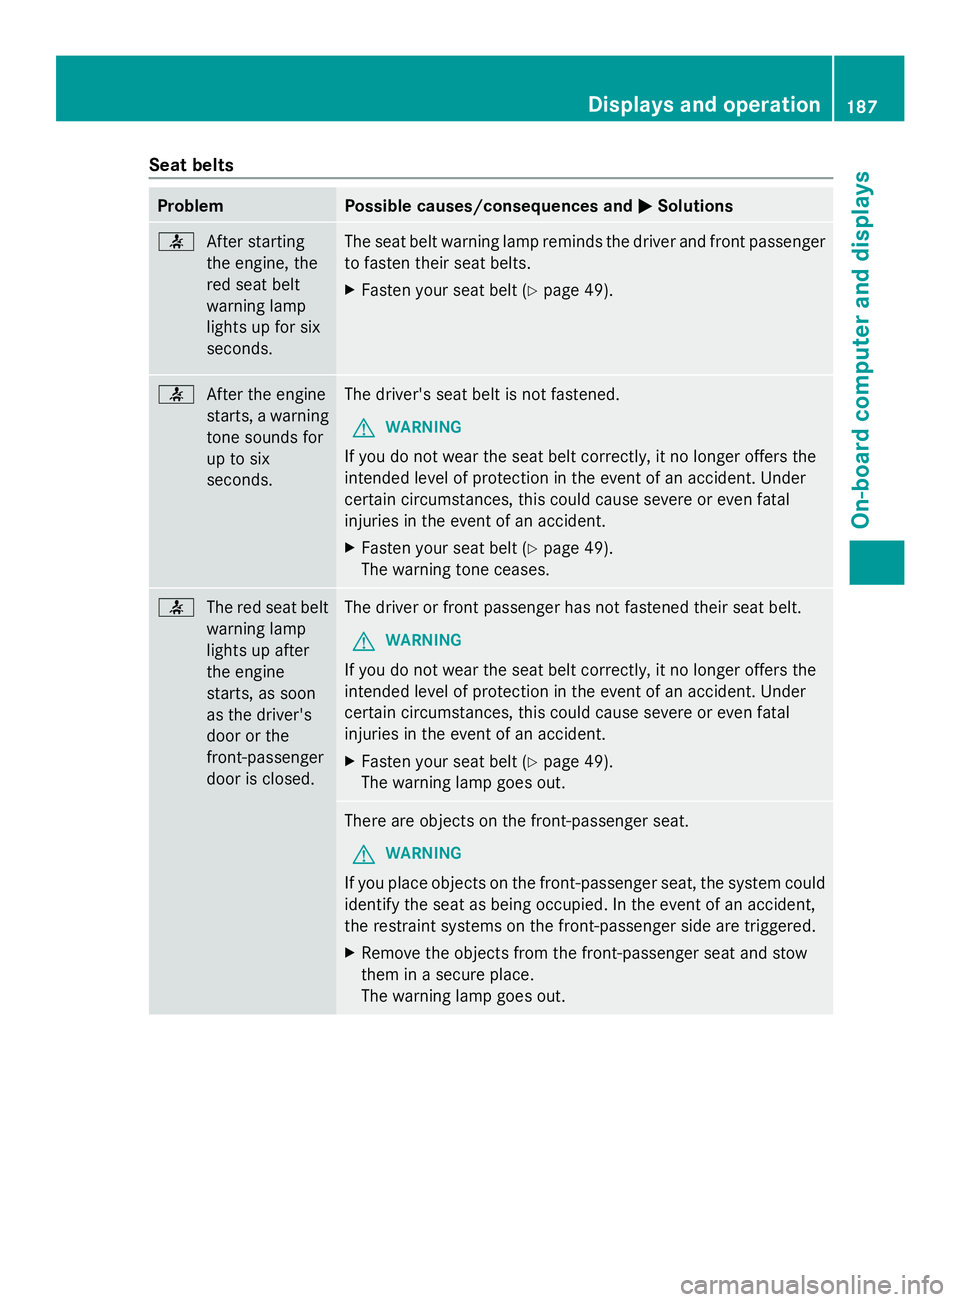
Seat belts
Problem Possible causes/consequences and
0050
0050Solutions 0076
After starting
the engine, the
red seat belt
warning lamp
lights up for six
seconds. The seat belt warning lamp reminds the driver and front passenger
to fasten their seat belts.
X
Fasten your seat belt (Y page 49).0076
After the engine
starts, a warning
tone sounds for
up to six
seconds. The driver's seat belt is not fastened.
G WARNING
If you do not wear the seat belt correctly, it no longer offers the
intended level of protection in the event of an accident. Under
certain circumstances, this could cause severe or even fatal
injuries in the event of an accident.
X Fasten your seat belt (Y page 49).
The warning tone ceases. 0076
The red seat belt
warning lamp
lights up after
the engine
starts, as soon
as the driver's
door or the
front-passenger
door is closed. The driver or front passenger has not fastened their seat belt.
G WARNING
If you do not wear the seat belt correctly, it no longer offers the
intended level of protection in the event of an accident. Under
certain circumstances, this could cause severe or even fatal
injuries in the event of an accident.
X Fasten your seat belt (Y page 49).
The warning lamp goes out. There are objects on the front-passenger seat.
G WARNING
If you place objects on the front-passenger seat, the system could
identify the seat as being occupied. In the event of an accident,
the restraint systems on the front-passenger side are triggered.
X Remove the objects from the front-passenger seat and stow
them in a secure place.
The warning lamp goes out. Displays and operation
187On-board computer and displays Z
Page 190 of 286
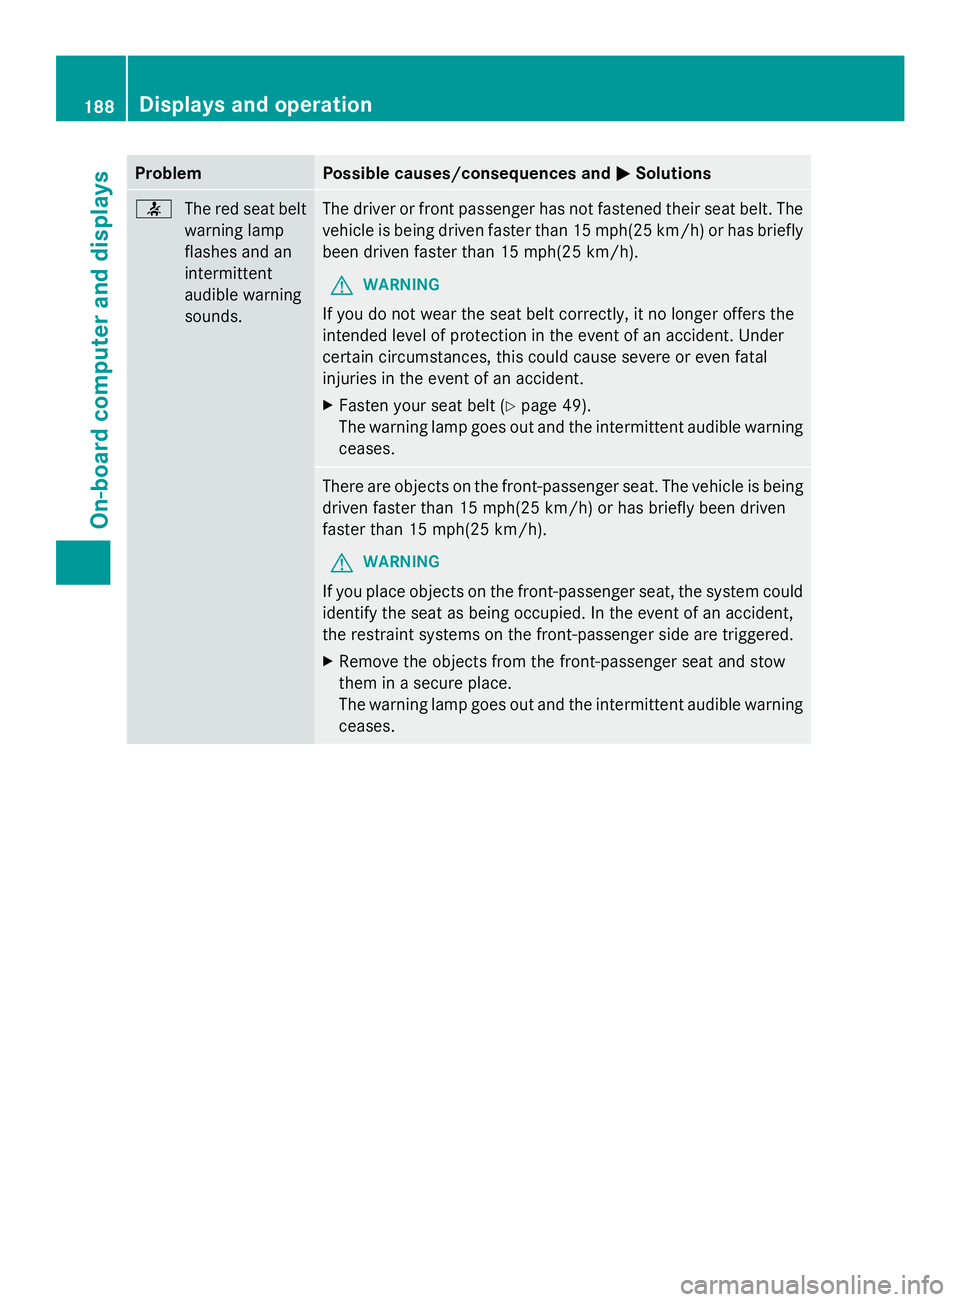
Problem Possible causes/consequences and
0050
0050Solutions 0076
The red seat belt
warning lamp
flashes and an
intermittent
audible warning
sounds. The driver or front passenger has not fastened their seat belt. The
vehicle is being driven faster than 15 mph(25 km/h) or has briefly
been driven faster than 15 mph(25 km/h).
G WARNING
If you do not wear the seat belt correctly, it no longer offers the
intended level of protection in the event of an accident. Under
certain circumstances, this could cause severe or even fatal
injuries in the event of an accident.
X Fasten your seat belt (Y page 49).
The warning lamp goes out and the intermittent audible warning
ceases. There are objects on the front-passenger seat. The vehicle is being
driven faster than 15 mph(25 km/h) or has briefly been driven
faster than 15 mph(25 km/h).
G WARNING
If you place objects on the front-passenger seat, the system could
identify the seat as being occupied. In the event of an accident,
the restraint systems on the front-passenger side are triggered.
X Remove the objects from the front-passenger seat and stow
them in a secure place.
The warning lamp goes out and the intermittent audible warning
ceases. 188
Displays and operationOn-board computer and displays
Page 198 of 286
Useful information
i This Operator's Manual describes all
models and all standard and optional
equipment of your vehicle available at the
time of publication of the Operator's
Manual. Country-specific differences are
possible. Please note that your vehicle may
not be equipped with all features
described. This also applies to safety-
related systems and functions.
i Please read the information on qualified
specialist workshops (Y page 22).Stowage areas
Stowage space
Important safety notes G
WARNING
If you do not correctly store objects in the
vehicle interior, they can slip or be flung
around, thus striking vehicle occupants.
There is a risk of injury, especially when
braking or abruptly changing directions.
R Always store objects so that they cannot be
flung around in these or in similar
situations.
R Always make sure that objects do not
protrude from stowage compartments,
parcel nets or stowage nets.
R Close lockable stowage compartments
while driving.
R Stow and secure objects that are heavy,
hard, pointy, sharp-edged, fragile or too
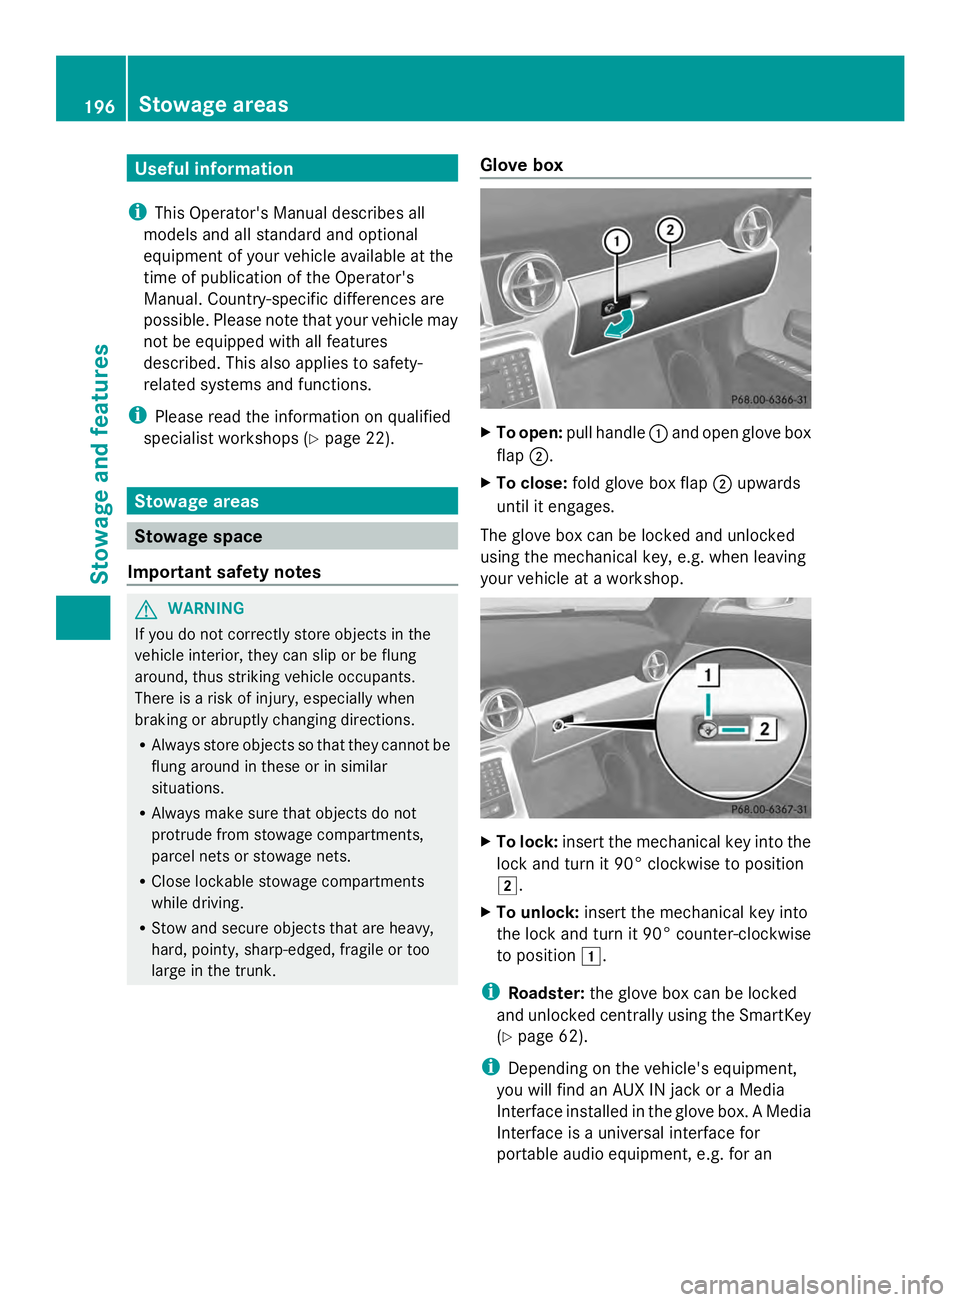
large in the trunk. Glove box X
To open: pull handle 0043and open glove box
flap 0044.
X To close: fold glove box flap 0044upwards
until it engages.
The glove box can be locked and unlocked
using the mechanical key, e.g. when leaving
your vehicle at a workshop. X
To lock: insert the mechanical key into the
lock and turn it 90° clockwise to position
0048.
X To unlock: insert the mechanical key into
the lock and turn it 90° counter-clockwise
to position 0047.
i Roadster: the glove box can be locked
and unlocked centrally using the SmartKey
(Y page 62).
i Depending on the vehicle's equipment,
you will find an AUX IN jack or a Media
Interface installed in the glove box. A Media
Interface is a universal interface for
portable audio equipment, e.g. for an 196
Stowage areasStowage and features
Page 201 of 286
X
Fold down the sun visor.
X Pull the sun visor out of bracket 0044.
X Swing the sun visor to the side.
X Slide the sun visor horizontally as desired. Ashtray
i You can remove the ashtray insert and
use the resulting compartment for
stowage.
! The stowage space under the ashtray is
not heat resistant. Before placing lit
cigarettes in the ashtray, make sure that
the ashtray is properly engaged. Otherwise,
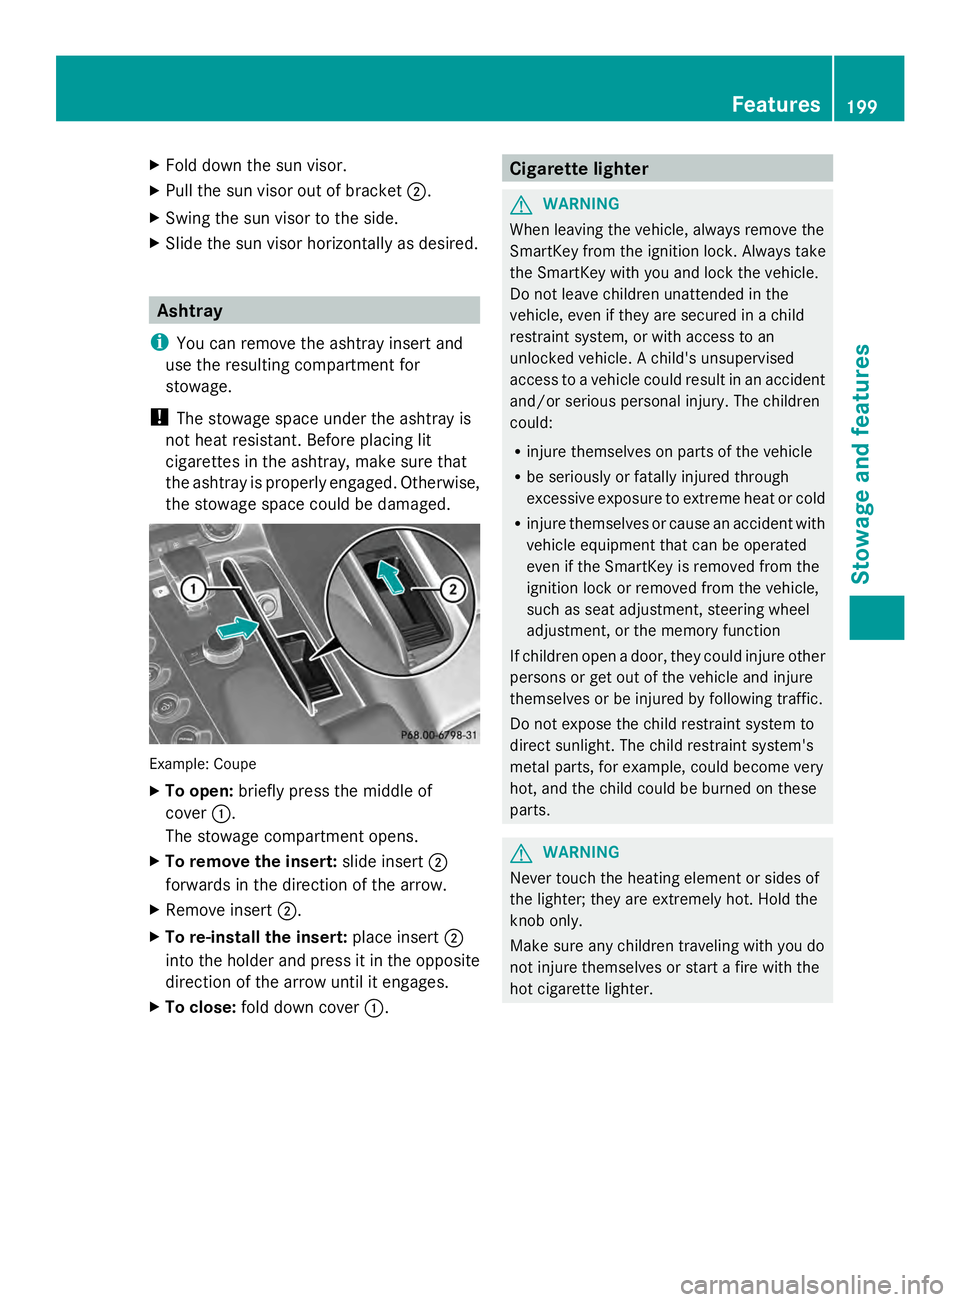
the stowage space could be damaged. Example: Coupe
X
To open: briefly press the middle of
cover 0043.
The stowage compartment opens.
X To remove the insert: slide insert0044
forwards in the direction of the arrow.
X Remove insert 0044.
X To re-install the insert: place insert0044
into the holder and press it in the opposite
direction of the arrow until it engages.
X To close: fold down cover 0043. Cigarette lighter
G
WARNING
When leaving the vehicle, always remove the
SmartKey from the ignition lock. Always take
the SmartKey with you and lock the vehicle.
Do not leave children unattended in the
vehicle, even if they are secured in a child
restraint system, or with access to an
unlocked vehicle. A child's unsupervised
access to a vehicle could result in an accident
and/or serious personal injury. The children
could:
R injure themselves on parts of the vehicle
R be seriously or fatally injured through
excessive exposure to extreme heat or cold
R injure themselves or cause an accident with
vehicle equipment that can be operated
even if the SmartKey is removed from the
ignition lock or removed from the vehicle,
such as seat adjustment, steering wheel
adjustment, or the memory function
If children open a door, they could injure other
persons or get out of the vehicle and injure
themselves or be injured by following traffic.
Do not expose the child restraint system to
direct sunlight. The child restraint system's
metal parts, for example, could become very
hot, and the child could be burned on these
parts. G
WARNING
Never touch the heating element or sides of
the lighter; they are extremely hot. Hold the
knob only.
Make sure any children traveling with you do
not injure themselves or start a fire with the
hot cigarette lighter. Features
199Stowage and features Z
Page 214 of 286
Floormat on the driver's side
G
WARNING
Whenever you are using a floormat, make sure
there is enough clearance and that the
floormat is securely fastened.
The floormat should always be securely
fastened using the fastening equipment.
Before driving off, check that the floormat is
securely in place and adjust it if necessary. A
loose floormat could slip and hinder proper
functioning of the pedals.
Do not place several floormats on top of each
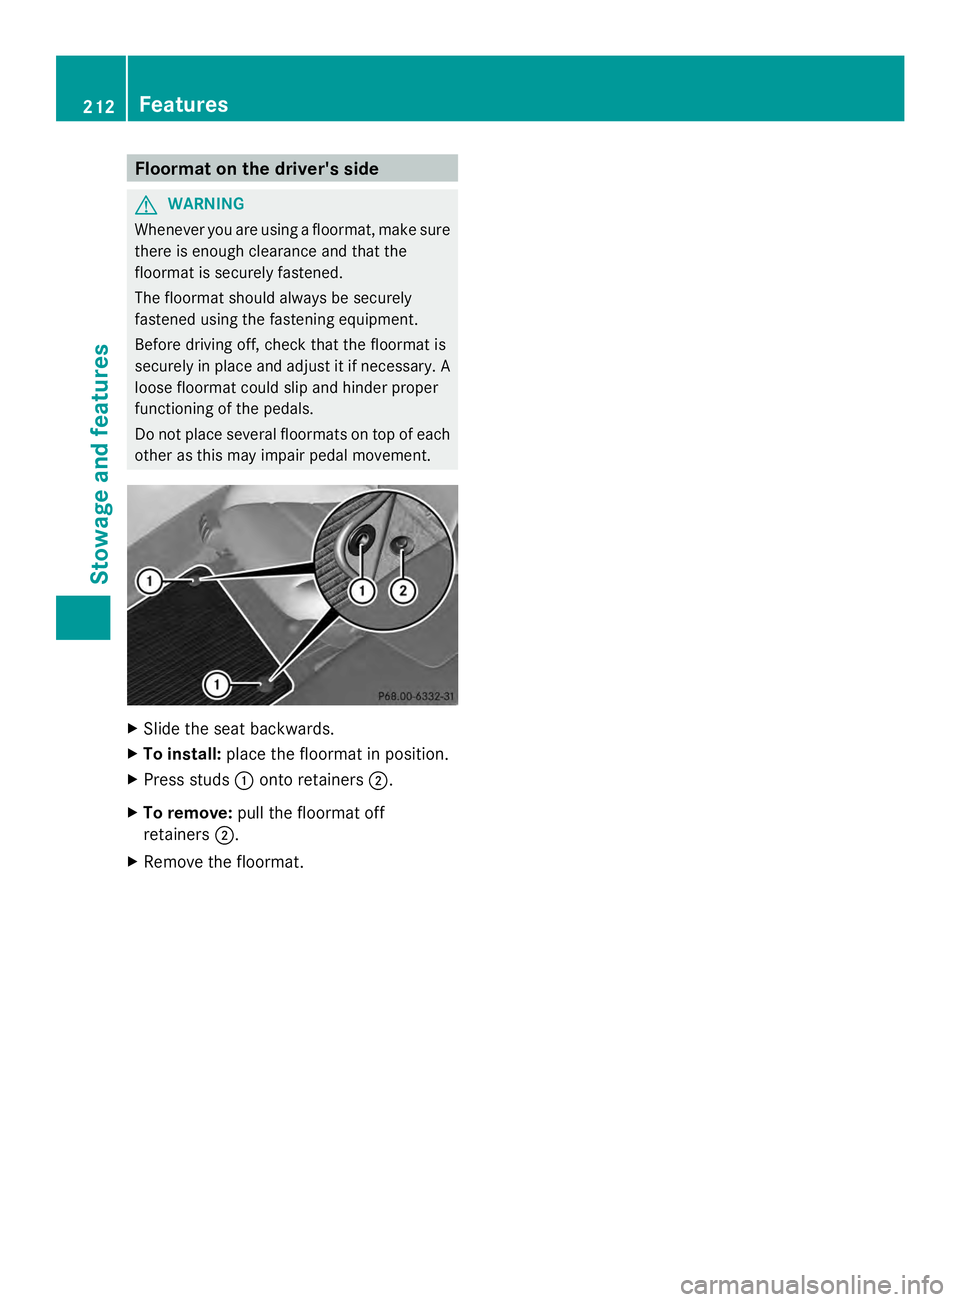
other as this may impair pedal movement. X
Slide the seat backwards.
X To install: place the floormat in position.
X Press studs 0043onto retainers 0044.
X To remove: pull the floormat off
retainers 0044.
X Remove the floormat. 212
FeaturesStowage and featu
res
Page 218 of 286
X
Unscrew oil filler cap 0043again and read the
dipstick.
If the level is between MIN mark 0087and
MAX mark 0044, the oil level is correct.
X If the oil level has dropped to MIN mark
0087 or below, add 1.1 US qt (1.0 liter) of
engine oil.
Adding engine oil G
WARNING
If engine oil comes into contact with hot
components in the engine compartment, it
may ignite. There is a risk of fire and injury.
Make sure that engine oil is not spilled next
to the filler neck. Let the engine cool down
and thoroughly clean the engine oil off the
components before starting the engine. H
Environmental note
When adding oil, take care not to spill any. If
oil enters the soil or waterways, it is harmful
to the environment.
! Only use engine oils and oil filters that
have been approved for vehicles with a
service system. You can obtain a list of the
engine oils and oil filters tested and
approved in accordance with the
Mercedes-Benz Specifications for Service
Products at any Mercedes-Benz Service
center.
Damage to the engine or exhaust system is
caused by the following:
R using engine oils and oil filters that have
not been specifically approved for the
service system
R replacing engine oil and oil filters after
the interval for replacement specified by
the service system has been exceeded
R using engine oil additives.
! Do not add too much oil. adding too much
engine oil can result in damage to the
engine or to the catalytic converter. Have
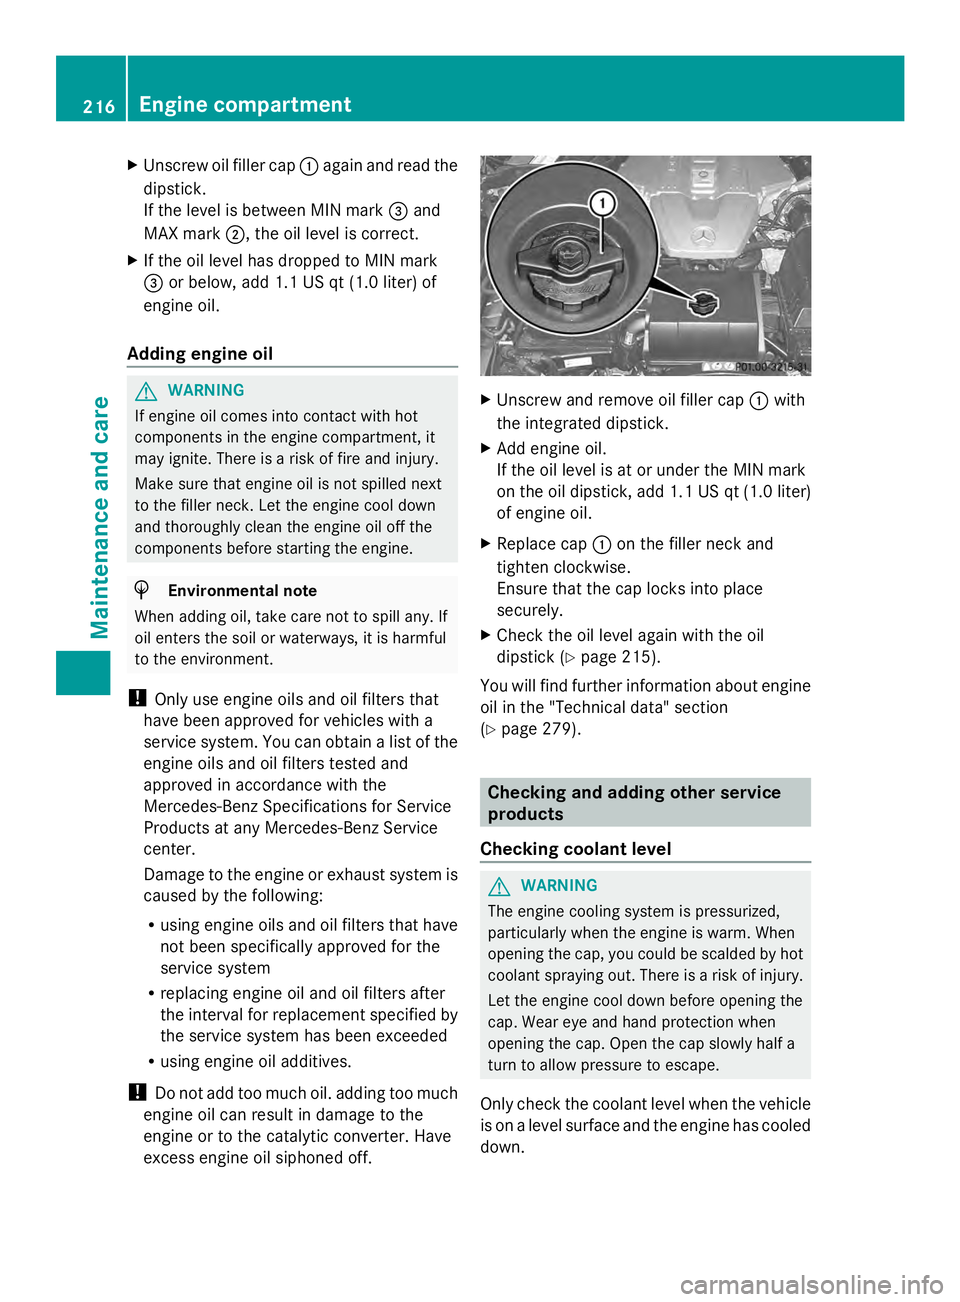
excess engine oil siphoned off. X
Unscrew and remove oil filler cap 0043with
the integrated dipstick.
X Add engine oil.
If the oil level is at or under the MIN mark
on the oil dipstick, add 1.1 US qt (1.0 liter)
of engine oil.
X Replace cap 0043on the filler neck and
tighten clockwise.
Ensure that the cap locks into place
securely.
X Check the oil level again with the oil
dipstick (Y page 215).
You will find further information about engine
oil in the "Technical data" section
(Y page 279). Checking and adding other service
products
Checking coolant level G
WARNING
The engine cooling system is pressurized,
particularly when the engine is warm. When
opening the cap, you could be scalded by hot
coolant spraying out. There is a risk of injury.
Let the engine cool down before opening the
cap. Wear eye and hand protection when
opening the cap. Open the cap slowly half a
turn to allow pressure to escape.
Only check the coolant level when the vehicle
is on a level surface and the engine has cooled
down. 216
Engine compartmentMaintenance and care
Page 226 of 286
!
Hold the wiper arm securely when folding
back. The windshield could be damaged if
the wiper arm smacks against it suddenly.
Cleaning the exterior lighting X
Clean the plastic lenses of the exterior
lighting using a wet sponge and a mild
cleaning agent, e.g. Mercedes-Benz car
shampoo or cleaning cloths.
! Only use cleaning agents or cleaning
cloths which are suitable for plastic light
lenses. Unsuitable cleaning agents or
cleaning cloths could scratch or damage
the plastic light lenses.
Cleaning the mirror turn signals !
Only use cleaning agents or cleaning
cloths that are suitable for plastic lenses.
Unsuitable cleaning agents or cleaning
cloths could scratch or damage the plastic
lenses of the mirror turn signals.
X Clean the plastic lenses of the mirror turn
signals in the exterior mirror housing using
a wet sponge and a mild cleaning agent,
e.g. Mercedes-Benz car shampoo or
cleaning cloths.
Cleaning the sensors !
When cleaning the sensors with a power
washer, maintain a distance between the
vehicle and the nozzle of the power washer
of at least 11.8 in (30 cm). Information
about the correct distance is available from
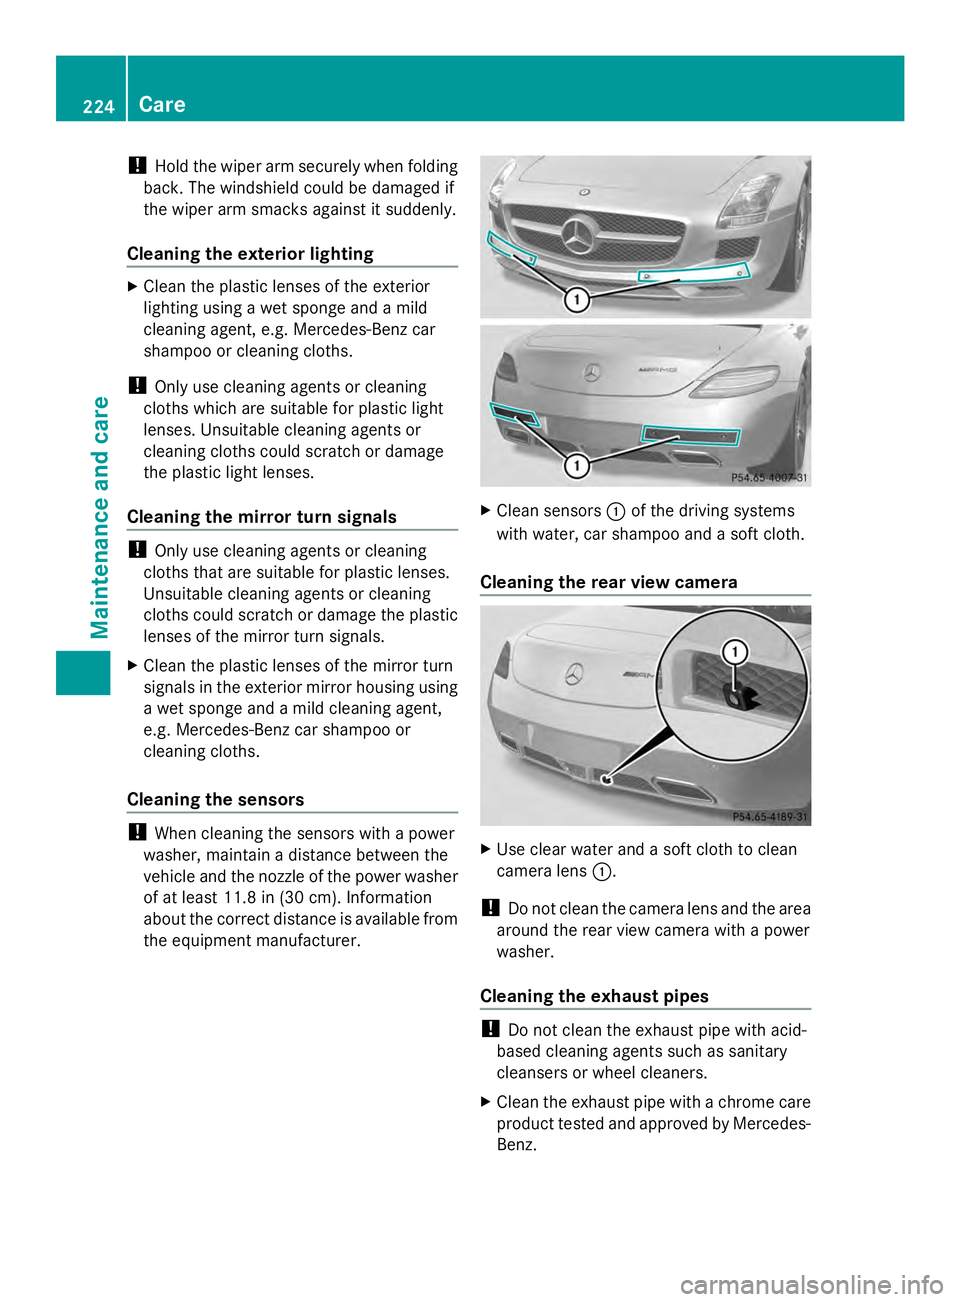
the equipment manufacturer. X
Clean sensors 0043of the driving systems
with water, car shampoo and a soft cloth.
Cleaning the rear view camera X
Use clear water and a soft cloth to clean
camera lens 0043.
! Do not clean the camera lens and the area
around the rear view camera with a power
washer.
Cleaning the exhaust pipes !
Do not clean the exhaust pipe with acid-
based cleaning agents such as sanitary
cleansers or wheel cleaners.
X Clean the exhaust pipe with a chrome care
product tested and approved by Mercedes-
Benz. 224
CareMaintenance and care