2013 MERCEDES-BENZ SLS AMG COUPE GT trunk
[x] Cancel search: trunkPage 182 of 286

Vehicle
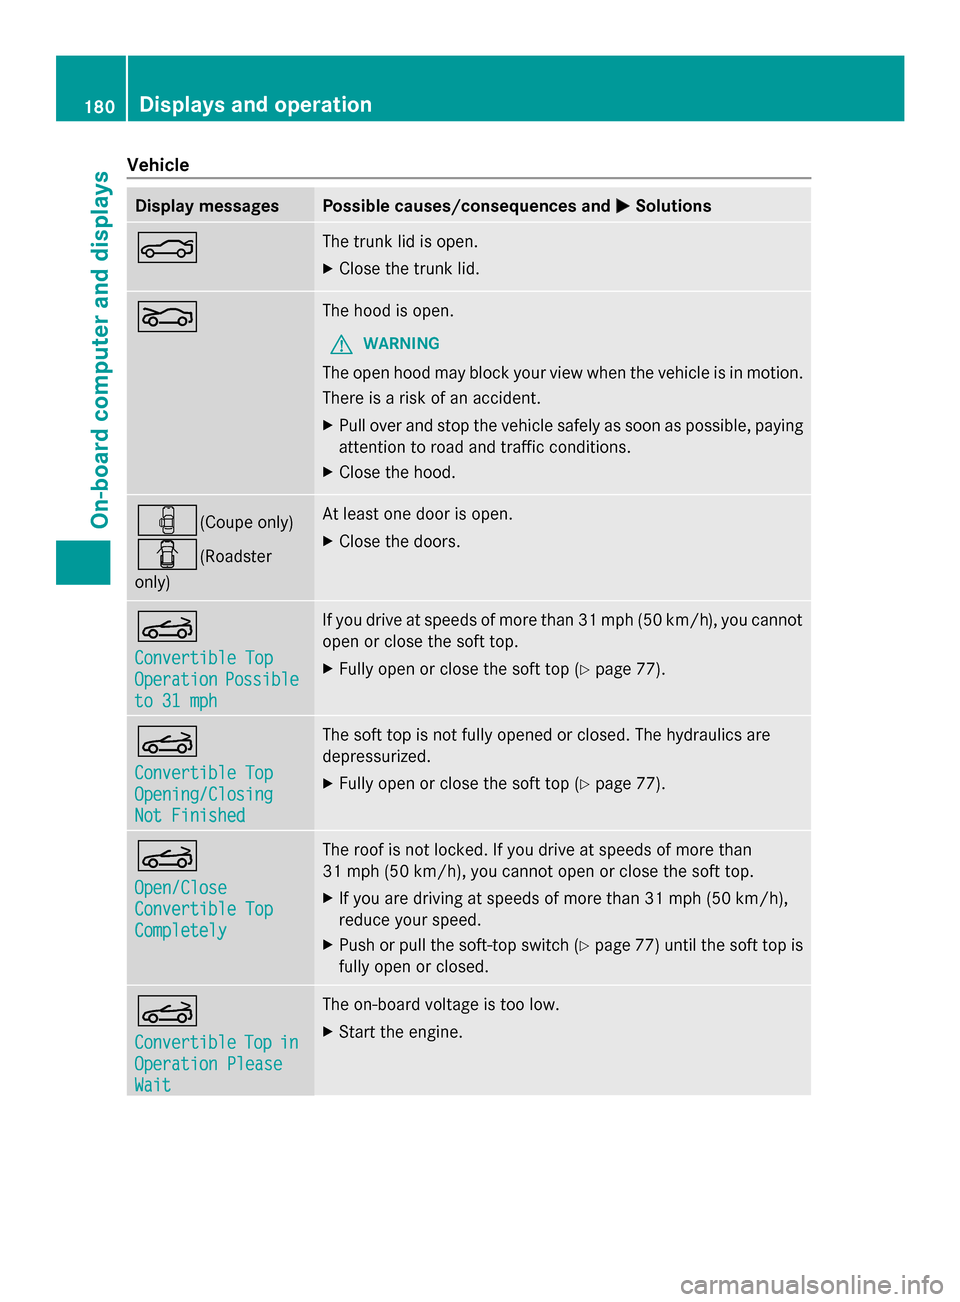
Display messages Possible causes/consequences and
0050
0050Solutions 0084 The trunk lid is open.
X
Close the trunk lid. 005A The hood is open.
G WARNING
The open hood may block your view when the vehicle is in motion.
There is a risk of an accident.
X Pull over and stop the vehicle safely as soon as possible, paying
attention to road and traffic conditions.
X Close the hood. 00B6(Coupe only)
0051(Roadster
only) At least one door is open.
X
Close the doors. 0059
Convertible Top Convertible Top
Operation Operation
Possible
Possible
to 31 mph
to 31 mph If you drive at speeds of more than 31 mph (50 km/h), you cannot
open or close the soft top.
X
Fully open or close the soft top (Y page 77).0059
Convertible Top Convertible Top
Opening/Closing Opening/Closing
Not Finished Not Finished The soft top is not fully opened or closed. The hydraulics are
depressurized.
X Fully open or close the soft top (Y page 77).0059
Open/Close Open/Close
Convertible Top Convertible Top
Completely Completely The roof is not locked. If you drive at speeds of more than
31 mph (50 km/h), you cannot open or close the soft top.
X
If you are driving at speeds of more than 31 mph (50 km/h),
reduce your speed.
X Push or pull the soft-top switch (Y page 77) until the soft top is
fully open or closed. 0059
Convertible Convertible
Top
Topin
in
Operation Please
Operation Please
Wait Wait The on-board voltage is too low.
X Start the engine. 180
Displays and operationOn-board computer and displays
Page 198 of 286

Useful information
i This Operator's Manual describes all
models and all standard and optional
equipment of your vehicle available at the
time of publication of the Operator's
Manual. Country-specific differences are
possible. Please note that your vehicle may
not be equipped with all features
described. This also applies to safety-
related systems and functions.
i Please read the information on qualified
specialist workshops (Y page 22).Stowage areas
Stowage space
Important safety notes G
WARNING
If you do not correctly store objects in the
vehicle interior, they can slip or be flung
around, thus striking vehicle occupants.
There is a risk of injury, especially when
braking or abruptly changing directions.
R Always store objects so that they cannot be
flung around in these or in similar
situations.
R Always make sure that objects do not
protrude from stowage compartments,
parcel nets or stowage nets.
R Close lockable stowage compartments
while driving.
R Stow and secure objects that are heavy,
hard, pointy, sharp-edged, fragile or too
large in the trunk. Glove box X
To open: pull handle 0043and open glove box
flap 0044.
X To close: fold glove box flap 0044upwards
until it engages.
The glove box can be locked and unlocked
using the mechanical key, e.g. when leaving
your vehicle at a workshop. X
To lock: insert the mechanical key into the
lock and turn it 90° clockwise to position
0048.
X To unlock: insert the mechanical key into
the lock and turn it 90° counter-clockwise
to position 0047.
i Roadster: the glove box can be locked
and unlocked centrally using the SmartKey
(Y page 62).
i Depending on the vehicle's equipment,
you will find an AUX IN jack or a Media
Interface installed in the glove box. A Media
Interface is a universal interface for
portable audio equipment, e.g. for an 196
Stowage areasStowage and features
Page 199 of 286

iPod
®
or USB device (see the separate
COMAND operating instructions).
i There is a 12 V power socket located in
the glove box.
Stowage compartment in the center
console X
To open: press down at the middle of the
marking on lid 0043.
X To close: fold down cover 0043.
i Depending on the equipment installed,
your vehicle is equipped with an ashtray or
a stowage compartment.
Stowage compartment under the
armrest X
To open: press button 0043on the left or right
and slide the armrest in the direction of the
arrow.
The armrest engages in two different
detents. i
Roadster: the stowage compartment can
be locked and unlocked centrally using the
SmartKey (Y page 62).
Stowage compartment in the rear
center console X
Press button 0043.
The stowage compartment opens.
i In the stowage compartment, you will find
the ignition lock (Y page 113)and the trunk
lid emergency release (Y page 73).
Stowage space on the rear wall
between the seats 0043
Ruffled pocket
Parcel nets There is a parcel net located in the front-
passenger footwell. Stowage areas
197Stowage an d features Z
Page 209 of 286

pause retraction. The rear spoiler is then
extended again.
Never leave children unsupervised in the
vehicle. They could unintentionally retract the
extended rear spoiler. Someone could then
become trapped and seriously injured.
! Do not enter an automatic car wash with
the rear spoiler extended. Otherwise, the
rear spoiler may be damaged.
Only extend the rear spoiler in order to
clean it by hand. Retract it again when you
have finished cleaning it.
X Close the trunk lid.
X Select key position 2with the Start/Stop
button.
X To extend: press button 0043.
The rear spoiler is extended.
Button 0043flashes until the rear spoiler has
extended and then lights up in red.
X To retract: press and hold button 0043until
the rear spoiler is completely retracted.
Button 0043flashes until the rear spoiler has
retracted and then goes out.
Rear Spoiler retracts manually
Rear Spoiler retracts manually
appears in the display.
i If you release button 0043while retracting
the rear spoiler, it extends again
automatically. Features
207Stowage and features Z
Page 210 of 286

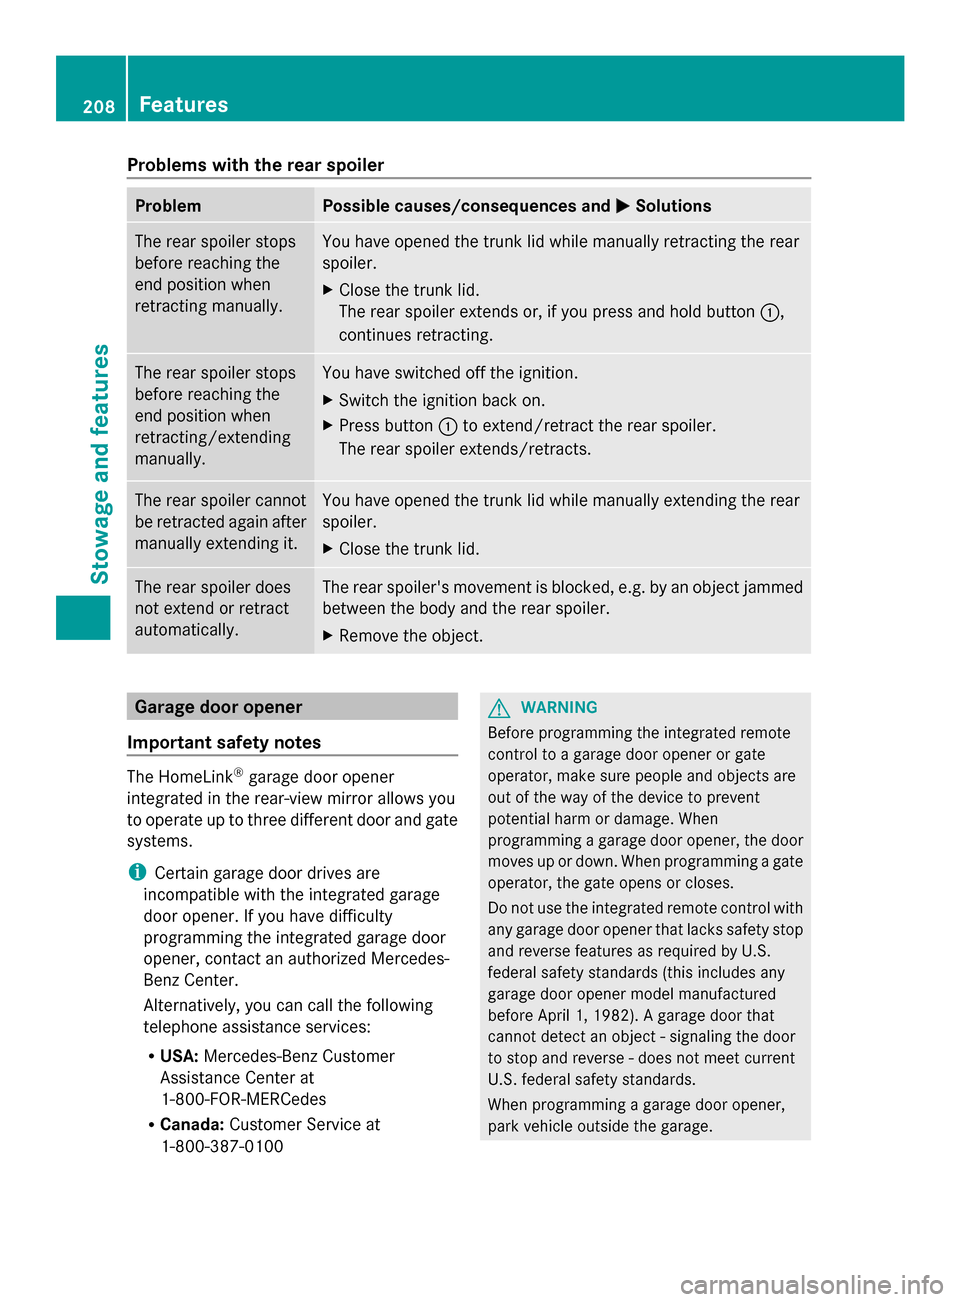
Problems with the rear spoiler
Problem Possible causes/consequences and
0050
0050Solutions The rear spoiler stops
before reaching the
end position when
retracting manually. You have opened the trunk lid while manually retracting the rear
spoiler.
X
Close the trunk lid.
The rear spoiler extends or, if you press and hold button 0043,
continues retracting. The rear spoiler stops
before reaching the
end position when
retracting/extending
manually. You have switched off the ignition.
X
Switch the ignition back on.
X Press button 0043to extend/retract the rear spoiler.
The rear spoiler extends/retracts. The rear spoiler cannot
be retracted again after
manually extending it. You have opened the trunk lid while manually extending the rear
spoiler.
X
Close the trunk lid. The rear spoiler does
not extend or retract
automatically. The rear spoiler's movement is blocked, e.g. by an object jammed
between the body and the rear spoiler.
X
Remove the object. Garage door opener
Important safety notes The HomeLink
®
garage door opener
integrated in the rear-view mirror allows you
to operate up to three different door and gate
systems.
i Certain garage door drives are
incompatible with the integrated garage
door opener. If you have difficulty
programming the integrated garage door
opener, contact an authorized Mercedes-
Benz Center.
Alternatively, you can call the following
telephone assistance services:
R USA: Mercedes-Benz Customer
Assistance Center at
1-800-FOR-MERCedes
R Canada: Customer Service at
1-800-387-0100 G
WARNING
Before programming the integrated remote
control to a garage door opener or gate
operator, make sure people and objects are
out of the way of the device to prevent
potential harm or damage. When
programming a garage door opener, the door
moves up or down. When programming a gate
operator, the gate opens or closes.
Do not use the integrated remote control with
any garage door opener that lacks safety stop
and reverse features as required by U.S.
federal safety standards (this includes any
garage door opener model manufactured
before April 1, 1982). A garage door that
cannot detect an object - signaling the door
to stop and reverse - does not meet current
U.S. federal safety standards.
When programming a garage door opener,
park vehicle outside the garage. 208
FeaturesStowage and features
Page 213 of 286

same programming steps with this remote
control. Before performing these steps,
make sure that new batteries have been
installed in garage door drive remote
control
0083.
R Note that some remote controls only
transmit for a limited amount of time (the
indicator lamp on the remote control goes
out). Press button 0084on remote control
0083 again before transmission ends.
R Align the antenna cable of the garage door
opener unit. This can improve signal
reception/transmission.
Opening/closing the garage door Once programmed, the integrated garage
door opener 0083will assume the function of
the garage door system's remote control.
Please also read the operating instructions
for the garage door system.
X Select key position 2with the Start/Stop
button.
X Press button 0044,0087or0085 which you have
programmed to operate the garage door.
Garage door system with a fixed code:
indicator lamp 0043lights up green.
Garage door system with a rolling code:
indicator lamp 0043flashes green.
i The transmitter will transmit a signal as
long as the button is pressed. The
transmission is halted after a maximum of
ten seconds and indicator lamp 0043lights
up yellow. Press button 0044,0087or0085 again
if necessary.
Clearing the memory of the integrated
garage door opener on the rear-view
mirror X
Select key position 2with the Start/Stop
button.
X Press buttons 0044and 0085.
The indicator lamp lights up yellow.
X Press and hold buttons 0044and 0085until the
indicator lamp turns green. i
Make sure that you clear the memory of
the integrated garage door opener before
selling the vehicle. Charge maintenance socket
The battery may drain if the vehicle is left
stationary for long periods. In this case,
Mercedes-Benz recommends attaching the
trickle charger to the charge maintenance
socket.
The charge maintenance socket is designed
solely for connecting a trickle charger. A
trickle charger can be obtained from an
authorized Mercedes-Benz Center, for
example. X
Switch the ignition off.
X Open the trunk lid.
X Connect the cable provided in the trunk to
the trickle charger.
X Connect the trickle charger to charge
maintenance socket 0043. Consult the
manufacturer's operating instructions on
how to do so.
i A trickle charger connected to charge
maintenance socket 0043only maintains the
current charge level of the vehicle's
electrical system battery. If the vehicle's
electrical system battery is discharged, it
needs to be charged with a battery charger.
You will find further information on
charging the battery on (Y page 236). Features
211Stowage and features Z
Page 230 of 286

Useful information
i This Operator's Manual describes all
models and all standard and optional
equipment of your vehicle available at the
time of publication of the Operator's
Manual. Country-specific differences are
possible. Please note that your vehicle may
not be equipped with all features
described. This also applies to safety-
related systems and functions.
i Please read the information on qualified
specialist workshops (Y page 22).Where will I find...?
First-aid kit
The first-aid kit is located in the left-hand
stowage compartment in the trunk.
X Open the trunk lid. X
Turn fastener 0044in the direction of the
arrow.
X Open stowage compartment 0043.
X Open the Velcro fastener and remove the
first aid kit.
i Check the expiration date on the first-aid
kit at least once a year. Replace the
contents if necessary, and replace missing
contents. Vehicle tool kit
Wheel-change tool kit and jack 11 The wheel-change tool kit and the jack are
located in the left-hand stowage space in the
trunk.
Left-hand stowage space in trunk floor
0043
Lug wrench
0044 Towing eye
X Pull the loop on the floor covering and fold
the floor covering forward.
X Take out the jack and lug wrench 0043
underneath it.
TIREFIT kit, wheel chock, alignment bolt
and gloves The TIREFIT kit, wheel chock, alignment bolt
and gloves are located in the left-hand
stowage compartment in the trunk.
Left-hand stowage compartment in the trunk
11 Not included in the scope of delivery in all countries. 228
Where will I find...?Breakdown assistance
Page 231 of 286

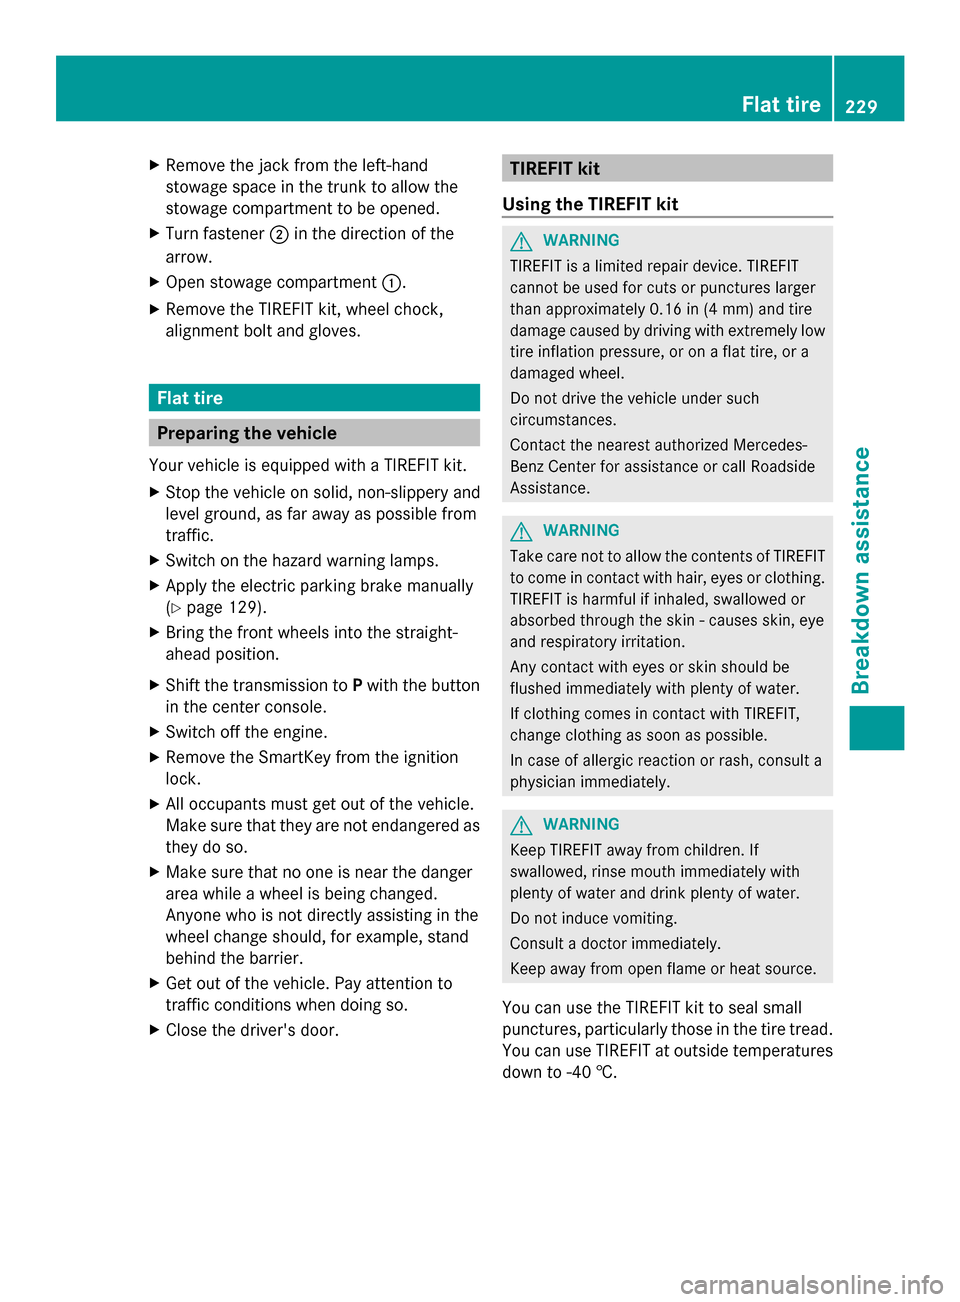
X
Remove the jack from the left-hand
stowage space in the trunk to allow the
stowage compartment to be opened.
X Turn fastener 0044in the direction of the
arrow.
X Open stowage compartment 0043.
X Remove the TIREFIT kit, wheel chock,
alignment bolt and gloves. Flat tire
Preparing the vehicle
Your vehicle is equipped with a TIREFIT kit.
X Stop the vehicle on solid, non-slippery and
level ground, as far away as possible from
traffic.
X Switch on the hazard warning lamps.
X Apply the electric parking brake manually
(Y page 129).
X Bring the front wheels into the straight-
ahead position.
X Shift the transmission to Pwith the button
in the center console.
X Switch off the engine.
X Remove the SmartKey from the ignition
lock.
X All occupants must get out of the vehicle.
Make sure that they are not endangered as
they do so.
X Make sure that no one is near the danger
area while a wheel is being changed.
Anyone who is not directly assisting in the
wheel change should, for example, stand
behind the barrier.
X Get out of the vehicle. Pay attention to
traffic conditions when doing so.
X Close the driver's door. TIREFIT kit
Using the TIREFIT kit G
WARNING
TIREFIT is a limited repair device. TIREFIT
cannot be used for cuts or punctures larger
than approximately 0.16 in (4 mm) and tire
damage caused by driving with extremely low
tire inflation pressure, or on a flat tire, or a
damaged wheel.
Do not drive the vehicle under such
circumstances.
Contact the nearest authorized Mercedes-
Benz Center for assistance or call Roadside
Assistance. G
WARNING
Take care not to allow the contents of TIREFIT
to come in contact with hair, eyes or clothing.
TIREFIT is harmful if inhaled, swallowed or
absorbed through the skin - causes skin, eye
and respiratory irritation.
Any contact with eyes or skin should be
flushed immediately with plenty of water.
If clothing comes in contact with TIREFIT,
change clothing as soon as possible.
In case of allergic reaction or rash, consult a
physician immediately. G
WARNING
Keep TIREFIT away from children. If
swallowed, rinse mouth immediately with
plenty of water and drink plenty of water.
Do not induce vomiting.
Consult a doctor immediately.
Keep away from open flame or heat source.
You can use the TIREFIT kit to seal small
punctures, particularly those in the tire tread.
You can use TIREFIT at outside temperatures
down to -40 †. Flat ti
re
229Breakdo wn assis tance Z