2013 MERCEDES-BENZ SL-CLASS ROADSTER radio
[x] Cancel search: radioPage 421 of 572

Entering channel numbers directly
X
Option 1: press the l button.
An input menu appears.
X Option 2: select Sat by turning cVd the
COMAND controller and press W to
confirm.
X Select Enter Channel and press W to
confirm.
An input menu appears.
Entering the channel
X With both options, press the corresponding
number buttons on the control unit in
succession.
COMAND sets the selected channel.
i You can only select currently permitted
digits. Selecting a channel from the SatRadio
channel list
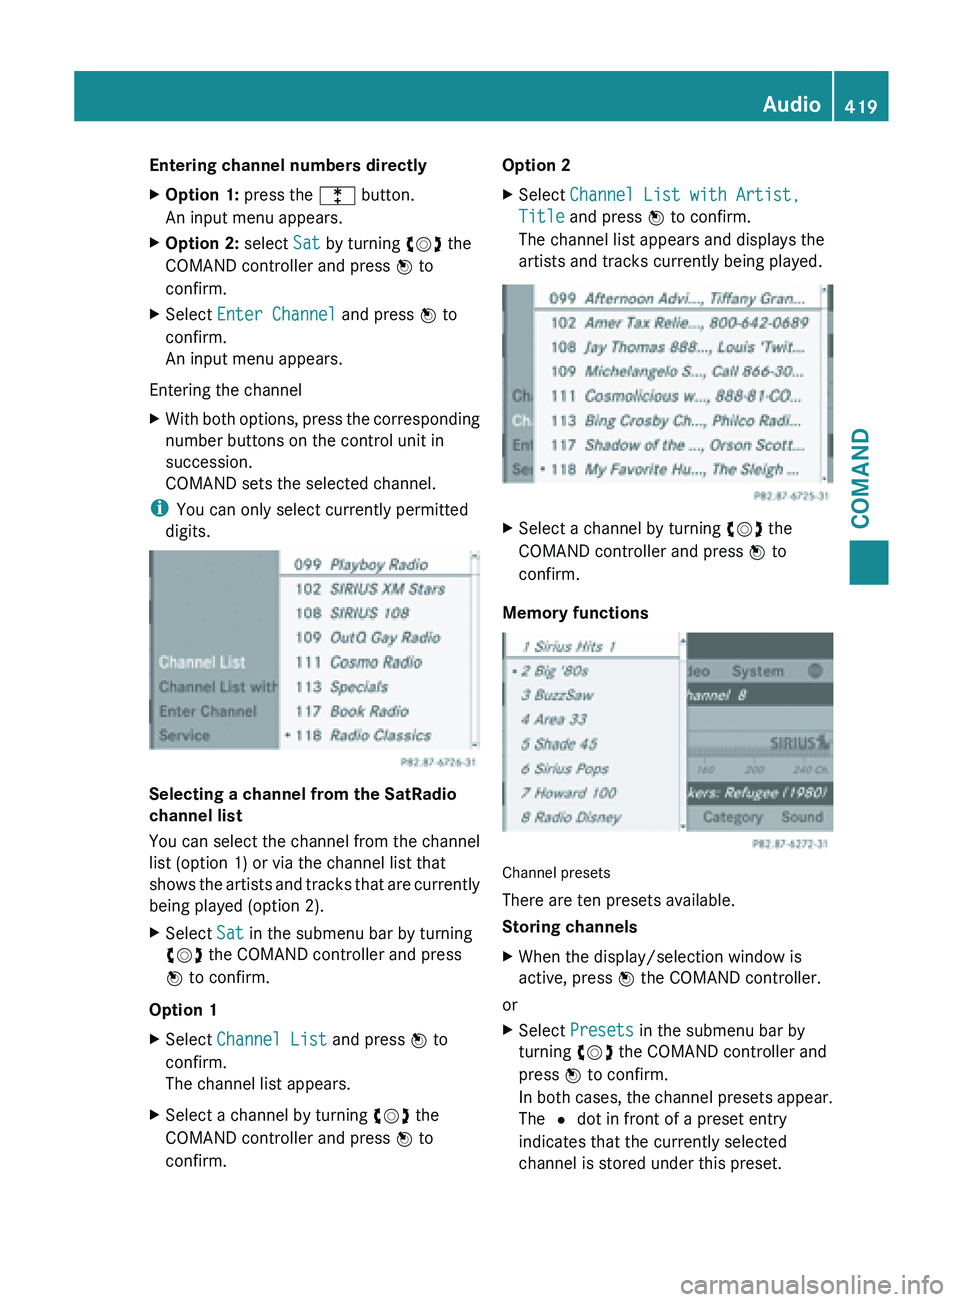
You can select the channel from the channel
list (option 1) or via the channel list that
shows
the
artists and tracks that are currently
being played (option 2).
X Select Sat in the submenu bar by turning
cVd the COMAND controller and press
W to confirm.
Option 1
X Select Channel List and press W to
confirm.
The channel list appears.
X Select a channel by turning cVd the
COMAND controller and press W to
confirm. Option 2
X
Select Channel List with Artist,
Title and press W to confirm.
The channel list appears and displays the
artists and tracks currently being played. X
Select a channel by turning cVd the
COMAND controller and press W to
confirm.
Memory functions Channel presets
There are ten presets available.
Storing channels
X
When the display/selection window is
active, press W the COMAND controller.
or
X Select Presets in the submenu bar by
turning cVd the COMAND controller and
press W to confirm.
In both
cases, the channel presets appear.
The # dot in front of a preset entry
indicates that the currently selected
channel is stored under this preset. Audio
419
COMAND Z
Page 422 of 572

X
Select a preset by turning cVd the
COMAND controller and press and hold
W until you hear a tone.
or
X Press and hold a number button, e.g.
n, until you hear a tone.
The channel is stored under the preset.
Storing channels automatically
This function automatically stores channels
with adequate reception in the preset
memory. Channels stored manually in the
preset memory will be overwritten.
X Option 1: press W the COMAND controller
when the display/selection window is
active.
X Select Autostore in
the presets by turning
cVd the COMAND controller and press
W to confirm.
X Option 2: select Presets in the submenu
bar by sliding VÆ and turning cVd the
COMAND controller and press W to
confirm.
X Select Autostore and
press W to confirm.
In both cases, COMAND searches for
channels that can be received. You will see
a message to this effect. The available
channels are automatically stored in the
preset positions.
X To cancel storing: select Cancel and
press W to confirm.
Selecting a channel from the preset list
X To call up the preset list: select
Presets by turning cVd the COMAND
controller and press W to confirm.
The channel preset list appears.
X To set a channel: select a preset by
turning cVd the COMAND controller and
press W to confirm.
or
X Press a number key, such as n.Displaying information
X
Select Info in the submenu bar by turning
cVd
the COMAND controller and press
W to confirm.
Information on the currently received
program is displayed.
If available, you will see:
R the full channel name
R the artist
of the track that is currently being
played
R the track that is currently being played
X To return to the radio display: confirm
Info by pressing W.
X Slide ZV the COMAND controller up.
Displaying service information :
Provider's phone number (SIRIUS XM) or
Call Service Provider
; SIRIUS ID of your satellite receiver
The provider's customer service center is
available by
phone at any time to answer any
general questions or questions on the
versions available. 420
Audio
COMAND
Page 423 of 572

X
Select Sat Radio in the submenu bar by
turning cVd the COMAND controller and
press W to confirm.
X Select Service and press W to confirm.
The provider's details appear.
X To return to the SatRadio main display:
slide XVY the COMAND controller.
Channel list updates
When receiving
a new channel list, the display
shows the Updating Channels...
message.
The station last selected is switched to mute
until the update has been completed.
Satellite radio mode is not available during
this process.
Once the update has been completed, the
satellite radio main menu appears. The
station last selected is played.
Sound settings
Information on sound settings ( Y page 278).Audio CD/DVD and MP3 mode
Important safety notes G
WARNING
COMAND is classified as a Class 1 laser
product. Never open the housing. There is a
risk of
damage to the eyes due to exposure to
invisible laser radiation if you open the casing,
or if the casing is faulty or damaged.
COMAND does not contain any parts that can
be serviced by the user. For safety reasons,
all maintenance work must be carried out by
qualified aftersales technicians. G
WARNING
Only when the vehicle is stationary should
you:
R insert a data carrier
R eject a disc There is a risk of being distracted from the
road and traffic conditions if you insert or
eject a disc while the vehicle is in motion.
Inserting/ejecting CDs/DVDs Notes
If the CD/DVD has a printed side, this must
face upwards when the CD/DVD is inserted.
If
neither
side is printed, the side to be played
should face downwards. The system may not
be able to play CDs/DVDs with copy
protection.
i If a medium contains other files in
addition to music files, the loading time
before the first track starts to play may be
longer.
Inserting a disc into the single DVD drive
X Press the 8 eject button.
If there is a disc already inserted, it will be
ejected.
X Take the disc out of the slot.
X Insert a disc into the slot.
If the disc is correctly inserted and is a
suitable disc,
it is drawn in by the drive and
played.
Ejecting a disc from the single DVD drive
X Press the 8 eject button.
X Take the disc out of the slot.
If you
do not take the disc out of the slot, it
is drawn in again automatically after a short
while and reloaded.
Inserting discs into the DVD changer
The DVD changer has a fixed magazine with
six trays.
X To insert a CD/DVD into the magazine
tray: press the V load/eject button.
A menu shows the current load status of
the magazine trays. The last tray selected
is identified by a red digit. Audio
421
COMAND Z
Page 463 of 572

X
To revert to the original size: press W the
COMAND controller.
or
X Press the % back button.
Exiting the picture viewer X
Select Back To Menu in the menu by
turning cVd the COMAND controller and
press W to confirm. X
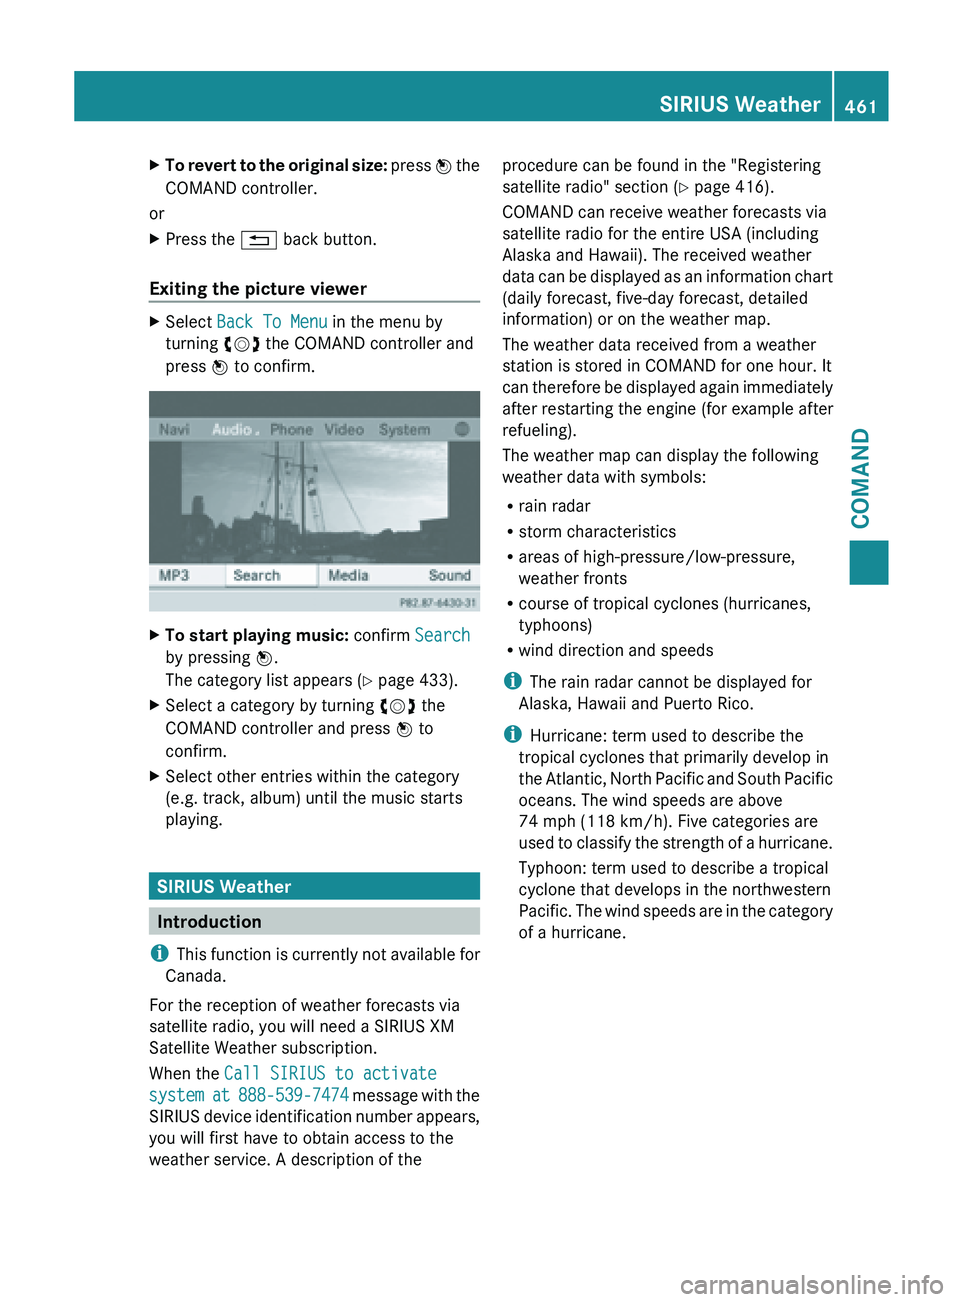
To start playing music: confirm Search
by pressing W.
The category list appears (Y
page 433).
X Select a category by turning cVd the
COMAND controller and press W to
confirm.
X Select other entries within the category
(e.g. track, album) until the music starts
playing. SIRIUS Weather
Introduction
i This function
is currently not available for
Canada.
For the reception of weather forecasts via
satellite radio, you will need a SIRIUS XM
Satellite Weather subscription.
When the Call SIRIUS to activate
system at 888-539-7474 message with the
SIRIUS device identification number appears,
you will first have to obtain access to the
weather service. A description of the procedure can be found in the "Registering
satellite radio" section
(Y
page 416).
COMAND can receive weather forecasts via
satellite radio for the entire USA (including
Alaska and Hawaii). The received weather
data can be displayed as an information chart
(daily forecast, five-day forecast, detailed
information) or on the weather map.
The weather data received from a weather
station is stored in COMAND for one hour. It
can therefore be displayed again immediately
after restarting the engine (for example after
refueling).
The weather map can display the following
weather data with symbols:
R rain radar
R storm characteristics
R areas of high-pressure/low-pressure,
weather fronts
R course of tropical cyclones (hurricanes,
typhoons)
R wind direction and speeds
i The rain radar cannot be displayed for
Alaska, Hawaii and Puerto Rico.
i Hurricane: term used to describe the
tropical cyclones that primarily develop in
the Atlantic, North Pacific and South Pacific
oceans. The wind speeds are above
74 mph (118 km/h). Five categories are
used to classify the strength of a hurricane.
Typhoon: term used to describe a tropical
cyclone that develops in the northwestern
Pacific. The wind speeds are in the category
of a hurricane. SIRIUS Weather
461
COMAND Z
Page 486 of 572

i
Usually, you now have 30seconds to
initiate the next step.
X Press previously programmed button ;
,
= or ? of the integrated garage door
opener until the door starts to move.
The rolling code synchronization is then
complete.
Notes on programming the remote
control
Canadian radio frequency laws require a
"break" (or interruption) of the transmission
signals after
broadcasting for a few seconds.
Therefore, these signals may not last long
enough for the integrated garage door
opener. The signal is not recognized during
programming. Comparable with Canadian
law, some U.S. garage door openers are
designed to "time-out" in the same manner.
Proceed as follows:
R if you live in Canada
R if you have difficulties programming the
garage door opener (regardless of where
you live) when using the programming
steps
X Press and hold one of buttons ; to ? on
the integrated garage door opener.
After a
short time, indicator lamp : starts
flashing yellow.
X Release the button.
X Press button B of garage door remote
control A for
two seconds, then release it
for two seconds.
X Press button B again for two seconds.
X Repeat this sequence on button B of
remote control A until indicator lamp :
lights up green.
If indicator lamp : turns red, repeat the
process.
X Continue with the other programming
steps (see above). Problems when programming
If you are experiencing problems
programming the integrated garage door
opener on the rear-view mirror, take note of
the following instructions:
R
Check the
transmitter frequency of garage
door drive remote control A. This can
usually be found on the back of the remote
control.
The integrated garage door opener is
compatible with devices that have units
which operate in the frequency range of
280to 390MHz.
R Replace the batteries in garage door
remote control A. This increases the
likelihood that garage door remote control
A will transmit a strong and precise signal
to the integrated garage door opener in the
rear-view mirror.
R When programming, hold remote control
A at varying distances and angles from the
button that you are programming. Try
various angles at a distance between 2and
12 inches (5to 30 cm) or at the same angle
but at varying distances.
R If another remote control for the same
garage door drive is available, repeat the
same programming steps with this remote
control. Before performing these steps,
make sure that new batteries have been
installed in garage door drive remote
control A.
R Note that some remote controls only
transmit for a limited amount of time (the
indicator lamp on the remote control goes
out). Press button B on remote control
A again before transmission ends.
R Align the antenna cable of the garage door
opener unit. This can improve signal
reception/transmission.484
Features
Stowage and features
Page 519 of 572

X
Switch off all electrical consumers (e.g. radio, blower, etc.).
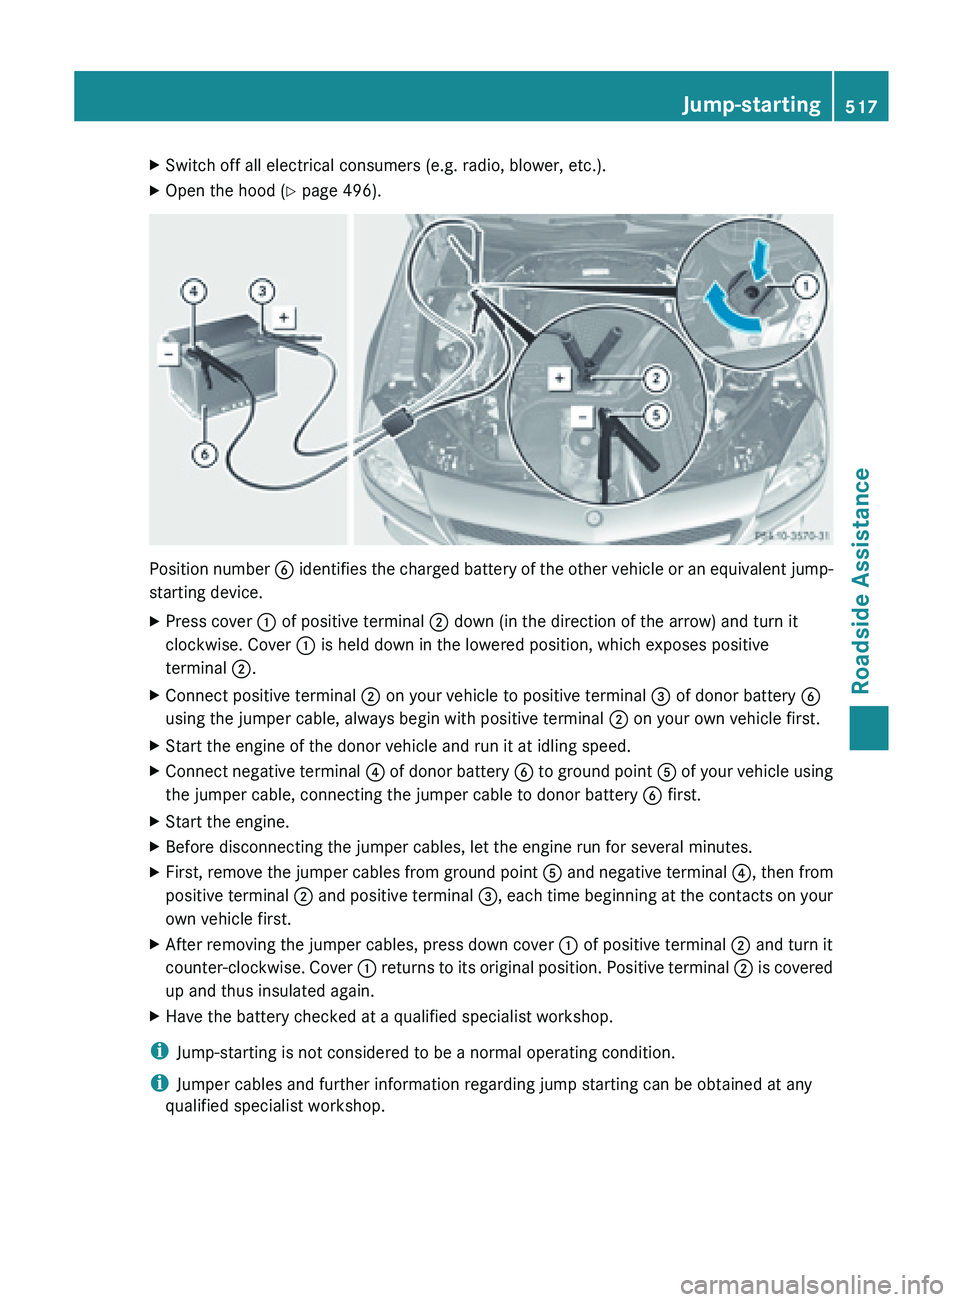
X Open the hood (Y page 496). Position number
B identifies the charged battery of the other vehicle or an equivalent jump-
starting device.
X Press cover : of positive terminal ; down (in the direction of the arrow) and turn it
clockwise. Cover : is held down in the lowered position, which exposes positive
terminal ;.
X Connect positive terminal ; on your vehicle to positive terminal = of donor battery B
using the jumper cable, always begin with positive terminal ; on your own vehicle first.
X Start the engine of the donor vehicle and run it at idling speed.
X Connect negative terminal ? of
donor battery B to ground point A of your vehicle using
the jumper cable, connecting the jumper cable to donor battery B first.
X Start the engine.
X Before disconnecting the jumper cables, let the engine run for several minutes.
X First, remove the jumper cables from ground point A and
negative terminal ?, then from
positive terminal ; and positive terminal =, each time beginning at the contacts on your
own vehicle first.
X After removing the jumper cables, press down cover : of positive terminal ; and turn it
counter-clockwise. Cover
:
returns to its original position. Positive terminal ; is covered
up and thus insulated again.
X Have the battery checked at a qualified specialist workshop.
i Jump-starting is not considered to be a normal operating condition.
i Jumper cables and further information regarding jump starting can be obtained at any
qualified specialist workshop. Jump-starting
517
Roadside Assistance Z
Page 537 of 572

alternate tires and wheels allow the TPMS to
continue to function properly.
It is the driver's responsibility to set the tire
inflation to the recommended cold tire
pressure suitable to the operating situation
( Y page 529). Note that the correct tire
pressure for the current operating situation
must first be taught-in to the tire pressure
monitor. If there is a substantial loss of
pressure, the warning threshold for the
warning message is aligned to the reference
values taught-in. Restart the tire pressure
monitor after adjusting to the cold tire
pressure. ( Y page 536) The current
pressures are
saved as new reference values.
As a result, a warning message will appear if
the tire pressure drops significantly.
The tire pressure monitor does not warn you
of an incorrectly set tire pressure. Observe
the notes on the recommended tire pressure
(Y page 529).
The tire pressure monitor is not able to warn
you of a sudden loss of pressure, e.g. if the
tire is penetrated by a foreign object. In the
event of a sudden loss of pressure, bring the
vehicle to a halt by braking carefully. Avoid
abrupt steering maneuvers.
If a tire pressure monitor system is installed,
the vehicle's wheels have sensors installed
that monitor the tire pressures in all four tires.
The tire pressure monitor warns you if the
pressure drops in one or more of the tires. The
tire pressure monitor only functions if the
correct wheel electronics units are installed
on each wheel.
The tire pressure monitor has a yellow
warning lamp in the instrument cluster for
indicating pressure loss/malfunctions (USA)
or pressure loss (Canada). Whether the
warning lamp flashes or lights up indicates
whether a tire pressure is too low or the tire
pressure monitor is malfunctioning:
R if the warning lamp is lit continuously, the
tire pressure on one or more tires is significantly too low. The tire pressure
monitor is not malfunctioning.
R USA only: if the warning lamp flashes for
around a minute and then remains lit
constantly, the tire pressure monitor is
malfunctioning.
Information on tire pressures is displayed in
the multifunction
display. After a few minutes
of driving, the current tire pressure of each
tire is shown in the multifunction display.
USA only: if there is a malfunction with the
tire pressure monitor it can take more than
ten minutes until the malfunction is shown by
the tire pressure warning lamp flashing for
approximately one minute and then lighting
up continuously. When the malfunction has
been rectified, the tire pressure warning lamp
goes out after a few minutes of driving.
The tire pressure values indicated by the on-
board computer may differ from those
measured at a gas station with a pressure
gauge. The tire pressures shown by the on-
board computer refer to those measured at
sea level. At high altitudes, the tire pressure
values indicated by a pressure gauge are
higher than those shown by the on-board
computer. In this case, do not reduce the tire
pressures.
The operation of the tire pressure monitor can
be affected by interference from radio
transmitting equipment (e.g. radio
headphones, two-way radios) that may be
being operated in or near the vehicle.
i USA only:
This device complies with Part 15 of the
FCC Rules. Operation is subject to the
following two conditions:
1. This device may not cause harmful
interference, and
2. this device must accept any interference
received, including interference that may
cause undesired operation of the device.
Any unauthorized modification to this
device could void the user’s authority to
operate the equipment. Tire pressure
535
Wheels and tires Z