2013 MERCEDES-BENZ SL-CLASS ROADSTER door lock
[x] Cancel search: door lockPage 155 of 572

For further information on fuel and fuel quality
(Y page 561).
Refueling
Fuel filler flap :
To open the fuel filler flap
; To insert the fuel filler cap
= Tire pressure table
? Fuel type to be used
The fuel filler flap is unlocked or locked
automatically when you open or close the
vehicle with
the SmartKey or using KEYLESS-
GO.
The position of the fuel filler cap is displayed
8 in the instrument cluster. The arrow
next to the filling pump indicates the side of
the vehicle.
Opening X
Switch off the engine.
X Remove the SmartKey from the ignition
lock.
X KEYLESS-GO: open the driver’s door.
This corresponds to SmartKey position 0,
"key removed".
The driver’s door can be closed again.
X Press the fuel filler flap in the direction of
arrow :.
The fuel filler flap opens slightly.
X Open the fuel filler flap fully.
X Turn the fuel filler flap counter-clockwise
and remove it. X
Insert the fuel filler cap into the holder
bracket on the inside of filler flap ;.
X Completely insert the filler neck of the fuel
pump nozzle into the tank and refuel.
X Only fill the tank until the pump nozzle
switches off.
i Do not add any more fuel after the pump
stops filling for the first time. Otherwise,
fuel could leak out.
Closing X
Place fuel filler cap on the fuel filler neck
and turn clockwise until it engages.
X Close the fuel filler flap.
i Close the
fuel filler flap before locking the
vehicle.
i If you drive with the fuel filler cap open,
the reserve fuel warning lamp flashes. In
addition, the ; engine diagnostics
warning lamp may light up. A message
appears in the multifunction display
(Y page 240).
For further information on warning and
indicator lamps in the instrument cluster,
see ( Y page 263). Refueling
153
Driving and parking Z
Page 157 of 572
Vehicles with automatic transmission
X
Vehicles with a SmartKey: move the
transmission to position P.
X Turn the SmartKey to position 0 in the
ignition lock and remove it.
The immobilizer is activated.
X Vehicles with KEYLESS-GO: press the
Start/Stop button (
Y page 135).
The engine stops and all the indicator
lamps in the instrument cluster go out.
When the driver's door is closed, this
corresponds to key position 1. When the
driver's door is open, this corresponds to
key position 0(Y page 135).
If you try to switch off the engine when the
transmission is not in position P, a message
appears in
the multifunction display. A signal
sounds.
i The engine can be turned off while the
vehicle is in motion by pressing and holding
the Start/Stop button for three seconds.
This function operates independently from
the ECO start/stop automatic engine
switch-off function. Electric parking brake
General notes G
WARNING
When leaving the vehicle, always remove the
SmartKey from
the starter switch, take it with
you, and lock the vehicle. Do not leave
children unattended in the vehicle, or with
access to an unlocked vehicle. Children could
release the parking brake and/or shift the
automatic transmission out of park position
P, either of which could result in an accident
and/or serious personal injury.
i The electric parking brake performs a
function test at regular intervals while the
engine is switched off. The sounds that can
be heard while this is occurring are normal. Engaging and releasing manually
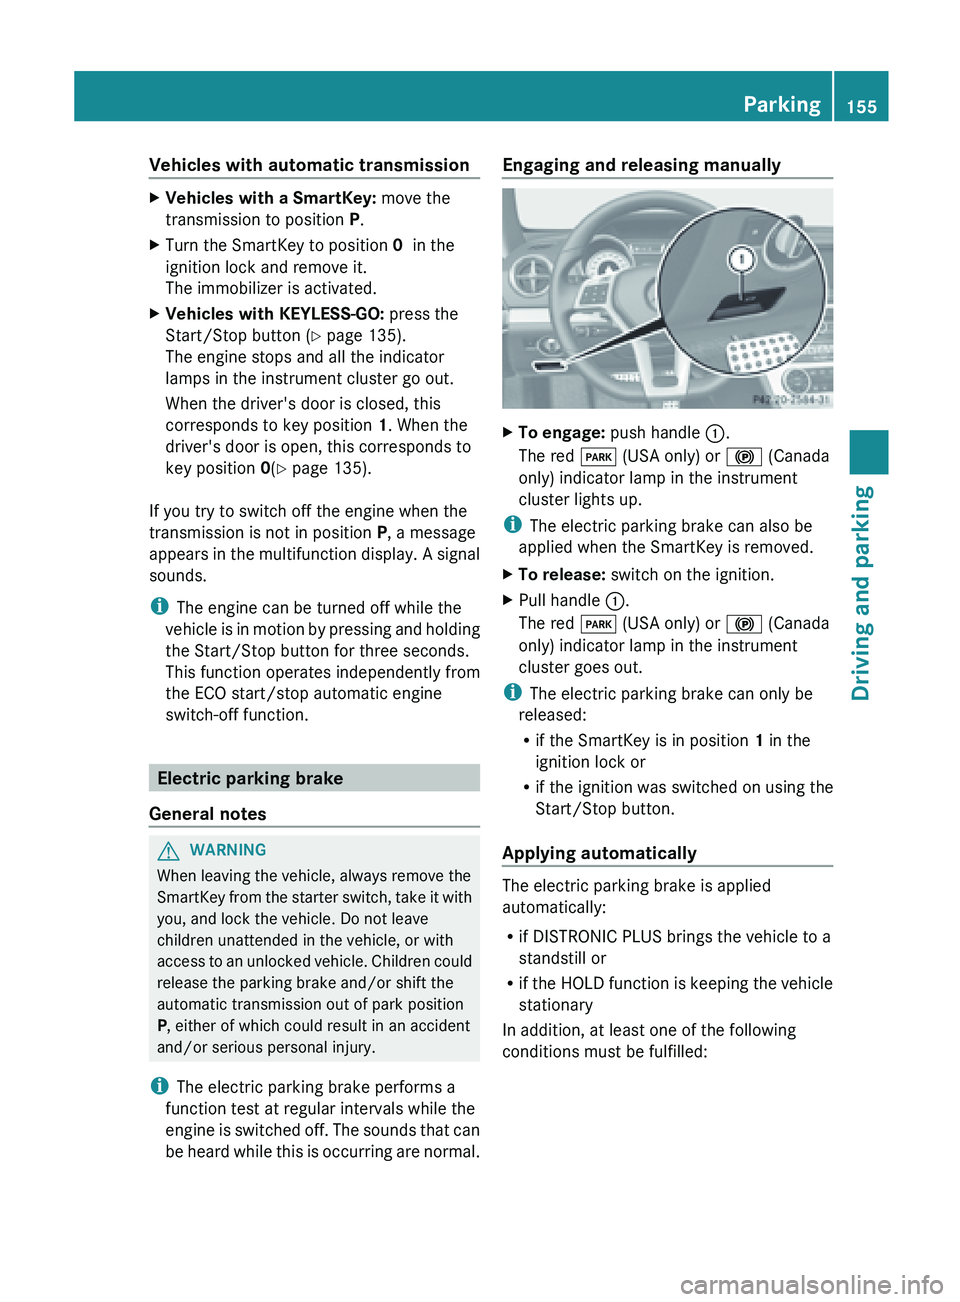
X
To engage: push handle :.
The red F (USA only) or ! (Canada
only) indicator lamp in the instrument
cluster lights up.
i The electric parking brake can also be
applied when the SmartKey is removed.
X To release: switch on the ignition.
X Pull handle :.
The red F (USA only) or ! (Canada
only) indicator lamp in the instrument
cluster goes out.
i The electric parking brake can only be
released:
R if the SmartKey is in position 1 in the
ignition lock or
R if the ignition was switched on using the
Start/Stop button.
Applying automatically The electric parking brake is applied
automatically:
R
if DISTRONIC PLUS brings the vehicle to a
standstill or
R if the
HOLD function is keeping the vehicle
stationary
In addition, at least one of the following
conditions must be fulfilled: Parking
155
Driving and parking Z
Page 179 of 572
R
a system malfunction occurs.
R the power supply is not sufficient.
If a
malfunction occurs, then the transmission
may also be shifted into position P
automatically. RACE START
Important safety notes G
WARNING
RACE START is only available when SPORT
handling mode is activated. SPORT handling
mode only stabilizes the vehicle to a limited
extent in the event of swerving or wheelspin.
RACE START
should only be used on specially
designated roads. Always adapt your speed
and driving style to the prevailing road and
weather conditions.
RACE START enables optimal acceleration
from a standing start. The precondition for
this is a suitable high-grip road surface.
i RACE START is only available for the
SL 63 AMG model.
Conditions for activation You can activate RACE START if:
R
the doors are closed.
R the engine
is running and it has reached an
operating temperature of approximately
176 ‡ (80 †. This is the case when the
engine oil temperature in the multifunction
display stops flashing.
R SPORT handling mode is activated
(Y page 61).
R the steering wheel is in the straight-ahead
position.
R the vehicle is stationary and the brake
pedal is depressed (left foot).
R the transmission is in position D. Activating RACE START X
Depress the brake pedal with your left foot
and keep it depressed.
X Turn the drive program selector clockwise
(Y page 147) until the RS lamp lights up.
The multifunction
display shows the RACE
START Confirm: Paddle UP Cancel:
Paddle DOWN message.
i If the activation conditions are no longer
fulfilled, RACE START is canceled. The
multifunction display shows the RACE
START Canceled message.
X To cancel: pull the left steering wheel
paddle shifter (
Y
page 148).
or
X To confirm: pull the right steering wheel
paddle shifter ( Y
page 148).
The RACE START Available Depress
gas pedal message appears in the
multifunction display.
i If you do not depress the accelerator
pedal fully within two seconds, RACE
START is canceled. The multifunction
display shows the RACE START Not
Possible See Operator's Manual
message.
X Fully depress the accelerator pedal.
The engine speed increases to at least
3500 rpm.
The RACE START Release brake to
start. message appears in the
multifunction display.
i If you do not release the brake pedal
within five seconds, RACE START is
canceled. The multifunction display shows
the RACE START Canceled message.
X Take your foot off the brake, but keep the
accelerator pedal depressed.
The vehicle pulls away at maximum
acceleration.
The RACE START
Active message appears
in the multifunction display.
RACE START is deactivated when the vehicle
reaches a speed of approximately 30 mph Driving systems
177
Driving and parking Z
Page 219 of 572
Setting the ambient lighting color
X
Press the = or ; button on the
steering wheel to select the Sett. menu.
X Press the : or 9 button to select the
Lights submenu.
X Press the a button to confirm.
X Press the : or 9
button to select the
Ambient Light Color function.
X Press the a button to confirm.
X Press the : or 9 button to set the
color to SOLAR, SOLAR Orange or SOLAR
Red.
X Press the a or % button
to save the
setting.
Switching Adaptive Highbeam Assist on/
off
X Press the = or ; button on the
steering wheel to select the Settings
menu.
X Press the : or 9
button to select the
Lights submenu.
X Press the a button to confirm.
X Press the :
or 9
button to select the
Adaptive Highbeam function.
If the Adaptive Highbeam function has
been switched on, the cone of light and the
_ symbol in the upper multifunction
display are shown in red.
X Press the a button to save the setting.
When Adaptive Highbeam Assist is activated,
the _ symbol appears in the lower
multifunction display.
For further information about Adaptive
Highbeam Assist, see ( Y page 114).
Surround lighting and exterior lighting
delayed switch-off
X Press the = or ; button on the
steering wheel to select the Settings
menu.
X Press the :
or 9
button to select the
Lights submenu. X
Press the a button to confirm.
X Press the :
or 9
button to select the
Surround Lighting: function.
When the Surround Lighting function is
activated, the cone of light in the
multifunction display is shown in red.
X Press the a button to save the setting.
Deactivating delayed switch-off of the
exterior lighting temporarily:
X Before leaving the vehicle, turn the
SmartKey to
position 0 in the ignition lock.
X Turn the SmartKey to position 2 in the
ignition lock.
The exterior lighting delayed switch-off is
deactivated.
Delayed switch-off of the exterior lighting is
reactivated the next time you start the
engine.
If you have activated the Surround
Lighting function
and the light switch is set
to Ã, the following functions are activated
when it is dark:
R Surround lighting: the exterior lighting
remains lit for 40 seconds after unlocking
with the SmartKey. If you start the engine,
the surround lighting is switched off and
the automatic headlamp mode is activated
(Y page 110).
R Exterior lighting delayed switch-off: the
exterior lighting remains lit for
60 seconds after the engine is switched off.
If you close all the doors and the trunk lid,
the exterior lighting goes off after
15 seconds.
i Depending on your vehicle's equipment,
when the surround lighting and delayed
switch-off exterior lighting are on, the
following light up:
R parking lamps
R front fog lamps
R low-beam headlamps
R daytime running lamps Menus and submenus
217
On-board computer and displays Z
Page 220 of 572

R
side marker lamps
R surround lighting in the exterior mirrors
Activating/deactivating the interior
lighting delayed switch-off
If you activate the Interior Lighting
Delay function, the interior lighting remains
on for 20seconds after you remove the
SmartKey from the ignition lock.
X Press the = or ; button on the
steering wheel to select the Settings
menu.
X Press the : or 9 button to select the
Lights submenu.
X Press the a button to confirm.
X Press : or 9 to select the
Interior Lighting Delay function.
When the Interior Lighting Delay
function is
activated, the vehicle interior is
displayed in red in the multifunction
display.
X Press the a button to save the setting.
Vehicle submenu Activating/deactivating the automatic
door locking mechanism
X
Press the = or ; button on the
steering wheel to select the Settings
menu.
X Press the : or 9
button to select the
Vehicle submenu.
X Press the a button to confirm.
X Press : or 9 to select the
Automatic Door Lock function.
When the Automatic
Door Lock function
is activated, the vehicle doors are displayed
in red in the multifunction display.
X Press the a button to save the setting.
If you activate the Automatic Door Lock
function, the
vehicle is centrally locked above
a speed of around 9 mph (15 km/h).
For further information on the automatic
locking feature, see ( Y page 76). Activating/deactivating the acoustic
locking verification signal
If
you
switch on the Acoustic Lock function,
an acoustic signal sounds when you lock the
vehicle.
X Press the = or ; button on the
steering wheel to select the Settings
menu.
X Press the : or 9
button to select the
Vehicle submenu.
X Press the a button to confirm.
X Press the :
or 9
button to select the
Acoustic Lock function.
If the Acoustic Lock function is activated,
the & symbol in the multifunction
display lights up red.
X Press the a button to save the setting.
Activating/deactivating the radar sensor
system
X Press the = or ; button on the
steering wheel to select the Sett. menu.
X Press the : or 9
button to select the
Vehicle submenu.
X Press the a button to confirm.
X Press the 9 or : button to select
Radar Sensor (See Oper. Manual).
You will see the selected setting: On or
Off.
X Press the a button to save the setting.
The following systems are switched off when
the radar sensor system is deactivated:
R DISTRONIC PLUS (Y page 164)
R BAS PLUS (
Y page 58)
R PRE-SAFE ®
Brake (Y page 63)
R Active Blind Spot Assist (Y page 195)
i USA only: This device has been approved
by the FCC as a "Vehicular Radar System".
The radar sensor is intended for use in an
automotive radar system only. Removal,
tampering, or altering of the device will void
any warranties, and is not permitted by the 218
Menus and submenus
On-board computer and displays
Page 221 of 572
FCC. Do not tamper with, alter, or use in
any non-approved way.
Any unauthorized modification to this
device could void the user’s authority to
operate the equipment.
i Canada only:
This device complies with the RSS-210
Rules of Industry Canada. Operation is
subject to the following two conditions:
1. This device may not cause harmful
interference, and
2. this
device must accept any interference
received, including interference that may
cause undesired operation of the device.
Any unauthorized modification to this
device could void the user’s authority to
operate the equipment.
Convenience submenu Activating/deactivating the EASY-
ENTRY/EXIT feature
G
WARNING
You must make sure no one can become
trapped or injured by the moving steering
wheel when the easy-entry/exit feature is
activated.
To stop steering wheel movement, move
steering wheel
adjustment lever or press one
of the memory position buttons.
Do not leave children unattended in the
vehicle, or with access to an unlocked vehicle.
Children could open the driver's door and
unintentionally activate the easy-entry/exit
feature, which could result in an accident
and/or serious personal injury.
X Press the = or ; button on the
steering wheel to select the Sett. menu.
X Press the :
or 9
button to select the
Convenience submenu.
X Press the a button to confirm. X
Press : or 9 to select the Easy
Entry/Exit function.
If the Easy Entry/Exit function is
activated, the vehicle steering wheel is
displayed in red in the multifunction
display.
X Press the a button to save the setting.
Further information on the EASY-ENTRY/EXIT
feature ( Y page 102).
Switching the belt adjustment on/off
X Press the = or ; button on the
steering wheel to select the Sett. menu.
X Press the : or 9
button to select the
Convenience submenu.
X Press the a button to confirm.
X Press the :
or 9
button to select the
Belt Adjustment function.
When the Belt Adjustment function is
activated, the vehicle seat belt is displayed
in red in the multifunction display.
X Press the a button to save the setting.
For further information on belt adjustment,
see ( Y page 52).
Restoring the factory settings X
Press the = or ; button on the
steering wheel to select the Sett. menu.
X Press the : or 9
button to select the
Factory Setting submenu.
X Press the a button to confirm.
The Reset All Settings? message
appears.
X Press the : or 9 button to select
No or Yes.
X Press the a button to confirm the
selection.
If you
have selected Yes, the multifunction
display shows a confirmation message.
For safety reasons, the Daytime Running
Lights function in the Lights submenu is
only reset if the vehicle is stationary. Menus and submenus
219
On-board computer and displays Z
Page 253 of 572
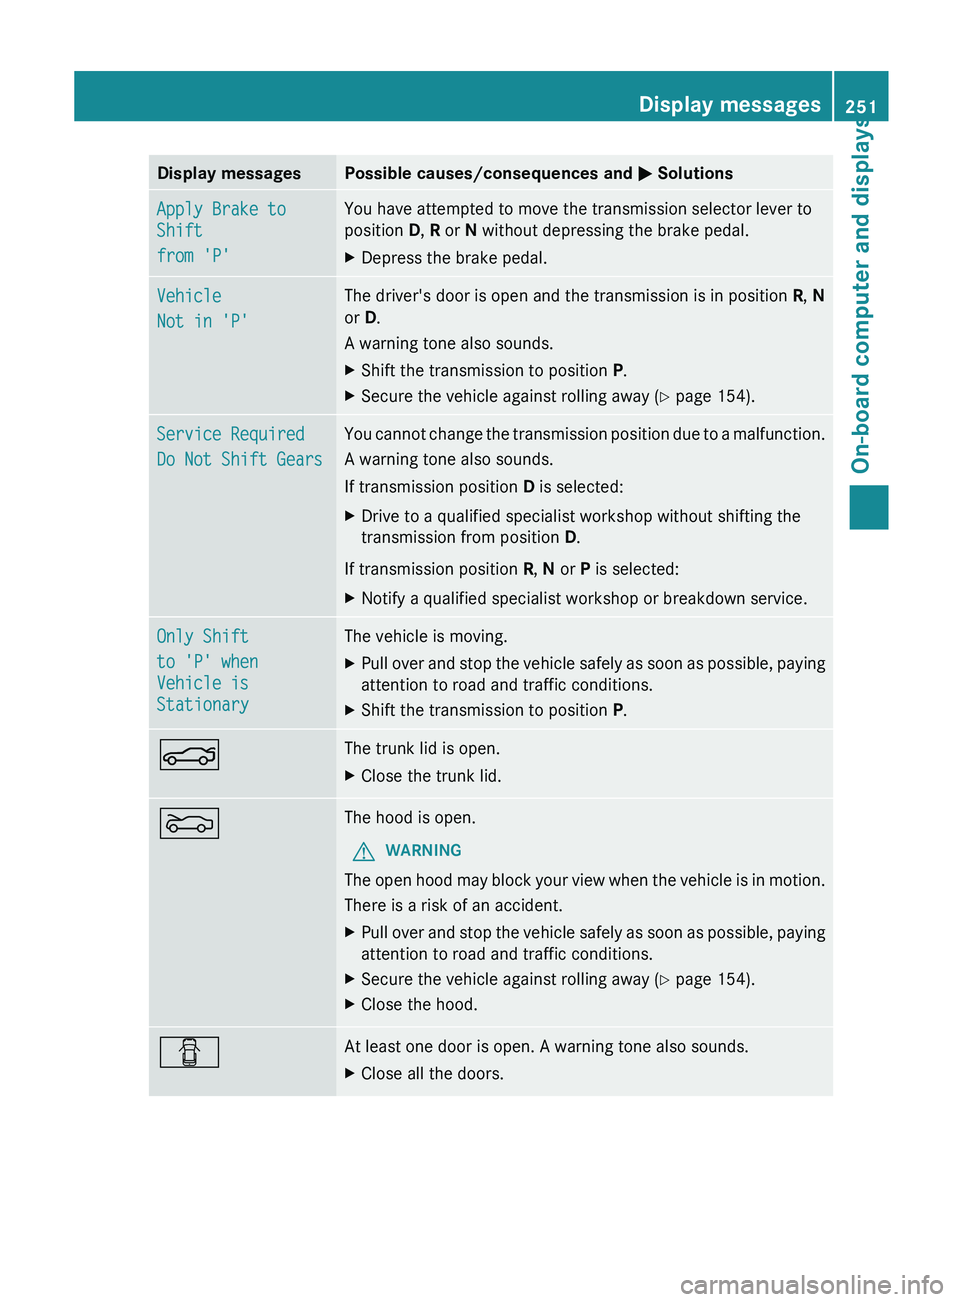
Display messages Possible causes/consequences and
M SolutionsApply Brake to
Shift
from 'P' You have attempted to move the transmission selector lever to
position D, R or N without depressing the brake pedal.
X
Depress the brake pedal. Vehicle
Not in 'P' The driver's door is open and the transmission is in position
R, N
or D.
A warning tone also sounds.
X Shift the transmission to position P.
X Secure the vehicle against rolling away ( Y page 154).Service Required
Do Not Shift Gears You cannot change the transmission position due to a malfunction.
A warning tone also sounds.
If transmission position
D is selected:
X Drive to a qualified specialist workshop without shifting the
transmission from position D.
If transmission position R, N or P is selected:
X Notify a qualified specialist workshop or breakdown service. Only Shift
to 'P' when
Vehicle is
Stationary The vehicle is moving.
X
Pull over and stop the vehicle safely as soon as possible, paying
attention to road and traffic conditions.
X Shift the transmission to position P.N The trunk lid is open.
X
Close the trunk lid. M The hood is open.
G WARNING
The open hood may block your view when the vehicle is in motion.
There is a risk of an accident.
X Pull over and stop the vehicle safely as soon as possible, paying
attention to road and traffic conditions.
X Secure the vehicle against rolling away ( Y page 154).
X Close the hood. C At least one door is open. A warning tone also sounds.
X
Close all the doors. Display messages
251On-board computer and displays Z
Page 255 of 572
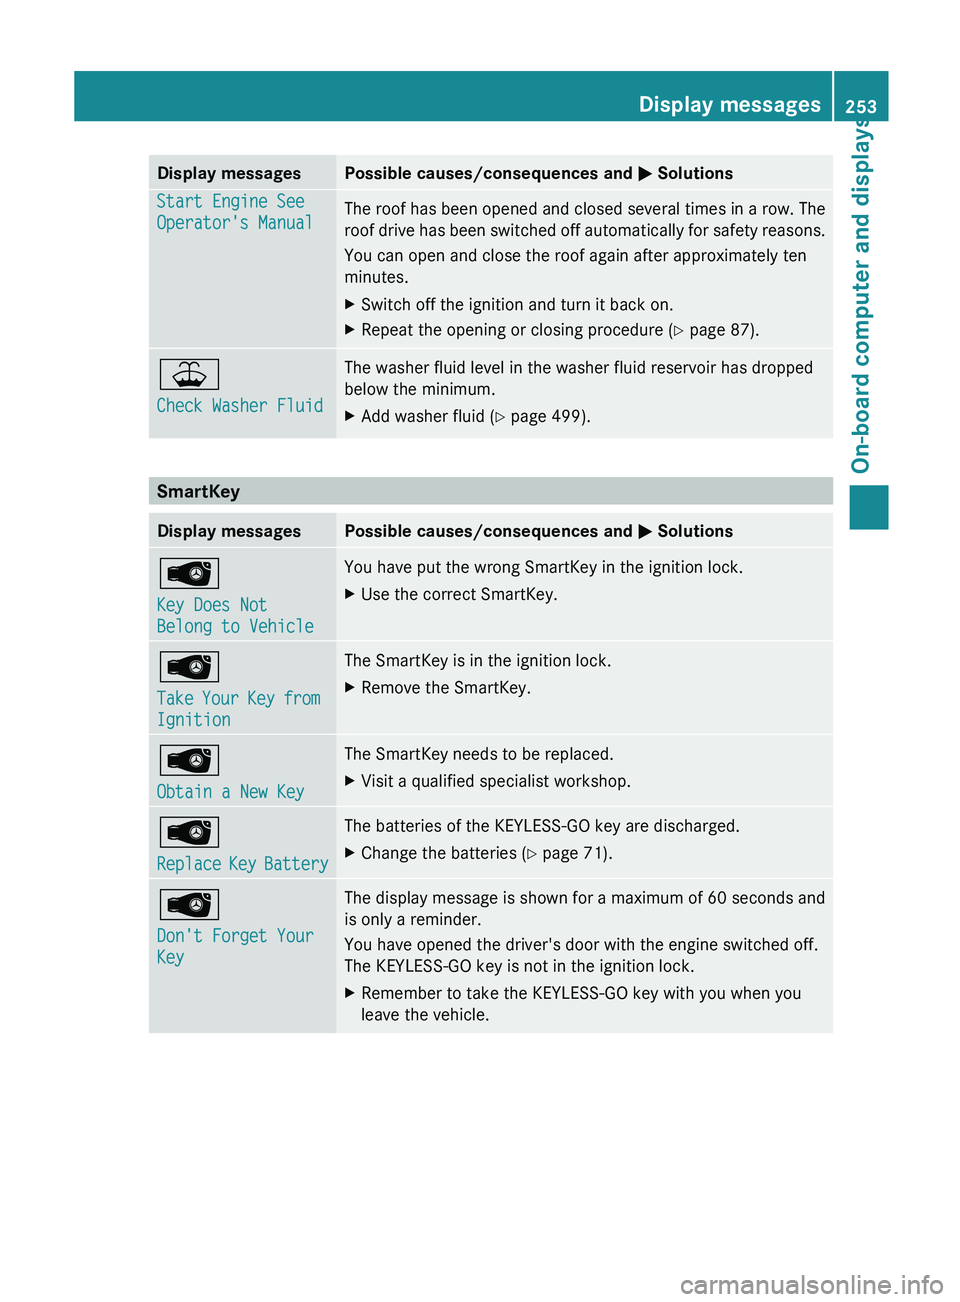
Display messages Possible causes/consequences and
M SolutionsStart Engine See
Operator's Manual
The roof has been opened and closed several times in a row. The
roof
drive
has been switched off automatically for safety reasons.
You can open and close the roof again after approximately ten
minutes.
X Switch off the ignition and turn it back on.
X Repeat the opening or closing procedure ( Y page 87).¥
Check Washer Fluid The washer fluid level in the washer fluid reservoir has dropped
below the minimum.
X
Add washer fluid ( Y page 499).SmartKey
Display messages Possible causes/consequences and
M SolutionsÂ
Key Does Not
Belong to Vehicle You have put the wrong SmartKey in the ignition lock.
X
Use the correct SmartKey. Â
Take
Your
Key from
Ignition The SmartKey is in the ignition lock.
X
Remove the SmartKey. Â
Obtain a New Key The SmartKey needs to be replaced.
X
Visit a qualified specialist workshop. Â
Replace
Key
Battery The batteries of the KEYLESS-GO key are discharged.
X
Change the batteries ( Y page 71).Â
Don't Forget Your
Key The display message is shown for a maximum of 60 seconds and
is only a reminder.
You have opened the driver's door with the engine switched off.
The KEYLESS-GO key is not in the ignition lock.
X
Remember to take the KEYLESS-GO key with you when you
leave the vehicle. Display messages
253
On-board computer and displays Z