2013 MERCEDES-BENZ SL-CLASS ROADSTER brake
[x] Cancel search: brakePage 67 of 572

permitted. Do not tamper with, alter, or use
the device in any non-approved way.
Any unauthorized modification to this
device could void the user's authority to
operate the equipment.
STEER CONTROL
STEER CONTROL
helps you by transmitting a
noticeable steering force to the steering
wheel in the direction required for vehicle
stabilization.
This steering assistance is provided in
particular if:
R both right wheels or both left wheels are on
a wet or slippery road surface when you
brake
R the vehicle starts to skid
If ESP ®
is malfunctioning, you will not receive
steering support from STEER CONTROL.
Power steering will, however, continue to
function. Theft deterrent locking system
Immobilizer
X To activate with the SmartKey: remove
the SmartKey from the ignition lock.
X To activate with KEYLESS-GO:
switch
the
ignition off and open the driver's door.
X To deactivate: switch on the ignition.
The immobilizer prevents your vehicle from
being started without the correct SmartKey.
When leaving the vehicle, always take the
SmartKey with you and lock the vehicle. The
engine can be started by anyone with a valid
SmartKey that is left inside the vehicle.
i The immobilizer is always deactivated
when you start the engine.
In the event that the engine cannot be
started when the starter battery is fully
charged, the immobilizer may be faulty.
Contact an authorized Mercedes-Benz Center or call 1-800-FOR-MERCedes (in
USA) or 1-800-387-0100
(in Canada). ATA (anti-theft alarm system)
X
To arm: lock the vehicle with the SmartKey
or KEYLESS-GO.
Indicator lamp
: flashes. The alarm
system is armed after approximately
15 seconds.
X To disarm: unlock the vehicle with the
SmartKey or KEYLESS-GO.
A visual and audible alarm is triggered if the
alarm system is armed and you open:
R a door
R the vehicle with the mechanical key
R the trunk
R the hood
R the glove box
R the stowage space under the armrest
R a stowage compartment in the rear
X To turn the alarm off with the
SmartKey: press
the % or & button
on the SmartKey.
The alarm is switched off.
or
X Insert the SmartKey into the ignition lock.
The alarm is switched off. Theft deterrent locking system
65
Safety Z
Page 99 of 572

Seats
Important safety notes
G
WARNING
The seats can still be adjusted when there is
no key in the ignition lock. For this reason,
children should never be left unsupervised in
the vehicle. They could otherwise become
trapped when adjusting the seat. G
WARNING
Make sure that the back of your head is
supported at eye level by the central area of
the head restraint. If your head is not
supported correctly
by the head restraint, you
could suffer a severe neck injury in the event
of an accident. Never drive if the head
restraints are not engaged and set correctly. G
WARNING
In order to avoid possible loss of vehicle
control, all seat, head restraint, steering
wheel and rear view mirror adjustments, as
well as fastening of seat belts, must be done
before setting the vehicle in motion. G
WARNING
Do not adjust the driver's seat while driving.
Adjusting the seat while driving could cause
the driver to lose control of the vehicle.
Never travel
in a moving vehicle with the seat
backrest in an excessively reclined position as
this can be dangerous. You could slide under
the seat belt in a collision. If you slide under
it, the seat belt would apply force at the
abdomen or neck. This could cause serious or
fatal injuries. The seat backrest and seat belts
provide the best restraint when the wearer is
in a position that is as upright as possible and
seat belts are properly positioned on the
body. G
WARNING
Your seat belt must be adjusted so that you
can correctly fasten your seat belt. Observe the following points:
R
adjust the
seat backrest until your arms are
slightly angled when holding the steering
wheel.
R adjust the seat to a comfortable seating
position that still allows you to reach the
accelerator/brake pedal safely. The
position should be as far back as possible
with the driver still able to operate the
controls properly.
R adjust the head restraint so that it is as
close to the head as possible and the center
of the head restraint supports the back of
the head at eye level.
R never place hands under the seat or near
any moving parts while a seat is being
adjusted.
Failure to do so could result in an accident
and/or serious personal injury. G
WARNING
Children 12 years old and under must be
seated and
properly secured in an appropriate
infant restraint, toddler restraint, or booster
seat recommended for the size and weight of
the child. Additional information can be found
under "Children in the vehicle".
A child's risk of serious or fatal injuries is
significantly increased if the child restraints
are not properly secured in the vehicle and/
or the child is not properly secured in the child
restraint.
! To avoid damage to the seats and the seat
heating, observe the following information:
R keep liquids from spilling on the seats. If
liquid is spilled on the seats, dry them as
soon as possible.
R if the seat covers are damp or wet, do not
switch on the seat heating. The seat
heating should also not be used to dry
the seats.
R clean the seat covers as recommended;
see "Interior care". Seats
97
Seats, steering wheel and mirrors Z
Page 115 of 572

Hazard warning lamps
X
To switch on the hazard warning lamps:
press button :.
All turn signals flash. If you now switch on
a turn
signal using the combination switch,
only the turn signal lamp on the
corresponding side of the vehicle will flash.
X To switch off the hazard warning
lamps: press button :.
The hazard warning lamps automatically
switch on if:
R an air bag is deployed.
R the vehicle decelerates rapidly from a
speed of
more than 45mph (70 km/h) and
comes to a standstill.
The hazard warning lamps switch off
automatically if the vehicle reaches a speed
of over 6mph (10km/h) again after a full
brake application.
i The hazard warning lamps still operate if
the ignition is switched off. Headlamp cleaning system
The headlamps are cleaned automatically if
the "Wipe with washer fluid" function is
operated five
times while the lights are on and
the engine is running (Y page 118). When you
switch off the ignition, the automatic
headlamp cleaning system is reset and
counting is resumed from 0. Cornering light function
The cornering light function improves the
illumination of the road over a wide angle in
the
direction
you are turning, enabling better
visibility in tight bends, for example. The
cornering light function can only be activated
when the low-beam headlamps are switched
on.
Active:
R if you are driving at speeds below
25mph (40 km/h) and switch on the turn
signal or turn the steering wheel
R if you are driving at speeds between
25mph (40 km/h) and45mph (70 km/h)
and turn the steering wheel
Not active: if your speed exceeds
25mph (40 km/h) or if you switch off the turn
signal or turn the steering wheel to the
straight-ahead position.
The cornering light function may remain lit for
a short time, but is automatically switched off
after no more than three minutes. Active light function
The active light function is a system that
moves the headlamps according to the
steering movements of the front wheels. In
this way, relevant areas remain illuminated
while driving. This allows you to recognize
pedestrians, cyclists and animals.
Active: when the lights are switched on. Exterior lighting
113
Lights and windshield wipers Z
Page 121 of 572

Replacing the wiper blades
Important safety notes G
WARNING
For safety reasons, switch off the windshield
wipers and remove the SmartKey from the
ignition lock
before changing the wiper blades
(vehicles with KEYLESS-GO: make sure that
the on-board electronics are in state 0).
Otherwise, the wiper motor could be switched
on suddenly and cause injury.
! To avoid damaging the wiper blades,
make sure that you touch only the wiper
arm of the wiper.
! Never open the hood if a windshield wiper
arm has been folded away from the
windshield.
Never fold a windshield wiper arm without
a wiper blade back onto the windshield.
Hold the windshield wiper arm firmly when
you change the wiper blade. If you release
the windshield wiper arm without a wiper
blade and it falls onto the windshield, the
windshield may be damaged by the force of
the impact.
Mercedes-Benz recommends that you have
the wiper blades changed at a qualified
specialist workshop.
! Always position the windshield wiper
arms vertically before folding them away
from the windshield. By doing so, you will
avoid damage to the hood.
Changing the windshield wiper blades Moving the wiper arm to a vertical
position
On vehicles without KEYLESS-GO:
X
Turn
the SmartKey to position
1 or 2
in the
ignition lock.
X Set the windshield wipers to
position °.
X When the wiper arms have reached a
vertical position, turn the SmartKey to position 0 and remove it from the ignition
lock.
X Fold the wiper arm away from the
windshield until it engages.
On vehicles with KEYLESS-GO:
X Switch off the engine.
X Remove your foot from the brake pedal.
X Set the windshield wipers to
position °.
X Press the Start/Stop button repeatedly
until the windshield wipers start.
X When the wiper arms have reached a
vertical position, press the Start/Stop
button.
X Fold the wiper arm away from the
windshield until it engages.
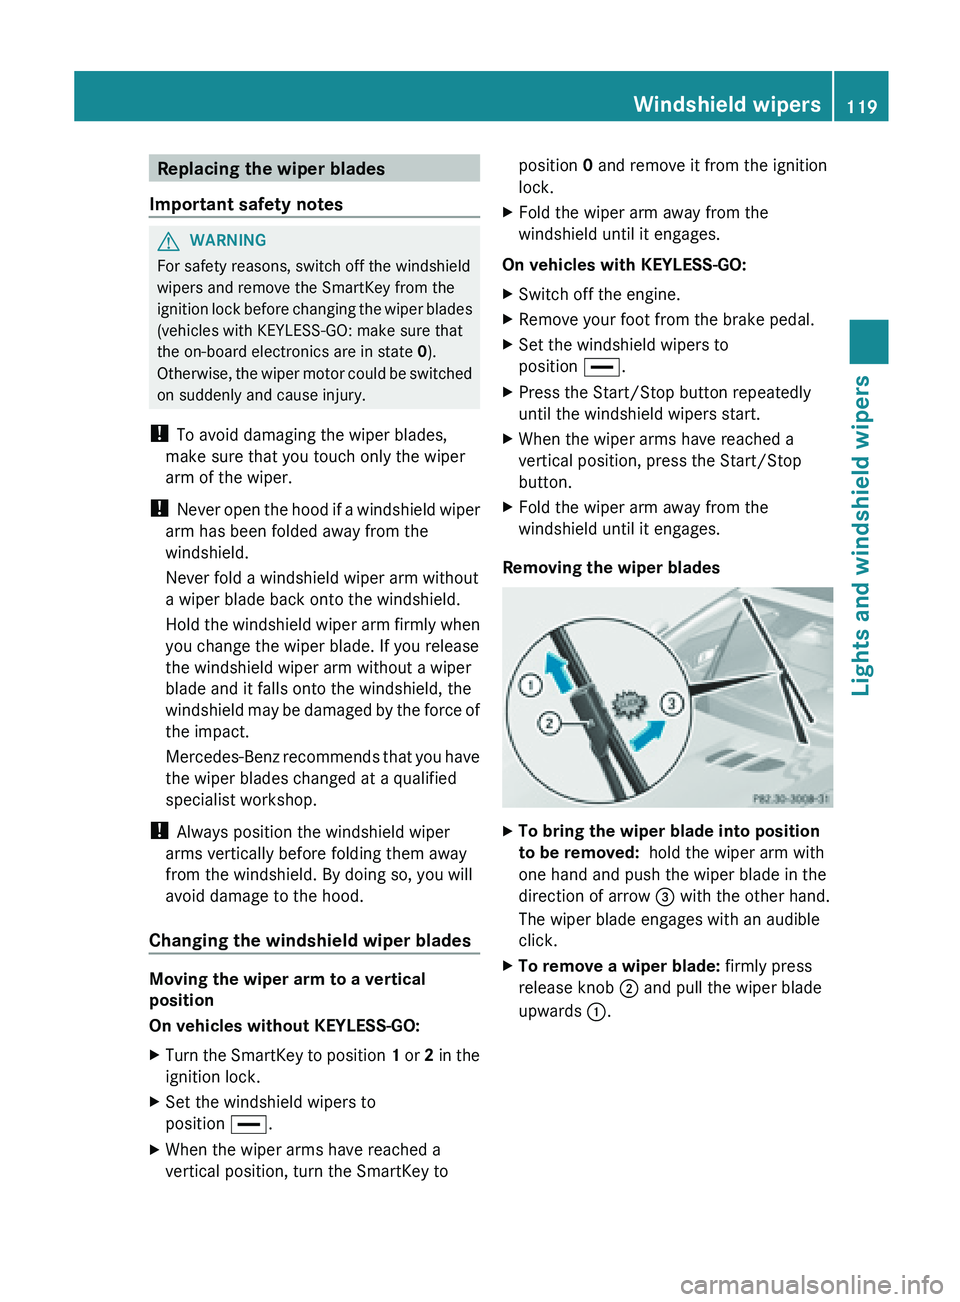
Removing the wiper blades X
To bring the wiper blade into position
to be removed:
hold the wiper arm with
one hand and push the wiper blade in the
direction of arrow = with the other hand.
The wiper blade engages with an audible
click.
X To remove a wiper blade: firmly press
release knob ; and pull the wiper blade
upwards :. Windshield wipers
119
Lights and windshield wipers Z
Page 136 of 572

Useful information
i This Operator's Manual describes all
models and all standard and optional
equipment of your vehicle available at the
time of publication of the Operator's
Manual. Country-specific differences are
possible. Please
note that your vehicle may
not be equipped with all features
described. This also applies to safety-
related systems and functions.
i Read the information on qualified
specialist workshops: ( Y page 31).Breaking-in notes
The first 1,000miles (1,500 km)
The more
you look after the engine when it is
new, the more satisfied you will be with its
performance in the future.
R You should therefore drive at varying
vehicle and engine speeds for the first
1,000miles (1,500km).
R Avoid heavy loads, e.g. driving at full
throttle, during this period.
R Change gear in good time, before the
tachometer needle is Ô of the way to the
red area of the tachometer.
R Do not manually shift to a lower gear to
brake the vehicle.
R If possible, do not depress the accelerator
pedal past the point of resistance
(kickdown).
R Only select shift ranges 3, 2 or 1 when
driving slowly, e.g. in mountainous terrain.
R Ideally, drive for the first 1,000 miles
(1,500km) in drive program C.
After 1,000 miles (1,500km), you can
increase the engine speed gradually and bring
the vehicle up to full speed. Additional breaking-in notes for AMG
vehicles:
R
do not drive faster than 85 mph
(140 km/h ) for the first 1,000 miles
(1,500 km).
R only allow the engine to reach a maximum
engine speed of 4,500 rpm briefly.
R change gear in good time.
i You should also observe these notes on
running
in if the engine or parts of the drive
train on your vehicle have been replaced. AMG vehicles with rear axle locking
differential
Your vehicle is equipped with a self-locking
differential on the rear axle. To improve the
protection of
the differential on the rear axle,
change the oil after a break-in distance of
2,000 miles (3,000 km). This oil change
extends the service life of the differential.
Have the oil change carried out at a qualified
specialist workshop. Mercedes-Benz
recommends that you use an authorized
Mercedes-Benz Center for this purpose. Driving
Important safety notes
G
WARNING
Make sure absolutely no objects are
obstructing the pedals' range of movement.
Keep the driver's footwell clear of all
obstacles. If there are any floormats or
carpets in
the footwell, make sure the pedals
still have sufficient clearance.
During sudden driving or braking maneuvers
the objects could get caught between the
pedals. You could then no longer brake or
accelerate. This could lead to accidents and
injury. 134
Driving
Driving and parking
Page 137 of 572

G
WARNING
On slippery road surfaces, never downshift in
order to obtain braking action. This could
result in
drive wheel slip and reduced vehicle
control. Your vehicle's ABS will not prevent
this type of loss of control. G
WARNING
It is dangerous to shift the automatic
transmission out of parking position
P or
neutral position N if the engine speed is
higher than
idle speed. If your foot is not firmly
on the brake pedal, the vehicle could
accelerate quickly forward or in reverse. You
could lose control of the vehicle and hit
someone or something. Only shift into gear
when the engine is idling normally and when
your right foot is firmly on the brake pedal.
! Warm up the engine quickly. Do not use
the engine's full performance until it has
reached operating temperature.
Only shift the automatic transmission to
the desired drive position when the vehicle
is stationary.
Where possible, avoid spinning the drive
wheels when pulling away on slippery
roads. You could otherwise damage the
drive train.
! AMG vehicles: at low engine oil
temperatures below 68 ‡ (+20 †), the
maximum engine speed is restricted in
order to protect the engine. To protect the
engine and maintain smooth engine
operation, avoid driving at full throttle when
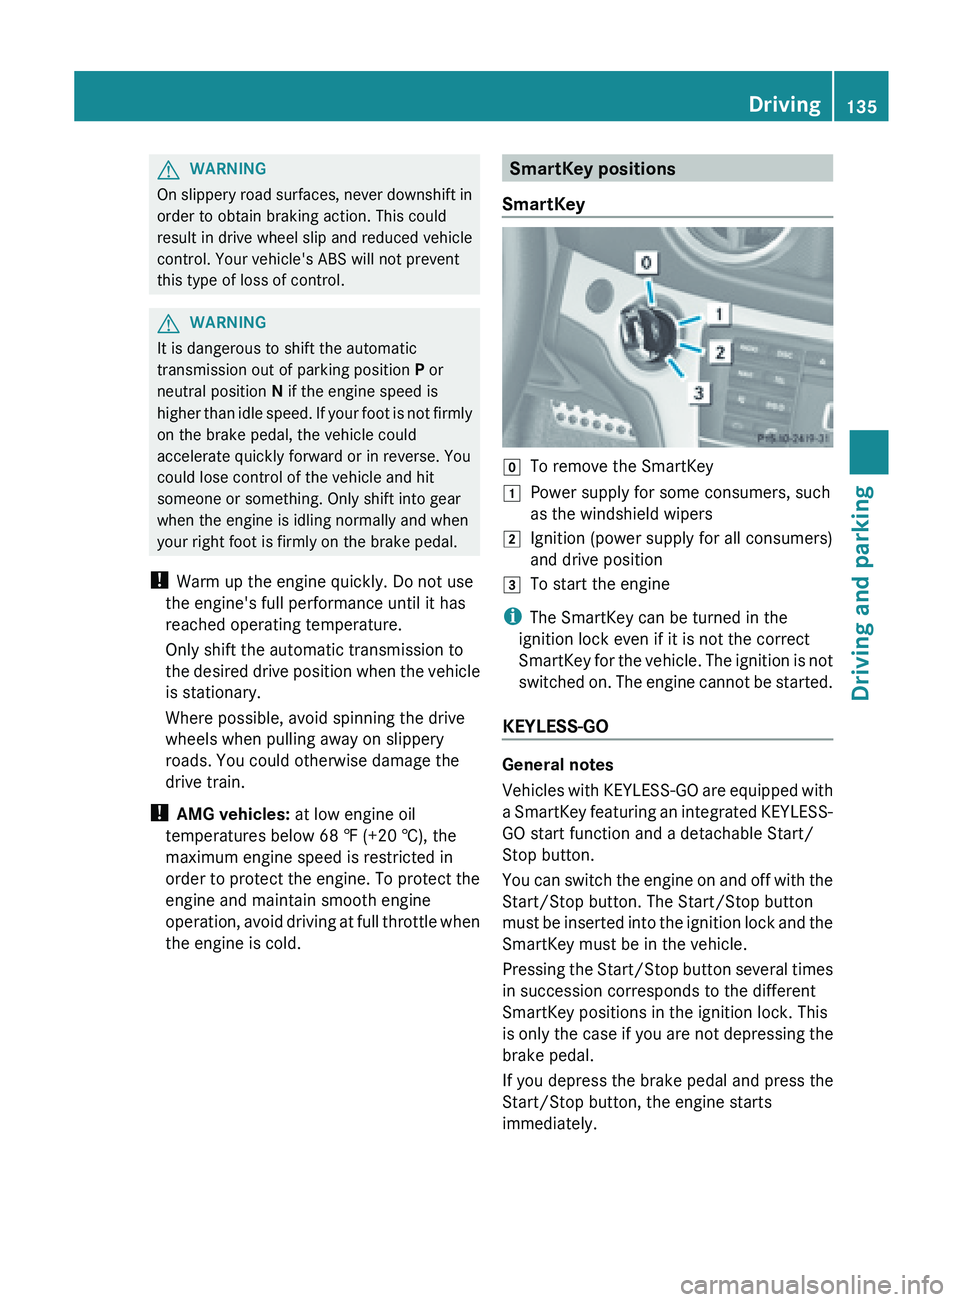
the engine is cold. SmartKey positions
SmartKey g
To remove the SmartKey
1 Power supply for some consumers, such
as the windshield wipers
2 Ignition (power supply for all consumers)
and drive position
3 To start the engine
i The SmartKey can be turned in the
ignition lock even if it is not the correct
SmartKey for
the vehicle. The ignition is not
switched on. The engine cannot be started.
KEYLESS-GO General notes
Vehicles
with
KEYLESS-GO are equipped with
a SmartKey featuring an integrated KEYLESS-
GO start function and a detachable Start/
Stop button.
You can switch the engine on and off with the
Start/Stop button. The Start/Stop button
must be inserted into the ignition lock and the
SmartKey must be in the vehicle.
Pressing the Start/Stop button several times
in succession corresponds to the different
SmartKey positions in the ignition lock. This
is only the case if you are not depressing the
brake pedal.
If you depress the brake pedal and press the
Start/Stop button, the engine starts
immediately. Driving
135
Driving and parking Z
Page 139 of 572

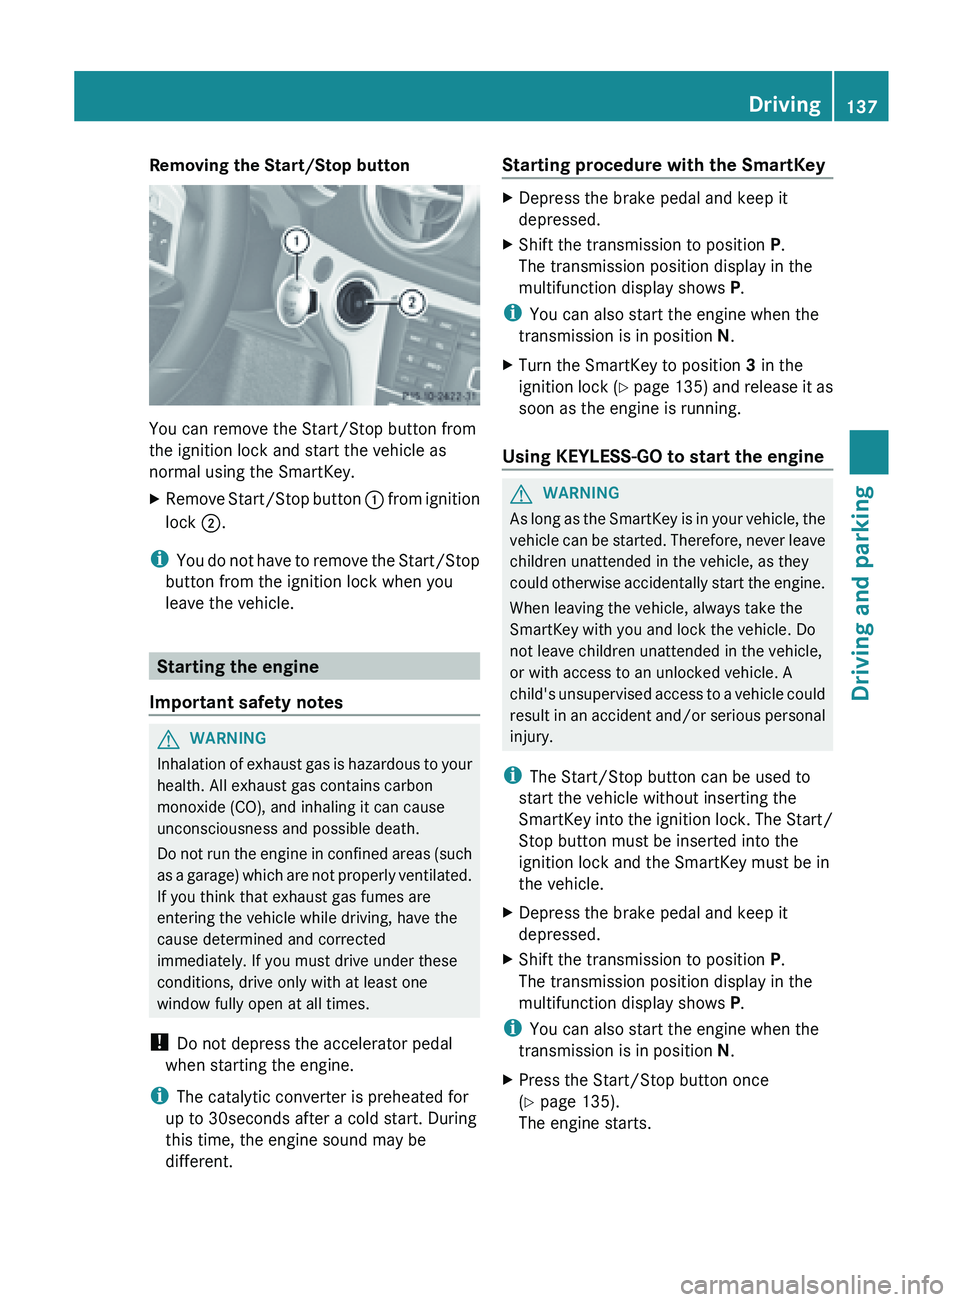
Removing the Start/Stop button
You can remove the Start/Stop button from
the ignition lock and start the vehicle as
normal using the SmartKey.
X
Remove Start/Stop button : from ignition
lock ;.
i You do
not have to remove the Start/Stop
button from the ignition lock when you
leave the vehicle. Starting the engine
Important safety notes G
WARNING
Inhalation of exhaust gas is hazardous to your
health. All exhaust gas contains carbon
monoxide (CO), and inhaling it can cause
unconsciousness and possible death.
Do not
run the engine in confined areas (such
as a garage) which are not properly ventilated.
If you think that exhaust gas fumes are
entering the vehicle while driving, have the
cause determined and corrected
immediately. If you must drive under these
conditions, drive only with at least one
window fully open at all times.
! Do not depress the accelerator pedal
when starting the engine.
i The catalytic converter is preheated for
up to 30seconds after a cold start. During
this time, the engine sound may be
different. Starting procedure with the SmartKey X
Depress the brake pedal and keep it
depressed.
X Shift the transmission to position P.
The transmission position display in the
multifunction display shows P.
i You can also start the engine when the
transmission is in position N.
X Turn the SmartKey to position 3 in the
ignition lock
(Y page 135) and release it as
soon as the engine is running.
Using KEYLESS-GO to start the engine G
WARNING
As long as the SmartKey is in your vehicle, the
vehicle can
be started. Therefore, never leave
children unattended in the vehicle, as they
could otherwise accidentally start the engine.
When leaving the vehicle, always take the
SmartKey with you and lock the vehicle. Do
not leave children unattended in the vehicle,
or with access to an unlocked vehicle. A
child's unsupervised access to a vehicle could
result in an accident and/or serious personal
injury.
i The Start/Stop button can be used to
start the vehicle without inserting the
SmartKey into the ignition lock. The Start/
Stop button must be inserted into the
ignition lock and the SmartKey must be in
the vehicle.
X Depress the brake pedal and keep it
depressed.
X Shift the transmission to position P.
The transmission position display in the
multifunction display shows P.
i You can also start the engine when the
transmission is in position N.
X Press the Start/Stop button once
(Y page 135).
The engine starts. Driving
137
Driving and parking Z
Page 140 of 572

Pulling away
Automatic transmission G
WARNING
It is dangerous to shift the automatic
transmission out of parking position P or
neutral position N if the engine speed is
higher than
idle speed. If your foot is not firmly
on the brake pedal, the vehicle could
accelerate quickly forward or in reverse. You
could lose control of the vehicle and hit
someone or something. Only shift into gear
when the engine is idling normally and when
your right foot is firmly on the brake pedal.
i It is only possible to shift the transmission
from position P to the desired position if
you depress the brake pedal. Only then is
the shift lock released.
X Depress the brake pedal and keep it
depressed.
X Shift the transmission to position D or R.
X Release the electric parking brake
(Y page 155).
X Release the brake pedal.
X Carefully depress the accelerator pedal.
! If a warning tone sounds and the
Release Park. Brake message appears
in the multifunction display, the parking
brake is still applied. Release the parking
brake.
i The vehicle
locks centrally once you have
pulled away.The locking knobs in the doors
drop down.
You can open the doors from the inside at
any time.
You can also deactivate the automatic
locking feature (Y page 218).
i Upshifts take place at higher engine
speeds after a cold start. This helps the
catalytic converter to reach its operating
temperature more quickly. Hill start assist G
WARNING
Never leave the vehicle when it is being held
by hill start assist. After approximately one
second, hill start assist will no longer brake
your vehicle and it could roll away.
Hill start assist helps you when pulling away
forwards or in reverse on an uphill gradient.
It holds the vehicle for a short time after you
have removed
your foot from the brake pedal.
This gives you enough time to move your foot
from the brake pedal to the accelerator pedal
and to depress it before the vehicle begins to
roll.
X Remove your foot from the brake pedal.
The vehicle
is then held for about a second.
X Pull away.
Hill start assist will not function if:
R you are pulling away on a level road or on
a downhill gradient.
R the transmission is in position N.
R the parking brake is applied.
R ESP ®
is malfunctioning. ECO start/stop function
Important safety notes G
WARNING
If the engine is switched off and the ECO
symbol is
shown in green in the multifunction
display, the engine has been switched off
automatically. All of the vehicle's systems
remain active. If you open the door, unfasten
your seat belt or remove your foot from the
brake pedal, the engine will automatically
start. The vehicle may begin moving. You
could suffer serious or even fatal injury or
cause an accident resulting in injury or death.
Never leave the vehicle while the ECO symbol
in the multifunction display is shown in green
or yellow. Always secure the vehicle against
rolling away before leaving it. 138
Driving
Driving and parking