2013 MERCEDES-BENZ SL-CLASS ROADSTER seat memory
[x] Cancel search: seat memoryPage 98 of 572

Useful information
i This Operator's Manual describes all
models and all standard and optional
equipment of your vehicle available at the
time of publication of the Operator's
Manual. Country-specific differences are
possible. Please
note that your vehicle may
not be equipped with all features
described. This also applies to safety-
related systems and functions.
i Read the information on qualified
specialist workshops: ( Y page 31).Correcting the driver's seat position
X
Observe the safety guidelines on seat
adjustment ( Y
page 97).
X Check whether you have adjusted seat =
properly.
Electrical seat adjustment ( Y page 98)
When adjusting the seat, make sure:
R you are
as far away from the driver's air bag
as possible.
R you are sitting in a normal upright position.
R you can fasten the seat belt properly.
R you have moved the backrest to an almost
vertical position. R
you have
set the seat cushion angle so that
your thighs are gently supported.
R you can depress the pedals properly.
X Check whether the head restraint is
adjusted properly.
When doing so, make sure that you have
adjusted the
head restraint so that the back
of your head is supported at eye level by
the center of the head restraint.
X Observe the safety guidelines on steering
wheel adjustment ( Y page 101).
X Check whether steering wheel : is
adjusted properly.
Adjusting the steering wheel
(Y page 101)
When adjusting the steering wheel, make
sure:
R you can hold the steering wheel with your
arms slightly bent.
R you can move your legs freely.
R you can see all the displays in the
instrument cluster clearly.
X Observe the safety guidelines for seat belts
(Y page 49).
X Check whether you have fastened seat
belt ; properly (Y
page 51).
The seat belt should:
R fit snugly across your body
R be routed across the middle of your
shoulder
R be routed
in your pelvic area across the hip
joints
X Before starting off, adjust the rear-view
mirror and the exterior mirrors in such a
way that
you have a good view of road and
traffic conditions (Y page 103).
X Store the seat, steering wheel and exterior
mirror settings using the memory function
(Y page 105).96
Correcting the driver's seat position
Seats, steering wheel and mirrors
Page 100 of 572

R
do not transport heavy loads on the
seats. Do
not place sharp objects on the
seat cushions, e.g. knives, nails or tools.
The seats should only be occupied by
passengers, if possible.
R when the seat heating is in operation, do
not cover the seats with insulating
materials, e.g. blankets, coats, bags,
seat covers, child seats or booster seats.
! Make sure that there are no objects in the
footwell or behind the seats when resetting
the seats. There is a risk that the seats
and/or the objects could be damaged.
i The head restraints cannot be removed.
For more information, contact a qualified
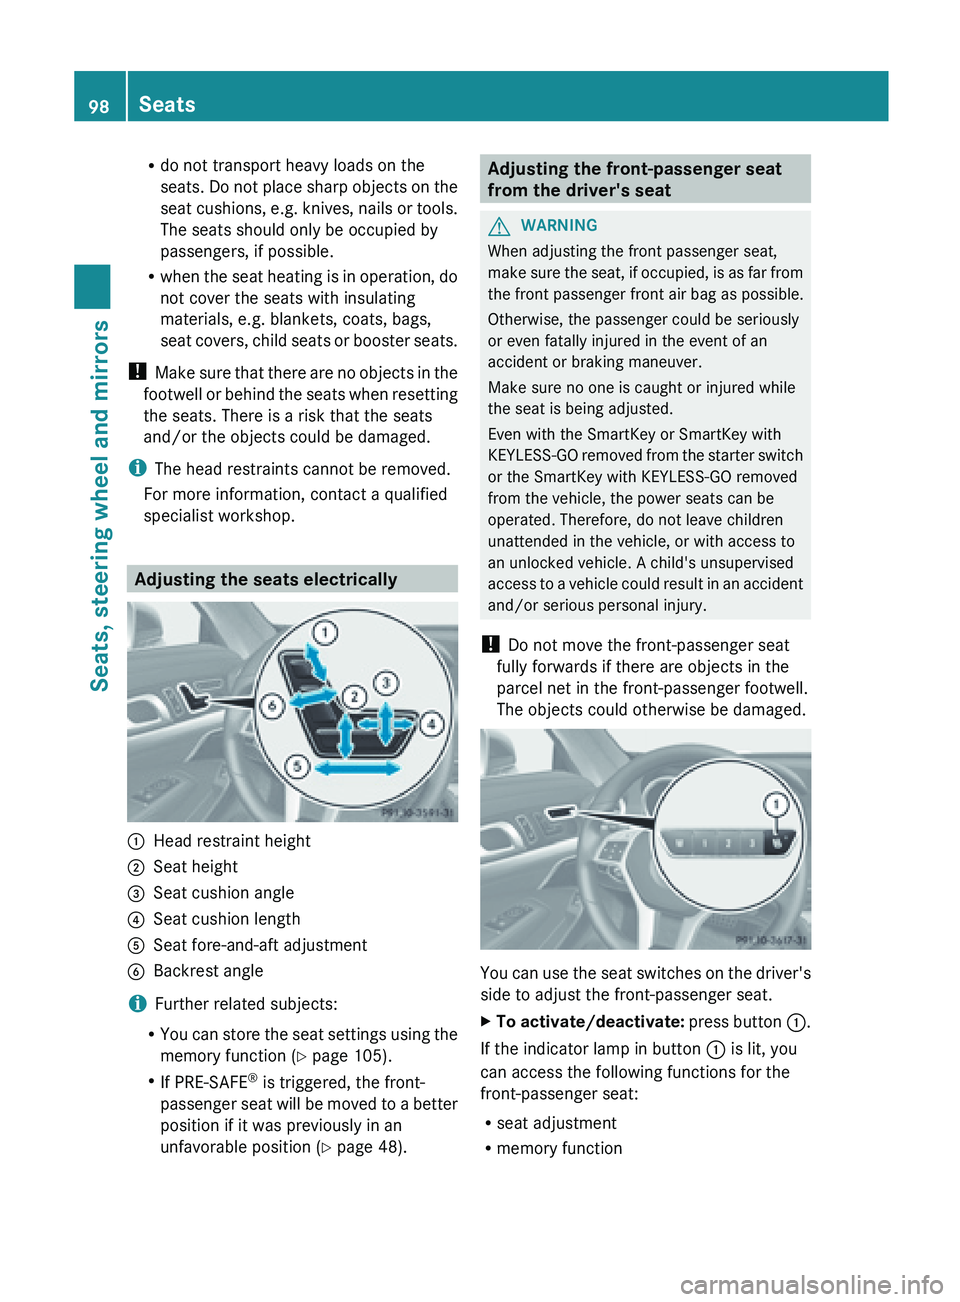
specialist workshop. Adjusting the seats electrically
:
Head restraint height
; Seat height
= Seat cushion angle
? Seat cushion length
A Seat fore-and-aft adjustment
B Backrest angle
i Further related subjects:
R You can
store the seat settings using the
memory function ( Y page 105).
R If PRE-SAFE ®
is triggered, the front-
passenger seat will be moved to a better
position if it was previously in an
unfavorable position ( Y page 48). Adjusting the front-passenger seat
from the driver's seat
G
WARNING
When adjusting the front passenger seat,
make sure
the seat, if occupied, is as far from
the front passenger front air bag as possible.
Otherwise, the passenger could be seriously
or even fatally injured in the event of an
accident or braking maneuver.
Make sure no one is caught or injured while
the seat is being adjusted.
Even with the SmartKey or SmartKey with
KEYLESS-GO removed from the starter switch
or the SmartKey with KEYLESS-GO removed
from the vehicle, the power seats can be
operated. Therefore, do not leave children
unattended in the vehicle, or with access to
an unlocked vehicle. A child's unsupervised
access to a vehicle could result in an accident
and/or serious personal injury.
! Do not move the front-passenger seat
fully forwards if there are objects in the
parcel net in the front-passenger footwell.
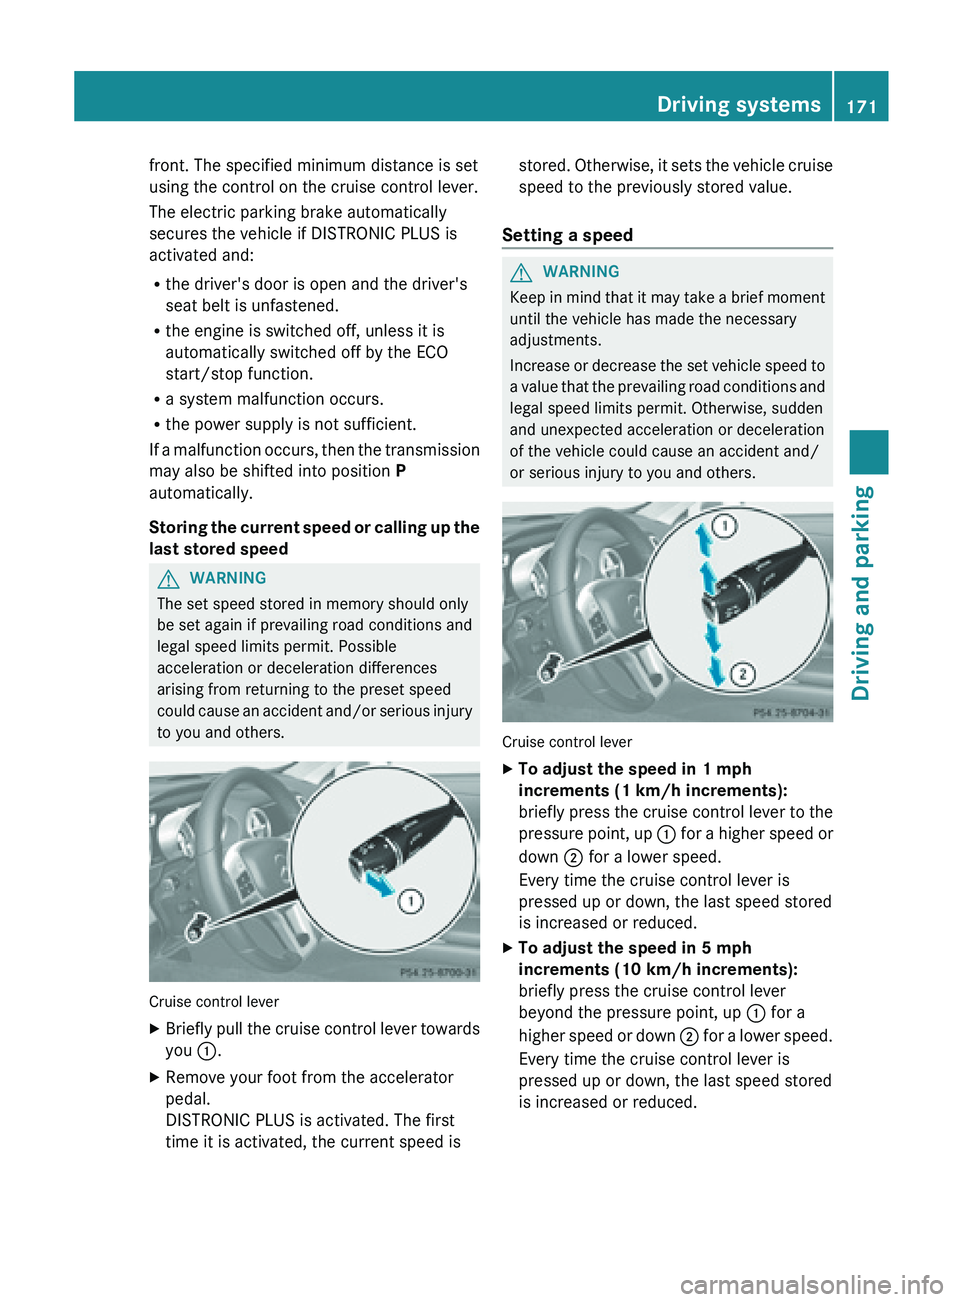
The objects could otherwise be damaged. You can use the seat switches on the driver's
side to adjust the front-passenger seat.
X
To activate/deactivate: press
button :.
If the indicator lamp in button : is lit, you
can access the following functions for the
front-passenger seat:
R seat adjustment
R memory function98
Seats
Seats, steering wheel and mirrors
Page 104 of 572

i
Further related subjects:
R EASY-ENTRY/EXIT feature
(Y page 102)
R storing settings (
Y page 105)EASY-ENTRY/EXIT feature
Important safety notes G
WARNING
Make sure that nobody can become trapped
when you activate the EASY-ENTRY/EXIT
feature.
If there is a risk of someone becoming
trapped, stop the adjustment procedure. To
halt the procedure:
R press the steering column adjustment
button.
R press one of the memory function position
buttons.
The steering column stops moving
immediately.
Do not keep the memory function position
button pressed as this will start the memory
function and set the steering wheel and seat
in motion.
Do not leave children unattended in the
vehicle. They
could open the driver's door and
thereby unintentionally activate the EASY-
ENTRY/EXIT feature and become trapped. G
WARNING
Let the system complete the adjustment
procedure before setting the vehicle in
motion. All steering wheel adjustment must
be completed before setting the vehicle in
motion. Driving off with the steering wheel
still adjusting could cause the driver to lose
control of the vehicle.
The EASY-ENTRY/EXIT
feature makes getting
in and out of your vehicle easier.
You can activate and deactivate the EASY-
ENTRY/EXIT feature in the on-board
computer (Y page 219). Position of the steering wheel when the
EASY-ENTRY/EXIT feature is active The steering wheel swings upwards when
you:
R
remove the
SmartKey from the ignition lock
R open the driver's door and KEYLESS-GO is
in position 1
R open the driver's door and the SmartKey is
in position 0 or 1 in the ignition lock
i The steering wheel only moves upwards if
it has not already reached the upper end
stop.
Position of the steering wheel for
driving The steering wheel is moved to the last
selected position when:
R
the driver's door is closed.
R you insert the SmartKey into the ignition
lock.
or
R you press the Start/Stop button once on
vehicles with KEYLESS-GO.
When you close the driver's door with the
ignition switched on, the steering wheel is
also automatically moved to the previously
set position.
The last position of the steering wheel is
stored when you switch off the ignition or
when you store the setting with the memory
function ( Y page 105).
Crash-responsive EASY-EXIT feature If the crash-responsive EASY-EXIT feature is
triggered
in
an accident, the steering column
will move upwards when the driver's door is
opened. This occurs irrespective of the
position of the SmartKey in the ignition lock.
This makes it easier to exit the vehicle and
rescue the occupants.
The crash-responsive EASY-EXIT feature is
only operational if the EASY-EXIT/ENTRY
feature is activated in the on-board computer. 102
Steering wheel
Seats, steering wheel and mirrors
Page 106 of 572

The rear-view mirror and the exterior mirror
on
the
driver's side automatically go into anti-
glare mode if the following conditions are met
simultaneously:
R the ignition is switched on and
R incident light from headlamps strikes the
sensor in the rear-view mirror.
The mirrors do not go into anti-glare mode if
reverse gear is engaged or if the interior
lighting is switched on. Parking position for the exterior
mirror on the front-passenger side
Setting and
storing the parking positionUsing reverse gear
You can position the front-passenger side
exterior
mirror
in such a way that you can see
the rear wheel on that side as soon as you
engage reverse gear. You can store this
position.
X Make sure that the vehicle is stationary and
that the SmartKey is in position 2 in the
ignition lock.
X Press button ; for the exterior mirror on
the front-passenger side.
X Engage reverse gear.
The exterior mirror on the front-passenger
side moves to the preset parking position.
X Use adjustment button = to adjust the
exterior mirror
to a position that allows you
to see the rear wheel and the curb.
The parking position is stored. i
If you shift the transmission to another
position, the exterior mirror on the front-
passenger side returns to the driving
position.
Using the memory button
You can position the front-passenger side
exterior mirror
in such a way that you can see
the rear wheel on that side as soon as you
engage reverse gear. This setting can be
stored using memory button M ?.
X Make sure that the SmartKey is in
position 2 in the ignition lock.
X With the exterior mirror on the front-
passenger side activated, use adjustment
button = to adjust the exterior mirror. In
the exterior mirror, the rear wheel and the
curb should be visible.
X Press memory button M ? and
one of the
arrows on adjustment button = within
three seconds.
The parking position is stored if the exterior
mirror does not move.
X If the mirror moves out of position, repeat
the steps.
Calling up a stored parking position
setting X
Turn the SmartKey to position 2 in the
ignition lock.
X Adjust the exterior mirror on the front-
passenger side using button ;.
X Engage reverse gear.
The exterior mirror on the front-passenger
side moves to the stored parking position.
The exterior mirror on the front-passenger
side moves back to its original position:
R as soon as you exceed a speed of 9 mph
(15 km/h)
R if you press button :
for the exterior
mirror on the driver's side 104
Mirrors
Seats, steering wheel and mirrors
Page 107 of 572

Memory function
Storing settings
G
WARNING
Only use the memory function on the driver's
side when
the vehicle is stationary. You could
otherwise be distracted from the traffic
conditions by the seat moving of its own
accord, and as a result cause an accident. X
Adjust the seat electrically ( Y
page 98).
X On the driver's side, adjust the steering
wheel (Y page
101) and the exterior mirrors
(Y page 103).
X Press memory button M and one of the
storage position buttons 1, 2 or 3 within
three seconds.
The settings are stored in the selected
preset position. A tone sounds when the
settings have been completed. Calling up a stored setting
X Press and hold the relevant storage
position button 1
, 2 or 3 until the seat,
steering wheel and exterior mirrors are in
the stored position.
i The setting procedure is interrupted as
soon as you release the storage position
button. Memory function
105
Seats, steering wheel and mirrors Z
Page 173 of 572

front. The specified minimum distance is set
using the control on the cruise control lever.
The electric parking brake automatically
secures the vehicle if DISTRONIC PLUS is
activated and:
R
the driver's door is open and the driver's
seat belt is unfastened.
R the engine is switched off, unless it is
automatically switched off by the ECO
start/stop function.
R a system malfunction occurs.
R the power supply is not sufficient.
If a
malfunction occurs, then the transmission
may also be shifted into position P
automatically.
Storing the current speed or calling up the
last stored speed G
WARNING
The set speed stored in memory should only
be set again if prevailing road conditions and
legal speed limits permit. Possible
acceleration or deceleration differences
arising from returning to the preset speed
could cause
an accident and/or serious injury
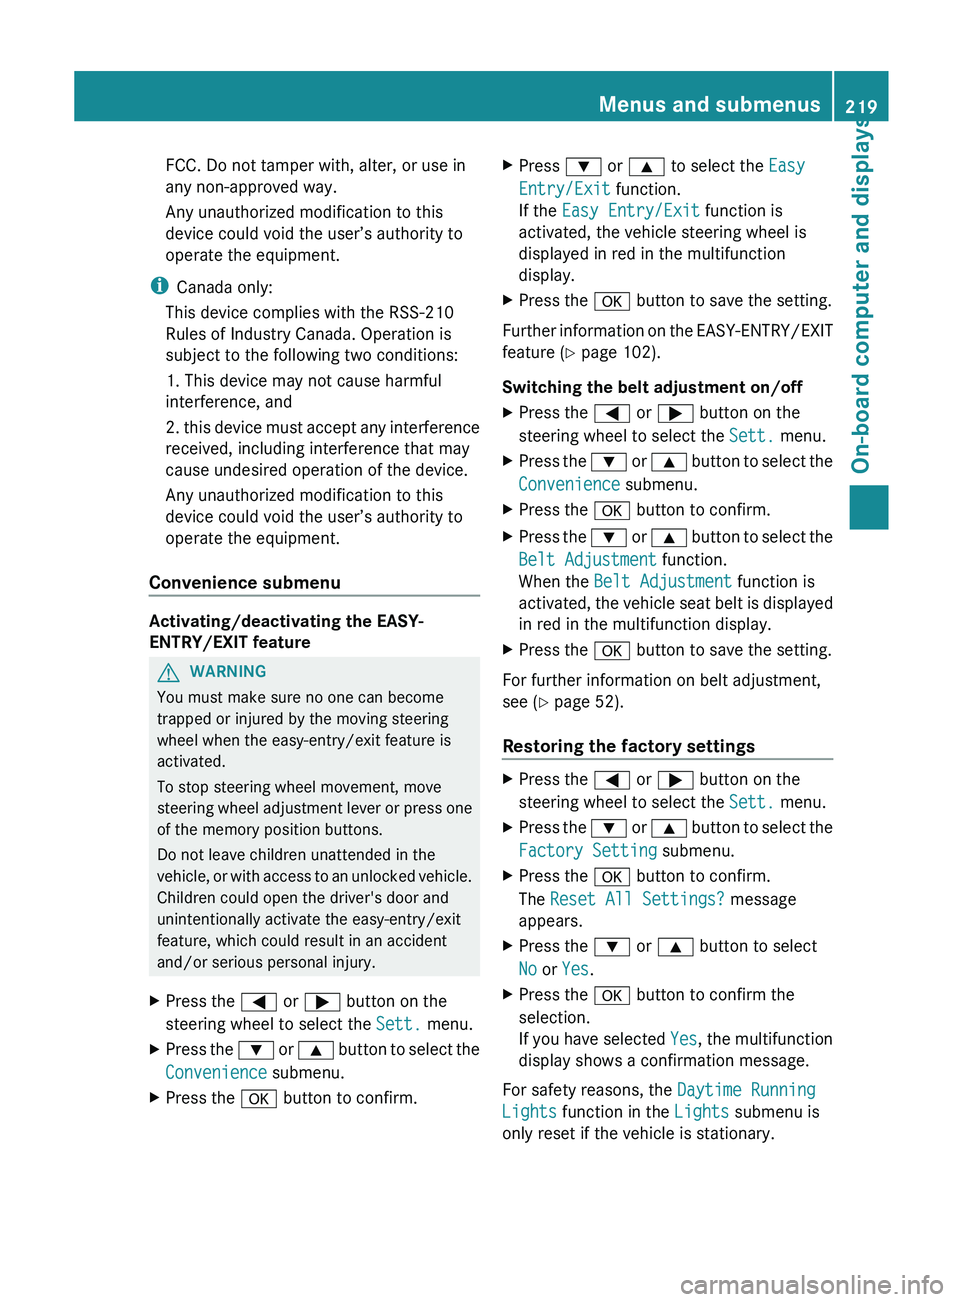
to you and others. Cruise control lever
X
Briefly pull the cruise control lever towards
you :.
X Remove your foot from the accelerator
pedal.
DISTRONIC PLUS is activated. The first
time it is activated, the current speed is stored. Otherwise, it sets the vehicle cruise
speed to the previously stored value.
Setting a speed G
WARNING
Keep in mind that it may take a brief moment
until the vehicle has made the necessary
adjustments.
Increase or
decrease the set vehicle speed to
a value that the prevailing road conditions and
legal speed limits permit. Otherwise, sudden
and unexpected acceleration or deceleration
of the vehicle could cause an accident and/
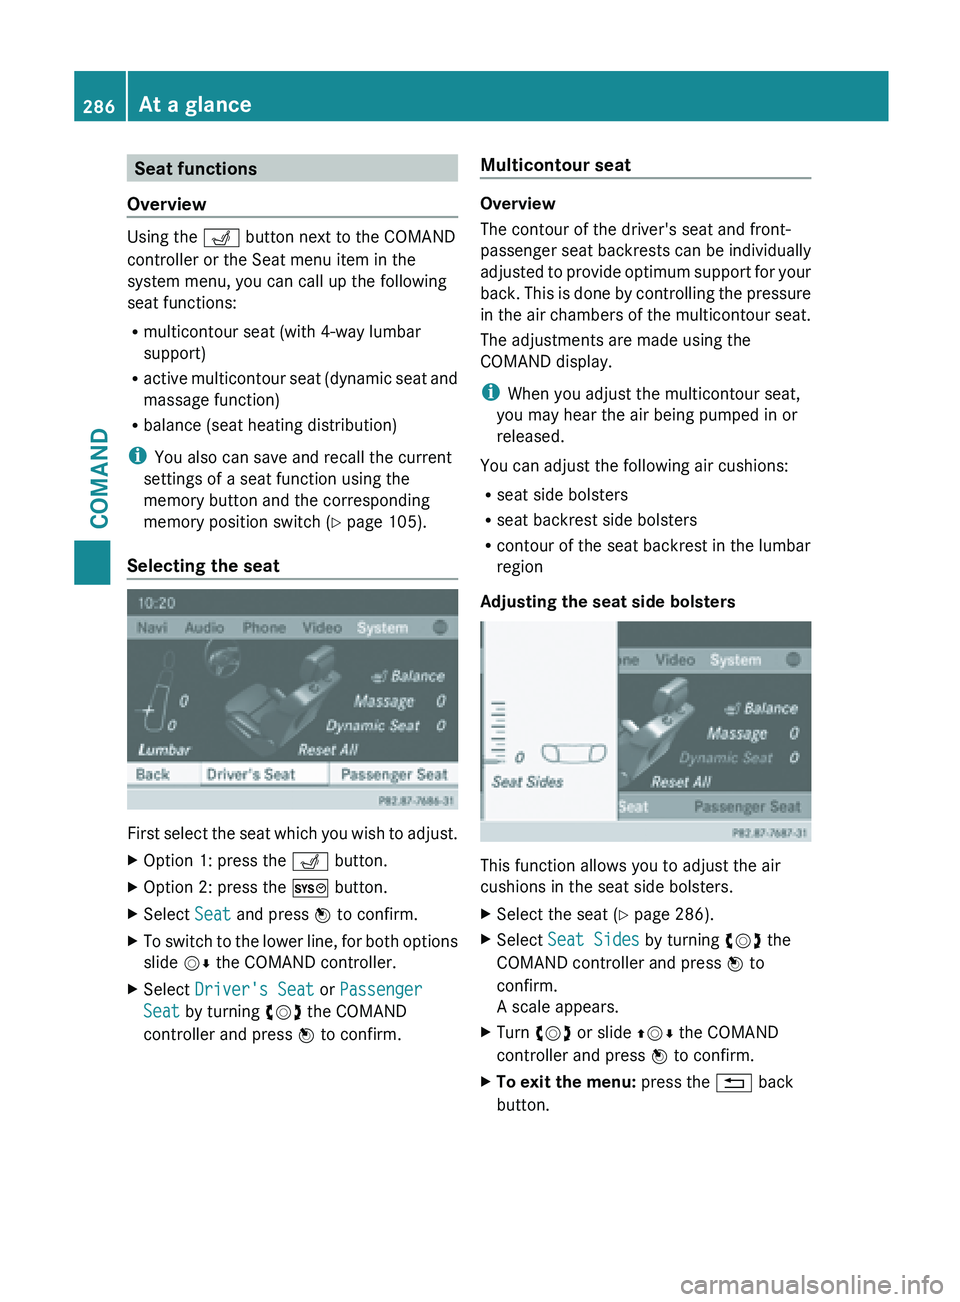
or serious injury to you and others. Cruise control lever
X
To adjust the speed in 1 mph
increments (1 km/h increments):
briefly press
the cruise control lever to the
pressure point, up : for a higher speed or
down ; for a lower speed.
Every time the cruise control lever is
pressed up or down, the last speed stored
is increased or reduced.
X To adjust the speed in 5 mph
increments (10 km/h increments):
briefly press the cruise control lever
beyond the pressure point, up : for a
higher speed
or down ; for a lower speed.
Every time the cruise control lever is
pressed up or down, the last speed stored
is increased or reduced. Driving systems
171
Driving and parking Z
Page 221 of 572

FCC. Do not tamper with, alter, or use in
any non-approved way.
Any unauthorized modification to this
device could void the user’s authority to
operate the equipment.
i Canada only:
This device complies with the RSS-210
Rules of Industry Canada. Operation is
subject to the following two conditions:
1. This device may not cause harmful
interference, and
2. this
device must accept any interference
received, including interference that may
cause undesired operation of the device.
Any unauthorized modification to this
device could void the user’s authority to
operate the equipment.
Convenience submenu Activating/deactivating the EASY-
ENTRY/EXIT feature
G
WARNING
You must make sure no one can become
trapped or injured by the moving steering
wheel when the easy-entry/exit feature is
activated.
To stop steering wheel movement, move
steering wheel
adjustment lever or press one
of the memory position buttons.
Do not leave children unattended in the
vehicle, or with access to an unlocked vehicle.
Children could open the driver's door and
unintentionally activate the easy-entry/exit
feature, which could result in an accident
and/or serious personal injury.
X Press the = or ; button on the
steering wheel to select the Sett. menu.
X Press the :
or 9
button to select the
Convenience submenu.
X Press the a button to confirm. X
Press : or 9 to select the Easy
Entry/Exit function.
If the Easy Entry/Exit function is
activated, the vehicle steering wheel is
displayed in red in the multifunction
display.
X Press the a button to save the setting.
Further information on the EASY-ENTRY/EXIT
feature ( Y page 102).
Switching the belt adjustment on/off
X Press the = or ; button on the
steering wheel to select the Sett. menu.
X Press the : or 9
button to select the
Convenience submenu.
X Press the a button to confirm.
X Press the :
or 9
button to select the
Belt Adjustment function.
When the Belt Adjustment function is
activated, the vehicle seat belt is displayed
in red in the multifunction display.
X Press the a button to save the setting.
For further information on belt adjustment,
see ( Y page 52).
Restoring the factory settings X
Press the = or ; button on the
steering wheel to select the Sett. menu.
X Press the : or 9
button to select the
Factory Setting submenu.
X Press the a button to confirm.
The Reset All Settings? message
appears.
X Press the : or 9 button to select
No or Yes.
X Press the a button to confirm the
selection.
If you
have selected Yes, the multifunction
display shows a confirmation message.
For safety reasons, the Daytime Running
Lights function in the Lights submenu is
only reset if the vehicle is stationary. Menus and submenus
219
On-board computer and displays Z
Page 288 of 572

Seat functions
Overview Using the T button next to the COMAND
controller or the Seat menu item in the
system menu, you can call up the following
seat functions:
R multicontour seat (with 4-way lumbar
support)
R active multicontour
seat (dynamic seat and
massage function)
R balance (seat heating distribution)
i You also can save and recall the current
settings of a seat function using the
memory button and the corresponding
memory position switch ( Y page 105).
Selecting the seat First
select the seat which you wish to adjust.
X Option 1: press the T button.
X Option 2: press the W button.
X Select Seat and press W to confirm.
X To switch to the lower line, for both options
slide VÆ the COMAND controller.
X Select Driver's Seat or Passenger
Seat by turning cVd the COMAND
controller and press W to confirm. Multicontour seat Overview
The contour of the driver's seat and front-
passenger
seat
backrests can be individually
adjusted to provide optimum support for your
back. This is done by controlling the pressure
in the air chambers of the multicontour seat.
The adjustments are made using the
COMAND display.
i When you adjust the multicontour seat,
you may hear the air being pumped in or
released.
You can adjust the following air cushions:
R seat side bolsters
R seat backrest side bolsters
R contour of the seat backrest in the lumbar
region
Adjusting the seat side bolsters This function allows you to adjust the air
cushions in the seat side bolsters.
X
Select the seat ( Y
page 286).
X Select Seat Sides by turning cVd the
COMAND controller and press W to
confirm.
A scale appears.
X Turn cVd or slide ZVÆ the COMAND
controller and press W to confirm.
X To exit the menu: press the % back
button. 286
At a glance
COMAND