2013 MERCEDES-BENZ SL-CLASS ROADSTER height
[x] Cancel search: heightPage 348 of 572
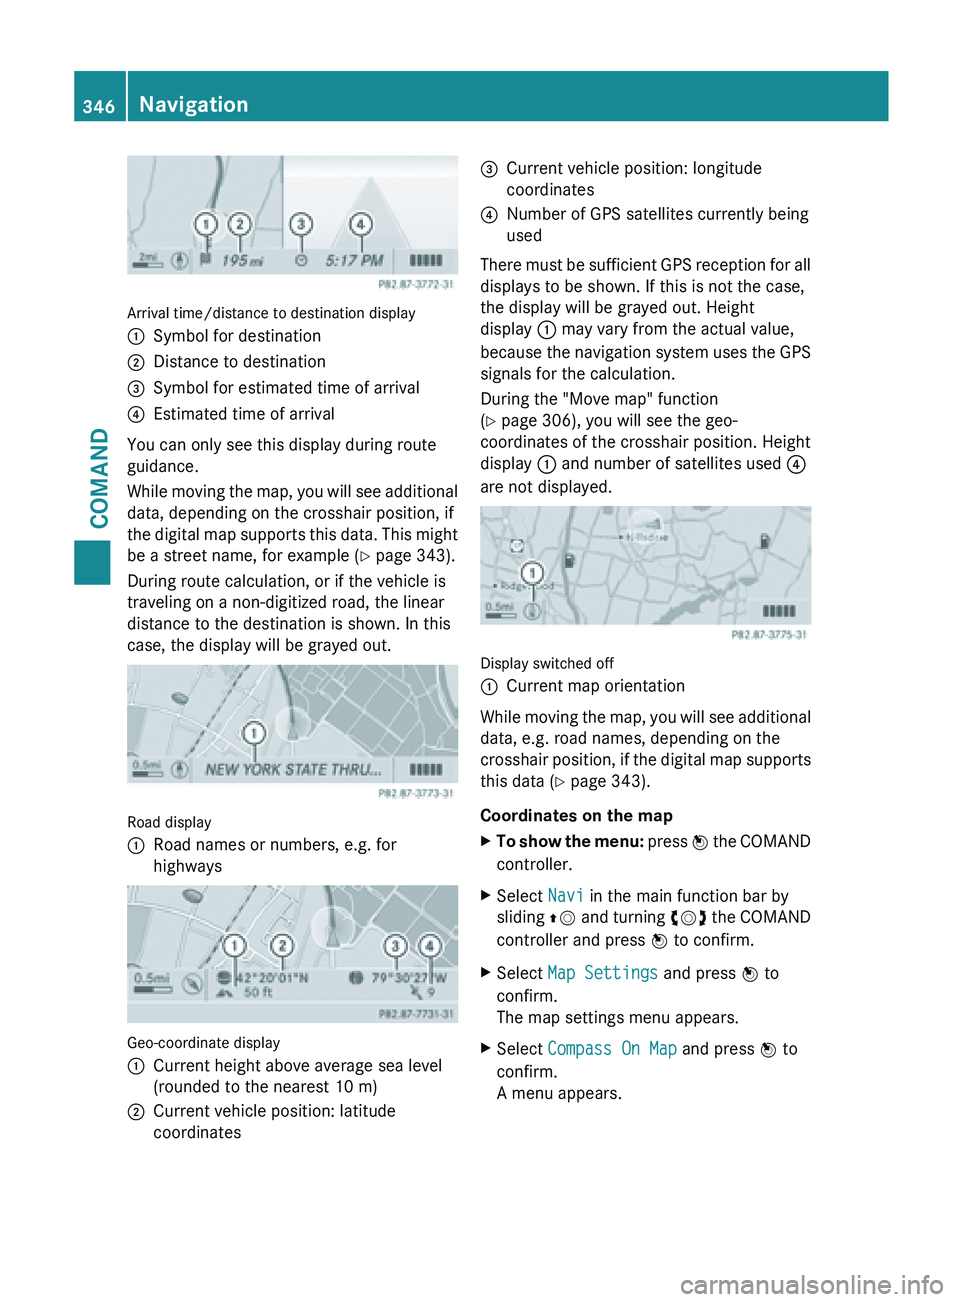
Arrival time/distance to destination display
:
Symbol for destination
; Distance to destination
= Symbol for estimated time of arrival
? Estimated time of arrival
You can only see this display during route
guidance.
While moving
the map, you will see additional
data, depending on the crosshair position, if
the digital map supports this data. This might
be a street name, for example ( Y page 343).
During route calculation, or if the vehicle is
traveling on a non-digitized road, the linear
distance to the destination is shown. In this
case, the display will be grayed out. Road display
:
Road names or numbers, e.g. for
highways Geo-coordinate display
:
Current height above average sea level
(rounded to the nearest 10 m)
; Current vehicle position: latitude
coordinates =
Current vehicle position: longitude
coordinates
? Number of GPS satellites currently being
used
There must be sufficient GPS reception for all
displays to be shown. If this is not the case,
the display will be grayed out. Height
display : may vary from the actual value,
because the
navigation system uses the GPS
signals for the calculation.
During the "Move map" function
(Y page 306), you will see the geo-
coordinates of the crosshair position. Height
display : and number of satellites used ?
are not displayed. Display switched off
:
Current map orientation
While moving the map, you will see additional
data, e.g. road names, depending on the
crosshair position,
if the digital map supports
this data ( Y page 343).
Coordinates on the map
X To show the menu: press W
the COMAND
controller.
X Select Navi in the main function bar by
sliding ZV and
turning cVd the COMAND
controller and press W to confirm.
X Select Map Settings and press W to
confirm.
The map settings menu appears.
X Select Compass On Map and press W to
confirm.
A menu appears. 346
Navigation
COMAND
Page 354 of 572
XM Radio website at
http://www.sirius.com (USA) or
http://www.siriuscanada.com
(Canada).
Once the connection has been established:
X Follow the instructions of the operator.
The activation process may take up to ten
minutes.
If registration is not included when
purchasing the system, your credit card
details will be required to activate your
account.
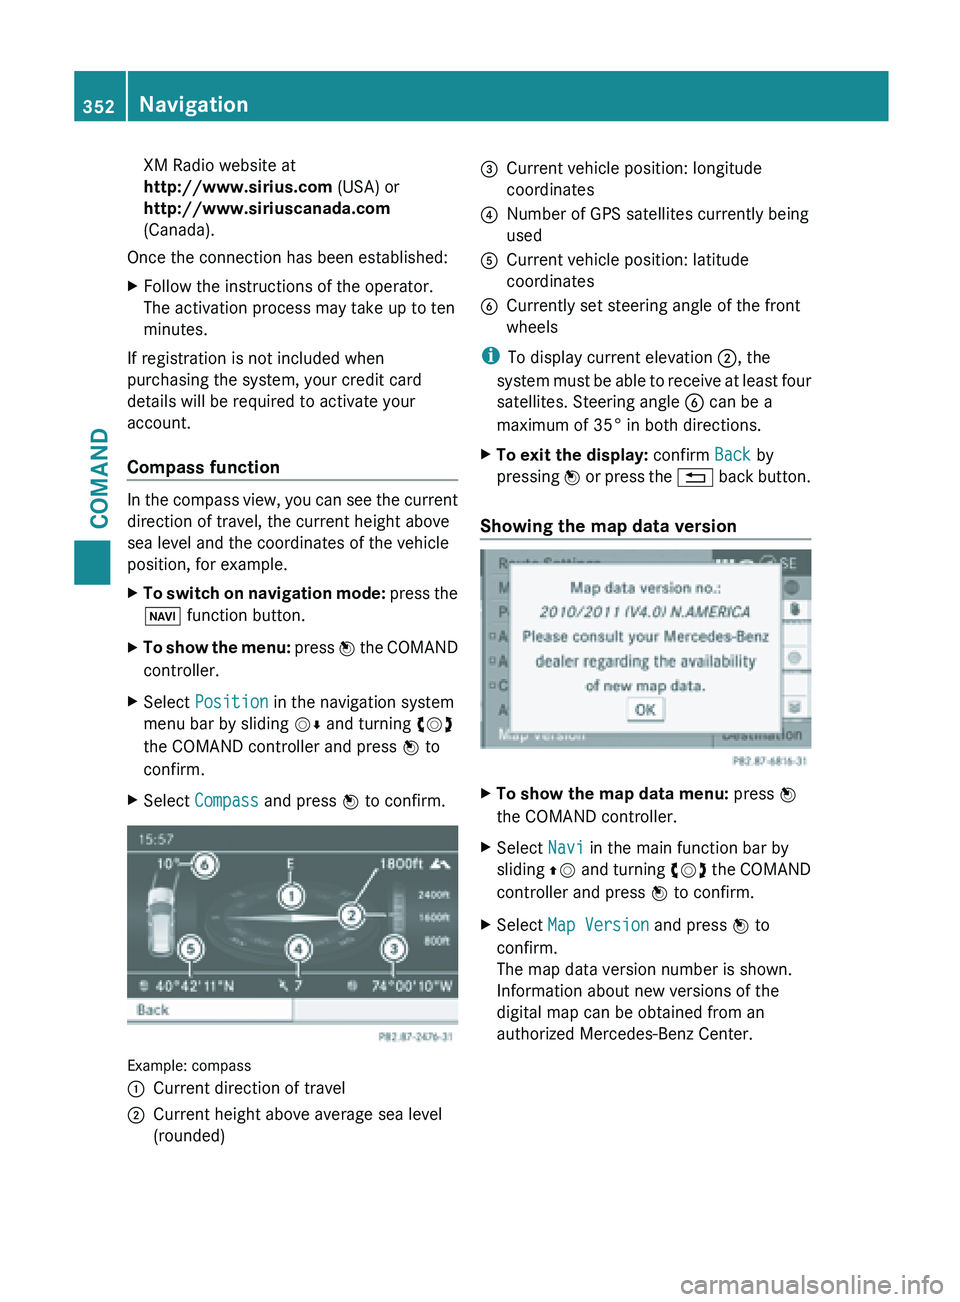
Compass function In the compass view, you can see the current
direction of travel, the current height above
sea level and the coordinates of the vehicle
position, for example.
X
To switch on navigation mode: press the
Ø function button.
X To show the menu:
press W
the COMAND
controller.
X Select Position in the navigation system
menu bar by sliding VÆ and turning cVd
the COMAND controller and press W to
confirm.
X Select Compass and press W to confirm. Example: compass
:
Current direction of travel
; Current height above average sea level
(rounded) =
Current vehicle position: longitude
coordinates
? Number of GPS satellites currently being
used
A Current vehicle position: latitude
coordinates
B Currently set steering angle of the front
wheels
i To display current elevation ;, the
system must
be able to receive at least four
satellites. Steering angle B can be a
maximum of 35° in both directions.
X To exit the display: confirm Back by
pressing W or
press the % back button.
Showing the map data version X
To show the map data menu: press W
the COMAND controller.
X Select Navi in the main function bar by
sliding ZV and
turning cVd the COMAND
controller and press W to confirm.
X Select Map Version and press W to
confirm.
The map data version number is shown.
Information about new versions of the
digital map can be obtained from an
authorized Mercedes-Benz Center. 352
Navigation
COMAND
Page 480 of 572
Problems with the loading aid
Problem Possible causes/consequences and
M SolutionsIt is no longer possible
to lower the stowed
roof in the trunk using
the loading aid. You cannot close the trunk any more.
X
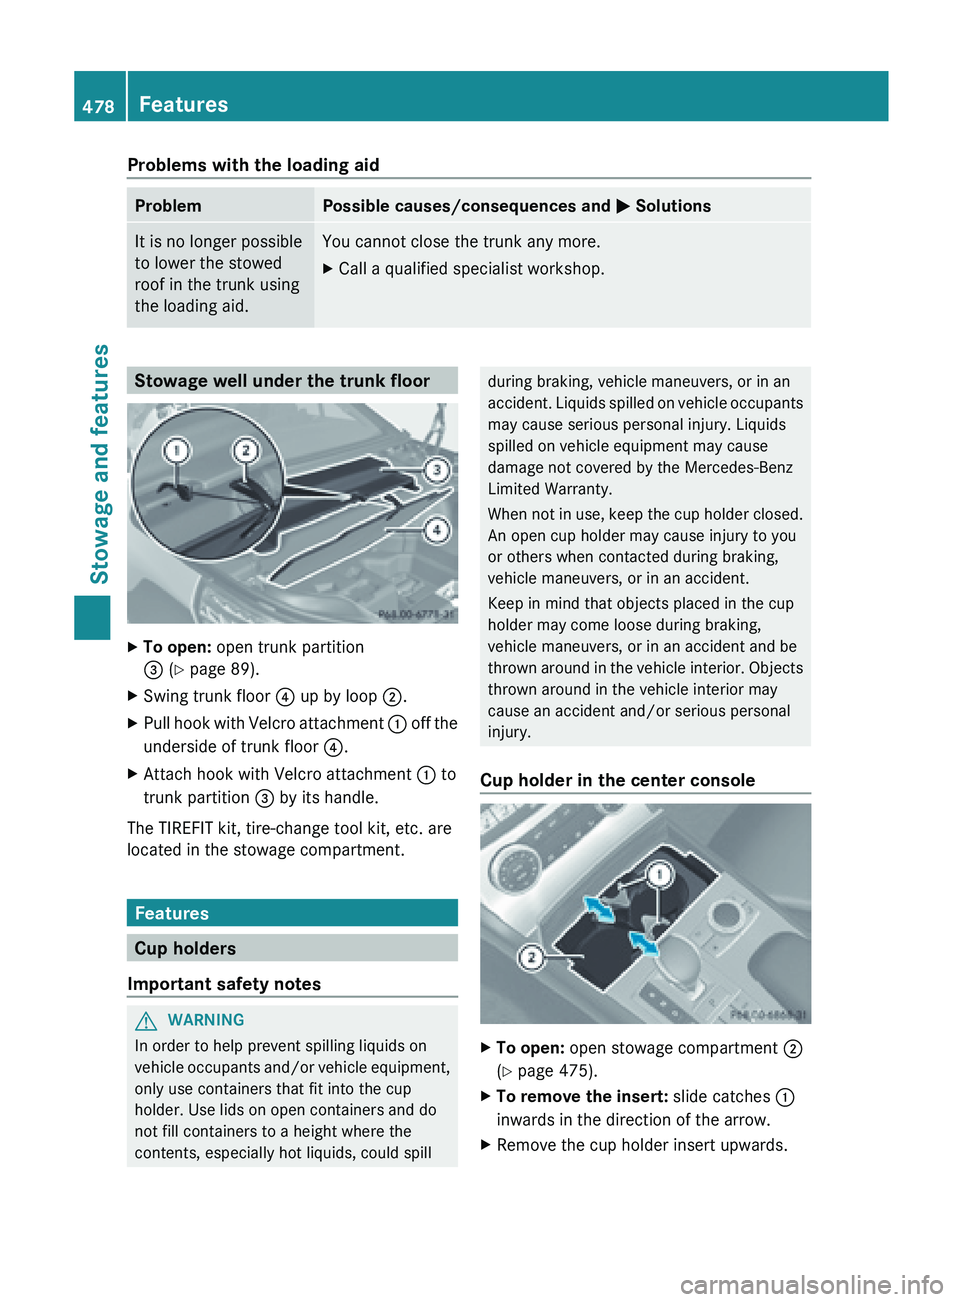
Call a qualified specialist workshop. Stowage well under the trunk floor
X
To open: open trunk partition
= (Y page 89).
X Swing trunk floor ? up by loop ;.
X Pull hook with Velcro attachment : off
the
underside of trunk floor ?.
X Attach hook with Velcro attachment : to
trunk partition = by its handle.
The TIREFIT kit, tire-change tool kit, etc. are
located in the stowage compartment. Features
Cup holders
Important safety notes G
WARNING
In order to help prevent spilling liquids on
vehicle occupants
and/or vehicle equipment,
only use containers that fit into the cup
holder. Use lids on open containers and do
not fill containers to a height where the
contents, especially hot liquids, could spill during braking, vehicle maneuvers, or in an
accident.
Liquids
spilled on vehicle occupants
may cause serious personal injury. Liquids
spilled on vehicle equipment may cause
damage not covered by the Mercedes-Benz
Limited Warranty.
When not in use, keep the cup holder closed.
An open cup holder may cause injury to you
or others when contacted during braking,
vehicle maneuvers, or in an accident.
Keep in mind that objects placed in the cup
holder may come loose during braking,
vehicle maneuvers, or in an accident and be
thrown around in the vehicle interior. Objects
thrown around in the vehicle interior may
cause an accident and/or serious personal
injury.
Cup holder in the center console X
To open: open stowage compartment ;
(Y page 475).
X To remove the insert: slide catches :
inwards in the direction of the arrow.
X Remove the cup holder insert upwards.478
Features
Stowage and features
Page 499 of 572
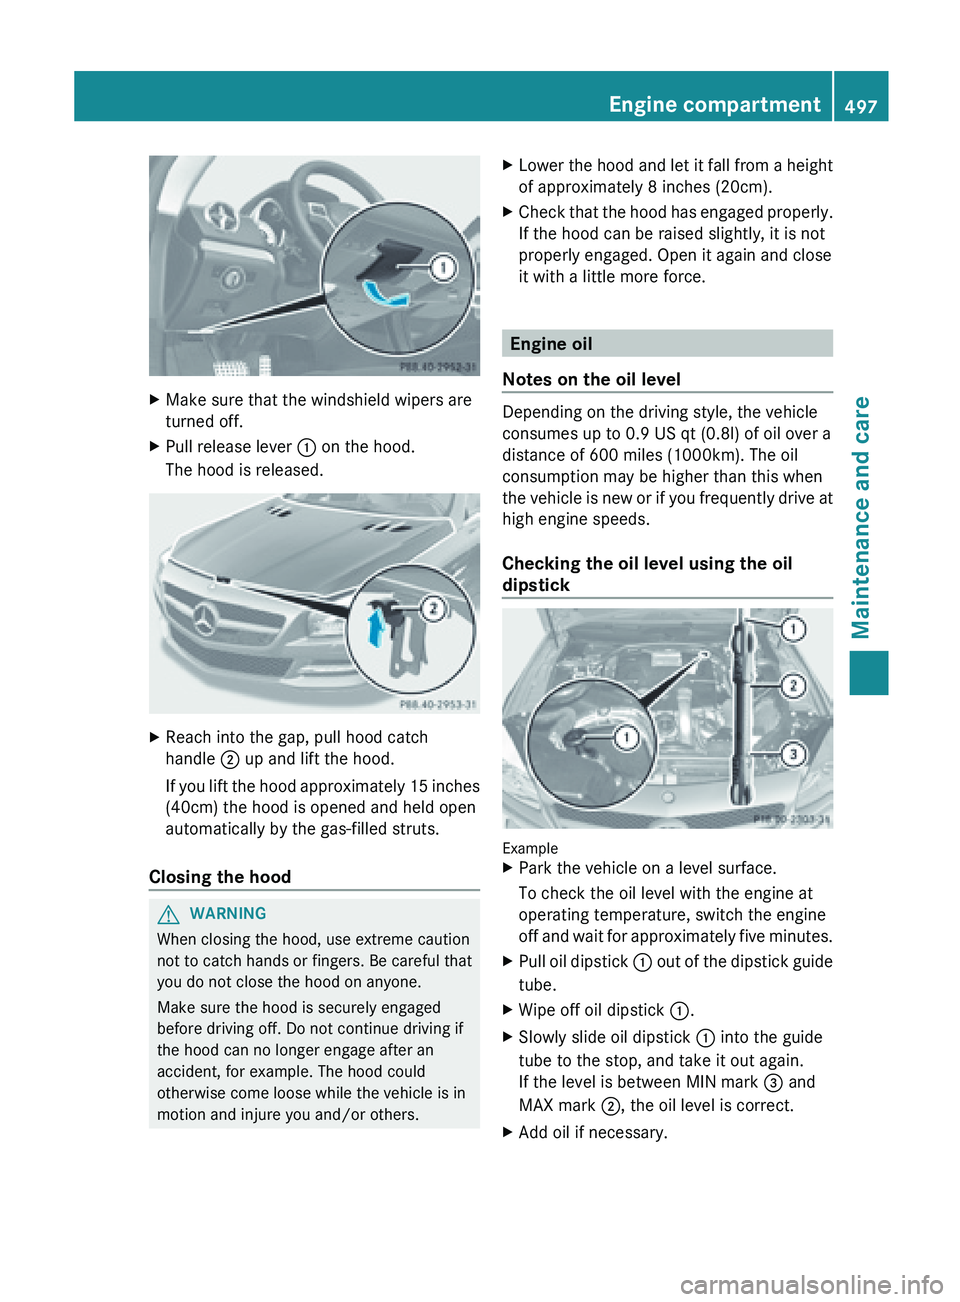
X
Make sure that the windshield wipers are
turned off.
X Pull release lever : on the hood.
The hood is released. X
Reach into the gap, pull hood catch
handle ; up and lift the hood.
If you
lift the hood approximately 15 inches
(40cm) the hood is opened and held open
automatically by the gas-filled struts.
Closing the hood G
WARNING
When closing the hood, use extreme caution
not to catch hands or fingers. Be careful that
you do not close the hood on anyone.
Make sure the hood is securely engaged
before driving off. Do not continue driving if
the hood can no longer engage after an
accident, for example. The hood could
otherwise come loose while the vehicle is in
motion and injure you and/or others. X
Lower the hood and let it fall from a height
of approximately 8 inches (20cm).
X Check
that the hood has engaged properly.
If the hood can be raised slightly, it is not
properly engaged. Open it again and close
it with a little more force. Engine oil
Notes on the oil level Depending on the driving style, the vehicle
consumes up to 0.9 US qt (
0.8l) of oil over a
distance of 600 miles (1000km). The oil
consumption may be higher than this when
the
vehicle is new or if you frequently drive at
high engine speeds.
Checking the oil level using the oil
dipstick Example
X
Park the vehicle on a level surface.
To check the oil level with the engine at
operating temperature, switch the engine
off and
wait for approximately five minutes.
X Pull oil dipstick : out
of the dipstick guide
tube.
X Wipe off oil dipstick :.
X Slowly slide oil dipstick : into the guide
tube to the stop, and take it out again.
If the level is between MIN mark = and
MAX mark ;, the oil level is correct.
X Add oil if necessary. Engine compartment
497
Maintenance and care Z
Page 544 of 572

Therefore, only use tire types and sizes
approved
for
your vehicle model. Observe the
tire load rating and speed rating required for
your vehicle. :
Tire width
; Nominal aspect ratio in %
= Tire code
? Rim diameter
A Load bearing index
B Speed rating
General:
depending on the manufacturer's
standards, the size imprinted in the tire wall
may not contain any letters or may contain
one letter
that precedes the size description.
If there is no letter preceding the size
description (as shown above): these are
passenger vehicle tires according to
European manufacturing standards.
If "P" precedes the size description: these are
passenger vehicle tires according to U.S.
manufacturing standards.
If "LT" precedes the size description: these
are light truck tires according to U.S.
manufacturing standards.
If "T" precedes the size description: these are
compact emergency spare wheels at high tire
pressure, to be used only temporarily in an
emergency.
Tire width: tire width : shows the nominal
tire width in millimeters.
Height-width ratio: aspect ratio ; is the
size ratio between the tire height and tire
width and is shown in percent. The aspect ratio is calculated by dividing the tire width by
the tire height.
Tire
code:
tire
code = specifies the tire type.
"R" represents radial tires; "D" represents
diagonal tires; "B" represents diagonal radial
tires.
Optionally, tires with a maximum speed of
over 149 mph (240 km/h) may have "ZR" in
the size description, depending on the
manufacturer (e.g. 245/40 ZR 18).
Rim diameter: rim diameter ? is the
diameter of the bead seat, not the diameter
of the rim flange. The rim diameter is
specified in inches (in).
Load-bearing index: load-bearing index A
is a numerical code that specifies the
maximum load-bearing capacity of a tire.
Do not overload the tires by exceeding the
specified load limit. The maximum
permissible load can be found on the
vehicle's Tire and Loading Information
placard on the B-pillar on the driver's side
(Y page 537).
Example:
The load bearing index 91 indicates a
maximum load of 1356 lb (615 kg) that the
tires can bear. For further information on the
maximum tire load in kilograms and pounds,
see ( Y page 544).
For further information on the load bearing
index, see "Load index" ( Y page 544).
Speed rating: speed rating B specifies the
approved maximum speed of the tire.
i Tire data is vehicle-specific and may
deviate from the data in the example.
Regardless of the speed rating, always
observe the speed limits. Drive carefully and
adapt your driving style to the traffic
conditions. 542
All about wheels and tires
Wheels and tires
Page 549 of 572

Aspect ratio
Relationship between tire height and tire
width in percent.
Tire pressure
This is pressure inside the tire applying an
outward
force
to each square inch of the tire's
surface. The tire pressure is specified in
pounds per square inch (psi), in kilopascal
(kPa) or in bar. The tire pressure should only
be corrected when the tires are cold.
Cold tire pressure
The tires are cold:
R if the vehicle has been parked without
direct sunlight on the tires for at least three
hours and
R if the vehicle has been driven for less than
1 mile (1.6 km).
Tread
The part of the tire that comes into contact
with the road.
Bead
The tire bead ensures that the tire sits
securely on the wheel. There are several steel
wires in the bead to prevent the tire from
coming loose from the wheel rim.
Sidewall
The part of the tire between the tread and the
bead.
Weight of optional extras
The combined weight of those optional extras
that weigh more than the replaced standard
parts and more than 2.3 kilograms (5 lbs).
These optional extras, such as high-
performance brakes, level control, a roof rack
or a high-performance battery, are not
included in the curb weight and the weight of
the accessories.
TIN (Tire Identification Number)
This is a unique identifier which can be used
by a tire manufacturer to identify tires, for
example for a product recall, and thus identify the purchasers. The TIN is made up of the
manufacturer's identity code, tire size, tire
type code and the manufacturing date.
Load bearing index
The load bearing index (also load index) is a
code
that
contains the maximum load bearing
capacity of a tire.
Traction
Traction is the result of friction between the
tires and the road surface.
Treadwear indicators
Narrow bars (tread wear bars) that are
distributed over the tire tread. If the tire tread
is level with the bars, the wear limit of á in
(1.6 mm) has been reached.
Occupant distribution
The distribution of occupants in a vehicle at
their designated seating positions.
Total load limit
Rated cargo and luggage load plus
68 kilograms (150 lb) multiplied by the
number of seats in the vehicle. Changing a wheel
Flat tire
Information on the procedure in the event of
a flat tire ( Y page 509). You will also find
information on
driving with MOExtended tires
in the event of a flat tire. Interchanging the wheels
G
WARNING
Interchanging the front and rear wheels may
severely impair the driving characteristics if
the wheels
or tires have different dimensions.
The wheel brakes or suspension components
may also be damaged. There is a risk of
accident. Changing a wheel
547
Wheels and tires
Z
Page 552 of 572
R
before raising the vehicle, secure it from
rolling away by applying the parking brake
and inserting wheel chocks. Never
disengage the parking brake while the
vehicle is raised.
R the jack must be placed on a firm, flat and
non-slip surface. On a loose surface, a
large, load-bearing
underlay must be used.
On a slippery surface, a non-slip underlay
must be used, e.g. rubber mats.
R do not use wooden blocks or similar
objects as a jack underlay. Otherwise, the
jack will not be able to achieve its load-
bearing capacity due to the restricted
height.
R make sure that the distance between the
underside of the tires and the ground does
not exceed 1.2 in (3 cm).
R never place your hands and feet under the
raised vehicle.
R never lie under the raised vehicle.
R never start the engine when the vehicle is
raised.
R never open or close a door or the trunk lid
when the vehicle is raised.
R make sure that no persons are present in
the vehicle when the vehicle is raised. X
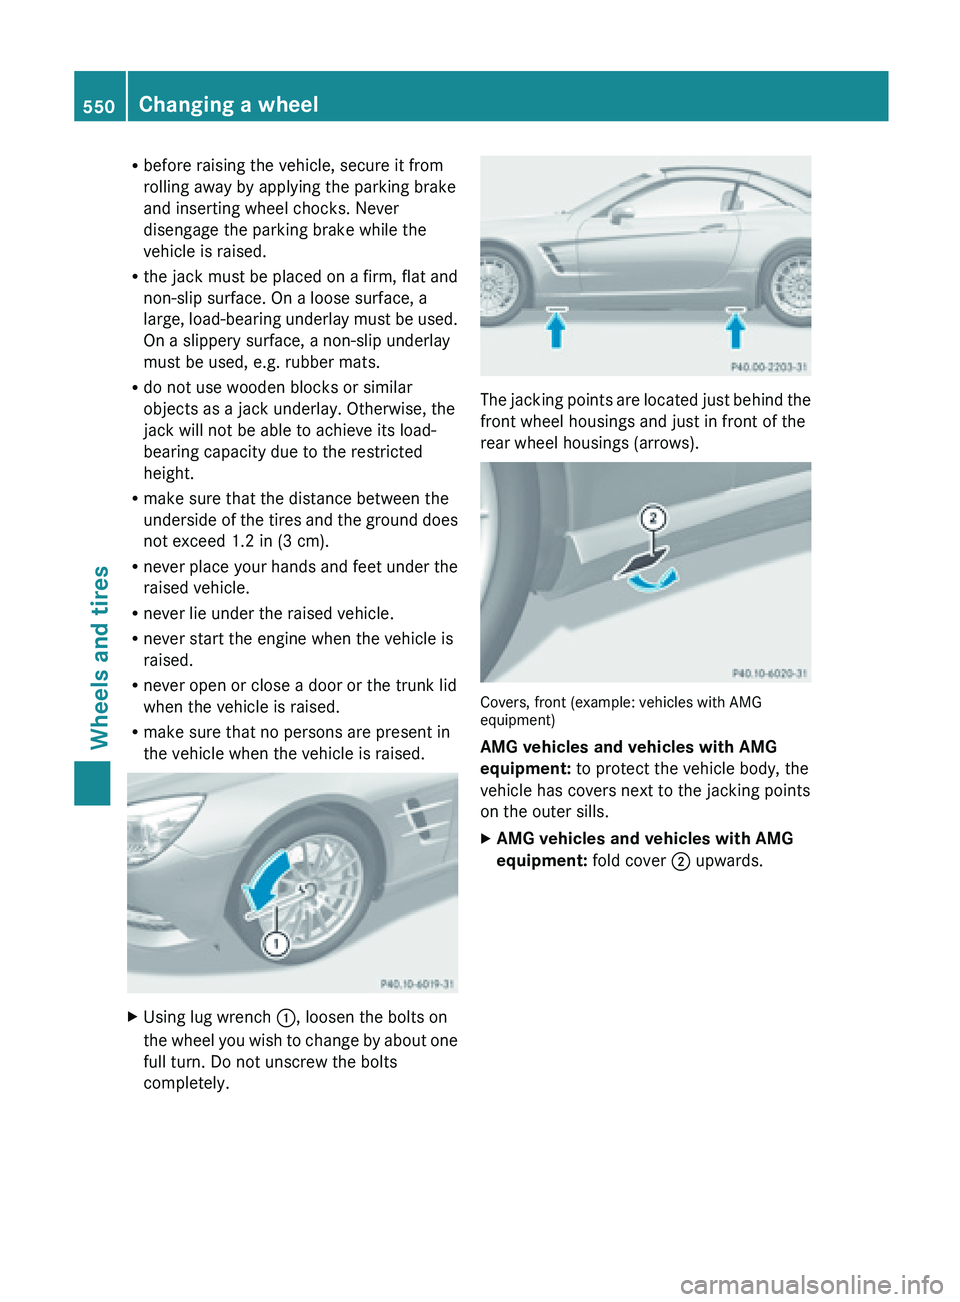
Using lug wrench :, loosen the bolts on
the wheel
you wish to change by about one
full turn. Do not unscrew the bolts
completely. The jacking points are located just behind the
front wheel housings and just in front of the
rear wheel housings (arrows).
Covers, front (example: vehicles with AMG
equipment)
AMG vehicles and vehicles with AMG
equipment:
to protect the vehicle body, the
vehicle has covers next to the jacking points
on the outer sills.
X AMG vehicles and vehicles with AMG
equipment: fold cover ; upwards.550
Changing a wheel
Wheels and tires
Page 567 of 572

!
Do not
add distilled or de-ionized water to
the washer fluid container. Otherwise, the
level sensor may be damaged.
! Only MB SummerFit and MB WinterFit
washer fluid should be mixed together. The
spray nozzles may otherwise become
blocked.
At temperatures above freezing:
X Fill the washer fluid reservoir with a mixture
of water and windshield washer fluid, e.g.
MB SummerFit.
X Add 1 part MB SummerFit to 100 parts
water.
At temperatures below freezing:
X Fill the washer fluid reservoir with a mixture
of water and windshield washer fluid, e.g.
MB WinterFit.
Adapt the mixing ratio to the
outside temperature.
X Down to 14 ‡ (Ò10 †): mix 1 part MB
WinterFit with 2 parts water.
X Down to Ò4 ‡ (Ò20 †): mix 1 part MB
WinterFit with 1 part water.
X Down to Ò20.2 ‡ (
Ò29 †): mix 2 parts MB
WinterFit with 1 part water. Model Capacity
All models
5.6 US qt(5.3 l)
i
Add windshield washer fluid, e.g. MB
SummerFit or MB WinterFit, to the washer
fluid all year round. Vehicle data
General notes
Please note that for the specified vehicle
data:
R The heights specified may vary as a result
of:
-tires
- load
- condition of the suspension
- optional equipment
R The vehicle length specified includes the
front license plate adapter. Dimensions and weights
All models (except
AMG vehicles)
:Opening height 75.8 in (1925 mm)
AMG vehicles
:Opening height 75.6 in – 79.3 in
(1921 mm –2013 mm ) Vehicle data
565
Technical data Z