2013 MERCEDES-BENZ SL-CLASS ROADSTER warning light
[x] Cancel search: warning lightPage 323 of 572
X
Call up the maps.google.com website and
destination address in the address entry
field.
X Click the corresponding button to send the
destination address to the e-mail address
registered with mbrace.
X Enter the e-mail address you specified
when setting up your mbrace account into
the corresponding
field in the "Send" dialog
window.
X Click "Send".
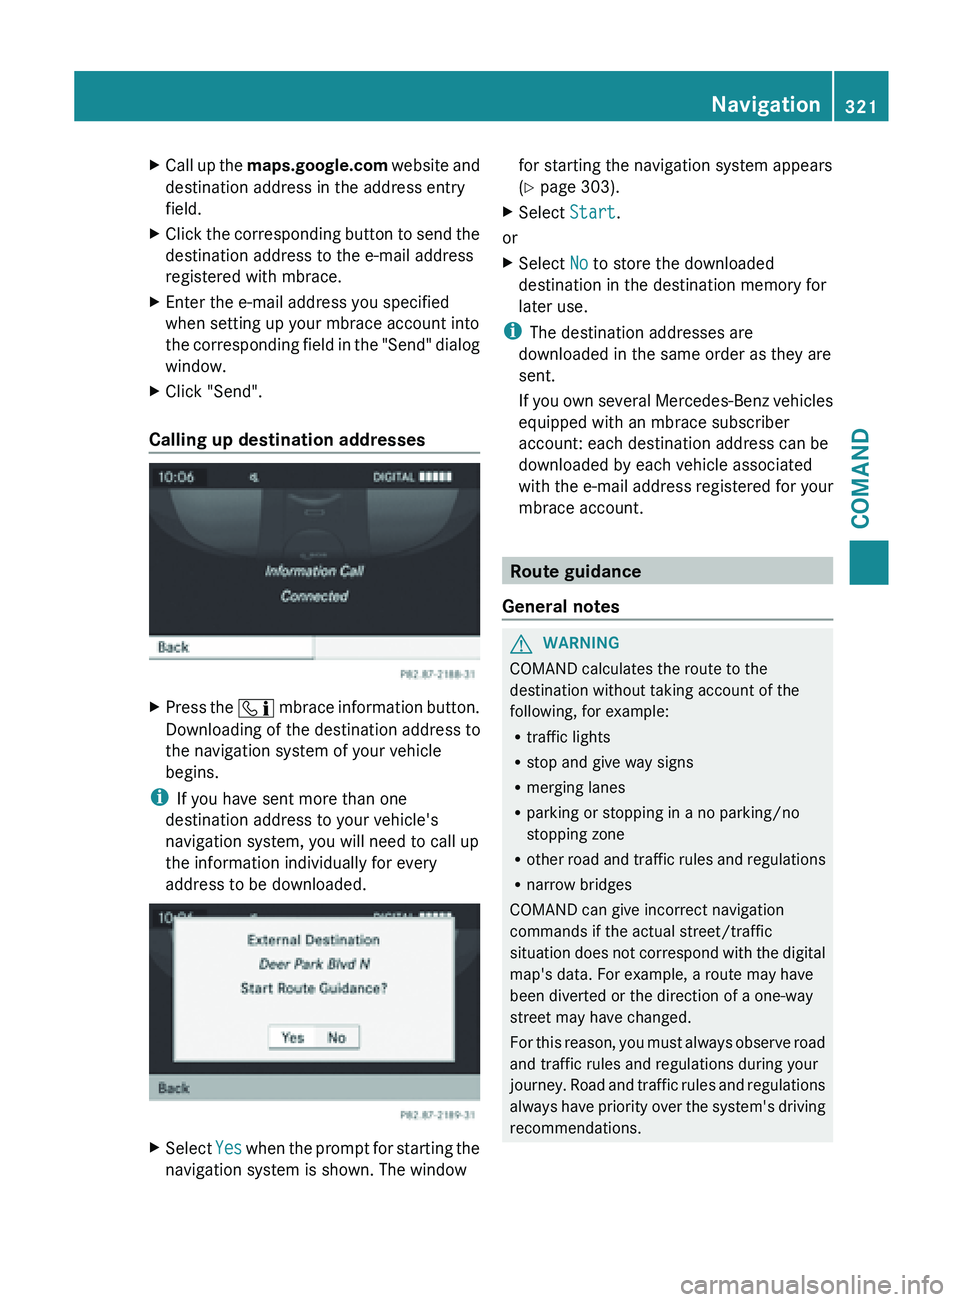
Calling up destination addresses X
Press the ï mbrace
information button.
Downloading of the destination address to
the navigation system of your vehicle
begins.
i If you have sent more than one
destination address to your vehicle's
navigation system, you will need to call up
the information individually for every
address to be downloaded. X
Select Yes when the prompt for starting the
navigation system is shown. The window for starting the navigation system appears
(
Y page 303).
X Select Start.
or
X Select No to store the downloaded
destination in the destination memory for
later use.
i The destination addresses are
downloaded in the same order as they are
sent.
If you
own several Mercedes-Benz vehicles
equipped with an mbrace subscriber
account: each destination address can be
downloaded by each vehicle associated
with the e-mail address registered for your
mbrace account. Route guidance
General notes G
WARNING
COMAND calculates the route to the
destination without taking account of the
following, for example:
R traffic lights
R stop and give way signs
R merging lanes
R parking or stopping in a no parking/no
stopping zone
R other road
and traffic rules and regulations
R narrow bridges
COMAND can give incorrect navigation
commands if the actual street/traffic
situation does not correspond with the digital
map's data. For example, a route may have
been diverted or the direction of a one-way
street may have changed.
For this reason, you must always observe road
and traffic rules and regulations during your
journey. Road and traffic rules and regulations
always have priority over the system's driving
recommendations. Navigation
321
COMAND Z
Page 460 of 572
X
Select the Back (to movie) menu item in
the menu and press W to confirm.
Setting the language and audio format This function is not available on all DVDs. If it
is available, you can set the DVD menu
language, the audio language or the audio
format.
The
number of settings is determined
by the DVD content. It is possible that the
settings may also be accessed in the DVD
menu (Y page 457).
X Show the DVD menu (Y page 457).
X In full-screen mode, press W the
COMAND
controller to show the menu.
X Select DVD-Video in the menu by turning
cVd the COMAND controller and press
W to confirm.
X Select DVD Functions and press W to
confirm.
X Select Menu Language or Audio
Language and press W to confirm.
In both cases, a menu appears after a few
seconds. The # dot in front of an entry
indicates the currently selected language.
X Select a setting by turning cVd the
COMAND controller and press W to
confirm.
Subtitles and camera angle These functions are not available on all DVDs.
The
number
of subtitle languages and camera
angles available depends on the content of
the DVD. It is possible that the settings may
also be accessed in the DVD menu
(Y page 457).
X Activate the DVD menu (Y page 457).
X Select DVD-Video in the menu by turning
cVd the COMAND controller and press
W to confirm.
X Select DVD Functions and press W to
confirm. X
Select Subtitles or Camera Angle and
press W to confirm.
In both
cases, a menu appears. The # dot
in front of an entry indicates the current
setting.
X Select a setting by turning cVd the
COMAND controller and press W to
confirm.
Interactive content DVDs can contain interactive content (e.g. a
video game). In a video game, for example,
you may be able to influence events by
selecting
and
triggering actions. The type and
number of actions depend on the DVD.
X Select an action by sliding ZVÆ or XVY
the
COMAND controller and press W to
execute it.
A menu appears and the first entry,
Select, is highlighted.
X Press W the COMAND controller. AUX video mode
Connecting external video sources G
WARNING
External video sources may have different
volumes, which can mean that system
messages such
as traffic announcements and
navigation system announcements are much
louder. If necessary, please deactivate the
system messages or adjust their volume
manually.
If your vehicle is equipped with Media
Interface, you can connect an external video
source (AUX video) ( Y page 445).
The 1/8 inch audio/video jacks are in the
center console stowage compartment.
i In vehicles with a rear view camera, the
AUX video jack cannot be used for external
video sources. 458
Video
COMAND
Page 478 of 572
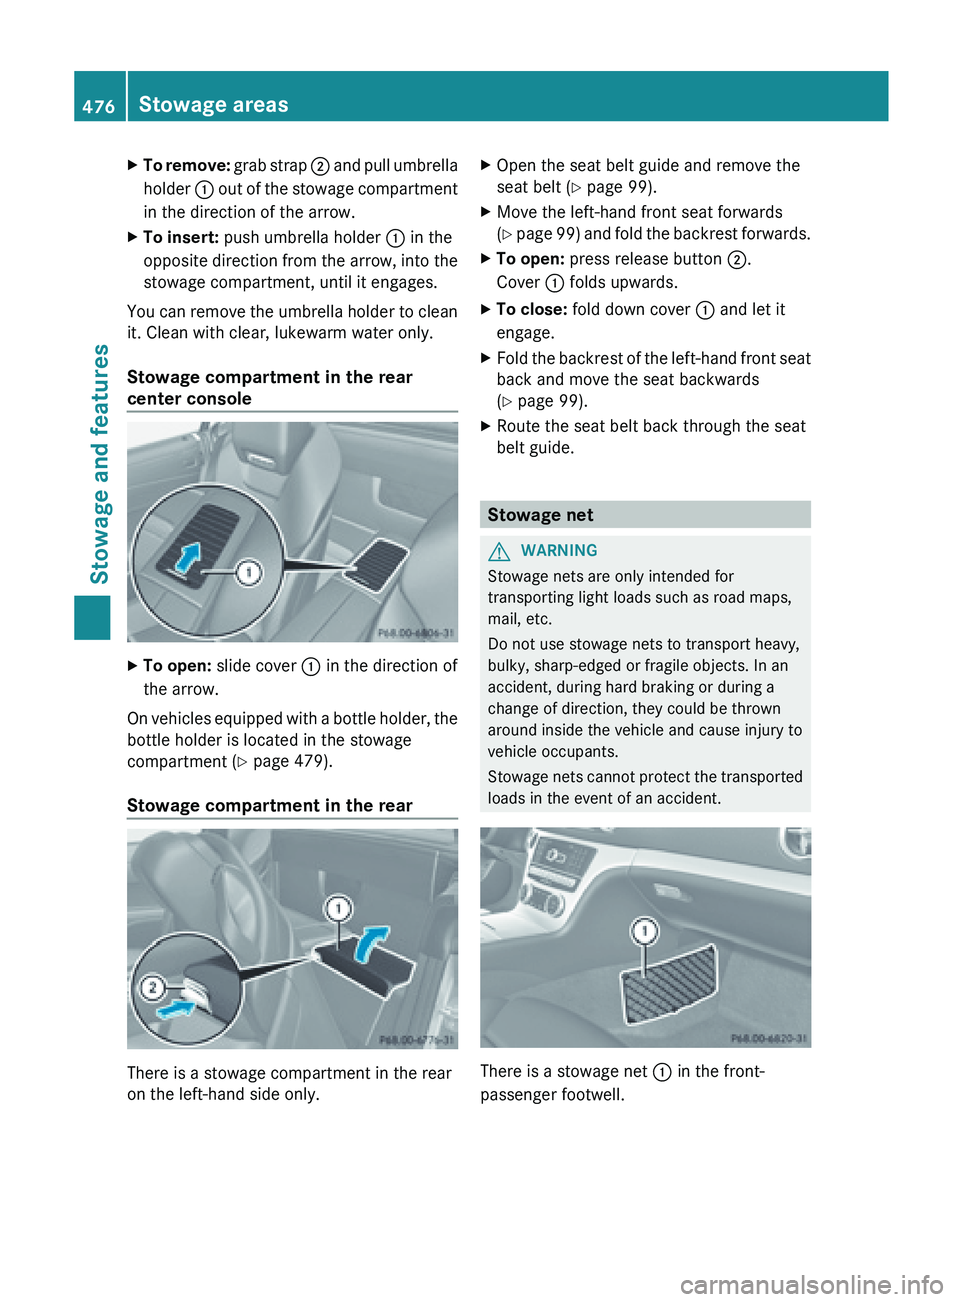
X
To remove: grab strap ; and pull umbrella
holder : out of the stowage compartment
in the direction of the arrow.
X To insert: push umbrella holder : in the
opposite direction
from the arrow, into the
stowage compartment, until it engages.
You can remove the umbrella holder to clean
it. Clean with clear, lukewarm water only.
Stowage compartment in the rear
center console X
To open: slide cover : in the direction of
the arrow.
On vehicles equipped with a bottle holder, the
bottle holder is located in the stowage
compartment (
Y page 479).
Stowage compartment in the rear There is a stowage compartment in the rear
on the left-hand side only. X
Open the seat belt guide and remove the
seat belt ( Y page 99).
X Move the left-hand front seat forwards
(Y page
99) and fold the backrest forwards.
X To open: press release button ;.
Cover : folds upwards.
X To close: fold down cover : and let it
engage.
X Fold the backrest of the left-hand front seat
back and move the seat backwards
(Y page 99).
X Route the seat belt back through the seat
belt guide. Stowage net
G
WARNING
Stowage nets are only intended for
transporting light loads such as road maps,
mail, etc.
Do not use stowage nets to transport heavy,
bulky, sharp-edged or fragile objects. In an
accident, during hard braking or during a
change of direction, they could be thrown
around inside the vehicle and cause injury to
vehicle occupants.
Stowage nets
cannot protect the transported
loads in the event of an accident. There is a stowage net
: in the front-
passenger footwell. 476
Stowage areasStowage and features
Page 479 of 572
Loading aid in the trunk
Raising/lowering the roof G
WARNING
To prevent injuries, make sure that there is no
possibility of body parts getting caught in
moving parts.
If potential danger exists, press
the switch again. This will immediately stop
the movement of the hardtop.
! Only close the trunk once the roof is
lowered completely. Otherwise, you could
damage the roof.
If you close the trunk lid before the roof is
lowered completely, the loading aid switch
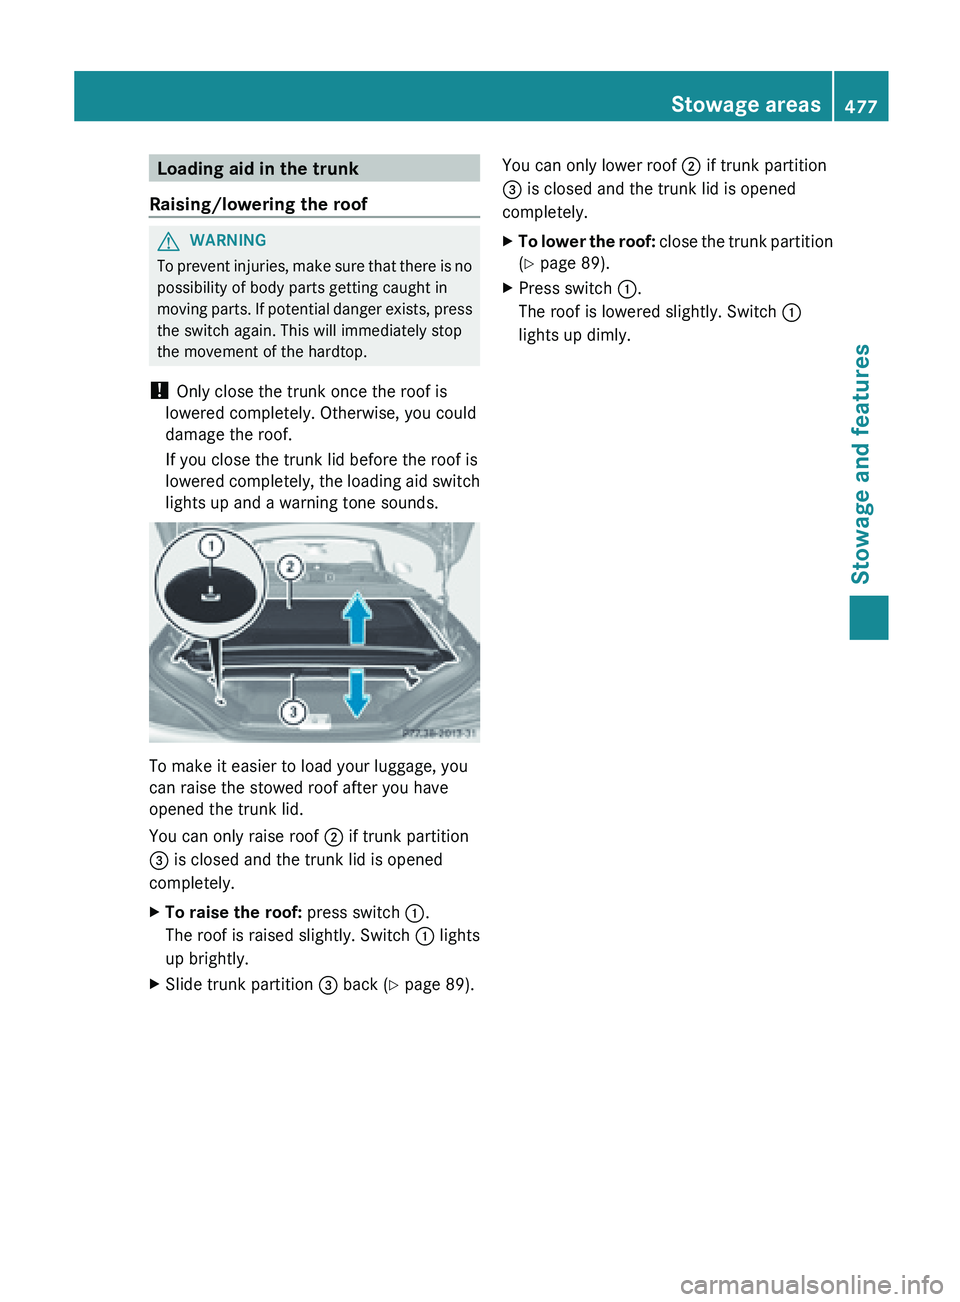
lights up and a warning tone sounds. To make it easier to load your luggage, you
can raise the stowed roof after you have
opened the trunk lid.
You can only raise roof
;
if trunk partition
= is closed and the trunk lid is opened
completely.
X To raise the roof: press switch :.
The roof is raised slightly. Switch : lights
up brightly.
X Slide trunk partition = back (Y page 89). You can only lower roof
; if trunk partition
= is closed and the trunk lid is opened
completely.
X To lower the roof: close
the trunk partition
(Y page 89).
X Press switch :.
The roof is lowered slightly. Switch :
lights up dimly. Stowage areas
477
Stowage and features Z
Page 481 of 572
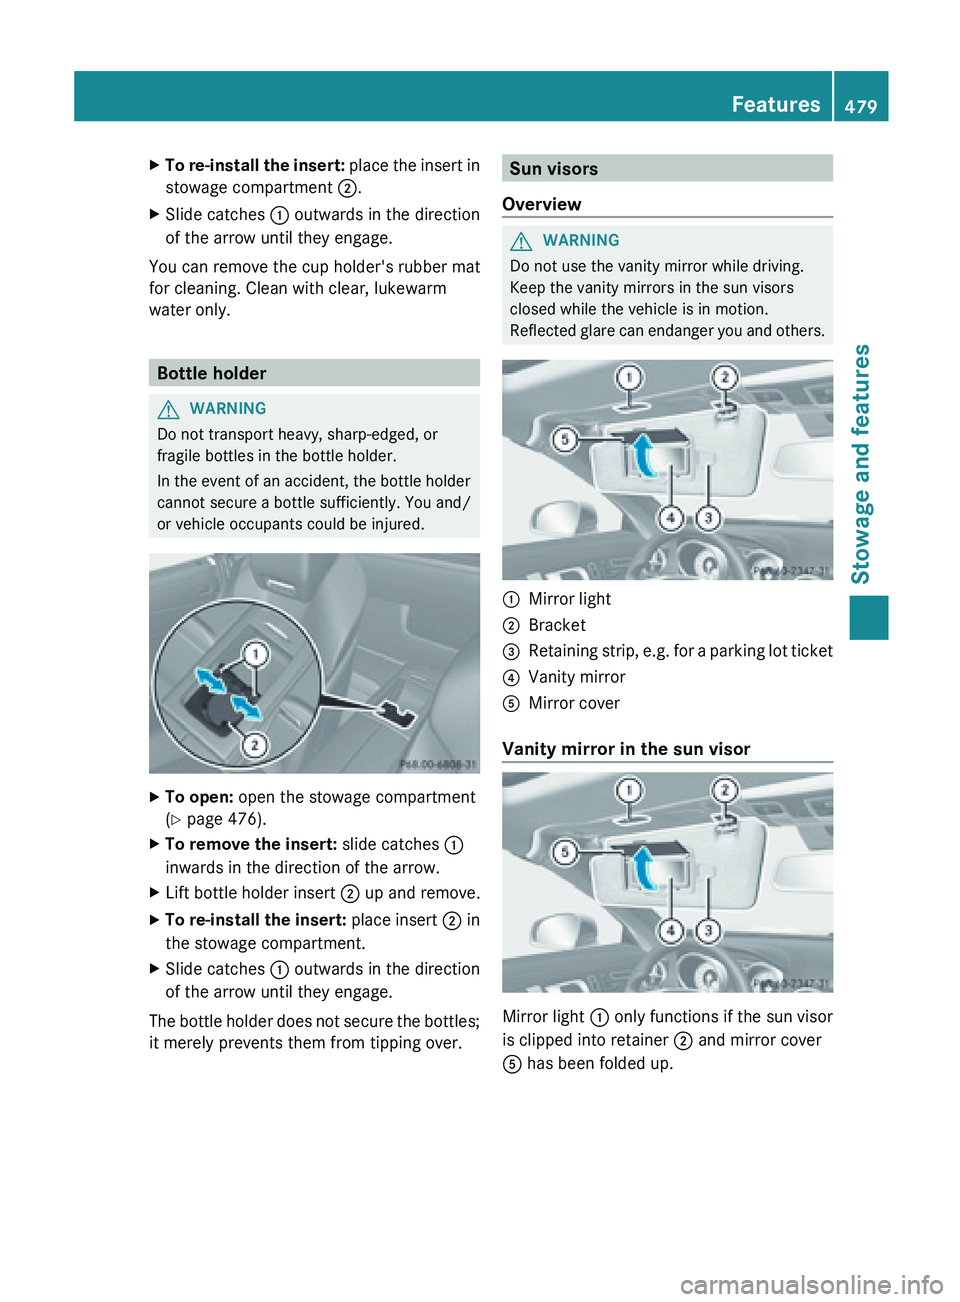
X
To re-install the insert: place the insert in
stowage compartment ;.
X Slide catches : outwards in the direction
of the arrow until they engage.
You can remove the cup holder's rubber mat
for cleaning. Clean with clear, lukewarm
water only. Bottle holder
G
WARNING
Do not transport heavy, sharp-edged, or
fragile bottles in the bottle holder.
In the event of an accident, the bottle holder
cannot secure a bottle sufficiently. You and/
or vehicle occupants could be injured. X
To open: open the stowage compartment
(Y page 476).
X To remove the insert: slide catches :
inwards in the direction of the arrow.
X Lift bottle holder insert ; up and remove.
X To re-install the insert: place
insert ; in
the stowage compartment.
X Slide catches : outwards in the direction
of the arrow until they engage.
The bottle holder does not secure the bottles;
it merely prevents them from tipping over. Sun visors
Overview G
WARNING
Do not use the vanity mirror while driving.
Keep the vanity mirrors in the sun visors
closed while the vehicle is in motion.
Reflected glare
can endanger you and others. :
Mirror light
; Bracket
= Retaining strip, e.g. for a parking lot ticket
? Vanity mirror
A Mirror cover
Vanity mirror in the sun visor Mirror light : only functions if the sun visor
is clipped into retainer
; and mirror cover
A has been folded up. Features
479
Stowage and features Z
Page 482 of 572
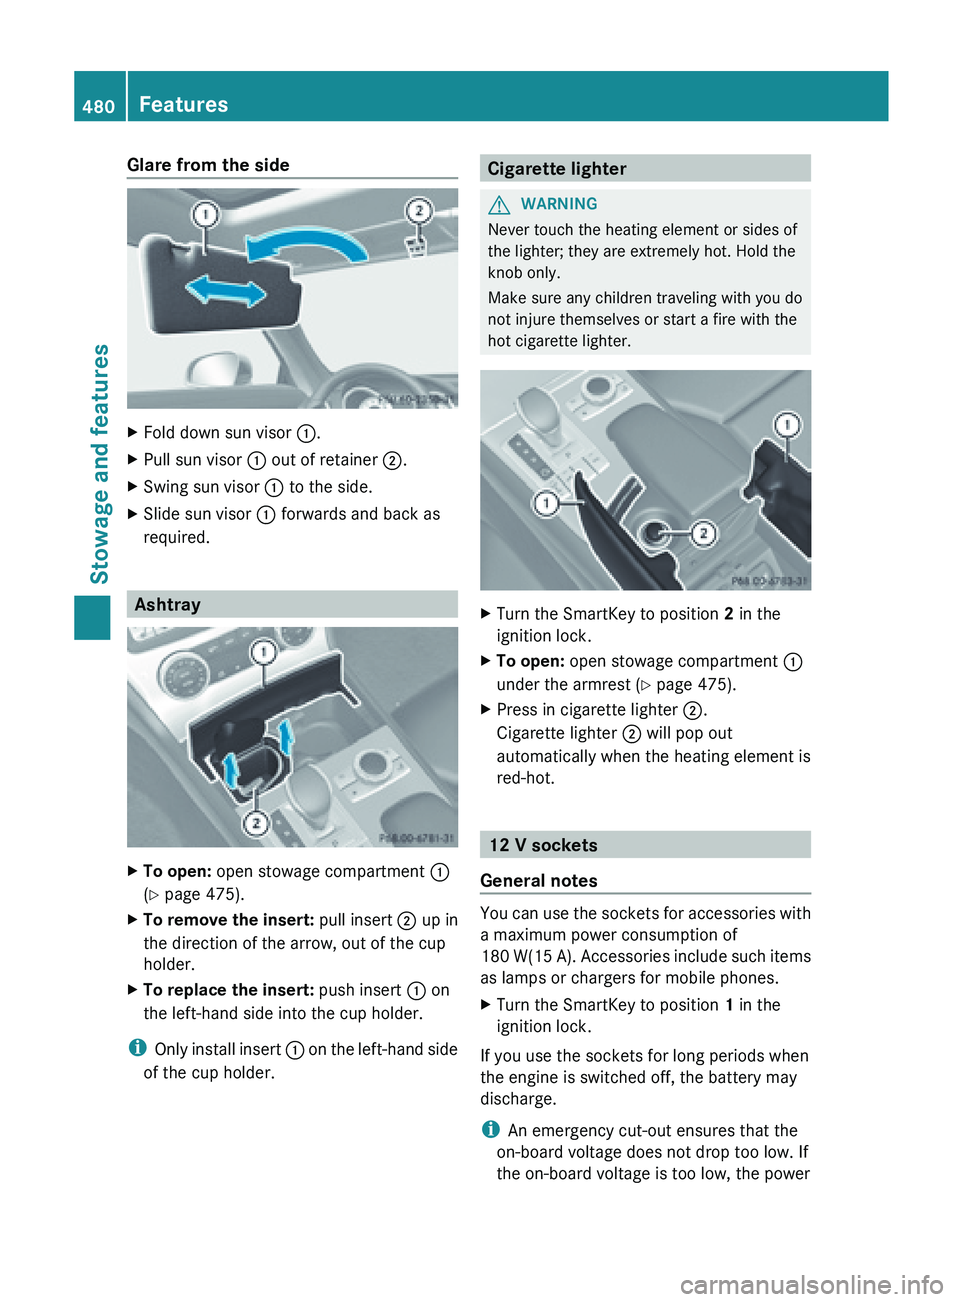
Glare from the side
X
Fold down sun visor :.
X Pull sun visor : out of retainer ;.
X Swing sun visor : to the side.
X Slide sun visor : forwards and back as
required. Ashtray
X
To open: open stowage compartment :
(Y page 475).
X To remove the insert: pull insert ; up in
the direction of the arrow, out of the cup
holder.
X To replace the insert: push insert : on
the left-hand side into the cup holder.
i Only install
insert : on the left-hand side
of the cup holder. Cigarette lighter
G
WARNING
Never touch the heating element or sides of
the lighter; they are extremely hot. Hold the
knob only.
Make sure any children traveling with you do
not injure themselves or start a fire with the
hot cigarette lighter. X
Turn the SmartKey to position 2 in the
ignition lock.
X To open: open stowage compartment :
under the armrest (Y page 475).
X Press in cigarette lighter ;.
Cigarette lighter ; will pop out
automatically when the heating element is
red-hot. 12 V sockets
General notes You can use the sockets for accessories with
a maximum power consumption of
180
W(15
A). Accessories include such items
as lamps or chargers for mobile phones.
X Turn the SmartKey to position 1 in the
ignition lock.
If you use the sockets for long periods when
the engine is switched off, the battery may
discharge.
i An emergency cut-out ensures that the
on-board voltage does not drop too low. If
the on-board voltage is too low, the power 480
Features
Stowage and features
Page 488 of 572
Shortly after successfully registering with the
mbrace service, a user ID and password will
be
sent
to you by mail. USA only: you can use
this password to log onto the mbrace area
under "Owners Online" at http://
www.mbusa.com.
The mbrace system is available if:
R it has been activated and is operational.
R the corresponding mobile phone network
is available for transmitting data to the
Customer Assistance Center.
R a service subscription is available.
R the starter battery is sufficiently charged.
i Determining the location of the vehicle on
a map is only possible if:
R GPS reception is available
R the vehicle position can be forwarded to
the Customer Assistance Center.
The mbrace system To adjust the volume during an mbrace call,
proceed as follows:
X
Press the W or X button on the
multifunction steering wheel.
or
X Use the volume controller of COMAND.
The mbrace system provides various
services, e.g.:
R automatic and manual emergency call
R Roadside Assistance call
R MB Info call
USA only: you can find information and a
description of all available features under
"Owners Online"
at http://www.mbusa.com. System self-test G
WARNING
A malfunction in the system has been
detected if one of the following conditions
occurs:
R the indicator lamp in the SOS button does
not light up during the system self-
diagnosis.
R the indicator lamp in the F Roadside
Assistance button does not light up during
the system self-diagnosis.
R the indicator lamp in the ï information
button does not light up during self-
diagnosis of the system.
R the indicator lamp in the SOS button, the
F Roadside Assistance button or the
ï information button continues to light
up red after the system self-diagnosis.
R The mbrace Inoperative or mbrace
Service Not Activated message
appears in the multifunction display after
the system self-diagnosis.
If a
malfunction is indicated as outlined above,
the system may not operate as expected. In
the event of an emergency, assistance must
be summoned by other means.
Have the system checked at the nearest
authorized Mercedes-Benz Center or contact
the following service hotlines:
R USA: Mercedes-Benz Customer Assistance
center at
1-800-FOR-MERCedes (1-800-367-6372)
or 1-888-990-9007
R Canada: Customer Service at
1-888-923-8367
After you have switched on the ignition, the
system carries out a self-diagnosis. 486
Features
Stowage and features
Page 499 of 572
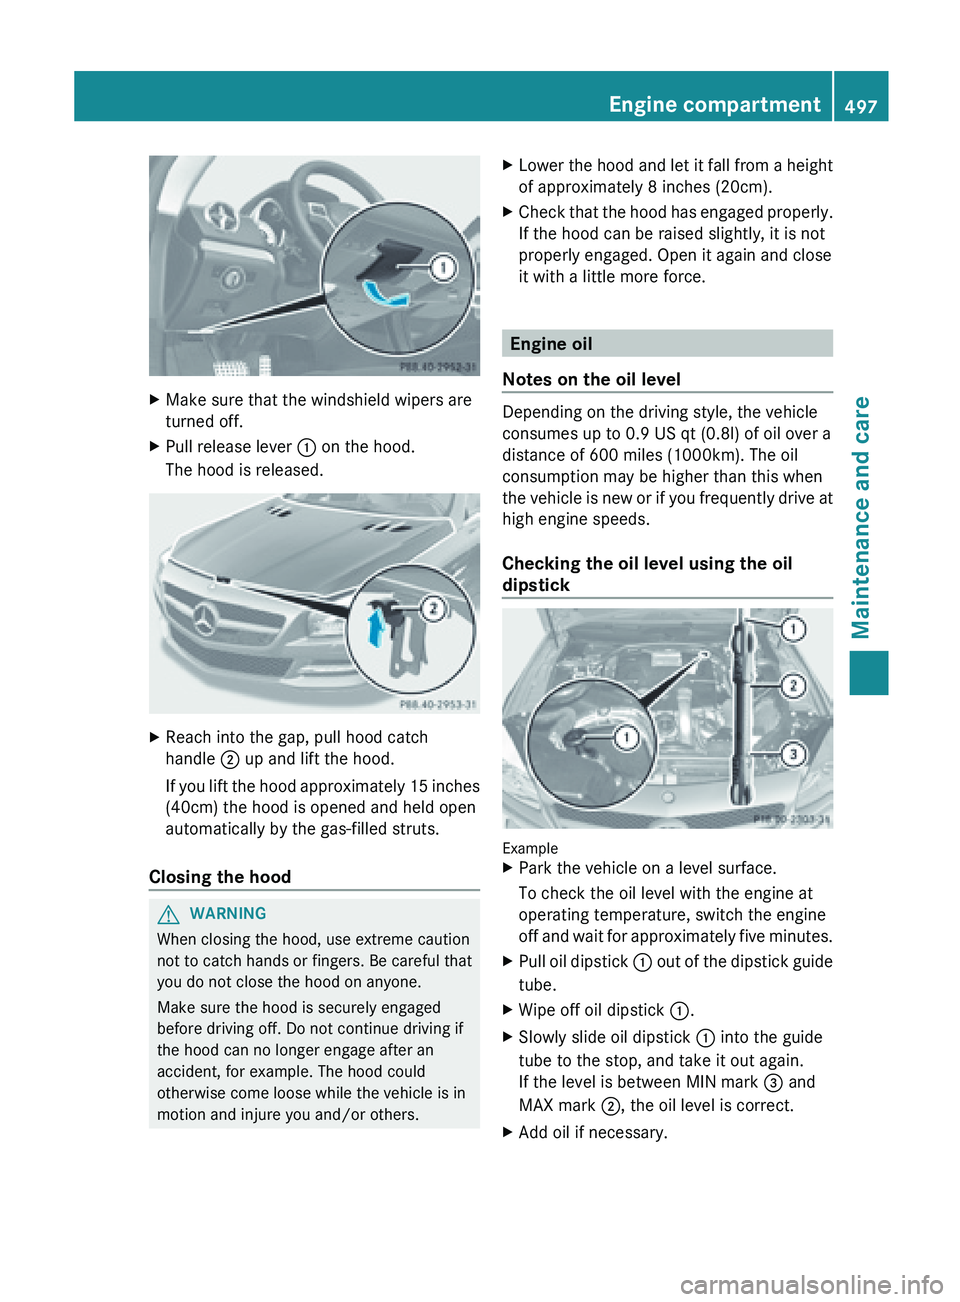
X
Make sure that the windshield wipers are
turned off.
X Pull release lever : on the hood.
The hood is released. X
Reach into the gap, pull hood catch
handle ; up and lift the hood.
If you
lift the hood approximately 15 inches
(40cm) the hood is opened and held open
automatically by the gas-filled struts.
Closing the hood G
WARNING
When closing the hood, use extreme caution
not to catch hands or fingers. Be careful that
you do not close the hood on anyone.
Make sure the hood is securely engaged
before driving off. Do not continue driving if
the hood can no longer engage after an
accident, for example. The hood could
otherwise come loose while the vehicle is in
motion and injure you and/or others. X
Lower the hood and let it fall from a height
of approximately 8 inches (20cm).
X Check
that the hood has engaged properly.
If the hood can be raised slightly, it is not
properly engaged. Open it again and close
it with a little more force. Engine oil
Notes on the oil level Depending on the driving style, the vehicle
consumes up to 0.9 US qt (
0.8l) of oil over a
distance of 600 miles (1000km). The oil
consumption may be higher than this when
the
vehicle is new or if you frequently drive at
high engine speeds.
Checking the oil level using the oil
dipstick Example
X
Park the vehicle on a level surface.
To check the oil level with the engine at
operating temperature, switch the engine
off and
wait for approximately five minutes.
X Pull oil dipstick : out
of the dipstick guide
tube.
X Wipe off oil dipstick :.
X Slowly slide oil dipstick : into the guide
tube to the stop, and take it out again.
If the level is between MIN mark = and
MAX mark ;, the oil level is correct.
X Add oil if necessary. Engine compartment
497
Maintenance and care Z