2013 MERCEDES-BENZ M-Class garage door opener
[x] Cancel search: garage door openerPage 13 of 458

Exterior lighting
see Lights
Exterior mirrors
Adjusting ....................................... 113
Dipping (automatic) .......................114
Folding in/ou t(automatically) .......114
Folding in/ou t(electrically) ...........114
Folding in whe nlocking (on-board
computer) ...................................... 277
Out of position (troubleshooting) ...114
Setting ........................................... 114
Storing settings (memory
function) ........................................ 116
Storing the parking position ..........115
Eyeglasses compartment .................334 F
Fille rcap
see Fuel filler flap
First-aid kit ......................................... 380
Flat tire MOExtended tires ..........................382
Preparing the vehicle .....................381
TIREFIT kit ...................................... 383
Floormat ............................................ .362
Folding the rear bench seat
forwards/back .................................. 335
Fording Off-road ......................................... 185
On flooded road s........................... 185
Fuel
Additives ........................................ 446
Consumption statistics ..................267
Displaying the current
consumption .................................. 267
Displaying the range ......................267
Driving tips .................................... 182
Flexible fuel vehicles ......................448
Fuel gauge ............................... 33, 263
Grade (gasoline) ............................ 445
Important safety notes ..................445
Premium-grade unleaded gasoline .445
Problem (malfunction) ...................176
Quality (diesel )............................... 447
Refueling ........................................ 173
Tank content/reserve fuel .............445Fuel filler flap
Opening/closing ............................ 174
Fuel filte r(display message) ............301
Fuel level Calling up the range (on-board
computer) ...................................... 267
Fuel tank
Capacity ........................................ 445
Problem (malfunction) ...................176
see Fuel tank
Fuses
Allocation chart ............................. 395
Before changing ............................. 395
Dashboard fuse box .......................395
Fuse box in the engine
compartment ................................. 395
Fuse box unde rrear bench seat ....395
Important safety notes ..................394
see Fuses G
Garage door opener Clearing the memory .....................361
Important safety notes ..................359
Opening/closing the garage door ..361
Programming (button in the rear-
view mirror) ................................... 359
Gear indicator (on-board
computer) .......................................... 278
Genuine Mercedes-Benz parts .........442
Glove box ........................................... 333
GTW (Gross Trailer Weight)
(definition) ......................................... 419 H
Handbrake see Parking brake
Hazard warning lamps ......................124
Headlamps Adding fluid to cleaning system .....368
Cleaning system (capacity )............ 452
Cleaning system (function) ............125
Cleaning system (notes) ................452
Fogging up ..................................... 127
see Automatic headlamp mode Index
11
Page 18 of 458

Plastic trim (cleaning instructions)
.375
Power closing feature .........................86
Power washers .................................. 371
Power windows see Side windows
PRE-SAFE ®
(anticipatory occupant
protection) Display message ............................ 289
Operation ........................................ .54
PRE-SAFE ®
Brake
Activating/deactivating .................272
Display message ............................ 291
Function/notes ................................ 73
Warning lamp ................................. 328
Product information ............................23
Program selector button ..................169
Protection of the environment General notes .................................. 23
Pulling away
Trailer ............................................ 160
Pulling away (automatic
transmission) ..................................... 160 Q
Qualifie dspecialis tworkshop ...........27 R
RACETIMER (on-board computer) ....279
Radar sensor system Activating/deactivating .................277
Display message ............................ 305
Radiator cover ................................... 365
Radio Selecting astation ......................... 269
see separate operating instructions
Radio-controlled devices
(installing) .......................................... 362
Reading lamp ..................................... 127
Rear axle level control (AMG
adaptive sport suspension
system) .............................................. 212
Rear compartment Setting the airv ents...................... 152
Rear fog lamp
Switching on/off ........................... 122Rear seats
Adjusting ....................................... 106
Rear view camera
Cleaning instructions .....................373
Function/notes ............................. 221
Switching on/off ........................... 222
Rear-view mirror
Anti-glare (manual )........................ 113
Dipping (automatic) .......................114
Rear window defroster
Problem (malfunction) ...................150
Switching on/off ........................... 149
Rear window wiper
Replacing the wiper blade .............. 134
Switching on/off ........................... 133
Refueling
Fuel gauge ............................... 33, 263
Important safety notes ..................173
Refueling proces s.......................... 174
see Fuel
Remote control
Programming (garage door
opener) .......................................... 359
Reporting safety defects ....................28
Reserve (fuel tank) see Fuel
Reserve fuel
Display message ............................ 301
Warning lamp ................................. 325
see Fuel
Residual heat (climate control) ........150
Restraint system see SRS (Supplemental Restraint
System)
Reversing lamps (display
message) ............................................ 297
Roadside Assistance (breakdown) ....25
Roller sunblind Panorama roof with power tilt/
sliding panel ..................................... 98
Rea rside windows ......................... 345
Roof carrier ........................................ 343
Roof lining and carpets (cleaning
guidelines) ......................................... 377
Roof load (maximum) ........................452
Route (navigation) see Route guidance (navigation) 16
Index
Page 41 of 458
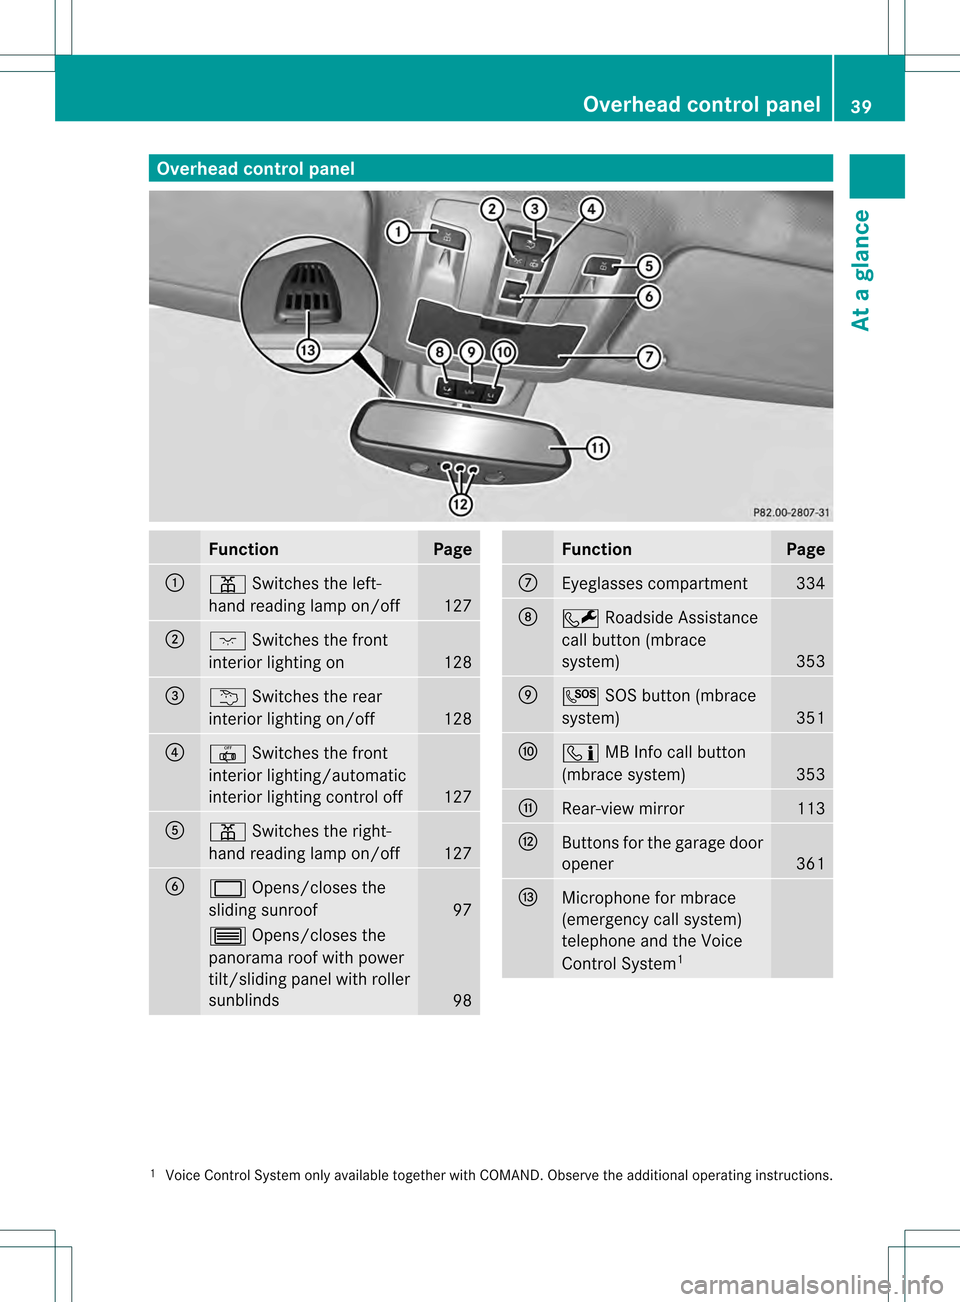
Overhea
dcontrol panel Function Page
0002
0015
Switches the left-
hand reading lamp on/off 127
0003
0006
Switches the front
interio rlighting on 128
001F
0002
Switches the rear
interior lighting on/off 128
001E
001D
Switches the front
interior lighting/automatic
interior lighting control off 127
001C
0015
Switches the right-
hand reading lamp on/off 127
001D
0002
Opens/closes the
sliding sunroof 97
0003
Opens/closes the
panorama roof with power
tilt/sliding panel with roller
sunblinds 98 Function Page
0011
Eyeglasses compartment 334
0012
0009
Roadside Assistance
call button (mbrace
system) 353
0013
000A
SOS button (mbrace
system) 351
0014
000B
MB Info call button
(mbrace system) 353
0015
Rear-view mirror 113
0016
Buttons for the garage door
opener
361
0017
Microphone for mbrace
(emergency call system)
telephone and the Voice
Control System 1 1
Voice Control System only available together with COMAND. Observe the additional operating instructions. Overhead control panel
39At a glance
Page 361 of 458
Triggering the vehicle alarm
With this function, you can trigge
rthe
vehicle's panic alarm via SMS. An alarm
sounds and the exterior lighting flashes.
Depending on the setting, the panic alarm
lasts five or ten seconds. Afterwards, the
alarm switches off. Garage door opener
Important safety notes G
WARNING
When you operate or program the garage door
with the integrated garage door opener,
persons in the range of movement of the
garage door can become trapped or struck by
the garage door. There is arisk of injury.
When using the integrated garage door
opener, always make sure that nobody is
within the range of movement of the garage
door. G
WARNING
Combustion engines emit poisonous exhaust
gases such as carbo nmonoxide. Inhaling
these exhaust gases leads to poisoning. There
is a risk of fatal injury. Therefore never leave
the engine running in enclosed spaces
without sufficient ventilation.
The HomeLink ®
garage door opener
integrated in the rear-view mirror allows you
to operate up to three different door and gate
systems.
Only operate garage doors using the
integrated garage door opener if:
R they are equipped with a safety stop and
reverse feature, and
R they conform to the current U.S. safety
standards.
When programming a garage door opener,
park vehicle outside the garage.
i Certain garage door drives are
incompatible with the integrated garage door opener. If you have difficulty
programming the integrated garage door
opener, contact an authorized Mercedes-
Benz Center.
Alternatively, you can call the following
telephone assistance services:
R USA: Mercedes-Benz Customer
Assistance Center at
1-800-FOR-MERCedes
R Canada: Customer Service at
1-800-387-0100
R HomeLink ®
hotline 1-800-355-3515
(free of charge)
More information on HomeLink ®
and/or
compatible products is also available
online at http://www.homelink.com.
i Notes on the declaration of conformity
(Y page 27).
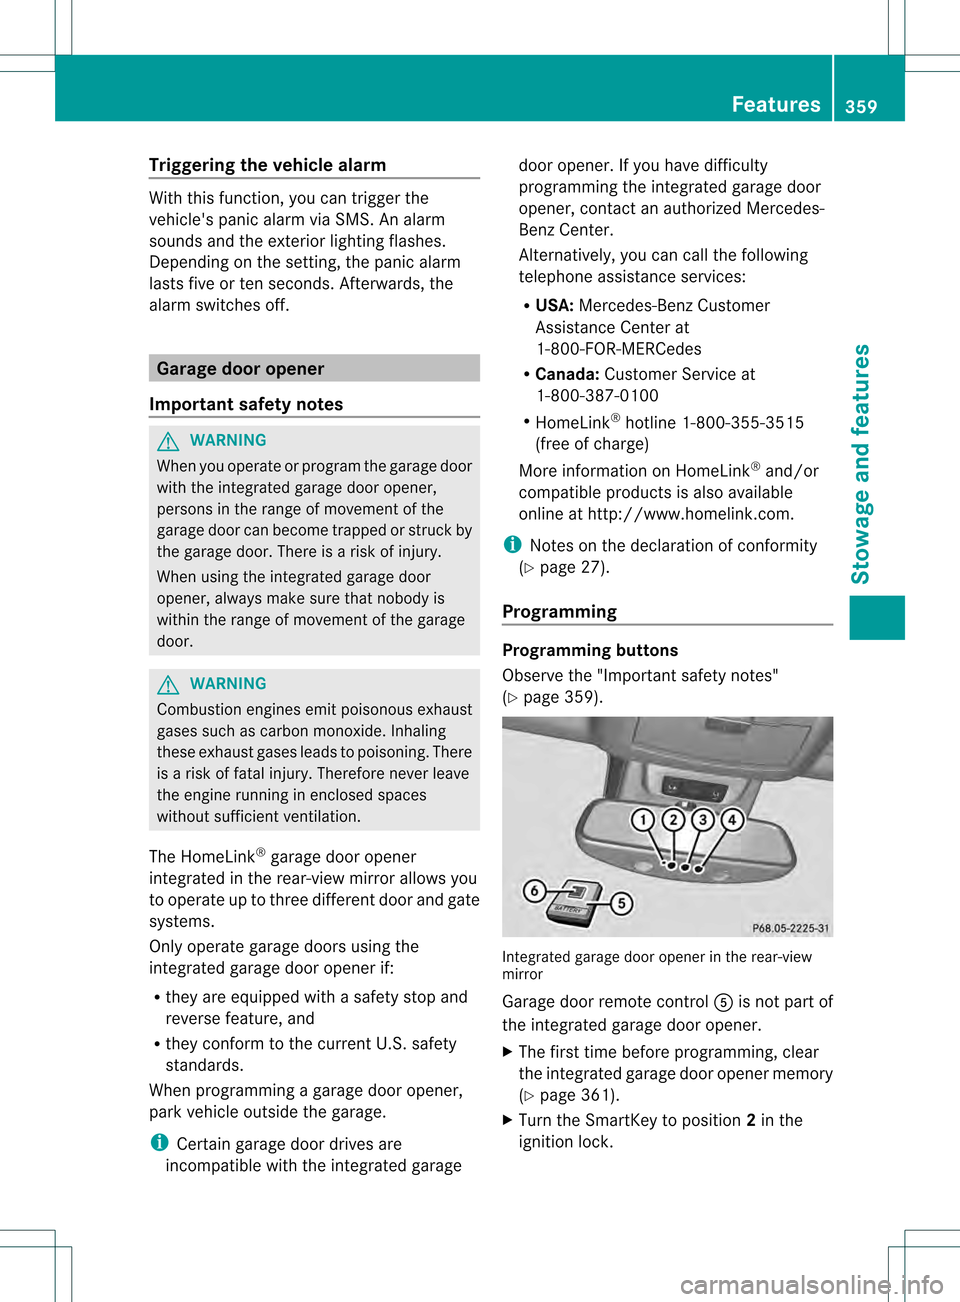
Programming Programming buttons
Observe the "Important safety notes"
(Y
page 359). Integrated garage door opener in the rear-view
mirror
Garage door remote control
001Cis not part of
the integrated garage door opener.
X The first time before programming, clear
the integrated garage door opener memory
(Y page 361).
X Turn the SmartKey to position 2in the
ignition lock. Features
359Stowage and features Z
Page 362 of 458
X
Press and hold one of buttons 0003to001E on
the integrated garage door opener.
After a short time, indicator lamp 0002lights
up yellow.
i Indicator lamp 0002lights up yellow as soon
as button 0003,001For001E is programmed for
the first time. If the selected button has
already been programmed, indicator
lamp 0002will only light up yellow after ten
seconds have elapsed.
X Release button 0003,001For001E. Indicator
lamp 0002flashes yellow.
X Point garage door remote control 001C
towards buttons 0003to001E on the rear-view
mirror at a distance of 2 to 8 inches (5 to
20 cm).
i The required distance between remote
control 001Cand the integrated garage door
opener depends on the garage door drive
system. Several attempts might be
necessary. You should test every position
for at least 25 seconds before trying
another position.
X Press and hold button 001Don remot econtrol
001C until indicator lamp 0002lights up green.
If indicator lamp 0002lights up green or
flashes, then programming has been
successful.
X Release button 001Don remote control 001Cfor
the garage door drive system.
X If indicator lamp 0002lights up red: repeat
the programming procedure for the
corresponding button on the rear-view
mirror. When doing so, vary the distance
between remote control 001Cand the rear-
view mirror.
i If the indicator lamp flashes green after
successful programming, the garage door
system is using a rolling code. After
programming, you must synchronize the
garage door opener integrated in the rear-
view mirror with the receiver of the garage
door system. Synchronizing the rolling code
Observe the "Important safety notes"
(Y
page 359).
Your vehicle must be within reach of the
garage door or exterior gate drive. Make sure
that neither your vehicle nor any persons/
objects are present within the sweep of the
door or gate.
X Turn the SmartKey to position 2in the
ignition lock.
X Press the program button of the door or
gate drive (see the door or gate drive
operating instructions, e.g. under
"programming of additional remote
controls").
i Usually, you now have 30seconds to
initiate the next step.
X Press previously programmed button 0003,
001F or001E of the integrated garage door
opener until the door closes.
The rolling code synchronization is then
complete.
Notes on programming the remote
control
Canadia nradio frequency laws require a
"break" (or interruption) of the transmission
signals after broadcasting for a few seconds.
Therefore, these signals may no tlast long
enough for the integrated garage door
opener. The signal is no trecognized during
programming. Comparable with Canadian
law, some U.S.g arage door openers also
feature a "break".
Proceed as follows:
R if you live in Canada
R if you have difficulties programming the
garage door opener (regardless of where
you live) when using the programming
steps 360
FeaturesStowage and features
Page 363 of 458
X
Press and hold one of buttons 0003to001E on
the integrated garage door opener.
After a short time, indicator lamp 0002lights
up yellow.
X Release the button.
Indicator lamp 0002flashes yellow.
X Press button 001Dof garage door remote
control 001Cfor two seconds, then release it
for two seconds.
X Press button 001Dagain for two seconds.
X Repeat this sequence on button 001Dof
remote control 001Cuntil indicator lamp 0002
lights up green.
If indicator lamp 0002turns red, repeat the
process.
X Continue with the other programming
steps (see above).
Problems when programming
If you are experiencing problems
programming the integrated garage door
opener on the rear-view mirror, take note of
the following instructions:
R Check the transmitter frequency of garage
door drive remote control 001C.This can
usually be found on the back of the remote
control.
The integrated garage door opener is
compatible with devices that have units
which operate in the frequency range of
280to 433MHz.
R Replace the batteries in garage door
remote control 001C.This increases the
likelihood that garage door remote control
001C will transmit a stronga nd precise signal
to the integrated garage door opene rinthe
rear-view mirror.
R When programming, hold remote control
001C at varying distances and angles from the
button that you are programming. Try
various angles at a distance between 2and
12 inches (5to 30 cm) or at the same angle
but at varying distances.
R If another remote control for the same
garage door drive is available, repeat the same programming steps with this remote
control. Before performing these steps,
make sure that new batteries have been
installed in garage door drive remote
control
001C.
R Note that some remote controls only
transmit for a limited amount of time (the
indicator lamp on the remote control goes
out). Press button 001Don remote control
001C again before transmission ends.
R Align the antenna cable of the garage door
opener unit. This can improve signal
reception/transmission.
Opening/closing the garage door After it has been programmed, the integrated
garage door opener performs the function of
the garage door system remote control.
Please also read the operating instructions
for the garage door system.
X
Turn the SmartKey to position 2in the
ignition lock.
X Press button 0003,001For001E which you have
programmed to operate the garage door.
Garage door system with a fixed code:
indicator lamp 0002lights up green.
Garage door system with a rolling code:
indicator lamp 0002flashes green.
i The transmitter will transmit a signal as
long as the button is pressed. The
transmission is halted after a maximum of
ten seconds and indicator lamp 0002lights
up yellow. Press button 0003,001For001E again
if necessary.
Clearing the memory X
Turn the SmartKey to position 2in the
ignition lock.
X Press buttons 0003and 001E.
The indicator lamp lights up yellow.
X Press and hold buttons 0003and 001Euntil the
indicator lamp turns green. Features
361Stowage and features Z
Page 364 of 458
i
Make sure that you clear the memory of
the integrated garage door opener before
selling the vehicle. Compass
Calling up the compass Information on operating the compass can be
found in the separate COMAND Operating
Instructions. Floormats
G
WARNING
Objects in the driver's footwell can restrict the
pedal travel or obstruct adepressed pedal.
The operating and road safety of the vehicle
is jeopardized. There is a risk of an accident.
Make sure that all objects in the vehicle are
stowed correctly, and that they cannot enter
the driver's footwell. Install the floormats
securely and as specified in order to ensure
sufficien tclearance for the pedals. Do not use
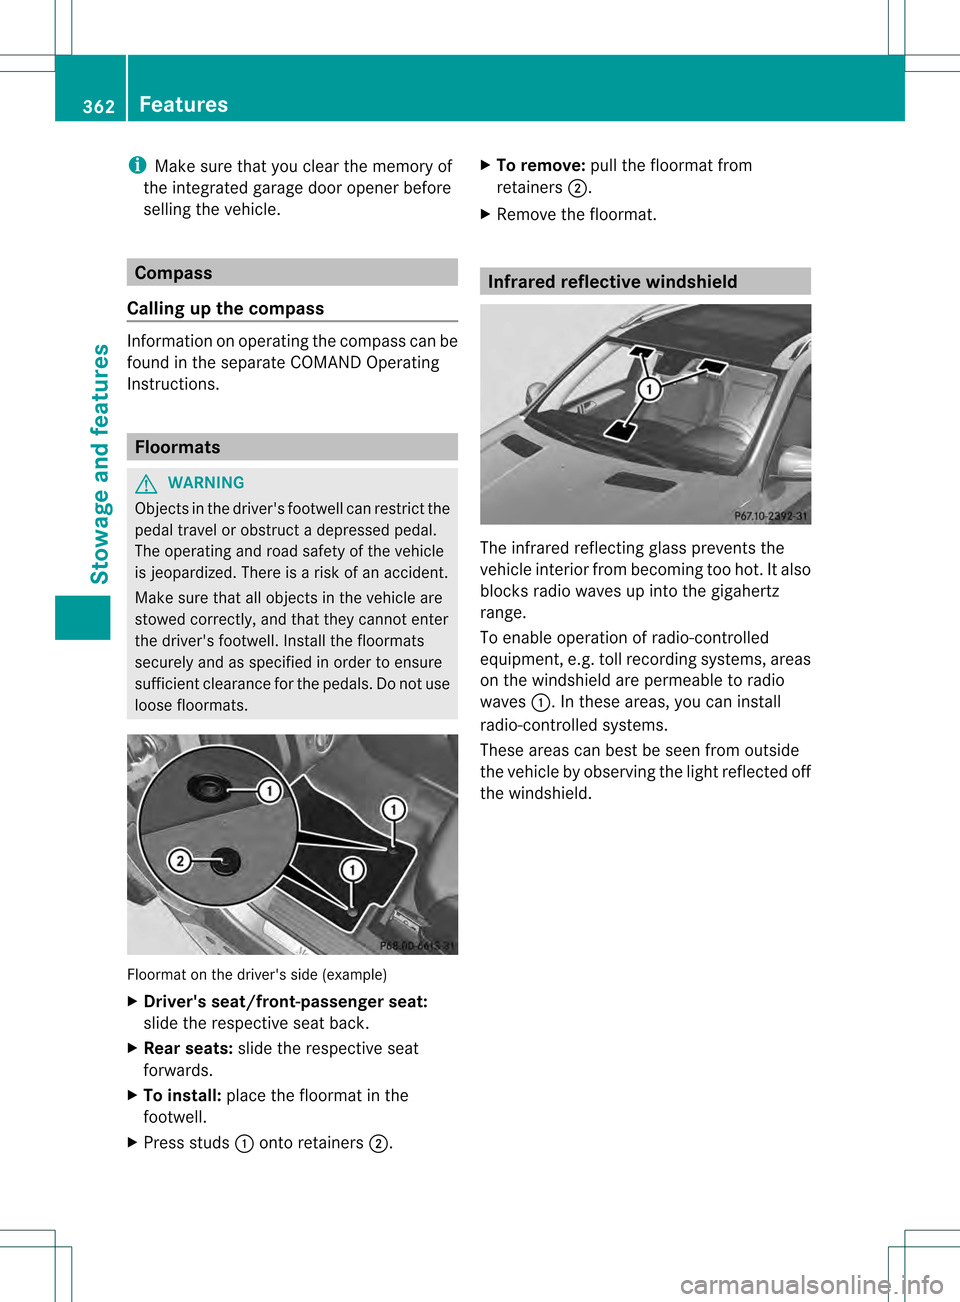
loose floormats. Floormat on the driver's side (example)
X
Driver's seat/front-passenger seat:
slide the respective seat back.
X Rear seats: slide the respective seat
forwards.
X To install: place the floormat in the
footwell.
X Press studs 0002onto retainers 0003. X
To remove: pull the floormat from
retainers 0003.
X Remove the floormat. Infrared reflective windshield
The infrared reflecting glass prevents the
vehicle interior fro
mbecoming too hot. It also
blocks radio waves up into the gigahertz
range.
To enable operation of radio-controlled
equipment, e.g. toll recording systems, areas
on the windshield are permeable to radio
waves 0002.Int hese areas, you can install
radio-controlled systems.
These areas can best be seen from outside
the vehicle by observing the light reflected off
the windshield. 362
FeaturesStowage and features