2013 MERCEDES-BENZ M-Class park assist
[x] Cancel search: park assistPage 250 of 458

X
To increase or decrease in 1 mph
increments (Canada: 1 km/h
increments): briefly press the cruise
control lever up 0002for a highe rset speed
or down 0003for a lower set speed.
The set speed appears in the multifunction
display with the 0001DSR symbol. It is also
displayed in status indicator 001F.
When DSR is activated, you can change the
set speed to a value between 1mph and
11 mph (Canada: between 2 km/h and
18 km/h).
i The DSR set speed is always changed in
1 mph increments (Canada: 1 km/h
increments). This is regardless of whether
you press the cruise control lever to or
beyond the pressure point.
Off-road program (vehicles without the
ON&OFFROAD package) 0002
Off-road program button
0003 Off-road program indicator lamp
X To switch on: press button0002.
Indicator lamp 0003lights up. The 0006off-
road indicator appears in the multifunction
display.
X To switch off: press button0002.
Indicator lamp 0003and the 0006off-road
indicator go out in the multifunction
display.
The off-road program assists you in driving
off-road. The engine’s performance
characteristics and the gearshifting characteristics of the automatic transmission
are adapted for this purpose. ABS, ESP
®
and
4ET Sprograms especially adapted to off-road
driving are activated .Agentle accelerator
pedal curve is also selected, i.e. the
accelerator pedal must be depressed much
further in order to accelerate.
Do not use the off-road program on roads that
are snow-covered or icy or if you have
mounted snow chains on your vehicle.
For information about driving off-road, see
(Y page 187).
Off-road programs (vehicles with the
ON&OFFROAD package) General notes
The off-road programs assist you in driving
off-road. The engine’s performance
characteristics and the gearshifting
characteristics of the automatic transmission
are adapted for this purpose. ABS, ESP
®
and
4ETS programs especially adapted to off-road
driving are activated. An accelerator pedal
curve suitable for the terrain is selected, i.e.
the accelerator pedal must be depressed
further to accelerate.
Do not use the off-road programs on roads
that are snow-covered or icy or if you have
mounted snow chains on your vehicle.
For information on driving off-road, see
(Y page 187).
The following program messages are shown
in the multifunction display until the
applicable vehicle level is set. Up to off-road
level 2, you can hide the program messages
using the 0007or the 000Bbutton on the
multifunction steering wheel. 248
Driving systemsDriving and parking
Page 252 of 458

The differential lock improves the vehicle’s
traction. 4ETS (Y
page 70) controls the
balance between both wheels on an axle.
You can only activate off-road program 2
when driving at speeds below 25 mph
(40 km/h).
LOW RANGE off-road gear (vehicles
with the ON&OFFROAD package) Important safety notes
G
WARNING
If you select the LOW RANGE off-road gear on
a slippery road surface, the wheels could lose
traction:
R if you remove your foot from the
accelerator pedal when driving
R if off road ABS intervenes when braking
If the wheels lose traction. the vehicle can no
longer be steered. There is an increased
danger of skidding and accidents.
Never select the LOW RANGE off-road gear
when driving on slippery road surfaces. G
WARNING
If you do not wait for the transfer case gear
change process to complete, the transfer
case could remain in the neutral position. The
power transmission to the driven wheels is
then interrupted. There is a danger of the
vehicle rolling away unintentionally. There is
a risk of an accident.
Wait until the transfer case shift process is
completed.
Do not turn off the engine while changing gear
and do not shift the automatic transmission
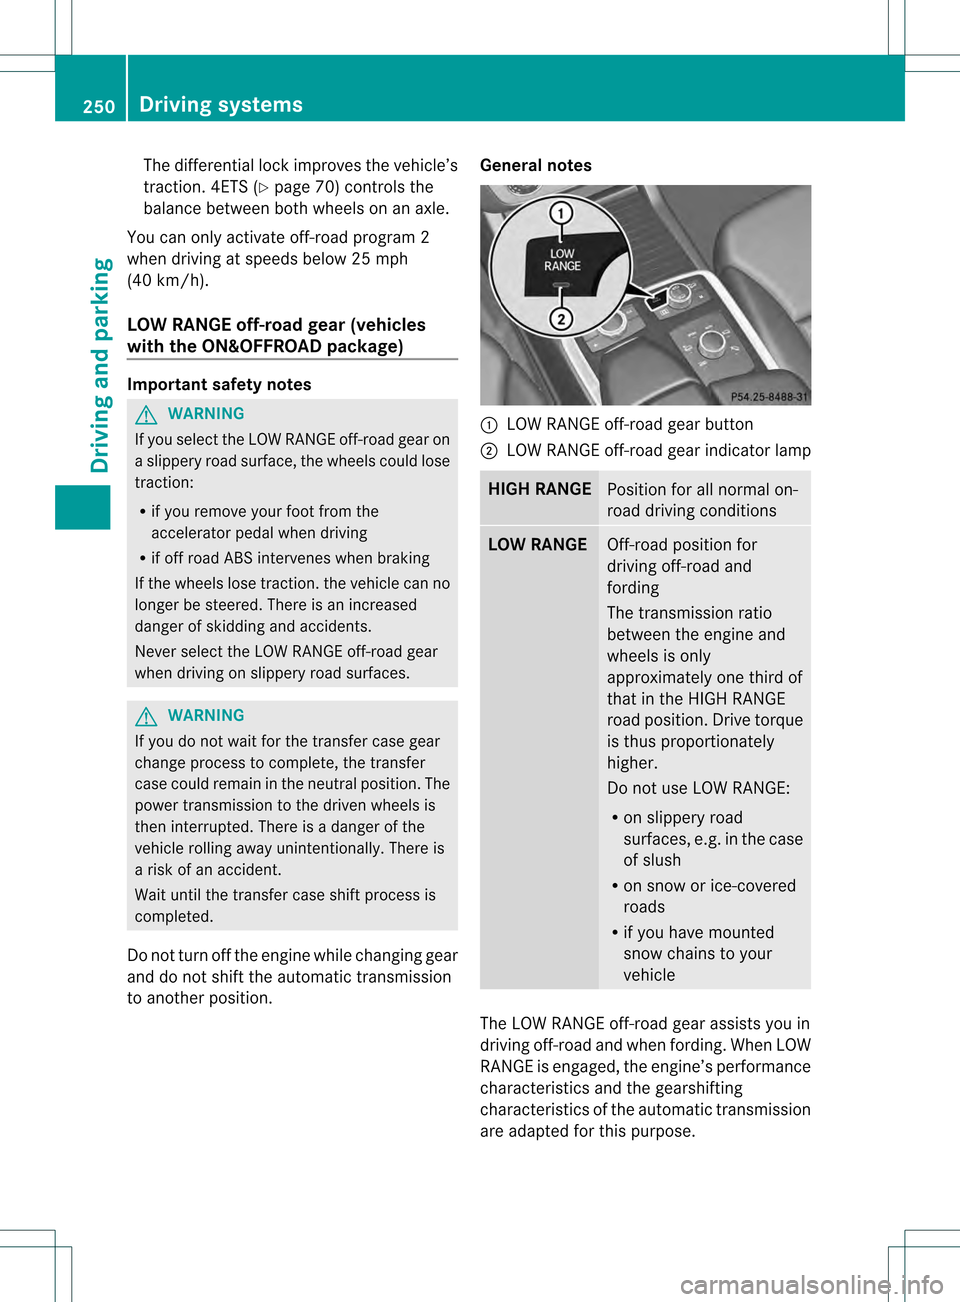
to another position. General notes 0002
LOW RANGE off-road gear button
0003 LOW RANGE off-road gear indicator lamp HIGH RANGE
Position for all normal on-
road driving conditions
LOW RANGE
Off-road position for
driving off-road and
fording
The transmission ratio
between the engine and
wheels is only
approximately one third of
that in the HIGH RANGE
road position. Drive torque
is thus proportionately
higher.
Do not use LOW RANGE:
R
on slippery road
surfaces, e.g. in the case
of slush
R on snow or ice-covered
roads
R if you have mounted
snow chains to your
vehicle The LOW RANGE off-road gear assists you in
driving off-road and when fording. When LOW
RANGE is engaged, the engine’s performance
characteristics and the gearshifting
characteristics of the automatic transmission
are adapted for this purpose.250
Driving systemsDriving and parking
Page 256 of 458

plates and those for the towing vehicle under
"Technical data" (Y
page 455).
When towing a trailer, your vehicle's handling
characteristics will be differen tincomparison
with when driving without atrailer.
The vehicle/trailer combination:
R is heavier
R is restricted in its acceleration and
gradient-climbing capability
R has an increased braking distance
R is affected more by strong crosswinds
R demands more sensitive steering
R has a larger turning radius
This could impair the handling
characteristics.
When towing a trailer, always adjust your
speed to the current road and weather
conditions. Do not exceed the maximum
permissible speed for yourv ehicle/trailer
combination.
General notes R
Do not exceed the legally prescribed
maximum speed for vehicle/trailer
combinations in the relevant country.
This lowers the risk of an accident.
R Only install an approved trailer coupling on
your vehicle.
Further information on availability and on
installation is available from any authorized
Mercedes-Benz Center.
R The bumpers of your vehicle are not
suitable for installing detachable trailer
couplings.
R Do not install hired trailer couplings or
other detachable trailer couplings on the
bumpers of your vehicle.
R If you no longer need the ball coupling,
remove it from the ball coupling recess.
This will reduce the risk of damage to the
ball coupling.
i When towing a trailer, set the tire
pressure on the rear axle of the towing vehicle for a maximum load; see the tire
pressure table in the fuel filler flap
(Y
page 419).
You will find installation dimensions and loads
in the "Technical data" section
(Y page 454).
The maximum noseweight of the trailer
drawbar on the ball coupling is
575 lbs(261 kg) for all models (except the
model ML 350 BlueEFFICIENCY).
The maximum noseweight of the trailer
drawbar on the ball coupling is 529 lbs
(240 kg) for the model
ML 350 BlueEFFICIENCY.
The actual noseweight may not be higher than
the value which is given. The value can be
found on the trailer tow hitch or trailer
identification plates. The lowest weight
applies.
Please note that when towing a trailer,
PARKTRONIC ( Ypage 213) and Blind Spot
Assist (Y page 233) are only available with
limitations, or not at all.
i On vehicles without level control, the
height of the ball coupling will alter
according to the load placed on the vehicle.
If necessary, use a trailer with a height-
adjustable drawbar.
Driving tips i
Observe the information on ESP ®
trailer
stabilization (Y page 72) and on pulling
away with a trailer (Y page 160).
The maximum permissible speed for vehicle/
trailer combinations depends on the type of
trailer. Before beginning the journey, check
the trailer's documents to see what the
maximum permissible speed is. Observe the
legally prescribed maximum speed in the
relevant country.
For certain Mercedes-Benzv ehicles, the
maximum permissible rear axle load is
increased when towing a trailer. See
"Technical data" to find out whether this
applies to your vehicle (Y page 455). If you254
Towing
atrailerDriving an d parking
Page 268 of 458

001C
Drive program (Y page 165)
001D Transmission positio n(Ypage 165)
X To show menu bar 001E:press the 0002
or 0005 button on the steering wheel.
Menu bar 001Edisappears after a few seconds.
Text field 001Fshows the selected menu or
submenu as well as display messages.
i You can set the time using the audio
system or COMAND; see the separate
operating instructions.
The following messages may appear in the
multifunction display:
0009000F000A Active Parking Assist
(Ypage 217)
CRUISE Cruise control (Y
page 192)
000BDSR DSR (Y
page 246)
0006 Off-road program (vehicles
without the ON&OFFROAD
package) (Y page 248)
0006 Off-road program (vehicles with
the ON&OFFROA Dpackage)
(Y page 248)
LOW RANGE LOW RANGE off-road gear
(Y
page 250)
0005 Adaptive high-beam Assist
(Ypage 126)
0003 ATTENTION ASSIST
(Ypage 230)
0013 ECO start/stop function
(Ypage 161)
0001 Lane Keeping Assist
(Ypage 235)
0001 Active Lane Keeping Assist
(Ypage 241)
0001 HOLD function (Y page 207)
0003 Distance warning function
(Ypage 68)
0003 PRE-SAFE®
Brake (Y page 73) Menus and submenus
Menu overview
Press the 0002or0005 button on the
steering wheel to call up the menu bar and
selec tamenu.
Operating the on-board computer
(Y page 264).
Depending on the equipment installed in the
vehicle, you can call up the following menus:
R Trip menu (Y
page 266)
R Navi menu (navigatio
ninstructions)
(Y page 268)
R Audio menu (Y
page 269)
R Tel menu (telephone) (Y
page 270)
R DriveAssist menu (assistance)
(Y page 272)
R Serv. menu (Y
page 273)
R Sett. menu (Y
page 274)
R ON&OFFROAD menu (Y
page 278)
R AMG menu in AMG vehicles (Y
page 278) Trip menu
Standard display X
Press and hold the 0007button on the
steering wheel until the Trip menu with
trip odometer 0002and odometer 0003is
shown. 266
Menus and submenusOn-board computer and displays
Page 274 of 458

Assistance menu
Introduction In the
DriveAssist menu, you have the
following options:
R showing the distance display
(Y page 272)
R activating/deactivating th edistance
warning function (Y page 272)
R activating/deactivating the PRE-SAFE ®
Brake (Y page 272)
R activating/deactivating ATTENTION
ASSIS T(Ypage 273)
R activating/deactivating Blind Spot Assist
or Active Blind Spot Assist (Y page 273)
R activating/deactivating Lane Keeping
Assist or Active Lane Keeping Assist
(Y page 273)
Showing the distance display X
Press 0002or0005 on the steering wheel
to select the DriveAssist menu.
X Press the 0003or0004 button to select
Distance Display .
X Press the 000Bbutton.
The DISTRONIC PLUS distance display
appears in the multifunction display
(Y page 202).
If the Sensors Deactivated message
appears, the radar senso rsystem is
deactivated.
X Activate the rada rsensor system
(Y page 277). Switching the distance warning
function on and off X
Press 0002or0005 on the steering wheel
to select the DriveAssist menu.
X Press 0003or0004 to select Dist. Warning .
X Press the 000Bbutton.
The curren tselection is displayed.
X To activate/deactivate: press the000B
button again.
When the distance warning function is
activated, the multifunction display shows
the 0003 symbol if the HOLD function is not
activated (Y page 207).
Vehicles with Active Parking Assist: if
PARKTRONIC is activated and you are driving
at a speed under 22 mph (35 km/h), the 000F
Active Parking Assist symbol is shown instead
of the 0003symbol ( Ypage 217).
Further information on the distance warning
function (Y page 68).
Activating/deactivating PRE-SAFE ®
Brake PRE-SAFE
®
Brake is only available in vehicles
with DISTRONIC PLUS.
X Press 0002or0005 on the steering wheel
to select the DriveAssist menu.
X Press the 0003or0004 button to select
PRE-SAFE Brake .
X Press the 000Bbutton.
The curren tselection is displayed.
X To activate/deactivate: press the000B
button again.
When PRE-SAFE ®
Brake is activated, the
multifunction display shows the 0003symbol
as long as the HOLD function is not activated
(Y page 207).
Vehicles with Active Parking Assist: if
PARKTRONIC is activated and you are driving
at a speed under 22 mph (35 km/h), the 000F
Active Parking Assist symbol is shown instead
of the 0003symbol ( Ypage 217). 272
Menus and submenusOn-board computer and displays
Page 309 of 458

Display messages Possible causes/consequences and
0001 Solutions
Blind Spot Assist or Active Blind Spot Assist is temporarily
inoperative. Possible causes are:
R
the sensors are dirty.
R function is impaired due to heavy rain or snow.
R the rada rsensor system is outside the operating temperature
range.
R the radar sensor system is temporarily inoperative, e.g. due to
electromagnetic radiation emitted by nearby TV or radio
stations or other sources of electromagnetic radiation.
The yellow 0003indicator lamps also light up in the exterior
mirrors.
When the causes stated above no longer apply, the display
message disappears.
Blind Spot Assist or Active Blind Spot Assist is operational again.
If the display message does not disappear:
X Pull over and stop the vehicle safely as soon as possible, paying
attention to road and traffic conditions.
X Secure the vehicle against rolling away (Y page 179).
X Clean the sensors (Y page 373).
X Restart the engine. Blind Spot Assist
Inoperative or
Active Blind Spot Assist Inoperative Blind Spot Assist or Active Blind Spot Assist is defective.
The yellow
0003indicator lamps also light up in the exterior
mirrors.
X Visit a qualified specialist workshop. Park Assist
Canceled The driver's door is open and the driver's seat belt has not been
fastened.
X
Repeat the parking process with the seat belt fastened and the
driver's door closed. You have inadvertently touched the multifunction steering wheel
while steering intervention was active.
X
While steering intervention is active, make sure that the
multifunction steering wheel is not touched unintentionally. The vehicle has started to skid and ESP
®
has intervened.
X Use Active Parking Assist again later (Y page 217). Display messages
307On-board computer and displays Z
Page 310 of 458

Display messages Possible causes/consequences and
0001 Solutions
Park Assist
Inoperative You have just carried out a large number of turning or parking
maneuvers.
Active Parking Assis
twill become available again after
approximately ten minutes (Y page 217).
X Pull over and stop the vehicle safely as soon as possible, paying
attention to road and traffic conditions.
X Switch off and restart the engine.
If the display message continues to be displayed:
X Visit a qualified specialist workshop. PARKTRONIC is defective.
X
Visit a qualified specialist workshop. Park Assist
Finished The vehicle is parked.
Awarning tone also sounds.
The display message disappears automatically. DISTRONIC PLUS Off DISTRONIC PLU
Shas been deactivated (Y page 194).
If it was deactivated automatically, a warning tone also sounds. DISTRONIC PLUS Now
Available DISTRONIC PLU
Sis operational againa fter having been
temporarily unavailable .You can now reactivate DISTRONIC PLUS
(Y page 194). DISTRONIC PLUS
Currently
Unavailable See
Operator's Manual DISTRONIC PLUS is temporarily inoperative. Possible causes are:
R
function is impaired due to heavy rain or snow.
R the sensors in the radiator grill and the bumper are dirty.
R the radar sensor system is temporarily inoperative, e.g. due to
electromagnetic radiation emitted by nearby TV or radio
stations or other sources of electromagnetic radiation.
R the system is outside the operating temperature range.
R the on-board voltage is too low.
Aw arning tone also sounds.
When the causes stated above no longer apply, the display
message disappears.
DISTRONIC is operational again.
If the display message does no tdisappear:
X Pull over and stop the vehicle safely as soon as possible, paying
attention to road and traffic conditions.
X Secure the vehicle against rolling away (Y page 179).
X Clean the sensors in the radiator grill and the bumper
(Y page 373).
X Restar tthe engine. 308
Display messagesOn-board computer and displays
Page 361 of 458

Triggering the vehicle alarm
With this function, you can trigge
rthe
vehicle's panic alarm via SMS. An alarm
sounds and the exterior lighting flashes.
Depending on the setting, the panic alarm
lasts five or ten seconds. Afterwards, the
alarm switches off. Garage door opener
Important safety notes G
WARNING
When you operate or program the garage door
with the integrated garage door opener,
persons in the range of movement of the
garage door can become trapped or struck by
the garage door. There is arisk of injury.
When using the integrated garage door
opener, always make sure that nobody is
within the range of movement of the garage
door. G
WARNING
Combustion engines emit poisonous exhaust
gases such as carbo nmonoxide. Inhaling
these exhaust gases leads to poisoning. There
is a risk of fatal injury. Therefore never leave
the engine running in enclosed spaces
without sufficient ventilation.
The HomeLink ®
garage door opener
integrated in the rear-view mirror allows you
to operate up to three different door and gate
systems.
Only operate garage doors using the
integrated garage door opener if:
R they are equipped with a safety stop and
reverse feature, and
R they conform to the current U.S. safety
standards.
When programming a garage door opener,
park vehicle outside the garage.
i Certain garage door drives are
incompatible with the integrated garage door opener. If you have difficulty
programming the integrated garage door
opener, contact an authorized Mercedes-
Benz Center.
Alternatively, you can call the following
telephone assistance services:
R USA: Mercedes-Benz Customer
Assistance Center at
1-800-FOR-MERCedes
R Canada: Customer Service at
1-800-387-0100
R HomeLink ®
hotline 1-800-355-3515
(free of charge)
More information on HomeLink ®
and/or
compatible products is also available
online at http://www.homelink.com.
i Notes on the declaration of conformity
(Y page 27).
Programming Programming buttons
Observe the "Important safety notes"
(Y
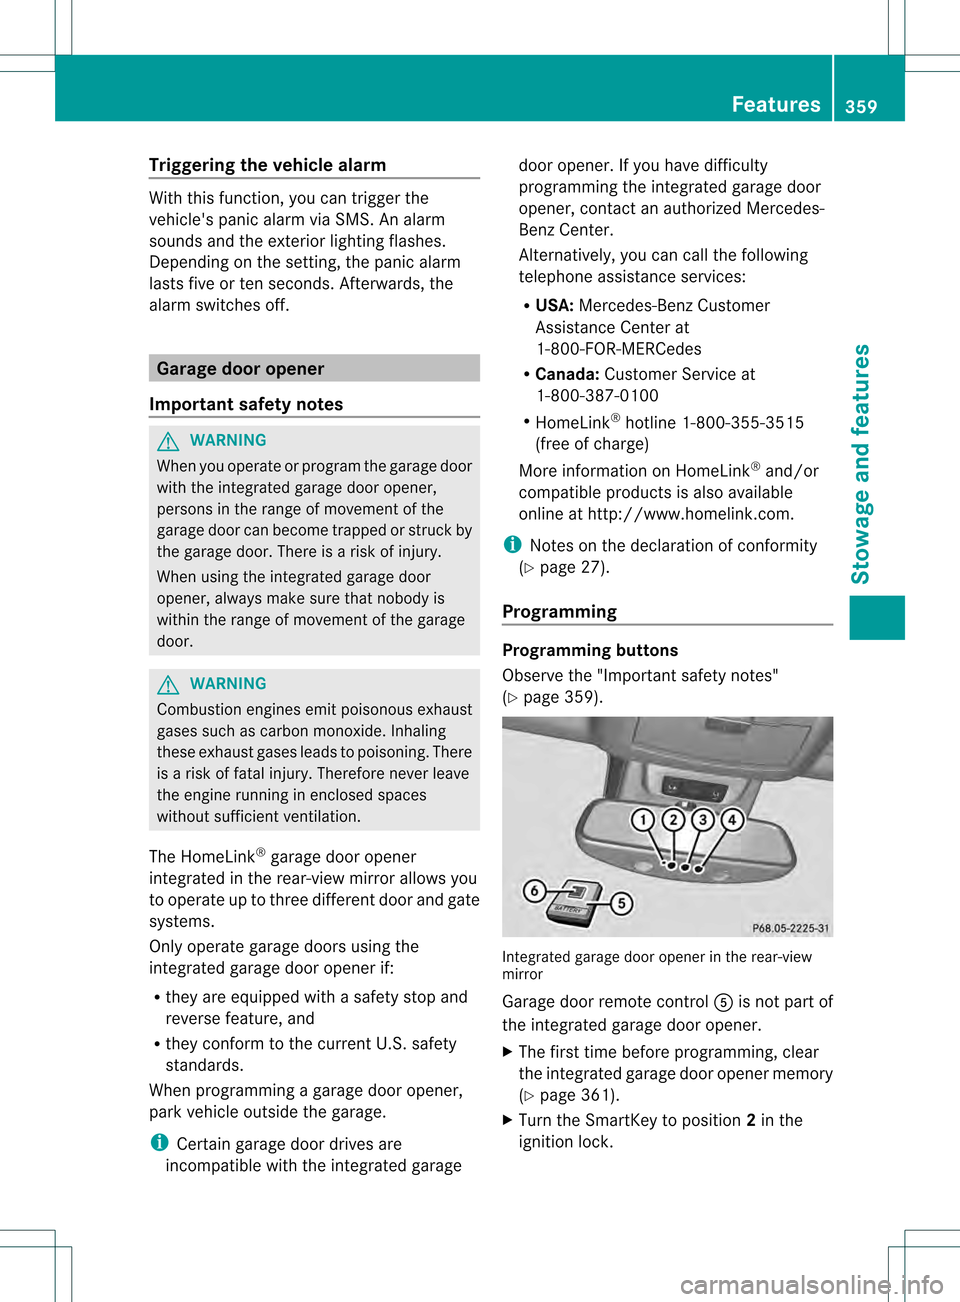
page 359). Integrated garage door opener in the rear-view
mirror
Garage door remote control
001Cis not part of
the integrated garage door opener.
X The first time before programming, clear
the integrated garage door opener memory
(Y page 361).
X Turn the SmartKey to position 2in the
ignition lock. Features
359Stowage and features Z