2013 MERCEDES-BENZ M-Class mirror
[x] Cancel search: mirrorPage 279 of 458

Activating/deactivating the rada
rsensor
system
X Press the 0002or0005 button on the
steering wheel to selec tthe Sett. menu.
X Press 0004or0003 to select the Vehicle submenu.
X Press 000Bto confirm.
X Press the 0003or0004 button to select
Radar Sensor (See Oper. Manual): .
You will see the selected setting: Enabledor
Disabled .
X Press the 000Bbutton to save the setting.
The following systems are switched off when
the radar sensor system is deactivated:
R DISTRONIC PLUS (Y page 194)
R BAS PLUS (Y page 67)
R PRE-SAFE ®
Brake (Y page 73)
R Blind Spot Assist (Y page 233)
R Active Blind Spot Assist (Y page 237)
Convenience submenu Activating/deactivating the EASY-
ENTRY/EXIT feature
G
WARNING
You must make sure no one can become
trapped or injured by the moving steering
wheel when the easy-entry/exit feature is
activated.
To stop steering wheel movement, move
steering wheel adjustment lever or press one
of the memory position buttons.
Do not leave children unattended in the
vehicle, or with access to an unlocked vehicle.
Children could open the driver's door and
unintentionally activate the easy-entry/exit
feature, which could result in an accident
and/or serious personal injury.
X Press the 0002or0005 button on the
steering wheel to select the Sett. menu.
X Press the 0004or0003 button to select the
Convenience submenu.X
Press 000Bto confirm.
X Press 0004or0003 to select the Easy Entry/Exit function.
If the Easy Entry/Exit function is
activated, the vehicle steering wheel is
displayed in red in the multifunction
display.
X Press the 000Bbutton to save the setting.
Further information on the EASY-ENTRY/EXIT
feature (Y page 112).
Switching the belt adjustment on/off
X Press the 0002or0005 button on the
steering wheel to select the Sett. menu.
X Press the 0004or0003 button to select the
Convenience submenu.
X Press 000Bto confirm.
X Press the 0004or0003 button to select the
Belt Adjustment function.
When the Belt Adjustment function is
activated, the vehicle seat belt is displayed
in red in the multifunction display.
X Press the 000Bbutton to save the setting.
For further information on belt adjustment,
see (Y page 57).
Switching the fold-in mirrors when
locking feature on/off
This function is only available on vehicles with
the memory function (Y page 116).
When you activate the Auto. Mirror Folding function, the exterior mirrors are
folded in when the vehicle is locked. If you
unlock the vehicle and then open a door, the
exterior mirrors fold out again.
X Press the 0002or0005 button on the
steering wheel to select the Sett. menu.
X Press the 0004or0003 button to select the
Convenience submenu.
X Press 000Bto confirm. Menus and submenus
277On-board computer and displays Z
Page 280 of 458

X
Press 0004or0003 to select the Auto. Mirror Folding function.
If the Auto. Mirror Folding function is
activated, the vehicle's exterior mirror is
displayed in red in the multifunction
display.
X Press the 000Bbutton to save the setting. 0002
To fold the exterior mirrors in or out
If you have switched the Auto. MirrorFolding on and you fold the exterior mirrors
in using button 0002, they will not fold out
automatically (Y page 114).
You can then only fold out the exterior mirrors
using button 0002.
Restoring the factory settings X
Press the 0002or0005 button on the
steering wheel to select the Sett. menu.
X Press the 0004or0003 button to select the
Factory Setting submenu.
X Press 000Bto confirm.
The Reset All Settings? message
appears.
X Press the 0004or0003 button to select
No or
Yes .
X Press 000Bto confirm the selection.
If you select Yes , the multifunction display
shows a confirmation message.
For safety reasons, the Daytime RunningLights function in the
Lights submenu is
only reset if the vehicle is stationary. ON&OFFROAD menu
Multifunction display (example)
X
Press the 0002or0005 button on the
steering wheel to select the ON&OFFROAD menu.
You can set the following curren tsettings to
appear in the ON&OFFROAD menu:
R On-road program (Y page 243)
R Off-road program (Y page 248) AMG menu in AMG vehicles
AMG displays 0002
Digital speedometer
0003 Gear indicator
001F Upshift indicator
001E Engine oil temperature
001C Coolant temperature
001D ECO start/stop function status indicator
(Ypage 161)
X Press the 0002or0005 button on the
steering wheel to select the AMG menu.
Upshift indicator UP 001F
indicates that the
engine has reached the overrevving range
when in the manual gearshift program.
Upshift indicator UP 001F
fades out other
messages until you have shifted up.
When the engine oil temperature is below
176 ‡(80 †) the oil temperature is show nin278
Menus and submenusOn-board computer and displays
Page 298 of 458

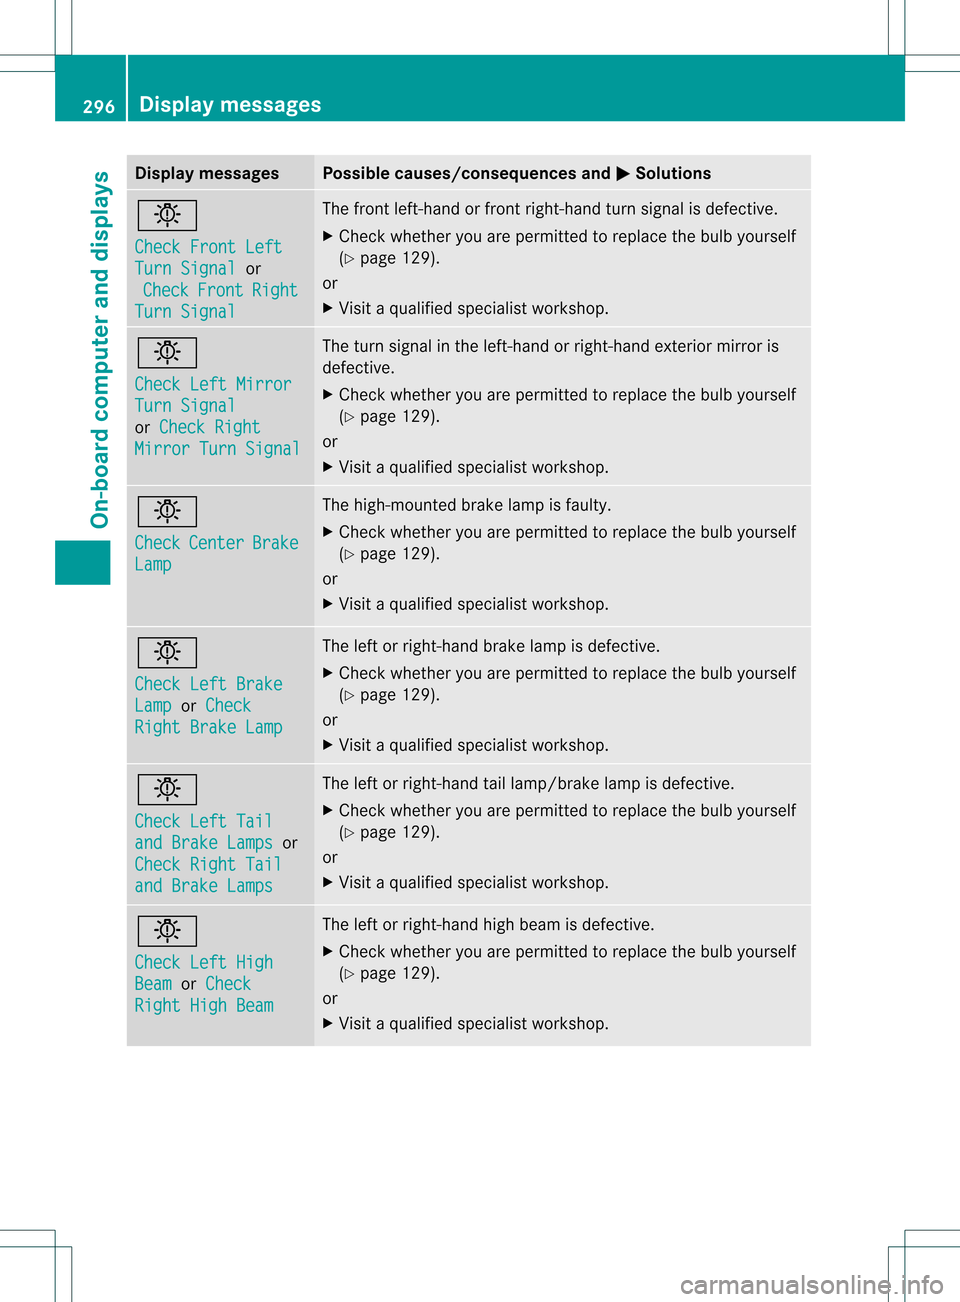
Display messages Possible causes/consequences and
0001 Solutions
0004
Check Front Left
Turn Signal or
Check Front Right
Turn Signal The front left-hand or front right-hand turn signal is defective.
X
Chec kwhether you are permitted to replace the bulb yourself
(Y page 129).
or
X Visit a qualified specialist workshop. 0004
Check Left Mirror
Turn Signal
or
Check Right Mirror Turn Signal The turn signal in the left-hand or right-hand exterior mirror is
defective.
X
Check whether you are permitted to replace the bulb yourself
(Y page 129).
or
X Visit a qualified specialist workshop. 0004
Check
Center Brake
Lamp The high-mounted brake lamp is faulty.
X
Check whether you are permitted to replace the bulb yourself
(Y page 129).
or
X Visit a qualified specialist workshop. 0004
Check Left Brake
Lamp or
Check Right Brake Lamp The left or right-hand brake lamp is defective.
X
Check whether you are permitted to replace the bulb yourself
(Y page 129).
or
X Visit a qualified specialist workshop. 0004
Check Left Tail
and Brake Lamps or
Check Right Tail and Brake Lamps The left or right-hand tail lamp/brake lamp is defective.
X
Check whether you are permitted to replace the bulb yourself
(Y page 129).
or
X Visit a qualified specialist workshop. 0004
Check Left High
Beam or
Check Right High Beam The left or right-hand high beam is defective.
X
Check whether you are permitted to replace the bulb yourself
(Y page 129).
or
X Visit a qualified specialist workshop. 296
Display messagesOn-board computer and displays
Page 309 of 458

Display messages Possible causes/consequences and
0001 Solutions
Blind Spot Assist or Active Blind Spot Assist is temporarily
inoperative. Possible causes are:
R
the sensors are dirty.
R function is impaired due to heavy rain or snow.
R the rada rsensor system is outside the operating temperature
range.
R the radar sensor system is temporarily inoperative, e.g. due to
electromagnetic radiation emitted by nearby TV or radio
stations or other sources of electromagnetic radiation.
The yellow 0003indicator lamps also light up in the exterior
mirrors.
When the causes stated above no longer apply, the display
message disappears.
Blind Spot Assist or Active Blind Spot Assist is operational again.
If the display message does not disappear:
X Pull over and stop the vehicle safely as soon as possible, paying
attention to road and traffic conditions.
X Secure the vehicle against rolling away (Y page 179).
X Clean the sensors (Y page 373).
X Restart the engine. Blind Spot Assist
Inoperative or
Active Blind Spot Assist Inoperative Blind Spot Assist or Active Blind Spot Assist is defective.
The yellow
0003indicator lamps also light up in the exterior
mirrors.
X Visit a qualified specialist workshop. Park Assist
Canceled The driver's door is open and the driver's seat belt has not been
fastened.
X
Repeat the parking process with the seat belt fastened and the
driver's door closed. You have inadvertently touched the multifunction steering wheel
while steering intervention was active.
X
While steering intervention is active, make sure that the
multifunction steering wheel is not touched unintentionally. The vehicle has started to skid and ESP
®
has intervened.
X Use Active Parking Assist again later (Y page 217). Display messages
307On-board computer and displays Z
Page 347 of 458

Sun visors
Overview G
WARNING
If the mirror cover of the vanity mirror is folded
up when the vehicle is in motion, you could be
blinded by incident light. There is a risk of an
accident.
Always keep the mirror cover folded down
while driving. 0002
Mirror light
0003 Bracket
001F Retaining clip, e.g. for a car park ticket
001E Vanity mirror
001C Mirror cover
Vanity mirror in the sun visor Mirror light
0002only functions if the sun visor
is clipped into bracket 0003and mirror cover
001C has been folded up.
Glare from the side X
Fold down sun visor 0002.
X Pull sun visor 0002out of retainer 001F.
X Swing sun visor 0002to the side.
X Slide sun visor 0002horizontally as required.
X Fold down additional sun visor 0003to the
windshield. Roller sunblinds on the rear side
windows
! Always guide the roller sunblind by hand.
Do not let it snap back suddenly as this
would damage the automatic roller
mechanism.
! Do not drive the vehicle with the roller
sunblind hooked in and the side windows
opened simultaneously .The roller sunblind
can jump out of the retainers and spring
back suddenly when driving at high speeds,
e.g. when driving on the freeway. This could
damage the inertia reel. Therefore, either
close the side window or retract the roller
sunblind before driving at high speeds. X
To extend: pull the roller sunblind out by
tab 0002and hook it onto retainers 0003at the
back of the window. Features
345Stowage and features Z
Page 361 of 458

Triggering the vehicle alarm
With this function, you can trigge
rthe
vehicle's panic alarm via SMS. An alarm
sounds and the exterior lighting flashes.
Depending on the setting, the panic alarm
lasts five or ten seconds. Afterwards, the
alarm switches off. Garage door opener
Important safety notes G
WARNING
When you operate or program the garage door
with the integrated garage door opener,
persons in the range of movement of the
garage door can become trapped or struck by
the garage door. There is arisk of injury.
When using the integrated garage door
opener, always make sure that nobody is
within the range of movement of the garage
door. G
WARNING
Combustion engines emit poisonous exhaust
gases such as carbo nmonoxide. Inhaling
these exhaust gases leads to poisoning. There
is a risk of fatal injury. Therefore never leave
the engine running in enclosed spaces
without sufficient ventilation.
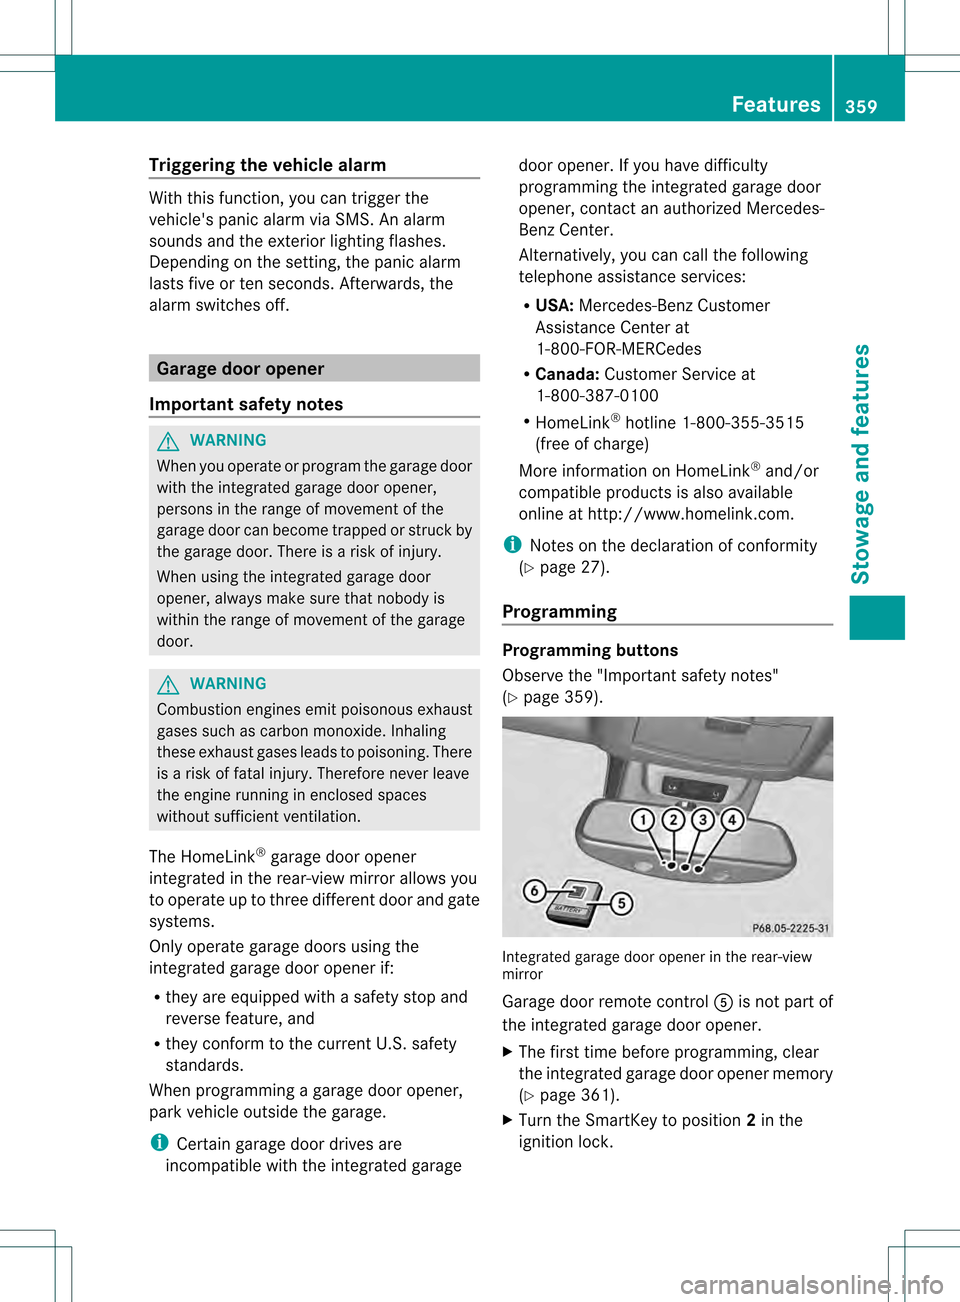
The HomeLink ®
garage door opener
integrated in the rear-view mirror allows you
to operate up to three different door and gate
systems.
Only operate garage doors using the
integrated garage door opener if:
R they are equipped with a safety stop and
reverse feature, and
R they conform to the current U.S. safety
standards.
When programming a garage door opener,
park vehicle outside the garage.
i Certain garage door drives are
incompatible with the integrated garage door opener. If you have difficulty
programming the integrated garage door
opener, contact an authorized Mercedes-
Benz Center.
Alternatively, you can call the following
telephone assistance services:
R USA: Mercedes-Benz Customer
Assistance Center at
1-800-FOR-MERCedes
R Canada: Customer Service at
1-800-387-0100
R HomeLink ®
hotline 1-800-355-3515
(free of charge)
More information on HomeLink ®
and/or
compatible products is also available
online at http://www.homelink.com.
i Notes on the declaration of conformity
(Y page 27).
Programming Programming buttons
Observe the "Important safety notes"
(Y
page 359). Integrated garage door opener in the rear-view
mirror
Garage door remote control
001Cis not part of
the integrated garage door opener.
X The first time before programming, clear
the integrated garage door opener memory
(Y page 361).
X Turn the SmartKey to position 2in the
ignition lock. Features
359Stowage and features Z
Page 362 of 458

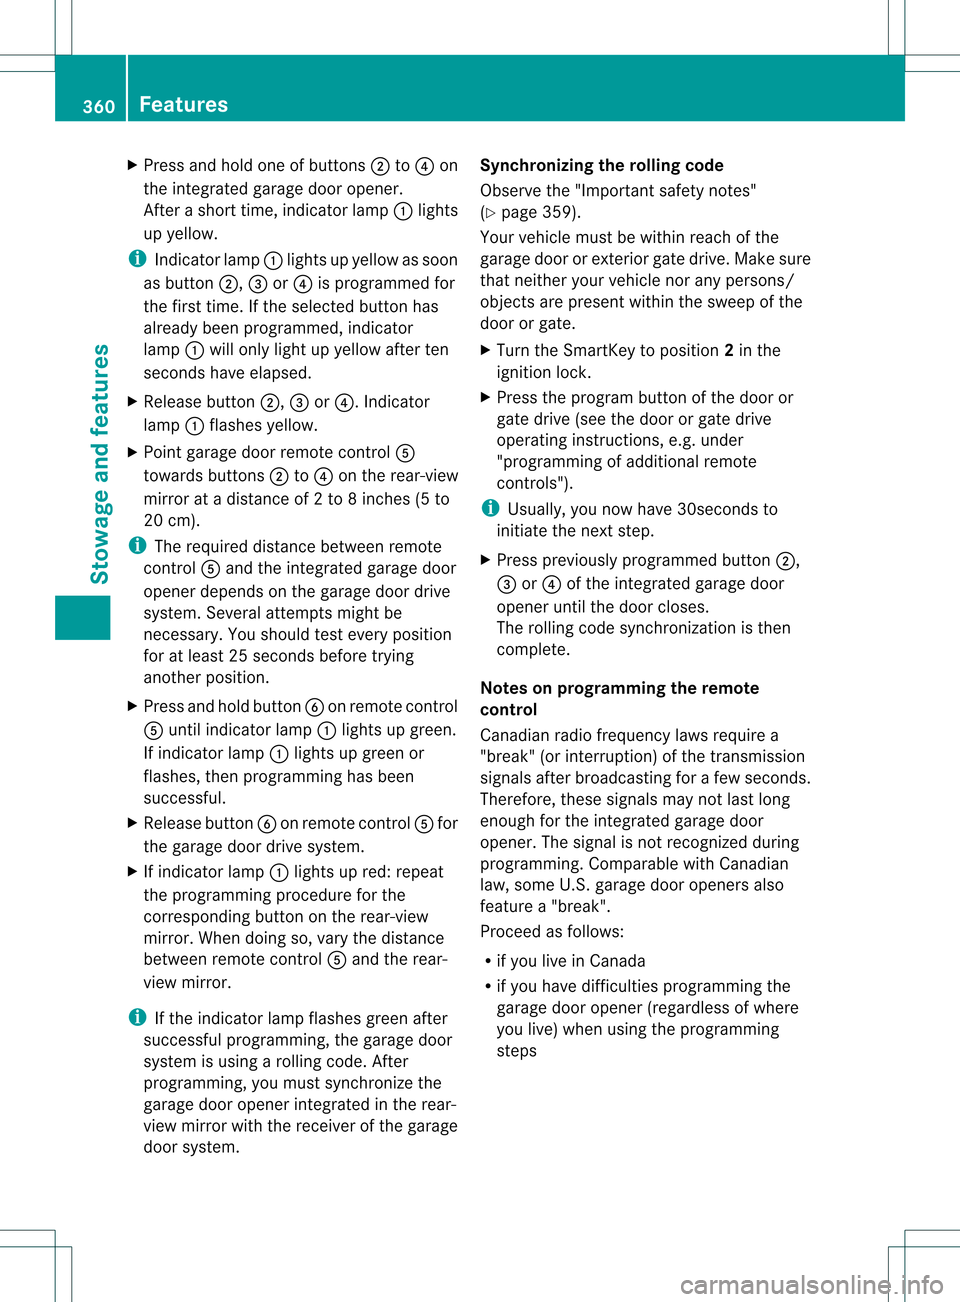
X
Press and hold one of buttons 0003to001E on
the integrated garage door opener.
After a short time, indicator lamp 0002lights
up yellow.
i Indicator lamp 0002lights up yellow as soon
as button 0003,001For001E is programmed for
the first time. If the selected button has
already been programmed, indicator
lamp 0002will only light up yellow after ten
seconds have elapsed.
X Release button 0003,001For001E. Indicator
lamp 0002flashes yellow.
X Point garage door remote control 001C
towards buttons 0003to001E on the rear-view
mirror at a distance of 2 to 8 inches (5 to
20 cm).
i The required distance between remote
control 001Cand the integrated garage door
opener depends on the garage door drive
system. Several attempts might be
necessary. You should test every position
for at least 25 seconds before trying
another position.
X Press and hold button 001Don remot econtrol
001C until indicator lamp 0002lights up green.
If indicator lamp 0002lights up green or
flashes, then programming has been
successful.
X Release button 001Don remote control 001Cfor
the garage door drive system.
X If indicator lamp 0002lights up red: repeat
the programming procedure for the
corresponding button on the rear-view
mirror. When doing so, vary the distance
between remote control 001Cand the rear-
view mirror.
i If the indicator lamp flashes green after
successful programming, the garage door
system is using a rolling code. After
programming, you must synchronize the
garage door opener integrated in the rear-
view mirror with the receiver of the garage
door system. Synchronizing the rolling code
Observe the "Important safety notes"
(Y
page 359).
Your vehicle must be within reach of the
garage door or exterior gate drive. Make sure
that neither your vehicle nor any persons/
objects are present within the sweep of the
door or gate.
X Turn the SmartKey to position 2in the
ignition lock.
X Press the program button of the door or
gate drive (see the door or gate drive
operating instructions, e.g. under
"programming of additional remote
controls").
i Usually, you now have 30seconds to
initiate the next step.
X Press previously programmed button 0003,
001F or001E of the integrated garage door
opener until the door closes.
The rolling code synchronization is then
complete.
Notes on programming the remote
control
Canadia nradio frequency laws require a
"break" (or interruption) of the transmission
signals after broadcasting for a few seconds.
Therefore, these signals may no tlast long
enough for the integrated garage door
opener. The signal is no trecognized during
programming. Comparable with Canadian
law, some U.S.g arage door openers also
feature a "break".
Proceed as follows:
R if you live in Canada
R if you have difficulties programming the
garage door opener (regardless of where
you live) when using the programming
steps 360
FeaturesStowage and features
Page 363 of 458

X
Press and hold one of buttons 0003to001E on
the integrated garage door opener.
After a short time, indicator lamp 0002lights
up yellow.
X Release the button.
Indicator lamp 0002flashes yellow.
X Press button 001Dof garage door remote
control 001Cfor two seconds, then release it
for two seconds.
X Press button 001Dagain for two seconds.
X Repeat this sequence on button 001Dof
remote control 001Cuntil indicator lamp 0002
lights up green.
If indicator lamp 0002turns red, repeat the
process.
X Continue with the other programming
steps (see above).
Problems when programming
If you are experiencing problems
programming the integrated garage door
opener on the rear-view mirror, take note of
the following instructions:
R Check the transmitter frequency of garage
door drive remote control 001C.This can
usually be found on the back of the remote
control.
The integrated garage door opener is
compatible with devices that have units
which operate in the frequency range of
280to 433MHz.
R Replace the batteries in garage door
remote control 001C.This increases the
likelihood that garage door remote control
001C will transmit a stronga nd precise signal
to the integrated garage door opene rinthe
rear-view mirror.
R When programming, hold remote control
001C at varying distances and angles from the
button that you are programming. Try
various angles at a distance between 2and
12 inches (5to 30 cm) or at the same angle
but at varying distances.
R If another remote control for the same
garage door drive is available, repeat the same programming steps with this remote
control. Before performing these steps,
make sure that new batteries have been
installed in garage door drive remote
control
001C.
R Note that some remote controls only
transmit for a limited amount of time (the
indicator lamp on the remote control goes
out). Press button 001Don remote control
001C again before transmission ends.
R Align the antenna cable of the garage door
opener unit. This can improve signal
reception/transmission.
Opening/closing the garage door After it has been programmed, the integrated
garage door opener performs the function of
the garage door system remote control.
Please also read the operating instructions
for the garage door system.
X
Turn the SmartKey to position 2in the
ignition lock.
X Press button 0003,001For001E which you have
programmed to operate the garage door.
Garage door system with a fixed code:
indicator lamp 0002lights up green.
Garage door system with a rolling code:
indicator lamp 0002flashes green.
i The transmitter will transmit a signal as
long as the button is pressed. The
transmission is halted after a maximum of
ten seconds and indicator lamp 0002lights
up yellow. Press button 0003,001For001E again
if necessary.
Clearing the memory X
Turn the SmartKey to position 2in the
ignition lock.
X Press buttons 0003and 001E.
The indicator lamp lights up yellow.
X Press and hold buttons 0003and 001Euntil the
indicator lamp turns green. Features
361Stowage and features Z