2013 MERCEDES-BENZ GLK-CLASS SUV washer fluid
[x] Cancel search: washer fluidPage 18 of 380

Seat belts
Adjusting the driver's and front-
passenger seat belt .........................56
Adjusting the height ......................... 56
Belt force limiters ............................ 58
center rear-compartment seat .........57
Cleaning .........................................
309
Correct usage .................................. 55
Emergency Tensioning Devices ........ 58
Fastening ......................................... 56
Important safety guidelines .............54
Releasing ......................................... 57
Safety guidelines ............................. 41
Switching belt adjustment on/off
(on-board computer) ...................... 229
Warning lamp ................................. 257
Warning lamp (function) ................... 57
see Seat belts
Seats
Adjusting (electrically) .....................98
Adjusting lumbar support ..............100
Adjusting the 4-way lumbar
support .......................................... 101
Adjusting the head restraint ............ 99
Cleaning the cover ......................... 309
Correct driver's seat position ........... 96
Folding the backrest (rear
compartment) forwards/back .......272
Folding the rear bench seat
forwards/back ............................... 272
Important safety notes .................... 97
Seat heating problem .................... 101
Storing settings (memory
function) ........................................ 106
Switching seat heating on/off ....... 101
Sensors (cleaning instructions) .......307
Service menu (on-board computer) . 226
Service products Brake fluid ..................................... 370
Coolant (engine) ............................ 371
DEF special additives .....................369
Engine oil ....................................... 369
Fuel ................................................ 365
Important safety notes .................. 365
Refrigerant (air-conditioning
system) .......................................... 372
Washer fluid ................................... 372Settings
Factory (on-board computer) ......... 230
On-board computer ....................... 226
Setting the air distribution ...............133
Setting the airflow ............................ 134
Side impact air bag ............................. 45
Side marker lamp (display
message) ............................................ 241
Side windows Cleaning ......................................... 306
Convenience closing feature ............ 88
Convenience opening feature .......... 87
Important safety information
...........86
Opening/closing .............................. 87
Problem (malfunction) .....................89
Resetting ......................................... 89
Sliding sunroof
see Panorama roof with power
tilt/sliding panel
SmartKey
Changing the battery ....................... 77
Changing the programming ............. 75
Checking the battery ....................... 77
Convenience closing feature ............ 88
Convenience opening feature .......... 87
Display message ............................ 256
Door central locking/unlocking ....... 74
Important safety notes .................... 74
Loss ................................................. 78
Mechanical key ................................ 76
Positions (ignition lock) ................. 141
Problem (malfunction) .....................78
Starting the engine ........................ 143
Snow chains ...................................... 331
Sockets Center console .............................. 280
General notes ................................ 280
Luggage compartment ................... 281
Rear compartment ......................... 281
Spare wheel
Storage location ............................ 360
Stowing .......................................... 361
Specialist workshop ............................ 27
Special seat belt retractor .................. 61
Speed, controlling see Cruise control 16
Index
Page 22 of 380

U
Unlocking Emergency unlocking .......................81
From inside the vehicle (central
unlocking button) ............................. 80V
Vanity mirror (in the sun visor) ........ 279
Vehicle Data acquisition ............................... 28
Display message ............................ 254
Emergency locking ........................... 81
Emergency unlocking .......................81
Equipment
....................................... 23
Individual settings ..........................226
Limited Warranty ............................. 28
Loading .......................................... 339
Locking (in an emergency) ............... 81
Locking (SmartKey) .......................... 74
Lowering ........................................ 356
Maintenance .................................... 24
Parking for a long period ................ 161
Pulling away ................................... 143
Raising ........................................... 354
Reporting problems .........................27
Securing from rolling away ............353
Towing away .................................. 320
Transporting .................................. 322
Unlocking (in an emergency) ........... 81
Unlocking (SmartKey) ......................74
Vehicle data ................................... 373
Vehicle data ....................................... 373
Vehicle dimensions ...........................373
Vehicle emergency locking ................81
Vehicle identification number see VIN
Vehicle identification plate ..............364
Vehicle tool kit .................................. 312
Video (DVD) ........................................ 223
VIN ...................................................... 364W
Warning and indicator lamps ABS ................................................ 259
Brakes ........................................... 259
Check Engine ................................. 264Coolant
.......................................... 265
Distance warning ........................... 267
DISTRONIC PLUS
...........................
267
ESP ®
.............................................. 261
ESP ®
OFF ....................................... 262
Fuel tank ........................................ 264
Overview .......................................... 32
PASSENGER AIR BAG OFF
indicator lamp .................................. 47
Reserve fuel
................................... 264
Seat belt ........................................ 257
SRS ................................................ 263
Tire pressure monitor .................... 268
Warranty ............................................ 364
Washer fluid Display message ............................ 255
Wheel bolt tightening torque ...........356
Wheel chock ...................................... 353
Wheels Changing a wheel .......................... 352
Checking ........................................ 329
Cleaning ......................................... 305
Cleaning (warning) .........................353
Emergency spare wheel ................. 359
Important safety notes .................. 328
Interchanging/changing ................352
Mounting a new wheel ................... 355
Mounting a wheel .......................... 353
Removing a wheel ..........................355
Storing ........................................... 352
Tightening torque ........................... 356
Wheel size/tire size ....................... 357
Window curtain air bag
Display message ............................ 236
Operation ......................................... 46
Windows
see Side windows
Windshield
Defrosting ...................................... 134
see Windshield
Windshield washer fluid
see Windshield washer system
Windshield washer system .............. 303
Notes ............................................. 372
Windshield wipers
Problem (malfunction) ...................124
Rear window wiper ........................12120
Index
Page 115 of 380
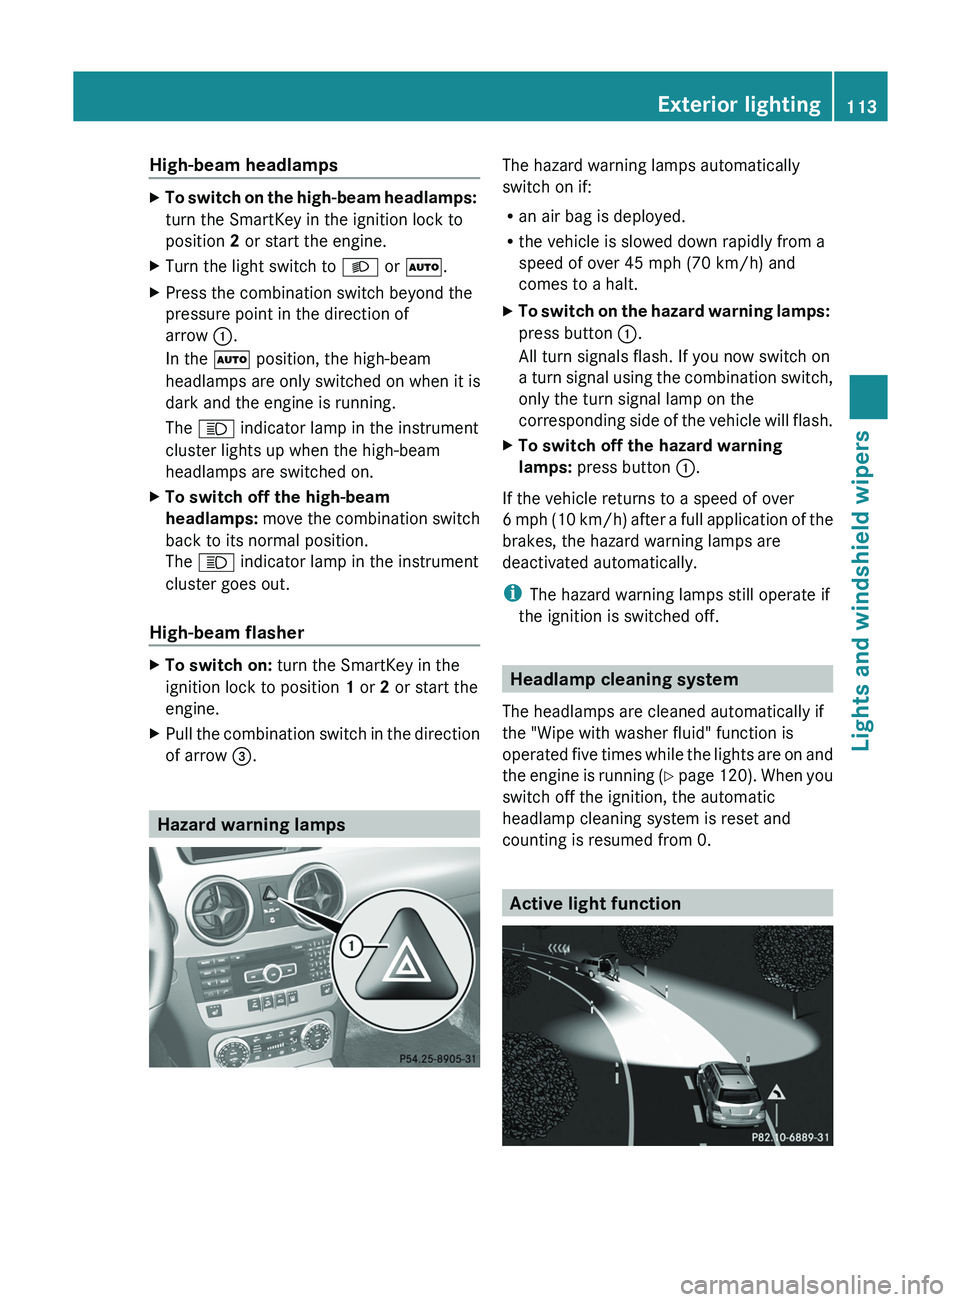
High-beam headlamps
X
To switch on the high-beam headlamps:
turn the SmartKey in the ignition lock to
position 2 or start the engine.
X Turn the light switch to 0058 or 0058.
X Press the combination switch beyond the
pressure point in the direction of
arrow 0043.
In the 0058 position, the high-beam
headlamps are only switched on when it is
dark and the engine is running.
The 0057 indicator lamp in the instrument
cluster lights up when the high-beam
headlamps are switched on.
X To switch off the high-beam
headlamps: move the combination switch
back to its normal position.
The 0057
indicator lamp in the instrument
cluster goes out.
High-beam flasher X
To switch on: turn the SmartKey in the
ignition lock to position 1 or 2 or start the
engine.
X Pull the combination switch in the direction
of arrow 0087. Hazard warning lamps The hazard warning lamps automatically
switch on if:
R
an air bag is deployed.
R the vehicle is slowed down rapidly from a
speed of over 45 mph (70 km/h) and
comes to a halt.
X To switch on the hazard warning lamps:
press button 0043.
All turn signals flash. If you now switch on
a turn signal using the
combination switch,
only the turn signal lamp on the
corresponding side of the vehicle will flash.
X To switch off the hazard warning
lamps: press button 0043.
If the vehicle returns to a speed of over
6 mph (10 km/h
)
after a full application of the
brakes, the hazard warning lamps are
deactivated automatically.
i The hazard warning lamps still operate if
the ignition is switched off. Headlamp cleaning system
The headlamps are cleaned automatically if
the "Wipe with washer fluid" function is
operated five times while the
lights are on and
the engine is running (Y page 120). When you
switch off the ignition, the automatic
headlamp cleaning system is reset and
counting is resumed from 0. Active light function Exterior lighting
113
Lights and windshield wipers Z
Page 122 of 380
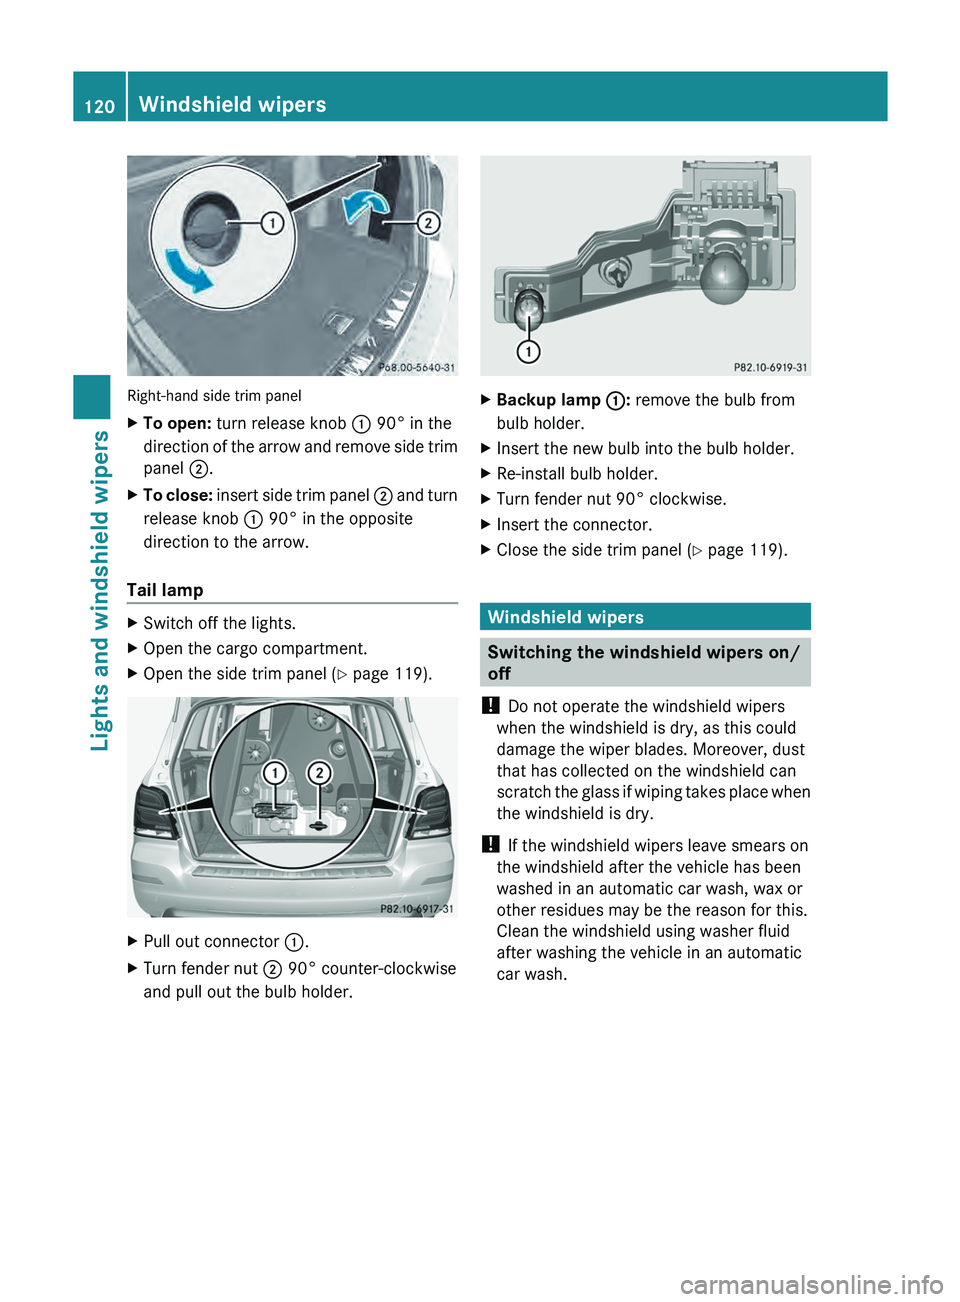
Right-hand side trim panel
X
To open: turn release knob 0043 90° in the
direction of the arrow and
remove side trim
panel 0044.
X To close: insert side trim panel
0044 and turn
release knob
0043 90° in the opposite
direction to the arrow.
Tail lamp X
Switch off the lights.
X Open the cargo compartment.
X Open the side trim panel ( Y page 119).X
Pull out connector 0043.
X Turn fender nut 0044 90° counter-clockwise
and pull out the bulb holder. X
Backup lamp 0043: remove the bulb from
bulb holder.
X Insert the new bulb into the bulb holder.
X Re-install bulb holder.
X Turn fender nut 90° clockwise.
X Insert the connector.
X Close the side trim panel ( Y page 119). Windshield wipers
Switching the windshield wipers on/
off
! Do not operate the windshield wipers
when the windshield is dry, as this could
damage the wiper blades. Moreover, dust
that has collected on the windshield can
scratch the glass if wiping
takes place when
the windshield is dry.
! If the windshield wipers leave smears on
the windshield after the vehicle has been
washed in an automatic car wash, wax or
other residues may be the reason for this.
Clean the windshield using washer fluid
after washing the vehicle in an automatic
car wash. 120
Windshield wipers
Lights and windshield wipers
Page 123 of 380

Combination switch
0047
003F Windshield wiper off
0048 0062 Intermittent wipe, low 7
0049 0063 Intermittent wipe, high 8
004A 00AA Continuous wipe, slow
004B 00A9 Continuous wipe, fast
0084 00D3 Single wipe/ 00D4 To wipe the
windshield using washer fluid
X Switch on the ignition.
X Turn the combination switch to the
corresponding position.
! Vehicles with a rain sensor: if the
windshield becomes dirty in dry weather
conditions, the windshield wipers may be
activated inadvertently. This could then
damage the windshield wiper blades or
scratch the windshield.
For this reason, you should always switch
off the windshield wipers in dry weather.
If the wiper blades are worn, the windshield
will no longer be wiped properly. This could
prevent you from observing the traffic
conditions. Replace the wiper blades twice a
year, ideally in spring and fall. Switching the rear window wiper on/
off
Combination switch
0043
00C5 Switch
0048 00E2 To wipe with washer fluid
0049 I To switch on intermittent wiping
004A 0 To switch off intermittent wiping
004B 00E2 To wipe with washer fluid
X Turn the SmartKey to position 1 or
2 in the
ignition lock.
X Turn switch
0043 on the combination switch
to the corresponding position.
When the rear window wiper
is switched on,
the icon appears in the instrument cluster. Replacing the wiper blades
Important safety notes G
WARNING
If the windshield wipers begin to move while
you are changing the wiper
blades, you could
be trapped by the wiper arm. There is a risk
of injury.
Always switch off the windshield wipers and
ignition before changing the wiper blades.
! Never open the hood/tailgate if a wiper
arm has been folded away from the
windshield/rear window.
7 Rain sensor set to low sensitivity.
8 Rain sensor set to high sensitivity. Windshield wipers
121
Lights and windshield wipers Z
Page 126 of 380
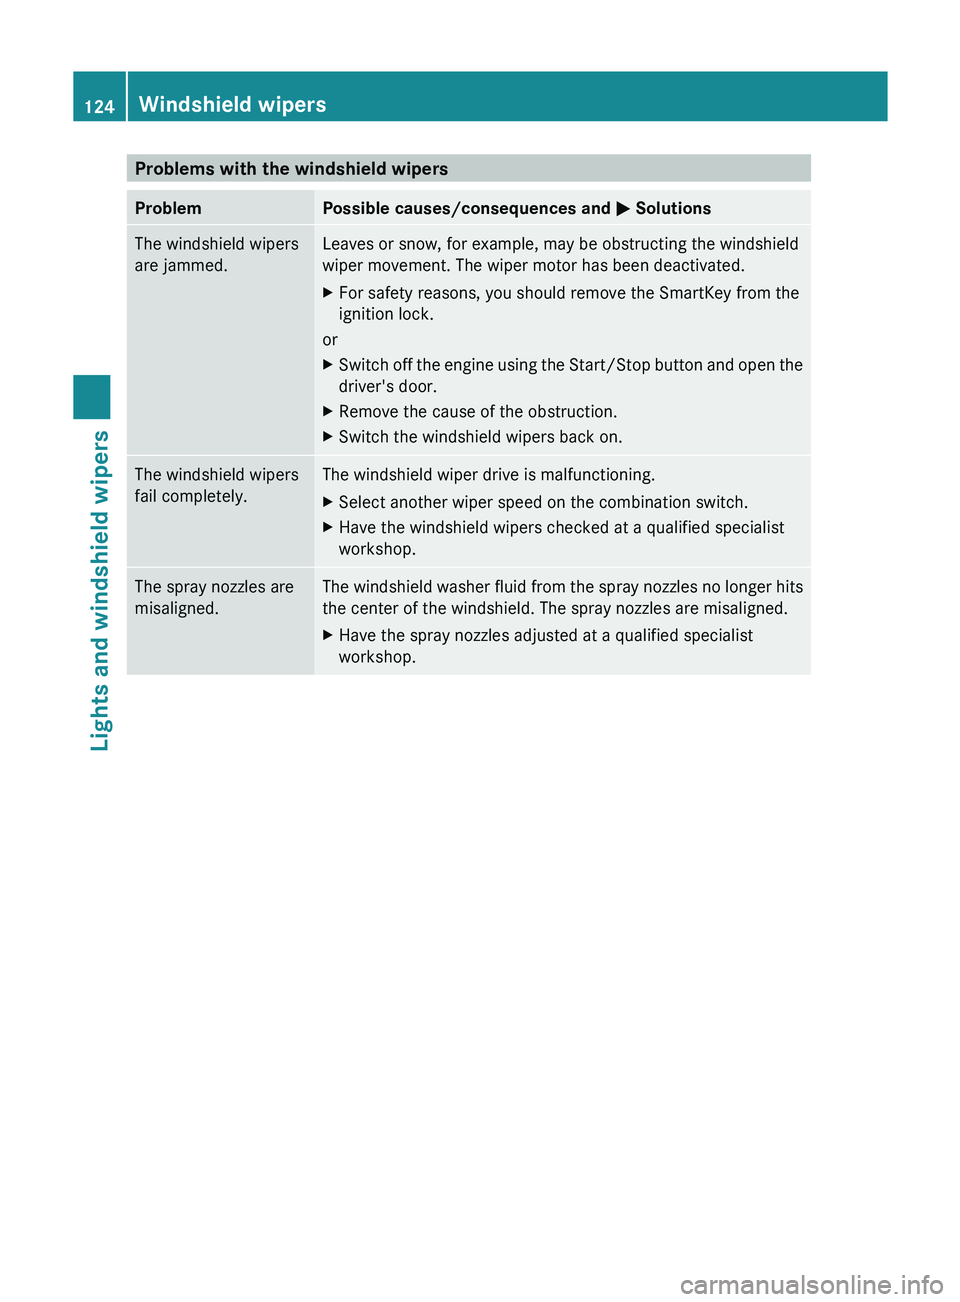
Problems with the windshield wipers
Problem Possible causes/consequences and
0050 SolutionsThe windshield wipers
are jammed. Leaves or snow, for example, may be obstructing the windshield
wiper movement. The wiper motor has been deactivated.
X
For safety reasons, you should remove the SmartKey from the
ignition lock.
or
X Switch off the engine using the Start/Stop button and open the
driver's door.
X Remove the cause of the obstruction.
X Switch the windshield wipers back on. The windshield wipers
fail completely. The windshield wiper drive is malfunctioning.
X
Select another wiper speed on the combination switch.
X Have the windshield wipers checked at a qualified specialist
workshop. The spray nozzles are
misaligned. The windshield washer fluid from the spray nozzles no longer hits
the center of the windshield. The spray nozzles are misaligned.
X
Have the spray nozzles adjusted at a qualified specialist
workshop.124
Windshield wipersLights and windshield wipers
Page 257 of 380
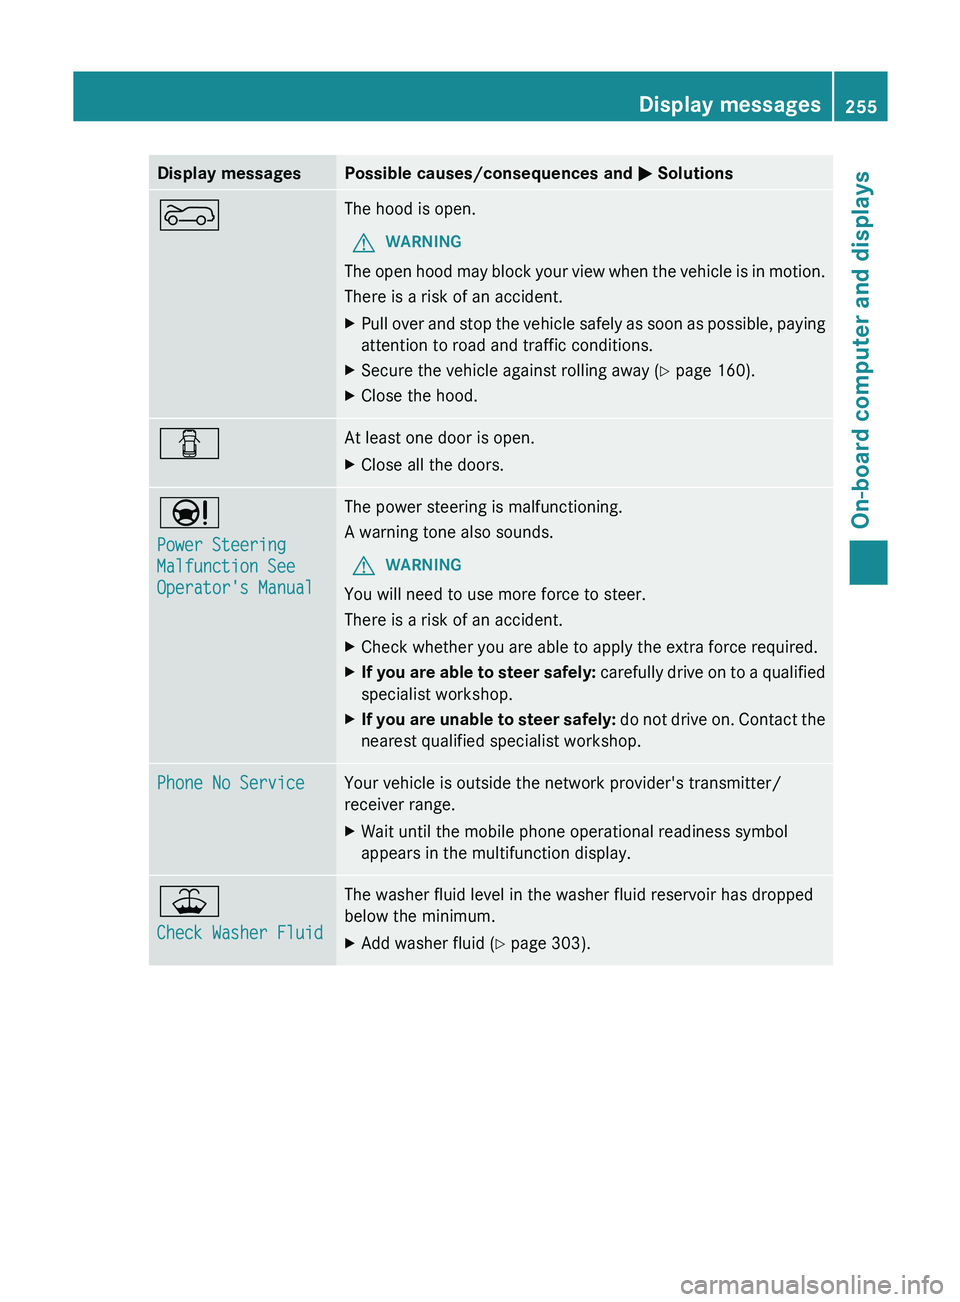
Display messages Possible causes/consequences and
0050 Solutions0066 The hood is open.
G WARNING
The open hood may block your view when the vehicle is in motion.
There is a risk of an accident.
X Pull over and stop the vehicle safely as soon as possible, paying
attention to road and traffic conditions.
X Secure the vehicle against rolling away ( Y page 160).
X Close the hood. 0051 At least one door is open.
X
Close all the doors. 00CC
Power Steering
Malfunction See
Operator's Manual The power steering is malfunctioning.
A warning tone also sounds.
G WARNING
You will need to use more force to steer.
There is a risk of an accident.
X Check whether you are able to apply the extra force required.
X If you are able to steer safely:
carefully drive
on to
a qualified
specialist workshop.
X If you are unable to steer safely: do not drive on.
Contact the
nearest qualified specialist workshop. Phone No Service Your vehicle is outside the network provider's transmitter/
receiver range.
X
Wait until the mobile phone operational readiness symbol
appears in the multifunction display. 00B2
Check Washer Fluid The washer fluid level in the washer fluid reservoir has dropped
below the minimum.
X
Add washer fluid ( Y page 303). Display messages
255
On-board computer and displays Z
Page 305 of 380
If the coolant level is approximately 0.6 in
(1.5 cm) above marker bar
0087 in the fuel
filler neck when warm, there is enough
coolant in expansion tank 0044.
X If necessary, add coolant that has been
tested and approved by Mercedes-Benz.
X Replace cap 0043
and turn it
clockwise
as far
as it will go.
For further information on coolant, see
(Y page 371).
Adding washer fluid to the windshield
washer system/headlamp cleaning
system G
WARNING
Windshield washer concentrate is highly
flammable. If it comes into contact with hot
engine components or the exhaust system it
could ignite. There is a risk of fire and injury.
Make sure that no windshield washer
concentrate is spilled next to the filler neck. X
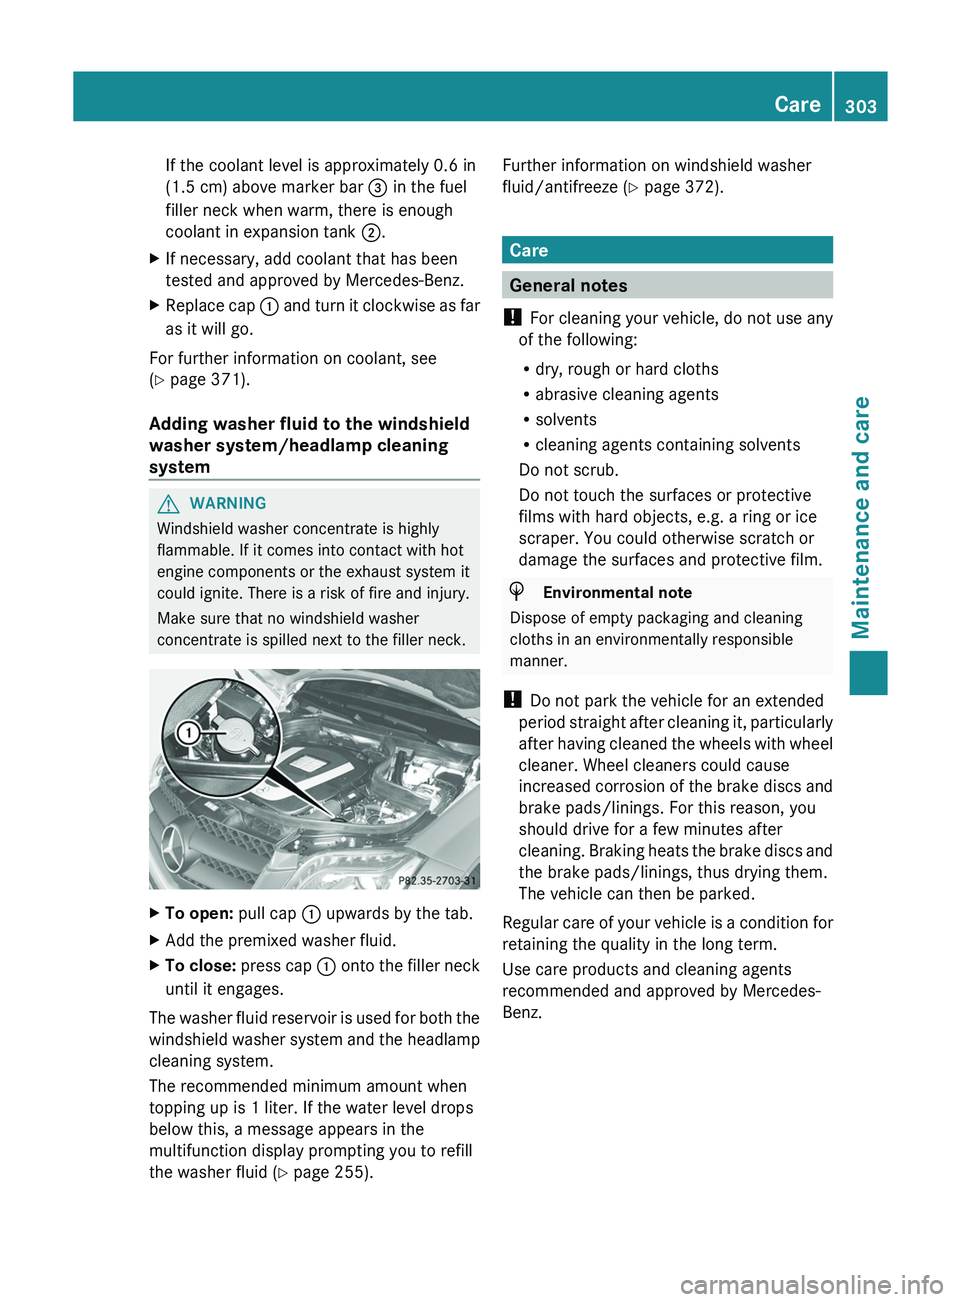
To open: pull cap 0043 upwards by the tab.
X Add the premixed washer fluid.
X To close:
press cap 0043 onto the
filler neck
until it engages.
The washer fluid reservoir is used for both the
windshield washer system and the
headlamp
cleaning system.
The recommended minimum amount when
topping up is 1 liter. If the water level drops
below this, a message appears in the
multifunction display prompting you to refill
the washer fluid ( Y page 255). Further information on windshield washer
fluid/antifreeze (
Y page 372). Care
General notes
! For cleaning your vehicle, do not use any
of the following:
R dry, rough or hard cloths
R abrasive cleaning agents
R solvents
R cleaning agents containing solvents
Do not scrub.
Do not touch the surfaces or protective
films with hard objects, e.g. a ring or ice
scraper. You could otherwise scratch or
damage the surfaces and protective film. H
Environmental note
Dispose of empty packaging and cleaning
cloths in an environmentally responsible
manner.
! Do not park the vehicle for an extended
period straight after cleaning it,
particularly
after having cleaned the wheels with wheel
cleaner. Wheel cleaners could cause
increased corrosion of the brake discs and
brake pads/linings. For this reason, you
should drive for a few minutes after
cleaning. Braking heats the brake discs and
the brake pads/linings, thus drying them.
The vehicle can then be parked.
Regular care of your vehicle is a condition for
retaining the quality in the long term.
Use care products and cleaning agents
recommended and approved by Mercedes-
Benz. Care
303Maintenance and care Z