2013 MERCEDES-BENZ GLK-CLASS SUV instrument cluster
[x] Cancel search: instrument clusterPage 123 of 380

Combination switch
0047
003F Windshield wiper off
0048 0062 Intermittent wipe, low 7
0049 0063 Intermittent wipe, high 8
004A 00AA Continuous wipe, slow
004B 00A9 Continuous wipe, fast
0084 00D3 Single wipe/ 00D4 To wipe the
windshield using washer fluid
X Switch on the ignition.
X Turn the combination switch to the
corresponding position.
! Vehicles with a rain sensor: if the
windshield becomes dirty in dry weather
conditions, the windshield wipers may be
activated inadvertently. This could then
damage the windshield wiper blades or
scratch the windshield.
For this reason, you should always switch
off the windshield wipers in dry weather.
If the wiper blades are worn, the windshield
will no longer be wiped properly. This could
prevent you from observing the traffic
conditions. Replace the wiper blades twice a
year, ideally in spring and fall. Switching the rear window wiper on/
off
Combination switch
0043
00C5 Switch
0048 00E2 To wipe with washer fluid
0049 I To switch on intermittent wiping
004A 0 To switch off intermittent wiping
004B 00E2 To wipe with washer fluid
X Turn the SmartKey to position 1 or
2 in the
ignition lock.
X Turn switch
0043 on the combination switch
to the corresponding position.
When the rear window wiper
is switched on,
the icon appears in the instrument cluster. Replacing the wiper blades
Important safety notes G
WARNING
If the windshield wipers begin to move while
you are changing the wiper
blades, you could
be trapped by the wiper arm. There is a risk
of injury.
Always switch off the windshield wipers and
ignition before changing the wiper blades.
! Never open the hood/tailgate if a wiper
arm has been folded away from the
windshield/rear window.
7 Rain sensor set to low sensitivity.
8 Rain sensor set to high sensitivity. Windshield wipers
121
Lights and windshield wipers Z
Page 144 of 380
started with the Start/Stop button if the
SmartKey is in the vehicle. Electrically
powered equipment can be operated.
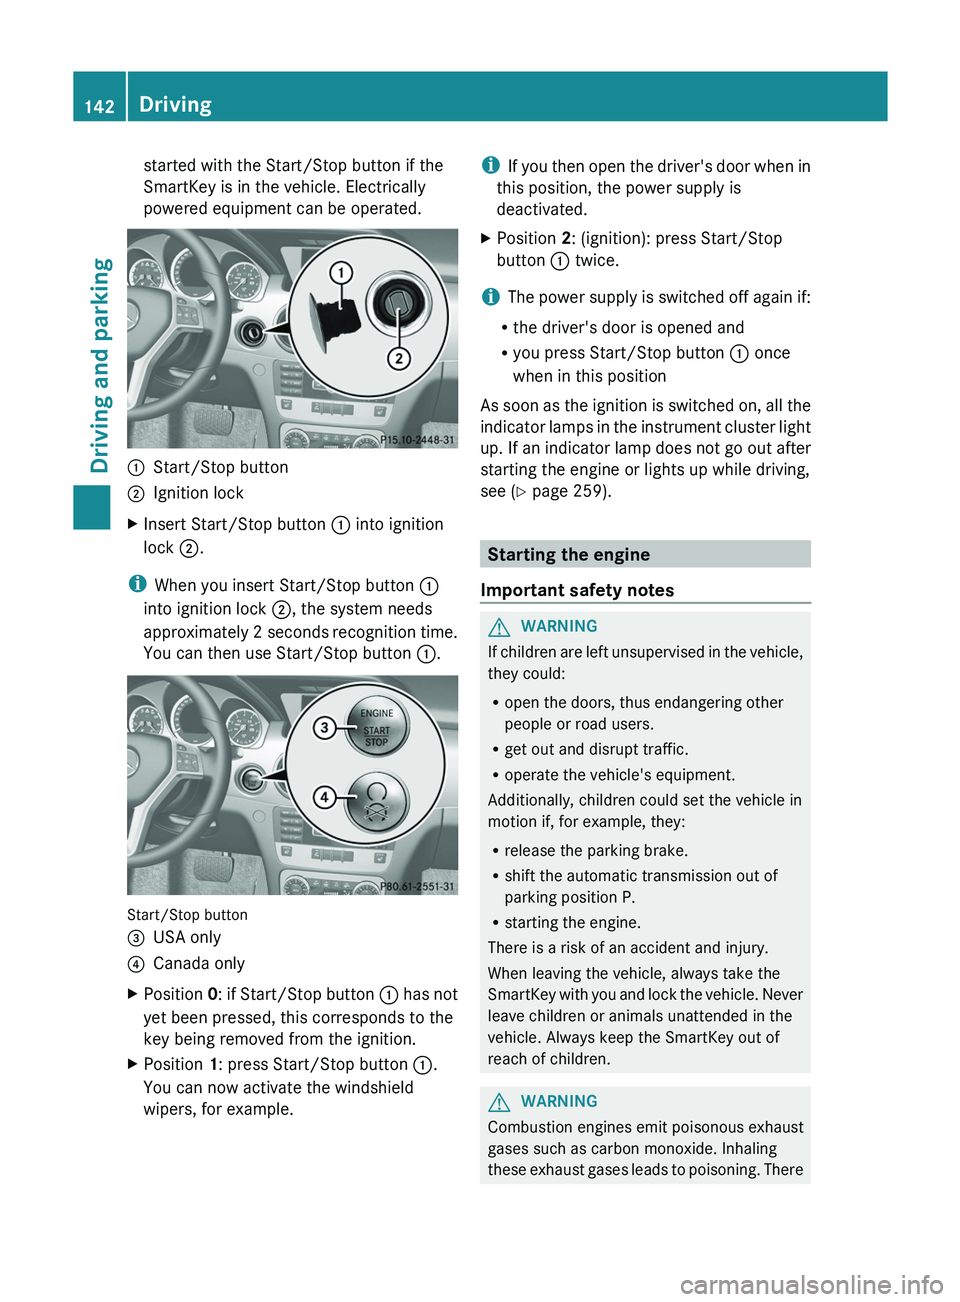
0043
Start/Stop button
0044 Ignition lock
X Insert Start/Stop button 0043 into ignition
lock 0044.
i When you insert Start/Stop button 0043
into ignition lock 0044, the system needs
approximately 2 seconds recognition
time.
You can then use Start/Stop button 0043
.Start/Stop button
0087
USA only
0085 Canada only
X Position 0: if Start/Stop button
0043 has not
yet been pressed, this corresponds to the
key being removed from the ignition.
X Position
1: press Start/Stop button 0043.
You can now activate the windshield
wipers, for example. i
If you then open the
driver's door when in
this position, the power supply is
deactivated.
X Position 2: (ignition): press Start/Stop
button 0043 twice.
i The power supply is switched off again if:
R the driver's door is opened and
R you press Start/Stop button 0043 once
when in this position
As soon as
the ignition is switched on, all the
indicator lamps in the instrument cluster light
up. If an indicator lamp does not go out after
starting the engine or lights up while driving,
see ( Y page 259). Starting the engine
Important safety notes G
WARNING
If children are left unsupervised in the vehicle,
they could:
R open the doors, thus endangering other
people or road users.
R get out and disrupt traffic.
R operate the vehicle's equipment.
Additionally, children could set the vehicle in
motion if, for example, they:
R release the parking brake.
R shift the automatic transmission out of
parking position P.
R starting the engine.
There is a risk of an accident and injury.
When leaving the vehicle, always take the
SmartKey with you and lock
the vehicle. Never
leave children or animals unattended in the
vehicle. Always keep the SmartKey out of
reach of children. G
WARNING
Combustion engines emit poisonous exhaust
gases such as carbon monoxide. Inhaling
these exhaust gases leads to
poisoning. There142
Driving
Driving and parking
Page 145 of 380
is a risk of fatal injury. Therefore never leave
the engine running in enclosed spaces
without sufficient ventilation.
G
WARNING
Flammable materials introduced through
environmental influence or by animals can
ignite if in contact with
the exhaust system or
parts of the engine that heat up. There is a risk
of fire.
Carry out regular checks to make sure that
there are no flammable foreign materials in
the engine compartment or in the exhaust
system.
! Do not depress the accelerator pedal
when starting the engine.
General notes i
Vehicles with a gasoline engine: the
catalytic converter is preheated for up to
30 seconds after a cold
start. The sound of
the engine may change during this time.
Automatic transmission X
Shift the transmission to position P.
The transmission position display in the
multifunction display shows P.
i You can also start the engine when the
transmission is in position N.
Starting procedure with the SmartKey i
To start the engine using the SmartKey
instead of KEYLESS-GO, pull the Start/
Stop button out of the ignition lock.
X To start a gasoline engine: turn the
SmartKey to position 3 in the ignition lock (Y page 141) and release it as soon as the
engine is running.
X To start a diesel engine: turn the
SmartKey to position 2 in the ignition lock
(Y page 141).
The 0028 preglow indicator lamp in the
instrument cluster lights up.
X When the 0028 preglow indicator lamp
goes out, turn the SmartKey to position
3(Y page 141) and release
it as soon as the
engine is running.
i You can start the engine
without preglow
if the engine is warm.
Using KEYLESS-GO to start the engine You can start the engine if a valid SmartKey
with the integrated KEYLESS-GO function is
in the vehicle. Always take
the SmartKey with
you when leaving the vehicle, even if you only
leave it for a short time. Pay attention to the
important safety notes.
i The Start/Stop button can be used to
start the vehicle without inserting the
SmartKey into the ignition lock. The Start/
Stop button must be inserted in the ignition
lock and the SmartKey must be in the
vehicle.
X Depress the brake pedal and keep it
depressed.
X Press the Start/Stop button once
(Y page 141).
The engine starts. Pulling away
Automatic transmission G
WARNING
If the engine speed is above the idling speed
and you engage transmission position D or
R, the vehicle could pull
away suddenly. There
is a risk of an accident. Driving
143
Driving and parking
Z
Page 149 of 380
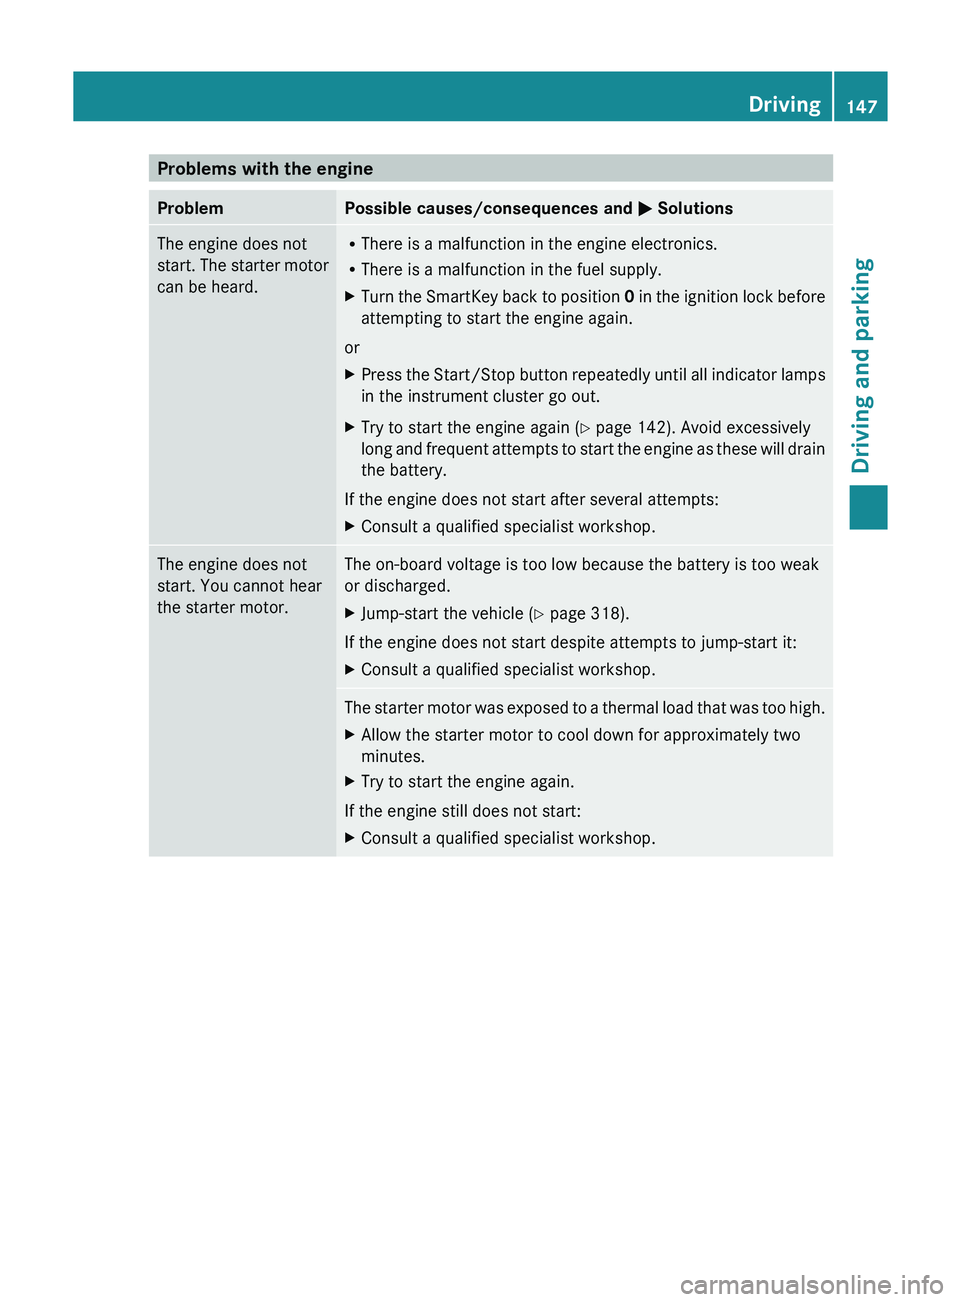
Problems with the engine
Problem Possible causes/consequences and
0050 SolutionsThe engine does not
start.
The starter
motor
can be heard. R
There is a malfunction in the engine electronics.
R There is a malfunction in the fuel supply.
X Turn the SmartKey back to position 0
in the
ignition lock
before
attempting to start the engine again.
or
X Press the Start/Stop button repeatedly until all indicator lamps
in the instrument cluster go out.
X Try to start the engine again (Y page 142). Avoid excessively
long and frequent attempts to
start the engine as these will drain
the battery.
If the engine does not start after several attempts:
X Consult a qualified specialist workshop. The engine does not
start. You cannot hear
the starter motor. The on-board voltage is too low because the battery is too weak
or discharged.
X
Jump-start the vehicle (Y page 318).
If the engine does not start despite attempts to jump-start it:
X Consult a qualified specialist workshop. The starter motor was exposed to a thermal load that was too high.
X
Allow the starter motor to cool down for approximately two
minutes.
X Try to start the engine again.
If the engine still does not start:
X Consult a qualified specialist workshop. Driving
147
Driving and parking Z
Page 157 of 380
If you or others come into contact with fuel,
observe the following:
R
Wash away fuel from skin immediately
using soap and water.
R If fuel comes into contact with your eyes,
immediately rinse them thoroughly with
clean water. Seek medical assistance
without delay.
R If fuel is swallowed, seek medical
assistance without delay. Do not induce
vomiting.
R Immediately change out of clothing which
has come into contact with fuel. G
WARNING
Electrostatic buildup can create sparks and
ignite fuel vapors. There is a risk of fire and
explosion.
Always touch the vehicle body
before opening
the fuel filler flap or touching the fuel pump
nozzle. Any existing electrostatic buildup is
thereby discharged. G
WARNING
Vehicles with a diesel engine:
If you mix diesel fuel with gasoline, the flash
point is lower than that of pure diesel fuel.
When the engine is running, exhaust system
components could overheat without being
noticed. There is a risk of fire.
Never refuel with gasoline. Never
mix gasoline
with diesel fuel.
! Do not use gasoline to refuel vehicles with
a diesel engine. Do not use diesel to refuel
vehicles with a gasoline engine. Do not
switch on the ignition if you accidentally
refuel with the wrong fuel. Otherwise, the
fuel will enter the fuel system. Even small
amounts of the wrong fuel could result in
damage to the fuel system and the engine.
The repair costs are high. Notify a qualified
specialist workshop and have the fuel tank
and fuel lines drained completely. !
Overfilling the fuel tank could
damage the
fuel system.
! Take care not to spill any fuel on painted
surfaces. You could otherwise damage the
paintwork.
! Use a filter when refueling from a fuel can.
Otherwise, the fuel lines and/or injection
system could be blocked by particles from
the fuel can.
Do not get into the vehicle again during the
refueling process. Otherwise, electrostatic
charge could build up again.
If you overfill the fuel tank, fuel could spray
out when the fuel pump nozzle is removed.
For further information on fuel and fuel quality
(Y page 365). Refueling
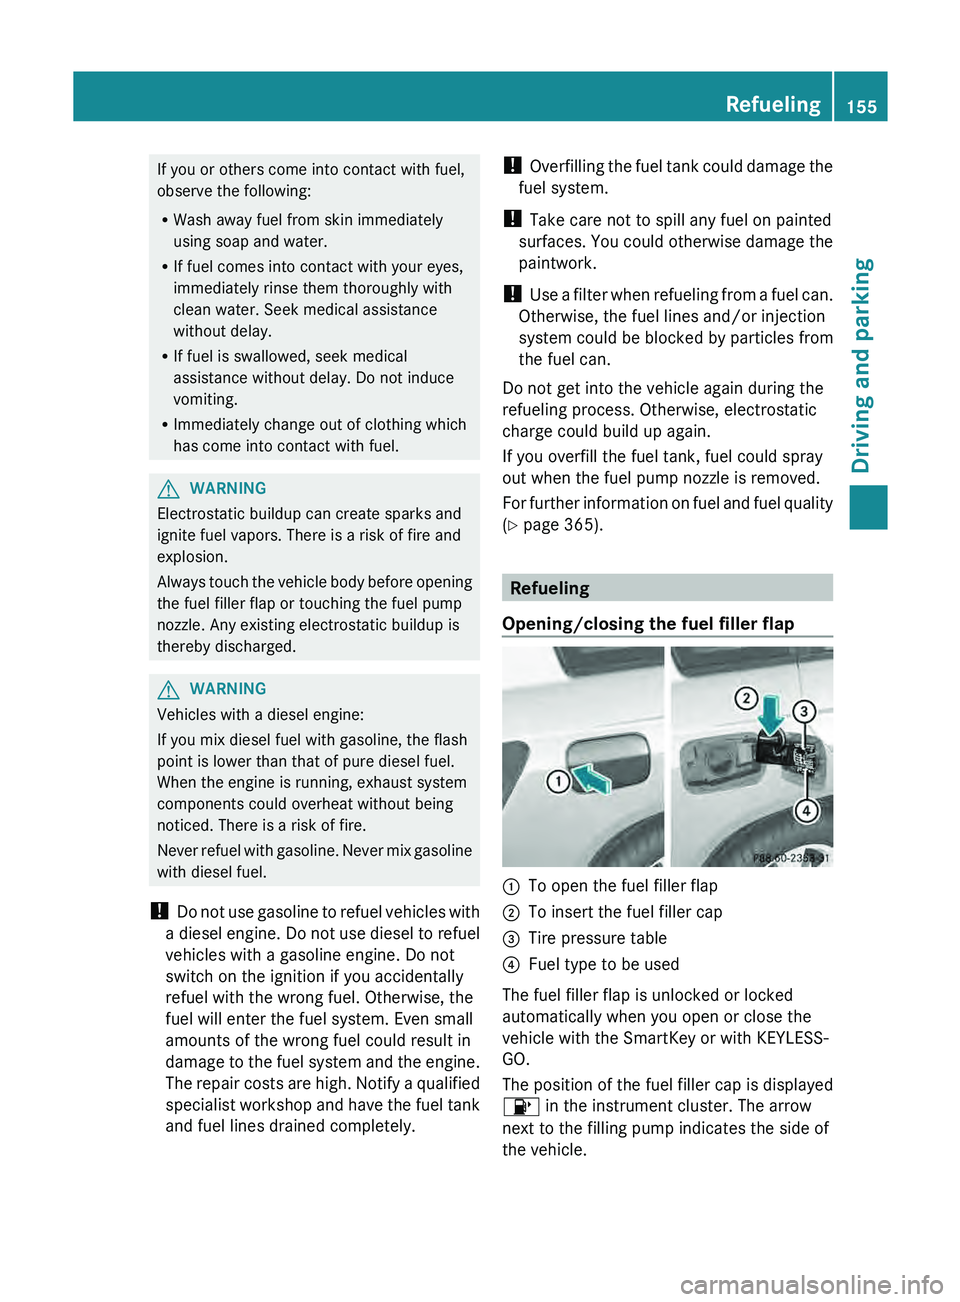
Opening/closing the fuel filler flap 0043
To open the fuel filler flap
0044 To insert the fuel filler cap
0087 Tire pressure table
0085 Fuel type to be used
The fuel filler flap is unlocked or locked
automatically when you open or close the
vehicle with the SmartKey or with KEYLESS-
GO.
The position of the fuel filler cap is displayed
00B6 in the instrument cluster. The arrow
next to the filling pump indicates the side of
the vehicle. Refueling
155
Driving and parking Z
Page 158 of 380
To open
X
Switch the engine off.
X Remove the SmartKey from the ignition
lock.
X KEYLESS-GO: open the driver’s door.
This corresponds to key position 0: "key
removed".
The driver’s door can be closed again.
X Press the fuel filler flap in the direction of
arrow 0043.
The fuel filler flap opens slightly.
X Open the fuel filler flap fully.
X Turn the fuel filler flap counter-clockwise
and remove it.
X Insert the fuel filler cap into the holder
bracket on the inside of filler flap 0044.
X Completely insert the filler neck of the fuel
pump nozzle into the tank, hook in place
and refuel.
X Only fill the tank until the pump nozzle
switches off.
i Do not add any more fuel after the pump
stops filling for the first time. Otherwise,
fuel may leak out.
To close X
Replace the cap on the filler neck and turn
clockwise until it engages audibly.
X Close the fuel filler flap.
i Close the fuel filler flap
before locking the
vehicle.
i If you are driving with the fuel filler cap
open, the 00B6 reserve fuel warning lamp
flashes. A message appears in the
multifunction display ( Y page 245).
In addition, the 00B9 Check Engine warning
lamp may light up ( Y page 264).
For further information on warning and
indicator lamps in the instrument cluster,
see ( Y page 264).156
Refueling
Driving and parking
Page 163 of 380

Vehicles with automatic transmission
X
Apply the parking brake firmly.
X Shift the transmission to position P.
Using the SmartKey
X Turn the SmartKey to position 0 in the
ignition lock and remove it.
The immobilizer is activated.
i The SmartKey can only be removed if the
transmission is in position P.
Using KEYLESS-GO
X Press the Start/Stop button (Y page 141).
The engine stops and all the indicator
lamps in the instrument cluster go out.
i When the driver's door is closed, this
corresponds to key position 1. When the
driver's door is open, this corresponds to
key position 0
: "key removed".
i In the event of an
emergency, the engine
can be turned off while the vehicle is in
motion by pressing and holding the Start/
Stop button for three seconds. Parking brake
G
WARNING
If you must brake the vehicle with the parking
brake, the braking distance is considerably
longer and the wheels could
lock. There is an
increased danger of skidding and accidents.
Only use the parking brake to brake the
vehicle when the service brake is faulty. Do
not apply the parking brake too firmly. If the
wheels lock, release the parking brake until
the wheels begin turning again. G
WARNING
If you leave children unsupervised in the
vehicle, they could set it in motion by, for
example:
R releasing the parking brake
R shifting the automatic transmission out of
the parking position P
R starting the engine.
They could also operate the vehicle's
equipment. There is a risk
of an accident and
injury.
When leaving the vehicle, always take the
SmartKey with you and lock the vehicle. Never
leave children unsupervised in the vehicle.
If you brake the vehicle with the parking
brake, the brake lamps will not light up. X
To apply:
depress parking brake 0044
firmly.
When the
engine is running, the 0027 (USA
only) or 004D (Canada only) indicator lamp
lights up in the instrument cluster.
X To release: depress the brake pedal and
keep it depressed.
X Pull release handle 0043.
When the ignition is switched on or the
engine is running, the 0027 (USA only) or
004D (Canada only)
indicator lamp
goes out
in the instrument cluster. Parking the vehicle for a long period
If you leave the vehicle
parked for longer than
four weeks, the battery may be damaged by
exhaustive discharging. Parking
161
Driving and parking Z
Page 167 of 380
Servicing the brakes
!
If the red brake warning
lamp lights up in
the instrument cluster and you hear a
warning tone while the engine is running,
the brake fluid level may be too low.
Observe additional warning messages in
the multifunction display.
The brake fluid level may be too low due to
brake pad wear or leaking brake lines.
Have the brake system checked
immediately. This work should be carried
out at a qualified specialist workshop.
All checks and maintenance work on the
brake system must be carried out at a
qualified specialist workshop. Consult a
qualified specialist workshop to arrange this.
Have brake pads installed and brake fluid
replaced at a qualified specialist workshop.
! Vehicles with 4MATIC: function or
performance tests may only be carried out
on a 2-axle dynamometer. If you are
planning to have the vehicle tested on such
a dynamometer, contact an authorized
Mercedes-Benz Center to obtain further
information first. Otherwise, you could
damage the drive train or the brake system.
! As the ESP ®
system operates
automatically, the engine and the ignition
must be switched off (SmartKey in position
0 or 1 in the ignition lock) when:
R testing the parking brake on a brake
dynamometer.
R you intend to have the vehicle towed with
the front or rear axle raised (not
permitted for vehicles with 4MATIC).
Braking maneuvers triggered automatically
by ESP ®
may seriously damage the brake
system.
If the brake system has only been subject to
moderate loads, you should test the
functionality of your brakes at regular
intervals. To do so, press firmly on the brake
pedal when driving at a high speed. This
improves the grip of the brake pads. You can find a description of Brake Assist
(BAS) on (
Y page 65).
Mercedes-Benz recommends that you only
have brake pads/linings installed on your
vehicle which have been approved for
Mercedes-Benz vehicles or
which correspond
to an equivalent quality standard. Brake
pads/linings which have not been approved
for Mercedes-Benz vehicles or which are not
of an equivalent quality could affect your
vehicle's operating safety.
Mercedes-Benz recommends that you only
use brake fluid that has been specially
approved
for your vehicle by Mercedes-Benz,
or which corresponds to an equivalent quality
standard. Brake fluid which has not been
approved for Mercedes-Benz vehicles or
which is not of an equivalent quality could
affect your vehicle's operating safety.
Parking brake G
WARNING
If you must brake the vehicle with the parking
brake, the braking distance is considerably
longer and the
wheels could
lock. There is an
increased danger of skidding and accidents.
Only use the parking brake to brake the
vehicle when the service brake is faulty. Do
not apply the parking brake too firmly. If the
wheels lock, release the parking brake until
the wheels begin turning again.
If you brake the vehicle with the parking
brake, the brake lamps will not light up.
If you drive on wet roads or dirt-covered
surfaces, road salt and/or dirt could get into
the parking brake.
In order to prevent corrosion and a reduction
in the braking power of the parking brake,
observe the following:
R gently depress the parking brake from time
to time before beginning the journey.
R drive for approximately 110 yds (100 m) at
a maximum speed of 12 mph (20 km/h). Driving tips
165
Driving and parking Z