2013 MERCEDES-BENZ GLK-CLASS SUV check oil
[x] Cancel search: check oilPage 303 of 380
oil consumption may be higher than this when
the vehicle is new
or
if you frequently drive at
high engine speeds.
Depending on the engine, the oil dipstick may
be in a different location.
When checking the oil level:
R park the vehicle on a level surface.
R the engine should be switched off for
approximately five minutes if the engine is
at normal operating temperature.
R if the engine is not at normal operating
temperature, e.g. if the engine was only
started briefly: wait about 30 minutes
before carrying out the measurement.
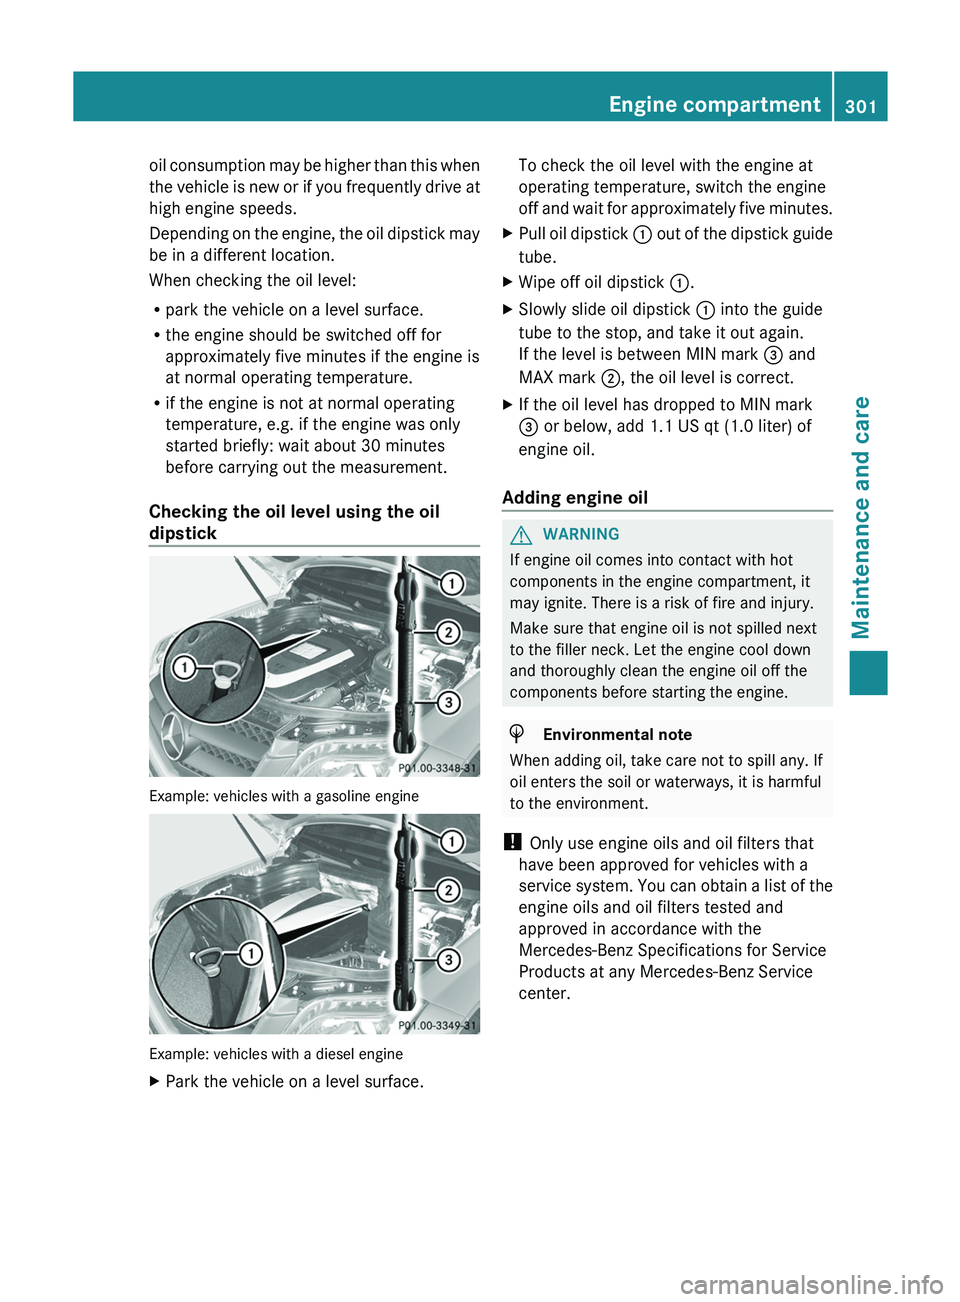
Checking the oil level using the oil
dipstick Example: vehicles with a gasoline engine
Example: vehicles with a diesel engine
X
Park the vehicle on a level surface. To check the oil level with the engine at
operating temperature, switch the engine
off
and wait for
approximately
five minutes.
X Pull oil dipstick 0043 out of the dipstick
guide
tube.
X Wipe off oil dipstick 0043.
X Slowly slide oil dipstick 0043 into the guide
tube to the stop, and take it out again.
If the level is between MIN mark 0087 and
MAX mark 0044, the oil level is correct.
X If the oil level has dropped to MIN mark
0087 or below, add 1.1 US qt (1.0 liter) of
engine oil.
Adding engine oil G
WARNING
If engine oil comes into contact with hot
components in the engine compartment, it
may ignite. There is a risk of fire and injury.
Make sure that engine oil is not spilled next
to the filler neck. Let the engine cool down
and thoroughly clean the engine oil off the
components before starting the engine. H
Environmental note
When adding oil, take care not to spill any. If
oil enters the soil or waterways, it is harmful
to the environment.
! Only use engine oils and oil filters that
have been approved for vehicles with a
service system. You can obtain
a list of the
engine oils and oil filters tested and
approved in accordance with the
Mercedes-Benz Specifications for Service
Products at any Mercedes-Benz Service
center. Engine compartment
301
Maintenance and care Z
Page 304 of 380
Damage to the engine or exhaust system is
caused by the following:
R
using engine oils and oil
filters that have
not been specifically approved for the
service system
R replacing engine oil and oil filters after
the interval for replacement specified by
the service system has been exceeded
R using engine oil additives.
! Do not add too much oil. If the oil level is
above the "max" mark on the dipstick, too
much oil has been added. This can lead to
damage to the engine or the catalytic
converter. Have excess oil siphoned off. Example: engine oil cap
X
Turn cap 0043 counter-clockwise and remove
it.
X Add engine oil.
If the oil level is at or below the MIN mark
on the oil dipstick, add
1.1 US qt (1.0 liter)
of engine oil.
X Replace cap 0043 on the filler neck and turn
clockwise.
Ensure that the cap locks into place
securely.
X Check the oil level again with the oil
dipstick (Y page 301).
Further information on engine oil
(Y page 369). Checking and adding other service
products
Checking coolant level G
WARNING
The engine cooling system is pressurized,
particularly when the engine is warm. When
opening the cap, you could
be scalded by hot
coolant spraying out. There is a risk of injury.
Let the engine cool down before opening the
cap. Wear eye and hand protection when
opening the cap. Open the cap slowly half a
turn to allow pressure to escape.
Only check the coolant level when the vehicle
is on a level surface and the engine has cooled
down.
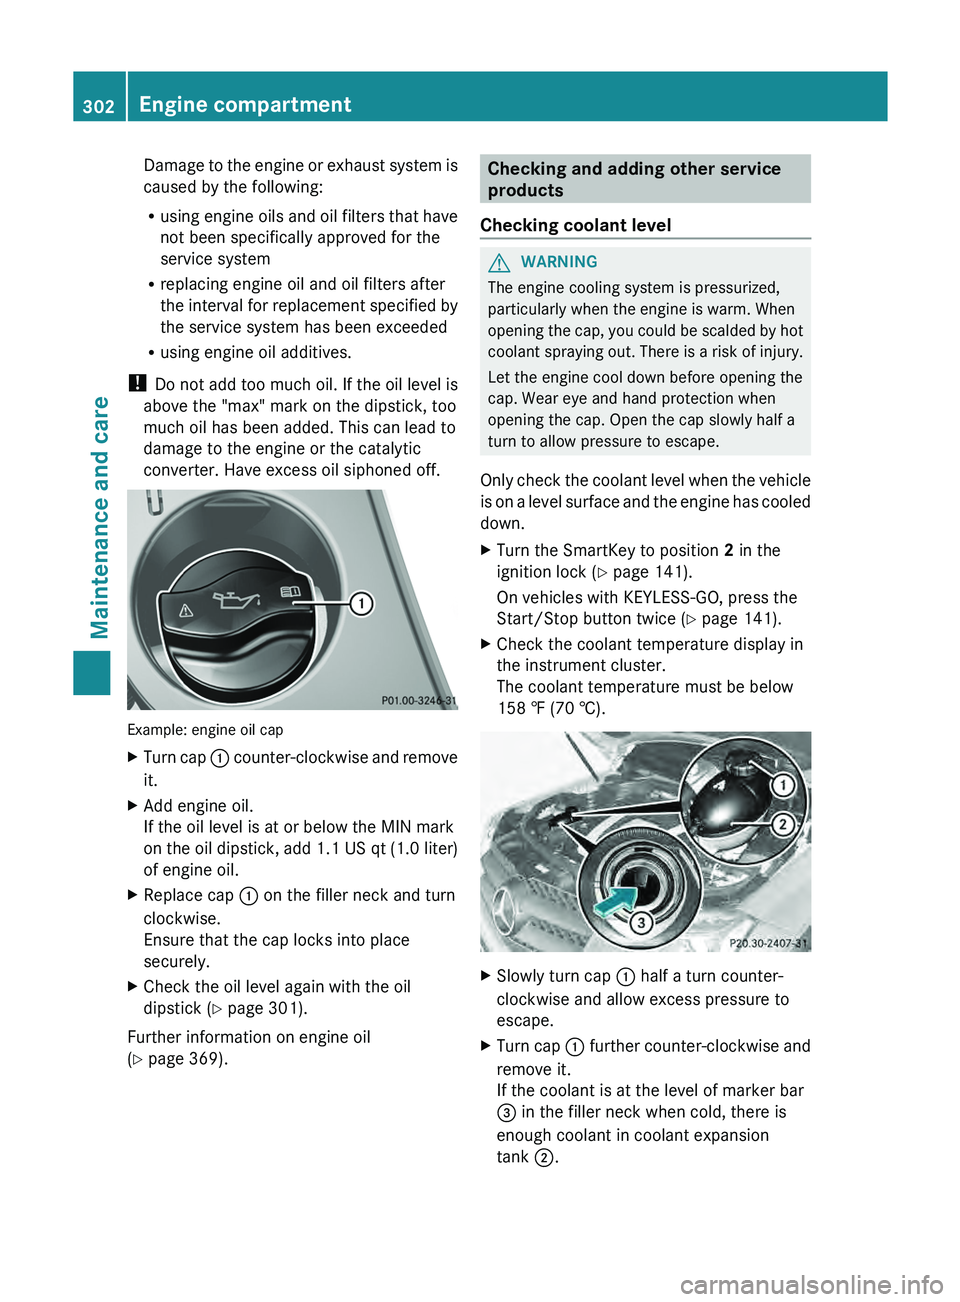
X Turn the SmartKey to position 2 in the
ignition lock (Y page 141).
On vehicles with KEYLESS-GO, press the
Start/Stop button twice (Y
page 141).
X Check the coolant temperature display in
the instrument cluster.
The coolant temperature must be below
158 ‡ (70 †). X
Slowly turn cap 0043 half a turn counter-
clockwise and allow excess pressure to
escape.
X Turn cap 0043 further
counter-clockwise and
remove it.
If the coolant is at the level of marker bar
0087 in the filler neck when cold, there is
enough coolant in coolant expansion
tank 0044
.302
Engine compartment
Maintenance and care
Page 310 of 380
tail pipe by cleaning it regularly, especially in
winter and after washing.
X
Clean the exhaust tail pipes with a chrome
care product tested and approved by
Mercedes-Benz.
Cleaning the trailer tow hitch H
Environmental note
Dispose of rags soaked in oil and grease in an
environmentally responsible manner.
! Observe the note on care
provided by the
trailer manufacturer.
The ball coupling must be cleaned if it
becomes dirty or corroded.
X Remove rust on the ball of the ball coupling,
e.g. with a wire brush.
X Remove dirt with a clean, lint-free cloth or
a brush.
X After cleaning, lightly grease the ball of the
ball coupling again.
X Check that the vehicle's trailer tow hitch is
working properly.
i You can also have the
maintenance work
on the ball coupling and the trailer tow hitch
carried out by a qualified specialist
workshop. Interior care
Cleaning the display !
For cleaning, do not use any of the
following:
R alcohol-based thinner or gasoline
R abrasive cleaning agents
R commercially-available household
cleaning agents
These may damage the display
surface. Do
not put pressure on the display surface
when cleaning. This could lead to
irreparable damage to the display. X
Before cleaning the display, make sure that
it is switched off and has cooled down.
X Clean the display surface using a
commercially available microfiber cloth
and TFT/LCD display cleaner.
X Dry the display surface using a dry
microfiber cloth.
Cleaning the plastic trim G
WARNING
Care products and cleaning agents containing
solvents cause surfaces in the cockpit to
become porous. As a result,
plastic parts may
come loose in the event of air bag
deployment. There is a risk of injury.
Do not use any care products and cleaning
agents to clean the cockpit.
! Do not affix the following to plastic
surfaces:
R stickers
R films
R scented oil bottles or similar items
You can otherwise damage the plastic.
! Do not allow cosmetics, insect repellent
or sunscreen to come into contact with the
plastic trim. This maintains the high-quality
look of the surfaces.
X Wipe the plastic trim with a damp, lint-free
cloth, e.g. a microfiber cloth.
X Heavy soiling: use care and cleaning
products recommended and approved by
Mercedes-Benz.
The surface may
change color
temporarily.
Wait until the surface is dry again.
Cleaning the steering wheel and gear or
selector lever X
Thoroughly wipe with a damp cloth or use
leather care agents that have been
recommended and approved by Mercedes-
Benz. 308
Care
Maintenance and care
Page 354 of 380

Treadwear indicators
Narrow bars (tread wear bars) that are
distributed over the tire tread.
If the tire tread
is level with the bars, the wear limit of 00CD in
(1.6 mm) has been reached. Occupant distribution
The distribution of occupants in a vehicle at
their designated seating positions. Total load limit
Nominal load and luggage load plus 68 kg
(150 lbs)
multiplied by
the number of seats in
the vehicle. Changing a wheel
Flat tire
You can find
information on
what to do in the
event of a flat tire in the "Flat tire" section
(Y page 312).
Information on driving with MOExtended tires
in the event of a flat tire can be found under
"MOExtended tires (tires with run-flat
characteristics" (Y page 313). Rotating the wheels
G
WARNING
Interchanging the front and rear wheels may
severely impair the driving characteristics if
the wheels or tires have
different dimensions.
The wheel brakes or suspension components
may also be damaged. There is a risk of
accident.
Rotate front and rear wheels only if the wheels
and tires are of the same dimensions.
! On vehicles equipped with a tire pressure
monitor, electronic components are
located in the wheel. Tire-mounting tools should not be used
near the valve. This could damage the
electronic components.
Only have tires changed at a qualified
specialist workshop.
Always observe the instructions and safety
notes in the "Mounting a wheel" section
(Y page 353).
The wear patterns on the front and rear tires
differ, depending on the operating
conditions.
Rotate the wheels before a clear wear pattern
has formed on the tires. Front tires typically
wear more on the shoulders and the rear tires
in the center.
If your vehicle's tire configuration allows, you
can rotate the wheels according to the
intervals in the tire manufacturer's warranty
book in your vehicle documents. If no
warranty book is available, the tires should be
rotated every 3,000 to 6,000 miles (5,000 to
10,000 km), or earlier if tire wear requires. Do
not change the direction of wheel rotation.
Clean the contact surfaces of the wheel and
the brake disc thoroughly every time a wheel
is rotated. Check the tire pressures.
Information on changing tires and mounting
the spare wheel ( Y page 352). Direction of rotation
Tires with a specified direction of rotation
have additional benefits, e.g. if
there is a risk
of hydroplaning. You will only gain these
benefits if the correct direction of rotation is
maintained.
An arrow on the sidewall of the tire indicates
its correct direction of rotation. Storing wheels
Store wheels that are not
being used in a cool,
dry and preferably dark place. Protect the
tires from oil, grease, gasoline and diesel. 352
Changing a wheel
Wheels and tires
Page 358 of 380
bolts to come loose. As a result, you could
lose a wheel while driving. There is a risk of
accident.
Never oil or grease wheel bolts. In the event
of damage to the
threads,
contact a qualified
specialist workshop immediately. Have the
damaged wheel bolts or hub threads
replaced/renewed. Do not continue driving. G
WARNING
If you tighten the wheel bolts or wheel nuts
when the vehicle is raised, the jack could tip
over. There is a risk of injury.
Only tighten the wheel bolts or wheel nuts
when the vehicle is on the ground.
Always pay attention to the instructions and
safety notes in the "Changing a wheel"
section ( Y page 352).
Only use wheel bolts that
have been designed
for the wheel and the vehicle. For safety
reasons, Mercedes-Benz recommends that
you only use wheel bolts which have been
approved for Mercedes-Benz vehicles and the
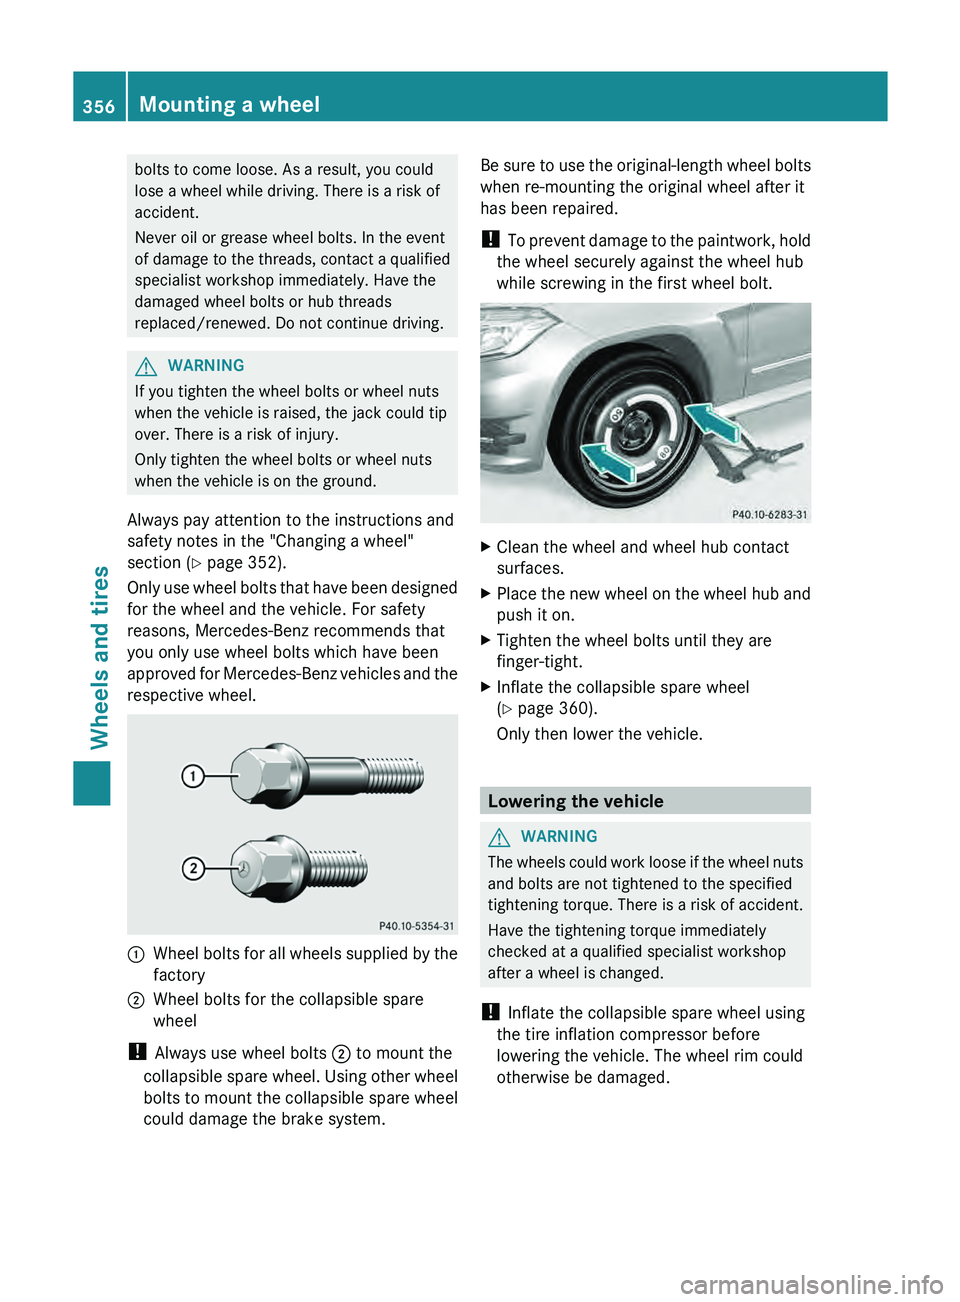
respective wheel. 0043
Wheel bolts for all wheels supplied by the
factory
0044 Wheel bolts for the collapsible spare
wheel
! Always use wheel bolts 0044 to mount the
collapsible spare wheel. Using other
wheel
bolts to mount the collapsible spare wheel
could damage the brake system. Be sure to use the original-length wheel bolts
when re-mounting the original wheel after it
has been repaired.
!
To prevent damage to
the
paintwork, hold
the wheel securely against the wheel hub
while screwing in the first wheel bolt. X
Clean the wheel and wheel hub contact
surfaces.
X Place the new wheel on the wheel hub and
push it on.
X Tighten the wheel bolts until they are
finger-tight.
X Inflate the collapsible spare wheel
(Y page 360).
Only then lower the vehicle. Lowering the vehicle
G
WARNING
The wheels could work loose if the wheel nuts
and bolts are not tightened to the specified
tightening torque. There is a risk of accident.
Have the tightening torque immediately
checked at a qualified specialist workshop
after a wheel is changed.
! Inflate the collapsible spare wheel using
the tire inflation compressor before
lowering the vehicle. The wheel rim could
otherwise be damaged. 356
Mounting a wheel
Wheels and tires
Page 369 of 380
Gasoline
Fuel grade
!
Do not use diesel to
refuel vehicles with a
gasoline engine. Do not switch on the
ignition if you accidentally refuel with the
wrong fuel. Otherwise, the fuel will enter
the fuel system. Even small amounts of the
wrong fuel could result in damage to the
fuel system and the engine. The repair
costs are high. Notify a qualified specialist
workshop and have the fuel tank and fuel
lines drained completely.
! You should only refuel with unleaded
premium-grade gasoline as this avoids
damaging the catalytic converter.
If engine running problems are apparent,
have the cause checked immediately and
repaired. Excess unburned fuel can
otherwise enter the catalytic converter,
leading to overheating and possibly
causing a fire.
! To ensure the longevity and full
performance of the engine, only premium-
grade unleaded gasoline may be used.
If there is no premium-grade unleaded
gasoline available and regular unleaded
gasoline must be used, please observe the
following precautions:
R only fill the fuel tank to half full with
regular unleaded gasoline and fill the rest
with premium-grade unleaded gasoline
as soon as possible.
R do not drive at the maximum speed.
R avoid sudden acceleration.
R if the vehicle is carrying a light load, e.g.
two passengers without luggage, do not
allow the engine to rev above 3000 rpm.
R if the vehicle is fully loaded or is being
operated in mountainous terrain, do not
depress the accelerator pedal further
than 00C3 of the pedal travel.
Only refuel using premium-grade unleaded
gasoline with a minimum octane rating of 91. Reformulated Gasoline (RFG) and/or
unleaded
gasoline
with additives
can
be used.
The concentration of additives in the fuel,
however, must not exceed 10%, e.g.:
R Ethanol
R TAME
R ETBE
R IPA
R TBA
For MTBE, the concentration should not
exceed 15%.
The concentration of methanol in gasoline,
including other additives, must not exceed
3%.
Using mixtures of methanol and ethanol is not
permitted. Gasohol, a mixture of 10% ethanol
and 90% unleaded gasoline may be used.
All of these blends must fulfill the fuel
requirements, e.g.:
R knock resistance
R boiling point
R vapor pressure
You will usually find information about the fuel
grade on the pump. If you cannot find the
label on the pump, ask the staff for
assistance.
i For more information, contact a qualified
specialist workshop.
Information on refueling (Y page 154).
Additives
! Operating the engine with fuel additives
can increase wear and tear to the fuel
system high-pressure pump and lead to
contamination of the entire fuel system.
The repair costs are high. This does not
include additives for the removal and
prevention of residue buildup. gasoline
must only be mixed with additives
recommended by Mercedes-Benz. More
information about recommended additives
can be obtained from any authorized
Mercedes-Benz Center. Service products and filling capacities
367
Technical data Z
Page 373 of 380
Coolant
Important safety notes G
WARNING
If antifreeze comes into contact with hot
components in the engine compartment, it
may ignite. There is a risk of fire and injury.
Let the engine cool down before you add
antifreeze. Make sure that antifreeze is not
spilled next to the filler neck. Thoroughly
clean the antifreeze from components
before
starting the engine.
! Only add coolant that has been premixed
with the desired antifreeze protection. You
could otherwise damage the engine.
Further information on coolants can be
found in the Mercedes-Benz Specifications
for Service Products, MB Specifications for
Service Products 310.1, e.g. on the
Internet at
http://bevo.mercedes-benz.com. Or
contact a qualified specialist workshop.
! Always use a suitable coolant mixture,
even in countries where high temperatures
prevail.
Otherwise, the engine cooling system is not
sufficiently protected from corrosion and
overheating.
When handling coolant, observe the
important safety notes on service products
(Y page 365).
The coolant is a mixture of water and
antifreeze/corrosion inhibitor. It performs
the following tasks:
R corrosion protection
R antifreeze protection
R raising the boiling point
If the coolant has antifreeze protection down
to -35 ‡ (-37 †), the boiling point of the
coolant during operation is approximately
266 ‡ (130 †). The antifreeze/corrosion inhibitor
concentration in the engine cooling system
should:
R
be at least 50%. This
will protect the engine
cooling system against freezing down to
approximately -35 ‡ (-37 †).
R not exceed 55% (antifreeze protection
down to -49 ‡ [-45 †]). Otherwise, heat
will not be dissipated as effectively.
If the vehicle has lost coolant, add equal
amounts of water and antifreeze/corrosion
inhibitor.
Mercedes-Benz recommends an antifreeze/
corrosion inhibitor concentrate in
accordance with MB Specifications for
Service Products 310.1.
The coolant is checked with every
maintenance interval at a qualified specialist
workshop.
i When the vehicle is first delivered, it is
filled with a coolant mixture that ensures
adequate antifreeze and corrosion
protection.
Filling capacities Model Capacity
GLK 250 BlueTEC
approx. 10.6 US qt
(10.0 l) GLK 350
BlueEFFICIENCY
GLK 350 4MATIC
BlueEFFICIENCY
approx. 8.9 US qt
(8.4 l) i
Use MB 325.0 or MB 326.0 corrosion
inhibitor/antifreeze. Service products and filling capacities
371
Technical data Z