2013 MERCEDES-BENZ GLK-CLASS SUV light
[x] Cancel search: lightPage 171 of 380
lose control of the vehicle. If the gradient is
too steep for your
vehicle,
drive back down in
reverse gear.
Maximum gradient-climbing capability i
If the load on the front axle is reduced
when pulling away on a steep uphill slope,
the front wheels have a tendency to spin.
4ETS recognizes this and brakes the
wheels accordingly. The rear wheel torque
is increased, making it easier to drive off.
Hilltops When driving up an uphill gradient, slightly
reduce pressure on the accelerator
immediately before reaching the brow of the
hill.
Make
use of
the
vehicle's own impetus to
travel over the brow.
This style of driving prevents:
R the vehicle from lifting off the ground on the
brow of a hill
R the vehicle from traveling too quickly down
the other side
Driving downhill R
Drive slowly.
R Do not drive at an angle down steep
inclines. Steer into the line
of fall and drive
with the front wheels aligned straight.
Otherwise, the vehicle could slip sideways,
tip and rollover.
R Before tackling steep downhill gradients,
select shift range 1.
R Activate DSR. If this is not sufficient, brake
gently. When doing so, make sure that the
vehicle is facing in the direction of the line
of fall.
R Check that the brakes are working normally
after a long downhill stretch. Driving systems
Cruise Control
Important safety notes Cruise control maintains a constant road
speed for you. It
brakes
automatically in order
to avoid exceeding the set speed. On long and
steep downhill gradients, especially if the
vehicle is laden or towing a trailer, you must
select shift range 1, 2 or 3 in good time. By
doing so, you will make use of the braking
effect of the engine. This relieves the load on
the brake system and prevents the brakes
from overheating and wearing too quickly.
Use cruise control only if road and traffic
conditions make it appropriate to maintain a
steady speed for a prolonged period. You can
store any road speed above 20 mph
(30 km/h).
If you fail to adapt your driving style, cruise
control can neither reduce the risk of an
accident nor override the laws of physics.
Cruise control cannot take into account the
road, traffic and weather conditions. Cruise
control is only an aid. You are responsible for
the distance to the vehicle in front, for vehicle
speed, for braking in good time and for
staying in your lane.
Do not use cruise control:
R in road and traffic conditions which do not
allow you to maintain a constant speed e.g.
in heavy traffic or on winding roads
R on slippery road surfaces. Braking or
accelerating could cause the drive wheels
to lose traction and the vehicle could then
skid
R when there is poor visibility, e.g. due to fog,
heavy rain or snow
If there is a change of drivers, advise the new
driver of the speed stored.
i Cruise control should not be activated
when driving off-road. Driving systems
169
Driving and parking Z
Page 172 of 380
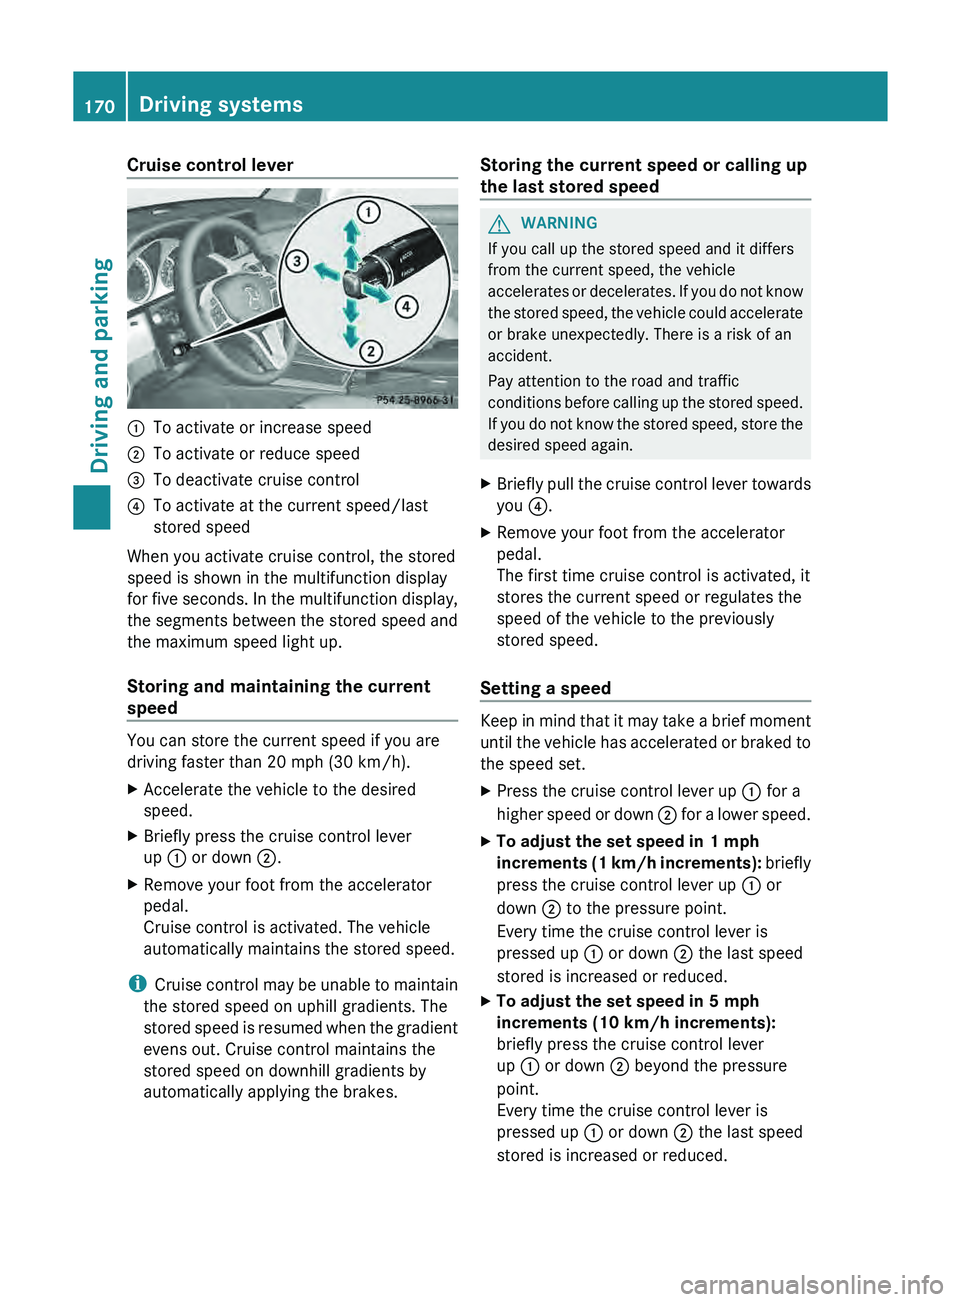
Cruise control lever
0043
To activate or increase speed
0044 To activate or reduce speed
0087 To deactivate cruise control
0085 To activate at the current speed/last
stored speed
When you activate cruise control, the stored
speed is shown in the multifunction display
for five seconds. In
the
multifunction display,
the segments between the stored speed and
the maximum speed light up.
Storing and maintaining the current
speed You can store the current speed if you are
driving faster than 20 mph (30 km/h).
X
Accelerate the vehicle to the desired
speed.
X Briefly press the cruise control lever
up 0043 or down 0044 .
X Remove your foot from the accelerator
pedal.
Cruise control is activated. The vehicle
automatically maintains the stored speed.
i Cruise control may
be unable
to maintain
the stored speed on uphill gradients. The
stored speed is resumed when the gradient
evens out. Cruise control maintains the
stored speed on downhill gradients by
automatically applying the brakes. Storing the current speed or calling up
the last stored speed G
WARNING
If you call up the stored speed and it differs
from the current speed, the vehicle
accelerates or decelerates. If you
do not know
the stored speed, the vehicle could accelerate
or brake unexpectedly. There is a risk of an
accident.
Pay attention to the road and traffic
conditions before calling up the stored speed.
If you do not know the stored speed, store the
desired speed again.
X Briefly pull the cruise control lever towards
you 0085.
X Remove your foot from the accelerator
pedal.
The first time cruise control is activated, it
stores the current speed or regulates the
speed of the vehicle to the previously
stored speed.
Setting a speed Keep in mind that it may take a brief moment
until the vehicle has
accelerated
or braked to
the speed set.
X Press the cruise control lever up 0043 for a
higher speed or down 0044
for a lower speed.
X To adjust the set speed in 1 mph
increments (1 km/h increments):
briefly
press the cruise control lever up 0043
or
down 0044 to the pressure point.
Every time the cruise control lever is
pressed up 0043 or down 0044 the last speed
stored is increased or reduced.
X To adjust the set speed in 5 mph
increments (10 km/h increments):
briefly press the cruise control lever
up 0043 or down 0044 beyond the pressure
point.
Every time the cruise control lever is
pressed up 0043 or down 0044 the last speed
stored is increased or reduced. 170
Driving systems
Driving and parking
Page 178 of 380
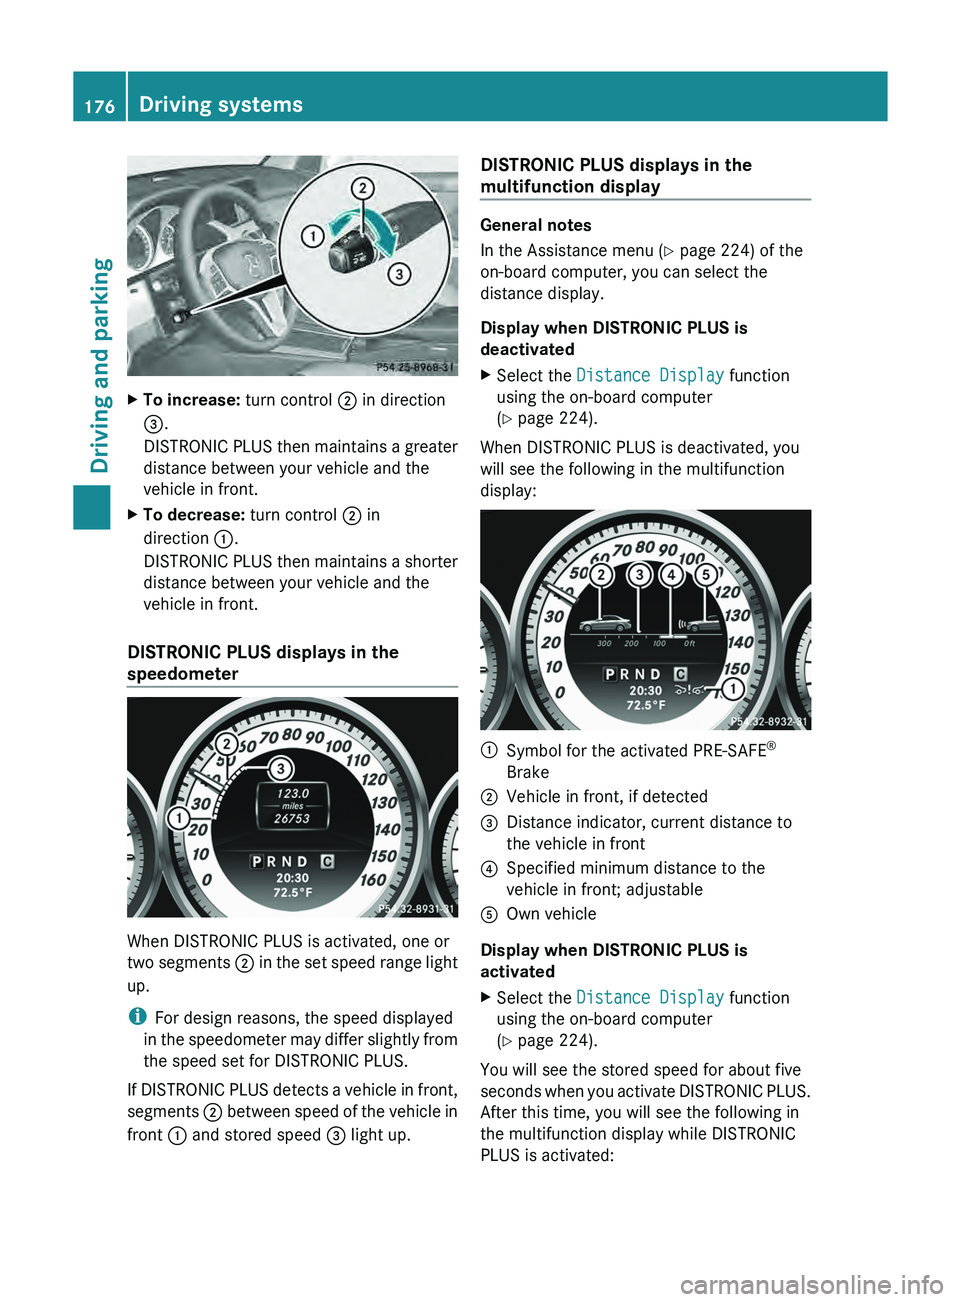
X
To increase: turn control 0044 in direction
0087.
DISTRONIC PLUS then maintains
a
greater
distance between your vehicle and the
vehicle in front.
X To decrease: turn control 0044 in
direction 0043.
DISTRONIC PLUS then maintains
a
shorter
distance between your vehicle and the
vehicle in front.
DISTRONIC PLUS displays in the
speedometer When DISTRONIC PLUS is activated, one or
two segments
0044 in the
set speed range light
up.
i For design reasons, the speed displayed
in the speedometer may differ slightly from
the speed set for DISTRONIC PLUS.
If DISTRONIC PLUS detects a vehicle in front,
segments 0044 between speed of the vehicle in
front 0043 and stored speed 0087 light up.DISTRONIC PLUS displays in the
multifunction display General notes
In the Assistance menu (Y page 224) of the
on-board computer, you can select the
distance display.
Display when DISTRONIC PLUS is
deactivated
X
Select the Distance Display function
using the on-board computer
(
Y page 224).
When DISTRONIC PLUS is deactivated, you
will see the following in the multifunction
display: 0043
Symbol for the activated PRE-SAFE ®
Brake
0044 Vehicle in front, if detected
0087 Distance indicator, current distance to
the vehicle in front
0085 Specified minimum distance to the
vehicle in front; adjustable
0083 Own vehicle
Display when DISTRONIC PLUS is
activated
X Select the Distance Display function
using the on-board computer
(Y page 224).
You will see the stored speed for about five
seconds when you activate DISTRONIC
PLUS.
After this time, you will see the following in
the multifunction display while DISTRONIC
PLUS is activated: 176
Driving systems
Driving and parking
Page 181 of 380
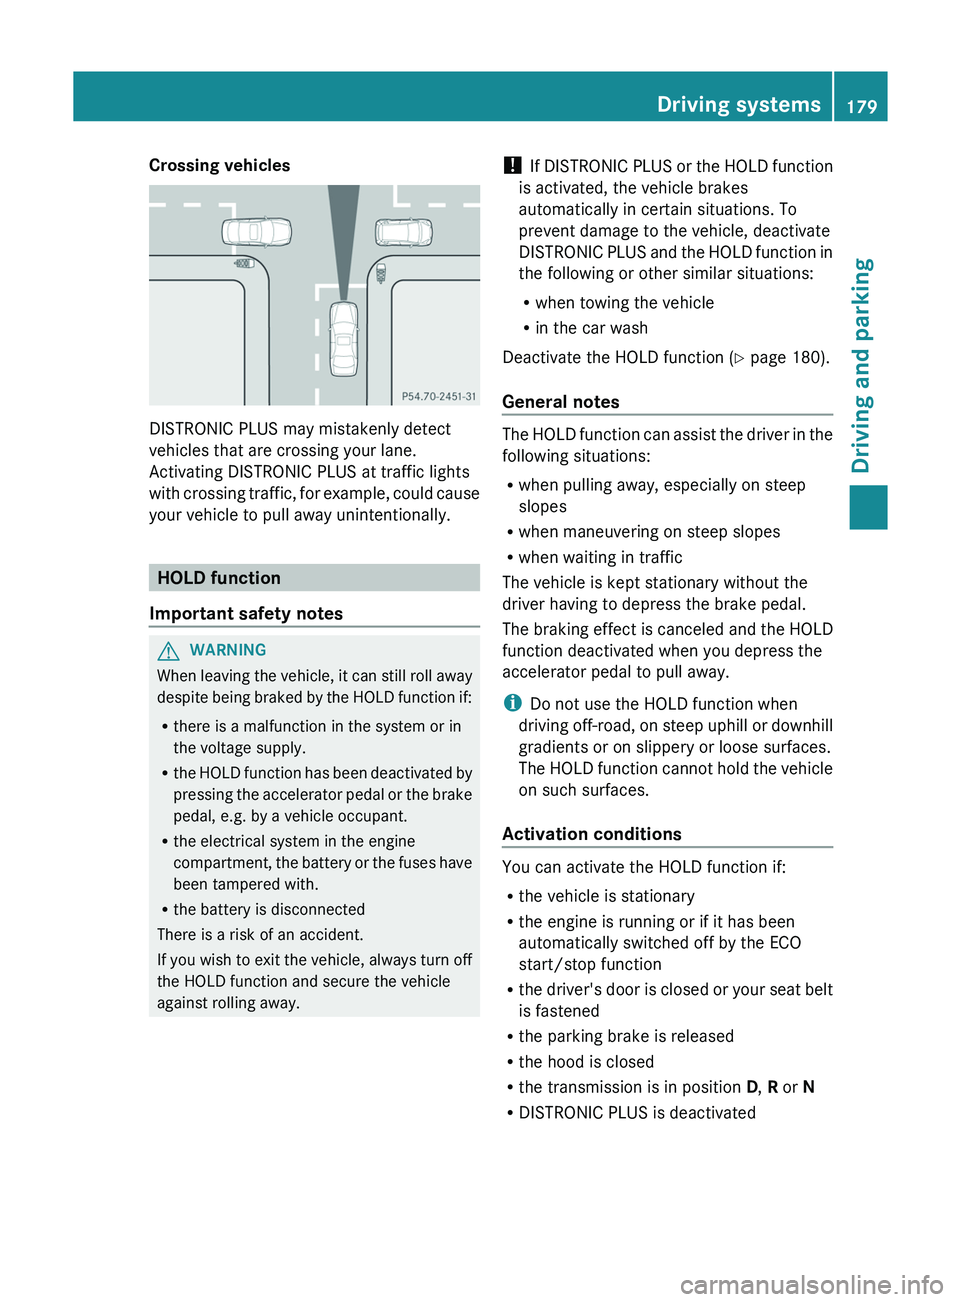
Crossing vehicles
DISTRONIC PLUS may mistakenly detect
vehicles that are crossing your lane.
Activating DISTRONIC PLUS at traffic lights
with crossing traffic, for
example,
could cause
your vehicle to pull away unintentionally. HOLD function
Important safety notes G
WARNING
When leaving the vehicle, it can still roll away
despite being braked by the
HOLD function if:
R there is a malfunction in the system or in
the voltage supply.
R the HOLD function has been deactivated by
pressing the accelerator pedal or the brake
pedal, e.g. by a vehicle occupant.
R the electrical system in the engine
compartment, the battery or the fuses have
been tampered with.
R the battery is disconnected
There is a risk of an accident.
If you wish to exit the vehicle, always turn off
the HOLD function and secure the vehicle
against rolling away. !
If DISTRONIC PLUS or the
HOLD function
is activated, the vehicle brakes
automatically in certain situations. To
prevent damage to the vehicle, deactivate
DISTRONIC PLUS and the HOLD function in
the following or other similar situations:
R when towing the vehicle
R in the car wash
Deactivate the HOLD function (Y page 180).
General notes The HOLD function can assist the driver in the
following situations:
R
when pulling away, especially on steep
slopes
R when maneuvering on steep slopes
R when waiting in traffic
The vehicle is kept stationary without the
driver having to depress the brake pedal.
The braking effect is canceled
and the HOLD
function deactivated when you depress the
accelerator pedal to pull away.
i Do not use the HOLD function when
driving off-road, on steep uphill or downhill
gradients or on slippery or loose surfaces.
The HOLD function cannot hold the vehicle
on such surfaces.
Activation conditions You can activate the HOLD function if:
R
the vehicle is stationary
R the engine is running or if it has been
automatically switched off by the ECO
start/stop function
R the driver's
door is
closed
or your seat belt
is fastened
R the parking brake is released
R the hood is closed
R the transmission is in position D, R or N
R DISTRONIC PLUS is deactivated Driving systems
179
Driving and parking Z
Page 183 of 380

truck or a pneumatic drill could cause
PARKTRONIC to malfunction.
PARKTRONIC may not function
correctly
on
uneven terrain.
PARKTRONIC is activated automatically when
you:
R switch on the ignition
R shift the transmission to position D, R or N
R release the parking brake
PARKTRONIC is deactivated at speeds above
11 mph (18 km/h). It is reactivated at lower
speeds.
PARKTRONIC monitors the area around your
vehicle using six sensors in the front and four
sensors in the rear. 0043
Sensors in the front bumper, left-hand
side (example)
Range of the sensors General notes
PARKTRONIC does not take objects into
consideration that are:
R
below the detection range, e.g. people,
animals or objects
R above the detection range, e.g.
overhanging loads, truck overhangs or
loading ramps
The sensors must be free from dirt, ice or
slush. They can otherwise not function
correctly. Clean the sensors regularly,
taking
care not to scratch or damage them
(Y page 307). Side view
Top view
Front sensors
Center Approx. 40 in (approx.
100 cm)
Corners Approx. 24 in (approx.
60 cm)
Rear sensors
Center Approx. 48 in (approx.
120 cm)
Corners Approx. 32 in (approx.
80 cm)
Minimum distance
Center Approx. 8 in (approx.
20 cm)
Corners Approx. 6 in (approx.
15 cm)
If there is an obstacle within this range, the
relevant warning displays light up and a Driving systems
181
Driving and parking Z
Page 184 of 380

warning tone sounds. If the distance falls
below the minimum, the distance may no
longer be shown.
Warning displays
The warning displays show the distance
between the sensors and the obstacle. The
warning display for the front area is located
on the dashboard above
the
center air vents.
The warning display for the rear area is
located on the headliner in the rear
compartment. Warning display for the front area
0043
Segments on the left-hand side of the
vehicle
0044 Segments on the right-hand side of the
vehicle
0087 Segments showing operational readiness
The warning display for each side of the
vehicle is
divided into
five
yellow and two red
segments. PARKTRONIC is operational if
yellow segments showing operational
readiness 0087 light up.
The selected transmission position and the
direction in which the vehicle is rolling
determine which warning display is active
when the engine is running. Transmission
position Warning display
D
Front area activated
R, N or the vehicle
is rolling
backwards Rear and front areas
activated
P
No areas activated
One or more segments light up as the vehicle
approaches an obstacle, depending on the
vehicle's distance from the obstacle.
From the:
R
sixth segment onwards, you will hear an
intermittent warning tone for
approximately two seconds.
R seventh segment onwards, you will hear a
warning tone for approximately two
seconds. This indicates that you have now
reached the minimum distance.
Deactivating/activating PARKTRONIC 0043
Deactivating/activating PARKTRONIC
0044 Indicator lamp
If indicator lamp 0044 lights up, PARKTRONIC
is
deactivated.
i PARKTRONIC is automatically activated
when you turn the SmartKey to position
2
in the ignition lock. 182
Driving systems
Driving and parking
Page 186 of 380

Problems with PARKTRONIC
Problem Possible causes/consequences and
0050 SolutionsOnly the red segments
in the PARKTRONIC
warning displays are lit.
You also
hear a warning
tone for approximately
two seconds.
PARKTRONIC is
deactivated after
approximately five
seconds, and the
indicator lamp in the
PARKTRONIC button
lights up. PARKTRONIC has malfunctioned and has switched off.
X
If problems persist, have PARKTRONIC checked at a qualified
specialist workshop. Only the red segments
in the PARKTRONIC
warning displays are lit.
PARKTRONIC is
deactivated after
approximately five
seconds. The PARKTRONIC sensors are dirty or there is interference.
X
Clean the PARKTRONIC sensors ( Y page 307).
X Switch the ignition back on. The problem may be caused by an external source of radio or
ultrasound waves.
X
See if PARKTRONIC functions in a different location. Active Parking Assist
Important safety notes Active Parking Assist is an electronic parking
aid with ultrasound. Ultrasound is used to
measure the road on
both
sides of the vehicle.
A suitable parking space is indicated by the
parking symbol. Active steering intervention
can assist you during parking. You may also
use PARKTRONIC ( Y page 180). When
PARKTRONIC is switched off, Active Parking
Assist is also unavailable. G
WARNING
The vehicle swings out when parking and in
doing so could cross into the opposite lane.
This could result in a collision with another
road user. There is a risk of an accident.
Pay attention to other road users when
parking. Stop the vehicle if necessary or cancel the Active Parking Assist parking
procedure.
! If unavoidable, you should drive over
obstacles such as curbs slowly and not at
a sharp angle. Otherwise, you
may damage
the wheels or tires.
Active Parking Assist is merely an aid. It is not
a replacement for your attention to your
immediate surroundings. You are always
responsible for safe maneuvering, parking
and exiting a parking space. When
maneuvering, parking or pulling out of a
parking space, make sure that there are no
persons, animals or objects in the area in
which you are maneuvering. 184
Driving systems
Driving and parking
Page 190 of 380
Once you have exited the parking space
completely, the steering wheel is moved to
the straight-ahead position. You hear a tone
and the Park Assist Finished message
appears in the multifunction
display.
You will
then have to steer and merge into traffic on
your own. PARKTRONIC is still available.
Canceling Active Parking Assist You can cancel Active Parking Assist at any
time.
X
Stop the movement of the multifunction
steering wheel or steer yourself.
Active Parking Assist will be canceled at
once. The Park Assist Canceled
message appears in the multifunction
display.
or
X Press the PARKTRONIC button on the
center console (Y page 182).
PARKTRONIC is switched off and Active
Parking Assist is immediately canceled.
The Park Assist Canceled
message
appears in the multifunction display.
Active Parking Assist is canceled
automatically if:
R you engage the electric parking brake
R parking using Active Parking Assist is no
longer possible
R you are driving faster than 6 mph
(10 km/h)
R a wheel spins, ESP®
intervenes or fails. The
00E5 warning lamp lights up in the
instrument cluster.
A warning tone sounds. The parking space
symbol disappears and the multifunction
display shows the Park Assist Canceled
message.
If Active Parking Assist is canceled, you must
steer again yourself.
If a system malfunction occurs, the vehicle is
braked to a standstill. To drive on, depress the
accelerator again. Towing a trailer For vehicles with a trailer tow hitch, the
minimum length for parking
spaces
is slightly
increased.
If you have attached a trailer to your vehicle,
you should not use Active Parking Assist.
Once the electrical connection is established
between your vehicle and the trailer, Active
Parking Assist is no longer available.
PARKTRONIC is deactivated for the rear area. Rear view camera
Important safety notes The rear view camera is only an aid. It is not
a replacement for your attention to your
immediate surroundings. You are always
responsible for safe maneuvering and
parking.
When
maneuvering or
parking,
make
sure that there are no persons, animals or
objects in the area in which you are
maneuvering.
Under the following circumstances, the rear
view camera will not function, or will function
in a limited manner:
R the tailgate is open
R in heavy rain, snow or fog
R at night or in very dark places
R if the camera is exposed to very bright light
R if the area is lit by fluorescent light or LED
lighting (the display may flicker)
R if there is a sudden change in temperature,
e.g. when driving into a heated garage in
winter
R if the camera lens is dirty or obstructed
R if the rear of your vehicle is damaged. In
this event, have the camera position and
setting checked at a qualified specialist
workshop.188
Driving systems
Driving and parking