2013 MERCEDES-BENZ GLA SUV tow bar
[x] Cancel search: tow barPage 16 of 401

Starting the engine ........................ 160
Key positions (ignition lock) ............ 159
Kickdown
Driving tips .................................... 170
Manual drive progra m.................... 174
Kneebag ............................................... 50 L
Lamps see Warning and indicator lamps
Lane Keeping Assist
Activating/deactivating ................. 245
Display message ............................ 276
Function/information .................... 224
Lane package ..................................... 222
Lap time (RACETIMER) ...................... 251
Lashing eyelets ................................. 306
Licence plate lamp (display mes-
sage) ................................................... 270
Light sensor (display message) ....... 271
Lighting
see Lights
Lights
Activating/deactivating the Intel-
ligent Light System ........................ 247
Activating/deactivating the inte-
rior lighting delayed switch-off ....... 248
Active light function ....................... 124
Automatic headlamp mode ............ 121
Cornering light function ................. 124
Dipped-beam headlamp s............... 121
Display message ............................ 268
Driving abroad ............................... 120
Foglamps ....................................... 121
Foglamps (extended range) ........... 125
Hazard warning lamps ................... 123
Headlamp flashe r........................... 123
Headlamp range ............................ 122
Light switch ................................... 120
Main-beam headlamp s................... 123
Motorway mode ............................. 124
Off-road lights ................................ 125
Parking lamps ................................ 122
Rear foglamp ................................. 122
Setting the ambient lighting
brightness (on-board computer) .... 247
Side lamps ..................................... 122 Switching the daytime driving
lights on/off (on-board com-
puter) ............................................. 246
Switching the daytime driving
lights on/off (switch) ..................... 121
Switching the exterior lighting
delayed switch-off on/off (on-
board computer) ............................ 247
Switching the surround lighting
on/off (on-board computer) .......... 247
Turn signals ................................... 123
see Interior lighting
see Replacing bulbs
LIM indicator lamp
Cruise control ................................ 189
DISTRONIC PLUS ........................... 194
Variable SPEEDTRONIC ................. 191
Limiting the speed
see SPEEDTRONIC
Loading guidelines ............................ 300
Locking
see Central locking
Locking (doors)
Automatic ........................................ 93
Emergency locking ........................... 94
From inside (central locking but-
ton) .................................................. 92
Locking centrally
see Central locking
Locking verification signal (on-
board computer) ............................... 249
Luggage compartment enlarge-
ment ................................................... 304
Important safety notes .................. 304
Notes on use ................................. 305
Luggage compartment floor
Important safety notes .................. 307
opening/closing ............................ 307
stowage well, under ....................... 307
Luggage net ....................................... 303
Lumbar support
Adjusting the 4-way lumbar sup-
port ................................................ 112 M
M+S tyres ........................................... 354 Index
13
Page 186 of 401

R
observe the gearshift recommendation.
R drive the vehicle in drive program E(vehi-
cles with automatic transmission).
i On long journeys at a constant speed, e.g.
on the motorway, only the bar for Constant
Constant
will change.
i The ECO display summarises the driving
characteristics from the start of the journey
to its completion. Therefore, there are
dynamic changes in the bars at the start of a journey. During a prolonged driving time,these changes are smaller. For more
dynamic changes, perform a manual reset.
For further information on the ECO display,
see (Y page 238). Braking
Important safety notes G
WARNING
If you shift down on a slippery road surface in an attempt to increase the engine's braking
effect, the drive wheels could lose their grip.
This increases the risk of skidding and having
an accident.
Do not shift down for additional engine brak-
ing on a slippery road surface.
Downhill gradients Change into a lower gear in good time on long
and steep downhill gradients. Take particular note of this when driving a laden vehicle and
when towing a trailer. For vehicles with auto-
matic transmission, you need to have selec-
ted manual drive program M(Y page 172).
i This also applies if you have activated
cruise control, SPEEDTRONIC or DIS-
TRONIC PLUS.
This will use the braking effect of the engine, so less braking will be required to maintain
vehicle speed. This relieves the load on the
brake system and prevents the brakes from
overheating and wearing too quickly. i
Briefly depressing the accelerator pedal
on downhill gradients while the manual
drive program Mis temporarily activated
(vehicles with automatic transmission): the automatic transmission may switch back to
the last active automatic drive program Eor
S. The automatic transmission may shift to a higher gear. This can reduce the engine's
braking effect.
Heavy and light loads G
WARNING
The braking system can overheat if you leave your foot on the brake pedal while driving.
This increases the braking distance and could
even cause the braking system to fail. There is
a risk of an accident.
Never use the brake pedal as a footrest. Do
not simultaneously depress both the brake
pedal and the accelerator pedal while driving.
! Depressing the brake pedal constantly
results in excessive and premature wear to
the brake pads.
If heavy demands are made on the brakes, do not park the vehicle immediately. Drive on for
a short while. This allows the airflow to cool
the brakes more quickly.
If the brakes have been used only moderately,
you should occasionally test their effective-
ness. To do this, brake more firmly from a
higher speed, paying attention to traffic con-
ditions. This improves the grip of the brakes.
Wet road surfaces If you have driven for a long time in heavy rain
without braking, there may be a delayed reac-
tion from the brakes when braking for the first time. This may also occur after a car wash orafter driving through deep water.
You have to depress the brake pedal more
firmly. Maintain a greater distance from the
vehicle in front.
After driving on a wet road or having the vehi-
cle washed, brake firmly while paying atten- Driving tips
183Driving and parking Z
Page 220 of 401
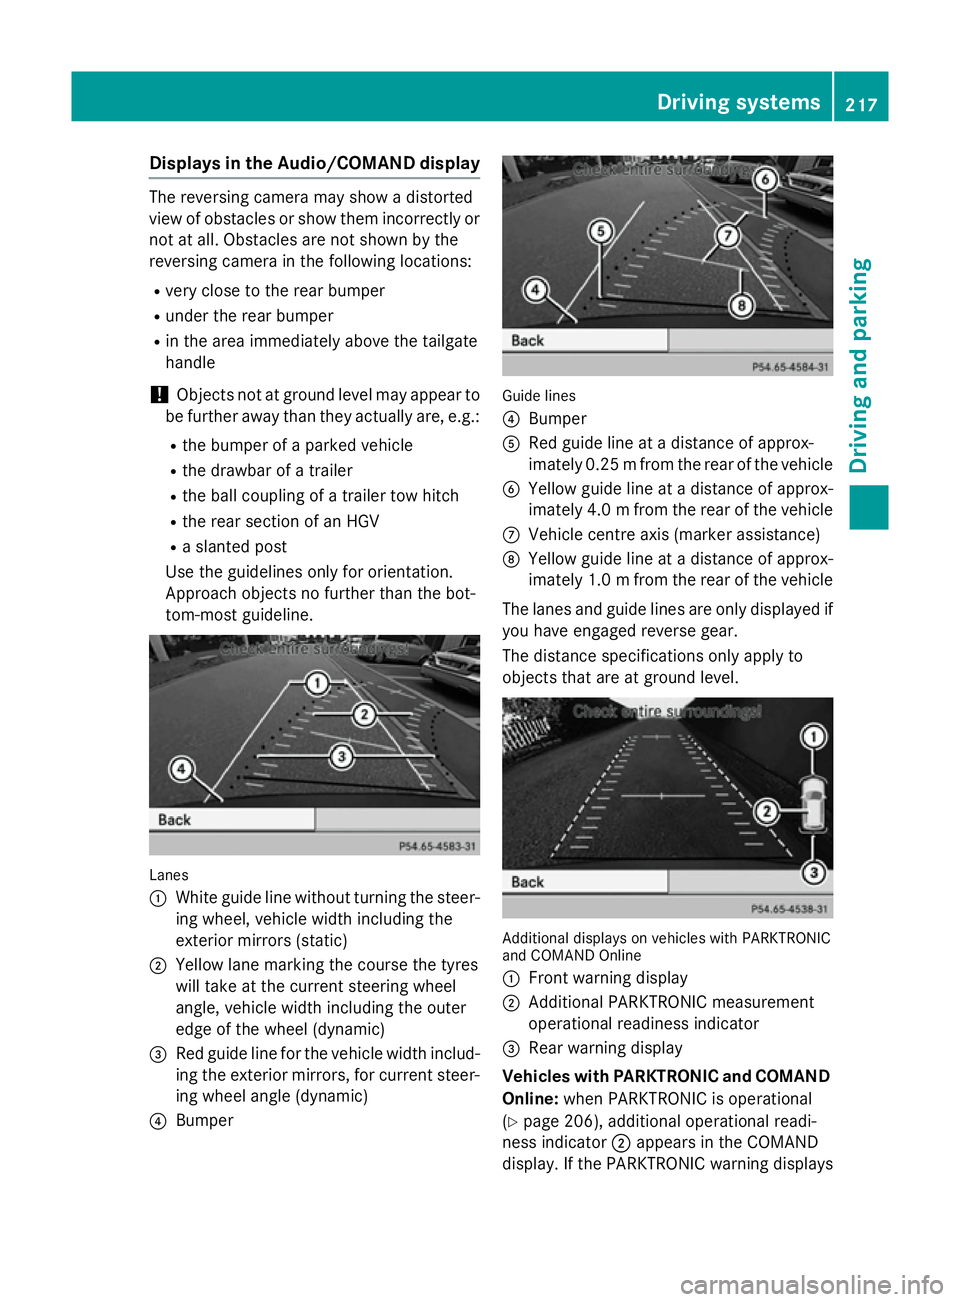
Displays in the Audio/COMAND display
The reversing camera may show a distorted
view of obstacles or show them incorrectly or not at all. Obstacles are not shown by the
reversing camera in the following locations:
R very close to the rear bumper
R under the rear bumper
R in the area immediately above the tailgate
handle
! Objects not at ground level may appear to
be further away than they actually are, e.g.:
R the bumper of a parked vehicle
R the drawbar of a trailer
R the ball coupling of a trailer tow hitch
R the rear section of an HGV
R a slanted post
Use the guidelines only for orientation.
Approach objects no further than the bot-
tom-most guideline. Lanes
:
White guide line without turning the steer-
ing wheel, vehicle width including the
exterior mirrors (static)
; Yellow lane marking the course the tyres
will take at the current steering wheel
angle, vehicle width including the outer
edge of the wheel (dynamic)
= Red guide line for the vehicle width includ-
ing the exterior mirrors, for current steer-
ing wheel angle (dynamic)
? Bumper Guide lines
?
Bumper
A Red guide line at a distance of approx-
imately 0.25 mfrom the rear of the vehicle
B Yellow guide line at a distance of approx-
imately 4.0 mfrom the rear of the vehicle
C Vehicle centre axis (marker assistance)
D Yellow guide line at a distance of approx-
imately 1.0 mfrom the rear of the vehicle
The lanes and guide lines are only displayed if
you have engaged reverse gear.
The distance specifications only apply to
objects that are at ground level. Additional displays on vehicles with PARKTRONIC
and COMAND Online
:
Front warning display
; Additional PARKTRONIC measurement
operational readiness indicator
= Rear warning display
Vehicles with PARKTRONIC and COMAND
Online: when PARKTRONIC is operational
(Y page 206), additional operational readi-
ness indicator ;appears in the COMAND
display. If the PARKTRONIC warning displays Driving systems
217Driving and parking Z
Page 222 of 401
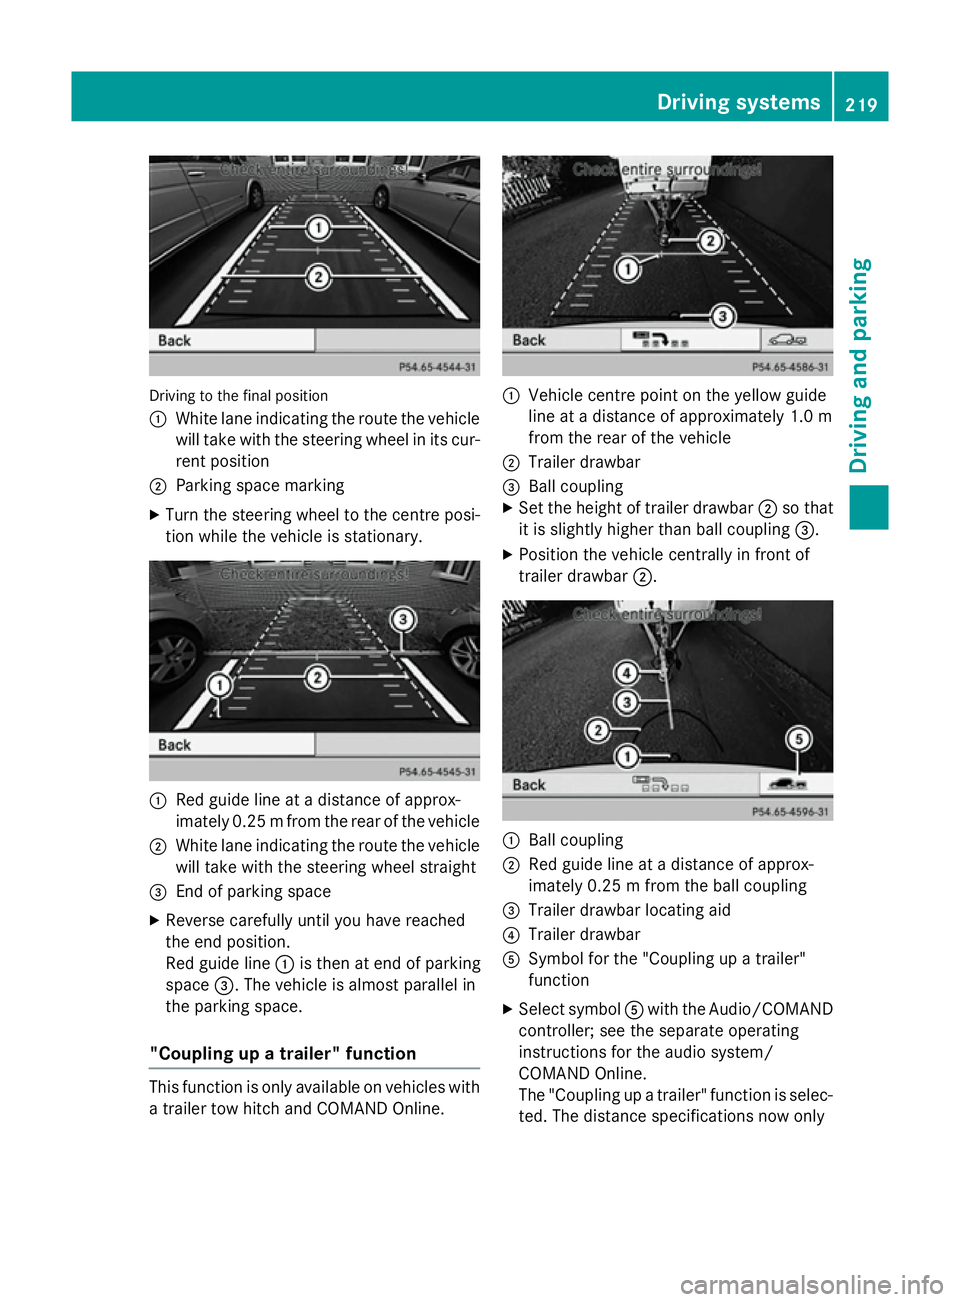
Driving to the final position
:
White lane indicating the route the vehicle
will take with the steering wheel in its cur-
rent position
; Parking space marking
X Turn the steering wheel to the centre posi-
tion while the vehicle is stationary. :
Red guide line at a distance of approx-
imately 0.25 mfrom the rear of the vehicle
; White lane indicating the route the vehicle
will take with the steering wheel straight
= End of parking space
X Reverse carefully until you have reached
the end position.
Red guide line :is then at end of parking
space =. The vehicle is almost parallel in
the parking space.
"Coupling up a trailer" function This function is only available on vehicles with
a trailer tow hitch and COMAND Online. :
Vehicle centre point on the yellow guide
line at a distance of approximately 1.0 m
from the rear of the vehicle
; Trailer drawbar
= Ball coupling
X Set the height of trailer drawbar ;so that
it is slightly higher than ball coupling =.
X Position the vehicle centrally in front of
trailer drawbar ;. :
Ball coupling
; Red guide line at a distance of approx-
imately 0.25 m from the ball coupling
= Trailer drawbar locating aid
? Trailer drawbar
A Symbol for the "Coupling up a trailer"
function
X Select symbol Awith the Audio/COMAND
controller; see the separate operating
instructions for the audio system/
COMAND Online.
The "Coupling up a trailer" function is selec- ted. The distance specifications now only Driving systems
219Driving and parking Z
Page 225 of 401

Permanently showing detected traffic
signs in the multifunction display
X Display the assistance graphic using the
on-board computer (Y page 243).
A traffic sign indicating a speed limit or the
end of a speed limit appears in the multi-
function display as soon as it is detected.
Traffic sign :indicating a speed limit is gen-
erally displayed until:
R a traffic sign indicating the end of the speed
limit is detected.
R you make a turn.
R you leave or enter a town.
R the road type changes (e.g. motorway,
country road).
R you have travelled a certain minimum dis-
tance without the traffic sign being repea-
ted or detected again. Lane Tracking package
General notes The Lane Tracking package consists of Blind
Spot Assist (Y page 222) and Lane Keeping
Assist (Y page 224).
Blind Spot Assist General notes
Blind Spot Assist uses a radar sensor system
to monitor the areas on both sides of your
vehicle. It supports you from speeds of
30 km/h. A warning display in the exterior
mirrors draws your attention to vehicles
detected in the monitored area. If you then
switch on the corresponding turn signal to
change lane, you will also receive an optical
and audible collision warning. For this pur-
pose, Blind Spot Assist uses sensors in the
rear bumper. Important safety notes G
WARNING
Blind Spot Assist does not react to vehicles:
R overtaken too closely on the side, placing
them in the blind spot area
R when the difference in the speed of
approach and overtaking is too great
As a result, Blind Spot Assist cannot warn
drivers in these situations. There is a risk of an accident.
Always pay careful attention to the traffic sit- uation and maintain a safe distance at the side
of the vehicle.
Blind Spot Assist is only an aid. It may fail to
detect some vehicles and is no substitute for
attentive driving.
Monitoring range of the sensors
In particular, the detection of obstacles can
be impaired in the case of:
R dirt on the sensors or obscured sensors
R poor visibility, e.g. due to fog, heavy rain or
snow
R a narrow vehicle travelling in front, e.g. a
motorcycle or a bicycle
R very wide lanes
R narrow lanes
R vehicles not driving in the middle of their
lane
R barriers or other road boundaries
Vehicles in the monitoring range are then not indicated. 222
Driving systemsDriving and parking
Page 229 of 401
G
WARNING
You could lose control of the vehicle/trailer
combination if it begins to swerve. The vehi-
cle/trailer combination could even overturn.
There is a risk of an accident.
On no account should you attempt to
straighten out the vehicle/trailer combina-
tion by increasing speed. Decrease your
speed and do not countersteer. Brake if nec-
essary. G
WARNING
If the maximum the permissible load for a car- rier system is exceeded, the carrier could
come loose from the vehicle and endanger
other road users. There is a risk of an accident and injury.
Never exceed the permissible noseweight
when using a carrier.
! Depressing the brake pedal constantly
results in excessive and premature wear to
the brake pads.
The GLA 45 AMG 4MATIC model cannot be
used to tow a trailer.
Exceeding the maximum permissible nose-
weight of the trailer drawbar on the ball cou-
pling may cause damage to the following:
R your vehicle
R the trailer
R the ball coupling
R the trailer tow hitch
The vehicle/trailer combination could
become unstable.
If the noseweight used is lower than the min- imum permissible noseweight, the vehicle/
trailer combination could also become unsta-
ble.
To avoid hazardous situations:
R make sure to check the noseweight before
each journey.
R use a drawbar noseweight as close as pos-
sible to the maximum noseweight. R
do not exceed the maximum permissible
noseweight.
R do not use a noseweight lower than the
minimum permissible trailer drawbar nose-
weight.
When reversing the vehicle towards the
trailer, make sure there is nobody between
the trailer and the vehicle.
Couple and uncouple the trailer carefully. If
you do not couple the trailer to the towing
vehicle correctly, the trailer could become
detached.
Make sure that the following values are not
exceeded:
R the permissible trailer drawbar noseweight
R the permissible trailer load
R the permissible rear axle load of the towing
vehicle
R the maximum permissible gross vehicle
weight of both the towing vehicle and the
trailer
The applicable permissible values, which
must not be exceeded, can be found:
R in your vehicle documents
R on the identification plates of the trailer tow
hitch and the trailer
R on the vehicle identification plate
If the values differ, the lowest value applies.
You will find the values approved by the man-
ufacturer on the vehicle identification plates
and those for the towing vehicle under "Tech- nical data" (Y page 394).
When towing a trailer, your vehicle's handling
characteristics will be different in comparison
to when driving without a trailer.
The vehicle/trailer combination:
R is heavier
R is restricted in its acceleration and gradi-
ent-climbing capability
R has an increased braking distance
R is affected more by strong crosswinds
R demands more sensitive steering
R has a larger turning circle 226
Towing a trailerDriving and parking
Page 230 of 401

This can impair the vehicle's handling char-
acteristics. Adapt your driving style accord-
ingly. Maintain a safe distance. Drive care-
fully.
When towing a trailer, always adjust your
speed to the current road and weather con-
ditions. Do not exceed the maximum permis- sible speed for your vehicle/trailer combina-
tion.
General notes X
When towing a trailer, set the tyre pressure
on the rear axle of the towing vehicle for a
maximum load; see the tyre pressure table in the fuel filler flap (Y page 356).
Please note that when towing a trailer, PARK-
TRONIC (Y page 206) and Blind Spot Assist
(Y page 222) availability is limited or not avail-
able at all.
i The height of the ball coupling changes
with the load of the vehicle. If necessary,
use a trailer with a height-adjustable draw- bar.
You will find fitting dimensions and loads
under "Technical data" (Y page 393).
Driving tips i
Observe the notes on ESP ®
trailer stabi-
lisation (Y page 80).
The maximum permissible speed for vehicle/
trailer combinations depends on the type of
trailer. Before beginning the journey, check
the trailer's documents to see what the max- imum permitted speed is. Observe the legally
prescribed maximum speed in the relevant
country.
For certain Mercedes-Benz vehicles, the max-
imum permissible rear axle load is increased
when towing a trailer. Refer to the "Technical
data" section to find out whether this applies to your vehicle. If you utilise any of the added
maximum rear axle load when towing a trailer, the vehicle/trailer combination may not
exceed a maximum speed of 100 km/h for reasons concerning the operating permit.
This also applies in countries in which the
permissible maximum speed for vehicle/
trailer combinations is above 100 km/h.
When towing a trailer, your vehicle's handling
characteristics will be different in comparison to when driving without a trailer and it will
consume more fuel.
Change into a lower gear in good time on long
and steep downhill gradients. For vehicles
with automatic transmission, you need to
have selected manual drive program M
(Y page 172).
i This also applies if you have activated
cruise control, SPEEDTRONIC or DIS-
TRONIC PLUS.
This will use the braking effect of the engine,
so less braking will be required to maintain
vehicle speed. This relieves the load on the
brake system and prevents the brakes from
overheating and wearing too quickly. If you
need additional braking, depress the brake
pedal repeatedly rather than continuously.
i Briefly depressing the accelerator pedal
on downhill gradients while the manual
drive program Mis temporarily activated
(vehicles with automatic transmission): the automatic transmission may switch back to
the last active automatic drive program Eor
S. The automatic transmission may shift to
a higher gear. This can reduce the engine's braking effect.
Driving tips If the trailer swings from side to side:
X Do not accelerate.
X Do not countersteer.
X Brake if necessary. Towing a trailer
227Driving and parking Z
Page 232 of 401
(grease free), depending on the instruc-
tions for the trailer.
Coupling up a trailer
X Make sure that the transmission is in posi-
tion P.
X Apply the electric parking brake.
X Position the trailer level behind the vehicle.
X Couple up the trailer.
X Establish the electric connection between
the vehicle and the trailer.
X Check that the trailer lighting system is
working.
A trailer that is connected is recognised
only when the electrical connection is
established correctly and when the lighting system is working properly. The function of
other systems, such as ESP ®
or PARK-
TRONIC also depends on this. Uncoupling a trailer
G
WARNING
If you uncouple a trailer with an engaged over- run brake, you could trap your hand between
the vehicle and the trailer drawbar. This poses a risk of injury.
Do not uncouple a trailer with an engaged
overrun brake.
! Do not disconnect a trailer with an
engaged overrun brake. Otherwise, your
vehicle could be damaged by the rebound- ing of the overrun brake.
! Remove the installed adapter cable
before folding in the ball coupling. Other-
wise, damage may occur to the rear
bumper and the adapter cable.
X Make sure that the transmission is in posi-
tion P.
X Apply the electric parking brake. X
Secure the trailer against rolling away.
X Remove the trailer cable and decouple the
trailer. Folding in the ball coupling
G
WARNING
If you release the ball coupling or it does not
engage correctly when folding in, it will swing out. Within pivoting range of the ball coupling,
there is an increased risk of an accident and
injury.
Only release the ball coupling if the pivoting
range is unobstructed. Always make sure that the ball coupling engages when folding in.
X Fold the ball coupling back in if you are not
using the trailer tow hitch.
X Place the protective covering on the ball
coupling.
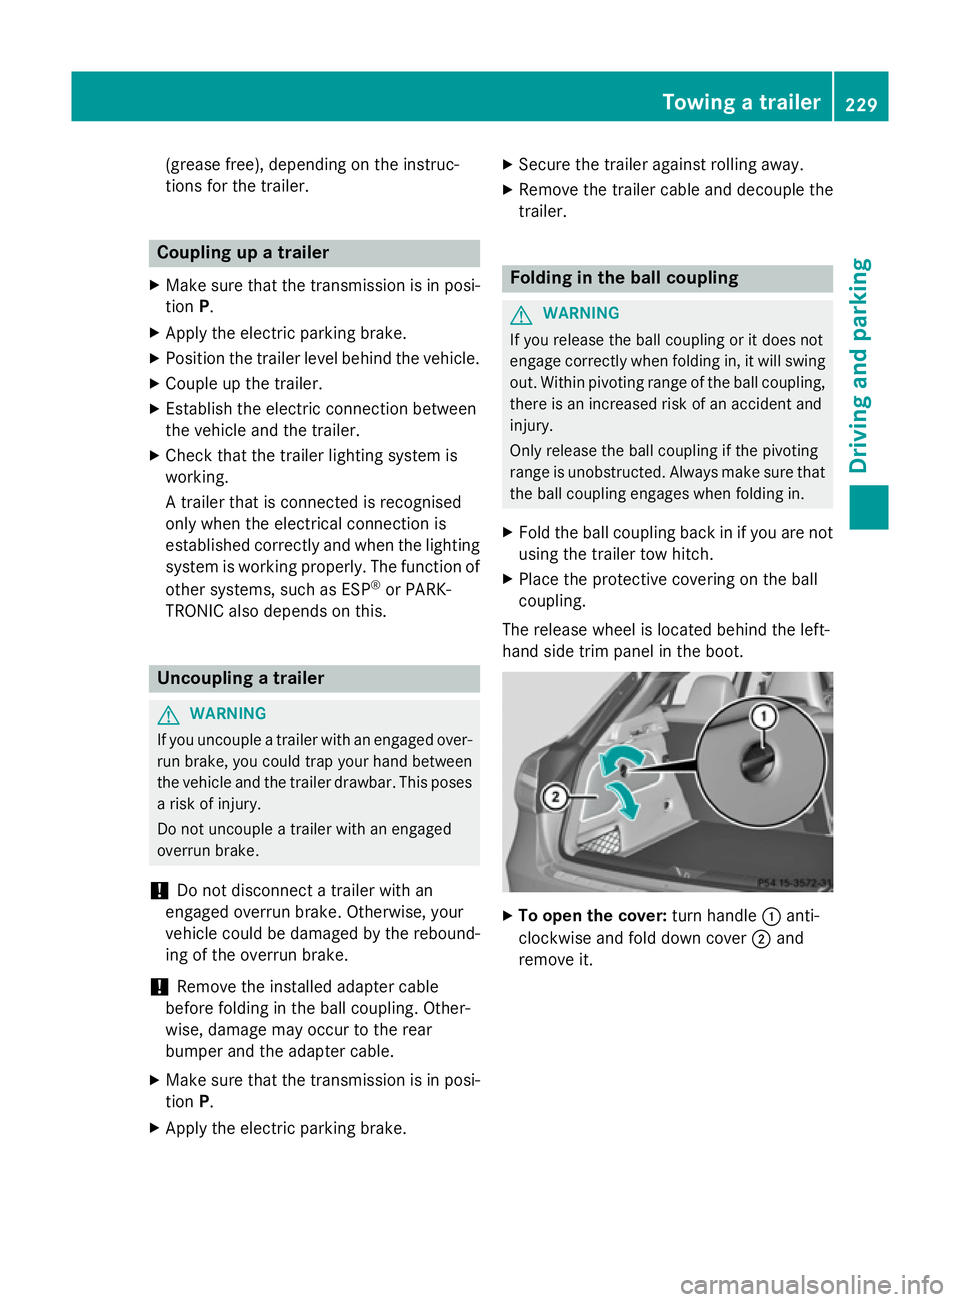
The release wheel is located behind the left-
hand side trim panel in the boot. X
To open the cover: turn handle:anti-
clockwise and fold down cover ;and
remove it. Towing a trailer
229Driving and parking Z