2013 MERCEDES-BENZ GLA SUV ECU
[x] Cancel search: ECUPage 14 of 401
Resetting ......................................
.116
Storing settings (memory func-
tion) ............................................... 117 F
Fault message see Display messages
Filler cap
see Fuel filler flap
Fire extinguisher ............................... 333
First-aid kit ......................................... 332
Fitting a wheel
Fitting a wheel ............................... 365
Lowering the vehicle ..................... .365
Preparing the vehicle ..................... 362
Raising the vehicle ......................... 363
Removing a wheel .......................... 365
Securing the vehicle against roll-
ing away ........................................ 363
Flat tyre
MOExtended tyres ......................... 334
Preparing the vehicle ..................... 334
TIREFIT kit ...................................... 335
see Emergency spare wheel
Floormat ............................................. 313
Foglamps
Extended range .............................. 125
Switching on/off ........................... 121
Frequencies
Mobile phone ................................. 382
Two-way radio ................................ 382
Front foglamps
Display message ............................ 270
Front-passenger front airbag deac-
tivation system
Display message ............................ 267
Operation ......................................... 52
Problems ......................................... 56
System self-test ............................... 54
Front-passenger seat
Folding the backrest forward/
back ............................................... 303
Fuel
Additives ........................................ 387
Consumption information .............. 388
Consumption statistics .................. 237 Displaying the current consump-
tion ................................................ 238
Displaying the range .....................
.238
E10 ................................................ 385
Fuel gauge ....................................... 32
Grade (petrol) ................................ 385
Important safety notes .................. 385
Low outside temperatures ............. 388
Notes for AMG vehicles ................. 386
Problem (malfunction) ................... 178
Quality (diesel )............................... 387
Refuelling ....................................... 175
Tank content/reserve fue l............. 385
Fuel filler flap
Opening ......................................... 176
Fuel filter (white display message) .. 274
Fuel level
Calling up the range (on-board
computer) ...................................... 238
Gauge .............................................. 32
Fuel reserve
see Fuel
Fuel tank
Capacity ........................................ 385
Problem (malfunction) ................... 178
Fuses
Allocation chart ............................. 349
Before changing ............................. 349
Fuse box in the engine compart-
ment .............................................. 349
Fuse box in the front-passenger
footwell .......................................... 349
Important safety notes .................. 348 G
Gear indicator (on-board com-
puter) .................................................. 251
Gear or selector lever (cleaning
instructions) ...................................... 328
Gearshift program
SETUP (on-board computer) .......... 251
Genuine Mercedes-Benz parts ........... 22
Glove compartment .......................... 301 Index
11
Page 15 of 401

H
Handbrake see Parking brake
Hazard warning lamps ...................... 123
Display message ............................ 287
Head restraints
Adjusting ....................................... 111
Adjusting (electrically) ................... 111
Adjusting (manually) ...................... 111
Adjusting (rear) .............................. 112
Fitting/removing (rear) .................. 112
Headlamp
Cleaning system (function) ............ 124
Cleaning system (notes) ............... .391
Headlamps
Misting up ...................................... 126
Topping up the cleaning system .... 321
see Automatic headlamp mode
Heating
see Climate control
High-pressure cleaners .................... 324
Hill start assist .................................. 161
HOLD function
Activating ....................................... 202
Deactivating ................................... 202
Display message ............................ 275
Function/notes ............................ .201 I
Ignition lock see Key positions
Immobiliser .......................................... 81
Indicator and warning lamp
Restraint system ............................ 294
Indicator and warning lamps
Coolant .......................................... 295
DISTRONIC PLUS ........................... 297
Engine diagnostics ......................... 295
SPORT handling mode ................... 292
Indicator lamps
Display message ............................ 269
see Warning and indicator lamps
Indicators
see Turn signals
Instrument cluster
Overview .......................................... 32 Settings ......................................... 246
Warning and indicator lamps ........... 34
Instrument cluster lighting .............. 234
Intelligent Light System
Activating/deactivating ................. 247
Display message ............................ 271
Overview ........................................ 124
Setting the dipped-beam head-
lamps for driving on the right/left .. 247
Interior lighting ................................. 127
Automatic control system .............. 127
Delayed switch-off (on-board
computer) ...................................... 248
Emergency lighting ........................ 128
Manual control ............................... 128
Overview ........................................ 127
Reading lamp ................................. 127
Setting the ambient lighting
brightness (on-board computer) .... 247
Interior motion sensor
Deactivating ..................................... 83
Function .......................................... .82
Priming ............................................ 82
Switching off .................................... 82
ISOFIX child seat securing system ....61 J
Jack Storage location ............................3 33
Using ............................................. 363
Jump starting (engine) ......................342 K
Key Changing the battery ....................... 89
Checking the battery ....................... 88
Convenience closing feature ............ 99
Convenience opening feature .......... 99
Display message ............................ 287
Door central locking/unlocking ....... 87
Emergency key element ................... 87
Important safety notes .................... 86
Loss ................................................. 90
Modifying the programming ............. 87
Positions (ignition lock) ................. 159
Problem (malfunction) ..................... 90 12
Index
Page 23 of 401
Reached (TIREFIT) .......................... 337
Recommended ..............................
.356
Tyre pressure loss warning
General notes ................................ 357
Important safety notes .................. 357
Restarting ...................................... 358
Tyre pressure monitor
Checking the tyre pressure elec-
tronically ........................................ 359
Function/notes ............................ .358
General notes ................................ 358
Important safety notes .................. 358
Radio type approval for the tyre
pressure monitor ........................... 361
Restarting ...................................... 360
Warning lamp ................................. 298
Warning message .......................... 360
Tyres
Changing a wheel .......................... 361
Checking ........................................ 353
Direction of rotatio n...................... 362
Display message ............................ 280
Important safety notes .................. 352
M+S tyres ...................................... 354
MOExtended tyre s......................... 354
Replacing ....................................... 361
Service life ..................................... 353
Storing ........................................... 362
Summer tyres ........................ 184, 354
Tyre size (data ).............................. 366
Tyre tread ...................................... 353
Wheel and tyre combinations ........ 368
see Flat tyre U
Unlocking Emergency unlocking ....................... 93
From inside the vehicle (central
unlocking button) ............................. 92 V
Vanity mirror (in sun visor) .............. 309
Variable SPEEDTRONIC
see SPEEDTRONIC
Vehicle
Correct use ...................................... 25
Data acquisition ............................... 26 Electronics ..................................... 382
Equipment ....................................... 23
Implied warranty .............................. 26
Individual settings .......................... 245
Leaving parked up ......................... 181
Locking (in an emergency) ............... 94
Locking (key) ................................... 87
Lowering ........................................ 365
Pulling away ................................... 160
Raising ........................................... 363
Registration ..................................... 25
Securing from rolling away ............ 363
Tow-starting ................................... 344
Towing away .................................. 344
Transporting .................................. 347
Unlocking (in an emergency) ........... 93
Unlocking (key) ................................ 87
Vehicle data ................................... 391
Vehicle data
Boot load (maximum) ..................... 391
Roof load (maximum) ..................... 391
Vehicle data (off-road driving)
Approach/departure angle ............ 393
Maximum gradient climbing abil-
ity .................................................. 393
Maximum water depth ................... 392
Vehicle dimensions ........................... 391
Vehicle emergency locking ................ 94
Vehicle identification number
see VIN
Vehicle identification plate .............. 384
Vehicle maintenance
see ASSYST PLUS
Vehicle tool kit .................................. 333
Video (DVD) ........................................ 241
Video DVD (on-board computer) ...... 241
VIN ...................................................... 384 W
Warning and indicator lamps ABS ................................................ 289
Brakes ........................................... 289
Distance warning signal ................. 297
ESP® ............................................. 291
ESP® OFF ...................................... 292
Fuel tank ........................................ 295
LIM (cruise control) ........................ 189 20
Index
Page 28 of 401
G
WARNING
If you connect equipment to a diagnostics
connection in the vehicle, it can affect the
operation of the vehicle systems. This may
affect the operating safety of the vehicle.
There is a risk of an accident.
Do not connect any equipment to a diagnos-
tics connection in the vehicle. G
WARNING
Objects in the driver's footwell may restrict
the clearance around the pedals or block a
depressed pedal. This jeopardises the oper-
ating and road safety of the vehicle. There is a risk of an accident.
Stow all objects securely in the vehicle so that
they do not get into the driver's footwell.
Always fit the floormats securely and as pre-
scribed in order to ensure that there is always sufficient room for the pedals. Do not use
loose floormats and do not place several floor- mats on top of one another.
! If the engine is switched off and equip-
ment on the diagnostics connection is
used, the starter battery may discharge.
Connecting equipment to the diagnostics
connection can lead to emissions monitoring information being reset, for example. This
may lead to the vehicle failing to meet the
requirements of the next emissions test dur-
ing the main inspection. Qualified specialist workshop
A qualified specialist workshop has the nec-
essary special skills, tools and qualifications
to correctly carry out any necessary work on
your vehicle. This particularly applies to work
relevant to safety.
Observe the notes in the Service Booklet.
Always have the following work carried out at a qualified specialist workshop:
R work relevant to safety
R service and maintenance work R
repair work
R modifications, installations and conver-
sions
R work on electronic components
Mercedes-Benz recommends that you use a
Mercedes-Benz Service Centre. Vehicle registration
Mercedes-Benz may ask its Service Centres
to carry out technical inspections on certain
vehicles. The quality or safety of the vehicle is
improved as a result of the inspection.
Mercedes-Benz can only inform you about
vehicle checks if it has your registration data.
It is possible that your vehicle has not yet
been registered in your name in the following
cases:
R if your vehicle was not purchased at an
authorised specialist dealer.
R if your vehicle has not yet been examined at
a Mercedes-Benz Service Centre.
It is advisable to register your vehicle with a
Mercedes-Benz Service Centre.
Inform Mercedes-Benz as soon as possible
about any change in address or vehicle own-
ership. You can do this at a Mercedes-Benz
Service Centre, for example. Correct use
If you remove any warning stickers, you or
others could fail to recognise certain dangers.
Leave warning stickers in position.
Observe the following information when driv- ing your vehicle:
R the safety notes in this manual
R the technical data in this manual
R traffic rules and regulations
R laws and safety standards pertaining to
motor vehicles Introduction
25 Z
Page 45 of 401
Useful information
i This Owner's Manual describes all mod-
els, series and optional equipment for your
vehicle that were available at the time of
going to press. National variations are pos- sible. Note that your vehicle may not be
equipped with all of the functions descri-
bed. This is also the case for systems and
functions relevant to safety.
i Read the information on qualified special-
ist workshops: (Y page 25). Panic alarm
X
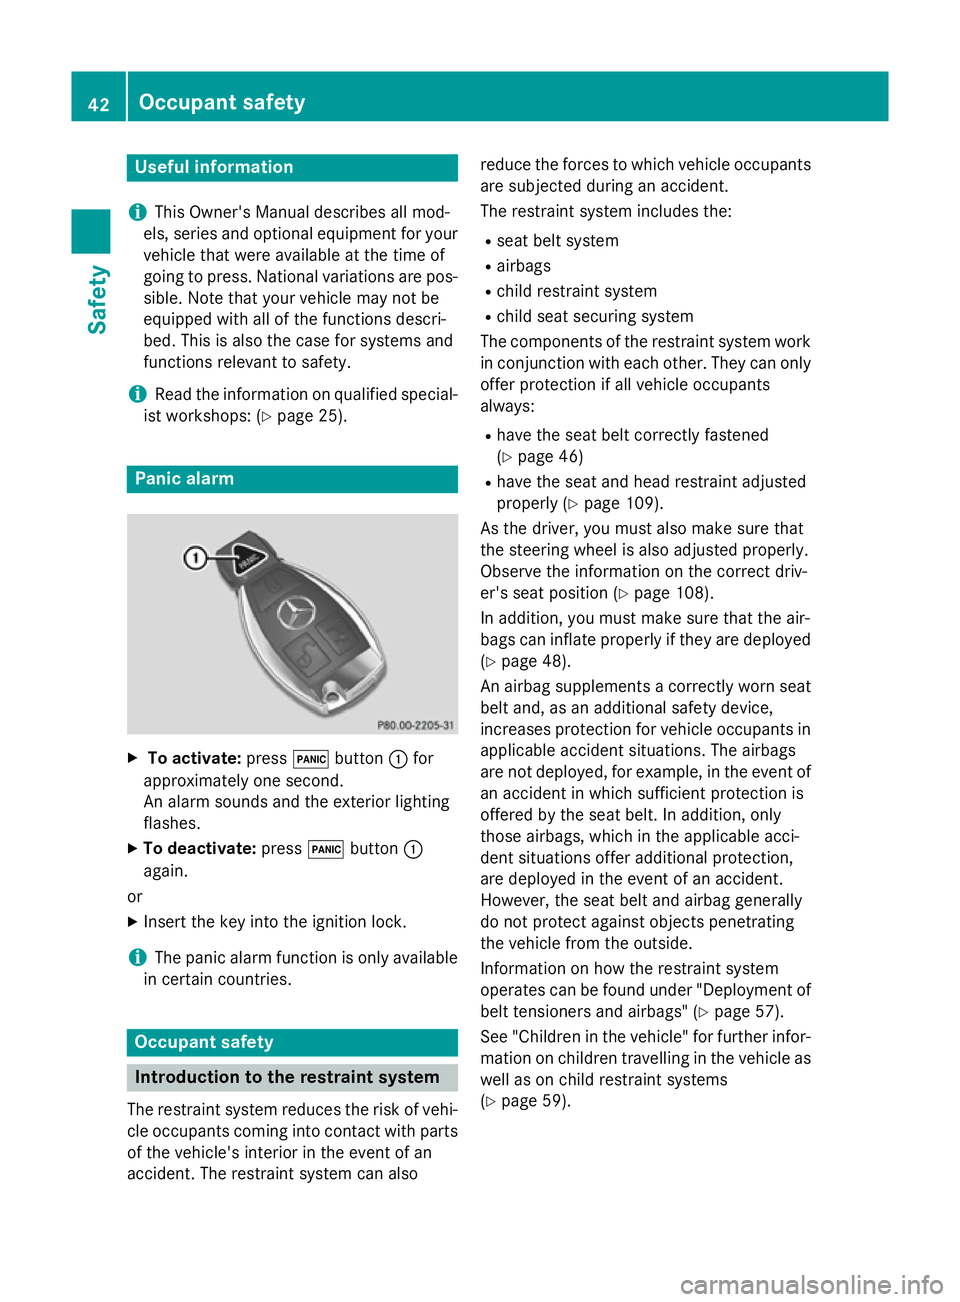
To activate: press!button :for
approximately one second.
An alarm sounds and the exterior lighting
flashes.
X To deactivate: press!button :
again.
or
X Insert the key into the ignition lock.
i The panic alarm function is only available
in certain countries. Occupant safety
Introduction to the restraint system
The restraint system reduces the risk of vehi-
cle occupants coming into contact with parts of the vehicle's interior in the event of an
accident. The restraint system can also reduce the forces to which vehicle occupants
are subjected during an accident.
The restraint system includes the:
R seat belt system
R airbags
R child restraint system
R child seat securing system
The components of the restraint system work
in conjunction with each other. They can only
offer protection if all vehicle occupants
always:
R have the seat belt correctly fastened
(Y page 46)
R have the seat and head restraint adjusted
properly (Y page 109).
As the driver, you must also make sure that
the steering wheel is also adjusted properly.
Observe the information on the correct driv-
er's seat position (Y page 108).
In addition, you must make sure that the air-
bags can inflate properly if they are deployed (Y page 48).
An airbag supplements a correctly worn seat
belt and, as an additional safety device,
increases protection for vehicle occupants in
applicable accident situations. The airbags
are not deployed, for example, in the event of an accident in which sufficient protection is
offered by the seat belt. In addition, only
those airbags, which in the applicable acci-
dent situations offer additional protection,
are deployed in the event of an accident.
However, the seat belt and airbag generally
do not protect against objects penetrating
the vehicle from the outside.
Information on how the restraint system
operates can be found under "Deployment of
belt tensioners and airbags" (Y page 57).
See "Children in the vehicle" for further infor- mation on children travelling in the vehicle as
well as on child restraint systems
(Y page 59). 42
Occupant safetySafety
Page 48 of 401
G
WARNING
The seat belt does not offer the intended level of protection if you have not moved the back-
rest to an almost vertical position. When brak-
ing or in the event of an accident, you could
slide underneath the seat belt and sustain
abdomen or neck injuries, for example. This
poses an increased risk of injury or even fatal injury.
Adjust the seat properly before beginning
your journey. Always ensure that the backrest
is in an almost vertical position and that the
shoulder section of your seatbelt is routed
across the centre of your shoulder. G
WARNING
Persons under 1.50 mtall cannot wear the
seat belts correctly without a suitable, addi-
tional restraint system. The seat belt cannot
perform its intended protective function if it is not fastened correctly. Also, an improperly
fastened seat belt can cause additional inju-
ries in the event of an accident, sudden brak-
ing or abrupt changes of direction. There is an increased risk of injury, possibly even fatal.
Secure persons less than 1.50 mtall in a suit-
able restraint system.
If a child younger than 12 years old and under 1.50 m in height is travelling in the vehicle:
R always secure the child in a child restraint
system suitable for this Mercedes-Benz
vehicle. The child restraint system must be appropriate to the age, weight and size of
the child.
R be sure to observe the instructions and
safety notes on the automatic front-
passenger front airbag deactivation system
(Y page 51)
R always observe the instructions and safety
notes on "Children in the vehicle" in this
Owner's Manual (Y page 59) in addition
to the child restraint system manufactur-
er's installation instructions G
WARNING
Seat belts cannot protect as intended, if:
R they are damaged, have been modified, are
extremely dirty, bleached or dyed
R the seat belt buckle is damaged or
extremely dirty
R modifications have been made to the belt
tensioners, belt anchorages or inertia reels
Damage caused to safety belts in an accident may not be visible, e.g. by splinters of glass.
Modified or damaged seat belts can tear or
fail, for example in the event of an accident.
Modified seat belt tensioners may be
deployed unintentionally or fail to be deployed
when required. There is an increased risk of
injury, possibly even fatal.
Never modify safety belts, seat belt tension-
ers, seat belt anchorages and inertia reels.
Ensure that seat belts are not damaged or
worn and are clean. After an accident, have
the seat belts checked immediately at a quali- fied specialist workshop.
Mercedes-Benz recommends that you only
use seat belts which have been approved
specifically for your vehicle by Mercedes-
Benz.
Vehicles with sports seats or AMG Per-
formance Seats: these seats are equipped
with the standard three-point seat belt. If you
fit a different multi-point seat belt, e.g. sports
or racing seat belts, the restraint system can-
not offer maximum protection. G
WARNING
If you feed seat belts through the opening in
the seat backrest, the seat backrest may be
damaged or may even break in the event of an accident. This poses an increased risk of
injury or even fatal injury.
Only use the standard three-point seat belt.
Never modify the seat belt system. Occupant safety
45Safety Z
Page 49 of 401
Correct seat belt use
Observe the safety notes on the seat belt
(Y
page 44).
All vehicle occupants must be wearing the
seat belt correctly before beginning the jour- ney. Also make sure that all vehicle occu-
pants are always wearing the seat belt cor-
rectly while the vehicle is in motion.
When fastening the seat belt, always make
sure that:
R the seat belt tongue is only inserted to the
belt buckle belonging to that seat.
R the seat belt is tight across your body.
Avoid wearing bulky clothing, e.g. a winter
coat.
R the seat belt is not twisted.
Only then can forces which occur be dis-
tributed across the surface of the seat belt.
R the shoulder section of the belt is always
routed across the centre of your shoulder.
The shoulder section of the seat belt should
not touch your neck nor be routed under
your arm. If possible, adjust the seat belt to the appropriate height.
R the lap belt passes across your lap as
tightly and as low down as possible.
The lap must always be routed across your hip joints and never across your abdomen.
This applies particularly to pregnant
women. If necessary, press the lap belt
down into your hip joints and pull tight with the shoulder section of the belt.
R the seat belt is not routed across sharp,
pointed or fragile objects.
If you have such items located on or in your
clothing, e.g. pens, keys or spectacles,
store these in a suitable place.
R only one person is using a seat belt.
Infants and children must never travel sit-
ting on the lap of a vehicle occupant. In the
event of an accident, they could be crushed between the vehicle occupant and seat
belt.
R objects are never secured with a seat belt if
the seat belt is also being used by one of the vehicle's occupants.
Seat belts are only intended to secure and
restrain vehicle occupants. Always observe
the "Loading guidelines" for securing objects,
luggage or loads (Y page 300).
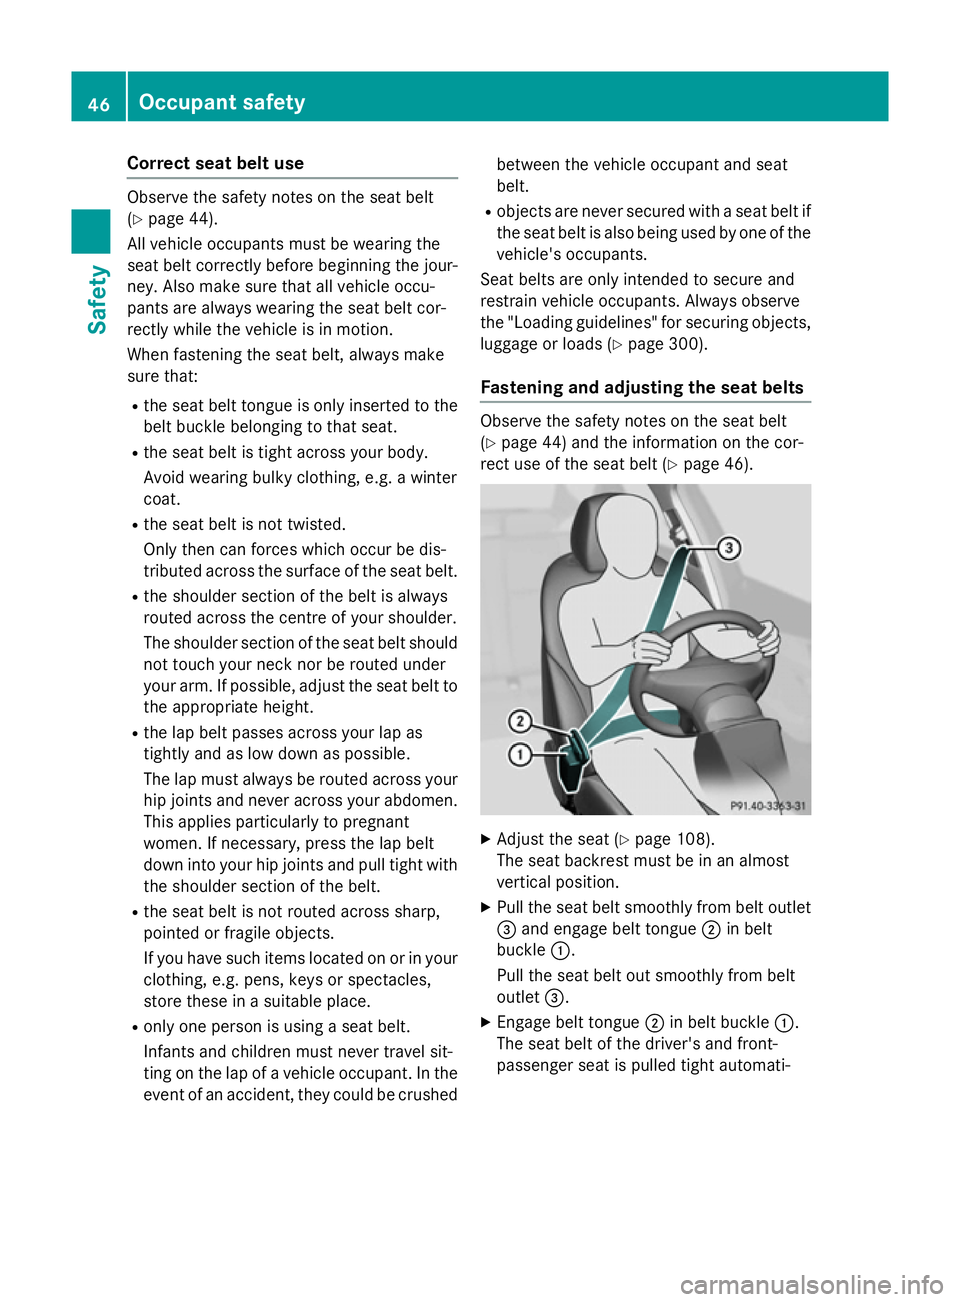
Fastening and adjusting the seat belts Observe the safety notes on the seat belt
(Y
page 44) and the information on the cor-
rect use of the seat belt (Y page 46). X
Adjust the seat (Y page 108).
The seat backrest must be in an almost
vertical position.
X Pull the seat belt smoothly from belt outlet
= and engage belt tongue ;in belt
buckle :.
Pull the seat belt out smoothly from belt
outlet =.
X Engage belt tongue ;in belt buckle :.
The seat belt of the driver's and front-
passenger seat is pulled tight automati- 46
Occupant safetySafety
Page 52 of 401
the door or side window. You may other-
wise be in the deployment area of the air-
bags.
R Always keep your feet in the footwell in
front of the seat. Do not put your feet on the
dashboard, for example. Your feet may oth-
erwise be in the deployment area of the
airbag.
R Always secure persons less than 1.50 mtall
in suitable restraint systems. Up to this
height, the seat belt cannot be worn cor-
rectly.
If a child is travelling in your vehicle, also
observe the following notes:
R Always secure children under 12 years of
age and less than 1.50 m tall in suitable
child restraint systems.
R Child restraint systems should be fitted to
the rear seats.
R Only secure a child to the front-passenger
seat when the front-passenger front airbag
is disabled, and only then in a rearward-
facing child restraint system. If the
PASSENGER AIR BAG OFF indicator lamp is
permanently lit, the front-passenger front
airbag is disabled (Y page 43).
R Always observe the instructions and safety
notes on the automatic front-passenger
front airbag deactivation system
(Y page 51) and on "Children in the vehi-
cle" (Y page 59) in addition to the child
restraint system manufacturer's installa-
tion instructions.
Objects in the vehicle interior may pre-
vent the airbag from functioning cor-
rectly. Before starting your journey and to
avoid risks resulting from the speed of the
airbag as it deploys, make sure that:
R there are no people, animals or objects
between the vehicle occupants and an air-
bag.
Do not place any objects on the dashboard
e.g. above the front-passenger front airbag.
R there are no objects between the seat, door
and B-pillar. R
no hard objects, e.g. coat hangers, are
hanging on the grab handles or coat hooks.
R no accessories, such as cup holders, are
attached to the vehicle within the deploy-
ment area of an airbag, e.g. to doors, side
windows, rear side trim or side walls.
R no heavy, sharp-edged or fragile objects
are in the pockets of your clothing. Store
such objects in a suitable place. G
WARNING
If you modify an airbag cover or affix objects
such as stickers to it, the airbag can no longer function correctly. There is an increased risk
of injury.
Never modify an airbag cover or affix objects
to it. G
WARNING
Sensors to control the airbags are located in
the doors. Modifications or work not per-
formed correctly to the doors or door panel-
ling, as well as damaged doors, can lead to the function of the sensors being impaired. The
airbags might therefore not function properly any more. Consequently, the airbags cannot
protect vehicle occupants as they are
designed to do. This poses an increased risk
of injury.
Never modify the doors or parts of the doors.
Always have work on the doors or door pan-
elling carried out at a qualified specialist
workshop.
Front airbags !
Do not place heavy objects on the front-
passenger seat. This could cause the sys-
tem to identify the seat as being occupied.
In the event of an accident, the restraint
systems on the front-passenger side may
be triggered and have to be replaced. Occupant safety
49Safety Z