2013 MERCEDES-BENZ GLA SUV ECU
[x] Cancel search: ECUPage 305 of 401

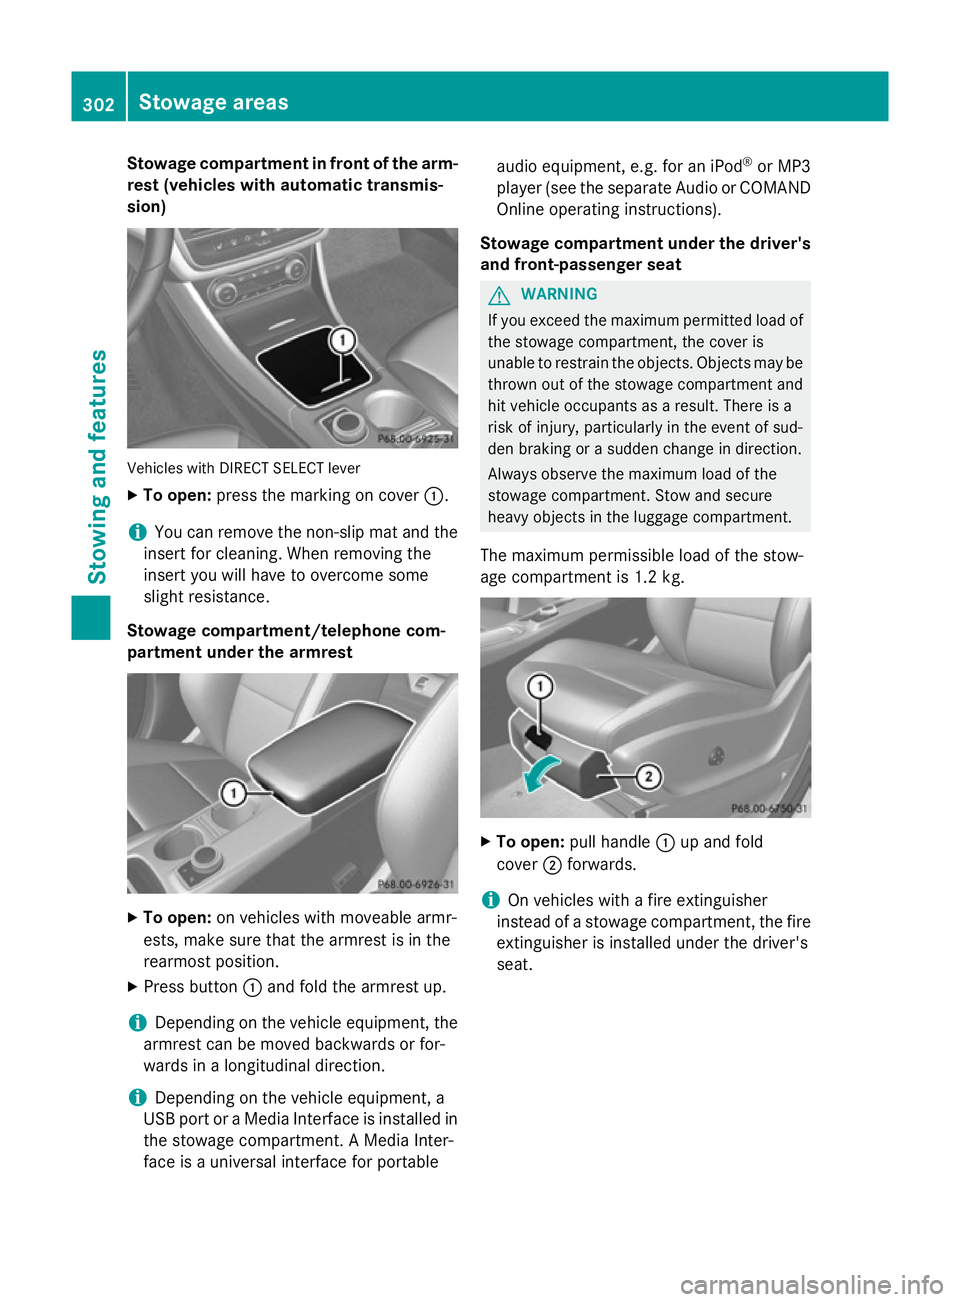
Stowage compartment in front of the arm-
rest (vehicles with automatic transmis-
sion) Vehicles with DIRECT SELECT lever
X To open: press the marking on cover :.
i You can remove the non-slip mat and the
insert for cleaning. When removing the
insert you will have to overcome some
slight resistance.
Stowage compartment/telephone com-
partment under the armrest X
To open: on vehicles with moveable armr-
ests, make sure that the armrest is in the
rearmost position.
X Press button :and fold the armrest up.
i Depending on the vehicle equipment, the
armrest can be moved backwards or for-
wards in a longitudinal direction.
i Depending on the vehicle equipment, a
USB port or a Media Interface is installed in the stowage compartment. A Media Inter-
face is a universal interface for portable audio equipment, e.g. for an iPod
®
or MP3
player (see the separate Audio or COMAND Online operating instructions).
Stowage compartment under the driver's and front-passenger seat G
WARNING
If you exceed the maximum permitted load of the stowage compartment, the cover is
unable to restrain the objects. Objects may be
thrown out of the stowage compartment and
hit vehicle occupants as a result. There is a
risk of injury, particularly in the event of sud-
den braking or a sudden change in direction.
Always observe the maximum load of the
stowage compartment. Stow and secure
heavy objects in the luggage compartment.
The maximum permissible load of the stow-
age compartment is 1.2 kg. X
To open: pull handle :up and fold
cover ;forwards.
i On vehicles with a fire extinguisher
instead of a stowage compartment, the fire
extinguisher is installed under the driver's
seat. 302
Stowage areasStowing and features
Page 309 of 401

Parcel shelf
!
The maximum load which may be placed
on the parcel shelf is 1.5 kg.
X To remove: detach straps :from the tail-
gate.
X Fold the parcel shelf downwards.
X Pull the parcel shelf out to the rear ;.
X To fit: place the parcel shelf on the guide
rails on the left and right.
X Push the parcel shelf evenly forwards using
both hands until it engages.
X Fold the parcel shelf up.
X Attach straps :to the tailgate. Securing a load
Lashing eyelets Observe the following notes on securing
loads:
R Observe the loading guidelines
(Y page 300).
R Secure the load using the lashing eyelets.
R Distribute the load on the lashing eyelets
evenly.
R Do not use elastic straps or nets to secure
a load. These are only intended as an anti-
slip protection for light loads.
R Do not route lashing materials across sharp
edges or corners.
R Pad sharp edges for protection. :
Lashing eyelets
Bag hook G
WARNING
The bag hooks cannot restrain heavy objects
or items of luggage. Objects or items of lug-
gage could be flung around and thereby hit
vehicle occupants when braking or abruptly
changing directions. There is a risk of injury.
Only hang light objects on the bag hooks.
Never hang hard, sharp-edged or fragile
objects on the bag hooks.
! The bag hook can bear a maximum load of
3 kg. Do not use it to secure a load. :
Bag hook 306
Stowage areasStowing and features
Page 311 of 401

You will find information about the maximum
roof load in the "Technical data" section
(Y page 391).
You will find information about the maximum roof load in the "Technical data" section
(Y page 391).
An incorrectly secured roof carrier or roof
load may become detached from the vehicle.
You must therefore ensure that you observe
the roof carrier manufacturer's installation
instructions.
Attaching the roof carrier X
Secure the roof carrier to roof rails :. In
doing so, observe the manufacturer's
installation instructions. Features
Cup holders
Important safety notes G
WARNING
The cup holder cannot secure a drinks con-
tainer in place during a journey. If you use a
cup holder during a journey, the drinks con-
tainer could be flung around and liquid could
be spilt. Vehicle occupants could come into
contact with the liquid and, in particular, be
scalded by hot liquid. You could be distracted
from the traffic situation and lose control of
the vehicle. There is a risk of an accident and
injury. Only use the cup holder when the vehicle is
stationary. Only place containers of a suitable size in the cup holder. Seal the container, in
particular when it contains hot liquid.
! Only use the cup holders for containers of
the right size and which have lids. The
drinks could otherwise spill. G
WARNING
If you do not correctly store objects in the
vehicle interior, they can slip or be flung
around, thus striking vehicle occupants.
There is a risk of injury, especially when brak- ing or abruptly changing directions.
R Always store objects so that they cannot be
flung around in these or in similar situa-
tions.
R Always make sure that objects do not pro-
trude from stowage compartments, lug-
gage nets or stowage nets.
R Close lockable stowage compartments
while driving.
R Stow and secure objects that are heavy,
hard, pointy, sharp-edged, fragile or too
large in the luggage compartment.
Observe the loading guidelines (Y page 300).
The stowage compartments in the doors pro- vide space for bottles:
R front: capacity up to 1.0 l
R rear: capacity up to 0.5 l
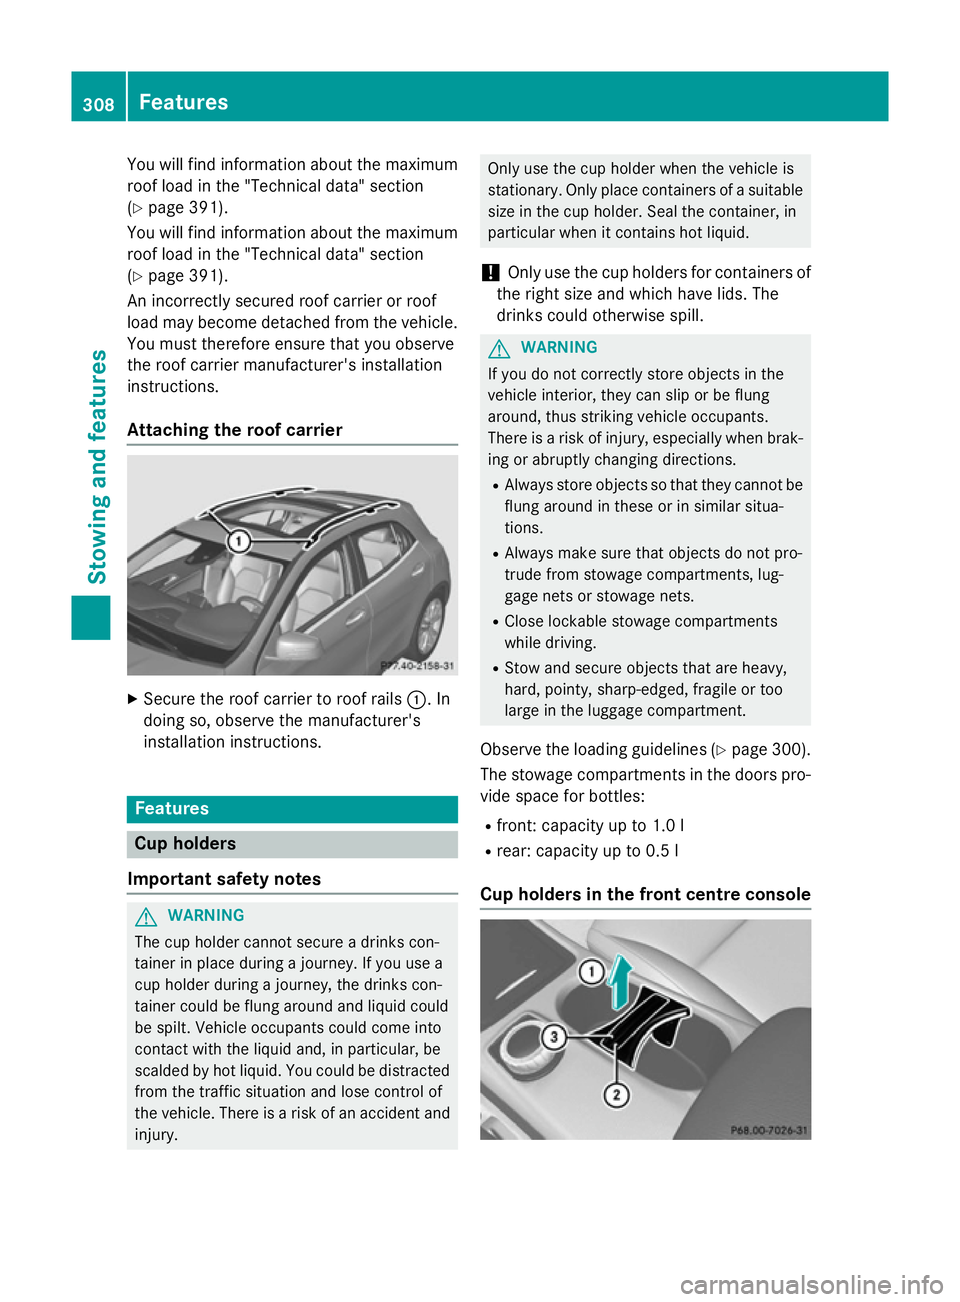
Cup holders in the front centre console 308
FeaturesStowing and features
Page 316 of 401

X
Open the telephone compartment
(Y page 302).
X Place the mobile phone bracket into the
pre-installed fitting; see the separate instal- lation instructions for the mobile phone fit-
ting.
X Insert the mobile phone into the mobile
phone bracket; see the separate installa-
tion instructions for the mobile phone fit-
ting.
Operating the mobile phone You can operate the telephone using the
6 and~ buttons on the multifunction
steering wheel. You can operate other mobile
phone functions via the on-board computer
(Y page 241).
When you remove the key from the ignition
lock, the mobile phone is disconnected from
the hands-free system. Active calls will first
be transferred to the mobile phone directly.
Mobile phone bracket in the stowage
compartment You can fold the pre-installed bracket up to
improve access to the stowage space
beneath it. Depending on the vehicle equip-
ment, a USB port or a Media Interface is
installed in the stowage compartment
(Y
page 302). X
To fold the bracket up: press button:.
X To fold the bracket down: press the
bracket down and allow it to engage. Floormat on the driver's side
G
WARNING
Objects in the driver's footwell may restrict
the clearance around the pedals or block a
depressed pedal. This jeopardises the oper-
ating and road safety of the vehicle. There is a risk of an accident.
Stow all objects securely in the vehicle so that
they do not get into the driver's footwell.
Always fit the floormats securely and as pre-
scribed in order to ensure that there is always sufficient room for the pedals. Do not use
loose floormats and do not place several floor-mats on top of one another. X
Slide the seat backwards.
X To fit: lay the floormat in the footwell.
X Press safety catch knobs :onto retain-
ers ;.
X To remove: pull the floormat away from
retainers ;.
X Remove the floormats. Retrofitted anti-glare film
Retrofitted anti-glare film on the inside of the
windows can interfere with radio/mobile
telephone reception. This is particularly the
case for conductive or metallic-coated films.
You can obtain information about anti-glare
film from a qualified specialist workshop. Features
313Stowing and features Z
Page 323 of 401

Damage to the engine or exhaust system is
caused by the following:
R using engine oils and oil filters that have
not been specifically approved for the
service system
R changing the engine oil and oil filter after
missing the change interval required by
the service system
R using engine oil additives
! Do not add too much oil. Topping up with
too much engine oil can result in damage to
the engine or to the catalytic converter.
Have excess engine oil siphoned off. Example: engine oil filler cap
X Turn cap :anti-clockwise and remove it.
X Top up the engine oil.
If the oil level is at or below the MIN mark on
the oil dipstick, top up with 1.0 lof engine
oil.
X Replace cap :on the filler neck and turn
clockwise.
Make sure that the cap locks securely into place.
X Check the oil level again with the oil dip-
stick (Y page 318).
For further information on engine oil, see
(Y page 388). Checking and adding other service
products
Checking the coolant level G
WARNING
The engine cooling system is under pressure, particularly if the engine is warm. You could
be scalded by hot coolant spraying out when
opening the cap. There is a danger of injury.
Allow the engine to cool before opening the
cap. Wear gloves and protective eyewear
when opening. Slowly turn the cap half a turn
to allow pressure to escape.
! The coolant level must only be checked
and corrected when the engine has cooled
down (coolant temperature under 40 †).
Checking the coolant level when the cool-
ant temperature is over 40 † can lead to
damage to the engine or engine cooling
system. Example
X Park the vehicle on a level surface.
Only check the coolant level if the vehicle is
on a level surface and the engine has
cooled down.
X Turn the key to position 2in the ignition
lock (Y page 159).
X Check the coolant temperature display in
the instrument cluster.
The coolant temperature must be below
40 †.
X Turn the key to position 0in the ignition
lock (Y page 159). 320
Engine compartmentMaintenance and care
Page 329 of 401

intervals. Deposits such as leaves, petals
and pollen may under certain circumstan-
ces prevent water from draining away. This
can lead to corrosion damage and damage to electronic components.
X Clean the inside and outside of the win-
dows with a damp cloth and a cleaning
agent that is recommended and approved
by Mercedes-Benz.
Cleaning the wiper blades G
WARNING
If the windscreen wipers are set in motion
when cleaning the windscreen or wiper
blades, you could become trapped. There is a danger of injury.
Always switch off the windscreen wipers and
the ignition before cleaning the windscreen orwiper blades.
! Only fold the windscreen wipers away
from the windscreen when vertical. Other-
wise, you will damage the bonnet.
! Do not pull on the wiper blade. Otherwise,
the wiper blade could be damaged.
! Do not clean wiper blades too often and
do not rub them too hard. Otherwise, the
graphite coating could be damaged. This
could cause wiper noise.
X Fold the wiper arms away from the wind-
screen.
X Clean the wiper blades carefully using a
damp cloth.
X Fold the windscreen wipers back again
before switching on the ignition.
! Hold the wiper arm securely when folding
back. The windscreen could be damaged if
the wiper arm hits against it suddenly.
Cleaning the exterior lighting !
Only use cleaning agents or cleaning
cloths that are suitable for plastic lenses.
Unsuitable cleaning agents or cleaning cloths could scratch or damage the plastic
lenses of the exterior lighting.
X Clean the plastic lenses of the exterior
lighting using a wet sponge and a mild
cleaning agent, e.g. Mercedes-Benz car
shampoo or cleaning cloths.
Cleaning the mirror turn signal !
Only use cleaning agents or cleaning
cloths that are suitable for plastic lenses.
Unsuitable cleaning agents or cleaning
cloths could scratch or damage the plastic lenses of the mirror turn signals.
X Clean the plastic lenses of the mirror turn
signals in the exterior mirror housing using
a wet sponge and a mild cleaning agent,
e.g. Mercedes-Benz car shampoo or clean-
ing cloths.
Cleaning the sensors !
If you clean the sensors with a high-pres-
sure cleaner, make sure that you keep a
distance of at least 30 cm between the
vehicle and the high-pressure cleaner noz-
zle. Information about the correct distance is available from the equipment manufac-
turer. X
Clean sensors :of the driving systems
with water, car shampoo and a soft cloth. 326
CareMaintenance and care
Page 335 of 401

Useful information
i This Owner's Manual describes all mod-
els, series and optional equipment for your
vehicle that were available at the time of
going to press. National variations are pos- sible. Note that your vehicle may not be
equipped with all of the functions descri-
bed. This is also the case for systems and
functions relevant to safety.
i Read the information on qualified special-
ist workshops: (Y page 25). Where will I find...?
Warning triangle
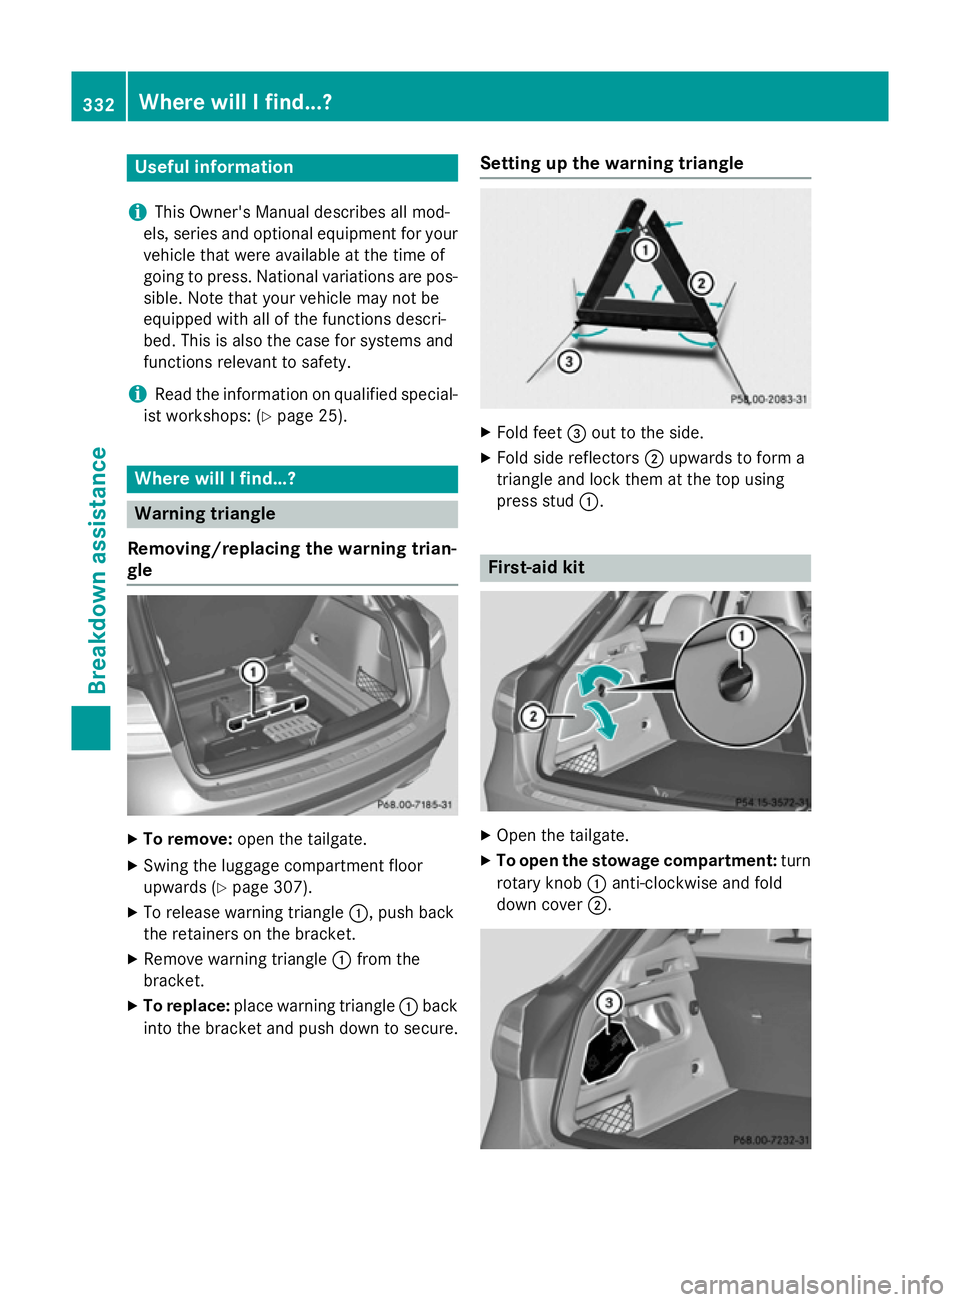
Removing/replacing the warning trian-
gle X
To remove: open the tailgate.
X Swing the luggage compartment floor
upwards (Y page 307).
X To release warning triangle :, push back
the retainers on the bracket.
X Remove warning triangle :from the
bracket.
X To replace: place warning triangle :back
into the bracket and push down to secure. Setting up the warning triangle X
Fold feet =out to the side.
X Fold side reflectors ;upwards to form a
triangle and lock them at the top using
press stud :. First-aid kit
X
Open the tailgate.
X To open the stowage compartment: turn
rotary knob :anti-clockwise and fold
down cover ;.332
Where will I find...?Breakdown assistance
Page 337 of 401

R
One pair of gloves
R Folding wheel chock Flat tyre
Preparing the vehicle
Your vehicle may be equipped with: R MOExtended tyres (tyres with run-flat char-
acteristics) (Y page 334)
Vehicle preparation is not necessary on
vehicles with MOExtended tyres.
R a TIREFIT kit (Y page 333)
R an emergency spare wheel (only for certain
countries)
Information on changing/fitting a wheel
(Y page 362).
X Stop the vehicle as far away as possible
from traffic on solid, non-slippery and level
ground.
X Switch on the hazard warning lamps.
X Secure the vehicle against rolling away
(Y page 179).
X If possible, bring the front wheels into the
straight-ahead position.
X Switch off the engine.
X Remove the key from the ignition lock.
X All occupants must get out of the vehicle.
Make sure that they are not endangered as they do so.
X Make sure that no one is near the danger
area while a wheel is being changed. Any-
one who is not directly assisting in the
wheel change should, for example, stand
behind the barrier.
X Get out of the vehicle. Pay attention to traf-
fic conditions when doing so.
X Close the driver's door.
X Place the warning triangle a suitable dis-
tance away (Y page 332). Observe legal
requirements.
i Vehicles with MOExtended tyres are not
equipped with a TIREFIT kit at the factory. It
is therefore recommended that you addi- tionally equip your vehicle with a TIREFIT kit
if you fit tyres that do not feature run-flat
characteristics, e.g. winter tyres. A TIREFIT
kit can be obtained from a qualified spe-
cialist workshop. MOExtended tyres (tyres with run-flat
characteristics)
General notes With MOExtended tyres (tyres with run-flat
characteristics), you can continue to drive
your vehicle even if there is a total loss of
pressure in one or more tyres. The affected
tyre must not show any clearly visible dam-
age.
You can recognise MOExtended tyres by the
MOExtended marking which appears on the
tyre wall. You will find this marking next to the
tyre size designation, the load-bearing capa-
city and the speed index.
MOExtended tyres may only be used in con-
junction with an active tyre pressure loss
warning system or tyre pressure monitoring
system.
If the pressure loss warning message
appears in the multifunction display:
R observe the instructions in the display mes-
sages (Y page 280).
R check the tyre for damage
R if driving on, observe the following notes
The maximum driving distance is approx-
imately 80 km when the vehicle is partially
laden and approximately 30 km when the
vehicle is fully laden.
In addition to the vehicle load, the driving dis- tance possible depends upon:
R speed
R road condition
R outside temperature
The driving distance possible in run-flat mode may be reduced by extreme driving condi-
tions/manoeuvres, or it can be increased
through a moderate style of driving. 334
Flat tyreBreakdown assistance