2013 MERCEDES-BENZ GLA SUV belt
[x] Cancel search: beltPage 280 of 401
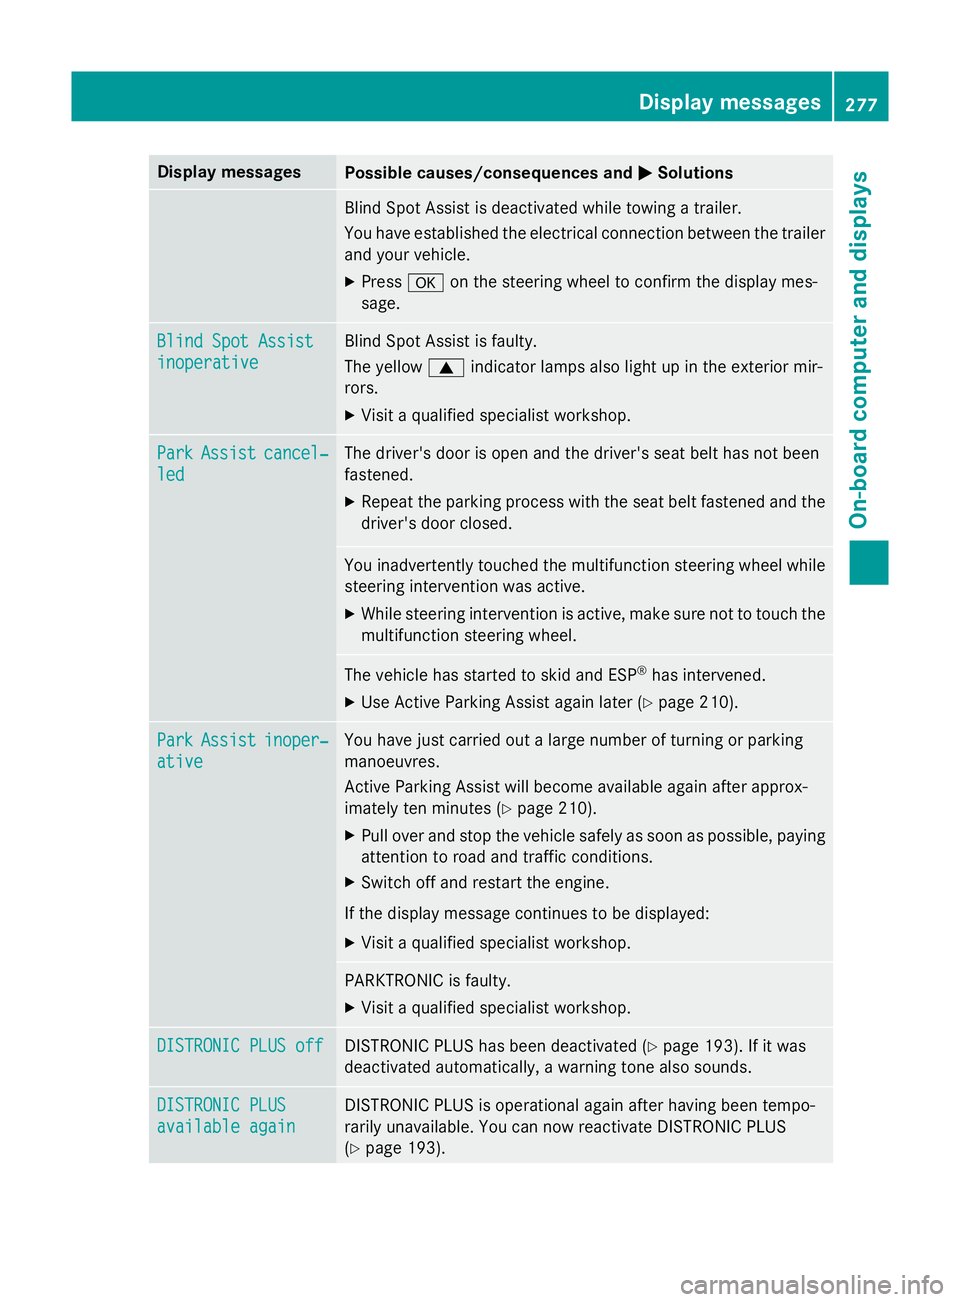
Display messages
Possible causes/consequences and
M
MSolutions Blind Spot Assist is deactivated while towing a trailer.
You have established the electrical connection between the trailer
and your vehicle.
X Press aon the steering wheel to confirm the display mes-
sage. Blind Spot Assist Blind Spot Assist
inoperative inoperative Blind Spot Assist is faulty.
The yellow
9indicator lamps also light up in the exterior mir-
rors.
X Visit a qualified specialist workshop. Park Park
Assist
Assist cancel‐
cancel‐
led
led The driver's door is open and the driver's seat belt has not been
fastened.
X Repeat the parking process with the seat belt fastened and the
driver's door closed. You inadvertently touched the multifunction steering wheel while
steering intervention was active.
X While steering intervention is active, make sure not to touch the
multifunction steering wheel. The vehicle has started to skid and ESP
®
has intervened.
X Use Active Parking Assist again later (Y page 210).Park Park
Assist
Assist inoper‐
inoper‐
ative
ative You have just carried out a large number of turning or parking
manoeuvres.
Active Parking Assist will become available again after approx-
imately ten minutes (Y
page 210).
X Pull over and stop the vehicle safely as soon as possible, paying
attention to road and traffic conditions.
X Switch off and restart the engine.
If the display message continues to be displayed: X Visit a qualified specialist workshop. PARKTRONIC is faulty.
X Visit a qualified specialist workshop. DISTRONIC PLUS off DISTRONIC PLUS off DISTRONIC PLUS has been deactivated (Y
page 193). If it was
deactivated automatically, a warning tone also sounds. DISTRONIC PLUS
DISTRONIC PLUS
available again available again DISTRONIC PLUS is operational again after having been tempo-
rarily unavailable. You can now reactivate DISTRONIC PLUS
(Y
page 193). Display
messages
277On-board computer and displays Z
Page 291 of 401

Warning and indicator lamps in the instrument cluster
Seat belts
Problem
Possible causes/consequences and
M
MSolutions ü
Only for certain coun-
tries: the red seat belt
warning lamp lights up
for six seconds after
the engine starts.
The seat belt warning lamp reminds the driver and front passenger
to fasten their seat belts.
X Fasten your seat belt (Y page 44).ü
Only for certain coun-
tries: the red seat belt
warning lamp lights up
after the engine starts.
In addition, a warning
tone sounds for up to
six seconds.
The driver's seat belt is not fastened.
X Fasten your seat belt (Y page 44).
The warning tone ceases. ü
The red seat belt warn-
ing lamp lights up after
the engine starts, as
soon as the driver's or
the front-passenger
door is closed.
The driver or passenger has not fastened their seat belt.
X Fasten your seat belt (Y page 44).
The warning lamp goes out. There are objects on the front-passenger seat.
X Remove the objects from the front-passenger seat and stow
them in a secure place.
The warning lamp goes out. ü
The red seat belt warn-
ing lamp flashes and an
intermittent audible
warning sounds. The driver or passenger has not fastened their seat belt. At the
same time, you are driving faster than 25 km/h or have briefly
driven faster than 25 km/h.
X Fasten your seat belt (Y page 44).
The warning lamp goes out and the intermittent warning tone
ceases. There are objects on the front-passenger seat. At the same time,
you are driving faster than 25 km/h or have briefly driven faster
than 25 km/h.
X Remove the objects from the front-passenger seat and stow
them in a secure place.
The warning lamp goes out and the intermittent warning tone
ceases. 288
Warning and indicator lamps in the instrument clusterOn-board computer and displays
Page 297 of 401
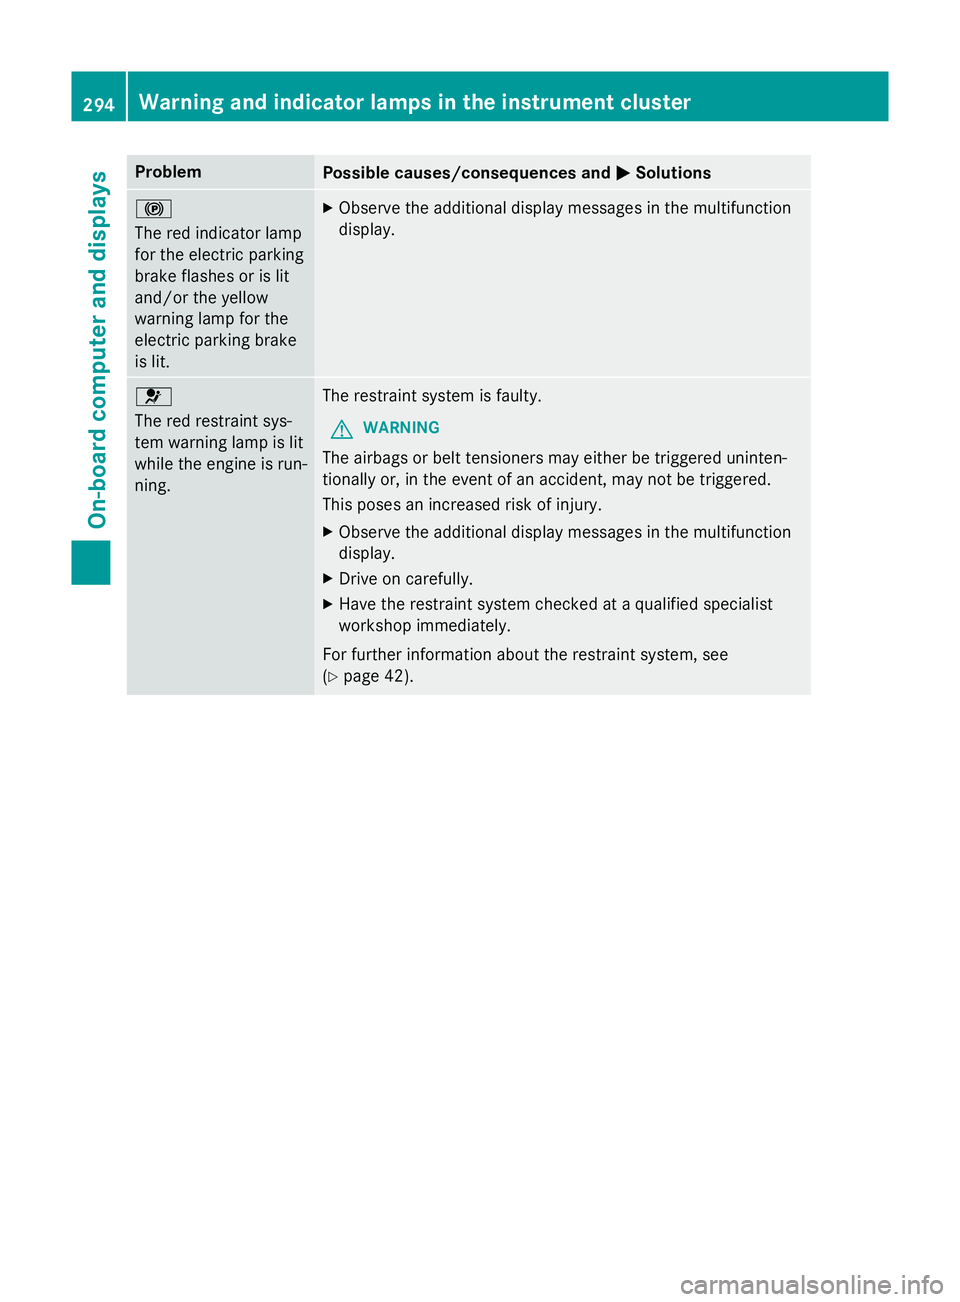
Problem
Possible causes/consequences and
M
MSolutions !
The red indicator lamp
for the electric parking
brake flashes or is lit
and/or the yellow
warning lamp for the
electric parking brake
is lit. X
Observe the additional display messages in the multifunction
display. 6
The red restraint sys-
tem warning lamp is lit
while the engine is run-
ning.
The restraint system is faulty.
G WARNING
The airbags or belt tensioners may either be triggered uninten-
tionally or, in the event of an accident, may not be triggered.
This poses an increased risk of injury. X Observe the additional display messages in the multifunction
display.
X Drive on carefully.
X Have the restraint system checked at a qualified specialist
workshop immediately.
For further information about the restraint system, see
(Y page 42). 294
Warning and indicator lamps in the instrument clusterOn-board computer and displays
Page 307 of 401
X
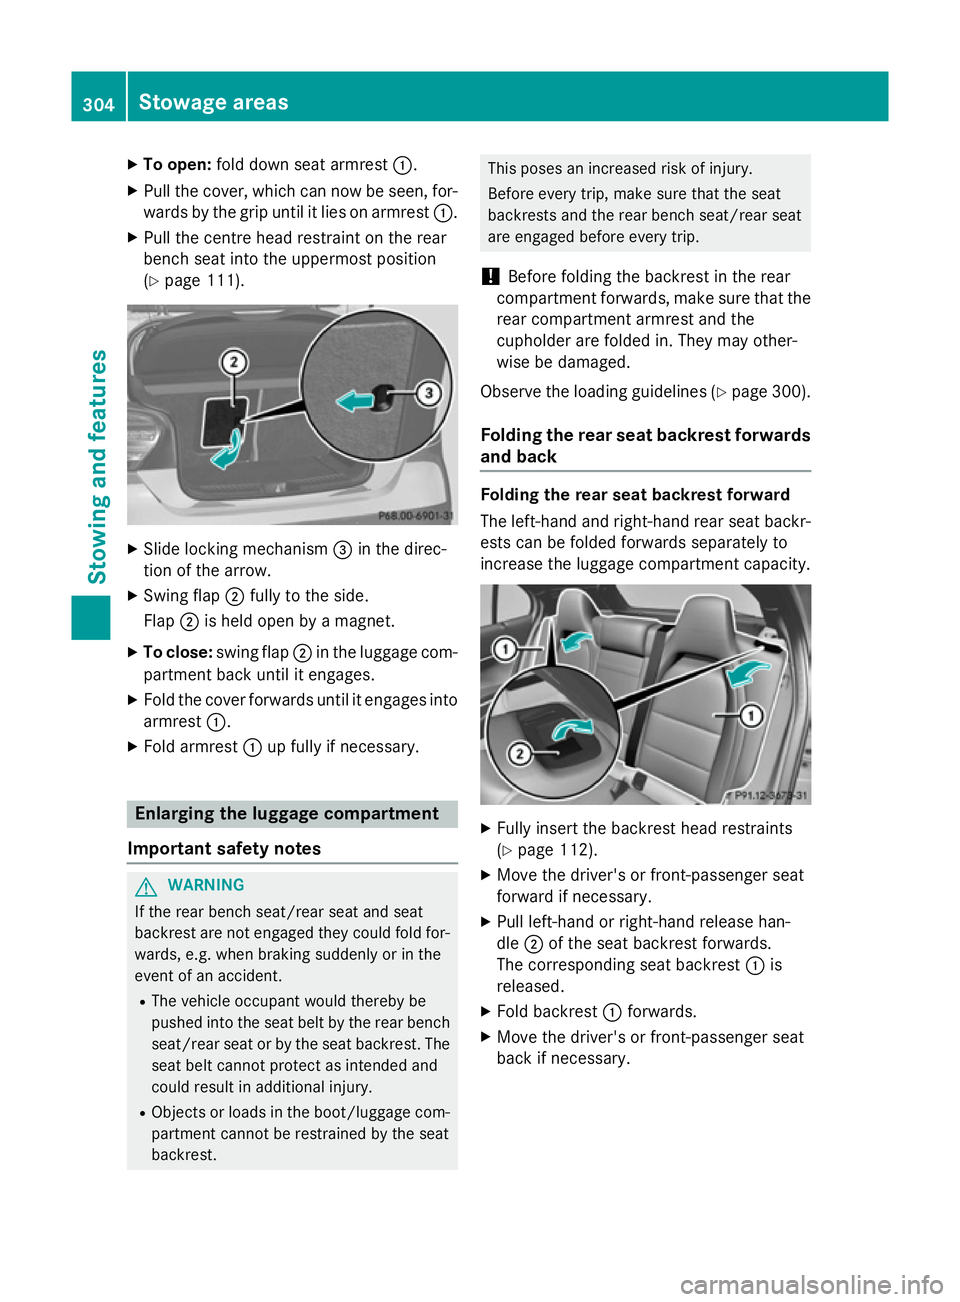
To open: fold down seat armrest :.
X Pull the cover, which can now be seen, for-
wards by the grip until it lies on armrest :.
X Pull the centre head restraint on the rear
bench seat into the uppermost position
(Y page 111). X
Slide locking mechanism =in the direc-
tion of the arrow.
X Swing flap ;fully to the side.
Flap ;is held open by a magnet.
X To close: swing flap ;in the luggage com-
partment back until it engages.
X Fold the cover forwards until it engages into
armrest :.
X Fold armrest :up fully if necessary. Enlarging the luggage compartment
Important safety notes G
WARNING
If the rear bench seat/rear seat and seat
backrest are not engaged they could fold for- wards, e.g. when braking suddenly or in the
event of an accident.
R The vehicle occupant would thereby be
pushed into the seat belt by the rear bench
seat/rear seat or by the seat backrest. The
seat belt cannot protect as intended and
could result in additional injury.
R Objects or loads in the boot/luggage com-
partment cannot be restrained by the seat
backrest. This poses an increased risk of injury.
Before every trip, make sure that the seat
backrests and the rear bench seat/rear seat
are engaged before every trip.
! Before folding the backrest in the rear
compartment forwards, make sure that the
rear compartment armrest and the
cupholder are folded in. They may other-
wise be damaged.
Observe the loading guidelines (Y page 300).
Folding the rear seat backrest forwards and back Folding the rear seat backrest forward
The left-hand and right-hand rear seat backr-
ests can be folded forwards separately to
increase the luggage compartment capacity. X
Fully insert the backrest head restraints
(Y page 112).
X Move the driver's or front-passenger seat
forward if necessary.
X Pull left-hand or right-hand release han-
dle ;of the seat backrest forwards.
The corresponding seat backrest :is
released.
X Fold backrest :forwards.
X Move the driver's or front-passenger seat
back if necessary. 304
Stowage areasSto
wing an d features
Page 308 of 401
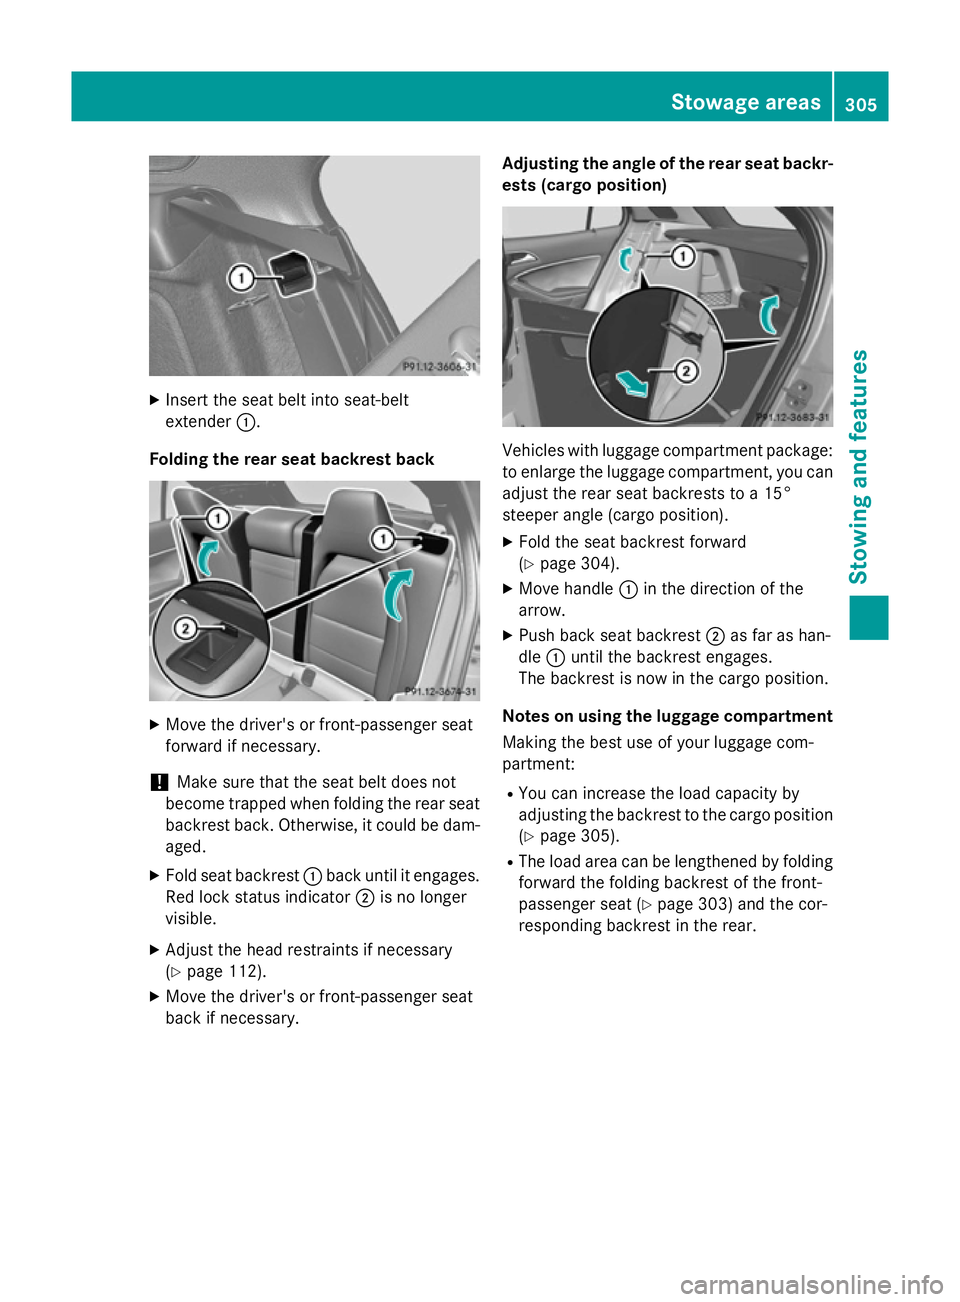
X
Insert the seat belt into seat-belt
extender :.
Folding the rear seat backrest back X
Move the driver's or front-passenger seat
forward if necessary.
! Make sure that the seat belt does not
become trapped when folding the rear seat backrest back. Otherwise, it could be dam-
aged.
X Fold seat backrest :back until it engages.
Red lock status indicator ;is no longer
visible.
X Adjust the head restraints if necessary
(Y page 112).
X Move the driver's or front-passenger seat
back if necessary. Adjusting the angle of the rear seat backr-
ests (cargo position) Vehicles with luggage compartment package:
to enlarge the luggage compartment, you canadjust the rear seat backrests to a 15°
steeper angle (cargo position).
X Fold the seat backrest forward
(Y page 304).
X Move handle :in the direction of the
arrow.
X Push back seat backrest ;as far as han-
dle :until the backrest engages.
The backrest is now in the cargo position.
Notes on using the luggage compartment Making the best use of your luggage com-
partment:
R You can increase the load capacity by
adjusting the backrest to the cargo position
(Y page 305).
R The load area can be lengthened by folding
forward the folding backrest of the front-
passenger seat (Y page 303) and the cor-
responding backrest in the rear. Stowage areas
305Stowing and features Z
Page 332 of 401
R
unevenness in structure
R marks caused by growth and injury
R subtle colour differences
These are characteristics of leather and not
material faults.
! To retain the natural appearance of the
leather, observe the following cleaning
instructions:
R Clean genuine leather covers carefully
with a damp cloth and then wipe the cov-
ers down with a dry cloth.
R Make sure that the leather does not
become soaked. It may otherwise
become rough and cracked.
R Only use leather care agents that have
been tested and approved by Mercedes-
Benz. You can obtain these from a quali- fied specialist workshop.
Seat covers from other materials
! Observe the following when cleaning:
R Clean artificial leather covers with a cloth
moistened with a solution containing 1%
detergent (e.g. washing-up liquid).
R Clean cloth covers with a microfibre
cloth moistened with a solution contain-
ing 1% detergent (e.g. washing-up liquid).
Rub carefully, and always wipe entire
seat sections to avoid leaving visible
lines. Leave the seat to dry afterwards.
Cleaning results depend on the type of
dirt and how long it has been there.
R Clean Alcantara® covers with a damp
cloth. Make sure that you wipe entire
seat sections to avoid leaving visible
lines.
Cleaning the seat belts G
WARNING
Seat belts may be severely weakened if
bleached or coloured. This may lead to the
seat belts, for example, tearing or failing in an accident. There is an increased risk of injury,
possibly even fatal. Never bleach or colour seat belts.
! Do not clean the seat belts using chemical
cleaning agents. Do not dry the seat belts at
temperatures above 80 † or in direct sun- light.
X Use clean, lukewarm water and soap solu-
tion.
Cleaning the roof lining and carpets X
Roof lining: if it is very dirty, use a soft
brush or a cleaning agent recommended
and approved by Mercedes-Benz.
X Carpets: use the carpet and textile clean-
ing agents recommended and approved by Mercedes-Benz. Care
329Maintenance and care Z
Page 346 of 401
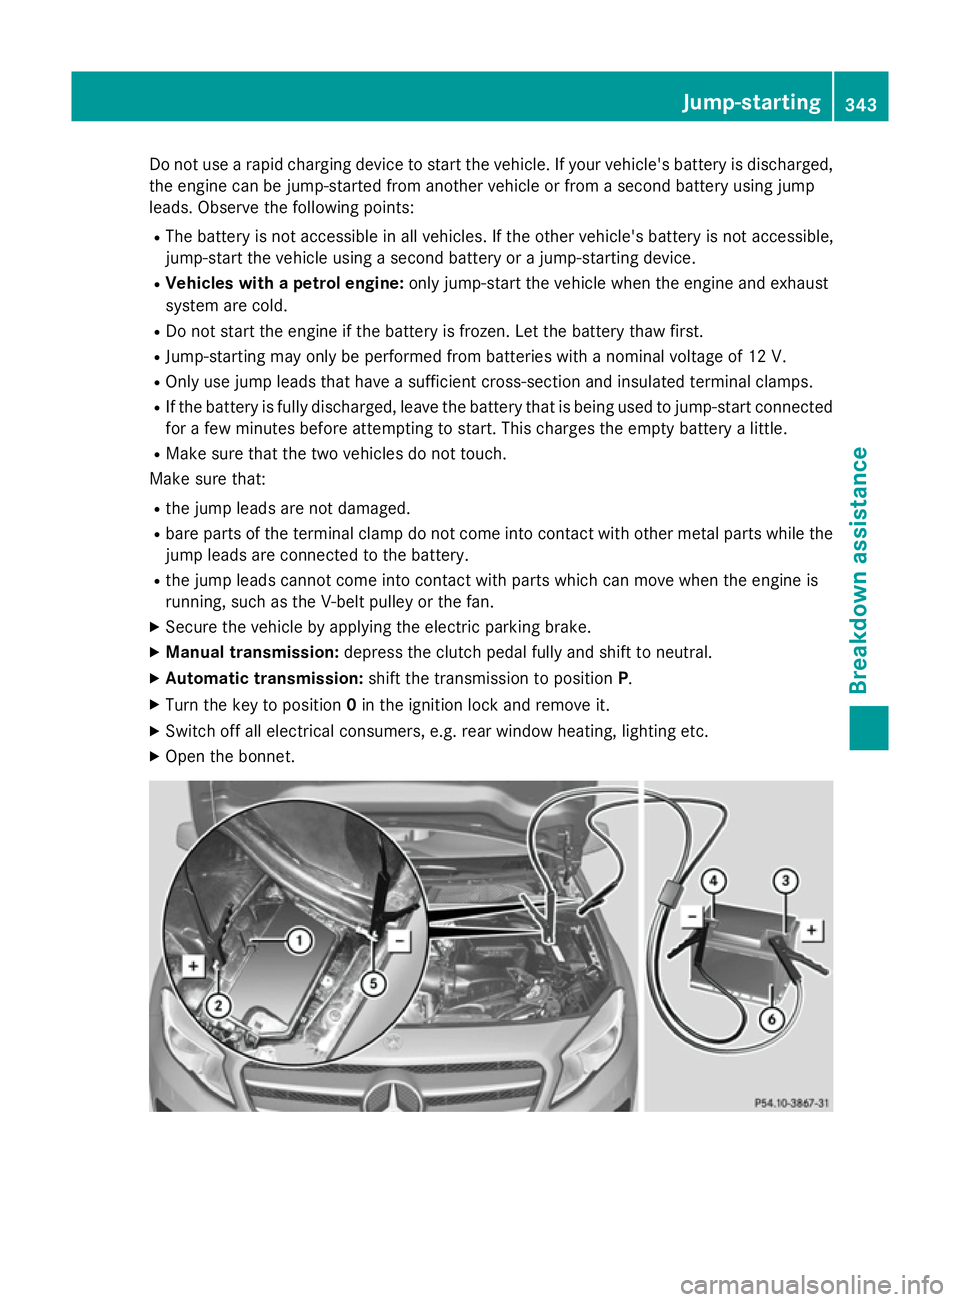
Do not use a rapid charging device to start the vehicle. If your vehicle's battery is discharged,
the engine can be jump-started from another vehicle or from a second battery using jump
leads. Observe the following points:
R The battery is not accessible in all vehicles. If the other vehicle's battery is not accessible,
jump-start the vehicle using a second battery or a jump-starting device.
R Vehicles with a petrol engine: only jump-start the vehicle when the engine and exhaust
system are cold.
R Do not start the engine if the battery is frozen. Let the battery thaw first.
R Jump-starting may only be performed from batteries with a nominal voltage of 12 V.
R Only use jump leads that have a sufficient cross-section and insulated terminal clamps.
R If the battery is fully discharged, leave the battery that is being used to jump-start connected
for a few minutes before attempting to start. This charges the empty battery a little.
R Make sure that the two vehicles do not touch.
Make sure that:
R the jump leads are not damaged.
R bare parts of the terminal clamp do not come into contact with other metal parts while the
jump leads are connected to the battery.
R the jump leads cannot come into contact with parts which can move when the engine is
running, such as the V-belt pulley or the fan.
X Secure the vehicle by applying the electric parking brake.
X Manual transmission: depress the clutch pedal fully and shift to neutral.
X Automatic transmission: shift the transmission to position P.
X Turn the key to position 0in the ignition lock and remove it.
X Switch off all electrical consumers, e.g. rear window heating, lighting etc.
X Open the bonnet. Jump-starting
343Breakdown assistance Z