2013 MERCEDES-BENZ GLA SUV ECO mode
[x] Cancel search: ECO modePage 206 of 401
i
RACE START is only available in AMG vehi-
cles.
Activation conditions You can activate RACE START if:
R the doors, the bonnet and the tailgate are
closed
R the engine is running and the transmission,
traction control and engine are at operating
temperature
R SPORT handling mode is activated
(Y page 78)
R the steering wheel is in the straight-ahead
position.
R the vehicle is stationary and the brake
pedal is depressed (left foot)
R the transmission is in position D
R drive program Mis selected (Y page 171).
Activating RACE START X
Depress the brake pedal with your left foot
and keep it depressed.
X Pull and hold both steering wheel gearshift
paddles.
X The RACE START Confirm: Paddle UP
RACE START Confirm: Paddle UP
Cancel: Paddle DOWN
Cancel: Paddle DOWN message appears
in the multifunction display.
X Release both steering wheel gearshift pad-
dles.
i If the activation conditions are no longer
fulfilled, RACE START is cancelled. The
RACE START not possible See Own‐
RACE START not possible See Own‐
er's
er's Manual Manual message appears in the mul-
tifunction display.
X To cancel: pull the left steering wheel shift
paddle (Y page 171).
or
X To confirm: pull the right steering wheel
shift paddle (Y page 171).
The RACE START available Depress
RACE START available Depress
accelerator
accelerator message appears in the mul-
tifunction display. i
If you do not depress the accelerator
pedal within a few seconds, RACE START is cancelled. The multifunction display shows
the RACE START cancelled
RACE START cancelled message.
X Fully depress the accelerator pedal.
The engine speed is increased.
The RACE START Release brake to RACE START Release brake to
start
start message appears in the multifunc-
tion display.
i If the brake pedal is not released after a
short while, RACE START is cancelled. The
multifunction display shows the RACE
RACE
START cancelled START cancelled message.
X Take your foot off the brake, but keep the
accelerator pedal depressed.
The vehicle pulls away at maximum accel-
eration.
The RACE RACE START
START active
active message appears
in the multifunction display.
RACE START is deactivated when the vehicle
reaches a speed of approximately 50 km/h.
Drive program Sis activated. SPORT handling
mode remains activated.
RACE START is deactivated immediately if
you release the accelerator pedal during
RACE START or if any of the activation condi- tions are no longer fulfilled. The RACE RACESTART
START
not possible
not possible orRACE START cancelled
RACE START cancelled
message appears in the multifunction dis-
play.
i After using it several times in short suc-
cession, RACE START will be unavailable
until a certain distance has been driven. 4MATIC
4MATIC ensures that all four wheels are per-
manently driven. Together with ESP ®
, it
improves the traction of your vehicle when-
ever a drive wheel spins due to insufficient
grip.
If you fail to adapt your driving style, 4MATIC
can neither reduce the risk of an accident nor override the laws of physics. 4MATIC cannot Driving systems
203Driving and parking Z
Page 229 of 401
G
WARNING
You could lose control of the vehicle/trailer
combination if it begins to swerve. The vehi-
cle/trailer combination could even overturn.
There is a risk of an accident.
On no account should you attempt to
straighten out the vehicle/trailer combina-
tion by increasing speed. Decrease your
speed and do not countersteer. Brake if nec-
essary. G
WARNING
If the maximum the permissible load for a car- rier system is exceeded, the carrier could
come loose from the vehicle and endanger
other road users. There is a risk of an accident and injury.
Never exceed the permissible noseweight
when using a carrier.
! Depressing the brake pedal constantly
results in excessive and premature wear to
the brake pads.
The GLA 45 AMG 4MATIC model cannot be
used to tow a trailer.
Exceeding the maximum permissible nose-
weight of the trailer drawbar on the ball cou-
pling may cause damage to the following:
R your vehicle
R the trailer
R the ball coupling
R the trailer tow hitch
The vehicle/trailer combination could
become unstable.
If the noseweight used is lower than the min- imum permissible noseweight, the vehicle/
trailer combination could also become unsta-
ble.
To avoid hazardous situations:
R make sure to check the noseweight before
each journey.
R use a drawbar noseweight as close as pos-
sible to the maximum noseweight. R
do not exceed the maximum permissible
noseweight.
R do not use a noseweight lower than the
minimum permissible trailer drawbar nose-
weight.
When reversing the vehicle towards the
trailer, make sure there is nobody between
the trailer and the vehicle.
Couple and uncouple the trailer carefully. If
you do not couple the trailer to the towing
vehicle correctly, the trailer could become
detached.
Make sure that the following values are not
exceeded:
R the permissible trailer drawbar noseweight
R the permissible trailer load
R the permissible rear axle load of the towing
vehicle
R the maximum permissible gross vehicle
weight of both the towing vehicle and the
trailer
The applicable permissible values, which
must not be exceeded, can be found:
R in your vehicle documents
R on the identification plates of the trailer tow
hitch and the trailer
R on the vehicle identification plate
If the values differ, the lowest value applies.
You will find the values approved by the man-
ufacturer on the vehicle identification plates
and those for the towing vehicle under "Tech- nical data" (Y page 394).
When towing a trailer, your vehicle's handling
characteristics will be different in comparison
to when driving without a trailer.
The vehicle/trailer combination:
R is heavier
R is restricted in its acceleration and gradi-
ent-climbing capability
R has an increased braking distance
R is affected more by strong crosswinds
R demands more sensitive steering
R has a larger turning circle 226
Towing a trailerDriving and parking
Page 243 of 401

Change of direction announced with a
lane recommendation :
Road to which the change of direction
leads
; Distance to change of direction and visual
distance display
= Recommended lane and new lane during a
change of direction
? Lanes not recommended
A Possible lane
B Change-of-direction symbol
On multilane roads, new lane recommenda-
tions can be displayed for the next change of
direction if the digital map supports this data.
During the change of direction, new lanes
may be added.
Recommended lane =: in this lane, you will
be able to complete the next two changes of
direction without changing lane.
Lane not recommended ?: you will not be
able to complete the next change of direction if you stay in this lane.
Possible lane A: in this lane, you will only be
able to complete the next change of direction
without changing lane.
Other status indicators of the naviga-
tion system R
O: you have reached the destination or an
intermediate destination.
R New route...
New route... orCalculating route Calculating route:
calculating a new route
R Off map
Off map orOff road
Off road : the vehicle position
is outside the area of the digital map (off-
map position).
R No route
No route : no route could be calculated to
the selected destination. Audio menu
Selecting a radio station :
Waveband
; Station frequency with memory position
The memory position is only displayed along
with station ;if this has been stored.
X Switch on the audio system or COMAND
Online and select Radio; see the separate
operating instructions.
X Press the =or; button on the steer-
ing wheel to select the Audio Audiomenu.
X To select a stored station: briefly press
the 9 or: button.
X To select a station from the station list:
press and briefly hold the 9or:
button.
If no station list is received: X To select a station using the station
search: press and briefly hold the 9
or : button.
i For information on changing waveband
and storing stations, see the separate oper-
ating instructions.
i DAB radio mode (Digital
AudioBroadcast-
ing); see the separate operating instruc-
tions. 240
Menus and submenusOn-board computer and displays
Page 251 of 401
R
surround lighting: the exterior lighting
remains lit for 40 seconds after unlocking
with the key. If you start the engine, the
surround lighting is switched off and auto-
matic headlamp mode is activated
(Y page 121).
R exterior lighting delayed switch-off: the
exterior lighting remains lit for 60 seconds
after the engine is switched off. If you close all the doors and the tailgate, the exterior
lighting goes off after 15 seconds.
X Press the =or; button on the steer-
ing wheel to select the Settings
Settings menu.
X Press the :or9 button to select the
Lights Lights submenu.
X Press ato confirm.
X Press the :or9 button to select the
Surround lighting
Surround lighting function.
When the Surround lighting
Surround lighting function is
activated, the light cone and the area
around the vehicle are displayed in orange
in the multifunction display.
X Press the abutton to save the setting.
Deactivating delayed switch-off of the exte-
rior lighting temporarily:
X Before leaving the vehicle, turn the key to
position 0in the ignition lock.
X Turn the key to position 2in the ignition
lock.
The exterior lighting delayed switch-off is
deactivated.
Delayed switch-off of the exterior lighting is
reactivated the next time you start the
engine.
i Depending on your vehicle's equipment,
when the surround lighting and delayed
switch-off exterior lighting are on, the fol-
lowing light up:
R side lamps
R foglamps
R dipped-beam headlamps
R daytime driving lights
R surround lighting in the exterior mirrors Activating/deactivating the interior light-
ing delayed switch-off
If you activate the Lighting delayed sw.-
Lighting delayed sw.-
off off function, the interior lighting remains on
for 20 seconds after you remove the key from
the ignition lock.
X Press the =or; button on the steer-
ing wheel to select the Settings
Settings menu.
X Press the :or9 button to select the
Lights
Lights submenu.
X Press ato confirm.
X Press the :or9 button to select the
Lighting delayed sw.-off
Lighting delayed sw.-off function.
If the Lighting delayed sw.-off
Lighting delayed sw.-off func-
tion has been switched on, the vehicle inte-
rior is displayed in orange in the multifunc-
tion display.
X Press the abutton to save the setting.
Vehicle Setting permanent SPEEDTRONIC
You can set permanent SPEEDTRONIC using
the
Limit Limit speed
speed(winter
(winter tyres)
tyres) function.
X Press the =or; button on the steer-
ing wheel to select the Settings
Settingsmenu.
X Press the :or9 button to select the
Vehicle
Vehicle submenu.
X Press ato confirm.
X Press :or9 to select the Limit
Limit
speed (winter tyres)
speed (winter tyres) function.
You will see the current setting.
X Press ato confirm.
X Press the :or9 button to adjust
permanent SPEEDTRONIC in increments of
ten (240 km/h 240 km/h to160 km/h
160 km/h). The Off
Offset-
ting switches permanent SPEEDTRONIC
off.
X Press the abutton to store the entry.
For further information on permanent SPEED- TRONIC (Y page 193).248
Menus and submenusOn-board computer and displays
Page 315 of 401
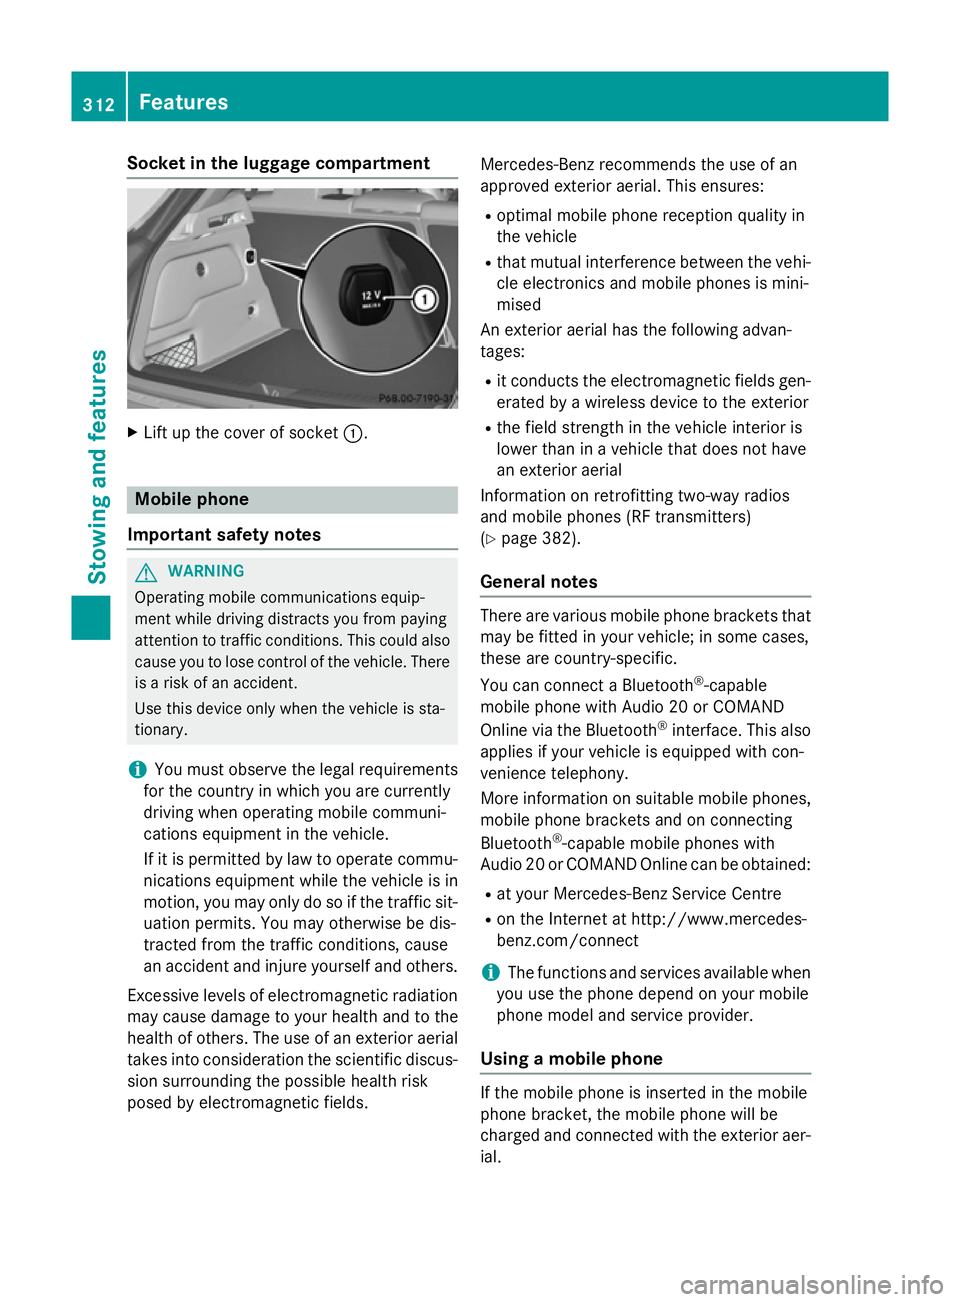
Socket in the luggage compartment
X
Lift up the cover of socket :.Mobile phone
Important safety notes G
WARNING
Operating mobile communications equip-
ment while driving distracts you from paying
attention to traffic conditions. This could also cause you to lose control of the vehicle. There
is a risk of an accident.
Use this device only when the vehicle is sta-
tionary.
i You must observe the legal requirements
for the country in which you are currently
driving when operating mobile communi-
cations equipment in the vehicle.
If it is permitted by law to operate commu-
nications equipment while the vehicle is in
motion, you may only do so if the traffic sit-
uation permits. You may otherwise be dis-
tracted from the traffic conditions, cause
an accident and injure yourself and others.
Excessive levels of electromagnetic radiation
may cause damage to your health and to the
health of others. The use of an exterior aerial takes into consideration the scientific discus-
sion surrounding the possible health risk
posed by electromagnetic fields. Mercedes-Benz recommends the use of an
approved exterior aerial. This ensures:
R optimal mobile phone reception quality in
the vehicle
R that mutual interference between the vehi-
cle electronics and mobile phones is mini-
mised
An exterior aerial has the following advan-
tages:
R it conducts the electromagnetic fields gen-
erated by a wireless device to the exterior
R the field strength in the vehicle interior is
lower than in a vehicle that does not have
an exterior aerial
Information on retrofitting two-way radios
and mobile phones (RF transmitters)
(Y page 382).
General notes There are various mobile phone brackets that
may be fitted in your vehicle; in some cases,
these are country-specific.
You can connect a Bluetooth ®
-capable
mobile phone with Audio 20 or COMAND
Online via the Bluetooth ®
interface. This also
applies if your vehicle is equipped with con-
venience telephony.
More information on suitable mobile phones,
mobile phone brackets and on connecting
Bluetooth ®
-capable mobile phones with
Audio 20 or COMAND Online can be obtained:
R at your Mercedes-Benz Service Centre
R on the Internet at http://www.mercedes-
benz.com/connect
i The functions and services available when
you use the phone depend on your mobile
phone model and service provider.
Using a mobile phone If the mobile phone is inserted in the mobile
phone bracket, the mobile phone will be
charged and connected with the exterior aer-
ial. 312
FeaturesStowing and features
Page 327 of 401

wiping noises caused by residue on the wind-
screen.
Washing by hand In some countries, washing by hand is only
allowed at wash bays that are specially
designed for this purpose. Observe the legal
requirements for each individual country.
X Do not use hot water and do not wash the
vehicle in direct sunlight.
X Use a soft sponge to clean.
X Use a mild cleaning agent, such as a car
shampoo approved by Mercedes-Benz.
X Thoroughly hose down the vehicle with a
gentle jet of water.
X Do not point the water jet directly towards
the air inlet.
X Use plenty of water and rinse out the
sponge frequently.
X Rinse the vehicle with clean water and dry
thoroughly with a chamois.
X Do not let the cleaning agent dry on the
paintwork.
When using the vehicle in winter, remove all
traces of road salt deposits carefully and as
soon as possible.
High-pressure cleaning equipment G
WARNING
The water jet of circular-jet nozzles (dirt grind- ers) can cause damage not visible from the
outside to tyres or chassis components. Com-
ponents damaged in this way can unexpect-
edly fail. There is a risk of an accident.
Do not use high-pressure cleaners with circu-
lar-jet nozzles to clean the vehicle. Have dam- aged tyres or chassis components replaced
immediately.
! Always maintain a distance of at least
30 cm between the vehicle and the high-
pressure cleaner nozzle. Information about
the correct distance is available from the
equipment manufacturer. Move the high-pressure cleaner nozzle
around when cleaning your vehicle.
Do not aim directly at any of the following:
R tyres
R door gaps, roof gaps, joints etc.
R electrical components
R battery
R connectors
R lights
R seals
R trim elements
R ventilation slots
Damaged seals or electrical components
can lead to leaks or failures.
! GLA 45 AMG 4MATIC Edition 1 model:
parts of your vehicle are covered with a
decorative foil. Maintain a distance of at
least 70 cm between the foil-wrapped parts
of the vehicle and the nozzle of the high
pressure cleaner.
Information about the correct distance is
available from the equipment manufac-
turer.
Move the high-pressure cleaner nozzle
around when cleaning your vehicle.
Cleaning the wheels !
Do not use acidic wheel cleaning products
to remove brake dust. This could damage
wheel bolts and brake components.
! Do not park up the vehicle for an extended
period straight after cleaning it, particularly after having cleaned the wheels with wheel
cleaner. Wheel cleaners could cause
increased corrosion of the brake discs and
brake pads/linings. For this reason, you
should drive for a few minutes after clean-
ing. Braking heats the brake discs and the
brake pads/linings, thus drying them. The
vehicle can then be parked up. 324
CareMaintenance and care
Page 337 of 401
R
One pair of gloves
R Folding wheel chock Flat tyre
Preparing the vehicle
Your vehicle may be equipped with: R MOExtended tyres (tyres with run-flat char-
acteristics) (Y page 334)
Vehicle preparation is not necessary on
vehicles with MOExtended tyres.
R a TIREFIT kit (Y page 333)
R an emergency spare wheel (only for certain
countries)
Information on changing/fitting a wheel
(Y page 362).
X Stop the vehicle as far away as possible
from traffic on solid, non-slippery and level
ground.
X Switch on the hazard warning lamps.
X Secure the vehicle against rolling away
(Y page 179).
X If possible, bring the front wheels into the
straight-ahead position.
X Switch off the engine.
X Remove the key from the ignition lock.
X All occupants must get out of the vehicle.
Make sure that they are not endangered as they do so.
X Make sure that no one is near the danger
area while a wheel is being changed. Any-
one who is not directly assisting in the
wheel change should, for example, stand
behind the barrier.
X Get out of the vehicle. Pay attention to traf-
fic conditions when doing so.
X Close the driver's door.
X Place the warning triangle a suitable dis-
tance away (Y page 332). Observe legal
requirements.
i Vehicles with MOExtended tyres are not
equipped with a TIREFIT kit at the factory. It
is therefore recommended that you addi- tionally equip your vehicle with a TIREFIT kit
if you fit tyres that do not feature run-flat
characteristics, e.g. winter tyres. A TIREFIT
kit can be obtained from a qualified spe-
cialist workshop. MOExtended tyres (tyres with run-flat
characteristics)
General notes With MOExtended tyres (tyres with run-flat
characteristics), you can continue to drive
your vehicle even if there is a total loss of
pressure in one or more tyres. The affected
tyre must not show any clearly visible dam-
age.
You can recognise MOExtended tyres by the
MOExtended marking which appears on the
tyre wall. You will find this marking next to the
tyre size designation, the load-bearing capa-
city and the speed index.
MOExtended tyres may only be used in con-
junction with an active tyre pressure loss
warning system or tyre pressure monitoring
system.
If the pressure loss warning message
appears in the multifunction display:
R observe the instructions in the display mes-
sages (Y page 280).
R check the tyre for damage
R if driving on, observe the following notes
The maximum driving distance is approx-
imately 80 km when the vehicle is partially
laden and approximately 30 km when the
vehicle is fully laden.
In addition to the vehicle load, the driving dis- tance possible depends upon:
R speed
R road condition
R outside temperature
The driving distance possible in run-flat mode may be reduced by extreme driving condi-
tions/manoeuvres, or it can be increased
through a moderate style of driving. 334
Flat tyreBreakdown assistance
Page 338 of 401
The maximum permissible distance which
can be driven in run-flat mode is counted from the moment the tyre pressure loss warning
appears in the multifunction display.
You must not exceed a maximum speed of
80 km/h.
i When replacing one or all tyres, make
sure that you use only:
R the tyre size specified for the vehicle and
R tyre(s) marked "MOExtended"
If a tyre has gone flat and cannot be
replaced with an MOExtended tyre, a
standard tyre may be used as a temporary
measure. Make sure that you use the
proper size and type (summer or winter
tyre).
i Vehicles with MOExtended tyres are not
equipped with a TIREFIT kit at the factory. It
is therefore recommended that you addi-
tionally equip your vehicle with a TIREFIT kit if you fit tyres that do not feature run-flat
characteristics, e.g. winter tyres. A TIREFIT
kit can be obtained from a qualified spe-
cialist workshop.
Important safety notes G
WARNING
When driving in emergency mode, the driving characteristics deteriorate, e.g. when corner-
ing, accelerating quickly and when braking.
There is a risk of accident.
Do not exceed the stated maximum speed.
Avoid abrupt steering and driving manoeu-
vres, and driving over obstacles (kerbs, pot-
holes, off-road). This applies in particular to a laden vehicle.
Stop driving in emergency mode if:
R you hear banging noises.
R the vehicle starts to shake.
R you see smoke and smell rubber.
R ESP ®
is intervening constantly.
R there are tears in the sidewalls of the tyre. After driving in emergency mode, have the
wheel rims checked at a qualified specialist
workshop with regard to their further use. The
faulty tyre must be replaced. TIREFIT kit
Important safety notes TIREFIT is a tyre sealant.
You can use TIREFIT to seal punctures of up to
4 mm, particularly those in the tyre tread. You
can use TIREFIT at outside temperatures
down to Ò20 †. G
WARNING
In the following situations, the tyre sealant is
unable to provide sufficient breakdown assis- tance, as it is unable to seal the tyre properly:
R there are cuts or punctures in the tyre
larger than those mentioned above.
R the wheel rim is damaged.
R you have driven at very low tyre pressures
or on a flat tyre.
There is a risk of an accident.
Do not drive any further. Contact a qualified
specialist workshop. G
WARNING
The tyre sealant is harmful and causes irrita-
tion. It must not come into contact with your
skin, eyes or clothing or be swallowed. Do not inhale TIREFIT fumes. Keep tyre sealant away
from children. There is a risk of injury.
If you come into contact with the tyre sealant,
observe the following:
R Rinse off the tyre sealant from your skin
immediately with water.
R If the tyre sealant comes into contact with
your eyes, immediately rinse them thor-
oughly with clean water.
R If tyre sealant is swallowed, immediately
rinse your mouth out thoroughly and drink
plenty of water. Do not induce vomiting,
and seek medical attention immediately. Flat tyre
335Breakdown assistance
Z