2013 MERCEDES-BENZ GL towing
[x] Cancel search: towingPage 356 of 454
immediately after pressing the SOS button,
you do not know if mbrace has successfully
made the emergency call. In this situation,
seek additional assistance by other means.
Roadside Assistance button X
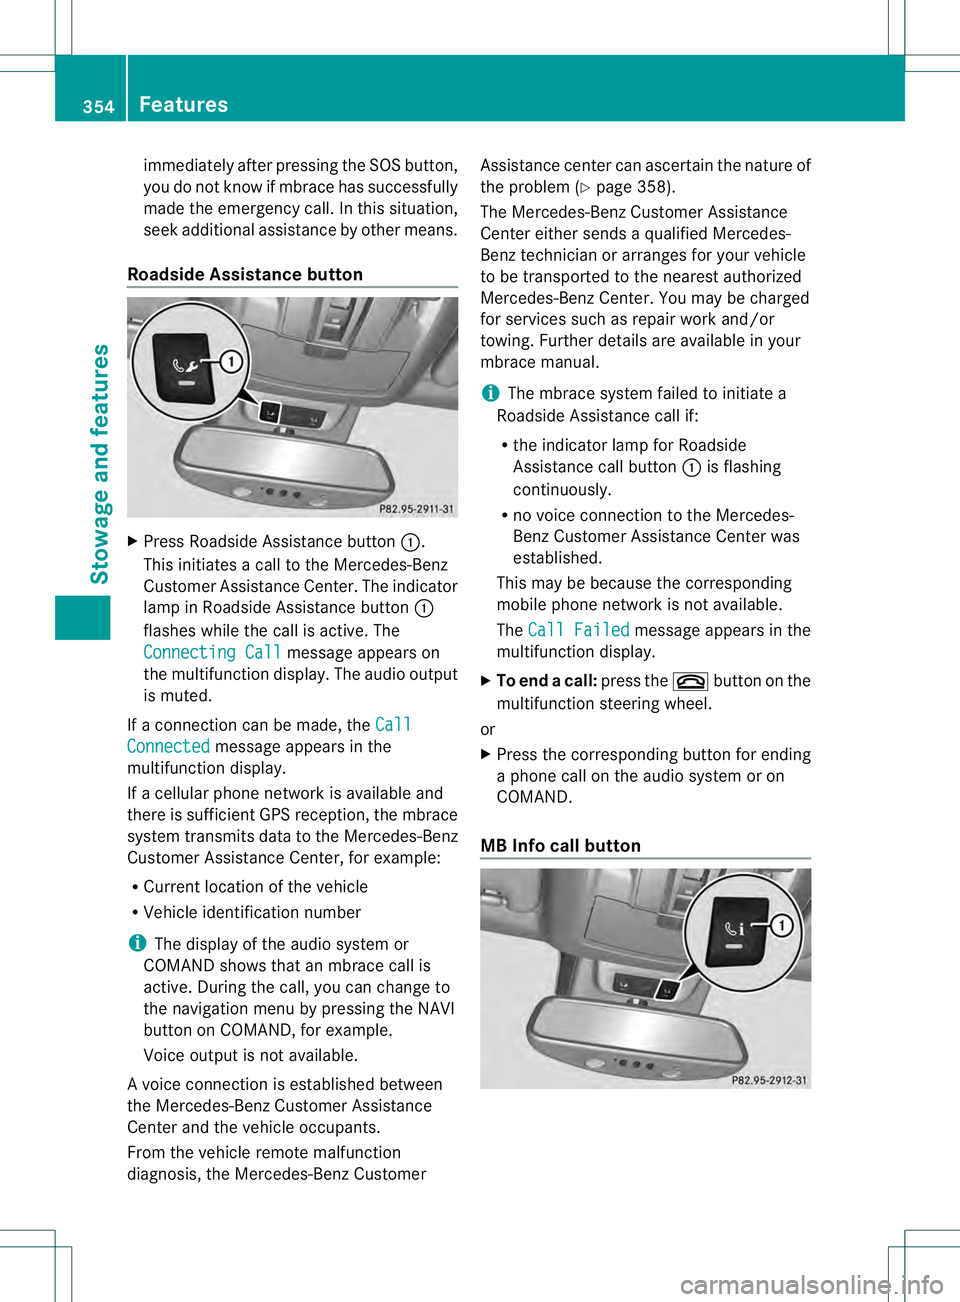
Press Roadside Assistance button 0002.
This initiates a call to the Mercedes-Benz
Customer Assistance Center. The indicator
lamp in Roadside Assistance button 0002
flashes while the call is active. The
Connecting Call message appears on
the multifunction display. The audio output
is muted.
If a connection can be made, the CallConnected message appears in the
multifunction display.
If a cellular phone network is available and
there is sufficien tGPS reception, the mbrace
system transmits data to the Mercedes-Benz
Customer Assistance Center, for example:
R Current location of the vehicle
R Vehicle identification number
i The display of the audio system or
COMAND shows that an mbrace call is
active. During the call, you can change to
the navigation menu by pressing the NAVI
button on COMAND, for example.
Voice output is not available.
Av oice connection is established between
the Mercedes-Benz Customer Assistance
Center and the vehicle occupants.
From the vehicle remote malfunction
diagnosis, the Mercedes-Benz Customer Assistance center can ascertain the nature of
the problem (Y
page 358).
The Mercedes-Benz Customer Assistance
Center either sends a qualified Mercedes-
Benz technician or arranges for your vehicle
to be transported to the nearest authorized
Mercedes-Benz Center. You may be charged
for services such as repair work and/or
towing. Further details are available in your
mbrace manual.
i The mbrace system failed to initiate a
Roadside Assistance call if:
R the indicator lamp for Roadside
Assistance call button 0002is flashing
continuously.
R no voice connection to the Mercedes-
Benz Customer Assistance Center was
established.
This may be because the corresponding
mobile phone network is not available.
The Call Failed message appears in the
multifunction display.
X To end acall: press the 000Dbutton on the
multifunctio nsteering wheel.
or
X Press the corresponding button for ending
a phone call on the audio syste moron
COMAND.
MB Info call button 354
FeaturesStowage and featu
res
Page 374 of 454
should drive for a few minutes after
cleaning. Braking heats the brake discs and
the brake pads/linings, thus drying them.
The vehicle can then be parked.
Regular care of your vehicle is a condition for
retaining the quality in the long term.
Use care products and cleaning agents
recommended and approved by Mercedes-
Benz. Washing the vehicle and cleaning the
paintwork
Automatic car wash G
WARNING
Braking efficiency is reduced after washing
the vehicle. There is a risk of an accident.
After the vehicle has been washed, brake
carefully while paying attention to the traffic
conditions until full braking power is restored.
! If DISTRONIC PLUS or the HOLD function
is activated, the vehicle brakes
automatically in certain situations. To
prevent damage to the vehicle, deactivate
DISTRONIC PLUS and the HOLD function in
the following or other similars ituations:
R when towing the vehicle
R in the car wash
! Neve rclean your vehicle in a Touchless
Automatic Car Wash as these use special
cleaning agents. These cleaning agents can
damage the paintwork or plastic parts.
! Make sure that:
R the side windows and the sliding sunroof
are fully closed.
R the ventilation/heating is switched off
(the OFF button has been pressed).
R the windshield wiper switch is in position
0.
Otherwise, the vehicle might be damaged.
! In car washes with a towing mechanism,
make sure that the automatic transmission is in transmission position
N, otherwise the
vehicle could be damaged.
R Vehicles with a SmartKey:
Do not remove the SmartKey from the
ignition lock. Do not open the driver's
door or front-passenger door when the
engine is switched off .Otherwise, the
automatic transmission selects park
position Pautomatically and locks the
wheels .You can prevent this by shifting
the automatic transmission to N
beforehand.
R Vehicles with KEYLESS-GO:
Do not open the driver's door or front-
passenger door when the engine is
switched off. Otherwise, the automatic
transmission selects park position P
automatically and locks the wheels.
Observe the following to make sure that the
automatic transmission stays in position N:
X Make sure the vehicle is stationary and the
ignition is switched off.
X Turn the SmartKey to position
2(Y page 163) in the ignition lock.
Use the SmartKey instead of the Start/
Stop button on vehicles with KEYLESS-GO.
X Depress and hold the brake pedal.
X Shift the automatic transmission to
position N.
X Release the brake pedal.
X Release the electric parking brake.
X Switch off the ignition and leave the
SmartKey in the ignition lock.
You can wash the vehicle in an automatic car
wash from the very start.
If the vehicle is very dirty, pre-wash it before
cleaning it in an automatic car wash.
After using an automatic car wash, wipe off
wax from the windshield and the wiper
blades. This will prevent smears and reduce
wiping noises caused by residue on the
windshield. 372
CareMaintenance and care
Page 383 of 454
Useful information
............................382
Where will I find...? ...........................382
Flat tire .............................................. 383
Batter y(vehicle) ................................ 387
Jump-starting .................................... 391
Towing and tow-starting ..................393
Fuses .................................................. 396 381Breakdown assistance
Page 384 of 454
Useful information
i This Operator's Manual describes all
models and all standard and optional
equipment of your vehicle available at the
time of publication of the Operator's
Manual. Country-specific differences are
possible. Please note that your vehicle may
not be equipped with all features
described. This also applies to safety-
related systems and functions.
i Read the information on qualified
specialist workshops: (Y page 28).Where will I find...?
First-aid kit
X
Open the tailgate.
X Remove first-aid kit 0002from the parcel net.
i Check the expiration date on the first-aid
kit at least once a year. Replace the
contents if necessary, and replace missing
items. Vehicle tool kit
General notes The vehicle tool kit can be found in the
stowage well under the cargo compartment
floor.
i
Apart from certain country-specific
variations, the vehicles are not equipped
with a tire-change tool kit .Some tools for changing a wheel are specific to the
vehicle. For more information on which
tools are required to perform a wheel
change on your vehicle, consult a qualified
specialist workshop.
Tools required for changing
awheel may
include, for example:
R Jack
R Wheel chock
R Lug wrench
R Ratchet wrench
R Alignment bolt
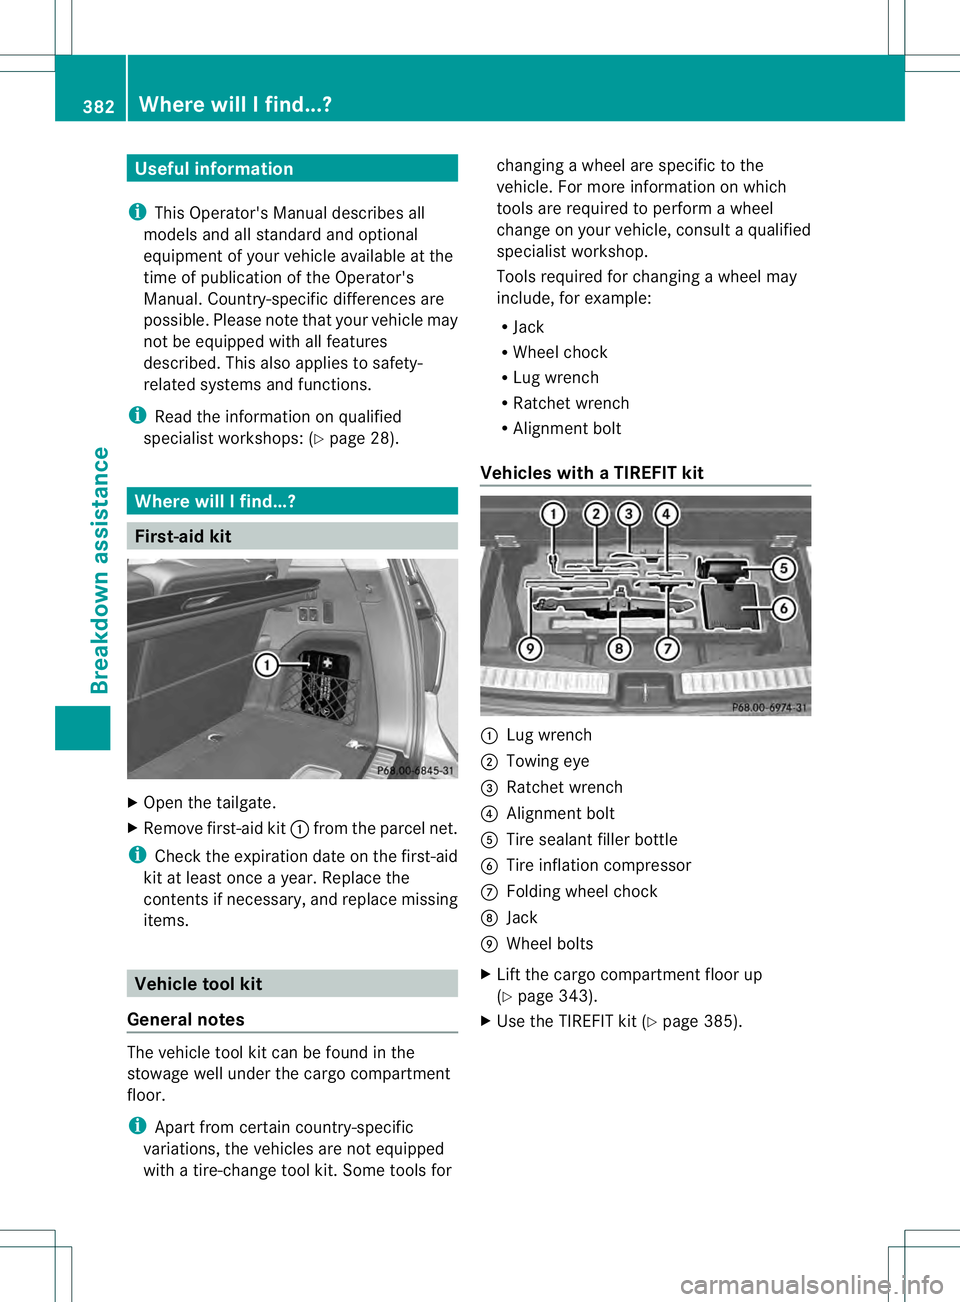
Vehicles with aTIREFIT kit 0002
Lug wrench
0003 Towing eye
0021 Ratchet wrench
0020 Alignmen tbolt
001E Tire sealant filler bottle
001F Tire inflation compressor
0013 Folding wheel chock
0014 Jack
0015 Wheel bolts
X Lift the cargo compartment floor up
(Y page 343).
X Use the TIREFIT kit (Y page 385).382
Where will I find...?Breakdown assistance
Page 385 of 454
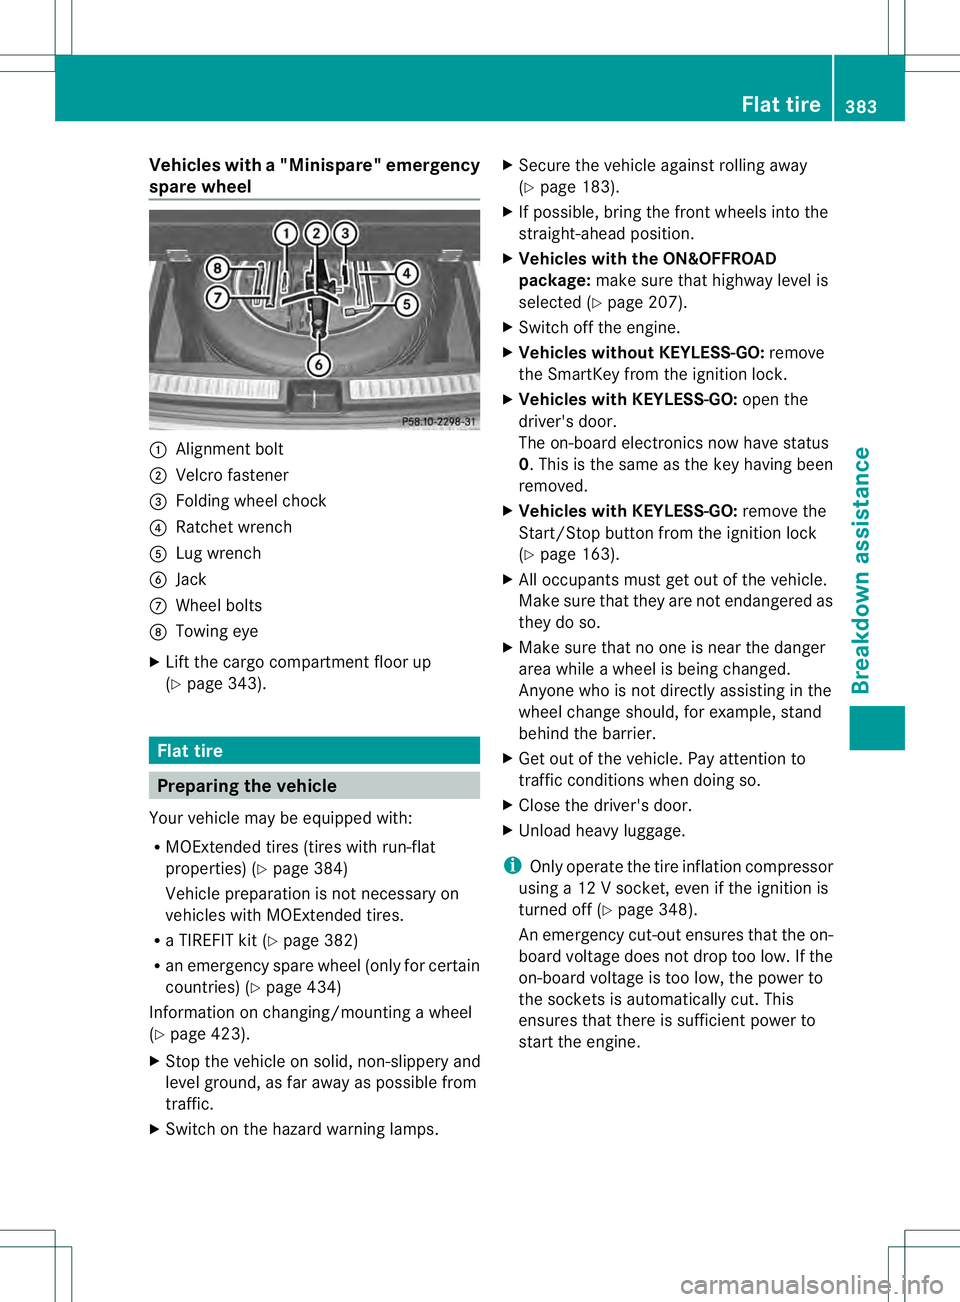
Vehicles with
a"Minispare" emergency
spare wheel 0002
Alignment bolt
0003 Velcro fastener
0021 Folding wheel chock
0020 Ratchet wrench
001E Lug wrench
001F Jack
0013 Wheel bolts
0014 Towing eye
X Lift the cargo compartment floor up
(Y page 343). Flat tire
Preparing the vehicle
Yourv ehicle may be equipped with:
R MOExtended tires (tires with run-flat
properties) (Y page 384)
Vehicle preparation is not necessary on
vehicles with MOExtended tires.
R a TIREFIT kit (Y page 382)
R an emergency spare wheel (only for certain
countries) (Y page 434)
Information on changing/mounting a wheel
(Y page 423).
X Stop the vehicle on solid, non-slippery and
level ground, as far away as possible from
traffic.
X Switch on the hazard warning lamps. X
Secure the vehicle against rolling away
(Y page 183).
X If possible, bring the fron twheels into the
straight-ahead position.
X Vehicles with the ON&OFFROAD
package: make sure that highway level is
selected (Y page 207).
X Switch off the engine.
X Vehicles without KEYLESS-GO: remove
the SmartKey from the ignition lock.
X Vehicles with KEYLESS-GO: open the
driver's door.
The on-board electronics now have status
0.T his is the same as the key having been
removed.
X Vehicles with KEYLESS-GO: remove the
Start/Stop button from the ignition lock
(Y page 163).
X All occupants must get out of the vehicle.
Make sure that they are not endangered as
they do so.
X Make sure that no one is near the danger
area while a wheel is being changed.
Anyone who is not directly assisting in the
wheel change should, for example, stand
behind the barrier.
X Get out of the vehicle. Pay attention to
traffic conditions when doing so.
X Close the driver's door.
X Unload heavy luggage.
i Only operate the tire inflation compressor
using a 12 V socket, even if the ignition is
turned off (Y page 348).
An emergency cut-out ensures that the on-
board voltage does not drop too low. If the
on-board voltage is too low, the power to
the sockets is automatically cut. This
ensures that there is sufficient power to
start the engine. Flat tire
383Breakdown assistance
Page 395 of 454
X
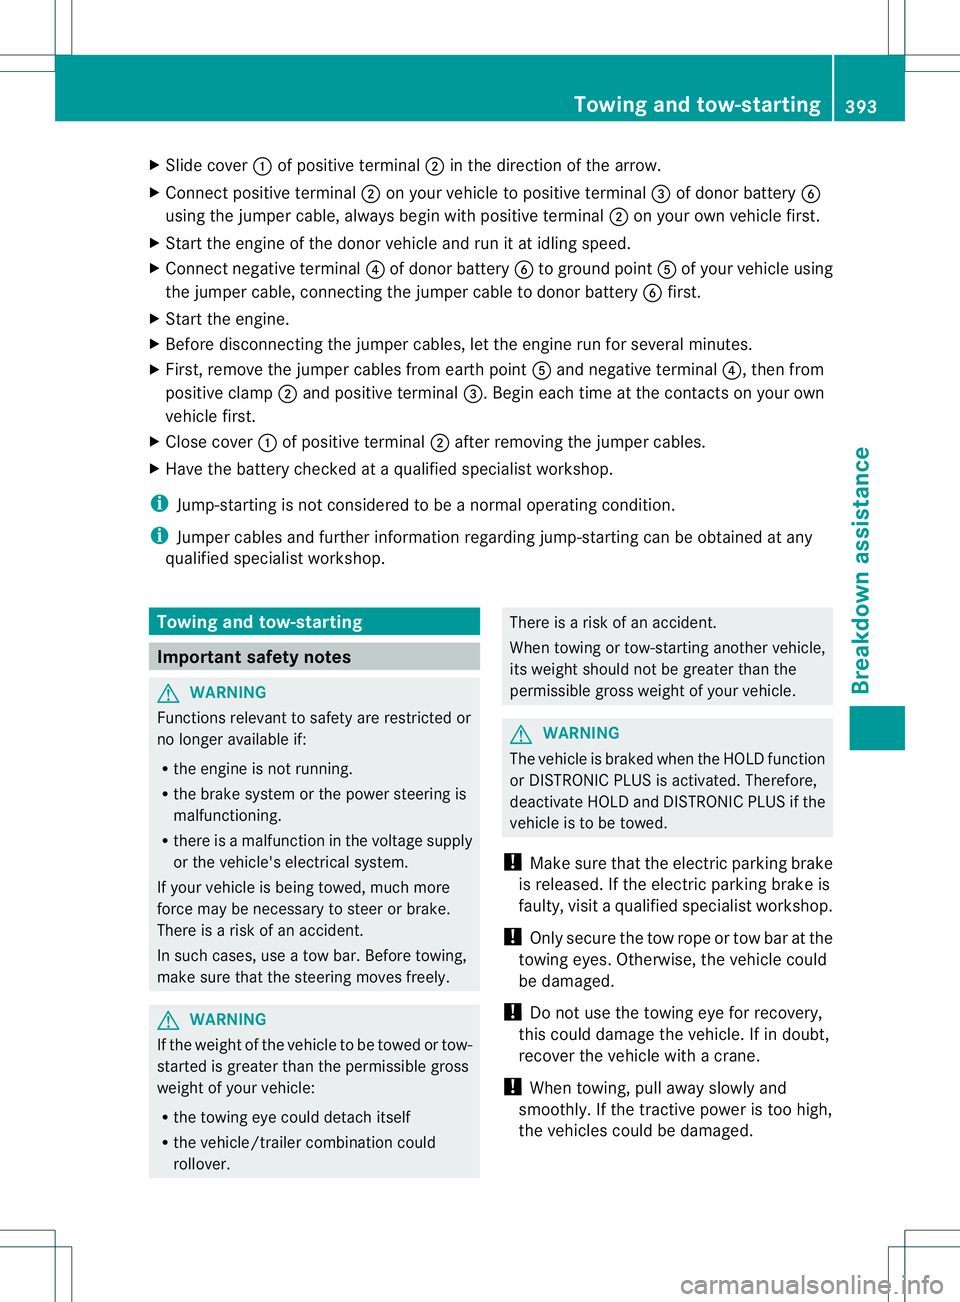
Slide cover 0002of positive terminal 0003in the direction of the arrow.
X Connect positive terminal 0003on your vehicle to positive terminal 0021of donor battery 001F
using the jumper cable, always begi nwith positive terminal 0003on your own vehicle first.
X Start the engine of the dono rvehicle and run it at idling speed.
X Connec tnegative terminal 0020of donor battery 001Fto ground point 001Eof your vehicle using
the jumper cable, connecting the jumper cable to donor battery 001Ffirst.
X Start the engine.
X Before disconnecting the jumper cables, let the engin erun for several minutes.
X First, remove the jumper cables from earth point 001Eand negative terminal 0020, then from
positive clamp 0003and positive terminal 0021. Begin each time at the contacts on your own
vehicle first.
X Close cover 0002of positive terminal 0003after removing the jumper cables.
X Have the battery checke dataqualified specialist workshop.
i Jump-starting is not considered to be a normal operating condition.
i Jumper cables and further information regarding jump-starting can be obtained at any
qualified specialist workshop. Towing and tow-starting
Important safety notes
G
WARNING
Functions relevant to safety are restricted or
no longer available if:
R the engine is not running.
R the brake system or the power steering is
malfunctioning.
R there is a malfunction in the voltage supply
or the vehicle's electrical system.
If your vehicle is being towed, much more
force may be necessary to steer or brake.
There is a risk of an accident.
In such cases, use a tow bar. Before towing,
make sure that the steering moves freely. G
WARNING
If the weight of the vehicle to be towed or tow-
started is greater than the permissible gross
weight of your vehicle:
R the towing eye could detach itself
R the vehicle/trailer combination could
rollover. There is a risk of an accident.
When towing or tow-starting another vehicle,
its weight should not be greater than the
permissible gross weight of your vehicle.
G
WARNING
The vehicle is braked when the HOLD function
or DISTRONIC PLUS is activated. Therefore,
deactivate HOLD and DISTRONIC PLUS if the
vehicle is to be towed.
! Make sure that the electric parking brake
is released. If the electric parking brake is
faulty, visit a qualified specialist workshop.
! Only secure the tow rope or tow bar at the
towing eyes. Otherwise, the vehicle could
be damaged.
! Do not use the towing eye for recovery,
this could damage the vehicle. If in doubt,
recover the vehicle with acrane.
! When towing, pull away slowly and
smoothly .Ifthe tractive power is too high,
the vehicles could be damaged. Towing and tow-starting
393Breakdown assistance Z
Page 396 of 454
!
When towing vehicles with KEYLESS-GO,
use the key instead of the Start/Stop
button. Otherwise, the automatic
transmission may shift to position Pwhen
the driver's or front-passenger door are
opened, which could lead to damage to the
transmission.
! Do not tow with sling-type equipment.
This could damage the vehicle.
! Vehicles with differential locks: make
sure the differential locks are in automatic
mode. When towing, the differential locks
must not be switched on. The transmission
may otherwise be damaged.
! The vehicle can be towed a maximum of
30 miles (50km). The towing speed of
30 mph (50 km/h) must not be exceeded.
If the vehicle has to be towed more than
30 miles (50km), the entire vehicle must be
raised and transported.
! If you tow or tow-start another vehicle, its
weight must not exceed the maximum
permissible gross vehicle weight of your
vehicle.
Information on your vehicle's gross vehicle
weight rating can be found on the vehicle
identification plate (Y page 438).
It is better to have the vehicle transported
than to have it towed.
If the vehicle has suffered transmission
damage, have it transported on a transporter
or trailer.
The automatic transmission must be in
position Nwhen the vehicle is being towed.
The battery must be connected and charged.
Otherwise, you:
R cannot turn the SmartKey to position 2in
the ignition lock
R cannot release the electric parking brake
R cannot shift the automatic transmission to
position N
i Deactivate the automatic locking feature
(Y page 280). You could otherwise be locked out when pushing or towing the
vehicle. Installing/removing the towing eye
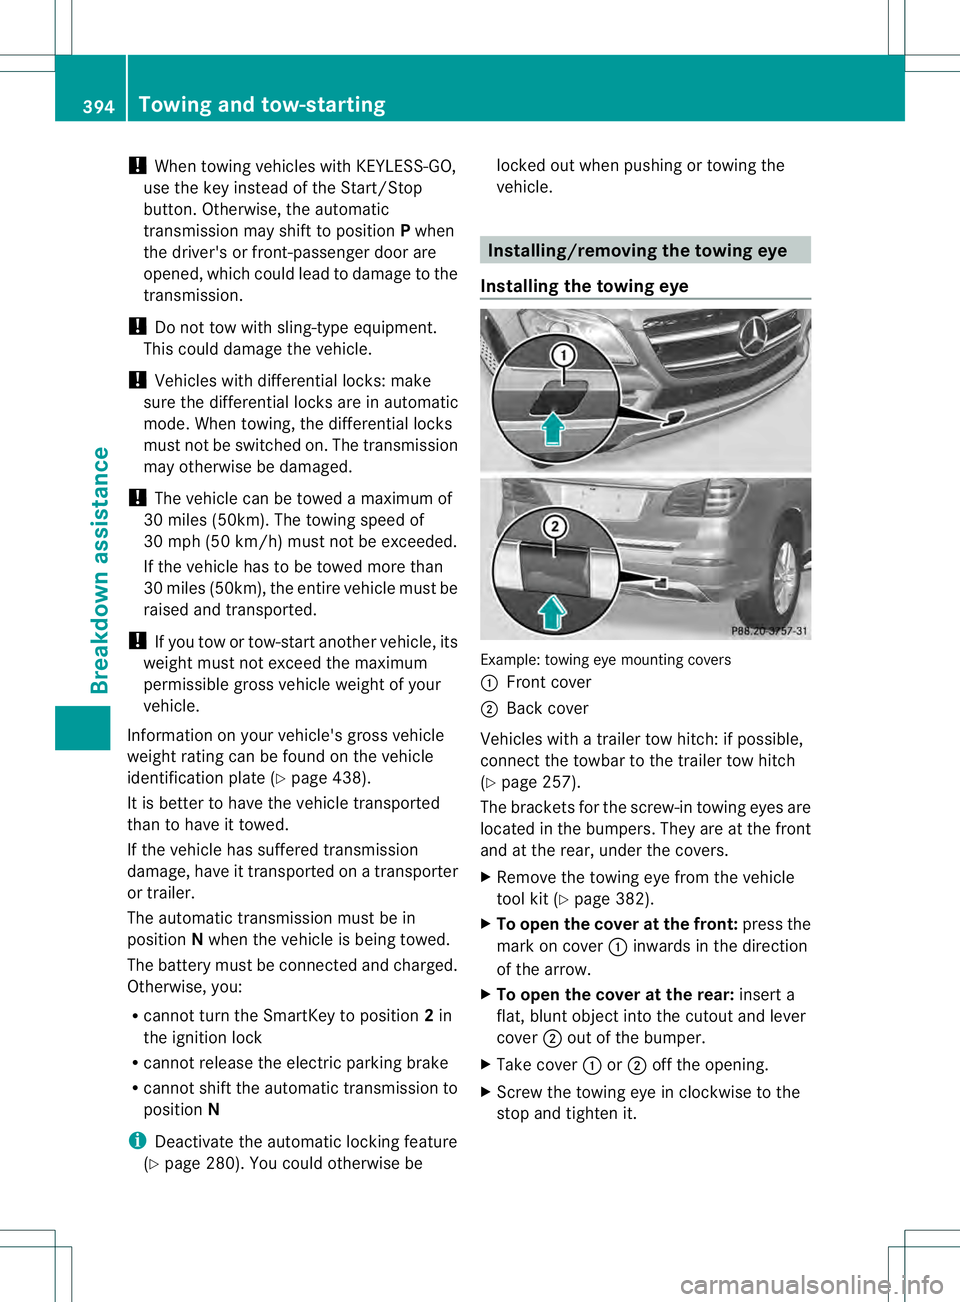
Installing the towing eye Example: towing eye mounting covers
0002 Front cover
0003 Back cover
Vehicles with a trailer tow hitch: if possible,
connect the towbar to the trailer tow hitch
(Y page 257).
The brackets for the screw-in towing eyes are
located in the bumpers. They are at the front
and at the rear, under the covers.
X Remove the towing eye from the vehicle
tool kit (Y page 382).
X To open the cover at the front: press the
mark on cover 0002inwards in the direction
of the arrow.
X To open the cover at the rear: insert a
flat, blunt object into the cutout and lever
cover 0003out of the bumper.
X Take cover 0002or0003 off the opening.
X Screw the towing eye in clockwise to the
stop and tighten it. 394
Towing and tow-startingBreakdown assistance
Page 397 of 454
Removing the towing eye
X
Loosen the towing eye and unscrew it.
X Attach cover 0002or0003 to the bumper and
press until it engages.
X Place the towing eye in the vehicle tool kit. Towing
avehicle with both axles on
the ground
It is importan tthat you observe the safety
instructions when towing away your vehicle
(Y page 393).
The automatic transmission automatically
shifts to position Pwhen you open the driver's
or front-passenger door or when you remove
the SmartKey from the ignition lock.
In order to ensure that the automatic
transmission stays in position Nwhen towing
the vehicle, you must observe the following
points:
X Make sure that the vehicle is stationary and
the SmartKey in the ignition lock is in
position 0.
X Turn the SmartKey to position 2in the
ignition lock.
On vehicles with KEYLESS-GO, use the
SmartKey instead of the Start/Stop button
(Y page 163).
X Depress and hold the brake pedal.
X Shift the automatic transmission to
position N.
X Release the brake pedal.
X Release the electric parking brake.
X Leave the SmartKey in position 2in the
ignition lock.
X Switch on the hazard warning lamps
(Y page 128).
i In order to signal a change of direction
when towing the vehicle with the hazard
warning lamps switched on, use the
combination switch as usual. In this case,
only the indicator lamps for the direction of
travel flash. After resetting the combination switch, the hazard warning
lamp starts flashing again. Transporting the vehicle
! Only lash the vehicle down by the wheels
or wheel rims, not by parts of the vehicle
such as axle or steering components.
Otherwise, the vehicle could be damaged.
The towing eyes or trailer tow hitch can be
used to pull the vehicle onto a trailer or
transporter if you wish to transport it.
X Turn the SmartKey to position 2in the
ignition lock.
X Shift the automatic transmission to
position N.
As soon as the vehicle is loaded:
X Prevent the vehicle from rolling away by
applying the electric parking brake.
X Shift the automatic transmission to
position P.
X Turn the SmartKey to position 0in the
ignition lock and remove it.
X Secure the vehicle. Information on 4MATIC vehicles
! Vehicles with 4MATIC must not be towed
with either the front or the rear axle raised,
as doing so will damage the transmission.
If the vehicle has transmission damage or
damage to the front or rear axle, have it
transported on a transporter or trailer.
In the event of damage to the electrical
system
If the battery is defective, the automatic
transmission will be locked in position P. To
shift the automatic transmission to position
N, you must provide power to the vehicle's
electrical system in the same way as when
jump-starting (Y page 391).
Have the vehicle transported on a transporter
or trailer. Towing and tow-starting
395Breakdown assistance Z