2013 MERCEDES-BENZ G-CLASS SUV battery
[x] Cancel search: batteryPage 310 of 364
Jump-starting
G
WARNING
Battery acid is caustic. There is a risk of injury.
Avoid contact with the skin, eyes or clothing. Do not inhale any battery gases. Do not lean over
the battery. Keep children away from batteries. Wash battery acid immediately with water and
seek medical attention. G
WARNING
During charging and jump-starting, explosive gases can escape from the battery. There is a risk
of an explosion.
Particularly avoid fire, naked flames, creating sparks and smoking. Ensure there is sufficient
ventilation while charging and jump-starting. Do not lean over a battery. G
WARNING
During the charging process, a battery produces hydrogen gas. If a short circuit occurs or sparks
are created, the hydrogen gas can ignite. There is a risk of an explosion.
R Make sure that the positive terminal of a connected battery does not come into contact with
vehicle parts.
R Never place metal objects or tools on a battery.
R It is important that
you observe the described order of the battery terminals when connecting
and disconnecting a battery.
R When jump-starting, make sure that the battery poles with identical polarity are connected.
R It is particularly important to observe the described order when connecting and disconnecting
the jumper cables.
R Never connect or disconnect the battery terminals while the engine is running. G
WARNING
A discharged battery can freeze at temperatures below freezing point. When jump-starting the
vehicle or charging the
battery, gases can escape from the battery. There is a risk of an explosion.
Allow the frozen battery to thaw out before charging it or jump-starting. G
WARNING
Non-combusted fuel can collect in the exhaust system and ignite. There is a risk of fire. Avoid
repeated and lengthy starting attempts.
! Avoid repeated and lengthy starting attempts. Otherwise, non-combusted fuel may
damage the catalytic converter and create a risk of fire.
Do not use a rapid charging device to start the vehicle.
Make sure the jumper cables are not damaged.
Make sure the jumper cables are not touching any other metal objects when they are
connected to the battery. 308
Jump-starting
Breakdown assistance
Page 311 of 364
If the indicator/warning lamps do not light up at temperatures around or below freezing point,
the discharged battery is likely to be frozen (a commonplace scenario). In this case, do not
jump-start the vehicle or recharge the battery.
Once the battery has thawed out, its service life may be dramatically reduced.
The starting characteristics can be impaired, particularly at low temperatures.
It is recommended that you have the thawed out battery checked at a qualified specialist
workshop.
Do not start
the
vehicle using a rapid charging device. If your vehicle's battery is discharged,
the engine can be jump-started from another vehicle or from a second battery using jumper
cables. Observe the following points:
R The battery is not accessible in all vehicles. If the other vehicle's battery is not accessible,
jump-start the vehicle using a second battery or a jump-starting device.
R Vehicles with a gasoline engine: only jump-start the vehicle when the engine and exhaust
system are cold.
R Do not start the engine if the battery is frozen. Let the battery thaw first.
R Jump-starting may only be performed from batteries with a nominal voltage of 12 V.
R Only use jumper cables which have a sufficient cross-section and insulated terminal clamps.
R If the battery is fully discharged, leave the battery that is being used to jump-start connected
for a few minutes before attempting to start. This charges the empty battery a little.
R Make sure that the two vehicles do not touch.
Make sure that:
R the jumper leads are not damaged.
R when the jumper cables are connected to the battery, uninsulated sections of the terminal
clamp do not come into contact with other metal sections.
R The jumper cables cannot come into contact with parts such as the pulley or the fan. These
parts move when the engine is started and while it is running.
X Apply the parking brake.
X Move the selector lever to position P.
X Switch off all electrical consumers (e.g. radio, blower, etc.).
X Open the hood (Y page 289). Jump-starting
309
Breakdown assistance Z
Page 312 of 364
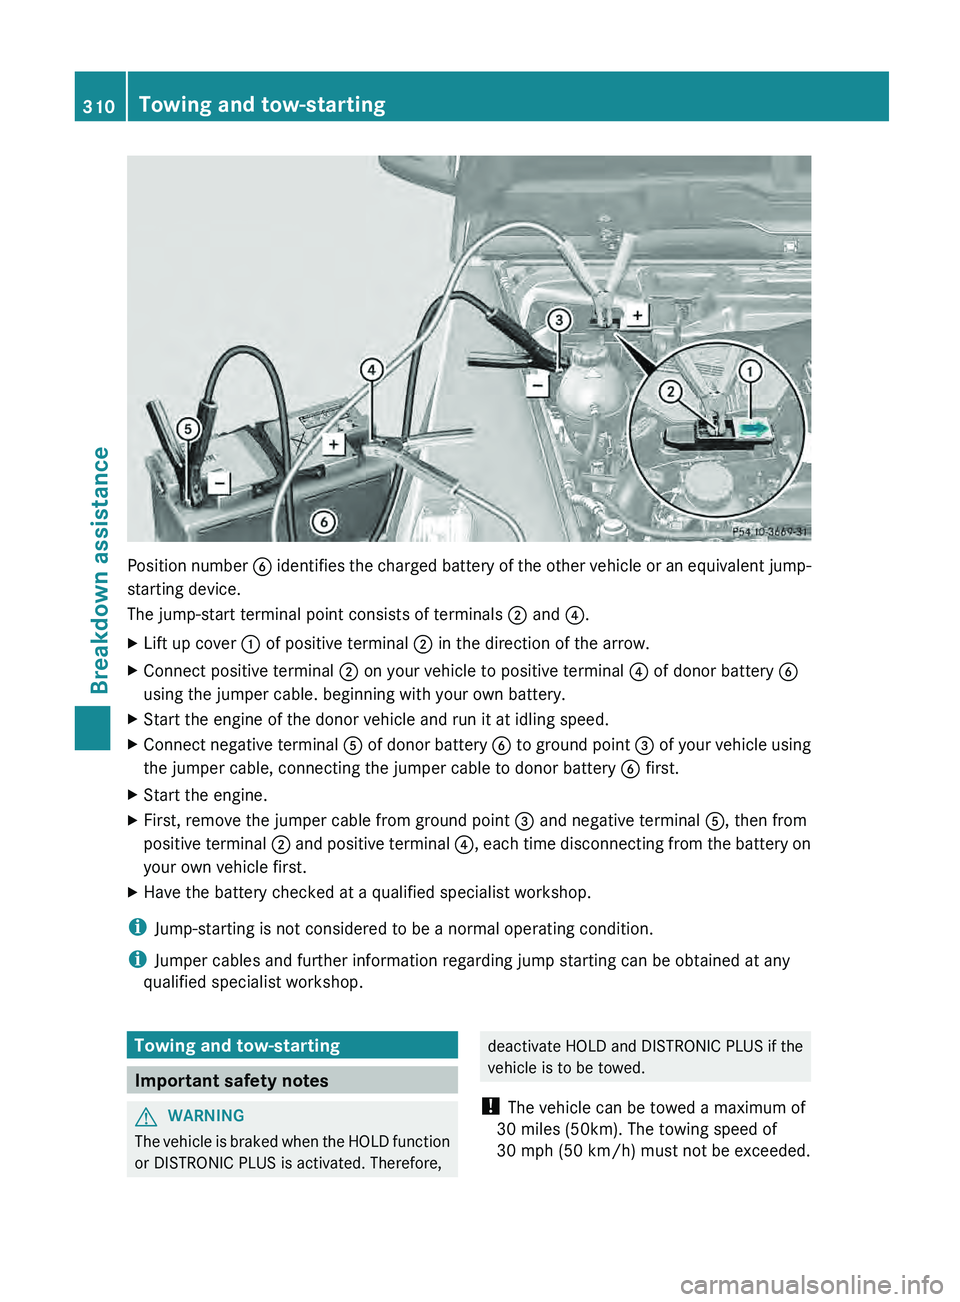
Position number
0084 identifies the charged battery of the other vehicle or an equivalent jump-
starting device.
The jump-start terminal point consists of terminals 0044 and 0085.
X Lift up cover 0043 of positive terminal 0044 in the direction of the arrow.
X Connect positive terminal 0044 on your vehicle to positive terminal 0085 of donor battery 0084
using the jumper cable. beginning with your own battery.
X Start the engine of the donor vehicle and run it at idling speed.
X Connect negative terminal 0083 of
donor battery
0084
to ground point 0087 of your vehicle using
the jumper cable, connecting the jumper cable to donor battery 0084 first.
X Start the engine.
X First, remove the jumper cable from ground point 0087 and negative terminal 0083, then from
positive terminal
0044 and
positive terminal 0085, each time disconnecting from the battery on
your own vehicle first.
X Have the battery checked at a qualified specialist workshop.
i Jump-starting is not considered to be a normal operating condition.
i Jumper cables and further information regarding jump starting can be obtained at any
qualified specialist workshop. Towing and tow-starting
Important safety notes
G
WARNING
The vehicle is braked when the HOLD function
or DISTRONIC PLUS is activated. Therefore, deactivate HOLD and DISTRONIC PLUS if the
vehicle is to be towed.
! The vehicle can be towed a maximum of
30 miles (50km). The towing speed of
30 mph (50 km/h) must not be exceeded. 310
Towing and tow-starting
Breakdown assistance
Page 313 of 364
If the vehicle has to be towed more than
30 miles (
50km),
the entire vehicle must be
raised and transported.
! Only secure the tow cable or tow bar to
the towing eyes. You could otherwise
damage the vehicle.
! Do not tow with sling-type equipment.
This could damage the vehicle.
! Do not use the towing eyes for recovery
purposes as this could damage the vehicle.
If in doubt, recover the vehicle with a crane.
! When towing, pull away slowly and
smoothly. If the tractive power is too high,
the vehicles could be damaged.
! Your vehicles is equipped with an
automatic transmission. Therefore, you
must not have the vehicle tow-started. The
transmission may otherwise be damaged. G
WARNING
If the weight of the vehicle to be towed or tow-
started is greater than the permissible gross
weight of your vehicle:
R the towing eye could detach itself
R the vehicle/trailer combination could
rollover.
There is a risk of an accident.
When towing or tow-starting another vehicle,
its weight should not be greater than the
permissible gross weight of your vehicle.
Information on your vehicle's gross vehicle
weight rating can be found on the vehicle
identification plate ( Y page 349).
It is better to have the vehicle transported
than to have it towed.
If the transfer case
can be shifted into neutral
N, you can tow the vehicle. If the transfer case cannot be shifted into
neutral N, you can tow the vehicle with one
axle raised. Please
bear
the following in mind:
R remove the propeller shaft between the
transfer case and the rolling axle.
R turn the SmartKey to position 1 in the
ignition lock (Y page 139).
The battery must be connected and charged.
Otherwise, you:
R cannot turn the SmartKey in the ignition
lock to position 2(Y page 139)
R cannot shift the automatic transmission to
position N
i Deactivate the automatic locking feature
(Y page 75). You could otherwise be locked
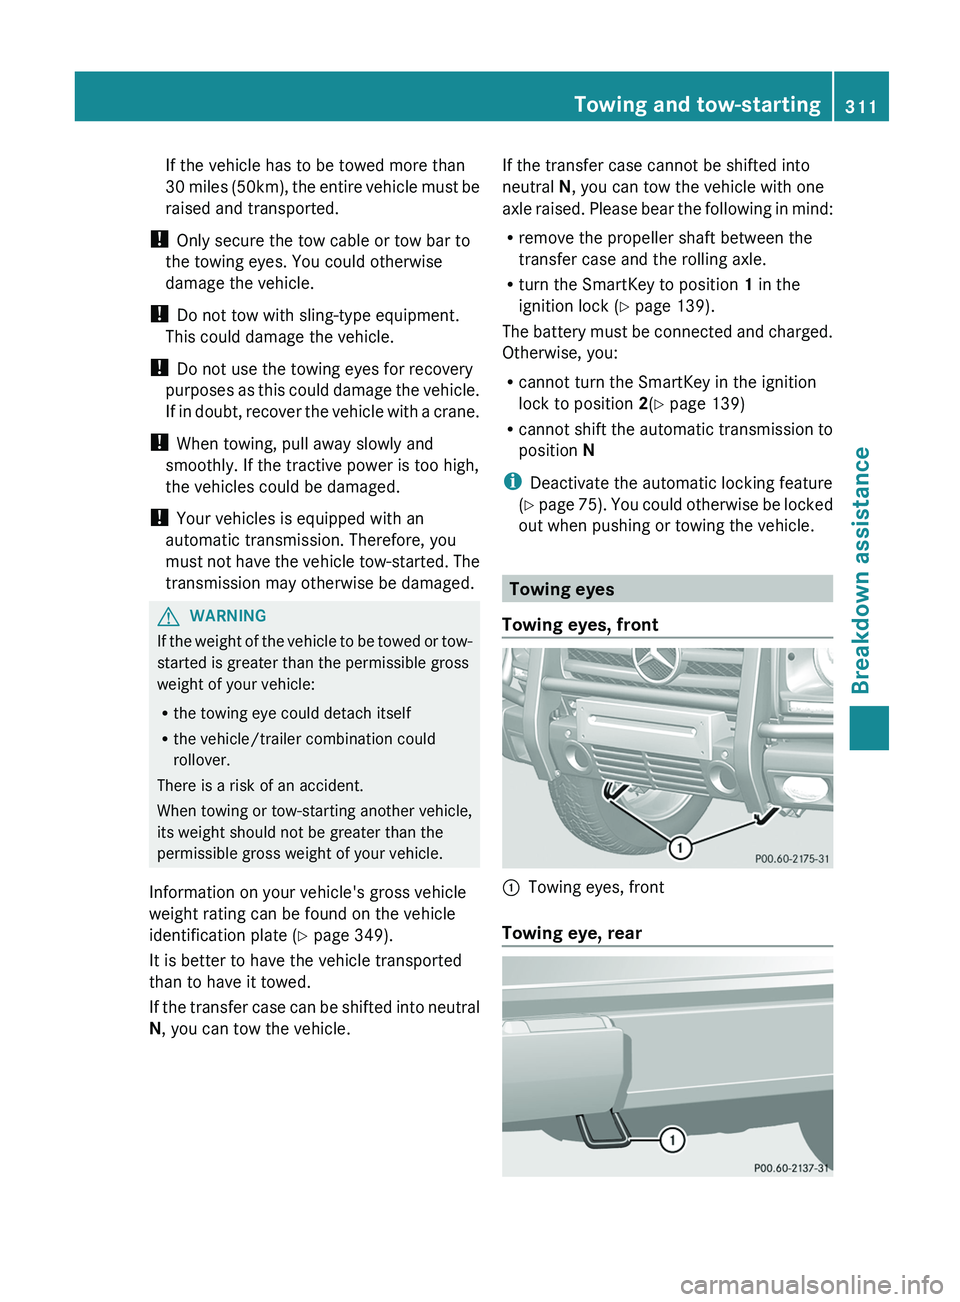
out when pushing or towing the vehicle. Towing eyes
Towing eyes, front 0043
Towing eyes, front
Towing eye, rear Towing and tow-starting
311
Breakdown assistance Z
Page 314 of 364
Rear towing eye
0043 is located under the
bumper, on the left-hand
side when viewed in
the direction of travel. Towing a vehicle with both axles on
the ground
It is important that you observe the safety
instructions when towing away your vehicle
(Y page 310).
X Switch on the hazard warning lamps
(Y page 104).
i In order to signal a change of direction
when towing the vehicle with the hazard
warning lamps switched on, use the
combination switch as usual. In this case,
only the turn signals for the desired
direction flash. When you reset the
combination switch, the hazard warning
lamps start flashing again.
X Turn the SmartKey to position 2 in the
ignition lock (Y page 139).
X When the vehicle is stationary, depress the
brake pedal and keep it depressed.
X Shift the transfer case to
neutral (Y page 200).
X Shift the automatic transmission to
position N.
X Release the brake pedal.
X Release the parking brake ( Y page 157).
i The transmission can only change gear if
the battery has sufficient charge.
If you cannot move
the selector lever to N,
the propeller shafts to the driven axles
must be removed. Transporting the vehicle
! Only lash the vehicle
down by the wheels
or wheel rims, not by parts of the vehicle
such as axle or steering components.
Otherwise, the vehicle could be damaged. Use the towing eyes to pull the vehicle if it
needs to be transported on a trailer or
transporter (
Y page 311).
X Apply the parking brake.
X Turn the SmartKey to position 2 in the
ignition lock (Y page 139).
X Move the selector lever to N.
X Shift the transfer case to
neutral (Y page 200).
X Secure the towing cable to the towing eyes
(Y page 311).
X Make sure that the vehicle cannot roll
away.
X Release the parking brake.
X Load the vehicle onto the transporter.
As soon as the vehicle is loaded:
X Apply the parking brake.
X Shift the automatic transmission to
position P.
X Turn the SmartKey to position 0 in the
ignition lock (Y page 139) and remove it.
X Secure the vehicle. Recovering a vehicle that has become
stuck
! Pull away smoothly, slowly, and in a
straight line when pulling
out a vehicle that
has become stuck. Excessive tractive
power could damage the vehicles.
If the drive wheels get trapped on loose or
muddy ground, recover the vehicle with the
utmost care, especially so if the vehicle is
laden.
Never attempt to recover a vehicle with a
trailer attached.
Pull out the vehicle backwards, if possible,
using the tracks it made when it became
stuck. 312
Towing and tow-starting
Breakdown assistance
Page 316 of 364
The fuses are located in various fuse boxes:
R
Main fuse box on the driver's side of the
dashboard
R Fuse box in the front-passenger footwell
R Fuse box in the transmission tunnel
R Fuse box in the battery case
The fuse allocation chart
and the spare fuses
are in the main fuse box on the dashboard
(Y page 314).
You will find the fuse removal device in the
vehicle tool kit (Y page 302). Dashboard fuse box
! Do not use a pointed object such as a
screwdriver to open the cover in the
dashboard. You could damage the
dashboard or the cover.
! Make sure that no
moisture can enter the
fuse box when the cover is open.
! When closing the cover, make sure that it
is lying correctly on the fuse box. Moisture
seeping in or dirt could otherwise impair
the operation of the fuses. X
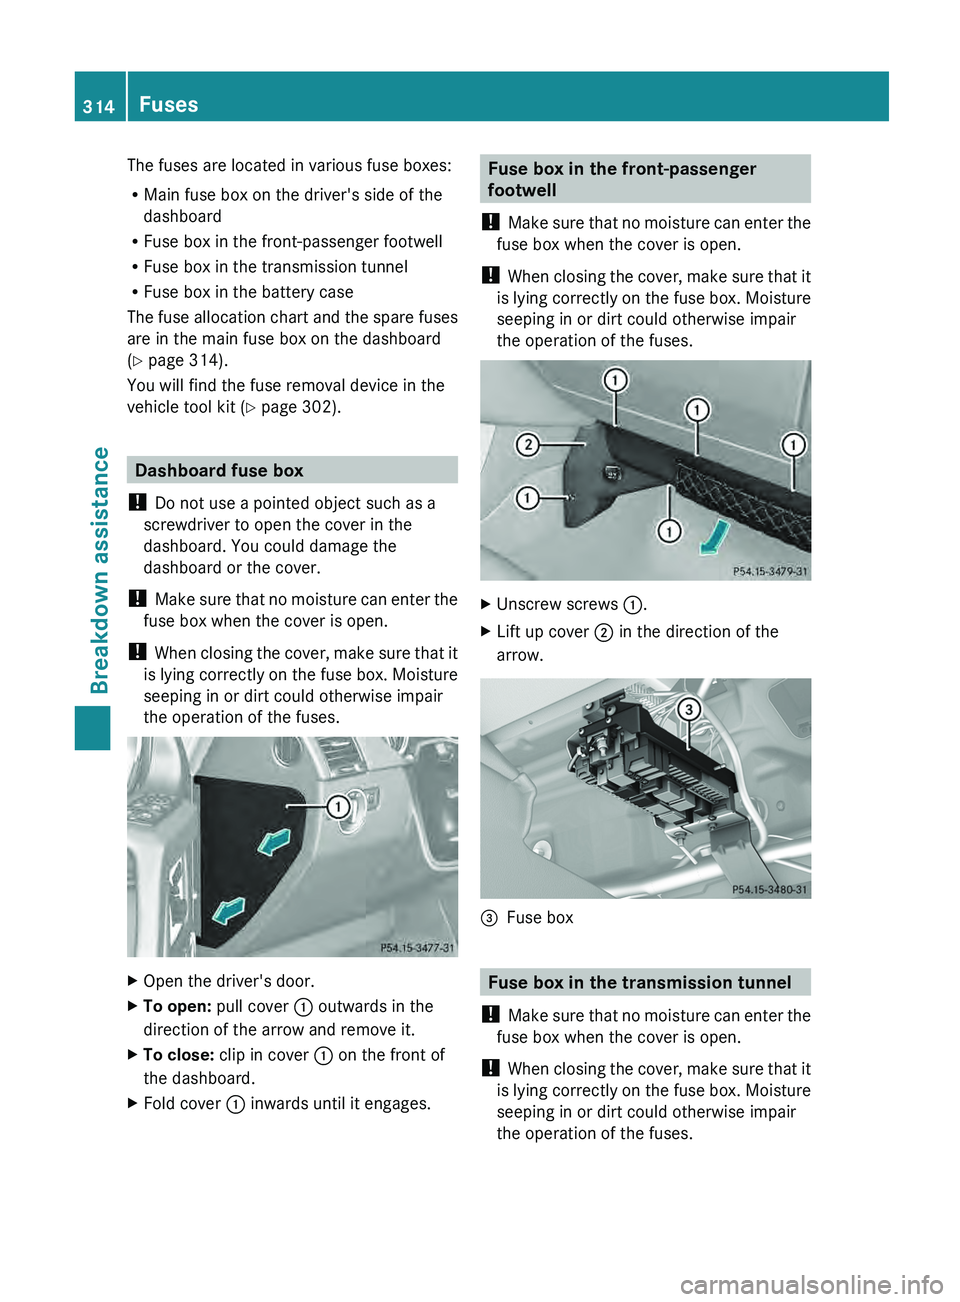
Open the driver's door.
X To open: pull cover 0043 outwards in the
direction of the arrow and remove it.
X To close: clip in cover 0043 on the front of
the dashboard.
X Fold cover 0043 inwards until it engages. Fuse box in the front-passenger
footwell
! Make sure that no
moisture can enter the
fuse box when the cover is open.
! When closing the cover, make sure that it
is lying correctly on the fuse box. Moisture
seeping in or dirt could otherwise impair
the operation of the fuses. X
Unscrew screws 0043.
X Lift up cover 0044 in the direction of the
arrow. 0087
Fuse box Fuse box in the transmission tunnel
! Make sure that no
moisture can enter the
fuse box when the cover is open.
! When closing the cover, make sure that it
is lying correctly on the fuse box. Moisture
seeping in or dirt could otherwise impair
the operation of the fuses. 314
Fuses
Breakdown assistance
Page 317 of 364

X
Fold down the cup holder on the center
console (Y page 268).
X Adjust the front-passenger seat to its
foremost position (Y page 86).
X To open: remove screws 0043.
X Remove cover 0044 in the direction of the
arrow.
X To close: clip in cover 0044.
X Install cover 0044 with screws 0043. Fuse box in the battery case
The fuses in the battery case do not usually
need to be replaced. If a fuse change is
necessary, consult a qualified specialist
workshop. Fuses
315Breakdown assistance Z
Page 342 of 364
Bead
The tire bead ensures that the tire sits
securely on the
wheel.
There are several steel
wires in the bead to prevent the tire from
coming loose from the wheel rim.
Sidewall The part of the tire between the tread and the
bead.
Weight of optional extras
The combined weight of those optional extras
that weigh more than the replaced standard
parts and more than 2.3 kg (5 lbs). These
optional extras, such as high-performance
brakes, level control, a roof rack or a high-
performance battery, are not included in the
curb weight and the weight of the
accessories.
TIN (Tire Identification Number) This is a unique identifier which can be used
by a tire manufacturer to identify tires, for
example for a
product
recall, and thus identify
the purchasers. The TIN is made up of the
manufacturer's identity code, tire size, tire
type code and the manufacturing date.
Load bearing index The load bearing index (also load index) is a
code
that
contains the
maximum load bearing
capacity of a tire.
Traction Traction is the result of friction between the
tires and the road surface.
TWR (Tongue Weight Rating)
The TWR specifies the maximum permissible
weight that the
ball
coupling of the trailer tow
hitch can support. Treadwear indicators Narrow bars (tread wear bars) that are
distributed over the
tire
tread. If the tire tread
is level with the bars, the wear limit of 00CD in
(1.6 mm) has been reached.
Occupant distribution The distribution of occupants in a vehicle at
their designated seating positions.
Total load limit
Nominal load and luggage load plus 150 lbs
(68 kg) multiplied by the number of seats in
the vehicle.
Changing a wheel
Flat tire
The "Breakdown assistance" section
(Y page 304)
contains
information and notes
on how to deal with a flat tire. Interchanging the wheels
G
WARNING
Rotate front and rear wheels only if the tires
are of the same dimension.
If your vehicle is equipped with mixed-size
tires (different tire dimensions
front vs. rear),
tire rotation is not possible. G
WARNING
Have the tightening torque checked after
changing a wheel. The wheels could come
loose if they are not tightened to a torque of
96 lb-ft (130 Nm).
Only use genuine
Mercedes-Benz wheel bolts
specified for your vehicle's rims.
! On vehicles equipped with a tire pressure
monitor, electronic components are
located in the wheel. 340
Changing a wheel
Wheels and tires