2013 MERCEDES-BENZ G-CLASS SUV child lock
[x] Cancel search: child lockPage 92 of 364
The system automatically switches down
from level 2to level1 after approximately
10 minutes.
The system automatically switches off
approximately 35 minutes after it is set to
level
1.
Problems with the seat heating If the on-board voltage is too low, the seat
heating is switched off automatically.
X
Switch off electrical consumers which you
do not need, such as the rear window
defroster or interior lighting.
If the on-board voltage is only interrupted
briefly, the seat heating
will switch back on
automatically. If the seat heating is not
switched on automatically:
X Switch the seat heating on manually
(Y page 89) Switching the seat ventilation on/off
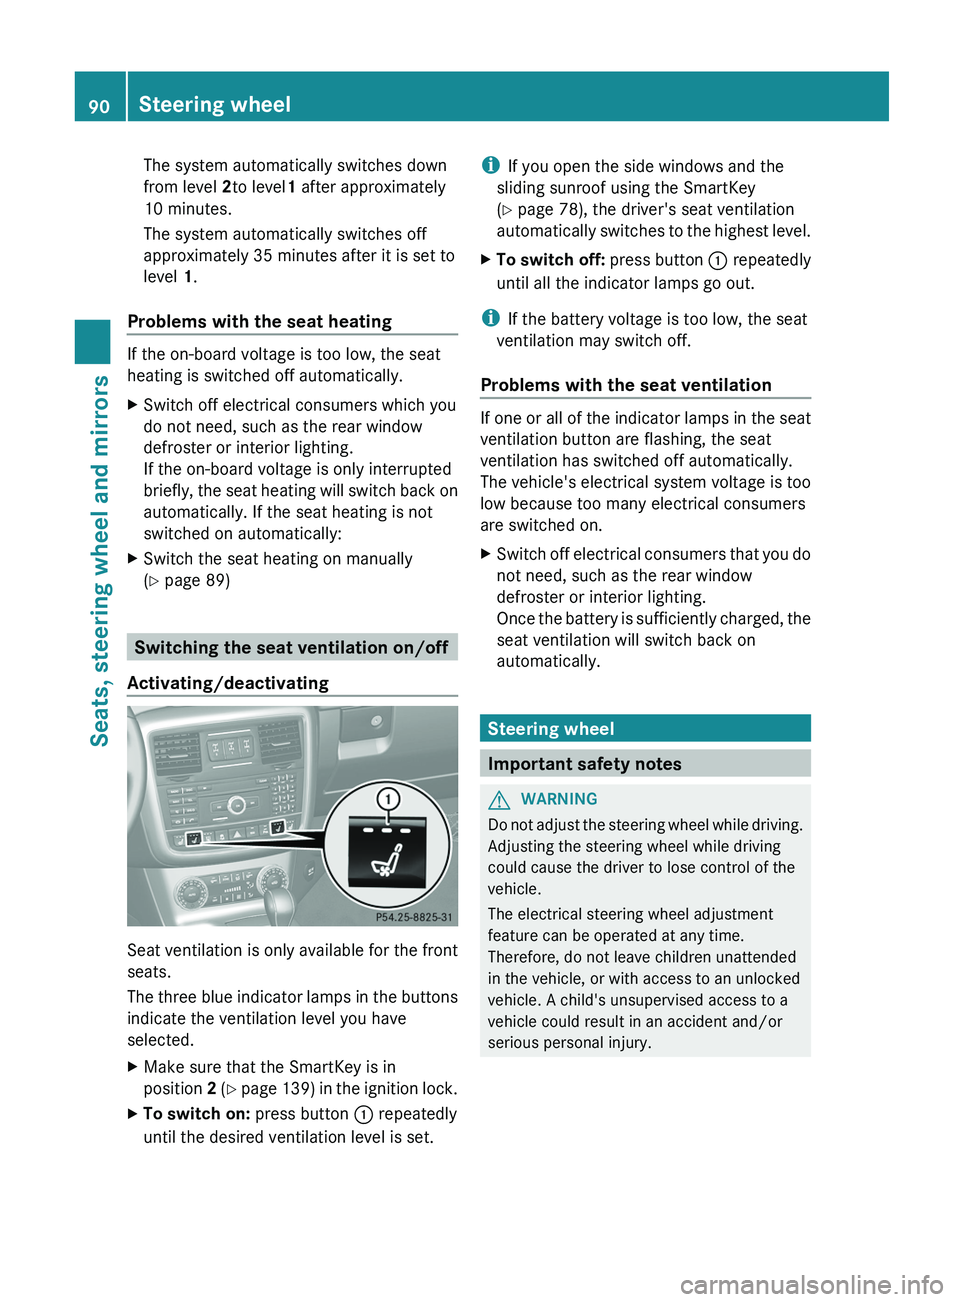
Activating/deactivating Seat ventilation is only available for the front
seats.
The three blue
indicator
lamps in the buttons
indicate the ventilation level you have
selected.
X Make sure that the SmartKey is in
position 2 (Y page 139) in
the ignition lock.
X To switch on: press button 0043 repeatedly
until the desired ventilation level is set. i
If you open the side windows and the
sliding sunroof using the SmartKey
(Y page 78), the driver's seat ventilation
automatically switches
to the
highest level.
X To switch off: press button 0043 repeatedly
until all the indicator lamps go out.
i If the battery voltage is too low, the seat
ventilation may switch off.
Problems with the seat ventilation If one or all of the indicator lamps in the seat
ventilation button are flashing, the seat
ventilation has switched off automatically.
The vehicle's electrical system voltage is too
low because too many electrical consumers
are switched on.
X
Switch off electrical consumers that you do
not need, such as the rear window
defroster or interior lighting.
Once the
battery is
sufficiently charged, the
seat ventilation will switch back on
automatically. Steering wheel
Important safety notes
G
WARNING
Do not adjust the steering wheel while driving.
Adjusting the steering wheel while driving
could cause the driver to lose control of the
vehicle.
The electrical steering wheel adjustment
feature can be operated at any time.
Therefore, do not leave children unattended
in the vehicle, or with access to an unlocked
vehicle. A child's unsupervised access to a
vehicle could result in an accident and/or
serious personal injury. 90
Steering wheel
Seats, steering wheel and mirrors
Page 94 of 364
If steering wheel heating indicator lamp
0087 is
flashing, the steering wheel heating has
switched off automatically. The vehicle's
electrical system voltage is too low because
too many electrical consumers are switched
on.
X Switch off electrical
consumers that you do
not need, such as the rear window
defroster or interior lighting.
Once the battery is
sufficiently charged, the
steering wheel heating will switch back on
automatically. Steering wheel EASY-ENTRY/EXIT
feature
Important safety notes G
WARNING
Make sure that nobody can become trapped
when you activate the EASY-ENTRY/EXIT
feature.
If there is a risk of someone becoming
trapped, stop the adjustment procedure. To
halt the procedure:
R press the steering column adjustment
button.
R press one of the memory function position
buttons.
The steering column stops moving
immediately.
Do not keep the memory function position
button pressed as this will start the memory
function and set the steering wheel and seat
in motion.
Do not leave children unattended in the
vehicle. They could open
the driver's door and
thereby unintentionally activate the EASY-
ENTRY/EXIT feature and become trapped. G
WARNING
Let the system complete the adjustment
procedure before setting the vehicle in
motion. All steering wheel adjustment must
be completed before setting the vehicle in motion. Driving off with the steering wheel
still adjusting could cause the driver to lose
control of the vehicle.
! Do not activate the EASY-ENTRY/EXIT
feature, if the seat
backrest is reclined too
far backwards. This can damage the front
or rear seats. You must first move the
backrest to a vertical position.
The EASY-ENTRY/EXIT feature makes getting
in and out of your vehicle easier.
You can activate and deactivate the EASY-
ENTRY/EXIT feature in the on-board
computer (Y page 221).
Position of the steering wheel when the
EASY-ENTRY/EXIT feature is active The steering wheel moves upwards and
towards the dashboard if:
R
you remove the SmartKey
from the ignition
lock or
R you open the driver's door with the
SmartKey in position 0 or 1 in the ignition
lock.
i The steering wheel only moves upwards
and towards the dashboard if it has not
already reached the upper end stop.
Position of the steering wheel for
driving The steering wheel is moved to the last
selected position when:
R
the driver's door is closed.
R you insert the SmartKey into the ignition
lock.
The last position of the steering wheel is
stored when you switch off the ignition or
when you store the setting with the memory
function ( Y page 95).92
Steering wheel
Seats, steering wheel and mirrors
Page 109 of 364
X
To switch on: press the 004A symbol on
rocker switch 0084.
X To switch off: set rocker switch 0084 to the
center position.
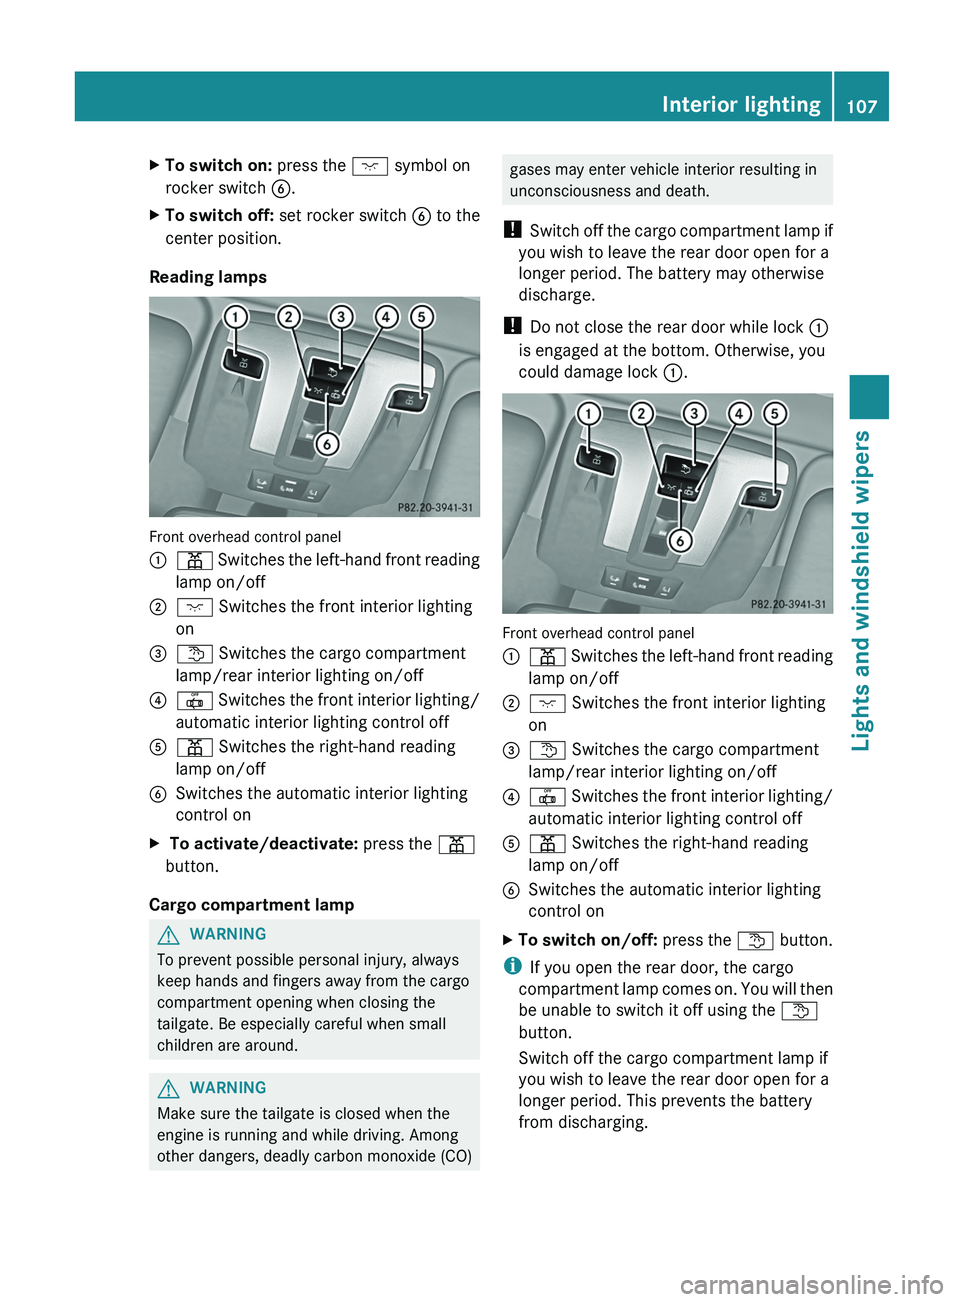
Reading lamps Front overhead control panel
0043
003D Switches the left-hand front reading
lamp on/off
0044 004A Switches the front interior lighting
on
0087 0041 Switches the cargo compartment
lamp/rear interior lighting on/off
0085 0033
Switches the front interior lighting/
automatic interior lighting control off
0083 003D Switches the right-hand reading
lamp on/off
0084 Switches the automatic interior lighting
control on
X To activate/deactivate: press the 003D
button.
Cargo compartment lamp G
WARNING
To prevent possible personal injury, always
keep hands and fingers away from the cargo
compartment opening when closing the
tailgate. Be especially careful when small
children are around. G
WARNING
Make sure the tailgate is closed when the
engine is running and while driving. Among
other dangers, deadly carbon monoxide (CO) gases may enter vehicle interior resulting in
unconsciousness and death.
! Switch off the cargo
compartment lamp if
you wish to leave the rear door open for a
longer period. The battery may otherwise
discharge.
! Do not close the rear door while lock 0043
is engaged at the bottom. Otherwise, you
could damage lock 0043. Front overhead control panel
0043
003D Switches the left-hand front reading
lamp on/off
0044 004A Switches the front interior lighting
on
0087 0041 Switches the cargo compartment
lamp/rear interior lighting on/off
0085 0033
Switches the front interior lighting/
automatic interior lighting control off
0083 003D Switches the right-hand reading
lamp on/off
0084 Switches the automatic interior lighting
control on
X To switch on/off: press the 0041 button.
i If you open the rear door, the cargo
compartment lamp comes on.
You will then
be unable to switch it off using the 0041
button.
Switch off the cargo compartment lamp if
you wish to leave the rear door open for a
longer period. This prevents the battery
from discharging. Interior lighting
107
Lights and windshield wipers Z
Page 149 of 364
X
When the vehicle is stationary, depress the
brake pedal and keep it depressed.
X Push the selector lever forwards past the
first point of resistance.
Transmission position R is engaged.
i For AMG vehicles: when reverse gear is
engaged and the ECO start/stop function
is switched on, the engine starts up
automatically ( Y page 141).
Shifting to neutral N G
WARNING
When leaving the SmartKey in the starter
switch, do not leave children unattended in
the vehicle. It is
possible for children to switch
on the ignition which could result in
unsupervised use of vehicle equipment.
Unsupervised use of vehicle equipment could
result in an accident and/or serious personal
injury.
If the vehicle is stationary:
X Depress the brake pedal.
X Depending on the current transmission
position, press the selector lever forwards
or backwards to the first point of
resistance.
The automatic transmission shifts to N.
If the engine has been switched off, the
automatic transmission automatically shifts
to N.
i For AMG vehicles: the ECO start/stop
function switches the engine off
automatically if the vehicle is braked to a
standstill when in neutral N and the brake
is still depressed (Y page 141). Remaining in neutral N G
WARNING
If children are left unsupervised in the vehicle,
they could:
R open the doors, thus endangering other
people or road users.
R get out and disrupt traffic.
R operate the vehicle's equipment.
Additionally, children could set the vehicle in
motion if, for example, they:
R release the parking brake.
R shift the automatic transmission out of
parking position P.
R starting the engine.
There is a risk of an accident and injury.
When leaving the vehicle, always take the
SmartKey with you and
lock the vehicle. Never
leave children or animals unattended in the
vehicle. Always keep the SmartKey out of
reach of children.
X Make sure that the ignition is switched on.
X When the vehicle is stationary, depress the
brake pedal and keep it depressed.
X Shift to neutral N.
X Release the brake pedal.
X If the parking brake is applied, release it.
X Switch off the ignition and leave the
SmartKey in the ignition lock.
Shifting to transmission position D X
When the vehicle is stationary, depress the
brake pedal and keep it depressed.
X Push the selector lever back past the first
point of resistance.
Transmission position D is engaged.
i For AMG vehicles: the ECO start/stop
function switches the engine off
automatically if the vehicle is braked to a
standstill when in transmission position D
and the brake is still depressed
(Y page 141). Automatic transmission
147
Driving and parking Z
Page 158 of 364
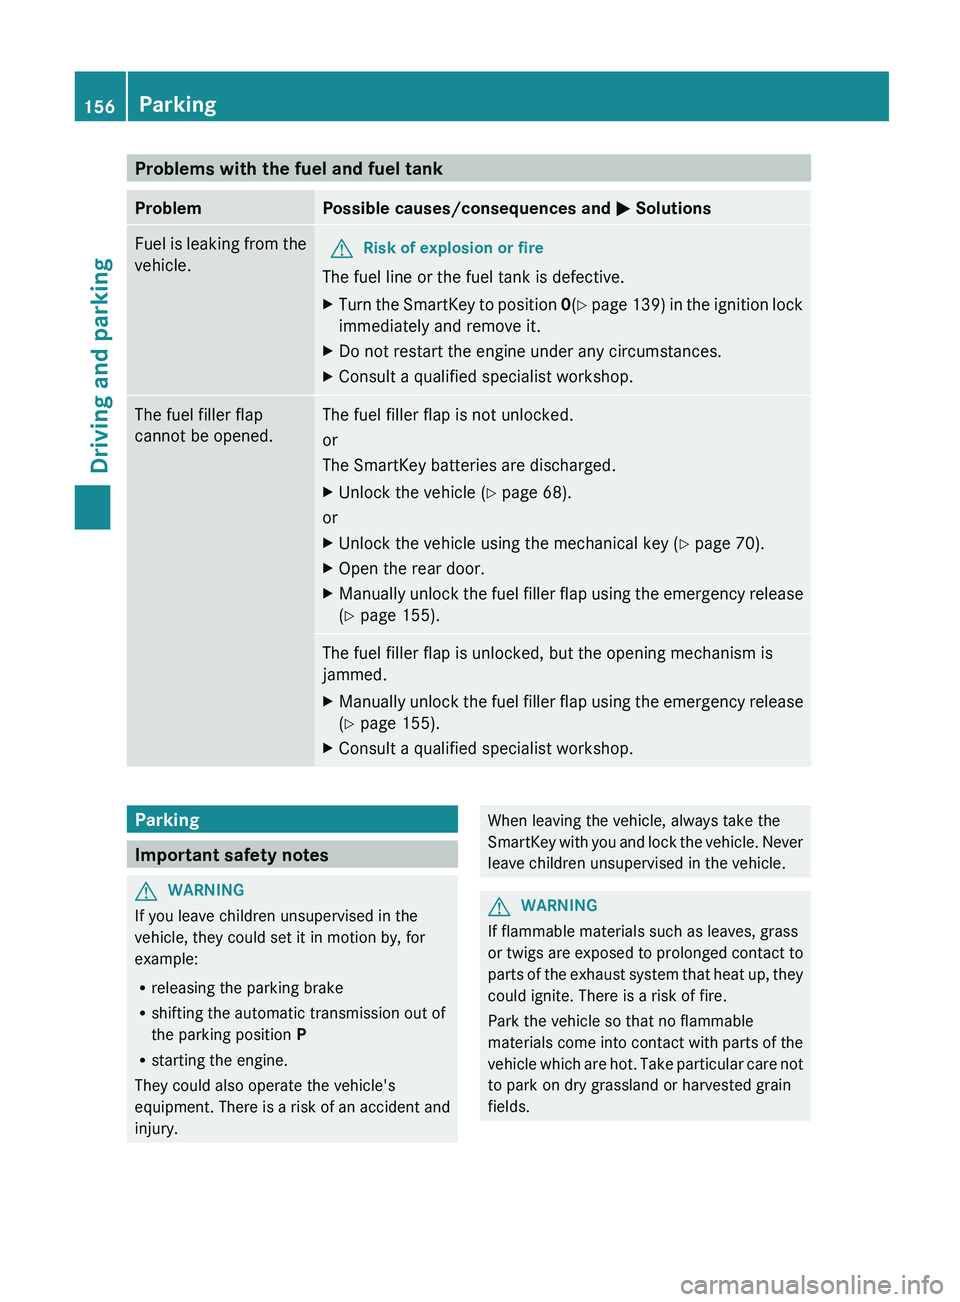
Problems with the fuel and fuel tank
Problem Possible causes/consequences and
0050 SolutionsFuel is leaking from the
vehicle.
G
Risk of explosion or fire
The fuel line or the fuel tank is defective.
X Turn the SmartKey to position 0(Y
page 139)
in the ignition lock
immediately and remove it.
X Do not restart the engine under any circumstances.
X Consult a qualified specialist workshop. The fuel filler flap
cannot be opened. The fuel filler flap is not unlocked.
or
The SmartKey batteries are discharged.
X
Unlock the vehicle (Y page 68).
or
X Unlock the vehicle using the mechanical key ( Y page 70).
X Open the rear door.
X Manually unlock the fuel filler flap using the emergency release
(Y page 155). The fuel filler flap is unlocked, but the opening mechanism is
jammed.
X
Manually unlock the fuel filler flap using the emergency release
(Y page 155).
X Consult a qualified specialist workshop. Parking
Important safety notes
G
WARNING
If you leave children unsupervised in the
vehicle, they could set it in motion by, for
example:
R releasing the parking brake
R shifting the automatic transmission out of
the parking position P
R starting the engine.
They could also operate the vehicle's
equipment. There is a
risk of an accident and
injury. When leaving the vehicle, always take the
SmartKey with you
and
lock the vehicle. Never
leave children unsupervised in the vehicle. G
WARNING
If flammable materials such as leaves, grass
or twigs are exposed
to prolonged contact to
parts of the exhaust system that heat up, they
could ignite. There is a risk of fire.
Park the vehicle so that no flammable
materials come into contact with parts of the
vehicle which are hot. Take particular care not
to park on dry grassland or harvested grain
fields. 156
Parking
Driving and parking
Page 159 of 364
G
WARNING
If you switch off the ignition while driving,
safety-relevant functions are only available
with limitations, or not
at all. This could affect,
for example, the power steering and the brake
boosting effect. You will require considerably
more effort to steer and brake. There is a risk
of an accident.
Do not switch off the ignition while driving. Switching off the engine
Important safety notes G
WARNING
If you switch off the ignition while driving,
safety-relevant functions are only available
with limitations, or not
at all. This could affect,
for example, the power steering and the brake
boosting effect. You will require considerably
more effort to steer and brake. There is a risk
of an accident.
Do not switch off the ignition while driving. G
WARNING
The automatic transmission switches to
neutral position N when you switch off the
engine. The vehicle may roll away. There is a
risk of an accident.
After switching off the engine, always switch
to parking position P. Prevent the parked
vehicle from rolling away by applying the
parking brake.
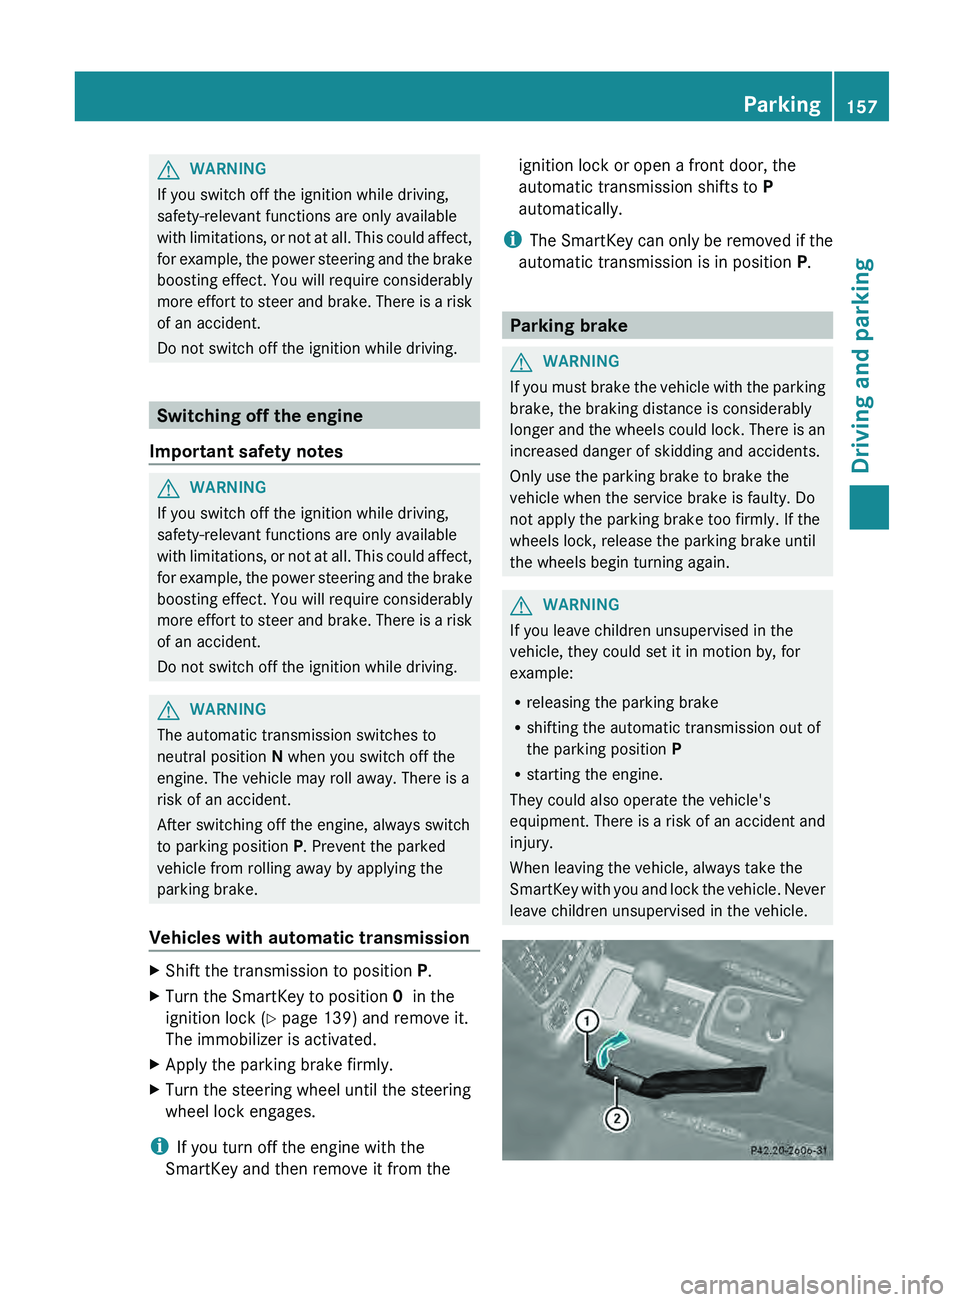
Vehicles with automatic transmission X
Shift the transmission to position P.
X Turn the SmartKey to position 0 in the
ignition lock (Y page 139) and remove it.
The immobilizer is activated.
X Apply the parking brake firmly.
X Turn the steering wheel until the steering
wheel lock engages.
i If you turn off the engine with the
SmartKey and then remove it from the ignition lock or open a front door, the
automatic transmission shifts to
P
automatically.
i The SmartKey can only
be removed if the
automatic transmission is in position P. Parking brake
G
WARNING
If you must brake the vehicle with the parking
brake, the braking distance is considerably
longer and the wheels
could lock. There is an
increased danger of skidding and accidents.
Only use the parking brake to brake the
vehicle when the service brake is faulty. Do
not apply the parking brake too firmly. If the
wheels lock, release the parking brake until
the wheels begin turning again. G
WARNING
If you leave children unsupervised in the
vehicle, they could set it in motion by, for
example:
R releasing the parking brake
R shifting the automatic transmission out of
the parking position P
R starting the engine.
They could also operate the vehicle's
equipment. There is a
risk of an accident and
injury.
When leaving the vehicle, always take the
SmartKey with you and lock the vehicle. Never
leave children unsupervised in the vehicle. Parking
157
Driving and parking Z
Page 223 of 364
Activating/deactivating the acoustic
locking verification signal
If you switch
on
the Acoustic Lock function,
an acoustic signal sounds when you lock the
vehicle.
X Press the 0059 or 0065 button on the
steering wheel to select the Sett. menu.
X Press 0064 or 0063 to select the Vehicle
submenu.
X Press 0076 to confirm.
X Press the 0064 or 0063 button
to select the
Acoustic Lock function.
If the Acoustic Lock function is activated,
the 0037 symbol in the multifunction
display lights up red.
X Press the 0076 button to save the setting.
Convenience Activating/deactivating the EASY-
ENTRY/EXIT feature
G
WARNING
You must make sure no one can become
trapped or injured by the moving steering
wheel when the easy-entry/exit feature is
activated.
To stop steering wheel movement, move
steering wheel adjustment lever
or press one
of the memory position buttons.
Do not leave children unattended in the
vehicle, or with access to an unlocked vehicle.
Children could open the driver's door and
unintentionally activate the easy-entry/exit
feature, which could result in an accident
and/or serious personal injury.
X Press the 0059 or 0065 button on the
steering wheel to select the Sett. menu.
X Press the 0064
or 0063
button
to select the
Convenience submenu.
X Press 0076 to confirm. X
Press 0064 or 0063 to select the Easy
Entry/Exit: function.
If the Easy Entry/Exit function is
activated, the vehicle steering wheel is
displayed in red in the multifunction
display.
X Press the 0076 button to save the setting.
Further information on the EASY-ENTRY/EXIT
feature ( Y page 92).
Switching the fold-in mirrors when
locking feature on/off
When you activate the Auto. Mirror
Folding function, the exterior mirrors are
folded in when the vehicle is locked. If you
unlock the vehicle and then open a door, the
exterior mirrors fold out again.
X Press the 0059 or 0065 button on the
steering wheel to select the Sett. menu.
X Press the 0064 or
0063 button
to select the
Convenience submenu.
X Press 0076 to confirm.
X Press 0064 or 0063 to select the Auto.
Mirror Folding function.
If the Auto. Mirror Folding function is
activated, the vehicle's exterior mirror is
displayed in red in the multifunction
display.
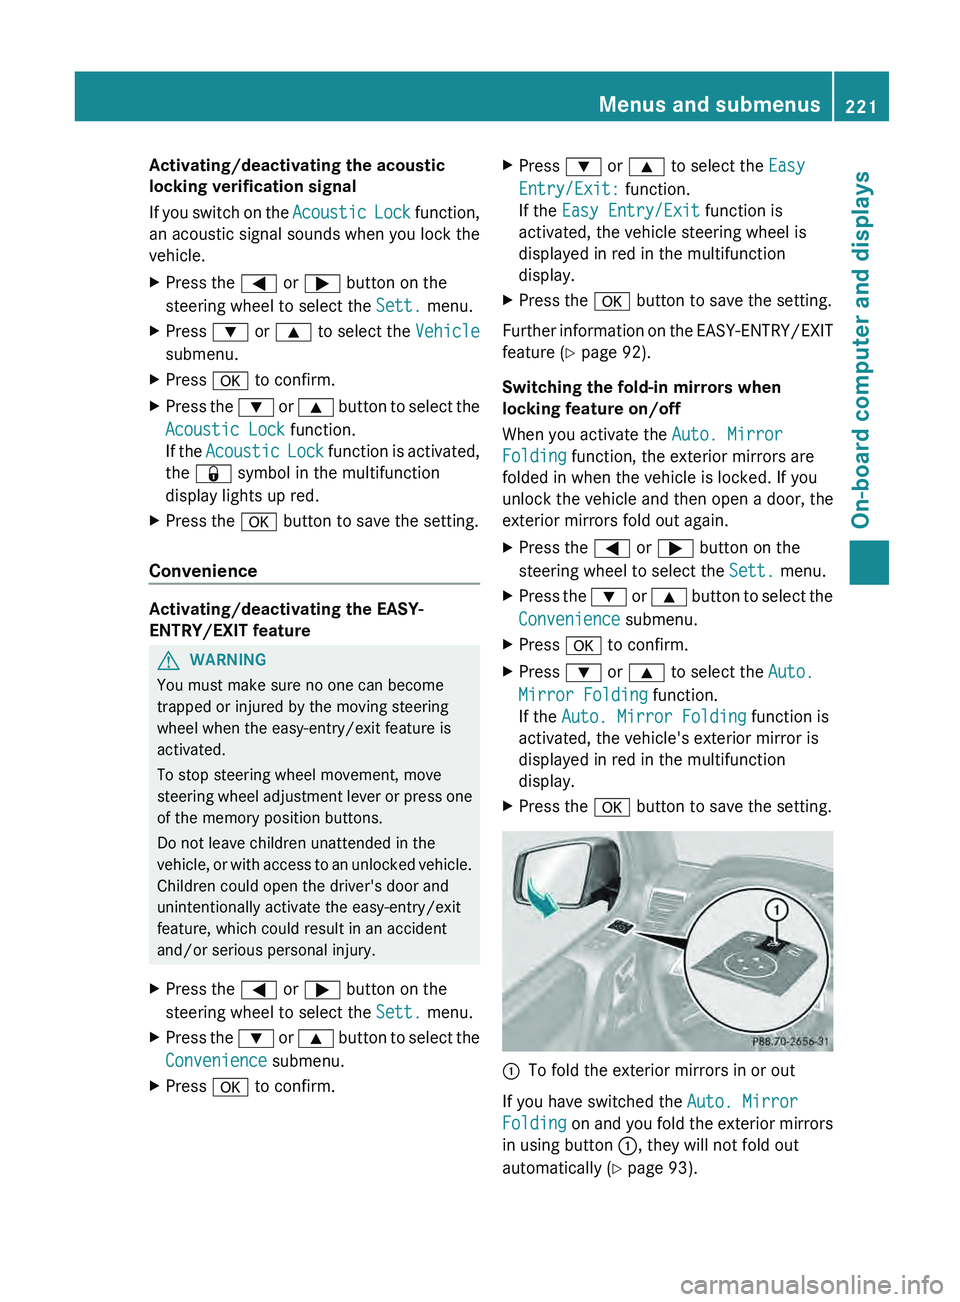
X Press the 0076 button to save the setting. 0043
To fold the exterior mirrors in or out
If you have switched the Auto. Mirror
Folding on and you
fold the exterior mirrors
in using button 0043, they will not fold out
automatically ( Y page 93). Menus and submenus
221
On-board computer and displays Z
Page 272 of 364
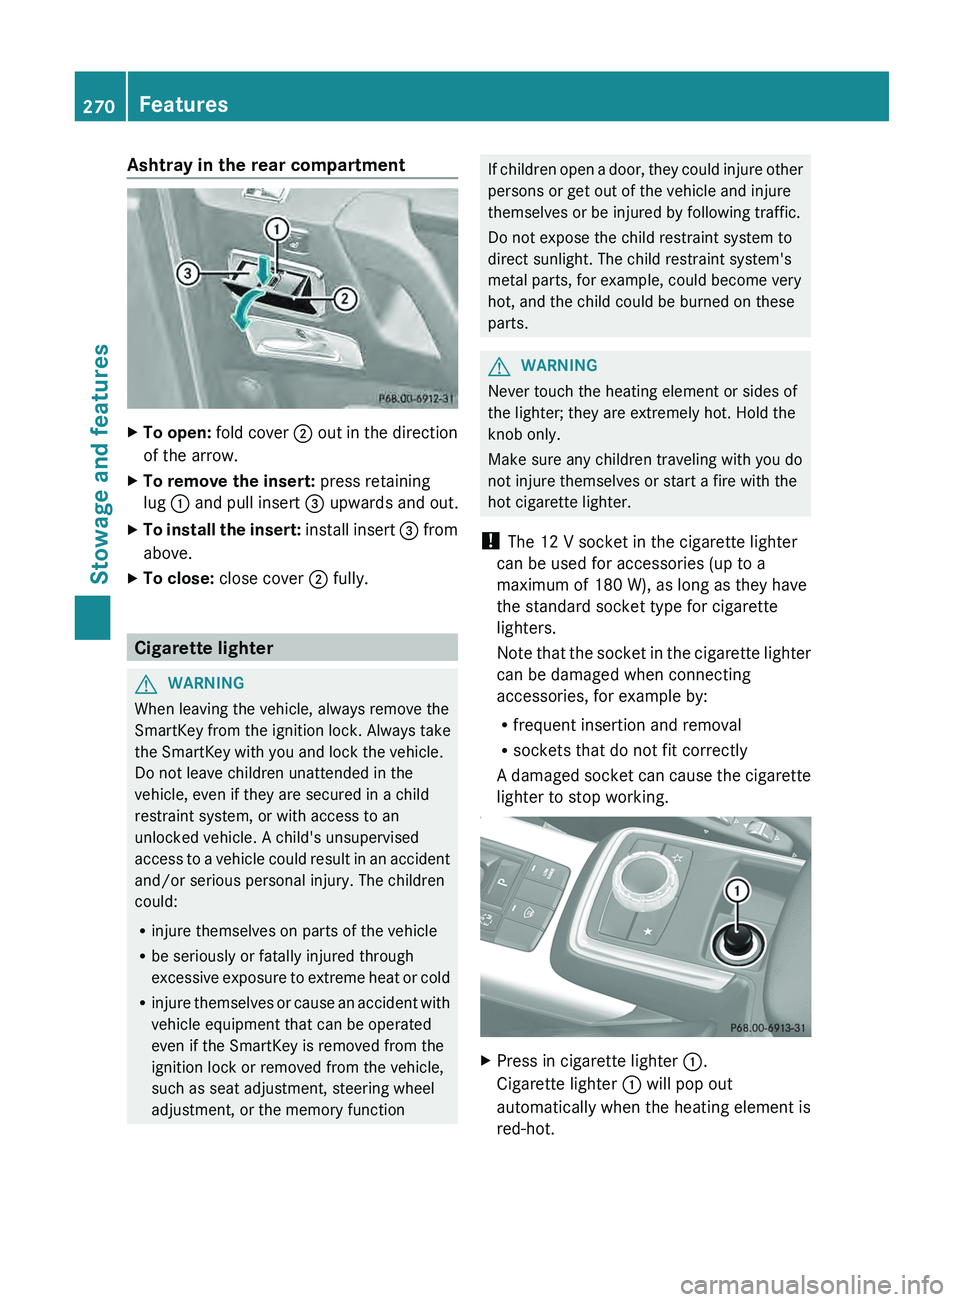
Ashtray in the rear compartment
X
To open: fold cover 0044 out in the direction
of the arrow.
X To remove the insert: press retaining
lug 0043 and pull insert 0087
upwards and out.
X To install the insert:
install insert 0087
from
above.
X To close: close cover 0044 fully.Cigarette lighter
G
WARNING
When leaving the vehicle, always remove the
SmartKey from the ignition lock. Always take
the SmartKey with you and lock the vehicle.
Do not leave children unattended in the
vehicle, even if they are secured in a child
restraint system, or with access to an
unlocked vehicle. A child's unsupervised
access to a vehicle
could result in an accident
and/or serious personal injury. The children
could:
R injure themselves on parts of the vehicle
R be seriously or fatally injured through
excessive exposure to extreme heat or cold
R injure themselves or cause an accident with
vehicle equipment that can be operated
even if the SmartKey is removed from the
ignition lock or removed from the vehicle,
such as seat adjustment, steering wheel
adjustment, or the memory function If children open a door, they could injure other
persons or get out of the vehicle and injure
themselves or be injured by following traffic.
Do not expose the child restraint system to
direct sunlight. The child restraint system's
metal parts, for example, could become very
hot, and the child could be burned on these
parts.
G
WARNING
Never touch the heating element or sides of
the lighter; they are extremely hot. Hold the
knob only.
Make sure any children traveling with you do
not injure themselves or start a fire with the
hot cigarette lighter.
! The 12 V socket in the cigarette lighter
can be used for accessories (up to a
maximum of 180 W), as long as they have
the standard socket type for cigarette
lighters.
Note that the socket
in the cigarette lighter
can be damaged when connecting
accessories, for example by:
R frequent insertion and removal
R sockets that do not fit correctly
A damaged socket can cause the cigarette
lighter to stop working. X
Press in cigarette lighter 0043.
Cigarette lighter 0043 will pop out
automatically when the heating element is
red-hot. 270
Features
Stowage and features