2013 MERCEDES-BENZ G-CLASS SUV isofix
[x] Cancel search: isofixPage 8 of 364

Cargo compartment cover
Installing/removing .......................267
Notes/how to use ......................... 267
Opening and closing ...................... 267
Overview ........................................ 267
Cargo compartment enlargement
Important safety notes .................. 264
Cargo tie down rings ......................... 267
CD player/CD changer (on-board
computer)
.......................................... 216
Center console Overview .......................................... 32
Upper section .................................. 32
Central locking
Automatic locking (on-board
computer) ...................................... 220
Locking/unlocking (SmartKey) ........ 68
Changing bulbs
Important safety notes .................. 108
Overview of bulb types ..................109
Reversing lamps ............................ 113
Side marker lamps .........................112
Turn signals (front) ......................... 111
Changing gears .................................. 148
Checklist After driving off-road ...................... 166
Before driving off-road ................... 165
Child-proof locks
Important safety notes .................... 59
Rear doors ....................................... 59
Children
In the vehicle ................................... 54
Restraint systems ............................ 54
Child seat
Automatic recognition ..................... 44
Automatic recognition/air bag
deactivation, self-test ......................46
LATCH-type (ISOFIX) child seat
anchors ............................................ 57
Special seat belt retractor ............... 56
Top Tether ....................................... 58
Troubleshooting ............................... 47
Chrome parts (cleaning
instructions) ...................................... 298
Cigarette lighter ................................ 270Climate control
Controlling automatically ............... 130
Cooling with air dehumidification ..124
Defrosting the windows ................. 132
Defrosting the windshield
..............131
Dual-zone automatic climate
control ........................................... 119
Important safety notes .................. 118
Indicator lamp ................................ 129
Maximum cooling .......................... 132
Notes on using automatic climate
control ........................................... 120
Overview of systems ...................... 118
Problems with "cooling with air
dehumidification" ........................... 129
Problem with the rear window
defroster ........................................ 133
Refrigerant ..................................... 354
Setting the air distribution .............131
Setting the airflow ......................... 131
Setting the air vents ......................134
Setting the temperature ................ 131
Switching air-recirculation mode
on/off ............................................ 134
Switching on/off ........................... 121
Switching residual heat on/off ...... 134
Switching the rear window
defroster on/off ............................ 133
Switching the ZONE function on/
off .................................................. 131
Windshield defroster ......................133
Cockpit
Overview .......................................... 28
see Instrument cluster
COMAND
see separate operating instructions
Combination switch ..........................103
Consumption statistics (on-board
computer) .......................................... 213
Convenience opening feature see Side windows
Coolant (engine)
Checking the level ......................... 291
Display message ............................ 234
Filling capacity ............................... 356
Notes ............................................. 354
Temperature (on-board computer) . 222 6
Index
Page 13 of 364

L
Lap time (RACETIMER) ......................222
LATCH-type (ISOFIX) child seat
anchors ................................................ 57
License plate lamp (display
message) ............................................ 233
Lights Activating/deactivating the
interior lighting delayed switch-off . 220
Automatic headlamp mode
............100
Cornering light function .................104
Driving abroad ................................. 98
Fog lamps ...................................... 101
Hazard warning lamps ................... 104
High beam flasher .......................... 104
High-beam headlamps ...................103
Light switch ..................................... 98
Low-beam headlamps ...................... 99
Parking lamps ................................ 102
Rear fog lamp ................................ 101
Standing lamps .............................. 102
Switching the daytime running
lamps on/off (on-board
computer) ...................................... 219
Switching the daytime running
lamps on/off (switch) ...................... 99
Switching the exterior lighting
delayed switch-off on/off (on-
board computer) ............................ 219
Switching the surround lighting
on/off (on-board computer) ..........219
Turn signals ................................... 103
see Changing bulbs
see Interior lighting
Light sensor (display message) .......234
LIM indicator lamp Cruise control ................................ 170
DISTRONIC PLUS ........................... 179
Variable SPEEDTRONIC .................175
Limit speed
Variable SPEEDTRONIC .................174
Load anchorage ................................. 266
Loading guidelines ............................262Locking
Emergency locking ........................... 76
From inside the vehicle (central
locking button) ................................. 74
see Central locking
Locking (doors)
Automatic ........................................ 75
Locking centrally
see Central locking
Locking verification signal (on-
board computer) ............................... 221
Low-beam headlamps Display message ............................ 231
Setting for driving abroad
(symmetrical) ................................... 98
Switching on/off .............................. 99
LOW RANGE off-road gear ................199
Luggage compartment
enlargement
Overview ........................................ 264
Lumbar support
Adjusting the 4-way lumbar
support ............................................ 89
Luxury head restraints .......................87 M
M+S tires ............................................ 320
Malfunction message see Display messages
Matte finish (cleaning
instructions) ...................................... 296
mbrace Call priority .................................... 276
Display message ............................ 229
Downloading destinations
(COMAND) ..................................... 277
Downloading routes .......................279
Emergency call .............................. 274
Geo fencing ................................... 280
Important safety notes .................. 272
Locating a stolen vehicle ............... 278
MB info call button ........................ 276
Remote vehicle locking .................. 277
Roadside Assistance button .......... 275
Self-test ......................................... 273
Speed alert .................................... 279
System .......................................... 273 Index
11
Page 41 of 364

The restraint system consists of:
R
seat belts
R child restraint systems
R LATCH-type (ISOFIX) child seat anchors
Additional protection is provided by:
R SRS (Supplemental Restraint System)
R NECK-PRO head restraints
R Air bag system components with:
-The 00730074 indicator lamp
- Front-passenger seat with BabySmart™
air bag deactivation system
The different air bag systems work
independently of each other. The protective
functions of the system work in conjunction
with each other. Not all air bags are always
deployed in an accident.
i Observe the additional information on
infants and children traveling with you in
the vehicle and restraint systems for
infants and children (Y page 54). SRS (Supplemental Restraint System)
Introduction SRS reduces the risk of occupants coming
into contact with the vehicle's interior in the
event of an accident. It can also reduce the
effect of the forces to which occupants are
subjected during an accident.
SRS consists of:
R
The 0075 SRS warning lamp
R Air bags
R Air bag control unit (with crash sensors)
R Emergency Tensioning Device (ETD) for
seat belts
R Seat belt force limiter SRS warning lamp G
WARNING
The SRS self-check has detected a
malfunction if the 0075 SRS indicator lamp:
R does not light up at all
R does not go out after approximately four
seconds after the engine is started
R lights up after
the
engine is started or while
the vehicle is in motion
For your safety, Mercedes-Benz strongly
recommends that you have the system
checked as soon as possible at a qualified
specialist workshop. SRS may otherwise fail
to activate when it is needed in the event of
an accident, which could lead to serious or
fatal injuries. SRS might also be activated
unexpectedly and unnecessarily, which could
also result in injury.
In addition, work carried out improperly on
SRS may render SRS inoperative or cause
unintended air bag deployment. Work on the
SRS system should only be carried out by
qualified specialist personnel. Consult a
qualified specialist workshop.
If it is necessary to modify an air bag system
to accommodate a person with disabilities,
contact an authorized Mercedes-Benz Center
for details. USA only: for further information,
contact our Customer Assistance Center at
1-800-FOR-MERCedes (1-800-367-6372).
SRS functions are checked regularly when
you switch on the ignition and when the
engine is running. Therefore, malfunctions
can be detected in good time.
The 0075 SRS warning lamp in the instrument
cluster lights up when the ignition is switched
on. It goes out no later than a few seconds
after the engine is started.
The SRS components are in operational
readiness when the SRS 0075 indicator lamp
goes out while the engine is running. Occupant safety
39
Safety Z
Page 59 of 364

All seat belts except the driver's seat belt are
equipped with a special seat belt retractor.
When activated, the special seat belt
retractor ensures that the seat belt will not
slacken once the child restraint system has
been secured.
Installing a child restraint system:
X
Always comply with the manufacturer's
installation instructions.
X Pull the seat belt smoothly from the seat
belt retractor.
X Engage the seat belt tongue in the belt
buckle.
Activating the special seat belt retractor:
X Pull the seat belt out fully and let the seat
belt retractor retract it again.
While the seat belt
is retracting, you should
hear a ratcheting sound. The special seat
belt retractor is activated.
X Push down on the child restraint system to
take up any slack.
Removing a child restraint system/
deactivating the special seat belt retractor:
X Always comply with the manufacturer's
installation instructions.
X Press the release button on the seat belt
buckle.
X Guide the seat belt tongue into the belt
outlet.
The special seat belt retractor is
deactivated.
LATCH-type (ISOFIX) child seat anchors
in the rear G
WARNING
Observe "Important safety notes"
(Y page 54). G
WARNING
Children that are too large for a child restraint
must travel in seats using normal seat belts.
Position shoulder belt across the chest and
shoulder, not face or neck. A booster seat may be necessary to achieve
proper seat belt positioning for children over
41 lb (18 kg) until they reach a height where
a lap/shoulder belt fits properly without a
booster.
Install the child restraint system in
accordance with the manufacturer's
instructions.
Attach the child restraint system to both
securing rings.
An incorrectly installed
child
restraint system
could come loose during an accident and
seriously or even fatally injure the child.
Child restraint systems or child seat securing
rings that are malfunctioning or damaged as
the result of a collision must be replaced.
! When installing the child restraint system,
make sure that the seat belt for the middle
seat does not get trapped. The seat belt
could otherwise be damaged.
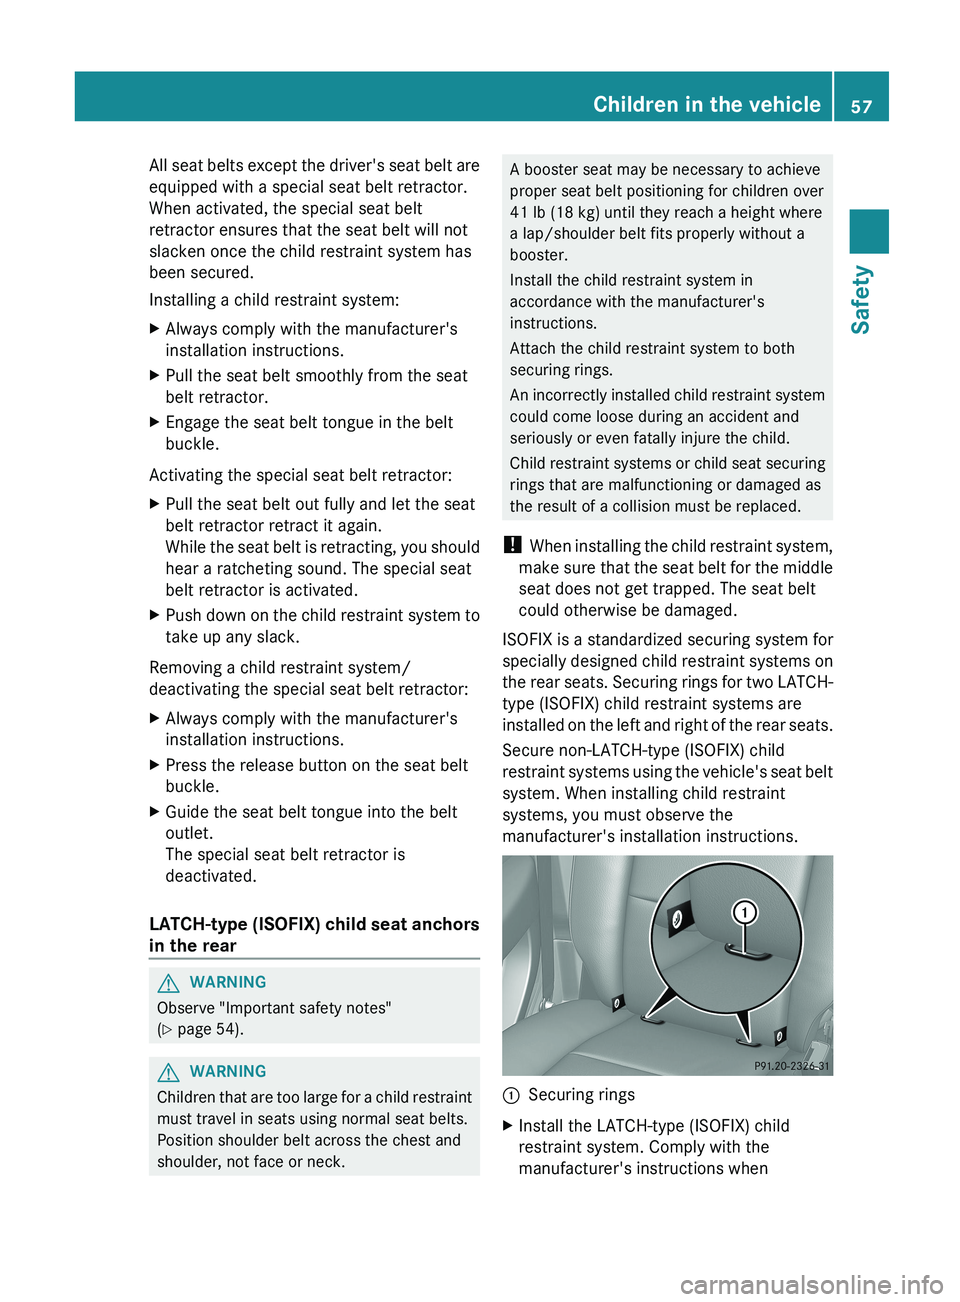
ISOFIX is a standardized securing system for
specially designed child restraint systems on
the rear seats. Securing rings for two LATCH-
type (ISOFIX) child restraint systems are
installed on the left and right of the rear seats.
Secure non-LATCH-type (ISOFIX) child
restraint systems using the vehicle's seat belt
system. When installing child restraint
systems, you must observe the
manufacturer's installation instructions. 0043
Securing rings
X Install the LATCH-type (ISOFIX) child
restraint system. Comply with the
manufacturer's instructions when Children in the vehicle
57
Safety Z
Page 60 of 364

installing the LATCH-type (ISOFIX) child
restraint system.
X When a LATCH-type (ISOFIX) child seat
securing system is installed, make sure
that the center seat belt in the rear
compartment is fully functional and can
move freely.
Top Tether G
WARNING
Observe "Important safety notes"
(Y page 54). G
WARNING
Always lock the rear seat backrests in their
upright position when the rear seats are
occupied by passengers. Lock the rear seat
backrests in their upright position before
installing the Top Tether straps or when the
cargo compartment is not in use. Make sure
that rear seat backrests
are secured properly
by pushing and pulling on the seat backrests.
If the seat backrest is not locked properly, the
seat backrest could fold forward. The child
restraint system is no longer supported
properly or held in position and can no longer
fulfill its function. This could cause serious or
even fatal injuries. G
WARNING
Only use the described top tether anchorage
rings for the respective child seat. Other
lashing eyelets could tear in case of an
accident. Make sure
the
top tether straps are
not crossed or twisted and the hook is
attached and closed properly.
Top Tether provides an additional connection
between a child restraint system, secured
with a LATCH-type (ISOFIX) child seat mount,
and the rear seat. This helps reduce the risk
of injury even further. X
Remove cargo compartment cover
(Y page 267).
X Move the head restraint upwards.
X Install the LATCH-type (ISOFIX) child
restraint system with Top Tether. Comply
with the manufacturer's installation
instructions when doing so.
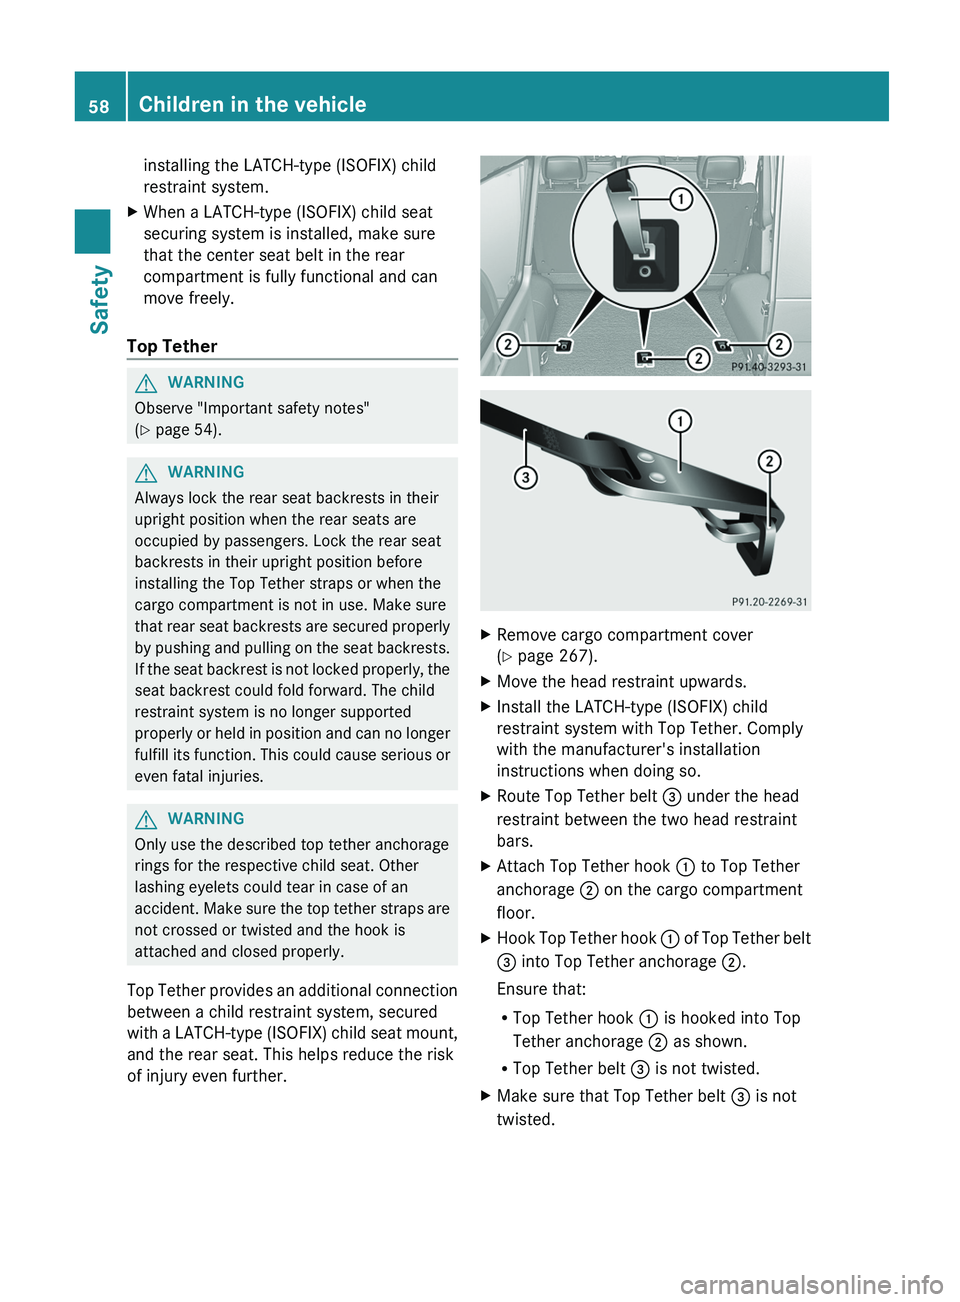
X Route Top Tether belt 0087 under the head
restraint between the two head restraint
bars.
X Attach Top Tether hook 0043 to Top Tether
anchorage 0044 on the cargo compartment
floor.
X Hook Top Tether hook 0043 of Top
Tether
belt
0087 into Top Tether anchorage 0044.
Ensure that:
R Top Tether hook 0043 is hooked into Top
Tether anchorage 0044 as shown.
R Top Tether belt 0087 is not twisted.
X Make sure that Top Tether belt 0087 is not
twisted. 58
Children in the vehicle
Safety