2013 MERCEDES-BENZ E-Class CABRIOLET windshield wipers
[x] Cancel search: windshield wipersPage 5 of 372

Index
....................................................... 4Introduction .........................................
21 At a glance
........................................... 27 Safety ...................................................
37 Opening/closing
................................. 71 Seats, steering wheel and mirrors ..
105 Lights and windshield wipers
..........119 Climate control
................................. 135 Driving and parking ..........................
149 On-board computer and displays
....211 Stowage and features ......................
267 Maintenance and care
......................293 Breakdown assistance
.....................307 Wheels and tires ...............................
321 Technical data ...................................
359 Contents
3
Page 21 of 372

V
Vanity mirror (in the sun visor) ........
274
Vehicle Data acquisition ............................... 25
Display message ............................ 251
Equipment ....................................... 21
Individual settings ..........................223
Limited Warranty ............................. 25
Loading .......................................... 333
Locking (in an emergency) ............... 81
Locking (SmartKey) .......................... 73
Lowering ........................................ 348
Maintenance .................................... 22
Parking for a long period ................ 169
Pulling away ................................... 153
Raising ........................................... 346
Reporting problems .........................24
Securing from rolling away ............345
Towing away .................................. 315
Transporting .................................. 317
Unlocking (in an emergency) ........... 80
Unlocking (SmartKey) ......................73
Vehicle data ................................... 367
Vehicle data ....................................... 367
Vehicle dimensions ...........................367
Vehicle emergency locking ................81
Vehicle identification number see VIN
Vehicle identification plate ..............361
Vehicle tool kit .................................. 308
Video Operating the DVD ......................... 220
VIN ...................................................... 361W
Warning and indicator lamps ABS
................................................ 258
Brakes ........................................... 258
Check Engine ................................. 262
Coolant .......................................... 262
Distance warning ........................... 264
DISTRONIC PLUS ........................... 264
ESP ®
.............................................. 259
ESP ®
OFF ....................................... 260
Fuel tank ........................................ 262
Overview .................................. 30, 256PASSENGER AIR BAG OFF
indicator lamp
.................................. 46
Reserve fuel
................................... 262
Seat belt ........................................ 257
SRS ................................................ 261
Tire pressure monitor .................... 265
Warranty ............................................ 360
Washer fluid Display message ............................ 254
Wheel bolt tightening torque ...........348
Wheel chock ...................................... 345
Wheels Changing a wheel .......................... 344
Checking ........................................ 323
Cleaning ......................................... 303
Cleaning (warning) .........................344
Emergency spare wheel ................. 355
Important safety notes .................. 322
Interchanging/changing ................344
Mounting a new wheel ................... 348
Mounting a wheel .......................... 345
Removing a wheel ..........................347
Storing ........................................... 344
Tightening torque ........................... 348
Wheel size/tire size ....................... 349
Wind deflector
see AIRCAP
Wind deflector (cleaning
instructions) ...................................... 302
Window curtain air bag Operation ......................................... 46
Windows
see Side windows
Wind screen (cleaning
instructions) ...................................... 303
Windshield Defrosting ...................................... 143
Windshield washer fluid
see Windshield washer system
Windshield washer system
Adding washer fluid .......................297
Filling capacity ............................... 367
Notes ............................................. 367
Windshield wipers
Problem (malfunction) ...................133
Replacing the wiper blades ............ 133
Switching on/off ........................... 132 Index
19
Page 121 of 372

Useful information ............................
120
Exterior lighting ................................ 120
Interior lighting ................................. 128
Replacing bulbs ................................. 129
Windshield wipers ............................132 119Lights and windshield wipers
Page 122 of 372

Useful information
i This Operator's Manual describes all
models and all standard and optional
equipment of your vehicle available at the
time of publication of the Operator's
Manual. Country-specific differences are
possible.
Please note that your vehicle may
not be equipped with all features
described. This also applies to safety-
related systems and functions.
i Read the information on qualified
specialist workshops: ( Y page 24).Exterior lighting
Important safety notes
For reasons of safety, Mercedes-Benz
recommends that you drive with the lights
switched
on even during the daytime. In some
countries, operation of the headlamps varies
due to legal requirements and self-imposed
obligations.
If you wish to drive during the daytime without
lights, switch off the daytime running lamps
function in the on-board computer
(Y page 224). Driving abroad
Symmetrical low-beam headlamps Switch the headlamps to symmetrical low
beam in countries in which traffic drives on
the
opposite side of the road from the country
where the vehicle is registered. This prevents
glare to oncoming traffic. When using
symmetrical lights, the edge of the road is not
lit as widely and as far ahead as normal.
Have the headlamps converted at a qualified
specialist workshop as close to the border as
possible before driving in these countries. Asymmetrical low-beam headlamps Have the headlamps converted back to
asymmetrical low-beam headlamps at a
qualified specialist workshop as soon as
possible after crossing the border again.
Setting the exterior lighting
Setting options Exterior lighting can be set using the:
R
light switch
R combination switch (Y page 124)
R the on-board computer (Y page 224)
Light switch Operation
1W
Left-hand standing lamps
2X Right-hand standing lamps
3T Parking lamps, license plate and
instrument cluster lighting
4Ã Automatic headlamp mode,
controlled by the light sensor
5L Low-beam/high-beam headlamps
BR Rear fog lamp
CN Fog lamps (only vehicles with front
fog lamps)
If you hear a warning tone when you leave the
vehicle, the lights may still be switched on.
X Turn the light switch to Ã.120
Exterior lighting
Lights and windshield wipers
Page 123 of 372

The exterior lighting (except the parking/
standing lamps) switches off automatically if
you:
R
remove
the SmartKey from the ignition lock
R open the driver's door with the SmartKey
in position 0.
Automatic headlamp mode G
WARNING
If the light switch is set to Ã
and it is foggy,
snowing or there is poor visibility, the low-
beam headlamps will not come on
automatically. This could endanger you and
others. In such situations turn the light switch
to L.
The automatic headlamp feature is only an
aid. The driver is responsible for the vehicle's
lighting at all times. 1W
Left-hand standing lamps
2X Right-hand standing lamps
3T Parking lamps, license plate and
instrument cluster lighting
4Ã Automatic headlamp mode,
controlled by the light sensor
5L Low-beam/high-beam headlamps
BR Rear fog lamp
CN Fog lamps (only vehicles with front
fog lamps) Ã is the favored light switch setting. The
light setting is automatically selected
according to the brightness of the ambient
light
(exception: poor visibility due to weather
conditions such as fog, snow or spray):
R SmartKey in position 1 in the ignition lock:
the parking lamps are switched on or off
automatically depending on the brightness
of the ambient light.
R With the engine running: if you have
activated the daytime running lamps
function via the on-board computer, the
daytime running lamps or the low-beam
headlamps and parking lamps are switched
on or off automatically depending on the
brightness of the ambient light.
X To switch on automatic headlamp
mode: turn the light switch to Ã.
Only for Canada:
The daytime running lamps improve the
visibility of your vehicle during the day. The
daytime
running lamps function is required by
law in Canada. It cannot therefore be
deactivated.
When the engine is running and the vehicle is
stationary: if you move the selector lever from
a drive position to P, the daytime running
lamps/low-beam headlamps go out after
three minutes.
When the engine is running, the vehicle is
stationary and in high ambient light
brightness: if you turn the light switch
to T, you turn on the daytime running
lamps and parking lamps.
If the engine is running and you turn the light
switch to L, the manual settings take
precedence over the daytime running lamps.
USA only:
The daytime running lamps improve the
visibility of your vehicle during the day. To do
this, the daytime running lamps function must
be switched on using the on-board computer
(Y page 224).
If the engine is running and you turn the light
switch to T or L, the manual settings Exterior lighting
121
Lights and windshield wipers Z
Page 124 of 372

take precedence over the daytime running
lamps.
i
In
the USA, the daytime running lamps are
deactivated upon delivery from the factory.
Low-beam headlamps G
WARNING
If the light switch is set to Ã
and it is foggy,
snowing or there is poor visibility, the low-
beam headlamps will not come on
automatically. This could endanger you and
others. In such situations turn the light switch
to L.
The automatic headlamp feature is only an
aid. The driver is responsible for the vehicle's
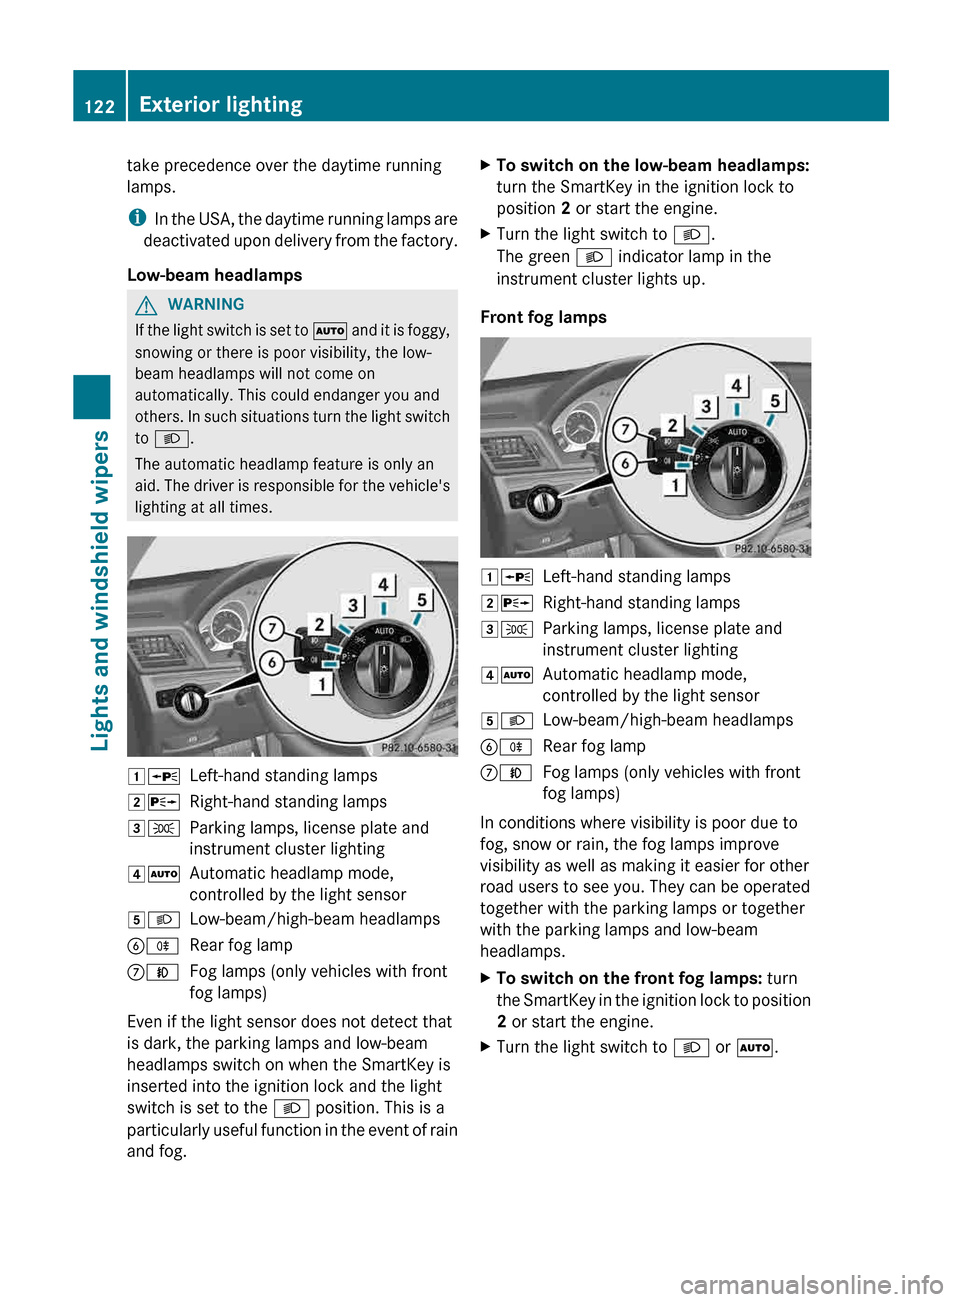
lighting at all times. 1W
Left-hand standing lamps
2X Right-hand standing lamps
3T Parking lamps, license plate and
instrument cluster lighting
4Ã Automatic headlamp mode,
controlled by the light sensor
5L Low-beam/high-beam headlamps
BR Rear fog lamp
CN Fog lamps (only vehicles with front
fog lamps)
Even if the light sensor does not detect that
is dark, the parking lamps and low-beam
headlamps switch on when the SmartKey is
inserted into the ignition lock and the light
switch is set to the L position. This is a
particularly
useful function in the event of rain
and fog. X
To switch on the low-beam headlamps:
turn the SmartKey in the ignition lock to
position 2 or start the engine.
X Turn the light switch to L.
The green L indicator lamp in the
instrument cluster lights up.
Front fog lamps 1W
Left-hand standing lamps
2X Right-hand standing lamps
3T Parking lamps, license plate and
instrument cluster lighting
4Ã Automatic headlamp mode,
controlled by the light sensor
5L Low-beam/high-beam headlamps
BR Rear fog lamp
CN Fog lamps (only vehicles with front
fog lamps)
In conditions where visibility is poor due to
fog, snow or rain, the fog lamps improve
visibility as well as making it easier for other
road users to see you. They can be operated
together with the parking lamps or together
with the parking lamps and low-beam
headlamps.
X To switch on the front fog lamps: turn
the
SmartKey in the ignition lock to position
2 or start the engine.
X Turn the light switch to L or Ã.122
Exterior lighting
Lights and windshield wipers
Page 125 of 372

X
Press the N button.
The green N indicator lamp in the
instrument cluster lights up.
X To switch off the front fog lamps: press
the N button.
The green N indicator lamp in the
instrument cluster goes out.
Rear fog lamp 1W
Left-hand standing lamps
2X Right-hand standing lamps
3T Parking lamps, license plate and
instrument cluster lighting
4Ã Automatic headlamp mode,
controlled by the light sensor
5L Low-beam/high-beam headlamps
BR Rear fog lamp
CN Fog lamps (only vehicles with front
fog lamps)
The rear fog lamp improves visibility of your
vehicle for the traffic behind in the event of
heavy fog. Please take note of the country-
specific regulations for the use of rear fog
lamps.
X To switch on the rear fog lamp: turn the
SmartKey in the ignition lock to position 2
or start the engine.
X Turn the light switch to L or Ã.X
Press the R button.
The yellow R indicator lamp in the
instrument cluster lights up.
X To switch off the rear fog lamp: press the
R button.
The yellow R indicator lamp in the
instrument cluster goes out.
Parking lamps
! If the battery has been excessively
discharged, the parking lamps or standing
lamps are automatically switched off to
enable the next engine start. Always park
your vehicle safely and sufficiently lit
according to legal standards. Avoid the
continuous use of the T parking lamps
for
several hours. If possible, switch on the
X right or the W left standing lamp. 1W
Left-hand standing lamps
2X Right-hand standing lamps
3T Parking lamps, license plate and
instrument cluster lighting
4Ã Automatic headlamp mode,
controlled by the light sensor
5L Low-beam/high-beam headlamps
BR Rear fog lamp
CN Fog lamps (only vehicles with front
fog lamps)
X To switch on: turn light switch to T.
The green T indicator lamp in the
instrument cluster lights up. Exterior lighting
123
Lights and windshield wipers Z
Page 126 of 372

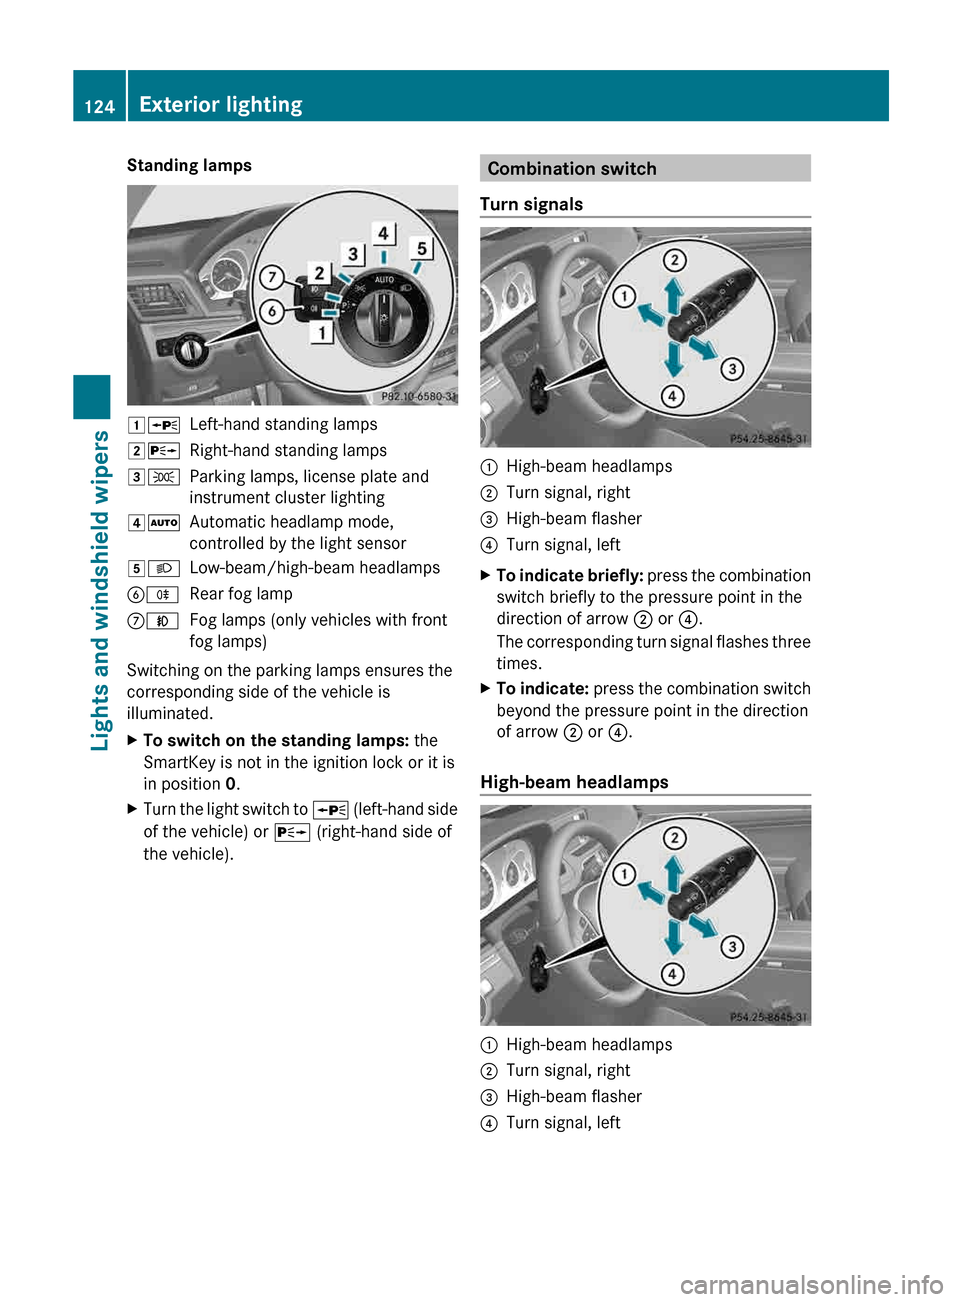
Standing lamps
1W
Left-hand standing lamps
2X Right-hand standing lamps
3T Parking lamps, license plate and
instrument cluster lighting
4Ã Automatic headlamp mode,
controlled by the light sensor
5L Low-beam/high-beam headlamps
BR Rear fog lamp
CN Fog lamps (only vehicles with front
fog lamps)
Switching on the parking lamps ensures the
corresponding side of the vehicle is
illuminated.
X To switch on the standing lamps: the
SmartKey is not in the ignition lock or it is
in position 0.
X Turn the light switch to W (left-hand side
of the vehicle) or X (right-hand side of
the vehicle). Combination switch
Turn signals :
High-beam headlamps
; Turn signal, right
= High-beam flasher
? Turn signal, left
X To indicate briefly: press
the combination
switch briefly to the pressure point in the
direction of arrow ; or ?.
The corresponding turn signal flashes three
times.
X To indicate: press
the combination switch
beyond the pressure point in the direction
of arrow ; or ?.
High-beam headlamps :
High-beam headlamps
; Turn signal, right
= High-beam flasher
? Turn signal, left124
Exterior lighting
Lights and windshield wipers