2013 MERCEDES-BENZ CLA trailer
[x] Cancel search: trailerPage 322 of 352
GWARNING
If you fit unsuitable accessories onto tyre
valves, the tyre valves may be overloaded and
malfunction, which can cause tyre pressure
loss. Due to their design, retrofitted tyre pres-
sure monitors keep the tyre valve open. This
can also result in tyre pressure loss. There is
a risk of accident.
Only screw standard valve caps or valve caps
specifically provided by Mercedes-Benz for
your vehicle onto the tyre valve.
GWARNING
If the tyre pressure drops repeatedly, the
wheel, valve or tyre may be damaged. Tyre
pressure that is too low may result in a tyre
blow-out. There is a risk of accident.
R Check the tyre for foreign objects.
R Check whether the wheel is losing air or the
valve is leaking.
If you are unable to rectify the damage, con-
tact a qualified specialist workshop.
HEnvironmental note
Check the tyre pressure regularly, at least
every 14 days.
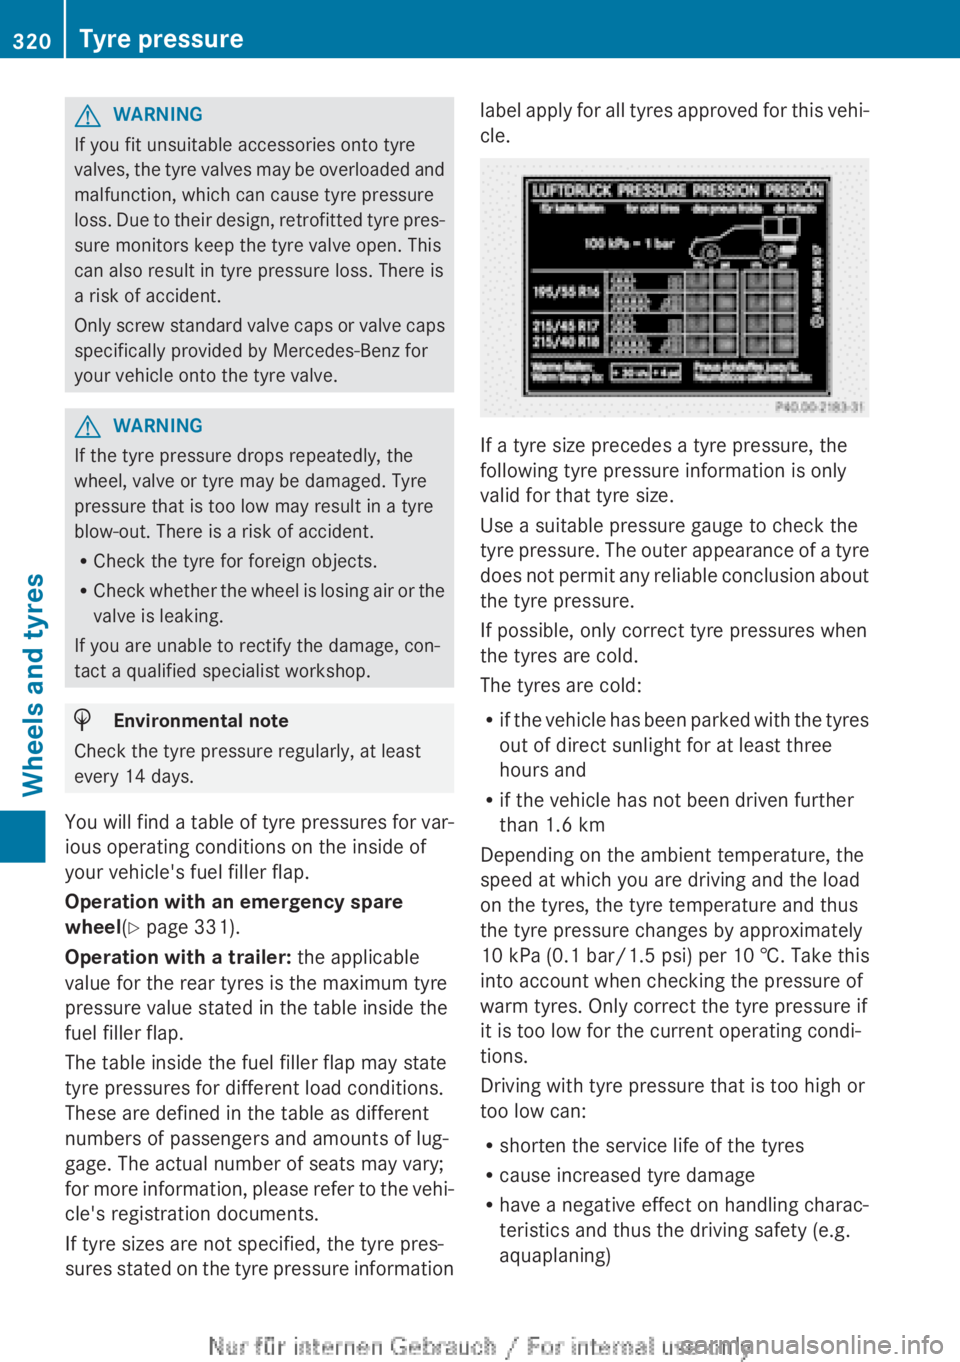
You will find a table of tyre pressures for var-
ious operating conditions on the inside of
your vehicle's fuel filler flap.
Operation with an emergency spare
wheel (Y page 331).
Operation with a trailer: the applicable
value for the rear tyres is the maximum tyre
pressure value stated in the table inside the
fuel filler flap.
The table inside the fuel filler flap may state
tyre pressures for different load conditions.
These are defined in the table as different
numbers of passengers and amounts of lug-
gage. The actual number of seats may vary;
for more information, please refer to the vehi-
cle's registration documents.
If tyre sizes are not specified, the tyre pres-
sures stated on the tyre pressure information
label apply for all tyres approved for this vehi-
cle.
If a tyre size precedes a tyre pressure, the
following tyre pressure information is only
valid for that tyre size.
Use a suitable pressure gauge to check the
tyre pressure. The outer appearance of a tyre
does not permit any reliable conclusion about
the tyre pressure.
If possible, only correct tyre pressures when
the tyres are cold.
The tyres are cold:
R if the vehicle has been parked with the tyres
out of direct sunlight for at least three
hours and
R if the vehicle has not been driven further
than 1.6 km
Depending on the ambient temperature, the
speed at which you are driving and the load
on the tyres, the tyre temperature and thus
the tyre pressure changes by approximately
10 kPa (0.1 bar/1.5 psi) per 10 †. Take this
into account when checking the pressure of
warm tyres. Only correct the tyre pressure if
it is too low for the current operating condi-
tions.
Driving with tyre pressure that is too high or
too low can:
R shorten the service life of the tyres
R cause increased tyre damage
R have a negative effect on handling charac-
teristics and thus the driving safety (e.g.
aquaplaning)
320Tyre pressureWheels and tyres
Page 323 of 352

iThe tyre pressure values given for low
loads are minimum values which offer you
good ride comfort characteristics.
However, you can also use the values given
for higher loads. These are permissible and
will not adversely affect the running of the
vehicle.
Tyre pressure loss warning system
General notes
While the vehicle is in motion, the tyre pres-
sure loss warning system monitors the set
tyre pressure using the rotational speed of
the wheels. This enables the system to detect
significant pressure loss in a tyre. If the speed
of rotation of a wheel changes as a result of
a loss of pressure, a corresponding warning
message will appear in the multifunction dis-
play.
You can recognise the tyre pressure loss
warning by the Run Flat Indicator
active Restart with OK message which
appears in the Service menu of the multi-
function display. Further information on the
message display can be found under "Restart-
ing the tyre pressure loss warning system"
( Y page 321).
Important safety notes
The tyre pressure warning system does not
warn you of an incorrectly set tyre pressure.
Observe the notes on the recommended tyre
pressure ( Y page 319).
The tyre pressure loss warning does not
replace the need to regularly check the tyre
pressures. An even loss of pressure on sev-
eral tyres at the same time cannot be detec-
ted by the tyre pressure loss warning system.
The tyre pressure monitor is not able to warn
you of a sudden loss of pressure, e.g. if the
tyre is penetrated by a foreign object. In the
event of a sudden loss of pressure, bring the
vehicle to a halt by braking carefully. Avoid
abrupt steering manoeuvres.
The function of the tyre pressure loss warning
system is limited or delayed if:
R snow chains are fitted to your vehicle's
tyres.
R road conditions are wintry.
R you are driving on sand or gravel.
R you adopt a very sporty driving style (cor-
nering at high speeds or driving with high
rates of acceleration).
R you are towing a very heavy or large trailer.
R you are driving with a heavy load (in the
vehicle or on the roof).
Restarting the tyre pressure loss warn-
ing system
Restart the tyre pressure loss warning system
if you have:
R changed the tyre pressure
R changed the wheels or tyres
R fitted new wheels or tyres
XBefore restarting, make sure that the tyre
pressures are set properly on all four tyres
for the respective operating conditions.
The recommended tyre pressures can be
found in the table on the fuel filler flap.
The tyre pressure loss warning system can
only give reliable warnings if you have set
the correct tyre pressure. If an incorrect
tyre pressure is set, these incorrect values
will be monitored.XObserve the notes in the section on tyre
pressures ( Y page 319).XMake sure that the key is in position 2 in
the ignition lock ( Y page 145).XPress = or ; on the steering wheel
to select the Service menu.XPress the 9 or : button to select
Tyre press. .XPress the a button.
The Run Flat Indicator active
Restart with OK message appears in the
multifunction display.Tyre pressure321Wheels and tyresZ
Page 327 of 352
Interchanging the front and rear wheels of
differing dimensions can render the general
operating permit invalid.
Always pay attention to the instructions and
safety notes when changing a wheel
( Y page 324).
The wear patterns on the front and rear tyres
differ, depending on the operating conditions.
Interchange the wheels before a clear wear
pattern has formed on the tyres. Front tyres
typically wear more on the shoulders and the
rear tyres in the centre.
On vehicles that have the same size front and
rear wheels, you can interchange the wheels
every 5,000 to 10,000 km depending on the
degree of tyre wear. Ensure the direction of
rotation is maintained.
Clean the contact surfaces of the wheel and
the brake disc thoroughly every time a wheel
is interchanged. Check the tyre pressure and,
if necessary, restart the tyre pressure loss
warning system or the tyre pressure monitor.
Direction of rotation
Tyres with a specified direction of rotation
have additional benefits, e.g. if there is a risk
of aquaplaning. You will only gain these ben-
efits if the correct direction of rotation is
observed.
An arrow on the sidewall of the tyre indicates
its correct direction of rotation.
Storing wheels
Store wheels that are not being used in a cool,
dry and preferably dark place. Protect the
tyres against oil, grease, petrol and diesel.
Cleaning the wheels
GWARNING
The water jet of circular-jet nozzles (dirt grind-
ers) can cause damage not visible from the
outside to tyres or chassis components. Com-
ponents damaged in this way can unexpect-
edly fail. There is a risk of an accident.
Do not use high-pressure cleaners with circu-
lar-jet nozzles to clean the vehicle. Have dam-
aged tyres or chassis components replaced
immediately.
Fitting a wheel
Preparing the vehicle
XStop the vehicle on solid, non-slippery and
level ground.XApply the electric parking brake manually
( Y page 163).XBring the front wheels into the straight-
ahead position.XVehicles with manual transmission:
fully depress the clutch pedal and engage
first or reverse gear.XVehicles with automatic transmission:
move the DIRECT SELECT lever to P.XSwitch off the engine.XRemove the key from the ignition lock.XIf a trailer is coupled to the vehicle, uncou-
ple it.XIf included in the vehicle equipment,
remove the tyre-change tool kit from the
vehicle.XSecure the vehicle to prevent it from rolling
away.
i Apart from certain country-specific varia-
tions, vehicles are not equipped with a tyre-
change tool kit. For information on which
tools are required to perform a wheel
change on your vehicle, consult a
Mercedes-Benz Service Centre.
Necessary wheel-changing tools can
include, for example:
R Jack
R Wheel chock
R Wheel wrench
Changing a wheel325Wheels and tyresZ
Page 335 of 352
Useful information ............................334
Information on technical data .........334
Vehicle electronics ...........................334
Identification plates .........................336
Service products and capacities .....336
Vehicle data ...................................... 343
Trailer tow hitch ................................ 344333Technical data
Page 338 of 352
Identification plates
Vehicle identification plate with vehi-
cle identification number (VIN)
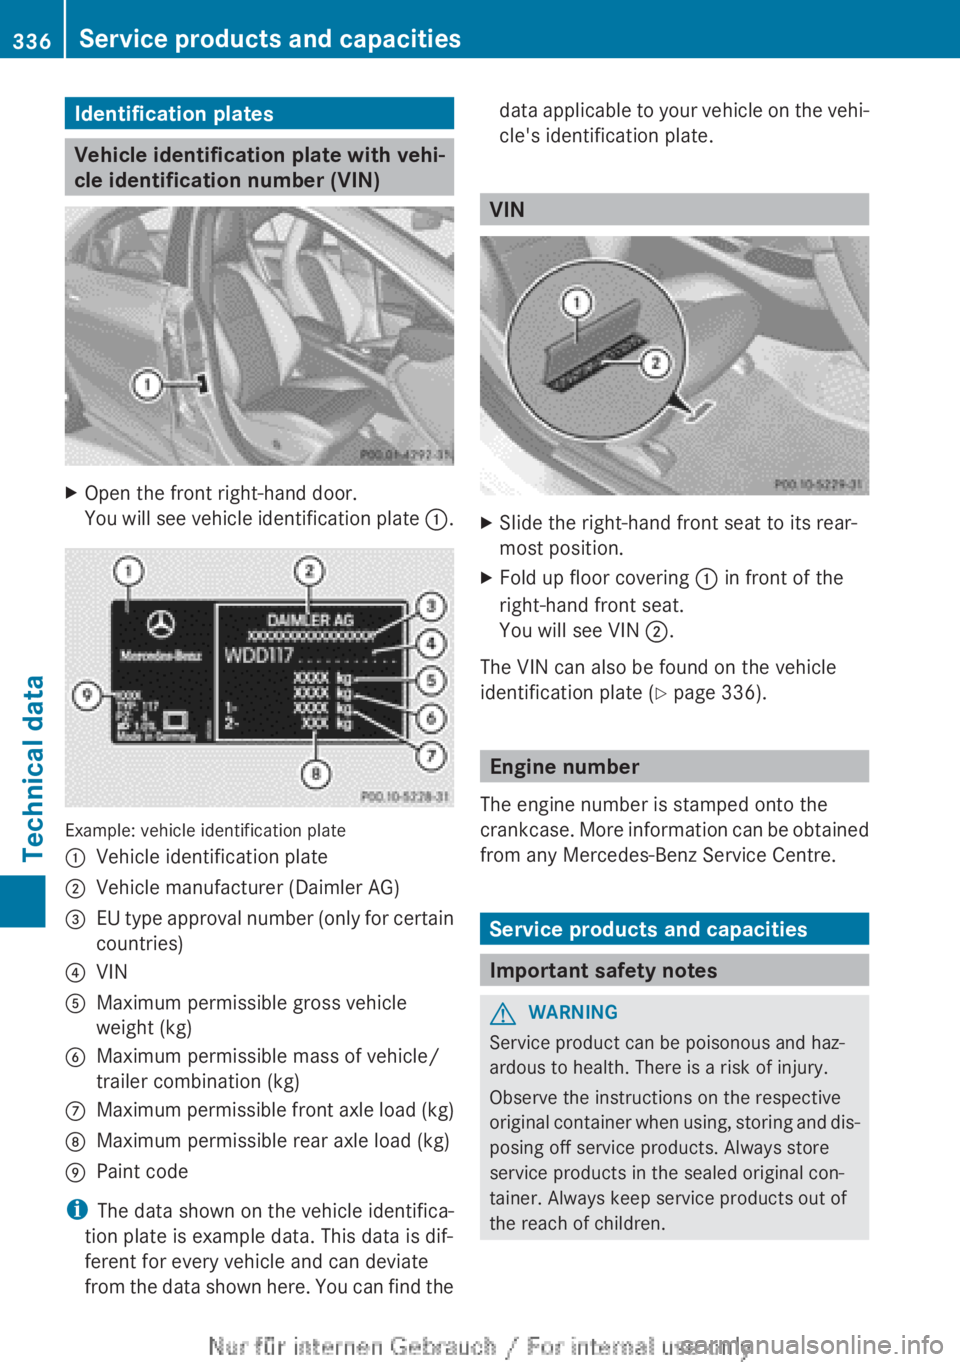
XOpen the front right-hand door.
You will see vehicle identification plate :.
Example: vehicle identification plate
:Vehicle identification plate;Vehicle manufacturer (Daimler AG)=EU type approval number (only for certain
countries)?VINAMaximum permissible gross vehicle
weight (kg)BMaximum permissible mass of vehicle/
trailer combination (kg)CMaximum permissible front axle load (kg)DMaximum permissible rear axle load (kg)EPaint code
i The data shown on the vehicle identifica-
tion plate is example data. This data is dif-
ferent for every vehicle and can deviate
from the data shown here. You can find the
data applicable to your vehicle on the vehi-
cle's identification plate.
VIN
XSlide the right-hand front seat to its rear-
most position.XFold up floor covering : in front of the
right-hand front seat.
You will see VIN ;.
The VIN can also be found on the vehicle
identification plate ( Y page 336).
Engine number
The engine number is stamped onto the
crankcase. More information can be obtained
from any Mercedes-Benz Service Centre.
Service products and capacities
Important safety notes
GWARNING
Service product can be poisonous and haz-
ardous to health. There is a risk of injury.
Observe the instructions on the respective
original container when using, storing and dis-
posing off service products. Always store
service products in the sealed original con-
tainer. Always keep service products out of
the reach of children.
336Service products and capacitiesTechnical data
Page 342 of 352
Rin mountainous terrain
R when towing a trailer
i Only for certain countries: you can find
the current consumption and emission val-
ues of your vehicle in the COC documents
(EU CERTIFICATE OF CONFORMITY). These
documents are delivered with your vehicle.
The consumption figures were in each case
based on the currently applicable version:
R for vehicles that comply with standards
up to and including the EURO 4 standard,
in accordance with EU Directive
80/1268/EEC
R for vehicles that comply with or exceed
the EURO 5 standard, in accordance with
Regulation (EC) No. 715/2007
Deviations from these values may occur
under normal operating conditions.
Engine oil
General notes
When handling engine oil, observe the impor-
tant safety notes on service products
( Y page 336).
The quality of the engine oil is decisive for the
function and service life of an engine. After
extensive tests, Mercedes-Benz approves
engine oils that correspond to the current
technical standard.
Therefore, only Mercedes-Benz approved
engine oils may be used in Mercedes-Benz
engines.
Further information on tested and approved
engine oils can be obtained from any
Mercedes-Benz Service Centre. Mercedes-
Benz recommends that you have the oil
change carried out at a qualified specialist
workshop.
Mercedes-Benz approval is indicated on the
oil container by the inscription "MB Approval"
and the corresponding designation, e.g. MB
Approval 229.51.
You can call up an overview of approved
engine oils on the Internet at:
http://bevo.mercedes-benz.com by enter-
ing the designation, e.g. 229.5.
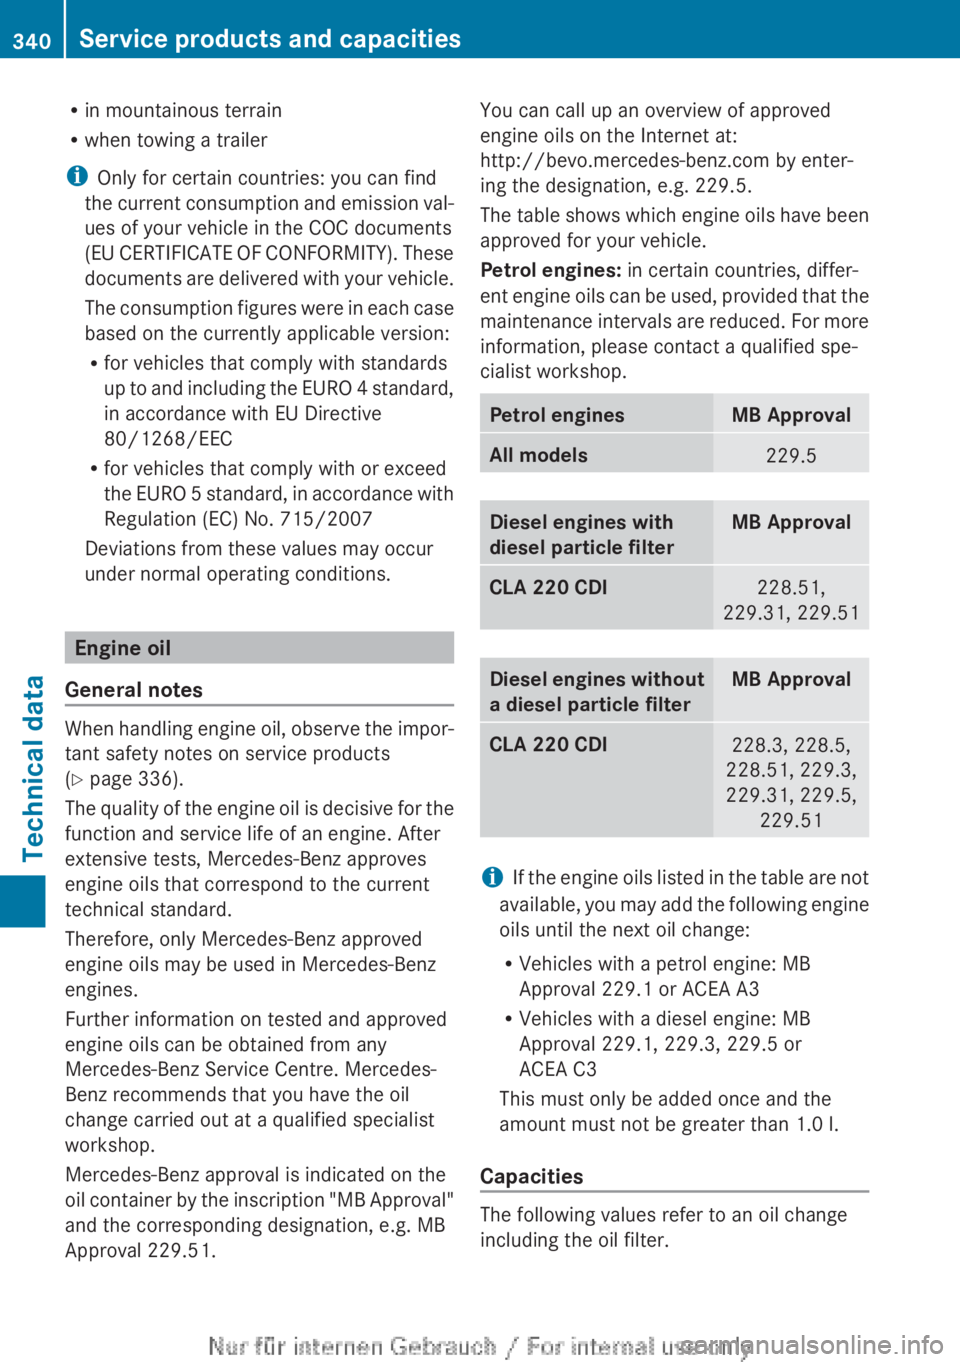
The table shows which engine oils have been
approved for your vehicle.
Petrol engines: in certain countries, differ-
ent engine oils can be used, provided that the
maintenance intervals are reduced. For more
information, please contact a qualified spe-
cialist workshop.Petrol enginesMB ApprovalAll models229.5Diesel engines with
diesel particle filterMB ApprovalCLA 220 CDI228.51,
229.31, 229.51Diesel engines without
a diesel particle filterMB ApprovalCLA 220 CDI228.3, 228.5,
228.51, 229.3,
229.31, 229.5, 229.51
iIf the engine oils listed in the table are not
available, you may add the following engine
oils until the next oil change:
R Vehicles with a petrol engine: MB
Approval 229.1 or ACEA A3
R Vehicles with a diesel engine: MB
Approval 229.1, 229.3, 229.5 or
ACEA C3
This must only be added once and the
amount must not be greater than 1.0 l.
Capacities
The following values refer to an oil change
including the oil filter.
340Service products and capacitiesTechnical data
Page 346 of 352
Vehicle heightCLA 180
CLA 200
CLA 220 CDI1432 mmCLA 2501436 mm
Trailer tow hitch
Mounting dimensions
! If you have a trailer tow hitch retrofitted,
changes to the cooling system may be nec-
essary, depending on the vehicle type.
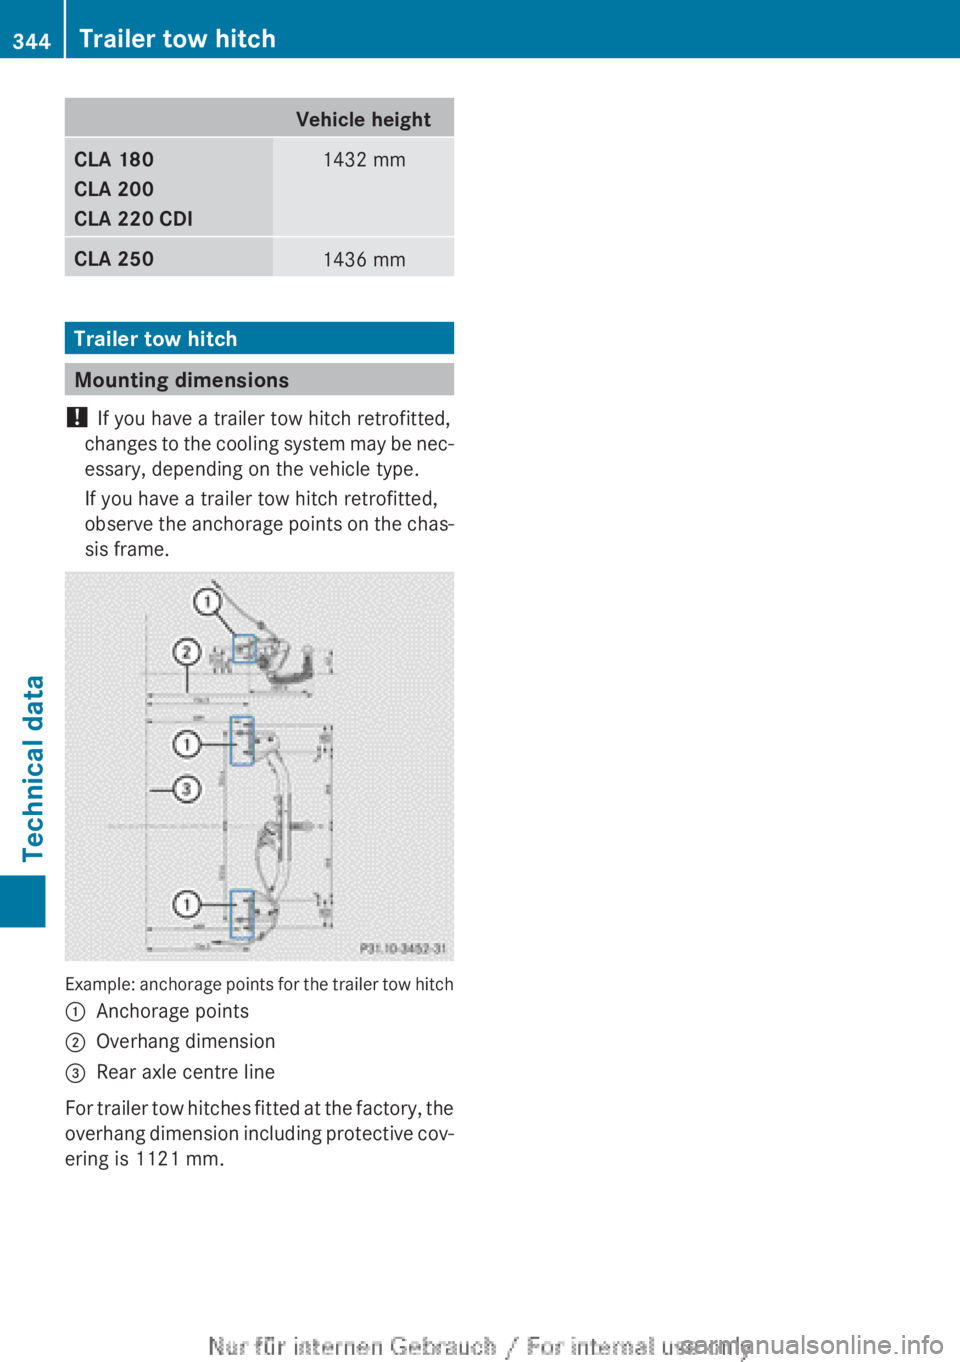
If you have a trailer tow hitch retrofitted,
observe the anchorage points on the chas-
sis frame.
Example: anchorage points for the trailer tow hitch
:Anchorage points;Overhang dimension=Rear axle centre line
For trailer tow hitches fitted at the factory, the
overhang dimension including protective cov-
ering is 1121 mm.
344Trailer tow hitchTechnical data
Page 347 of 352
Trailer loads
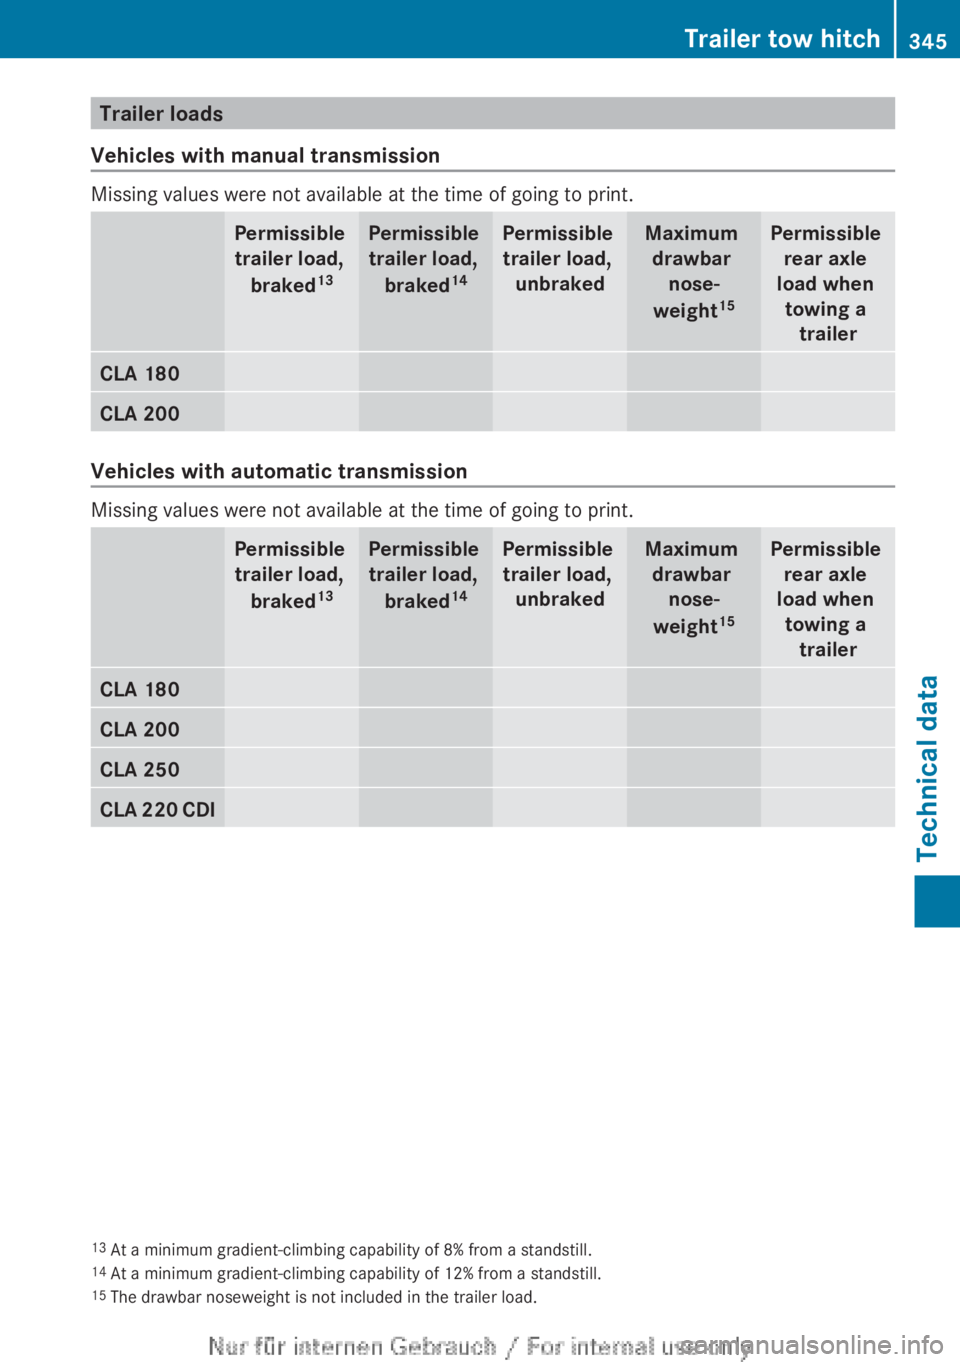
Vehicles with manual transmission
Missing values were not available at the time of going to print.
Permissible trailer load,
braked 13Permissible
trailer load,
braked 14Permissible
trailer load, unbrakedMaximum drawbar nose-
weight 15Permissible
rear axle
load when towing a trailerCLA 180CLA 200
Vehicles with automatic transmission
Missing values were not available at the time of going to print.
Permissible trailer load,
braked 13Permissible
trailer load,
braked 14Permissible
trailer load, unbrakedMaximum drawbar nose-
weight 15Permissible
rear axle
load when towing a trailerCLA 180CLA 200CLA 250CLA 220 CDI13 At a minimum gradient-climbing capability of 8% from a standstill.
14 At a minimum gradient-climbing capability of 12% from a standstill.
15 The drawbar noseweight is not included in the trailer load.Trailer tow hitch345Technical dataZ