2013 MERCEDES-BENZ CLA trailer
[x] Cancel search: trailerPage 173 of 352
SPEEDTRONIC
Important safety notes
SPEEDTRONIC brakes automatically so that
you do not exceed the set speed. On long and
steep downhill gradients, especially if the
vehicle is laden or towing a trailer, you must
select shift range 1, 2 or 3 in good time. By
doing so, you will make use of the braking
effect of the engine. This relieves the load on
the brake system and prevents the brakes
from overheating and wearing too quickly. If
you need additional braking, depress the
brake pedal repeatedly rather than continu-
ously.
If you fail to adapt your driving style, SPEED-
TRONIC can neither reduce the risk of an
accident nor override the laws of physics.
SPEEDTRONIC cannot take into account
road, weather or traffic conditions. SPEED-
TRONIC is only an aid. You are responsible for
the distance to the vehicle in front, for vehicle
speed, for braking in good time, and for stay-
ing in the lane.
If there is a change of drivers, advise the new
driver of the speed stored.
General notes
You can set a variable or permanent limit
speed:
R variable for speed limits, e.g. in built-up
areas
R permanent for long-term speed restric-
tions, e.g. when driving with winter tyres
fitted ( Y page 173)
i The speed indicated in the speedometer
may differ slightly from the limit speed
stored.
Variable SPEEDTRONIC
General notes
With the cruise control lever, you can operate
cruise control or DISTRONIC PLUS and vari-
able SPEEDTRONIC.
The LIM indicator lamp on the cruise control
lever indicates which system you have selec-
ted:
R LIM indicator lamp off: cruise control or
DISTRONIC PLUS is selected.
R LIM indicator lamp on: variable SPEED-
TRONIC is selected.
You can use the cruise control lever to limit
the speed to any speed above 30 km/h while
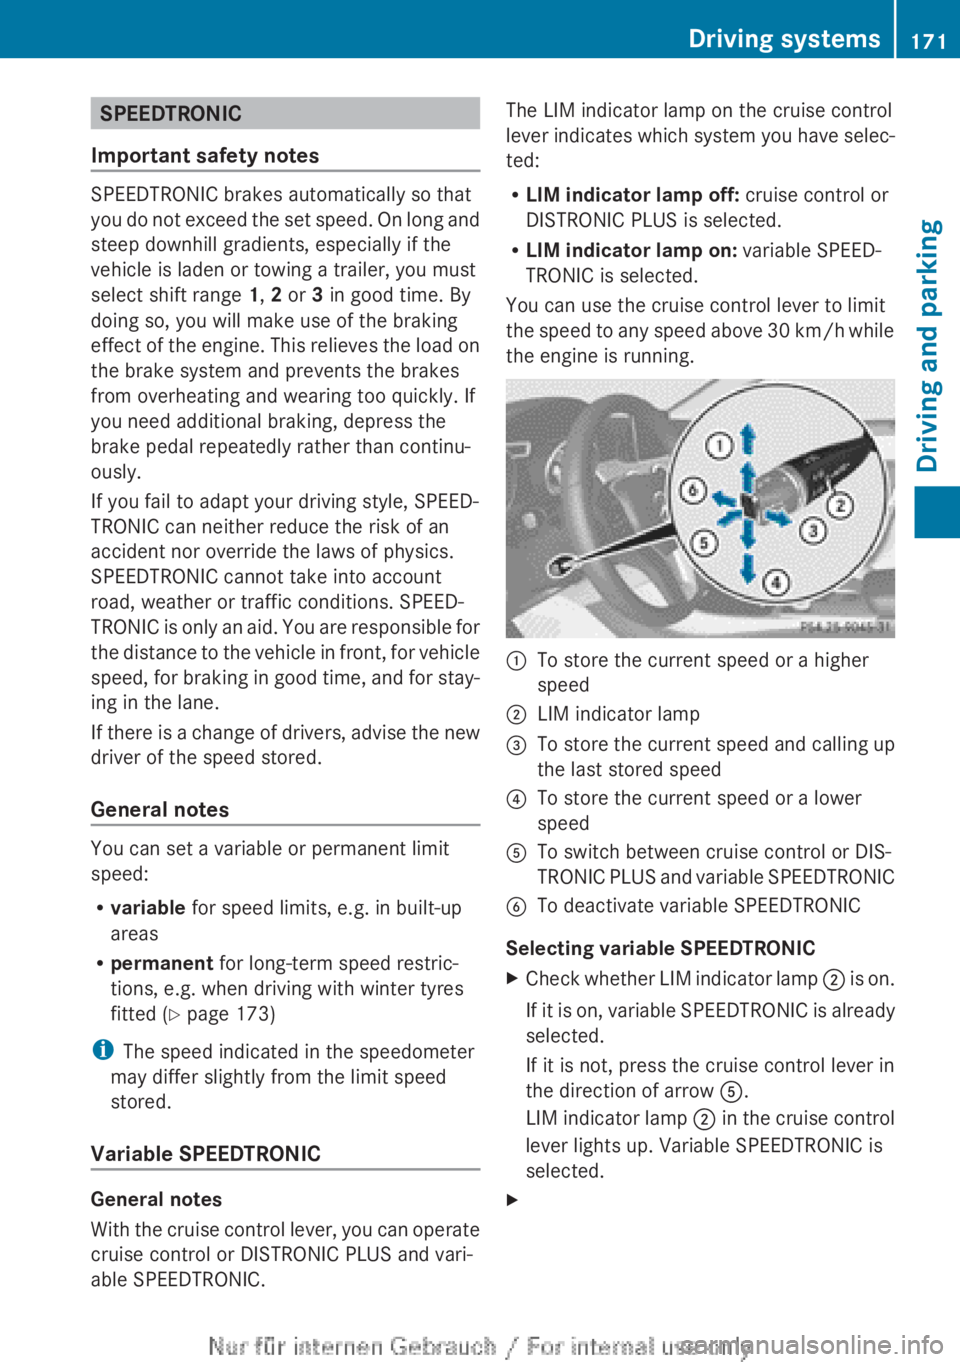
the engine is running.:To store the current speed or a higher
speed;LIM indicator lamp=To store the current speed and calling up
the last stored speed?To store the current speed or a lower
speedATo switch between cruise control or DIS-
TRONIC PLUS and variable SPEEDTRONICBTo deactivate variable SPEEDTRONIC
Selecting variable SPEEDTRONIC
XCheck whether LIM indicator lamp ; is on.
If it is on, variable SPEEDTRONIC is already
selected.
If it is not, press the cruise control lever in
the direction of arrow A.
LIM indicator lamp ; in the cruise control
lever lights up. Variable SPEEDTRONIC is
selected.XDriving systems171Driving and parkingZ
Page 185 of 352
PARKTRONIC is only an aid. It is not a substi-
tute for your attention to the immediate sur-
roundings. The responsibility for safe
manoeuvring and parking remains with you.
Make sure that there are no persons, animals
or objects in range while manoeuvring and
parking.
! When parking, pay particular attention to
objects above or below the sensors, such
as flower pots or trailer drawbars. PARK-
TRONIC does not detect such objects when
they are in the immediate vicinity of the
vehicle. You could damage the vehicle or
the objects.
The sensors may not detect snow and
objects which absorb ultrasonic sources.
Ultrasonic sources, such as an automatic
car wash, a lorry's compressed-air brakes
or a pneumatic drill, could cause PARK-
TRONIC to malfunction.
PARKTRONIC may not function correctly on
uneven terrain.
PARKTRONIC is activated automatically if
you:
R switch on the ignition
R shift to position D, R or N on vehicles with
automatic transmission
R release the electric parking brake
PARKTRONIC is deactivated at speeds above
18 km/h. It is reactivated at lower speeds.
Range of the sensors
General notes
PARKTRONIC does not take into account
obstacles located:
R below the detection range, e.g. persons,
animals or objects
R above the detection range, e.g. overhang-
ing loads, tail sections or loading ramps of
goods vehicles
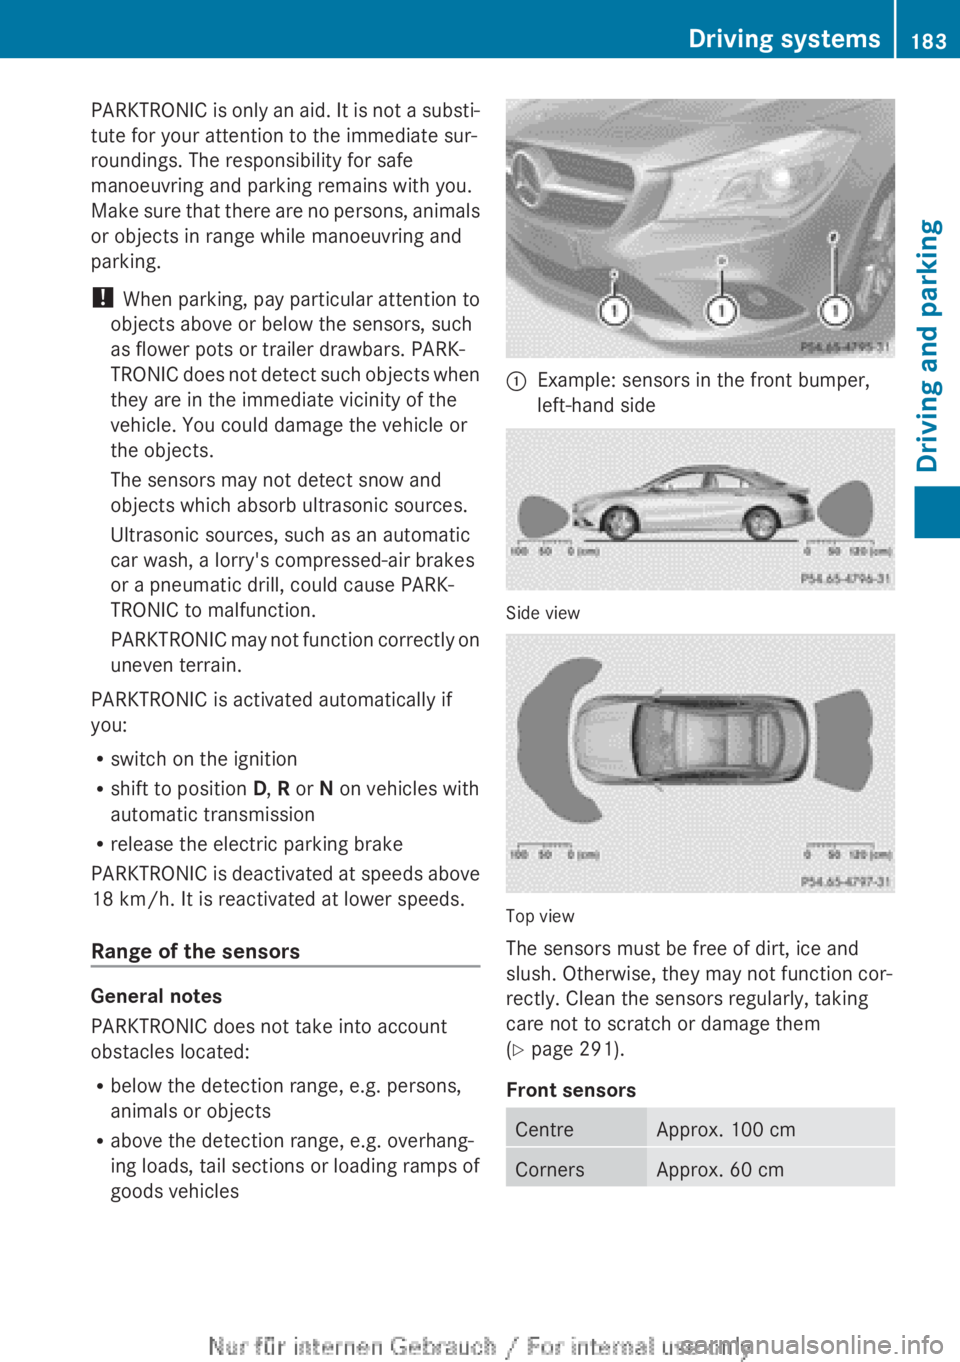
:Example: sensors in the front bumper,
left-hand side
Side view
Top view
The sensors must be free of dirt, ice and
slush. Otherwise, they may not function cor-
rectly. Clean the sensors regularly, taking
care not to scratch or damage them
( Y page 291).
Front sensors
CentreApprox. 100 cmCornersApprox. 60 cmDriving systems183Driving and parkingZ
Page 187 of 352
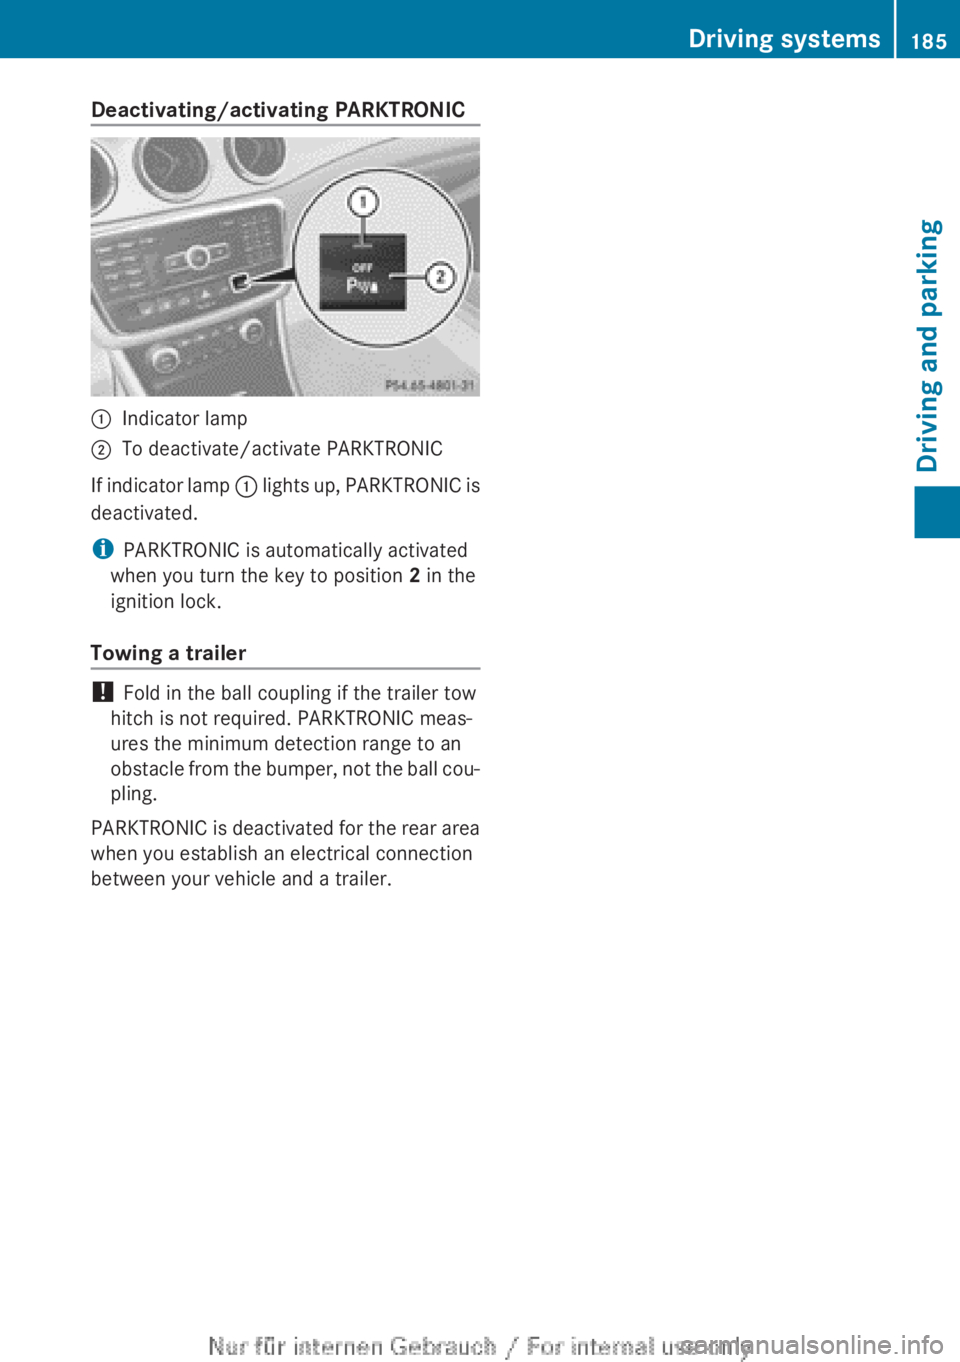
Deactivating/activating PARKTRONIC:Indicator lamp;To deactivate/activate PARKTRONIC
If indicator lamp : lights up, PARKTRONIC is
deactivated.
i PARKTRONIC is automatically activated
when you turn the key to position 2 in the
ignition lock.
Towing a trailer
! Fold in the ball coupling if the trailer tow
hitch is not required. PARKTRONIC meas-
ures the minimum detection range to an
obstacle from the bumper, not the ball cou-
pling.
PARKTRONIC is deactivated for the rear area
when you establish an electrical connection
between your vehicle and a trailer.
Driving systems185Driving and parkingZ
Page 189 of 352
Parking tips:
R on narrow roads, drive as closely as possi-
ble past the parking space.
R parking spaces that are littered or over-
grown might be identified or measured
incorrectly.
R parking spaces that are partially occupied
by trailer drawbars might not be identified
as such or be measured incorrectly.
R snowfall or heavy rain may lead to a parking
space being measured inaccurately.
R pay attention to the PARKTRONIC
( Y page 184) warning messages during the
parking procedure.
R at any time, you can intervene in the steer-
ing procedure to correct it. Active Parking
Assist will then be cancelled.
R when transporting a load which protrudes
from your vehicle, you should not use
Active Parking Assist.
R never use Active Parking Assist when snow
chains are fitted.
R make sure that the tyre pressures are
always correct. This has a direct influence
on the parking characteristics of the vehi-
cle.
Use Active Parking Assist for parking spaces:
R that are parallel or at right-angles to the
direction of travel
R that are on straight roads, not bends
R that are on the same level as the road, e.g.
not on the pavement
Detecting parking spaces
Objects located above the height range of
Active Parking Assist will not be detected
when the parking space is measured. These
are not taken into account when the parking
procedure is calculated, e.g. overhanging
loads, tail sections or loading ramps of goods
vehicles.
GWARNING
If objects are located above the detection
range, Active Parking Assist may start to steer
into the parking space too soon. As a result,
you could cause a collision. There is a risk of
an accident.
If objects are located above the detection
range, stop the vehicle and switch Active
Parking Assist off.
For further information on the detection
range ( Y page 183).
Active Parking Assist does not support you
parking in spaces at right angles to the direc-
tion of travel if:
R two parking spaces are located directly
next to one another
R the parking space is directly next to a low
obstacle such as a low kerb stone
R you forward park
Active Parking Assist does not support you
parking in spaces that are parallel or at right
angles to the direction of travel if:
R the parking space is on a kerb stone
R the parking space appears to be blocked,
for example by foliage or grass paving
blocks
R the range of movement is too small
R the parking space is bordered by an obsta-
cle which is not clearly defined such as a
tree or a trailer
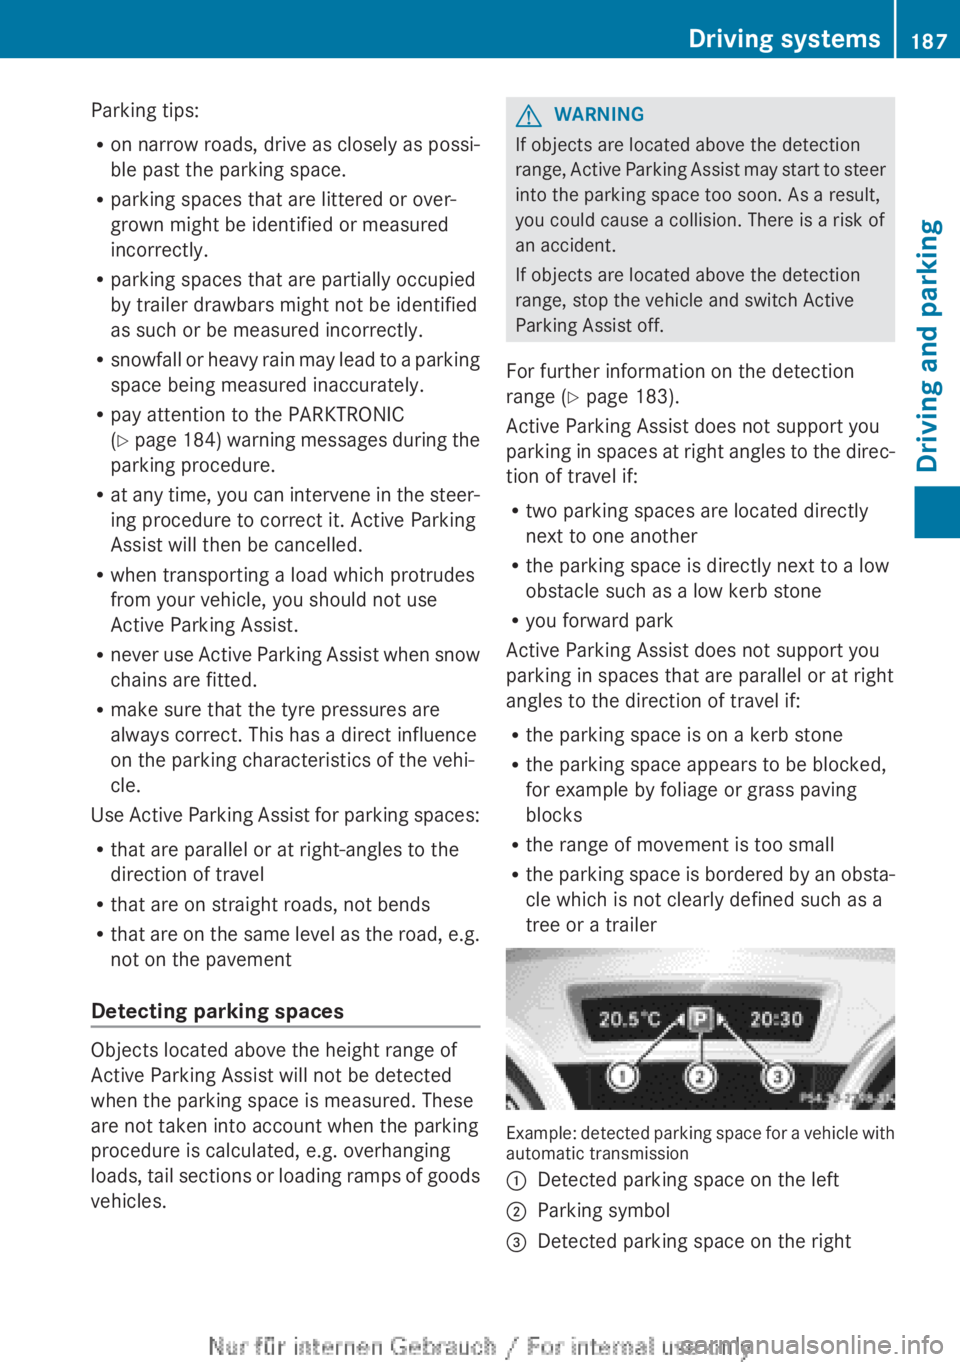
Example: detected parking space for a vehicle with
automatic transmission
:Detected parking space on the left;Parking symbol=Detected parking space on the rightDriving systems187Driving and parkingZ
Page 193 of 352
A warning tone sounds. The parking symbol
disappears and the multifunction display
shows the Park Assist cancelled mes-
sage.
When Active Parking Assist is cancelled, you
must steer again yourself.
Towing a trailer
For vehicles with a trailer tow hitch, the min-
imum required length for parking spaces is
slightly increased.
If you have attached a trailer to your vehicle,
you should not use Active Parking Assist.
Once the electrical connection is established
between your vehicle and the trailer, Active
Parking Assist is no longer available. PARK-
TRONIC is deactivated for the rear area.
Reversing camera
General notes
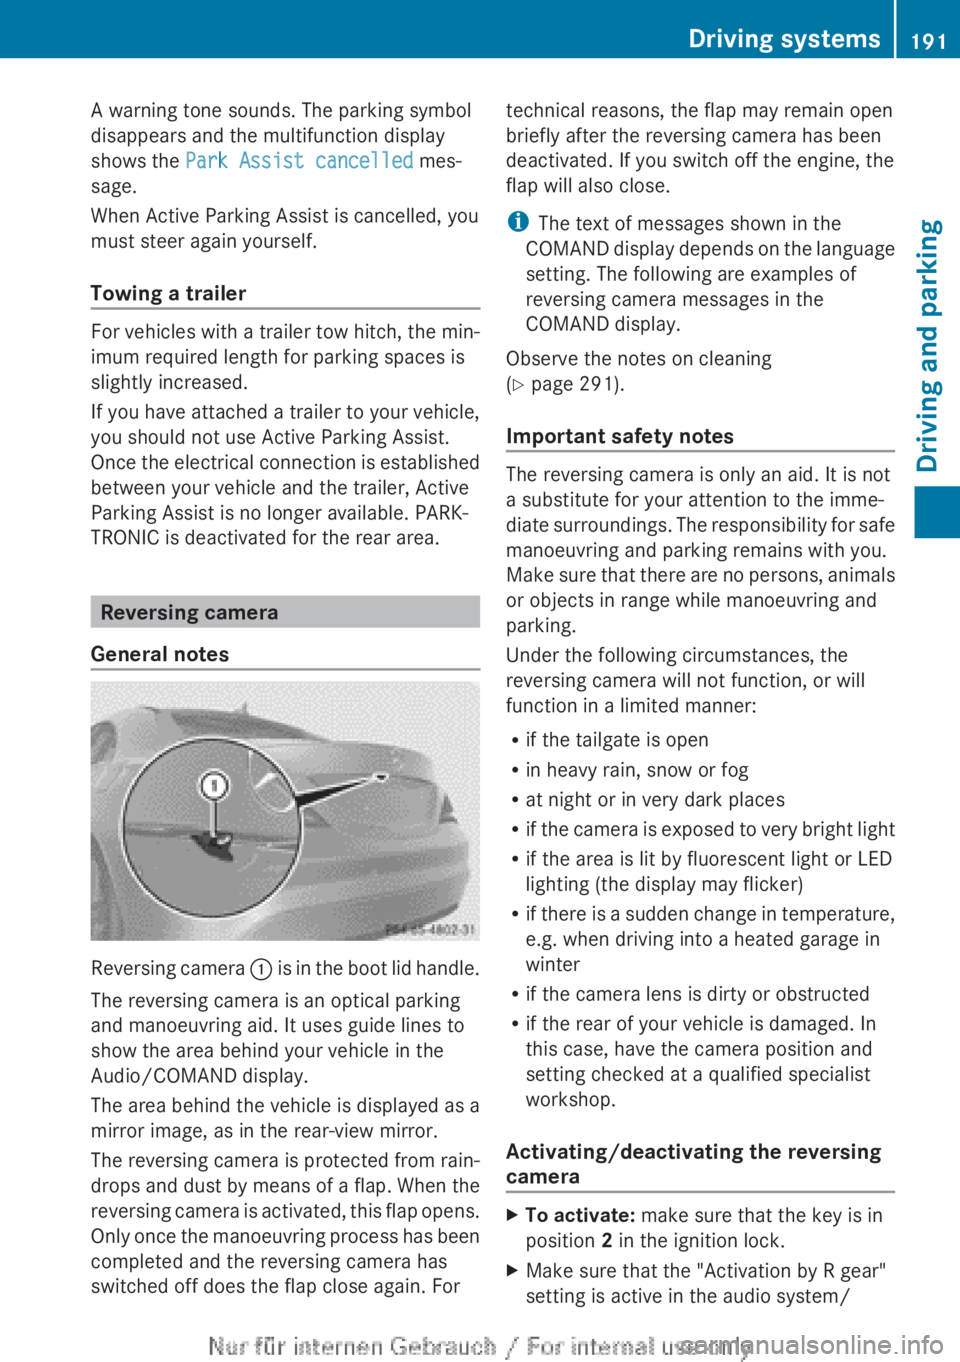
Reversing camera : is in the boot lid handle.
The reversing camera is an optical parking
and manoeuvring aid. It uses guide lines to
show the area behind your vehicle in the
Audio/COMAND display.
The area behind the vehicle is displayed as a
mirror image, as in the rear-view mirror.
The reversing camera is protected from rain-
drops and dust by means of a flap. When the
reversing camera is activated, this flap opens.
Only once the manoeuvring process has been
completed and the reversing camera has
switched off does the flap close again. For
technical reasons, the flap may remain open
briefly after the reversing camera has been
deactivated. If you switch off the engine, the
flap will also close.
i The text of messages shown in the
COMAND display depends on the language
setting. The following are examples of
reversing camera messages in the
COMAND display.
Observe the notes on cleaning
( Y page 291).
Important safety notes
The reversing camera is only an aid. It is not
a substitute for your attention to the imme-
diate surroundings. The responsibility for safe
manoeuvring and parking remains with you.
Make sure that there are no persons, animals
or objects in range while manoeuvring and
parking.
Under the following circumstances, the
reversing camera will not function, or will
function in a limited manner:
R if the tailgate is open
R in heavy rain, snow or fog
R at night or in very dark places
R if the camera is exposed to very bright light
R if the area is lit by fluorescent light or LED
lighting (the display may flicker)
R if there is a sudden change in temperature,
e.g. when driving into a heated garage in
winter
R if the camera lens is dirty or obstructed
R if the rear of your vehicle is damaged. In
this case, have the camera position and
setting checked at a qualified specialist
workshop.
Activating/deactivating the reversing
camera
XTo activate: make sure that the key is in
position 2 in the ignition lock.XMake sure that the "Activation by R gear"
setting is active in the audio system/Driving systems191Driving and parkingZ
Page 194 of 352
COMAND Online; see the separate audio
system/COMAND Online operating
instructions.XEngage reverse gear.
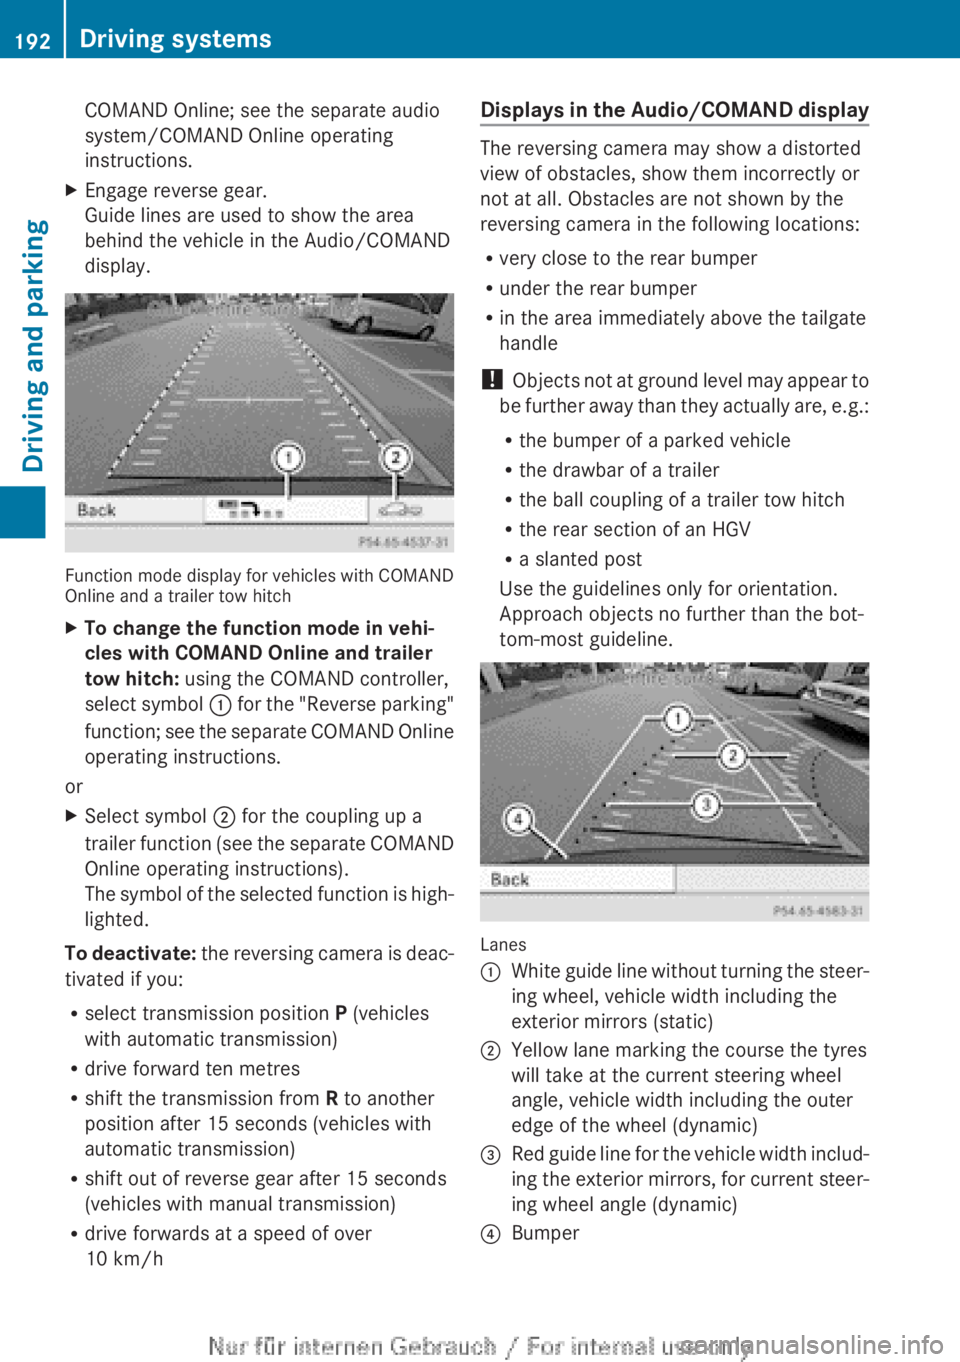
Guide lines are used to show the area
behind the vehicle in the Audio/COMAND
display.
Function mode display for vehicles with COMAND
Online and a trailer tow hitch
XTo change the function mode in vehi-
cles with COMAND Online and trailer
tow hitch: using the COMAND controller,
select symbol : for the "Reverse parking"
function; see the separate COMAND Online
operating instructions.
or
XSelect symbol ; for the coupling up a
trailer function (see the separate COMAND
Online operating instructions).
The symbol of the selected function is high-
lighted.
To deactivate: the reversing camera is deac-
tivated if you:
R select transmission position P (vehicles
with automatic transmission)
R drive forward ten metres
R shift the transmission from R to another
position after 15 seconds (vehicles with
automatic transmission)
R shift out of reverse gear after 15 seconds
(vehicles with manual transmission)
R drive forwards at a speed of over
10 km/h
Displays in the Audio/COMAND display
The reversing camera may show a distorted
view of obstacles, show them incorrectly or
not at all. Obstacles are not shown by the
reversing camera in the following locations:
R very close to the rear bumper
R under the rear bumper
R in the area immediately above the tailgate
handle
! Objects not at ground level may appear to
be further away than they actually are, e.g.:
R the bumper of a parked vehicle
R the drawbar of a trailer
R the ball coupling of a trailer tow hitch
R the rear section of an HGV
R a slanted post
Use the guidelines only for orientation.
Approach objects no further than the bot-
tom-most guideline.
Lanes
:White guide line without turning the steer-
ing wheel, vehicle width including the
exterior mirrors (static);Yellow lane marking the course the tyres
will take at the current steering wheel
angle, vehicle width including the outer
edge of the wheel (dynamic)=Red guide line for the vehicle width includ-
ing the exterior mirrors, for current steer-
ing wheel angle (dynamic)?Bumper192Driving systemsDriving and parking
Page 196 of 352
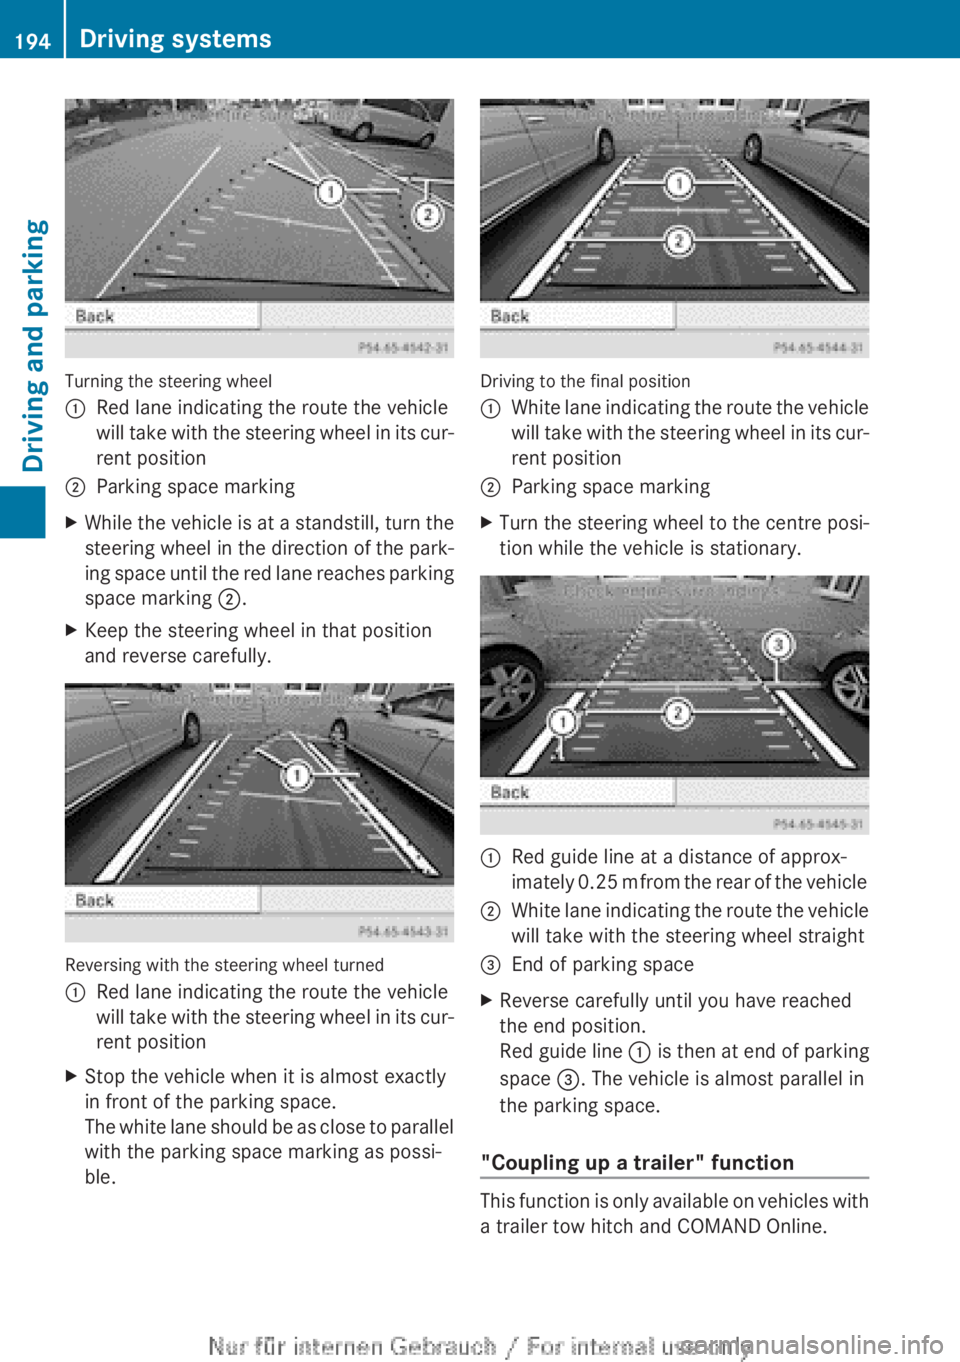
Turning the steering wheel
:Red lane indicating the route the vehicle
will take with the steering wheel in its cur-
rent position;Parking space markingXWhile the vehicle is at a standstill, turn the
steering wheel in the direction of the park-
ing space until the red lane reaches parking
space marking ;.XKeep the steering wheel in that position
and reverse carefully.
Reversing with the steering wheel turned
:Red lane indicating the route the vehicle
will take with the steering wheel in its cur-
rent positionXStop the vehicle when it is almost exactly
in front of the parking space.
The white lane should be as close to parallel
with the parking space marking as possi-
ble.
Driving to the final position
:White lane indicating the route the vehicle
will take with the steering wheel in its cur-
rent position;Parking space markingXTurn the steering wheel to the centre posi-
tion while the vehicle is stationary.:Red guide line at a distance of approx-
imately 0.25 m from the rear of the vehicle;White lane indicating the route the vehicle
will take with the steering wheel straight=End of parking spaceXReverse carefully until you have reached
the end position.
Red guide line : is then at end of parking
space =. The vehicle is almost parallel in
the parking space.
"Coupling up a trailer" function
This function is only available on vehicles with
a trailer tow hitch and COMAND Online.
194Driving systemsDriving and parking
Page 197 of 352
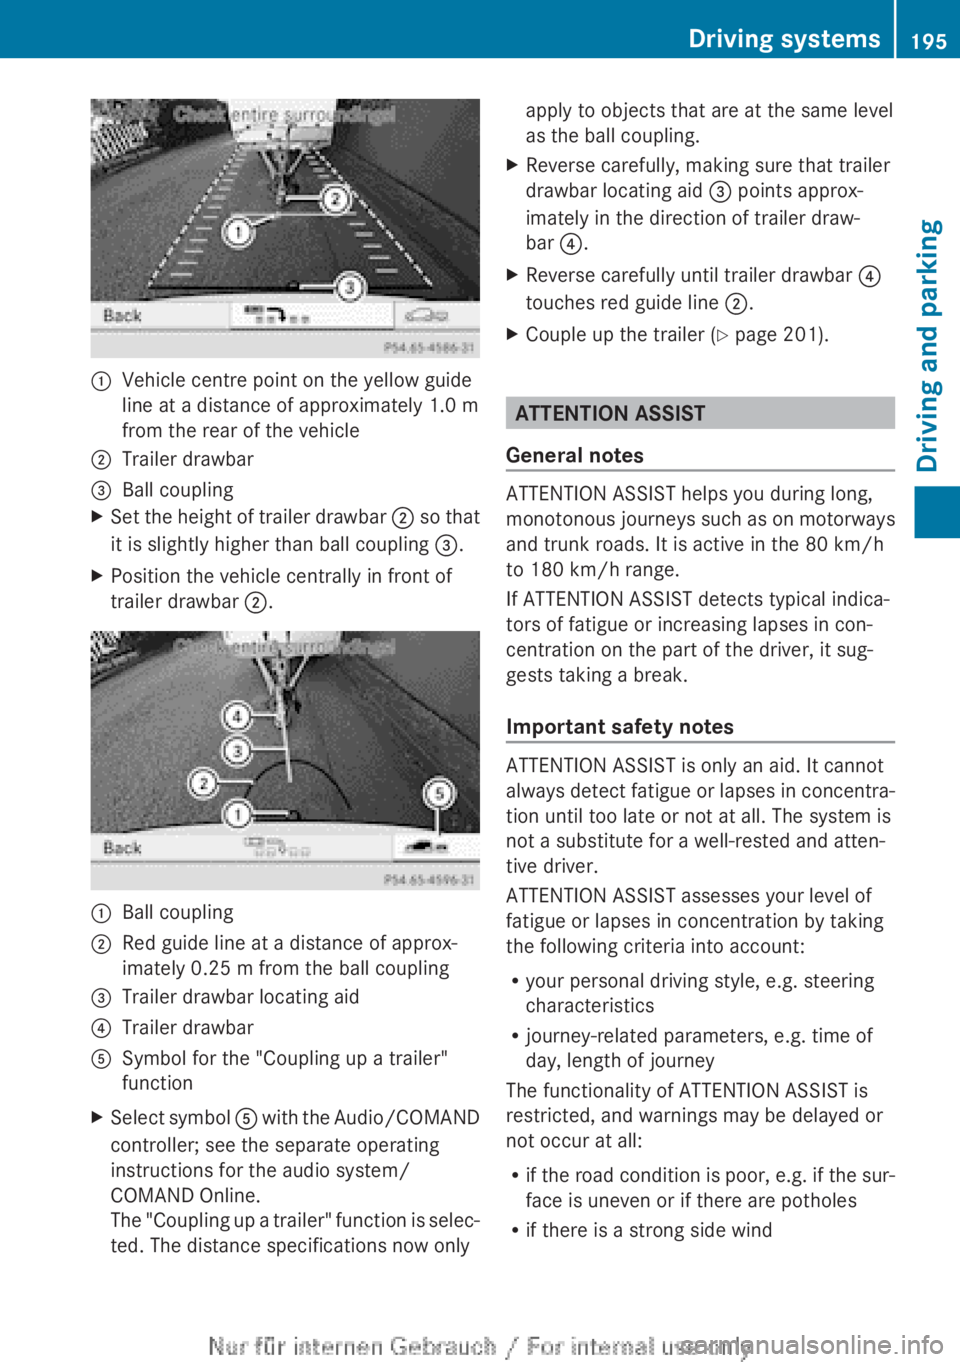
:Vehicle centre point on the yellow guide
line at a distance of approximately 1.0 m
from the rear of the vehicle;Trailer drawbar=Ball couplingXSet the height of trailer drawbar ; so that
it is slightly higher than ball coupling =.XPosition the vehicle centrally in front of
trailer drawbar ;.:Ball coupling;Red guide line at a distance of approx-
imately 0.25 m from the ball coupling=Trailer drawbar locating aid?Trailer drawbarASymbol for the "Coupling up a trailer"
functionXSelect symbol A with the Audio/COMAND
controller; see the separate operating
instructions for the audio system/
COMAND Online.
The "Coupling up a trailer" function is selec-
ted. The distance specifications now onlyapply to objects that are at the same level
as the ball coupling.XReverse carefully, making sure that trailer
drawbar locating aid = points approx-
imately in the direction of trailer draw-
bar ?.XReverse carefully until trailer drawbar ?
touches red guide line ;.XCouple up the trailer ( Y page 201).
ATTENTION ASSIST
General notes
ATTENTION ASSIST helps you during long,
monotonous journeys such as on motorways
and trunk roads. It is active in the 80 km/h
to 180 km/h range.
If ATTENTION ASSIST detects typical indica-
tors of fatigue or increasing lapses in con-
centration on the part of the driver, it sug-
gests taking a break.
Important safety notes
ATTENTION ASSIST is only an aid. It cannot
always detect fatigue or lapses in concentra-
tion until too late or not at all. The system is
not a substitute for a well-rested and atten-
tive driver.
ATTENTION ASSIST assesses your level of
fatigue or lapses in concentration by taking
the following criteria into account:
R your personal driving style, e.g. steering
characteristics
R journey-related parameters, e.g. time of
day, length of journey
The functionality of ATTENTION ASSIST is
restricted, and warnings may be delayed or
not occur at all:
R if the road condition is poor, e.g. if the sur-
face is uneven or if there are potholes
R if there is a strong side wind
Driving systems195Driving and parkingZ