2013 MERCEDES-BENZ CLA boot
[x] Cancel search: bootPage 120 of 352
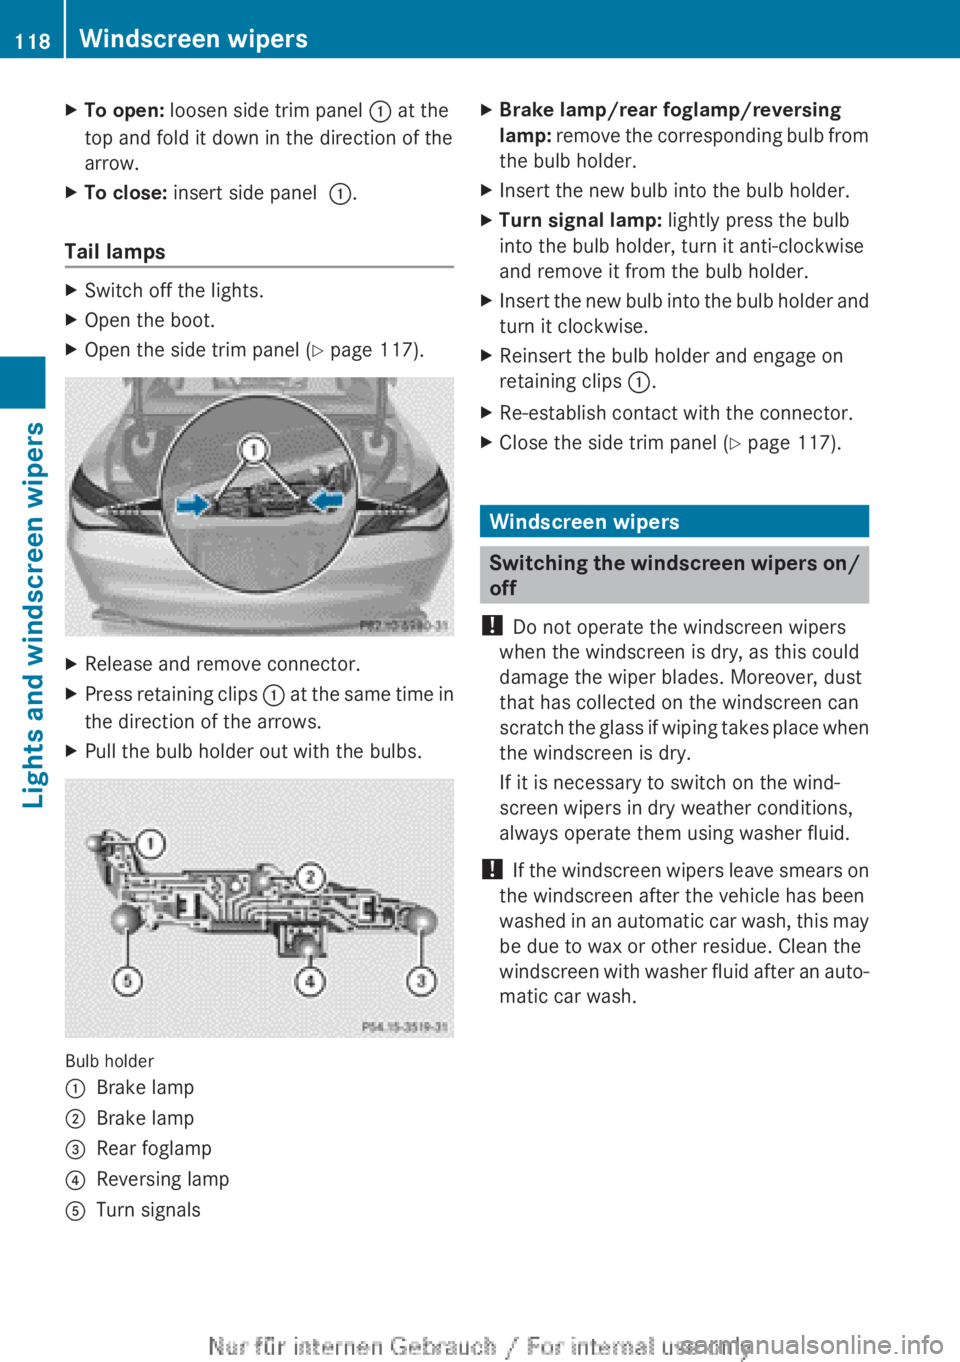
XTo open: loosen side trim panel : at the
top and fold it down in the direction of the
arrow.XTo close: insert side panel :.
Tail lamps
XSwitch off the lights.XOpen the boot.XOpen the side trim panel ( Y page 117).XRelease and remove connector.XPress retaining clips : at the same time in
the direction of the arrows.XPull the bulb holder out with the bulbs.
Bulb holder
:Brake lamp;Brake lamp=Rear foglamp?Reversing lampATurn signalsXBrake lamp/rear foglamp/reversing
lamp: remove the corresponding bulb from
the bulb holder.XInsert the new bulb into the bulb holder.XTurn signal lamp: lightly press the bulb
into the bulb holder, turn it anti-clockwise
and remove it from the bulb holder.XInsert the new bulb into the bulb holder and
turn it clockwise.XReinsert the bulb holder and engage on
retaining clips :.XRe-establish contact with the connector.XClose the side trim panel ( Y page 117).
Windscreen wipers
Switching the windscreen wipers on/
off
! Do not operate the windscreen wipers
when the windscreen is dry, as this could
damage the wiper blades. Moreover, dust
that has collected on the windscreen can
scratch the glass if wiping takes place when
the windscreen is dry.
If it is necessary to switch on the wind-
screen wipers in dry weather conditions,
always operate them using washer fluid.
! If the windscreen wipers leave smears on
the windscreen after the vehicle has been
washed in an automatic car wash, this may
be due to wax or other residue. Clean the
windscreen with washer fluid after an auto-
matic car wash.
118Windscreen wipersLights and windscreen wipers
Page 193 of 352
A warning tone sounds. The parking symbol
disappears and the multifunction display
shows the Park Assist cancelled mes-
sage.
When Active Parking Assist is cancelled, you
must steer again yourself.
Towing a trailer
For vehicles with a trailer tow hitch, the min-
imum required length for parking spaces is
slightly increased.
If you have attached a trailer to your vehicle,
you should not use Active Parking Assist.
Once the electrical connection is established
between your vehicle and the trailer, Active
Parking Assist is no longer available. PARK-
TRONIC is deactivated for the rear area.
Reversing camera
General notes
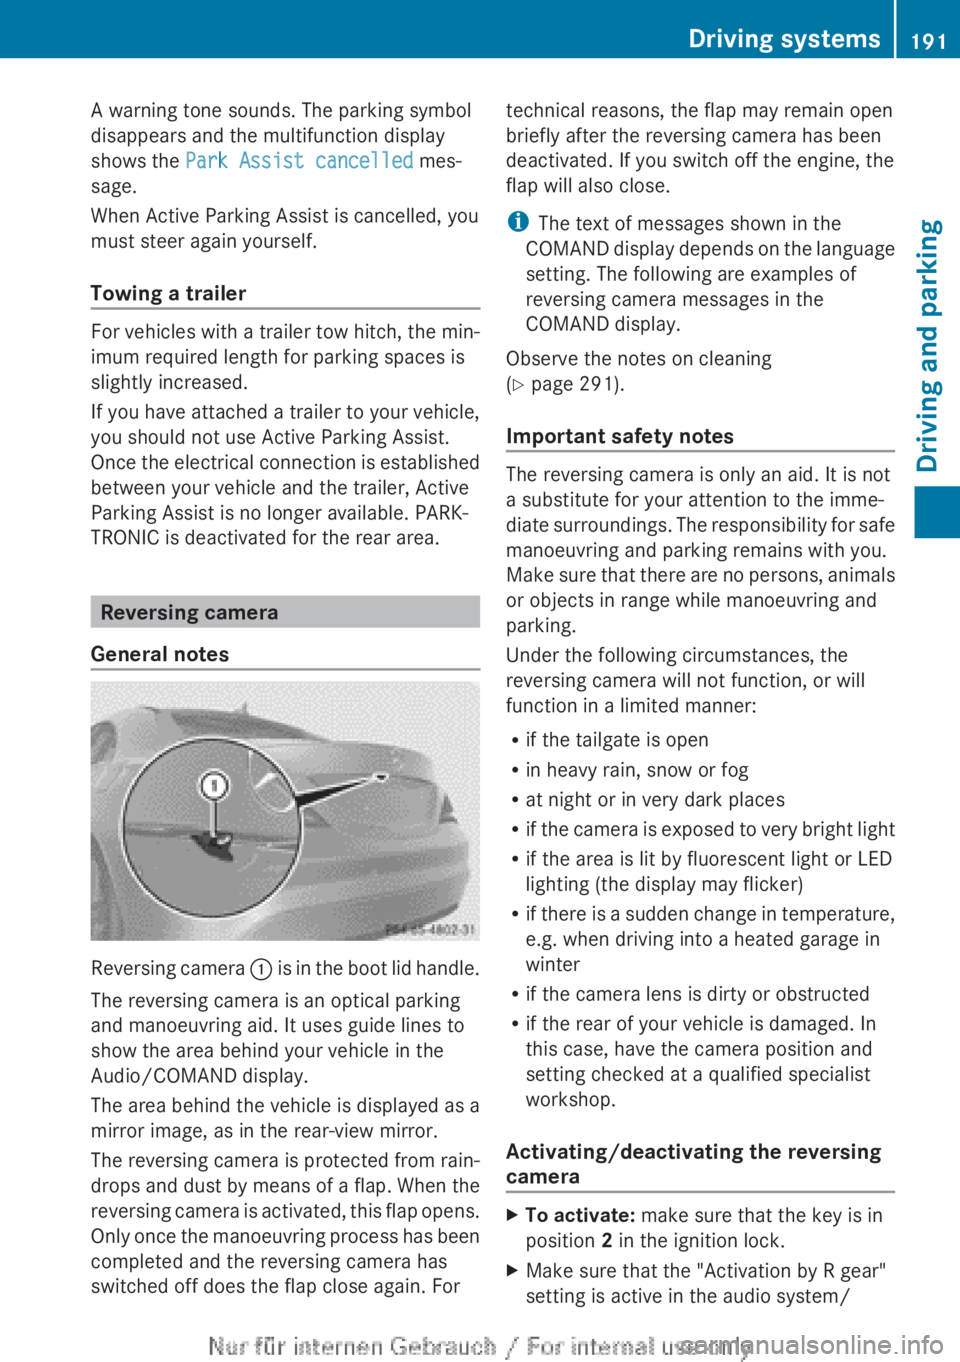
Reversing camera : is in the boot lid handle.
The reversing camera is an optical parking
and manoeuvring aid. It uses guide lines to
show the area behind your vehicle in the
Audio/COMAND display.
The area behind the vehicle is displayed as a
mirror image, as in the rear-view mirror.
The reversing camera is protected from rain-
drops and dust by means of a flap. When the
reversing camera is activated, this flap opens.
Only once the manoeuvring process has been
completed and the reversing camera has
switched off does the flap close again. For
technical reasons, the flap may remain open
briefly after the reversing camera has been
deactivated. If you switch off the engine, the
flap will also close.
i The text of messages shown in the
COMAND display depends on the language
setting. The following are examples of
reversing camera messages in the
COMAND display.
Observe the notes on cleaning
( Y page 291).
Important safety notes
The reversing camera is only an aid. It is not
a substitute for your attention to the imme-
diate surroundings. The responsibility for safe
manoeuvring and parking remains with you.
Make sure that there are no persons, animals
or objects in range while manoeuvring and
parking.
Under the following circumstances, the
reversing camera will not function, or will
function in a limited manner:
R if the tailgate is open
R in heavy rain, snow or fog
R at night or in very dark places
R if the camera is exposed to very bright light
R if the area is lit by fluorescent light or LED
lighting (the display may flicker)
R if there is a sudden change in temperature,
e.g. when driving into a heated garage in
winter
R if the camera lens is dirty or obstructed
R if the rear of your vehicle is damaged. In
this case, have the camera position and
setting checked at a qualified specialist
workshop.
Activating/deactivating the reversing
camera
XTo activate: make sure that the key is in
position 2 in the ignition lock.XMake sure that the "Activation by R gear"
setting is active in the audio system/Driving systems191Driving and parkingZ
Page 206 of 352
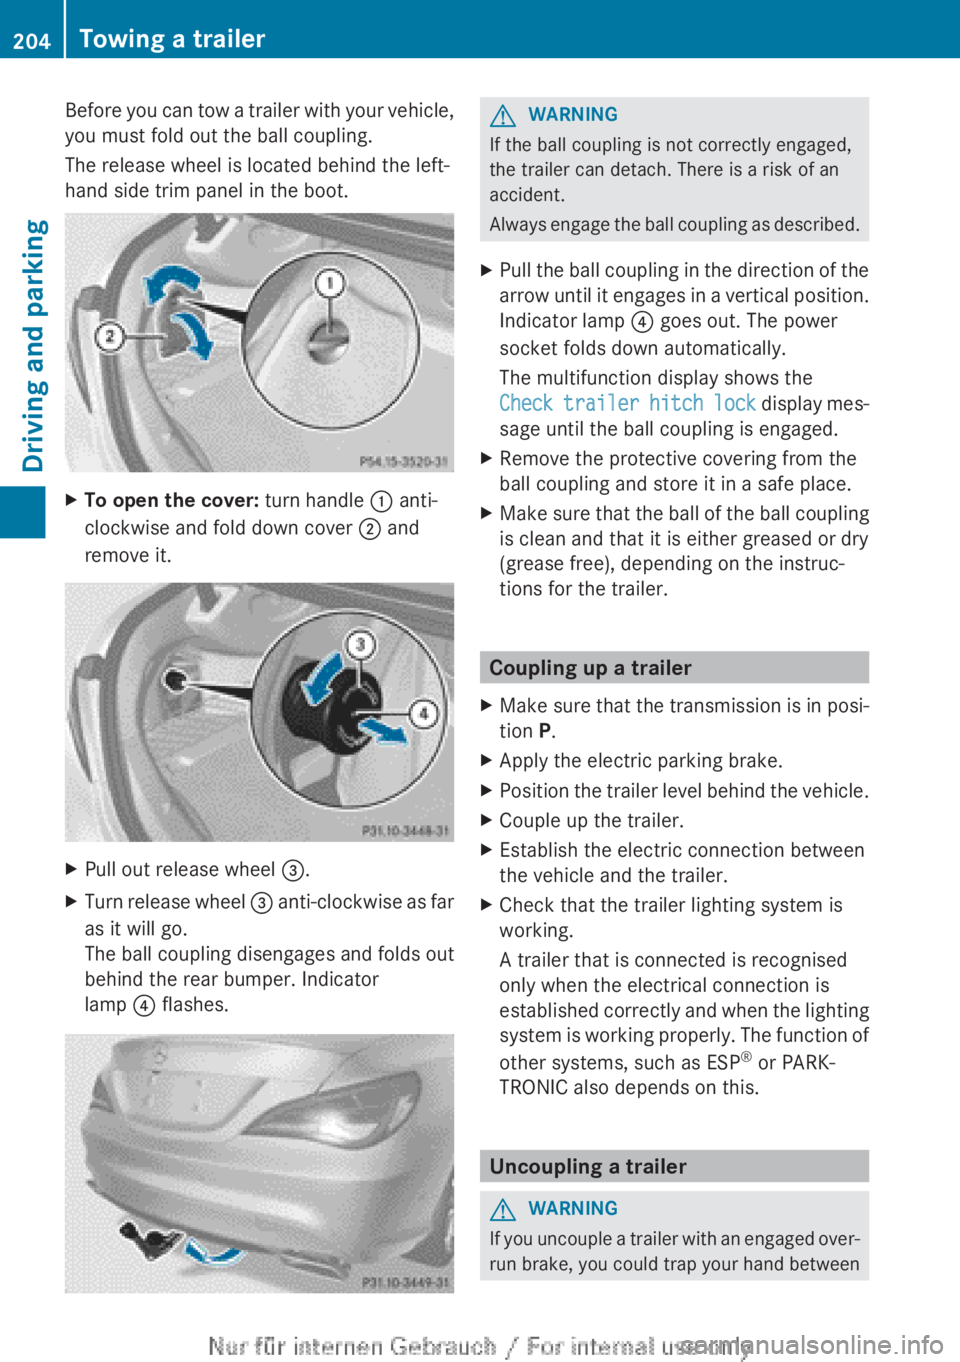
Before you can tow a trailer with your vehicle,
you must fold out the ball coupling.
The release wheel is located behind the left-
hand side trim panel in the boot.XTo open the cover: turn handle : anti-
clockwise and fold down cover ; and
remove it.XPull out release wheel =.XTurn release wheel = anti-clockwise as far
as it will go.
The ball coupling disengages and folds out
behind the rear bumper. Indicator
lamp ? flashes.GWARNING
If the ball coupling is not correctly engaged,
the trailer can detach. There is a risk of an
accident.
Always engage the ball coupling as described.
XPull the ball coupling in the direction of the
arrow until it engages in a vertical position.
Indicator lamp ? goes out. The power
socket folds down automatically.
The multifunction display shows the
Check trailer hitch lock display mes-
sage until the ball coupling is engaged.XRemove the protective covering from the
ball coupling and store it in a safe place.XMake sure that the ball of the ball coupling
is clean and that it is either greased or dry
(grease free), depending on the instruc-
tions for the trailer.
Coupling up a trailer
XMake sure that the transmission is in posi-
tion P.XApply the electric parking brake.XPosition the trailer level behind the vehicle.XCouple up the trailer.XEstablish the electric connection between
the vehicle and the trailer.XCheck that the trailer lighting system is
working.
A trailer that is connected is recognised
only when the electrical connection is
established correctly and when the lighting
system is working properly. The function of
other systems, such as ESP ®
or PARK-
TRONIC also depends on this.
Uncoupling a trailer
GWARNING
If you uncouple a trailer with an engaged over-
run brake, you could trap your hand between
204Towing a trailerDriving and parking
Page 207 of 352
the vehicle and the trailer drawbar. This poses
a risk of injury.
Do not uncouple a trailer with an engaged
overrun brake.
! Do not disconnect a trailer with an
engaged overrun brake. Otherwise, your
vehicle could be damaged by the rebound-
ing of the overrun brake.
! Remove the installed adapter cable
before folding in the ball coupling. Other-
wise, damage may occur to the rear
bumper and the adapter cable.XMake sure that the transmission is in posi-
tion P.XApply the electric parking brake.XSecure the trailer against rolling away.XRemove the trailer cable and decouple the
trailer.
Folding in the ball coupling
GWARNING
If you release the ball coupling or it does not
engage correctly when folding in, it will swing
out. Within pivoting range of the ball coupling,
there is an increased risk of an accident and
injury.
Only release the ball coupling if the pivoting
range is unobstructed. Always make sure that
the ball coupling engages when folding in.
XFold the ball coupling back in if you are not
using the trailer tow hitch.XPlace the protective covering on the ball
coupling.
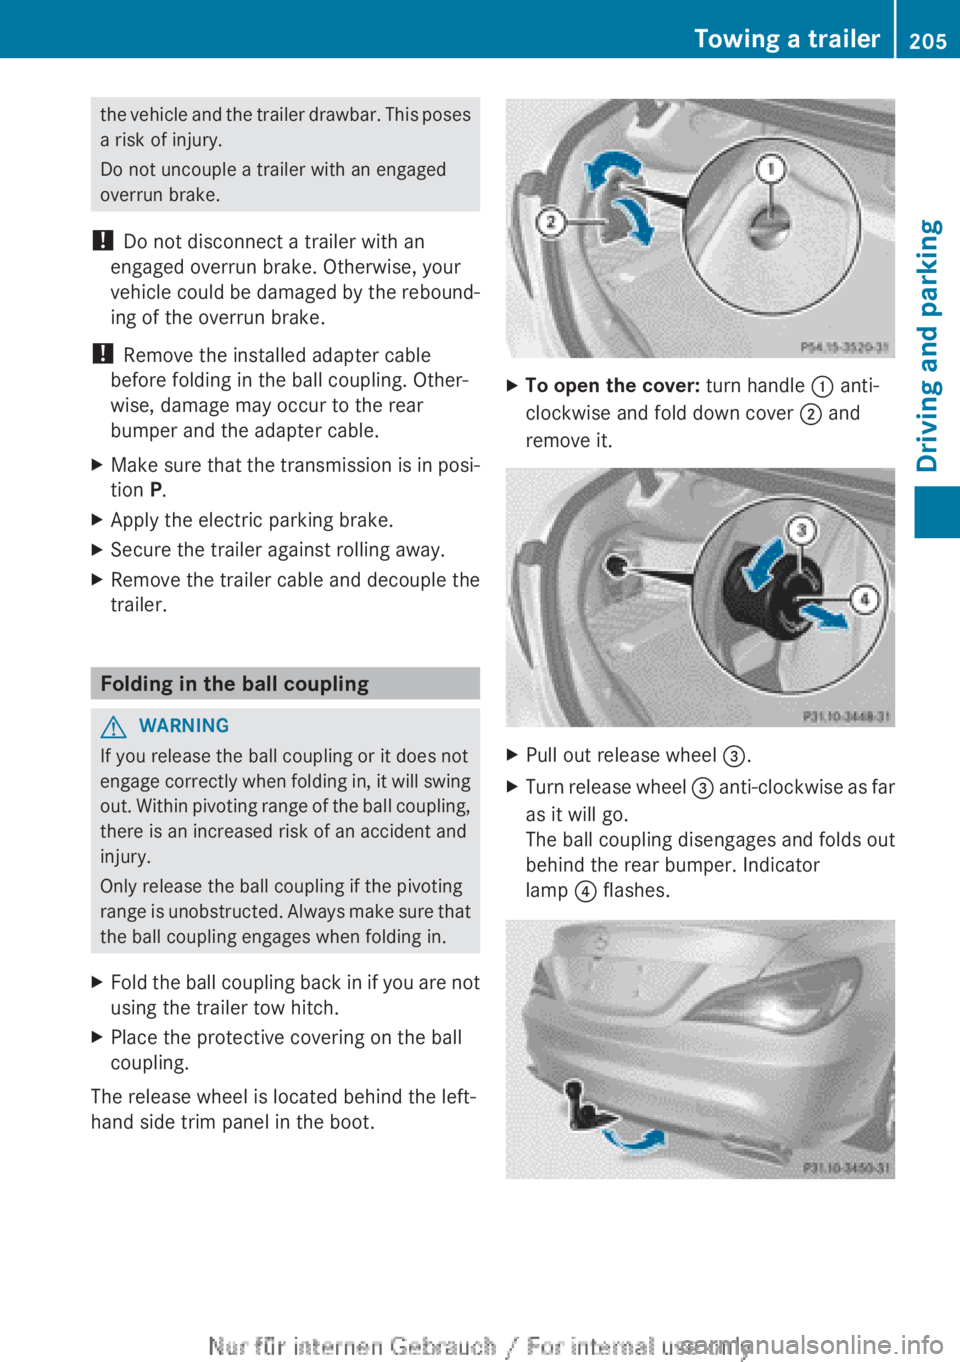
The release wheel is located behind the left-
hand side trim panel in the boot.
XTo open the cover: turn handle : anti-
clockwise and fold down cover ; and
remove it.XPull out release wheel =.XTurn release wheel = anti-clockwise as far
as it will go.
The ball coupling disengages and folds out
behind the rear bumper. Indicator
lamp ? flashes.Towing a trailer205Driving and parkingZ
Page 224 of 352
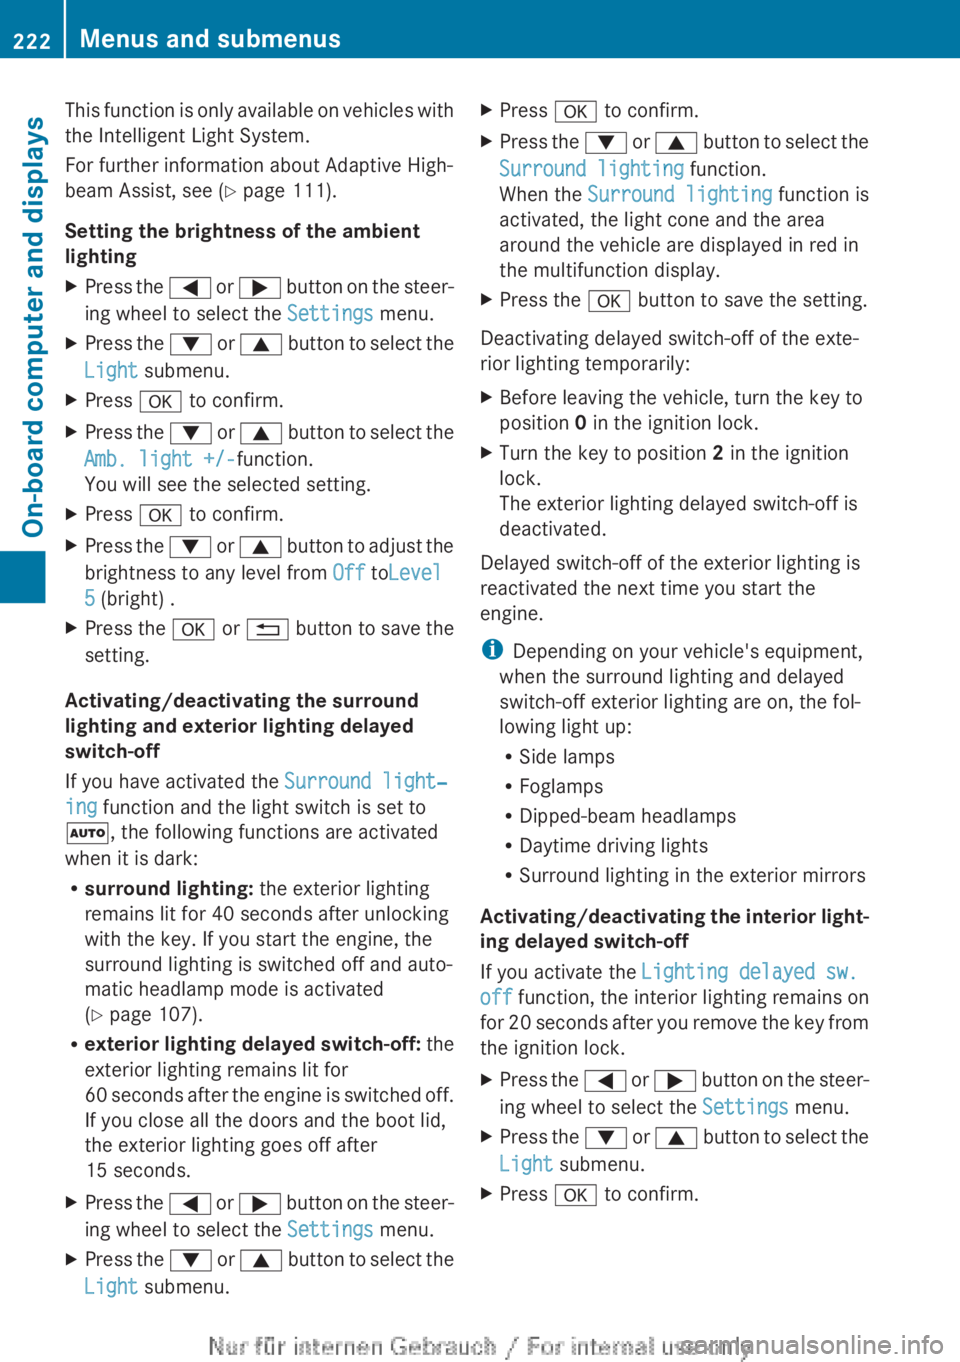
This function is only available on vehicles with
the Intelligent Light System.
For further information about Adaptive High-
beam Assist, see ( Y page 111).
Setting the brightness of the ambient
lightingXPress the = or ; button on the steer-
ing wheel to select the Settings menu.XPress the : or 9 button to select the
Light submenu.XPress a to confirm.XPress the : or 9 button to select the
Amb. light +/- function.
You will see the selected setting.XPress a to confirm.XPress the : or 9 button to adjust the
brightness to any level from Off toLevel
5 (bright) .XPress the a or % button to save the
setting.
Activating/deactivating the surround
lighting and exterior lighting delayed
switch-off
If you have activated the Surround light‐
ing function and the light switch is set to
à , the following functions are activated
when it is dark:
R surround lighting: the exterior lighting
remains lit for 40 seconds after unlocking
with the key. If you start the engine, the
surround lighting is switched off and auto-
matic headlamp mode is activated
( Y page 107).
R exterior lighting delayed switch-off: the
exterior lighting remains lit for
60 seconds after the engine is switched off.
If you close all the doors and the boot lid,
the exterior lighting goes off after
15 seconds.
XPress the = or ; button on the steer-
ing wheel to select the Settings menu.XPress the : or 9 button to select the
Light submenu.XPress a to confirm.XPress the : or 9 button to select the
Surround lighting function.
When the Surround lighting function is
activated, the light cone and the area
around the vehicle are displayed in red in
the multifunction display.XPress the a button to save the setting.
Deactivating delayed switch-off of the exte-
rior lighting temporarily:
XBefore leaving the vehicle, turn the key to
position 0 in the ignition lock.XTurn the key to position 2 in the ignition
lock.
The exterior lighting delayed switch-off is
deactivated.
Delayed switch-off of the exterior lighting is
reactivated the next time you start the
engine.
i Depending on your vehicle's equipment,
when the surround lighting and delayed
switch-off exterior lighting are on, the fol-
lowing light up:
R Side lamps
R Foglamps
R Dipped-beam headlamps
R Daytime driving lights
R Surround lighting in the exterior mirrors
Activating/deactivating the interior light-
ing delayed switch-off
If you activate the Lighting delayed sw.
off function, the interior lighting remains on
for 20 seconds after you remove the key from
the ignition lock.
XPress the = or ; button on the steer-
ing wheel to select the Settings menu.XPress the : or 9 button to select the
Light submenu.XPress a to confirm.222Menus and submenusOn-board computer and displays
Page 254 of 352
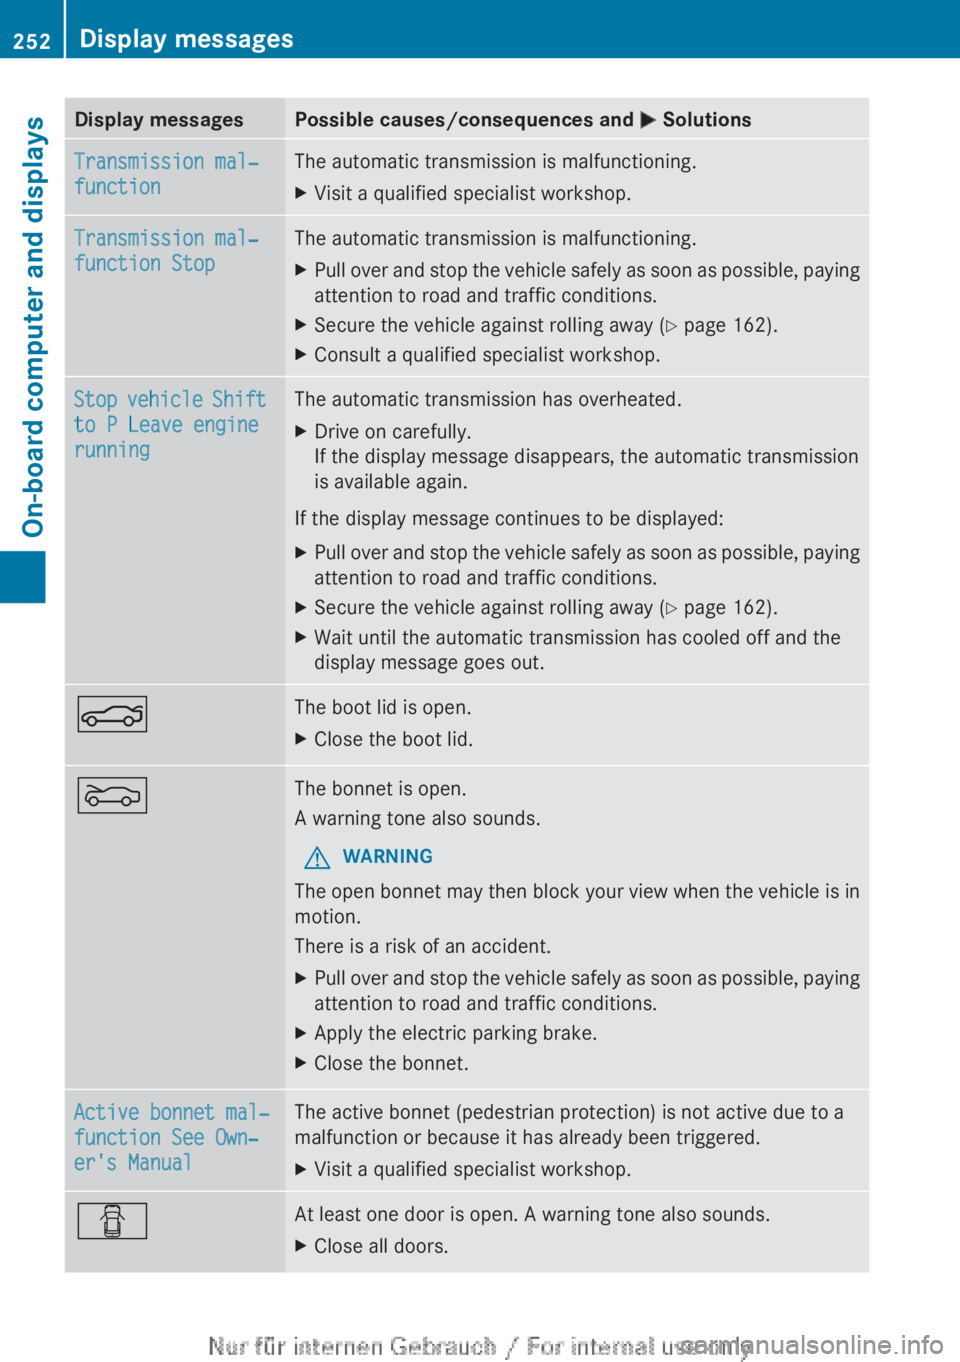
Display messagesPossible causes/consequences and M SolutionsTransmission mal‐
functionThe automatic transmission is malfunctioning.XVisit a qualified specialist workshop.Transmission mal‐
function StopThe automatic transmission is malfunctioning.XPull over and stop the vehicle safely as soon as possible, paying
attention to road and traffic conditions.XSecure the vehicle against rolling away ( Y page 162).XConsult a qualified specialist workshop.Stop vehicle Shift
to P Leave engine
runningThe automatic transmission has overheated.XDrive on carefully.
If the display message disappears, the automatic transmission
is available again.
If the display message continues to be displayed:
XPull over and stop the vehicle safely as soon as possible, paying
attention to road and traffic conditions.XSecure the vehicle against rolling away ( Y page 162).XWait until the automatic transmission has cooled off and the
display message goes out.NThe boot lid is open.XClose the boot lid.MThe bonnet is open.
A warning tone also sounds.GWARNING
The open bonnet may then block your view when the vehicle is in
motion.
There is a risk of an accident.
XPull over and stop the vehicle safely as soon as possible, paying
attention to road and traffic conditions.XApply the electric parking brake.XClose the bonnet.Active bonnet mal‐
function See Own‐
er's ManualThe active bonnet (pedestrian protection) is not active due to a
malfunction or because it has already been triggered.XVisit a qualified specialist workshop.CAt least one door is open. A warning tone also sounds.XClose all doors.252Display messagesOn-board computer and displays
Page 270 of 352
Useful information
i This Owner's Manual describes all mod-
els, series and optional equipment for your
vehicle that were available at the time of
going to press. National variations are pos-
sible. Note that your vehicle may not be
equipped with all of the functions descri-
bed. This is also the case for systems and
functions relevant to safety.
i Read the information on qualified special-
ist workshops: ( Y page 24).
Loading guidelines
GWARNING
If objects, luggage or loads are not secured or
not secured sufficiently, they could slip, tip
over or be flung around and thereby hit vehicle
occupants. There is a risk of injury, especially
when braking or abruptly changing directions.
Always store objects so that they cannot be
flung around. Secure objects, luggage or
loads against slipping or tipping before the
journey.
GWARNING
Combustion engines emit poisonous exhaust
gases such as carbon monoxide. Exhaust
gases can enter the vehicle interior if the boot
lid is open when the engine is running, espe-
cially if the vehicle is in motion. There is a risk
of poisoning.
Always switch off the engine before opening
the boot lid. Never drive with the boot lid
open.
The handling characteristics of a laden vehi-
cle are dependent on the distribution of the
load within the vehicle. For this reason, you
should observe the following notes when
transporting a load:
R when transporting a load, never exceed the
maximum permissible gross vehicle weight
or the permissible axle loads for the vehicle
(including occupants).
R the boot is the preferred place to carry
objects.
R position heavy loads as far forwards as pos-
sible and as low down in the boot as pos-
sible.
R the load must not protrude above the upper
edge of the seat backrests.
R always place the load against the rear or
front seat backrests. Make sure that the
seat backrests are securely locked into
place.
R always place the load behind unoccupied
seats if possible.
R use the lashing eyelets and the luggage
nets to transport loads and luggage.
R only use lashing eyelets and fastening com-
ponents that are suitable for the weight and
size of the load.
R secure the load with sufficiently strong and
wear-resistant lashing material. Pad sharp
edges for protection.
i Lashing material is available at any quali-
fied specialist workshop.
Stowage areas
Stowage spaces
Important safety notes
GWARNING
If you do not correctly store objects in the
vehicle interior, they can slip or be flung
around, thus striking vehicle occupants.
There is a risk of injury, especially when brak-
ing or abruptly changing directions.
R Always store objects so that they cannot be
flung around in these or in similar situa-
tions.
R Always make sure that objects do not pro-
trude from stowage compartments, lug-
gage nets or stowage nets.
268Stowage areasStowing and features
Page 271 of 352
RClose lockable stowage compartments
while driving.
R Stow and secure objects that are heavy,
hard, pointy, sharp-edged, fragile or too
large in the boot.
Observe the loading guidelines (Y page 268).
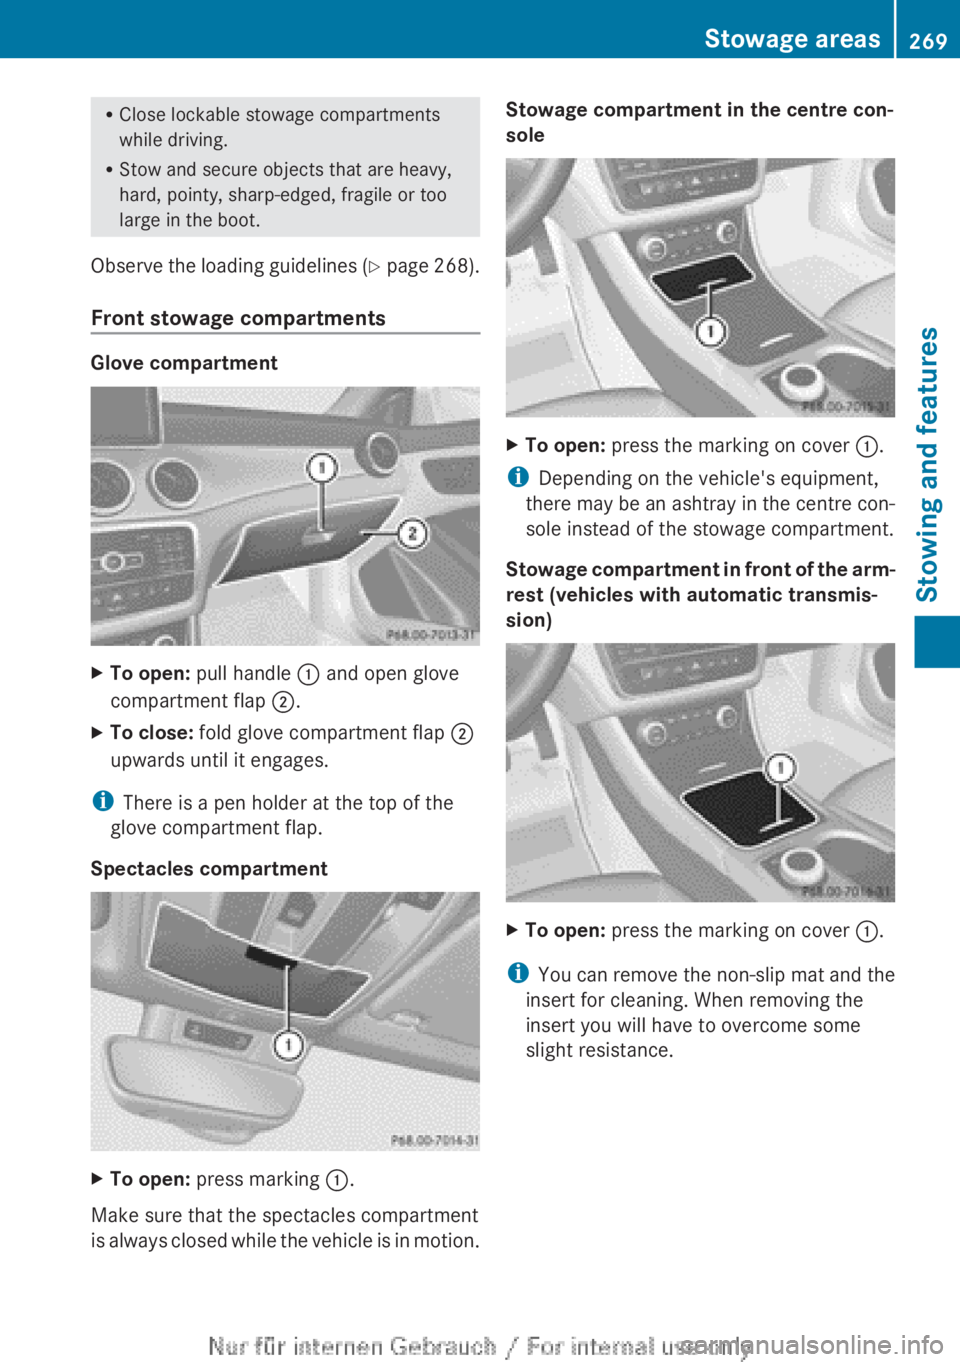
Front stowage compartments
Glove compartment
XTo open: pull handle : and open glove
compartment flap ;.XTo close: fold glove compartment flap ;
upwards until it engages.
i There is a pen holder at the top of the
glove compartment flap.
Spectacles compartment
XTo open: press marking :.
Make sure that the spectacles compartment
is always closed while the vehicle is in motion.
Stowage compartment in the centre con-
soleXTo open: press the marking on cover :.
i
Depending on the vehicle's equipment,
there may be an ashtray in the centre con-
sole instead of the stowage compartment.
Stowage compartment in front of the arm-
rest (vehicles with automatic transmis-
sion)
XTo open: press the marking on cover :.
i
You can remove the non-slip mat and the
insert for cleaning. When removing the
insert you will have to overcome some
slight resistance.
Stowage areas269Stowing and featuresZ