2013 MERCEDES-BENZ CLA towing
[x] Cancel search: towingPage 21 of 352
Securing from rolling away ............326
Towing away .................................. 308
Tow-starting ................................... 308
Transporting .................................. 311
Unlocking (in an emergency) ...........83
Unlocking (key) ................................ 77
Vehicle data ................................... 343
Vehicle data ....................................... 343
Vehicle dimensions ........................... 343
Vehicle emergency locking ................ 84
Vehicle identification number see VIN
Vehicle identification plate .............. 336
Vehicle maintenance see ASSYST PLUS
Vehicle tool kit .................................. 297
Vehicle weights ................................. 343
Video (DVD) ........................................ 215
Video DVD (on-board computer) ...... 215
VIN ...................................................... 336
W
Warning and indicator lamps ABS ................................................ 256
Brakes ........................................... 256
Distance warning signal .................264
ESP ®
.............................................. 258
ESP ®
OFF ....................................... 259
Fuel tank ........................................ 262
LIM (cruise control) ........................ 169
LIM (DISTRONIC PLUS) ..................174
LIM (variable SPEEDTRONIC) .........171
Overview .......................................... 32
PASSENGER AIRBAG OFF ................53
Reserve fuel ................................... 262
Seat belt ........................................ 255
SRS ................................................ 261
Tyre pressure monitor ...................265
Warning triangle ................................ 296
Washer fluid Display message ............................ 254
Wheel bolt tightening torque ........... 328
Wheel chock ...................................... 326
Wheels Changing/replacing .......................324
Changing a wheel .......................... 324
Checking ........................................ 317
Cleaning ......................................... 289
Cleaning (warning) .........................325
Emergency spare wheel .................331
Fitting a new wheel ........................328
Fitting a wheel ............................... 325
Important safety notes ..................316
Removing a wheel ..........................328
Storing ........................................... 325
Tightening torque ........................... 328
Wheel size/tyre size ......................329
Windowbag
Display message ............................ 236
Operation ......................................... 45
Windows
Cleaning ......................................... 290
see Side windows
Windscreen
Demisting ...................................... 132
see Windscreen
Windscreen washer fluid
see Windscreen washer system
Windscreen washer system
Notes ............................................. 342
Topping up ..................................... 286
Windscreen wipers
Display message ............................ 254
Problem (malfunction) ...................121
Replacing the wiper blades ............119
Switching on/off ........................... 118
Winter driving
General notes ................................ 318
Winter operation
Slippery road surfaces ...................168
Snow chains .................................. 319
Winter tyres
Limiting the speed (on-board com-
puter) ............................................. 223
M+S tyres ...................................... 318
Wiper blades
Cleaning ......................................... 291
Important safety notes ..................119
Replacing (windscreen) ..................119
Wooden trim (cleaning instructions) 293
Workshop see Qualified specialist workshop Index19
Page 70 of 352

Rstrong radar reflections, for example, in
multi-storey car parks
R a narrow vehicle travelling in front, e.g. a
motorcycle
R a vehicle travelling in front on a different
line
Following damage to the front end of the vehi-
cle, have the configuration and operation of
the radar sensor checked at a qualified spe-
cialist workshop. This also applies to colli-
sions at slow speeds where there is no visible
damage to the front of the vehicle.
Adaptive brake lamps
Adaptive Brake Assist warns following traffic
in an emergency braking situation:
R by means of flashing brake lamps
R the hazard warning lamps are activated
If you brake sharply from a speed of more
than 50 km/h or if braking is assisted by BAS
or BAS PLUS, the brake lamps flash rapidly.
In this way, traffic travelling behind you is
warned in an even more noticeable manner.
If you brake sharply from a speed of more
than 70 km/h to a standstill, the hazard warn-
ing lamps are activated automatically. If the
brakes are applied again, the brake lamps
light up continuously. The hazard warning
lamps switch off automatically if you travel
faster than 10 km/h . You can also switch off
the hazard warning lamps using the hazard
warning button ( Y page 110).
ESP ®
(Electronic Stability Program)
General notes
i Observe the "Important safety notes" sec-
tion ( Y page 64).
ESP ®
monitors driving stability and traction,
i.e. power transmission between the tyres
and the road surface.
If ESP ®
detects that the vehicle is deviating
from the direction desired by the driver, one
or more wheels are braked to stabilise the
vehicle. The engine output is also modified to
keep the vehicle on the desired course within
physical limits. ESP ®
assists the driver when
pulling away on wet or slippery roads. ESP ®
can also stabilise the vehicle during braking.
ETS (Electronic Traction System)
i Observe the "Important safety notes" sec-
tion ( Y page 64).
ETS traction control is part of ESP ®
.
ETS brakes the drive wheels individually if
they spin. This enables you to pull away and
accelerate on slippery surfaces, for example
if the road surface is slippery on one side. In
addition, more drive torque is transferred to
the wheel or wheels with traction.
ETS remains active when you deactivate
ESP ®
.
Important safety notes
GWARNING
If ESP ®
is malfunctioning, ESP ®
is unable to
stabilise the vehicle. In addition, other driving
safety systems are switched off. This increa-
ses the risk of skidding and an accident.
Drive on carefully. Have ESP ®
checked at a
qualified specialist workshop.
! When testing the electric parking brake
on a braking dynamometer, switch off the
ignition. Application of the brakes by
ESP ®
may otherwise destroy the brake sys-
tem.
When towing your vehicle with the front axle
raised, observe the notes on
ESP ®
(Y page 310).
ESP ®
is deactivated if the å ESP®
OFF
warning lamp in the instrument cluster lights
up continuously when the engine is running.
If the ÷ ESP®
warning lamp and the
å ESP®
OFF warning lamp are lit contin-
uously, ESP ®
is not available due to a mal-
function.
68Driving safety systemsSafety
Page 111 of 352
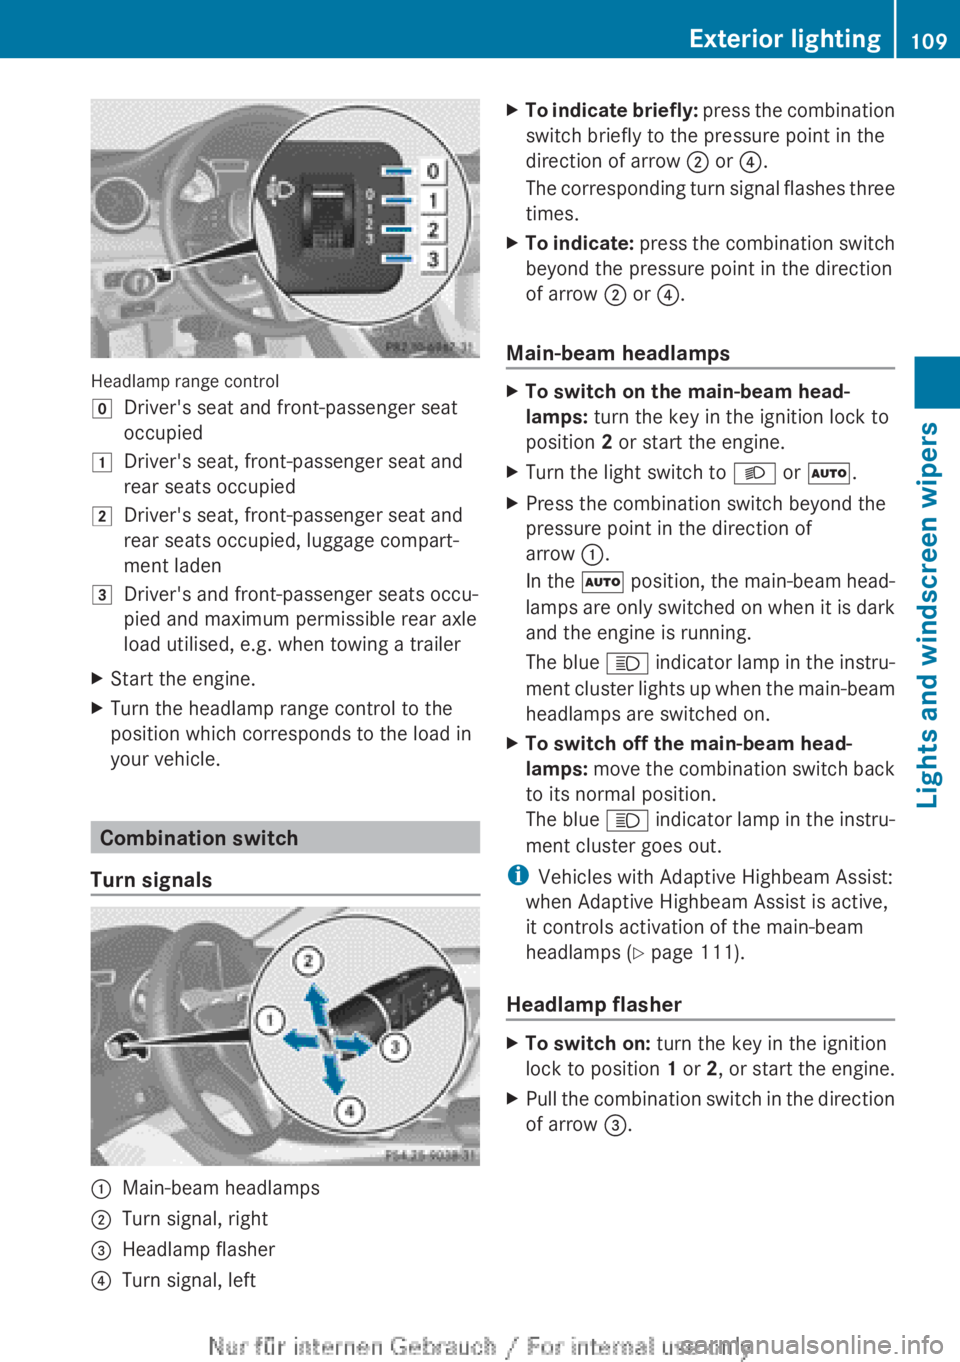
Headlamp range control
gDriver's seat and front-passenger seat
occupied1Driver's seat, front-passenger seat and
rear seats occupied2Driver's seat, front-passenger seat and
rear seats occupied, luggage compart-
ment laden3Driver's and front-passenger seats occu-
pied and maximum permissible rear axle
load utilised, e.g. when towing a trailerXStart the engine.XTurn the headlamp range control to the
position which corresponds to the load in
your vehicle.
Combination switch
Turn signals
:Main-beam headlamps;Turn signal, right=Headlamp flasher?Turn signal, leftXTo indicate briefly: press the combination
switch briefly to the pressure point in the
direction of arrow ; or ?.
The corresponding turn signal flashes three
times.XTo indicate: press the combination switch
beyond the pressure point in the direction
of arrow ; or ?.
Main-beam headlamps
XTo switch on the main-beam head-
lamps: turn the key in the ignition lock to
position 2 or start the engine.XTurn the light switch to L or à .XPress the combination switch beyond the
pressure point in the direction of
arrow :.
In the à position, the main-beam head-
lamps are only switched on when it is dark
and the engine is running.
The blue K indicator lamp in the instru-
ment cluster lights up when the main-beam
headlamps are switched on.XTo switch off the main-beam head-
lamps: move the combination switch back
to its normal position.
The blue K indicator lamp in the instru-
ment cluster goes out.
i Vehicles with Adaptive Highbeam Assist:
when Adaptive Highbeam Assist is active,
it controls activation of the main-beam
headlamps ( Y page 111).
Headlamp flasher
XTo switch on: turn the key in the ignition
lock to position 1 or 2, or start the engine.XPull the combination switch in the direction
of arrow =.Exterior lighting109Lights and windscreen wipersZ
Page 145 of 352
Useful information ............................144
Running-in notes ............................... 144
Driving ............................................... 144
Manual transmission ........................151
Automatic transmission ...................152
Refuelling ........................................... 159
Parking ............................................... 162
Driving tips ........................................ 165
Driving systems ................................ 168
Towing a trailer ................................. 201143Driving and parking
Page 153 of 352
ProblemPossible causes/consequences and M SolutionsVehicles with a petrol
engine:
The engine is not run-
ning smoothly and is
misfiring.There is a malfunction in the engine electronics or in a mechanical
component of the engine management system.XOnly depress the accelerator pedal slightly.
Otherwise, non-combusted fuel may get into the catalytic con-
verter and damage it.XHave the cause rectified immediately at a qualified specialist
workshop.The coolant tempera-
ture display is showing
more than 120 †. The
coolant warning lamp
may also be on and a
warning tone may
sound.The coolant level is too low. The coolant is too hot and the engine
is no longer being cooled sufficiently.XStop as soon as possible and allow the engine and the coolant
to cool down.XCheck the coolant level ( Y page 285). Observe the warning
notes as you do so and top up the coolant if necessary.If the coolant level is correct, the engine radiator fan may be faulty.
The coolant is too hot and the engine is no longer being cooled
sufficiently.XIf the coolant temperature is below 120 †, you can continue
driving to the nearest qualified specialist workshop.XAvoid heavy loads on the engine as you do so, e.g. driving in
mountainous terrain and stop-start traffic.Manual transmission
Gear lever
! Only engage gear when the clutch pedal
is depressed.
! When shifting to 5th and 6th gear, you
must press the shift lever to the right. Oth-
erwise, you could shift unintentionally into
3rd or 4th gear and damage the engine or
transmission.
If you shift down at too high a speed (trans-
mission braking), this can cause the engine
to overrev, leading to engine damage.
Do not use the clutch bite point to keep the
vehicle stationary on uphill gradients.
There is otherwise a risk of damaging the
clutch.
! On long and steep downhill gradients,
especially if the vehicle is laden or towing
a trailer, you must shift into gear 1, 2 or 3
in good time. This uses the engine's braking
effect. This relieves the load on the brake
system and prevents the brakes from over-
heating and wearing too quickly.
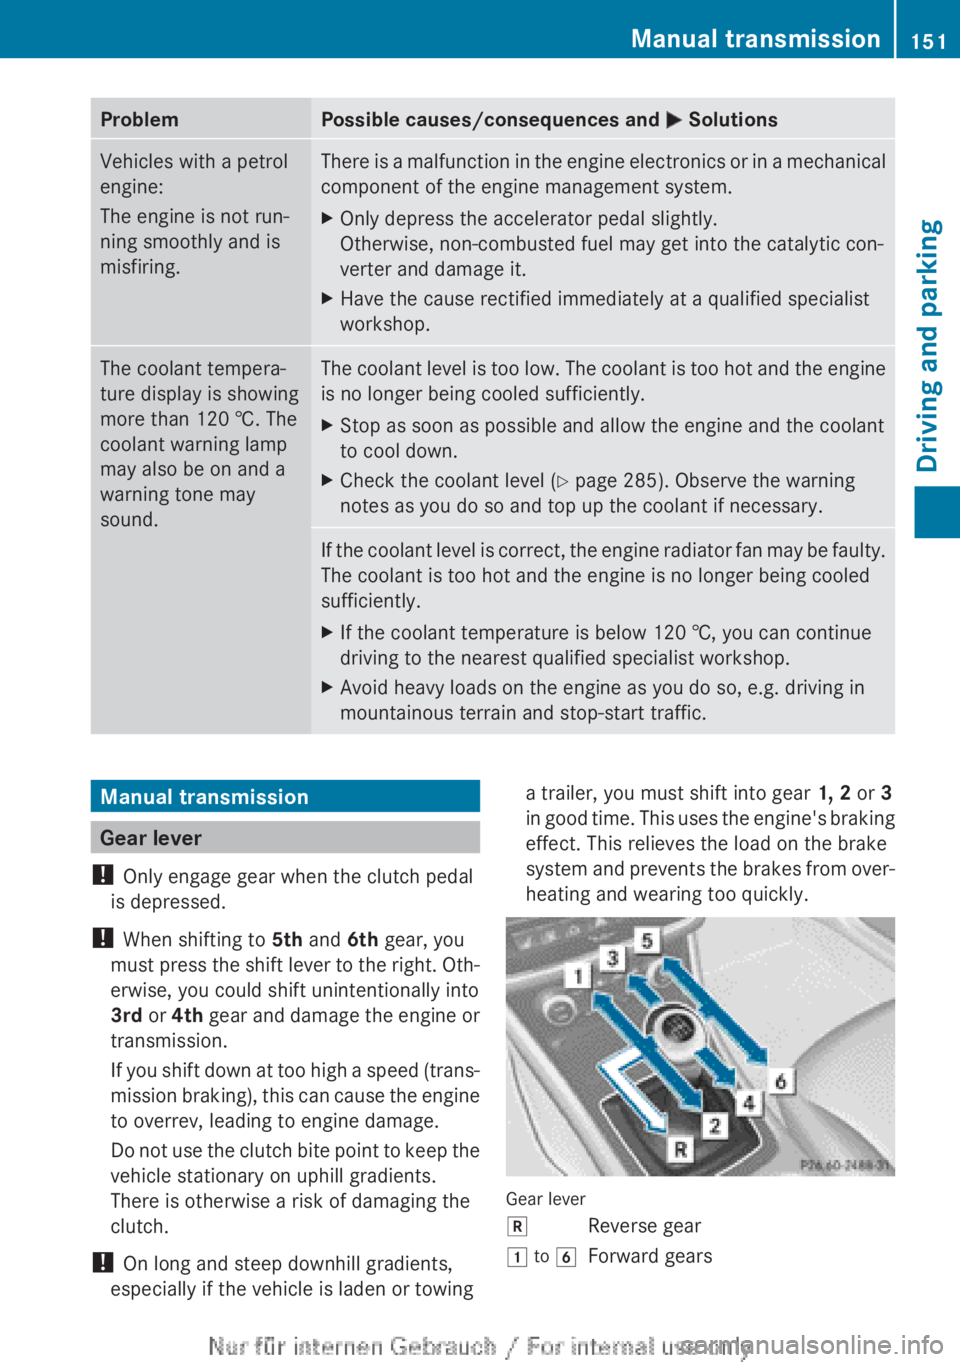
Gear lever
kReverse gear1 to 6Forward gearsManual transmission151Driving and parkingZ
Page 157 of 352
This interrupts the power transmission. The
vehicle may, for example, roll backwards on
gradients. There is a risk of an accident.
Never hold the vehicle stationary on uphill
gradients by depressing the accelerator.
The clutch may overheat if you hold the vehi-
cle stationary on uphill gradients by depress-
ing the accelerator pedal. If the clutch over-
heats, a warning tone sounds. The Stop
vehicle Shift to P Leave engine run‐
ning display message appears in the multi-
function display. You will only be able to con-
tinue you journey once the clutch has cooled
down and the display message in the multi-
function display has disappeared.
Never hold the vehicle stationary on uphill
gradients by depressing the accelerator.
Instead, only ever hold the vehicle stationary
on uphill gradients by:
R depressing the brake pedal
R activating the HOLD function
R engaging the electric parking brake
Kickdown
Use kickdown for maximum acceleration:
XDepress the accelerator pedal beyond the
pressure point.
The transmission shifts to a lower gear
depending on the engine speed.XEase off the accelerator pedal once the
desired speed is reached.
The automatic transmission shifts back up.
Towing a trailer
XDrive in the middle of the engine speed
range on uphill gradients.XDepending on the uphill or downhill gradi-
ent, select a lower gear (Y page 166), even
if cruise control, DISTRONIC PLUS, or
SPEEDTRONIC are activated.Program selector button
General notes
The program selector button allows you to
choose between drive programs with differ-
ent driving characteristics.
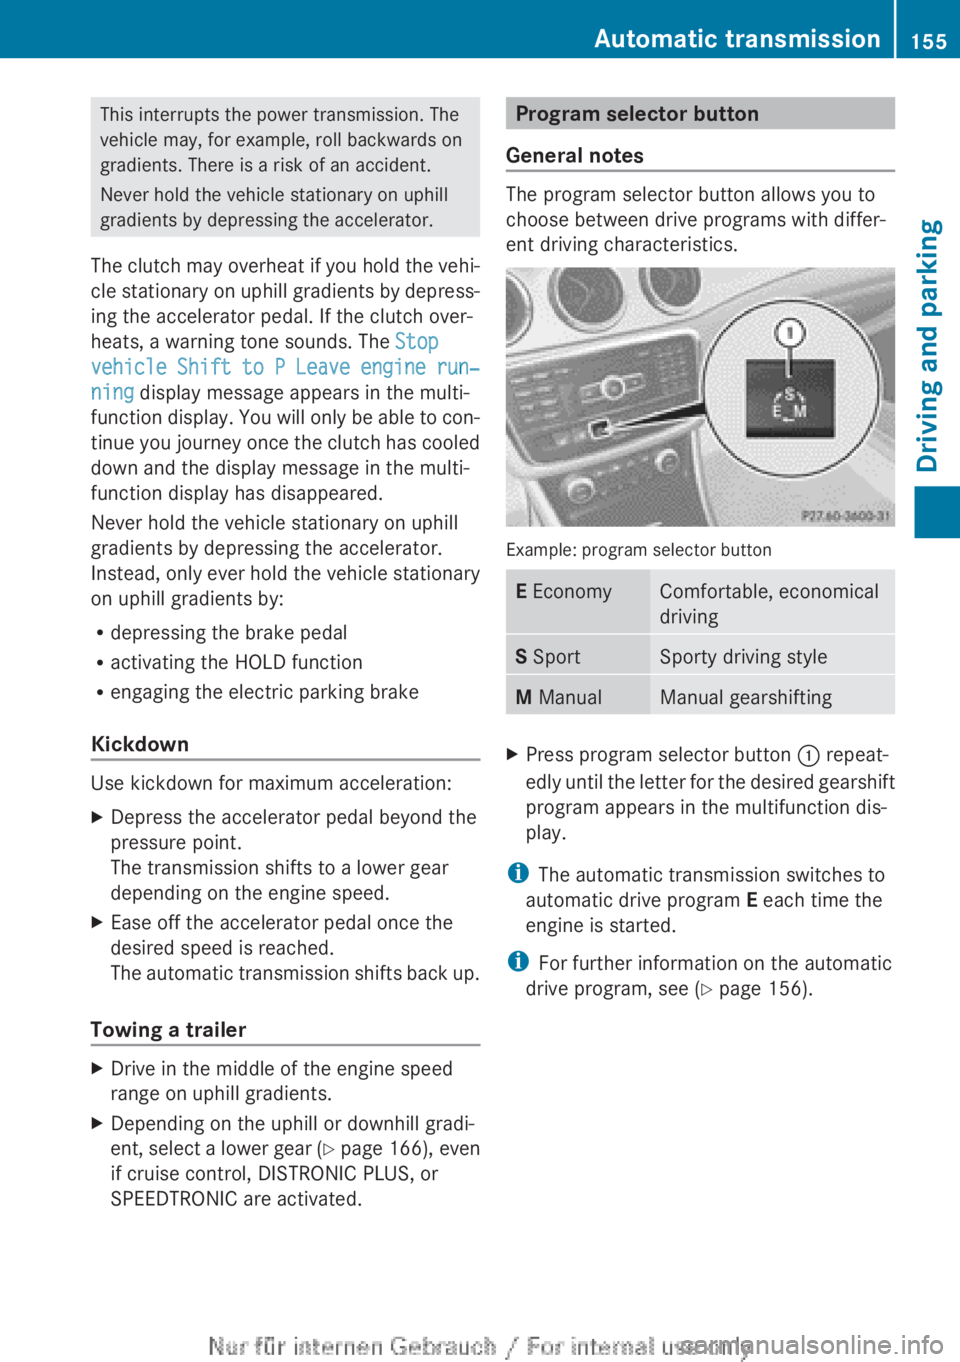
Example: program selector button
E EconomyComfortable, economical
drivingS SportSporty driving styleM ManualManual gearshiftingXPress program selector button : repeat-
edly until the letter for the desired gearshift
program appears in the multifunction dis-
play.
i The automatic transmission switches to
automatic drive program E each time the
engine is started.
i For further information on the automatic
drive program, see ( Y page 156).
Automatic transmission155Driving and parkingZ
Page 168 of 352
dynamic changes in the bars at the start of
a journey. During a prolonged driving time,
these changes are smaller. For more
dynamic changes, perform a manual reset.
For further information on the ECO display,
see ( Y page 212).
Braking
Important safety notes
GWARNING
If you shift down on a slippery road surface in
an attempt to increase the engine's braking
effect, the drive wheels could lose their grip.
This increases the risk of skidding and having
an accident.
Do not shift down for additional engine brak-
ing on a slippery road surface.
Downhill gradients
Change into a lower gear in good time on long
and steep downhill gradients. Take particular
note of this when driving a laden vehicle and
when towing a trailer. For vehicles with auto-
matic transmission, you need to have selec-
ted manual drive program M(Y page 156).
i This also applies if you have activated
cruise control, SPEEDTRONIC or DIS-
TRONIC PLUS.
This will use the braking effect of the engine,
so less braking will be required to prevent the
vehicle from gaining speed. This relieves the
load on the brake system and prevents the
brakes from overheating and wearing too
quickly.
i Briefly depressing the accelerator pedal
on downhill gradients while the manual
drive program M is temporarily activated
(vehicles with automatic transmission): the
automatic transmission may switch back to
the last active automatic drive program E
or S. The automatic transmission may shift
to a higher gear. This can reduce the
engine's braking effect.
Heavy and light loadsGWARNING
The braking system can overheat if you leave
your foot on the brake pedal while driving.
This increases the braking distance and could
even cause the braking system to fail. There
is a risk of an accident.
Never use the brake pedal as a footrest. Do
not simultaneously depress both the brake
pedal and the accelerator pedal while driving.
! Depressing the brake pedal constantly
results in excessive and premature wear to
the brake pads.
If heavy demands are made on the brakes, do
not park the vehicle immediately. Drive on for
a short while. This allows the airflow to cool
the brakes more quickly.
If the brakes have been used only moderately,
you should occasionally test their effective-
ness. To do this, brake more firmly from a
higher speed, paying attention to traffic con-
ditions. This improves the grip of the brakes.
Wet road surfaces
If you have driven for a long time in heavy rain
without braking, there may be a delayed reac-
tion from the brakes when braking for the first
time. This may also occur after a car wash or
after driving through deep water.
You have to depress the brake pedal more
firmly. Maintain a greater distance from the
vehicle in front.
After driving on a wet road or having the vehi-
cle washed, brake firmly while paying atten-
tion to the traffic conditions. This will warm
up the brake discs, thereby drying them more
quickly and protecting them against corro-
sion.
166Driving tipsDriving and parking
Page 170 of 352
Have your vehicle winterproofed at a qualified
specialist workshop at the onset of winter.
Observe the notes in the "Winter operation"
section ( Y page 318).
Driving with summer tyres
Observe the notes in the "Winter operation"
section ( Y page 318).
Slippery road surfaces
GWARNING
If you shift down on a slippery road surface in
an attempt to increase the engine's braking
effect, the drive wheels could lose their grip.
This increases the risk of skidding and having
an accident.
Do not shift down for additional engine brak-
ing on a slippery road surface.
If the vehicle threatens to skid or cannot be
stopped when moving at low speed:
XVehicles with manual transmission:
shift to neutral.XVehicles with automatic transmission:
shift the transmission to position N.XTry to bring the vehicle under control by
using corrective steering.
You should drive particularly carefully on slip-
pery road surfaces. Avoid sudden accelera-
tion, steering and braking manoeuvres.
The outside temperature indicator is not
designed to serve as an ice-warning device
and is therefore unsuitable for that purpose.
Changes in the outside temperature are dis-
played after a short delay.
Indicated temperatures just above the freez-
ing point do not guarantee that the road sur-
face is free of ice. The road may still be icy,
especially in wooded areas or on bridges. You
should pay special attention to road condi-
tions when temperatures are around freezing
point.
i For more information on driving with
snow chains, see ( Y page 319).
Driving systems
Cruise control
General notes
Cruise control maintains a constant road
speed for you. It brakes automatically in order
to avoid exceeding the set speed. You must
select a lower gear in good time on long and
steep downhill gradients, especially if the
vehicle is laden or towing a trailer. For vehi-
cles with automatic transmission, you need
to have selected manual drive program
M (Y page 156). By doing so, you will make
use of the braking effect of the engine. This
relieves the load on the brake system and
prevents the brakes from overheating and
wearing too quickly.
Use cruise control only if road and traffic con-
ditions make it appropriate to maintain a
steady speed for a prolonged period. You can
store any road speed above 30 km/h.
Important safety notes
If you fail to adapt your driving style, cruise
control can neither reduce the risk of an acci-
dent nor override the laws of physics. Cruise
control cannot take into account road,
weather or traffic conditions. Cruise control
is only an aid. You are responsible for the dis-
tance to the vehicle in front, for vehicle speed,
for braking in good time, and for staying in the
lane.
Do not use cruise control:
R in road and traffic conditions which do not
allow you to maintain a constant speed
(e.g. in heavy traffic or on winding roads).
R on smooth or slippery roads. Braking or
accelerating can cause the drive wheels to
lose traction and the vehicle could then
skid.
R when there is poor visibility, e.g. due to fog,
heavy rain or snow.
If there is a change of drivers, advise the new
driver of the speed stored.
168Driving systemsDriving and parking