2013 MERCEDES-BENZ CLA lock
[x] Cancel search: lockPage 20 of 352
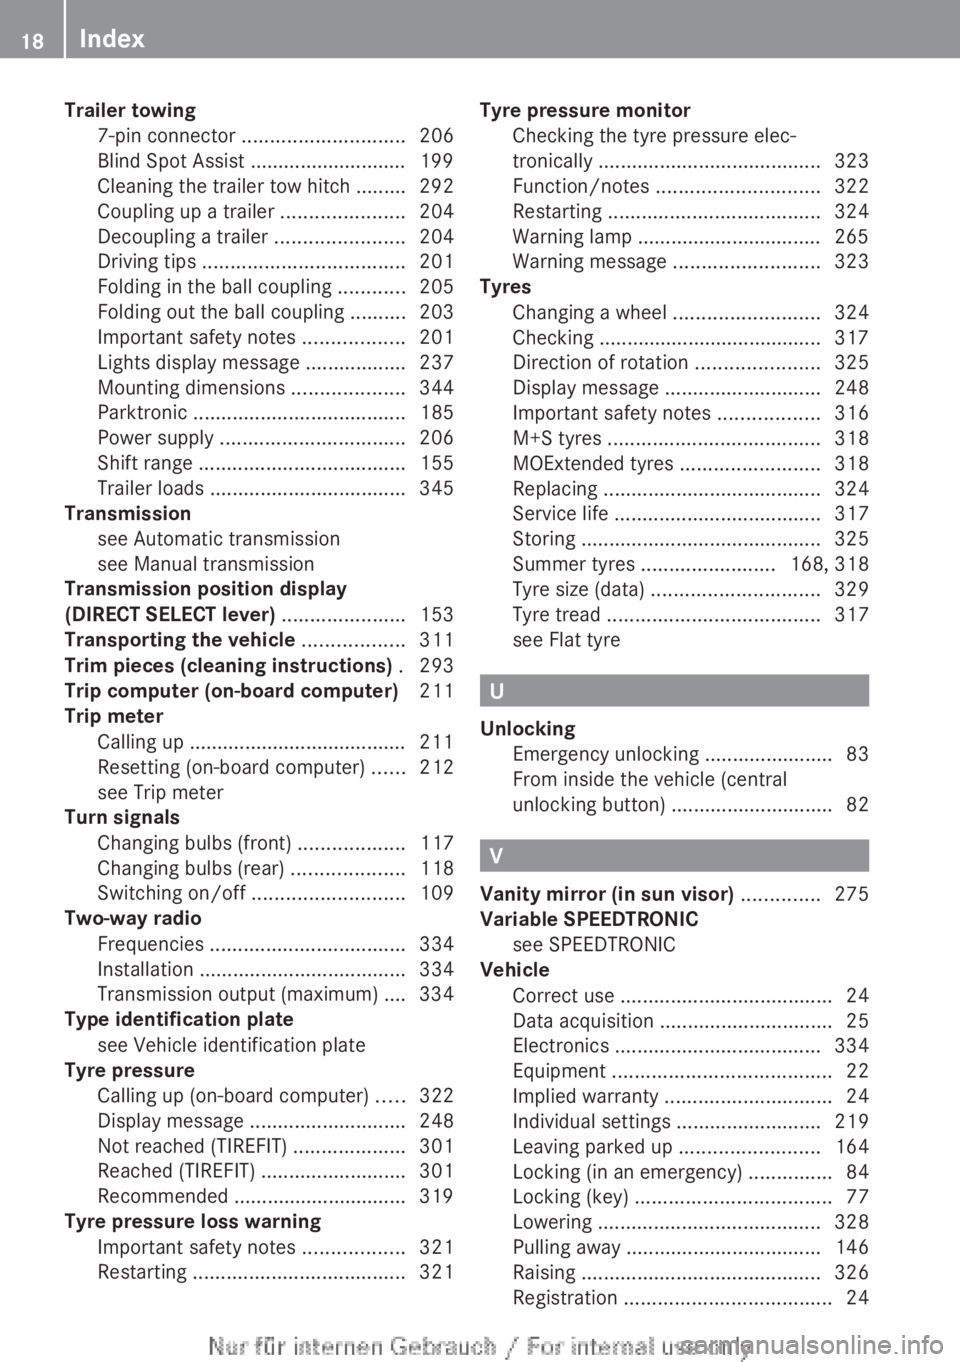
Trailer towing7-pin connector ............................. 206
Blind Spot Assist ............................ 199
Cleaning the trailer tow hitch ......... 292
Coupling up a trailer ......................204
Decoupling a trailer .......................204
Driving tips .................................... 201
Folding in the ball coupling ............205
Folding out the ball coupling ..........203
Important safety notes ..................201
Lights display message ..................237
Mounting dimensions ....................344
Parktronic ...................................... 185
Power supply ................................. 206
Shift range ..................................... 155
Trailer loads ................................... 345
Transmission
see Automatic transmission
see Manual transmission
Transmission position display
(DIRECT SELECT lever) ...................... 153
Transporting the vehicle .................. 311
Trim pieces (cleaning instructions) . 293
Trip computer (on-board computer) 211
Trip meter Calling up ....................................... 211
Resetting (on-board computer) ......212
see Trip meter
Turn signals
Changing bulbs (front) ...................117
Changing bulbs (rear) ....................118
Switching on/off ........................... 109
Two-way radio
Frequencies ................................... 334
Installation ..................................... 334
Transmission output (maximum) .... 334
Type identification plate
see Vehicle identification plate
Tyre pressure
Calling up (on-board computer) .....322
Display message ............................ 248
Not reached (TIREFIT) ....................301
Reached (TIREFIT) ..........................301
Recommended ............................... 319
Tyre pressure loss warning
Important safety notes ..................321
Restarting ...................................... 321Tyre pressure monitor
Checking the tyre pressure elec-
tronically ........................................ 323
Function/notes ............................. 322
Restarting ...................................... 324
Warning lamp ................................. 265
Warning message .......................... 323
Tyres
Changing a wheel .......................... 324
Checking ........................................ 317
Direction of rotation ......................325
Display message ............................ 248
Important safety notes ..................316
M+S tyres ...................................... 318
MOExtended tyres .........................318
Replacing ....................................... 324
Service life ..................................... 317
Storing ........................................... 325
Summer tyres ........................ 168, 318
Tyre size (data) .............................. 329
Tyre tread ...................................... 317
see Flat tyre
U
Unlocking Emergency unlocking .......................83
From inside the vehicle (central
unlocking button) ............................. 82
V
Vanity mirror (in sun visor) .............. 275
Variable SPEEDTRONIC see SPEEDTRONIC
Vehicle
Correct use ...................................... 24
Data acquisition ............................... 25
Electronics ..................................... 334
Equipment ....................................... 22
Implied warranty .............................. 24
Individual settings ..........................219
Leaving parked up .........................164
Locking (in an emergency) ...............84
Locking (key) ................................... 77
Lowering ........................................ 328
Pulling away ................................... 146
Raising ........................................... 326
Registration ..................................... 24
18Index
Page 21 of 352
Securing from rolling away ............326
Towing away .................................. 308
Tow-starting ................................... 308
Transporting .................................. 311
Unlocking (in an emergency) ...........83
Unlocking (key) ................................ 77
Vehicle data ................................... 343
Vehicle data ....................................... 343
Vehicle dimensions ........................... 343
Vehicle emergency locking ................ 84
Vehicle identification number see VIN
Vehicle identification plate .............. 336
Vehicle maintenance see ASSYST PLUS
Vehicle tool kit .................................. 297
Vehicle weights ................................. 343
Video (DVD) ........................................ 215
Video DVD (on-board computer) ...... 215
VIN ...................................................... 336
W
Warning and indicator lamps ABS ................................................ 256
Brakes ........................................... 256
Distance warning signal .................264
ESP ®
.............................................. 258
ESP ®
OFF ....................................... 259
Fuel tank ........................................ 262
LIM (cruise control) ........................ 169
LIM (DISTRONIC PLUS) ..................174
LIM (variable SPEEDTRONIC) .........171
Overview .......................................... 32
PASSENGER AIRBAG OFF ................53
Reserve fuel ................................... 262
Seat belt ........................................ 255
SRS ................................................ 261
Tyre pressure monitor ...................265
Warning triangle ................................ 296
Washer fluid Display message ............................ 254
Wheel bolt tightening torque ........... 328
Wheel chock ...................................... 326
Wheels Changing/replacing .......................324
Changing a wheel .......................... 324
Checking ........................................ 317
Cleaning ......................................... 289
Cleaning (warning) .........................325
Emergency spare wheel .................331
Fitting a new wheel ........................328
Fitting a wheel ............................... 325
Important safety notes ..................316
Removing a wheel ..........................328
Storing ........................................... 325
Tightening torque ........................... 328
Wheel size/tyre size ......................329
Windowbag
Display message ............................ 236
Operation ......................................... 45
Windows
Cleaning ......................................... 290
see Side windows
Windscreen
Demisting ...................................... 132
see Windscreen
Windscreen washer fluid
see Windscreen washer system
Windscreen washer system
Notes ............................................. 342
Topping up ..................................... 286
Windscreen wipers
Display message ............................ 254
Problem (malfunction) ...................121
Replacing the wiper blades ............119
Switching on/off ........................... 118
Winter driving
General notes ................................ 318
Winter operation
Slippery road surfaces ...................168
Snow chains .................................. 319
Winter tyres
Limiting the speed (on-board com-
puter) ............................................. 223
M+S tyres ...................................... 318
Wiper blades
Cleaning ......................................... 291
Important safety notes ..................119
Replacing (windscreen) ..................119
Wooden trim (cleaning instructions) 293
Workshop see Qualified specialist workshop Index19
Page 30 of 352
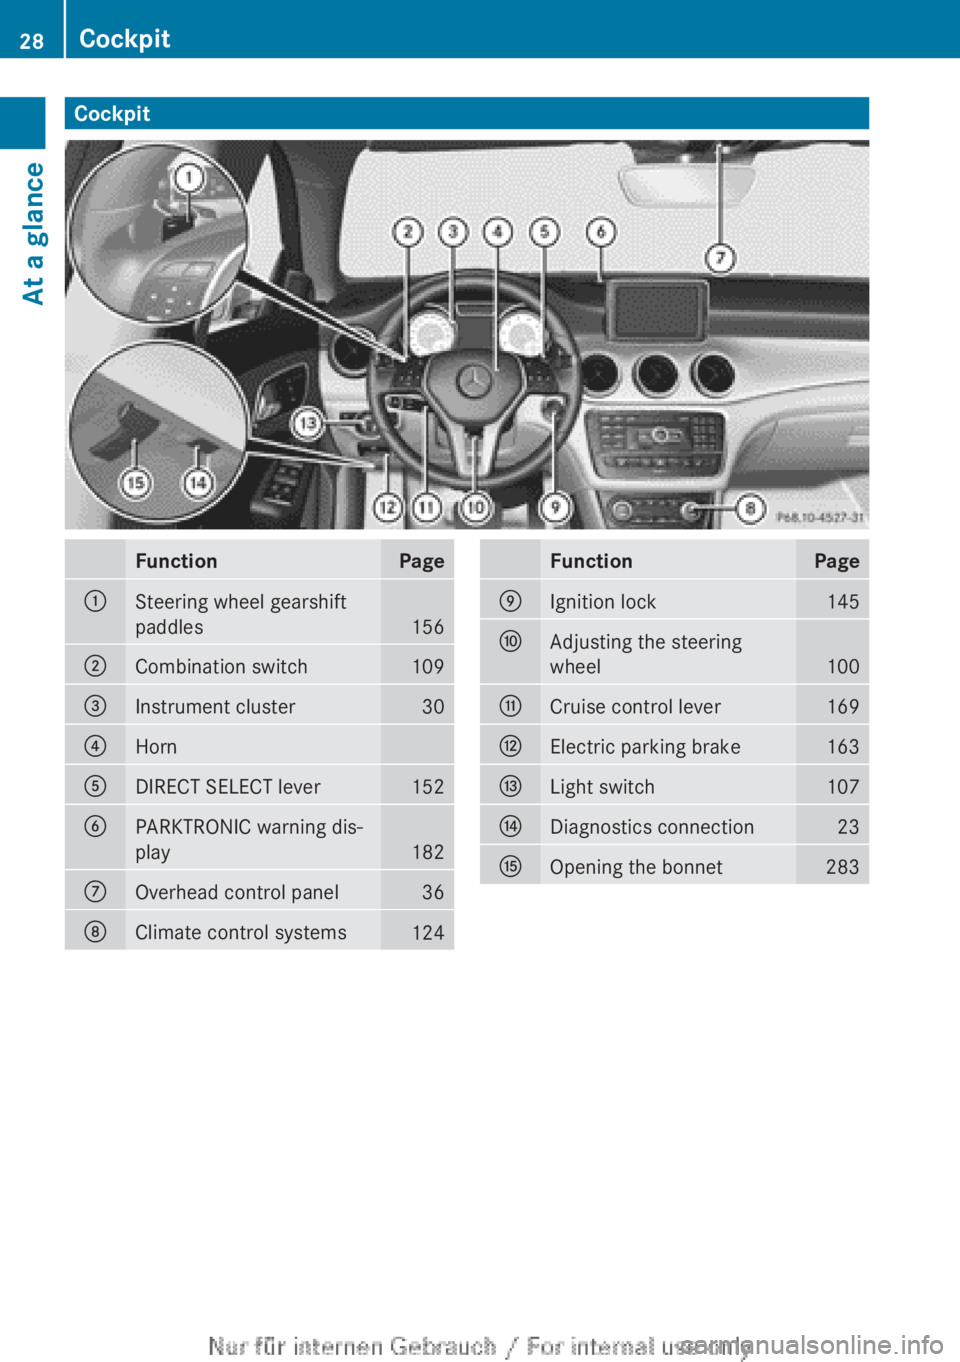
CockpitFunctionPage:Steering wheel gearshift
paddles
156
;Combination switch109=Instrument cluster30?HornADIRECT SELECT lever152BPARKTRONIC warning dis-
play
182
COverhead control panel36DClimate control systems124FunctionPageEIgnition lock145FAdjusting the steering
wheel
100
GCruise control lever169HElectric parking brake163ILight switch107JDiagnostics connection23KOpening the bonnet28328CockpitAt a glance
Page 31 of 352
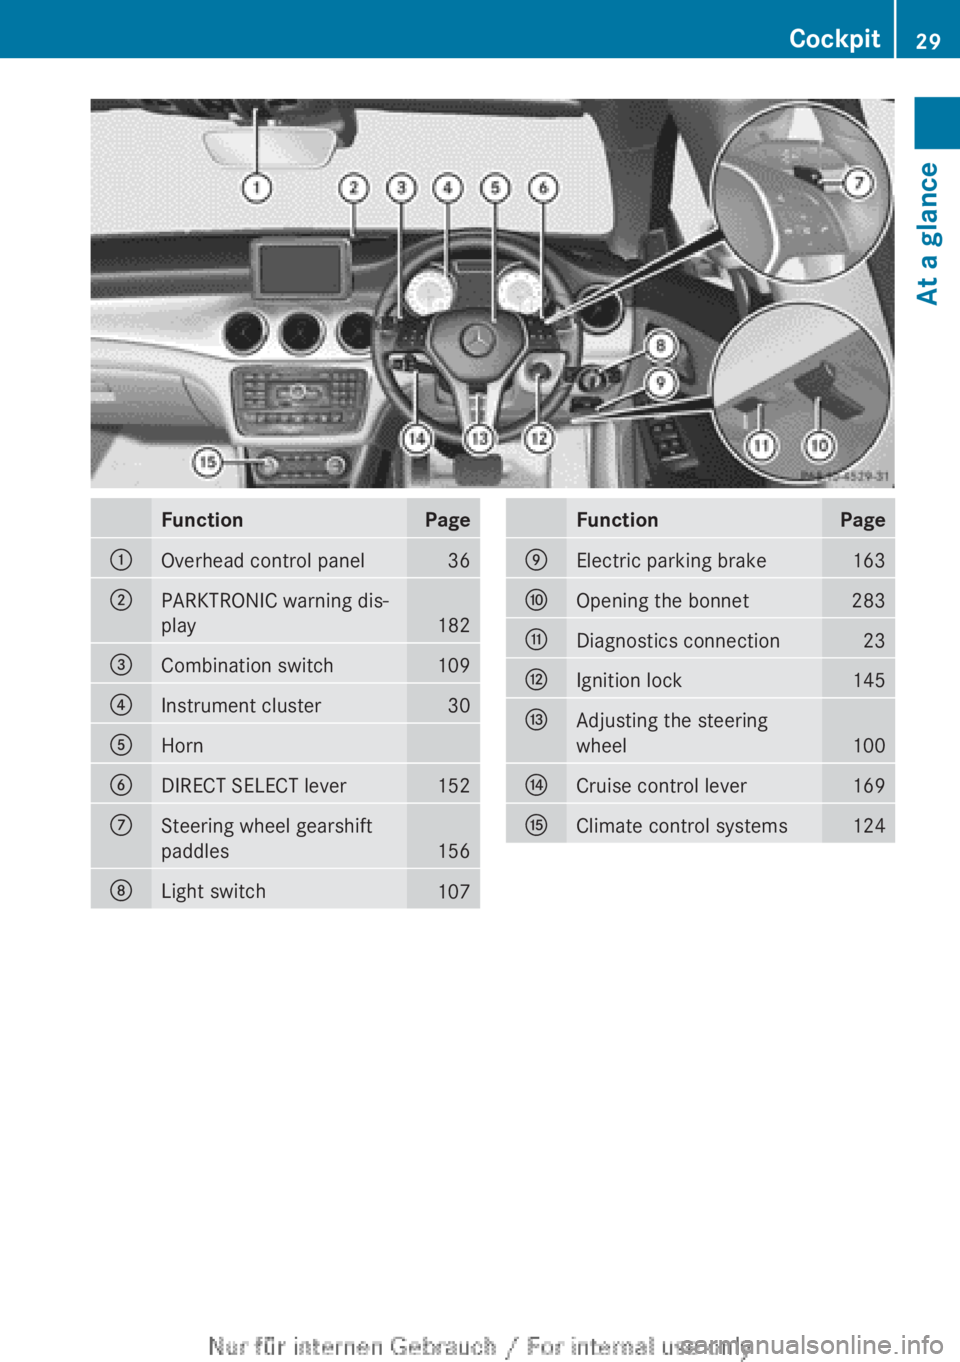
FunctionPage:Overhead control panel36;PARKTRONIC warning dis-
play
182
=Combination switch109?Instrument cluster30AHornBDIRECT SELECT lever152CSteering wheel gearshift
paddles
156
DLight switch107FunctionPageEElectric parking brake163FOpening the bonnet283GDiagnostics connection23HIgnition lock145IAdjusting the steering
wheel
100
JCruise control lever169KClimate control systems124Cockpit29At a glance
Page 39 of 352

Door control panelFunctionPage:Opens the door82;%& Unlocks/locks
the vehicle
82
=r 45= Saves
the seat and exterior mirror
settings
103
?Adjusts the seats electri-
cally
96
A7 Zö\
Adjusts and folds the exte-
rior mirrors in/out electri-
cally
101
FunctionPageBW Opens/closes the
side windows
87
Cn Activates/deacti-
vates the override feature
for the side windows in the
rear compartment
63
Do Opens the boot85Door control panel37At a glance
Page 42 of 352
Useful information
i This Owner's Manual describes all mod-
els, series and optional equipment for your
vehicle that were available at the time of
going to press. National variations are pos-
sible. Note that your vehicle may not be
equipped with all of the functions descri-
bed. This is also the case for systems and
functions relevant to safety.
i Read the information on qualified special-
ist workshops: ( Y page 24).
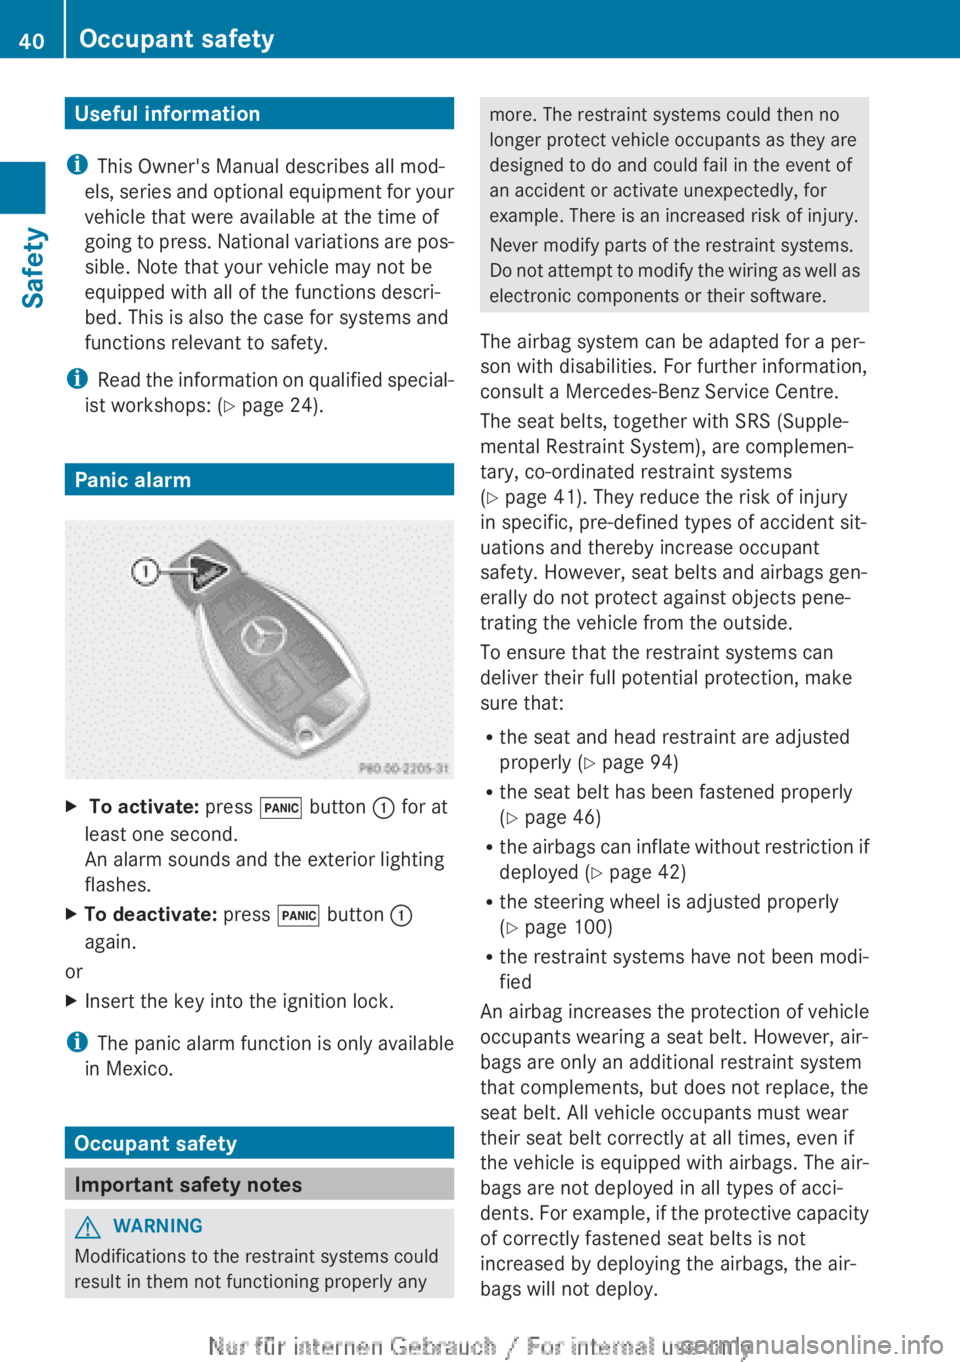
Panic alarm
X To activate: press ! button : for at
least one second.
An alarm sounds and the exterior lighting
flashes.XTo deactivate: press ! button :
again.
or
XInsert the key into the ignition lock.
i The panic alarm function is only available
in Mexico.
Occupant safety
Important safety notes
GWARNING
Modifications to the restraint systems could
result in them not functioning properly any
more. The restraint systems could then no
longer protect vehicle occupants as they are
designed to do and could fail in the event of
an accident or activate unexpectedly, for
example. There is an increased risk of injury.
Never modify parts of the restraint systems.
Do not attempt to modify the wiring as well as
electronic components or their software.
The airbag system can be adapted for a per-
son with disabilities. For further information,
consult a Mercedes-Benz Service Centre.
The seat belts, together with SRS (Supple-
mental Restraint System), are complemen-
tary, co-ordinated restraint systems
( Y page 41). They reduce the risk of injury
in specific, pre-defined types of accident sit-
uations and thereby increase occupant
safety. However, seat belts and airbags gen-
erally do not protect against objects pene-
trating the vehicle from the outside.
To ensure that the restraint systems can
deliver their full potential protection, make
sure that:
R the seat and head restraint are adjusted
properly ( Y page 94)
R the seat belt has been fastened properly
( Y page 46)
R the airbags can inflate without restriction if
deployed ( Y page 42)
R the steering wheel is adjusted properly
( Y page 100)
R the restraint systems have not been modi-
fied
An airbag increases the protection of vehicle
occupants wearing a seat belt. However, air-
bags are only an additional restraint system
that complements, but does not replace, the
seat belt. All vehicle occupants must wear
their seat belt correctly at all times, even if
the vehicle is equipped with airbags. The air-
bags are not deployed in all types of acci-
dents. For example, if the protective capacity
of correctly fastened seat belts is not
increased by deploying the airbags, the air-
bags will not deploy.40Occupant safetySafety
Page 48 of 352
Windowbags are deployed:
R at the start of an accident with a high rate
of lateral vehicle deceleration or accelera-
tion, e.g. in a side impact
R on the side on which an impact occurs
R on the driver's and the front passenger's
side if the vehicle overturns and the system
determines that deployment can offer addi-
tional protection to that provided by the
seat belt
R independently of the use of the seat belt
R regardless of whether the front-passenger
seat is occupied
R independently of the front airbags
PRE-SAFE ®
(anticipatory occupant
protection)
! Make sure that there are no objects in the
footwell or behind the seats when moving
the seat back. There is a risk that the seats
and/or the objects could be damaged.
PRE-SAFE ®
takes pre-emptive measures to
protect occupants in certain hazardous sit-
uations. Although your vehicle is equipped
with a PRE-SAFE ®
system, the possibility of
injury in the event of an accident cannot be
ruled out.
Always adapt your driving style to suit the
prevailing road and weather conditions and
maintain a safe distance from the vehicle in
front. Drive carefully.
PRE-SAFE ®
intervenes:
R when BAS activates, e.g. in emergency
braking situations.
R when adaptive Brake Assist intervenes
powerfully on vehicles with DISTRONIC
PLUS.
R in critical driving situations, e.g. when phys-
ical limits are exceeded and the vehicle
understeers or oversteers severely.
PRE-SAFE ®
takes the following measures
depending on the hazardous situation detec-
ted:
R the front seat belts are pre-tensioned.
R vehicles with the memory function: the
front-passenger seat is adjusted if it is in an
unfavourable position.
R if the vehicle skids, the panorama sliding
sunroof and the side windows are closed so
that only a small gap remains.
If the hazardous situation passes without
resulting in an accident, PRE-SAFE ®
slackens
the belt pretensioning. All settings made by
PRE-SAFE ®
can then be reversed.
If the seat belts are not released:XMove the backrest or seat back slightly, but
only when the vehicle is stationary.
Seat belt pretensioning is reduced and the
locking mechanism is released.
The seat-belt adjustment is an integral part of
the PRE-SAFE ®
convenience function. More
information about seat-belt adjustment can
be found under "Seat-belt adjustment"
( Y page 48).
Seat belts
Important safety notes
GWARNING
A seat belt which is not worn correctly, or
which has not been engaged in the seat belt
buckle correctly, cannot provide the intended
level of protection. Under certain circumstan-
ces, this could cause severe or even fatal inju-
ries in the event of an accident.
Therefore, make sure that all occupants — in
particular, pregnant women — wear their seat
belts correctly at all times.
R The seat belt must fit snugly on your body
and must not be twisted.Therefore, avoid
wearing bulky clothing, e.g. a winter coat.
The shoulder section of the belt must be
routed across the centre of your shoulder
46Occupant safetySafety
Page 50 of 352
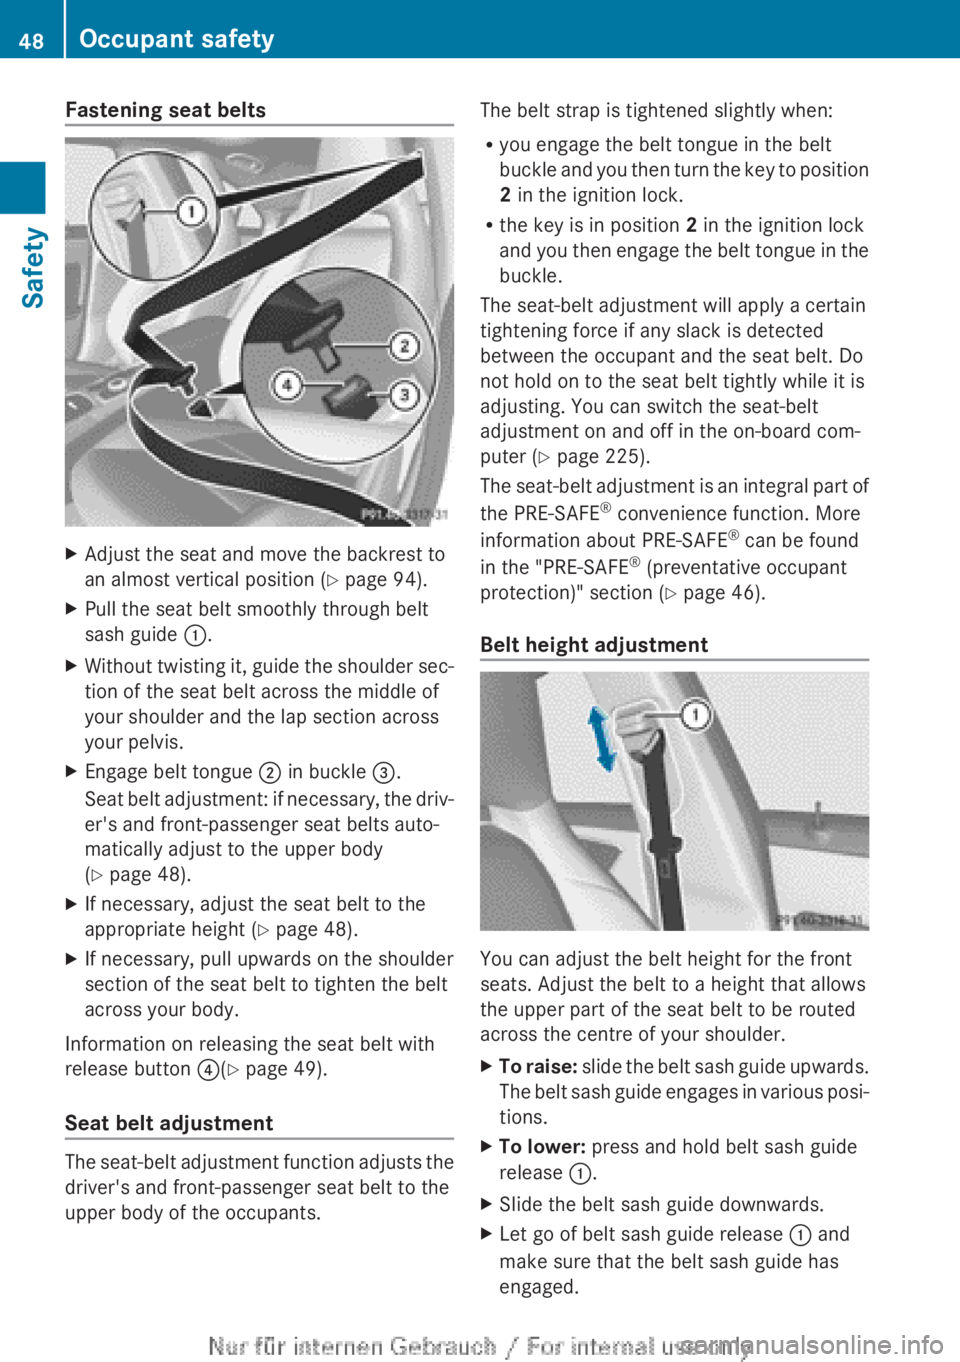
Fastening seat beltsXAdjust the seat and move the backrest to
an almost vertical position ( Y page 94).XPull the seat belt smoothly through belt
sash guide :.XWithout twisting it, guide the shoulder sec-
tion of the seat belt across the middle of
your shoulder and the lap section across
your pelvis.XEngage belt tongue ; in buckle =.
Seat belt adjustment: if necessary, the driv-
er's and front-passenger seat belts auto-
matically adjust to the upper body
( Y page 48).XIf necessary, adjust the seat belt to the
appropriate height ( Y page 48).XIf necessary, pull upwards on the shoulder
section of the seat belt to tighten the belt
across your body.
Information on releasing the seat belt with
release button ?(Y page 49).
Seat belt adjustment
The seat-belt adjustment function adjusts the
driver's and front-passenger seat belt to the
upper body of the occupants.
The belt strap is tightened slightly when:
R you engage the belt tongue in the belt
buckle and you then turn the key to position
2 in the ignition lock.
R the key is in position 2 in the ignition lock
and you then engage the belt tongue in the
buckle.
The seat-belt adjustment will apply a certain
tightening force if any slack is detected
between the occupant and the seat belt. Do
not hold on to the seat belt tightly while it is
adjusting. You can switch the seat-belt
adjustment on and off in the on-board com-
puter ( Y page 225).
The seat-belt adjustment is an integral part of
the PRE-SAFE ®
convenience function. More
information about PRE-SAFE ®
can be found
in the "PRE-SAFE ®
(preventative occupant
protection)" section ( Y page 46).
Belt height adjustment
You can adjust the belt height for the front
seats. Adjust the belt to a height that allows
the upper part of the seat belt to be routed
across the centre of your shoulder.
XTo raise: slide the belt sash guide upwards.
The belt sash guide engages in various posi-
tions.XTo lower: press and hold belt sash guide
release :.XSlide the belt sash guide downwards.XLet go of belt sash guide release : and
make sure that the belt sash guide has
engaged.48Occupant safetySafety