2013 MERCEDES-BENZ CLA clock setting
[x] Cancel search: clock settingPage 108 of 352
Useful information
i This Owner's Manual describes all mod-
els, series and optional equipment for your
vehicle that were available at the time of
going to press. National variations are pos-
sible. Note that your vehicle may not be
equipped with all of the functions descri-
bed. This is also the case for systems and
functions relevant to safety.
i Read the information on qualified special-
ist workshops: ( Y page 24).
Exterior lighting
General notes
For reasons of safety, Mercedes-Benz recom-
mends that you drive with the lights switched
on even during the daytime. In some coun-
tries, operation of the headlamps varies due
to legal requirements and self-imposed obli-
gations.
Driving abroad
General notes
If your journey takes you to countries where
vehicles are driven on the opposite side of the
road to the country in which the vehicle is
registered, your headlamps must be switched
to symmetrical dipped beam as soon as pos-
sible after crossing the border (exception:
vehicles with halogen headlamps). This pre-
vents oncoming traffic from being dazzled.
Symmetrical lights do not illuminate as large
an area of the edge of the carriageway.
Vehicles with halogen headlamps
It is not necessary to switch your headlamps
to symmetrical dipped beam when driving in
countries where vehicles are driven on the
opposite side of the road to the country in
which the vehicle is registered. Legal require-
ments are fulfilled without switching the
headlamps to symmetrical dipped beam.
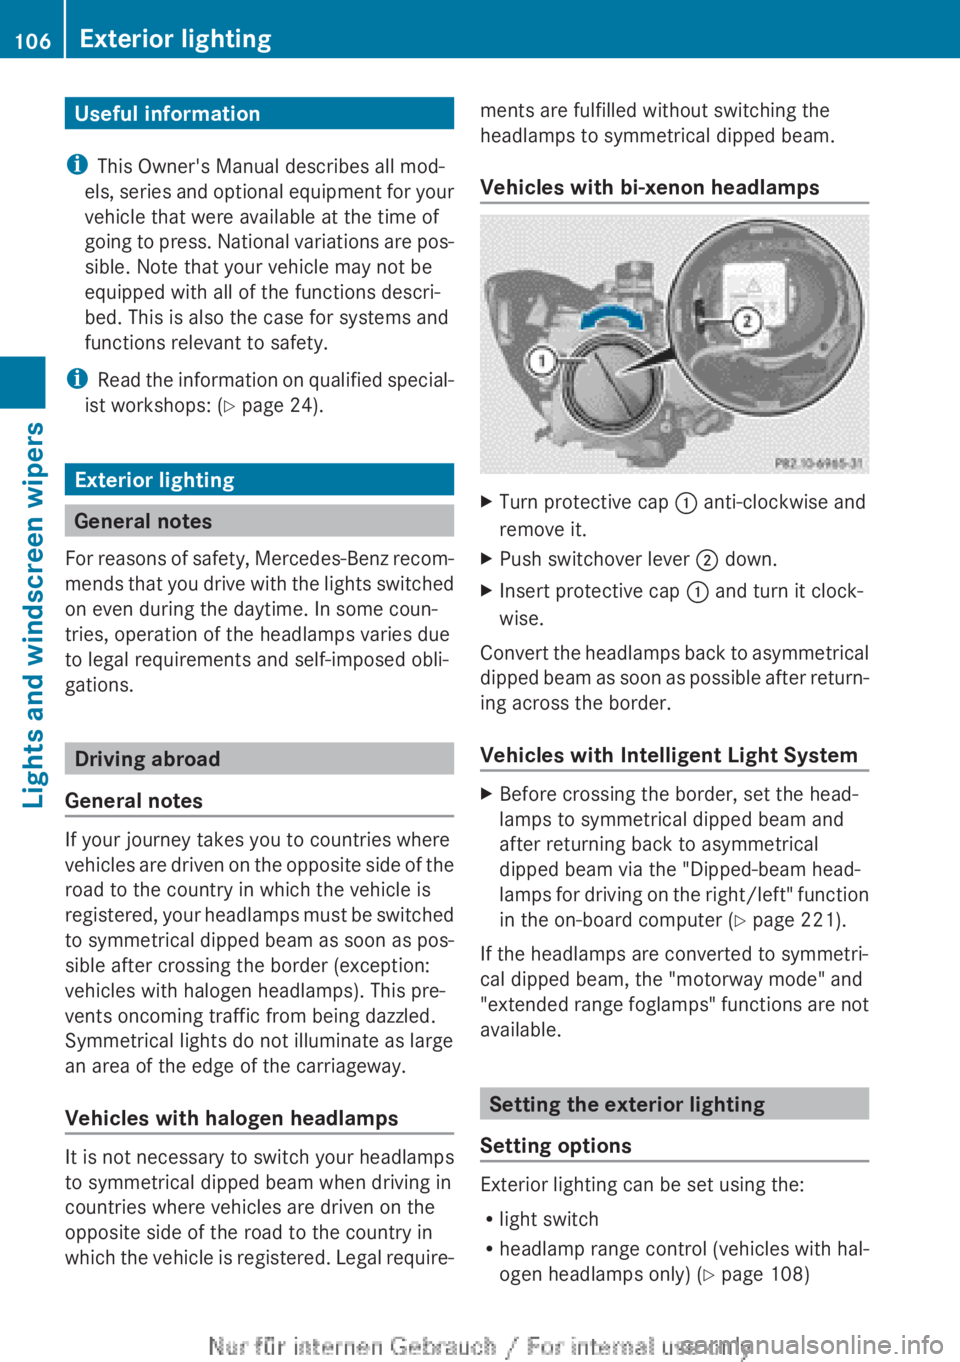
Vehicles with bi-xenon headlampsXTurn protective cap : anti-clockwise and
remove it.XPush switchover lever ; down.XInsert protective cap : and turn it clock-
wise.
Convert the headlamps back to asymmetrical
dipped beam as soon as possible after return-
ing across the border.
Vehicles with Intelligent Light System
XBefore crossing the border, set the head-
lamps to symmetrical dipped beam and
after returning back to asymmetrical
dipped beam via the "Dipped-beam head-
lamps for driving on the right/left" function
in the on-board computer ( Y page 221).
If the headlamps are converted to symmetri-
cal dipped beam, the "motorway mode" and
"extended range foglamps" functions are not
available.
Setting the exterior lighting
Setting options
Exterior lighting can be set using the:
R light switch
R headlamp range control (vehicles with hal-
ogen headlamps only) ( Y page 108)
106Exterior lightingLights and windscreen wipers
Page 127 of 352

Control panel for THERMATIC automatic climate control:To set the temperature (Y page 130);To demist the windscreen ( Y page 132)=To set the air distribution ( Y page 131)?To activate/deactivate air-recirculation mode ( Y page 134)ATo set the airflow ( Y page 131)BTo activate/deactivate cooling with air dehumidification ( Y page 128)CTo switch the rear window heating on/off ( Y page 133)Notes on using THERMATIC automatic
climate control
Automatic climate control
The following contains notes and recommen-
dations on optimum use of THERMATIC auto-
matic climate control.
R Switch on the air-conditioning system by
turning control knob A clockwise to the
desired position (except position 0).
R Set the temperature to 22 †.
R Recommendation to avoid misting of
the windows in the event of low outside
temperatures or rain: switch on the air
distribution ¯ and if possible switch off
P and O (Y page 131).
Deactivate air-recirculation mode
e (Y page 134).
Set airflow control A to a setting between
3 and 6(Y page 131).
R Recommendation for rapid cooling or
heating of the vehicle interior: briefly set
airflow control A to a setting between 3
and 6(Y page 131).
R Recommendation for a constant vehi-
cle interior temperature: set airflow con-
trol A to a setting between 1 and
3 (Y page 131).
R Recommendation for air distribution in
winter: select the O and ¯ settings
( Y page 131).
Recommendation for air distribution in
summer: select the P or P and
¯ settings ( Y page 131).
R Only use the "Windscreen demisting" func-
tion briefly until the windscreen is clear
again.Overview of climate control systems125Climate control
Page 130 of 352
erwise mist up as no fresh air is drawn into
the vehicle in air-recirculation mode.
R Use the ZONE function to adopt the tem-
perature settings on the driver's side for
the front-passenger side as well. The indi-
cator lamp in the á button goes out.
R Use the residual heat function if you want
to heat or ventilate the vehicle interior
when the ignition is switched off. The resid-
ual heat function can only be activated or
deactivated with the ignition switched off.
R Vehicles with COMAND Online: if you
change the settings of the climate control
system, the climate status display appears
for three seconds at the bottom of the
screen in the COMAND display. See also
the separate COMAND Online operating
instructions. You will see the current set-
tings of the various climate control func-
tions.
ECO start/stop function
During automatic engine switch-off, the cli-
mate control only operates at a reduced capa-
city. If you require the full climate control out-
put, you can switch off the ECO start/stop
function by pressing the ECO button
( Y page 149).
Operating the climate control system
Switching climate control on/off
Points to observe before use
When the climate control is switched off, the
air supply and air circulation are also
switched off. The windows could mist up.
Therefore, only switch off climate control
briefly.
THERMATIC automatic climate controlXTurn the key to position 2 in the ignition
lock ( Y page 145).XTo switch on: turn control A clockwise to
the desired position (except position 0)
( Y page 125).XTo switch off: turn control A anti-clock-
wise to position 0 (Y page 125).
THERMOTRONIC automatic climate
control
XTurn the key to position 2 in the ignition
lock ( Y page 145).X To switch on: press the à button.
The indicator lamp in the à button lights
up. Airflow and air distribution are set to
automatic mode.
or
XPress the ^ button.
The indicator lamp in the ^ button goes
out. The previous settings are reactivated.XTo deactivate: press the ^ button.
The indicator lamp in the ^ button lights
up.
i THERMOTRONIC automatic climate con-
trol: switch on climate control primarily
using the à button.
Activating/deactivating the cooling
with air dehumidification function
Points to observe before use
If you deactivate the "Cooling with air dehu-
midification function", the air inside the vehi-
cle will not be cooled in warmer weather. The
air inside the vehicle will not be dehumidified
either. The windows can mist up more
quickly. Therefore, only switch off the "Cool-
ing with air dehumidification function" briefly.
The "Cooling with air dehumidification" func-
tion is only available when the engine is run-
ning. The air inside the vehicle is cooled and
128Operating the climate control systemClimate control
Page 132 of 352
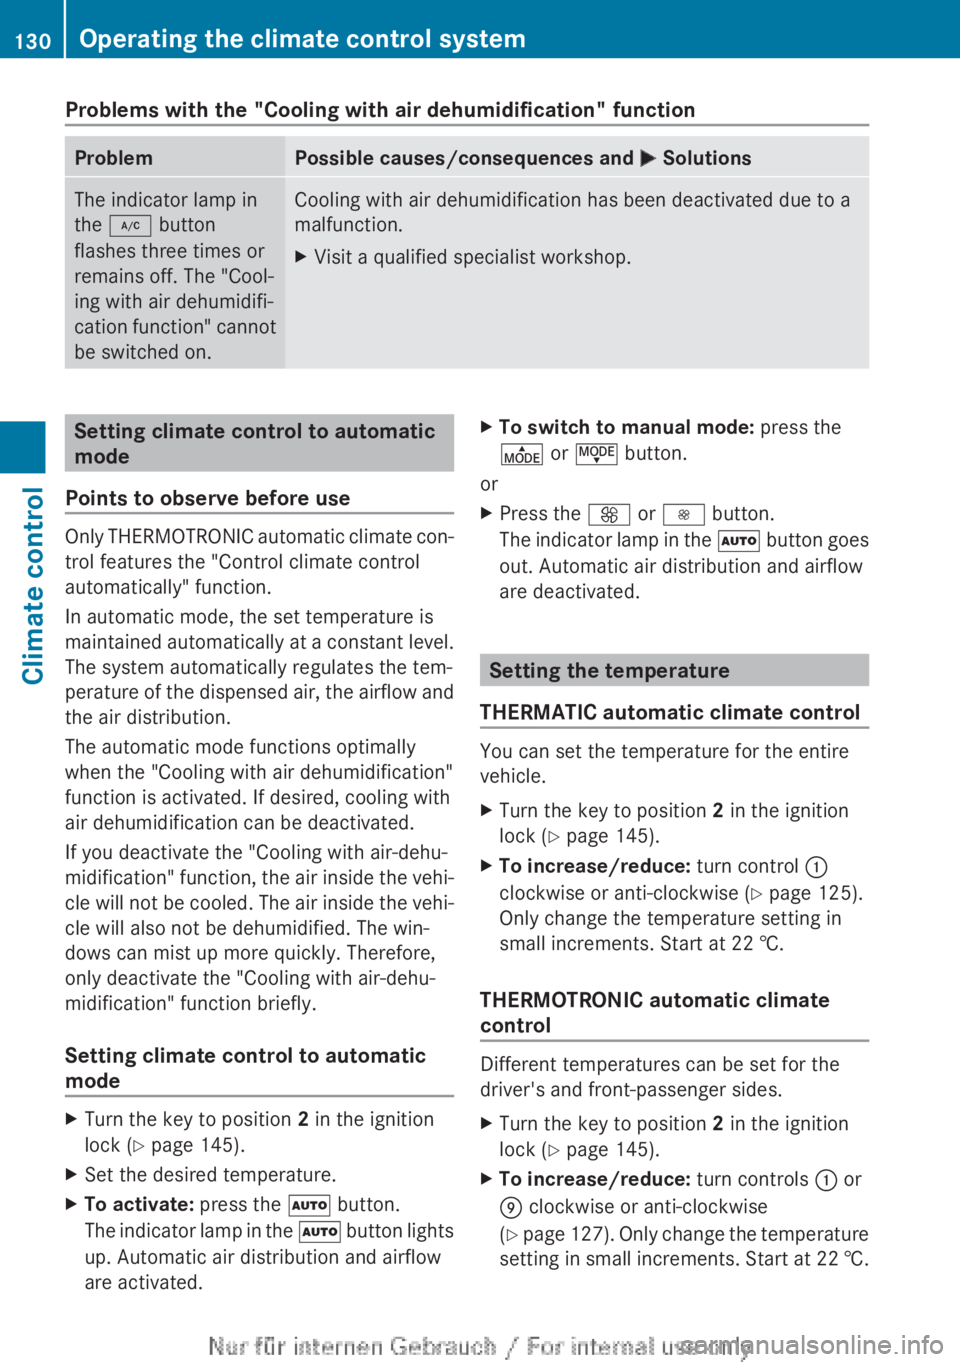
Problems with the "Cooling with air dehumidification" functionProblemPossible causes/consequences and M SolutionsThe indicator lamp in
the ¿ button
flashes three times or
remains off. The "Cool-
ing with air dehumidifi-
cation function" cannot
be switched on.Cooling with air dehumidification has been deactivated due to a
malfunction.XVisit a qualified specialist workshop.Setting climate control to automatic
mode
Points to observe before use
Only THERMOTRONIC automatic climate con-
trol features the "Control climate control
automatically" function.
In automatic mode, the set temperature is
maintained automatically at a constant level.
The system automatically regulates the tem-
perature of the dispensed air, the airflow and
the air distribution.
The automatic mode functions optimally
when the "Cooling with air dehumidification"
function is activated. If desired, cooling with
air dehumidification can be deactivated.
If you deactivate the "Cooling with air-dehu-
midification" function, the air inside the vehi-
cle will not be cooled. The air inside the vehi-
cle will also not be dehumidified. The win-
dows can mist up more quickly. Therefore,
only deactivate the "Cooling with air-dehu-
midification" function briefly.
Setting climate control to automatic
mode
XTurn the key to position 2 in the ignition
lock ( Y page 145).XSet the desired temperature.XTo activate: press the à button.
The indicator lamp in the à button lights
up. Automatic air distribution and airflow
are activated.XTo switch to manual mode: press the
É or Ë button.
or
XPress the K or I button.
The indicator lamp in the à button goes
out. Automatic air distribution and airflow
are deactivated.
Setting the temperature
THERMATIC automatic climate control
You can set the temperature for the entire
vehicle.
XTurn the key to position 2 in the ignition
lock ( Y page 145).XTo increase/reduce: turn control :
clockwise or anti-clockwise ( Y page 125).
Only change the temperature setting in
small increments. Start at 22 †.
THERMOTRONIC automatic climate
control
Different temperatures can be set for the
driver's and front-passenger sides.
XTurn the key to position 2 in the ignition
lock ( Y page 145).XTo increase/reduce: turn controls : or
E clockwise or anti-clockwise
( Y page 127). Only change the temperature
setting in small increments. Start at 22 †.130Operating the climate control systemClimate control
Page 133 of 352
Setting the air distribution
THERMATIC automatic climate control
Air distribution settings
¯Directs the airflow through the demis-
ter ventsPDirects the airflow through the centre
and side air ventsODirects the airflow through the foot-
well air vents
i You can also activate several of the air
distribution settings simultaneously. In
order to do this, press several of the air
distribution buttons. The air is then routed
through different air vents.
Setting the air distribution
XTurn the key to position 2 in the ignition
lock ( Y page 145).XPress one or more of the P, O ,
¯ buttons.
The corresponding indicator lamp comes
on.
THERMOTRONIC automatic climate
control
Air distribution settings
¯Directs the airflow through the demis-
ter ventsPDirects the airflow through the centre
and side air ventsODirects the airflow through the foot-
well air ventsSDirects airflow through the centre and
side air vents as well as the footwell air
vents 8
.bDirects the airflow through the centre
and side air vents as well as the demis-
ter vents 8aDirects the airflow through the foot-
well and demister ventsi Regardless of the air distribution setting,
airflow is always directed through the side
air vents. The side air vents can only be
closed if the adjusters are turned clockwise
until they engage.
Setting the air distributionXTurn the key to position 2 in the ignition
lock ( Y page 145).XPress the É or Ë button until the
desired symbol appears in the display.
Setting the airflow
THERMATIC automatic climate control
XTurn the key to position 2 in the ignition
lock ( Y page 145).XTo increase/reduce: turn control A
clockwise or anti-clockwise ( Y page 125).
THERMOTRONIC automatic climate
control
XTurn the key to position 2 in the ignition
lock ( Y page 145).XTo increase/reduce: press the K or
I button.
Switching the ZONE function on/off
This function is only available with the
THERMOTRONIC automatic climate control.
XTo activate: press the á button.
The indicator lamp in the á button lights
up.
The temperature setting for the driver's
side is not adopted for the front-passenger
side.XTo deactivate: press the á button.
The indicator lamp in the á button goes
out.8 Only for certain countries.Operating the climate control system131Climate control
Page 134 of 352
The temperature setting for the driver's
side is adopted for the front-passenger
side.
Demisting the windscreen
You can use this function to defrost the wind-
screen or to demist the inside of the wind-
screen and the side windows.
i You should only select the "Windscreen
demisting" function until the windscreen is
clear again.
XTurn the key to position 2 in the ignition
lock ( Y page 145).XTo activate: press the ¬ button.
The indicator lamp in the ¬ button lights
up.
The climate control system switches to the
following functions:
R high airflow
R high temperature
R air distribution to the windscreen and
front side windows
R air-recirculation mode off
i The "Windscreen demisting" function
automatically sets the blower output to the
optimum demisting effect. As a result, the
airflow may increase or decrease automat-
ically after the button is pressed.
i You can adjust the blower output man-
ually while the "Windscreen demisting"
function is in operation:
R THERMATIC automatic climate control:
turn airflow control A clockwise or anti-
clockwise ( Y page 125).
R THERMOTRONIC automatic climate con-
trol: press the ó or ô button.
XTo deactivate: press the ¬ button.
The indicator lamp in the ¬ button goes
out. The previous settings are reactivated.
Air-recirculation mode remains deactiva-
ted.
or
XTHERMOTRONIC automatic climate con-
trol: press the à button.
The indicator lamp in the ¬ button goes
out. Airflow and air distribution are set to
automatic mode.
or
XTHERMATIC automatic climate control:
turn temperature control : clockwise or
anti-clockwise ( Y page 125).
THERMOTRONIC automatic climate con-
trol: turn temperature control : or E
clockwise or anti-clockwise ( Y page 127).
Demisting the windows
Windows misted up on the inside
THERMATIC automatic climate control
XActivate the ¿ "Cooling with air dehu-
midification" function.XIf the windows continue to mist up, activate
the ¬ "Windscreen demisting" function.
i
You should only select this setting until
the windscreen is clear again.
THERMOTRONIC automatic climate con-
trol
XActivate the ¿ "Cooling with air dehu-
midification" function.XActivate automatic mode Ã.XIf the windows continue to mist up, activate
the ¬ "Windscreen demisting" function.
i
You should only select this setting until
the windscreen is clear again.
Windows misted up on the outside
XActivate the windscreen wipers.XSet the air distribution to P or O .
i
You should only select this setting until
the windscreen is clear again.
132Operating the climate control systemClimate control
Page 143 of 352
Display messagesPossible causes/consequences and M SolutionsThe auxiliary heating cannot be switched on or has switched itself
off.
There is too little fuel in the fuel tank.XRefuel at the nearest filling station.XMake another attempt to switch on the auxiliary heating using
the remote control.The auxiliary heating cannot be switched on or has switched itself
off.
The auxiliary heating is faulty.XHave the auxiliary heating checked at a qualified specialist
workshop.Adjusting the air vents
Important safety notes
GWARNING
Very hot or very cold air can flow from the air
vents. This could result in burns or frostbite in
the immediate vicinity of the air vents. There
is a risk of injury.
Make sure that all vehicle occupants always
maintain a sufficient distance to the air out-
lets. If necessary, redirect the airflow to
another area of the vehicle interior.
In order to ensure the direct flow of fresh air
through the air vents into the vehicle interior,
please observe the following notes:
R keep the air inlet between the windscreen
and the bonnet free of blockages, such as
ice, snow or leaves.
R never cover the vents or ventilation grilles
in the vehicle interior.
i Move the adjusters for the air vents ver-
tically or horizontally, to set the direction of
the airflow.
i Optimal climate control function is ach-
ieved by opening the air vents fully and set-
ting the adjusters to the middle position.
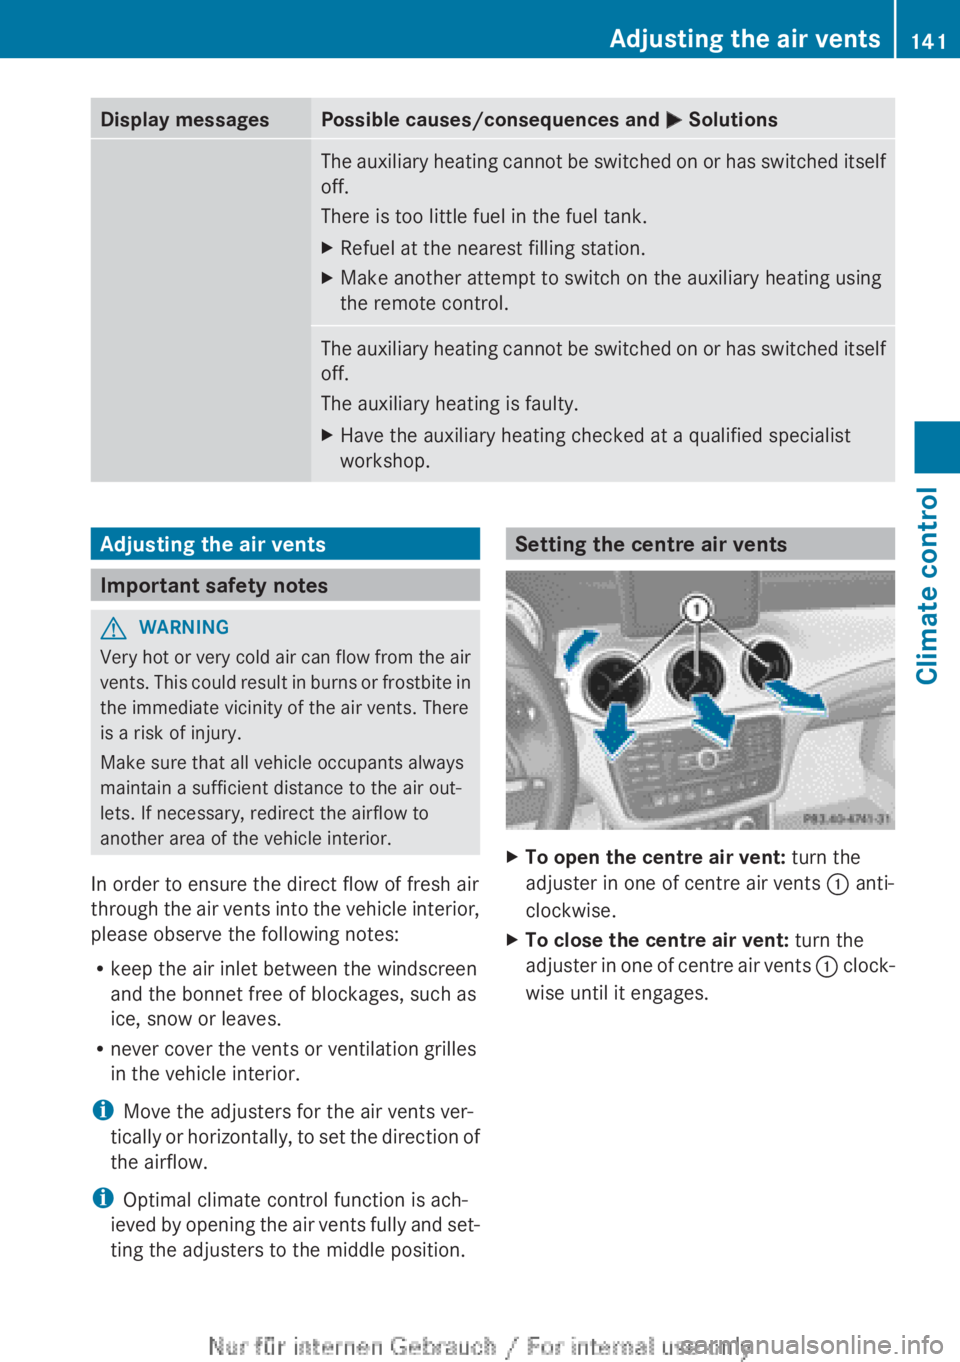
Setting the centre air ventsXTo open the centre air vent: turn the
adjuster in one of centre air vents : anti-
clockwise.XTo close the centre air vent: turn the
adjuster in one of centre air vents : clock-
wise until it engages.Adjusting the air vents141Climate controlZ
Page 144 of 352
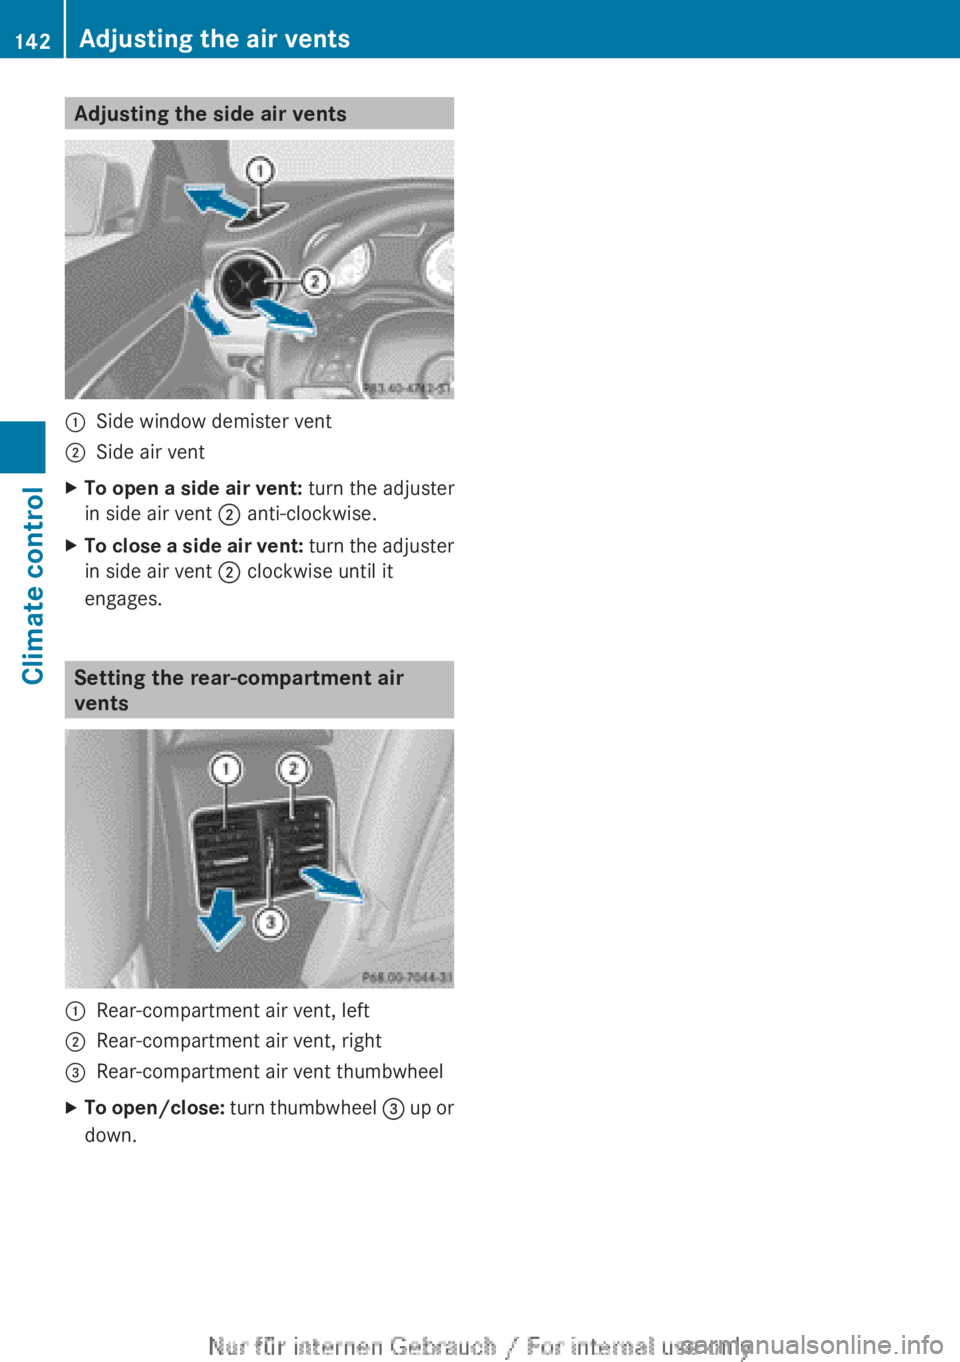
Adjusting the side air vents:Side window demister vent;Side air ventXTo open a side air vent: turn the adjuster
in side air vent ; anti-clockwise.XTo close a side air vent: turn the adjuster
in side air vent ; clockwise until it
engages.
Setting the rear-compartment air
vents
:Rear-compartment air vent, left;Rear-compartment air vent, right=Rear-compartment air vent thumbwheelXTo open/close: turn thumbwheel = up or
down.142Adjusting the air ventsClimate control