2013 MERCEDES-BENZ CLA COUPE radio
[x] Cancel search: radioPage 14 of 373

Fitting a wheel
Fitting a wheel .............................. .339
Lowering the vehicle ..................... .339
Preparing the vehicle ..................... 336
Raising the vehicle ......................... 337
Removing a wheel .......................... 339
Securing the vehicle against roll-
ing away ........................................ 336
Flat tyre
MOExtended tyres ......................... 308
Preparing the vehicle ..................... 308
TIREFIT kit ...................................... 309
see Emergency spare wheel
Floormat ............................................. 287
Foglamps
Extended range .............................. 115
Switching on/off ........................... 111
Frequencies
Mobile phone ................................. 352
Two-way radio ................................ 352
Front foglamps
Display message ............................ 247
Fuel
Additives ........................................ 357
Consumption information .............. 358
Consumption statistics .................. 217
Displaying the current consump-
tion ................................................ 218
Displaying the range ..................... .218
E10 ................................................ 356
Fuel gauge ....................................... 30
Grade (petrol) ................................ 356
Important safety notes .................. 355
Low outside temperatures ............. 358
Notes for AMG vehicles ................. 357
Problem (malfunction) ................... 166
Quality (diesel )............................... 357
Refuelling ....................................... 163
Tank content/reserve fue l............. 355
Fuel filler flap
Opening ......................................... 164
Fuel filter (white display message) .. 251
Fuel level
Calling up the range (on-board
computer) ...................................... 218
Gaug e.............................................. 30
Fuel reserve
see Fuel Fuel tank
Capacity ........................................ 355
Problem (malfunction) ................... 166
Fuses
Allocation chart ............................. 323
Before changing ............................. 323
Fuse box in the engine compart-
ment .............................................. 323
Fuse box in the front-passenger
footwell .......................................... 323
Important safety notes .................. 322 G
Gear indicator (on-board com-
puter) .................................................. 231
Gear or selector lever (cleaning
instructions) ...................................... 302
Gearshift program
SETUP (on-board computer) .......... 231
Genuine Mercedes-Benz parts ........... 21
Glove compartment .......................... 277 H
Handbrake see Parking brake
Hazard warning lamps ...................... 113
Display message ............................ 262
Head restraints
Adjusting ....................................... 101
Adjusting (electrically) ................... 101
Adjusting (manually) ...................... 101
Adjusting (rear) .............................. 102
Fitting/removing (rear) .................. 102
Headlamp
Cleaning system (function) ............ 114
Cleaning system (notes) ................ 361
Headlamps
Misting up ...................................... 116
Topping up the cleaning system .... 295
see Automatic headlamp mode
Heating
see Climate control
High-pressure cleaners .................... 298
Hill start assist .................................. 149
HOLD function
Activating ....................................... 186 Index
11
Page 18 of 373
see Exterior mirrors
see PARKTRONIC
Parking assistance
see PARKTRONIC
Parking brake
Display message ............................2 38
Electric parking brake .................... 168
Warning lamp ................................. 270
Parking lamps
Display message ............................ 247
Switching on/off ........................... 112
PARKTRONIC
Deactivating/activating ................. 191
Driving system ............................... 188
Function/notes ............................ .188
Important safety notes .................. 188
Problem (fault) ............................... 192
Sensor range ................................. 189
Trailer towing ................................. 191
Warning displa y............................. 190
PASSENGER AIRBAG OFF
Problem (malfunction) ..................... 62
PASSENGER AIRBAG OFF warning
lamp ...................................................... 53
Petrol .................................................. 356
Plastic trim (cleaning instruc-
tions) .................................................. 302
Power socket
Boot ............................................... 286
Power windows
see Side windows
PRE-SAFE® (anticipatory occupant
protection)
Operation ......................................... 46
PRE-SAFE® (preventive occupant
safety system)
Display message ............................ 243
Program selector button .................. 159
Protection of the environment
General notes .................................. 21
Pulling away
Automatic transmission ................. 148
Manual transmission ...................... 148
Trailer ............................................ 149 Q
Qualified specialist workshop ........... 24 R
RACE START (AMG vehicles) ............. 187
RACETIMER (on-board computer) .... 232
Radar sensor system
Activating/deactivating ................. 229
Display message ............................ 252
Radio
Selecting a station ......................... 220
see separate operating instructions
Radio-based vehicle components
Declaration of conformity ................ 23
Rain closing feature (panorama
sliding sunroof) ................................... 93
Reading lamp ..................................... 116
Rear bench seat
Folding the backrest forwards/
back ............................................... 280
Rear compartment
Setting the air vents ...................... 144
Rear foglamp
Changing bulb s.............................. 120
Display message ............................ 247
Switching on/of f........................... 112
Rear lamps
see Lights
Rear window heating
Problem (fault) ............................... 136
Switching on/of f........................... 135
Rear-compartment seat belt sta-
tus indicator ........................................ 49
Rear-view mirror
Anti-dazzle mode (automatic) ........ 106
Dipping (manual) ........................... 105
Refuelling
Fuel gaug e....................................... 30
Important safety notes .................. 163
Notes for AMG vehicles ................. 357
Refuelling process ......................... 164
see Fuel
Remote control
Auxiliary heating/ventilation .......... 139
Changing the batteries (auxiliary
heating) ......................................... 140
Replacing bulbs
Important safety notes .................. 117
Overview of bulb types .................. 118 Index
15
Page 22 of 373
Transmission position display
(DIRECT SELECT lever)
...................... 156
Transporting the vehicle .................. 321
Trim pieces (cleaning instruc-
tions) .................................................. 302
Trip computer (on-board com-
puter) .................................................. 217
Trip meter
Calling up ....................................... 217
Resetting (on-board computer) ...... 218
Turn signals
Changing bulbs (front) ................... 120
Changing bulbs (rear ).................... 120
Switching on/of f........................... 113
Two-way radio
Frequencies ................................... 352
Installation ..................................... 352
Transmission output (maximum) .... 352
Type identification plate
see Vehicle identification plate
Tyre pressure
Calling up (on-board computer) ..... 332
Display message ............................ 256
Important safety notes .................. 332
Not reached (TIREFIT) .................... 311
Reached (TIREFIT) .......................... 311
Recommended ............................... 330
Tyre pressure loss warning
General notes ................................ 331
Important safety notes .................. 331
Restarting ...................................... 332
Tyre pressure monitor
Checking the tyre pressure elec-
tronically ........................................ 333
Function/note s............................. 332
General notes ................................ 332
Important safety notes .................. 332
Restarting ...................................... 334
Warning lamp ................................. 274
Warning message .......................... 334
Tyres
Changing a whee l.......................... 335
Checking ........................................ 327
Direction of rotation ...................... 336
Display message ............................ 256
Important safety notes .................. 326
M+S tyres ...................................... 328
MOExtended tyre s......................... 328 Replacing ....................................... 335
Service life ..................................... 327
Storing ........................................... 336
Summer tyres ........................ 172, 328
Tyre size (data ).............................. 340
Tyre tread ...................................... 327
Wheel and tyre combinations ........ 342
see Flat tyre U
Unlocking Emergency unlocking ....................... 85
From inside the vehicle (central
unlocking button) ............................. 84 V
Vanity mirror (in sun visor) .............. 284
Variable SPEEDTRONIC
see SPEEDTRONIC
Vehicle
Correct use ...................................... 24
Data acquisition ............................... 25
Electronics ..................................... 352
Equipment ....................................... 22
Implied warranty .............................. 25
Individual settings .......................... 225
Leaving parked up ......................... 169
Locking (in an emergency) ............... 86
Locking (key) ................................... 79
Lowering ........................................ 339
Pulling away ................................... 148
Raising ........................................... 337
Registration ..................................... 24
Securing from rolling away ............ 336
Tow-starting ................................... 318
Towing away .................................. 318
Transporting .................................. 321
Unlocking (in an emergency) ........... 85
Unlocking (key) ................................ 79
Vehicle data ................................... 362
Vehicle data ....................................... 362
Vehicle dimensions ........................... 362
Vehicle emergency locking ................ 86
Vehicle identification number
see VIN
Vehicle identification plate .............. 354 Index
19
Page 26 of 373
G
WARNING
Flammable material such as leaves, grass or
twigs may ignite if they come into contact with hot parts of the exhaust system. There is a risk of fire.
When driving off road or on unpaved roads,
check the vehicle's underside regularly. In
particular, remove parts of plants or other
flammable materials which have become
trapped. In the case of damage, contact a
qualified specialist workshop. G
WARNING
Modifications to electronic components, their software as well as wiring could effect their
function and/or the operation of other net-
worked components. This could in particular
also be the case for systems relevant to
safety. They might not function properly any
more and/or jeopardise the operational
safety of the vehicle. There is an increased
risk of an accident and injury.
Do not attempt to modify the wiring as well as
electronic components or their software.
Always have work on electrical and electronic components carried out at a qualified special-
ist workshop.
If you make any changes to the vehicle elec-
tronics, the general operating permit is ren-
dered invalid.
! There is a risk of damage to the vehicle if:
R the vehicle becomes stuck, e.g. on a high
kerb or an unpaved road
R you drive too fast over an obstacle, e.g. a
kerb or a pothole in the road
R a heavy object strikes the underbody or
parts of the chassis
In situations like this, the body, the under-
body, chassis parts, wheels or tyres could
be damaged without the damage being visi-
ble. Components damaged in this way can
unexpectedly fail or, in the case of an acci-
dent, no longer withstand the strain they
are designed for. If the underbody panelling is damaged,
combustible materials such as leaves,
grass or twigs can gather between the
underbody and the underbody panelling. If
these materials come in contact with hot
parts of the exhaust system, they can catch
fire.
In such situations, have the vehicle
checked and repaired immediately at a
qualified specialist workshop. If, upon con-
tinuing your journey, you notice that driving
safety is impaired, pull over and stop the
vehicle immediately, paying attention to
road and traffic conditions. In such cases,
visit a qualified specialist workshop. Declarations of conformity
Wireless vehicle components The following information applies to all com-
ponents of the vehicle and the information
systems and communication devices integra-
ted into the vehicle which receive and/or
transmit radio waves:
The components of this vehicle that receive
and/or transmit radio waves are compliant
with the basic requirements and all other rel-
evant conditions of Directive 1999/5/EC.
You can obtain further information from any
Mercedes-Benz Service Centre.
Electromagnetic compatibility The electromagnetic compatibility of the vehi-
cle components has been checked and certi- fied according to the currently valid version of Regulation ECE-R 10. Diagnostics connection
The diagnostics connection is only intended
for the connection of diagnostic equipment at a qualified specialist workshop. Introduction
23 Z
Page 85 of 373
Problems with the key
Problem
Possible causes/consequences and
M
MSolutions You cannot lock or
unlock the vehicle
using the key. The key battery is discharged or nearly discharged.
X Try again to lock/unlock the vehicle using the remote control
function of the key. Point the tip of the key at the driver's door
handle from close range and press the %/& button.
If this does not work: X Check the key battery and replace it if necessary (Y page 81).
X Lock (Y page 85) or unlock (Y page 86) the vehicle using the
emergency key element. There is interference from a powerful source of radio waves.
X Try again to lock/unlock the vehicle using the remote control
function of the key. Point the tip of the key at the driver's door
handle from close range and press the %/& button. The key is faulty.
X Lock (Y page 85) or unlock (Y page 86) the vehicle using the
emergency key element.
X Have the key checked at a qualified specialist workshop. You have lost a key. X
Have the key deactivated at a qualified specialist workshop.
X Report the loss immediately to the vehicle insurers.
X If necessary, have the locks changed as well. You have lost the emer-
gency key element. X
Report the loss immediately to the vehicle insurers.
X If necessary, have the locks changed as well. 82
KeyOpening and closing
Page 142 of 373
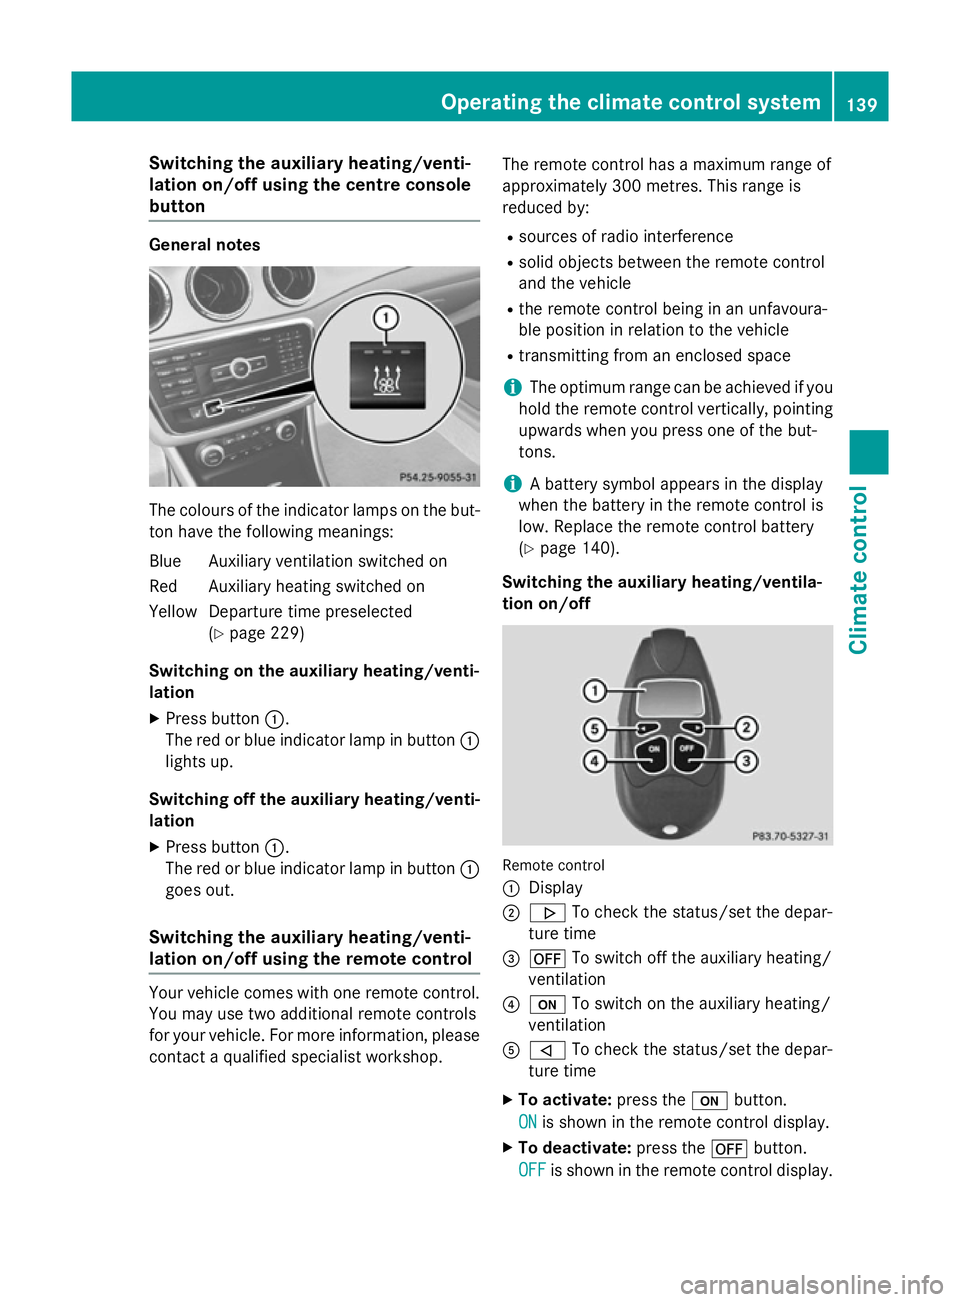
Switching the auxiliary heating/venti-
lation on/off using the centre console
button General notes
The colours of the indicator lamps on the but-
ton have the following meanings:
Blue Auxiliary ventilation switched on
Red Auxiliary heating switched on
Yellow Departure time preselected (Ypage 229)
Switching on the auxiliary heating/venti-
lation
X Press button :.
The red or blue indicator lamp in button :
lights up.
Switching off the auxiliary heating/venti- lation
X Press button :.
The red or blue indicator lamp in button :
goes out.
Switching the auxiliary heating/venti-
lation on/off using the remote control Your vehicle comes with one remote control.
You may use two additional remote controls
for your vehicle. For more information, please contact a qualified specialist workshop. The remote control has a maximum range of
approximately 300 metres. This range is
reduced by:
R sources of radio interference
R solid objects between the remote control
and the vehicle
R the remote control being in an unfavoura-
ble position in relation to the vehicle
R transmitting from an enclosed space
i The optimum range can be achieved if you
hold the remote control vertically, pointing upwards when you press one of the but-
tons.
i A battery symbol appears in the display
when the battery in the remote control is
low. Replace the remote control battery
(Y page 140).
Switching the auxiliary heating/ventila-
tion on/off Remote control
:
Display
; . To check the status/set the depar-
ture time
= ^ To switch off the auxiliary heating/
ventilation
? u To switch on the auxiliary heating/
ventilation
A , To check the status/set the depar-
ture time
X To activate: press theubutton.
ON
ON is shown in the remote control display.
X To deactivate: press the^button.
OFF OFF is shown in the remote control display. Operating the climate control system
139Climate control Z
Page 195 of 373
Problems with PARKTRONIC
Problem
Possible causes/consequences and
M
MSolutions Only the red segments
in the PARKTRONIC
warning displays are lit.
You also hear a warning
tone for approximately
two seconds.
PARKTRONIC is then
deactivated and the
indicator lamp on the
PARKTRONIC button
lights up. PARKTRONIC has malfunctioned and has been deactivated.
X If problems persist, have PARKTRONIC checked at a qualified
specialist workshop. Only the red segments
in the PARKTRONIC
warning displays are lit.
PARKTRONIC is then
deactivated. The PARKTRONIC sensors are dirty or there is interference.
X Clean the PARKTRONIC sensors (Y page 300).
X Switch the ignition back on. The problem may be caused by an external source of radio or
ultrasound waves.
X See if PARKTRONIC functions in a different location. Active Parking Assist
General notes Active Parking Assist is an electronic parking
aid with ultrasound. It measures the road on
both sides of the vehicle. A parking symbol
indicates a suitable parking space. Active
steering intervention can assist you during
manoeuvring and parking. You may also use
PARKTRONIC (Y page 188).
Important safety notes Active Parking Assist is only an aid. It is not a
substitute for your attention to the immediate
surroundings. The responsibility for safe
manoeuvring and parking remains with you.
Make sure that no persons, animals or
objects are in the manoeuvring range.
When PARKTRONIC is switched off, Active
Parking Assist is also unavailable. G
WARNING
While parking or pulling out of a parking
space, the vehicle swings out and can drive
onto areas of the oncoming lane. This could
cause you to collide with other road users.
There is a risk of an accident.
Pay attention to other road users. Stop the
vehicle if necessary or cancel the Active Park- ing Assist parking procedure.
! If unavoidable, you should drive over
obstacles such as kerbs slowly and not at a
sharp angle. Otherwise, you may damage
the wheels or tyres.
Active Parking Assist may also display spaces not suitable for parking, e.g.:
R parking or stopping prohibitions
R in front of driveways or entrances and exits
R unsuitable surfaces 192
Driving systemsDriving and parking
Page 223 of 373
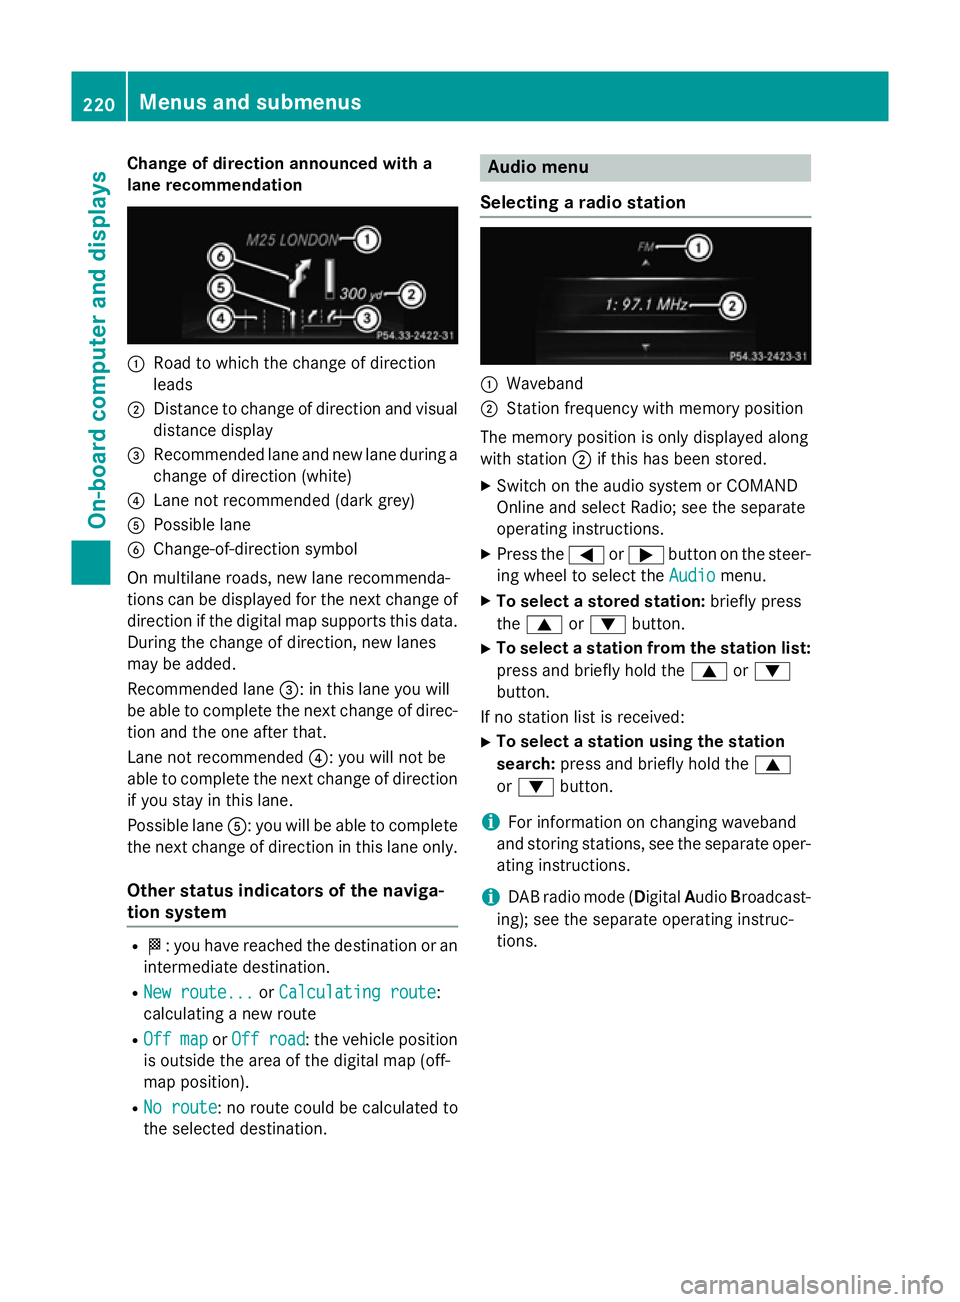
Change of direction announced with a
lane recommendation :
Road to which the change of direction
leads
; Distance to change of direction and visual
distance display
= Recommended lane and new lane during a
change of direction (white)
? Lane not recommended (dark grey)
A Possible lane
B Change-of-direction symbol
On multilane roads, new lane recommenda-
tions can be displayed for the next change of
direction if the digital map supports this data. During the change of direction, new lanes
may be added.
Recommended lane =: in this lane you will
be able to complete the next change of direc- tion and the one after that.
Lane not recommended ?: you will not be
able to complete the next change of direction
if you stay in this lane.
Possible lane A: you will be able to complete
the next change of direction in this lane only.
Other status indicators of the naviga-
tion system R
O: you have reached the destination or an
intermediate destination.
R New route...
New route... orCalculating route Calculating route:
calculating a new route
R Off map
Off map orOff road
Off road : the vehicle position
is outside the area of the digital map (off-
map position).
R No route No route : no route could be calculated to
the selected destination. Audio menu
Selecting a radio station :
Waveband
; Station frequency with memory position
The memory position is only displayed along
with station ;if this has been stored.
X Switch on the audio system or COMAND
Online and select Radio; see the separate
operating instructions.
X Press the =or; button on the steer-
ing wheel to select the Audio Audiomenu.
X To select a stored station: briefly press
the 9 or: button.
X To select a station from the station list:
press and briefly hold the 9or:
button.
If no station list is received: X To select a station using the station
search: press and briefly hold the 9
or : button.
i For information on changing waveband
and storing stations, see the separate oper-
ating instructions.
i DAB radio mode (Digital
AudioBroadcast-
ing); see the separate operating instruc-
tions. 220
Menus and submenusOn-board computer and displays