2013 MERCEDES-BENZ CLA COUPE steering
[x] Cancel search: steeringPage 204 of 373
:
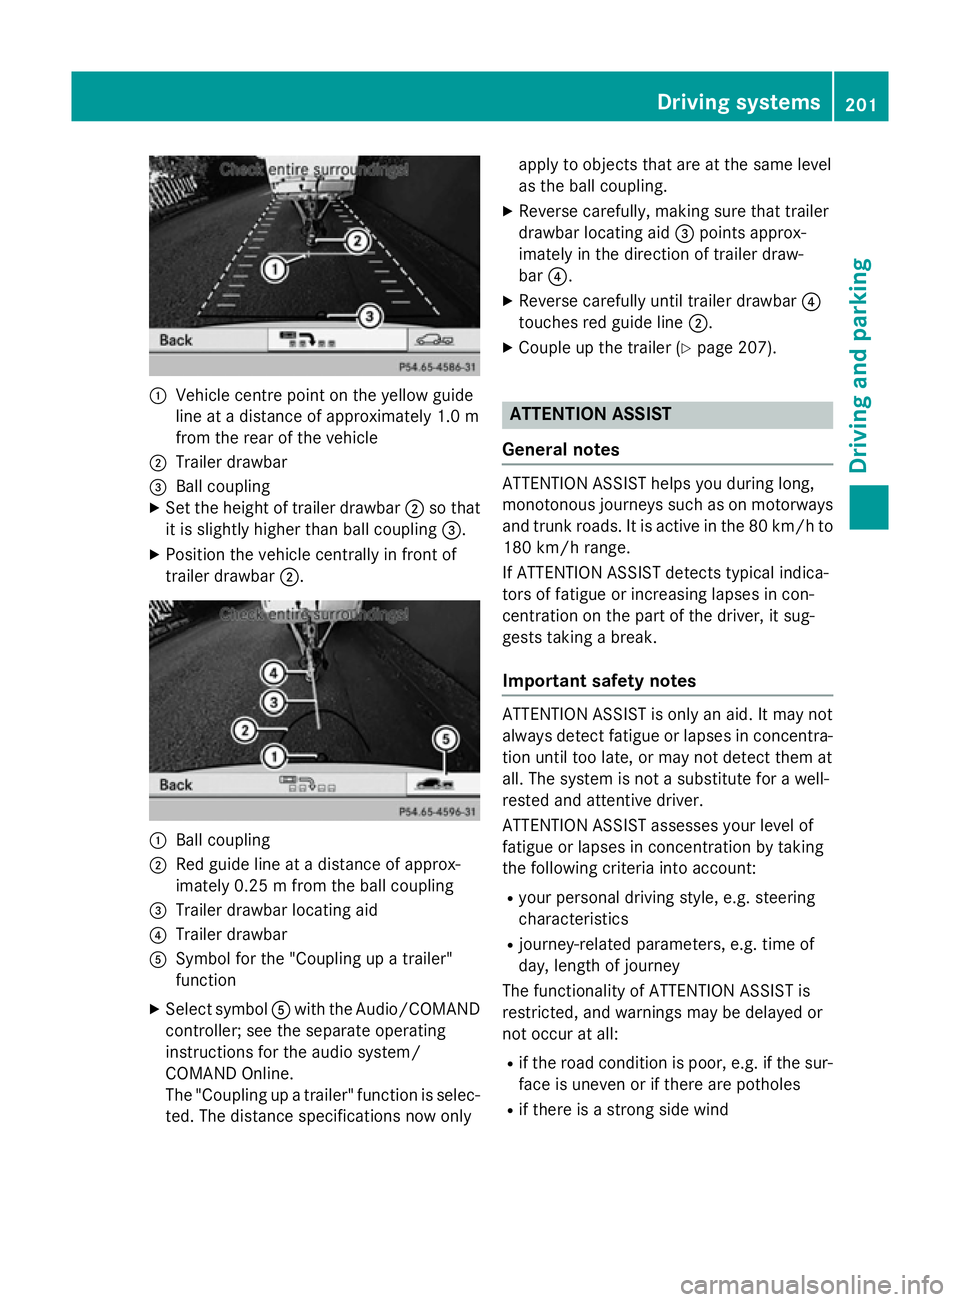
Vehicle centre point on the yellow guide
line at a distance of approximately 1.0 m
from the rear of the vehicle
; Trailer drawbar
= Ball coupling
X Set the height of trailer drawbar ;so that
it is slightly higher than ball coupling =.
X Position the vehicle centrally in front of
trailer drawbar ;. :
Ball coupling
; Red guide line at a distance of approx-
imately 0.25 m from the ball coupling
= Trailer drawbar locating aid
? Trailer drawbar
A Symbol for the "Coupling up a trailer"
function
X Select symbol Awith the Audio/COMAND
controller; see the separate operating
instructions for the audio system/
COMAND Online.
The "Coupling up a trailer" function is selec- ted. The distance specifications now only apply to objects that are at the same level
as the ball coupling.
X Reverse carefully, making sure that trailer
drawbar locating aid =points approx-
imately in the direction of trailer draw-
bar ?.
X Reverse carefully until trailer drawbar ?
touches red guide line ;.
X Couple up the trailer (Y page 207). ATTENTION ASSIST
General notes ATTENTION ASSIST helps you during long,
monotonous journeys such as on motorways and trunk roads. It is active in the 80 km/h to
180 km/h range.
If ATTENTION ASSIST detects typical indica-
tors of fatigue or increasing lapses in con-
centration on the part of the driver, it sug-
gests taking a break.
Important safety notes ATTENTION ASSIST is only an aid. It may not
always detect fatigue or lapses in concentra-
tion until too late, or may not detect them at
all. The system is not a substitute for a well-
rested and attentive driver.
ATTENTION ASSIST assesses your level of
fatigue or lapses in concentration by taking
the following criteria into account:
R your personal driving style, e.g. steering
characteristics
R journey-related parameters, e.g. time of
day, length of journey
The functionality of ATTENTION ASSIST is
restricted, and warnings may be delayed or
not occur at all:
R if the road condition is poor, e.g. if the sur-
face is uneven or if there are potholes
R if there is a strong side wind Driving systems
201Driving and parking Z
Page 209 of 373
can warn you before you leave your lane unin-
tentionally.
This function is available in the range between
60 km/h and 200 km/h.
A warning may be given if a front wheel
passes over a lane marking. It will warn you by means of intermittent vibration through the
steering wheel for up to 1.5 seconds.
Important safety notes G
WARNING
Lane Keeping Assist cannot always clearly
identify lane markings.
In these cases, Lane Keeping Assist may:
R give an unnecessary warning
R not give a warning
There is a risk of an accident.
Always pay particular attention to the traffic
situation and keep in lane, especially if Lane
Keeping Assist alerts you. G
WARNING
The Lane Keeping Assist warning does not
return the vehicle to the original lane. There is a risk of an accident.
Always steer, apply the brakes or accelerate
the vehicle yourself, especially if Lane Keep-
ing Assist alerts you.
If you fail to adapt your driving style, Lane
Keeping Assist can neither reduce the risk of
an accident nor override the laws of physics. Lane Keeping Assist cannot take into account
road, weather or traffic conditions. Lane
Keeping Assist is only an aid. You are respon- sible for the distance to the vehicle in front,
for vehicle speed, for braking in good time,
and for staying in lane.
Lane Keeping Assist does not keep your vehi-
cle in its lane. The system may be impaired or may not func-
tion if:
R there is poor visibility, e.g. due to insuffi-
cient illumination of the road, or due to
snow, rain, fog or spray
R there is glare, e.g. from oncoming traffic,
the sun or reflection from other vehicles
(e.g. if the road surface is wet)
R the windscreen is dirty, misted up, dam-
aged or covered, for instance by a sticker,
in the vicinity of the camera
R no, or several, unclear lane markings are
present for one lane, e.g. in a construction
area
R the lane markings are worn away, dark or
covered up, e.g. by dirt or snow
R the distance to the vehicle in front is too
small and the lane markings thus cannot be
detected
R the lane markings change quickly, e.g.
lanes branch off, cross one another or
merge
R the road is narrow and winding
R there are highly variable shade conditions
on the road
Activating Lane Keeping Assist X Activate Lane Keeping Assist using the on-
board computer; to do so, select Standard Standard
or Adaptive
Adaptive (Ypage 225).
If you drive at speeds above 60 km/h and
lane markings are detected, the lane mark-
ings in the assistance graphics display
(Y page 223) are shown in green.
When Standard is selected, no warning vibra-
tion occurs if:
R you have switched on the turn signals. In
this event, the warnings are suppressed for
a certain period of time.
R a driving safety system intervenes, such as
ABS, BAS or ESP ®
. 206
Driving systemsDriving and parking
Page 211 of 373
To avoid hazardous situations:
R make sure to check the noseweight before
each journey.
R use a drawbar noseweight as close as pos-
sible to the maximum noseweight.
R do not exceed the maximum permissible
noseweight.
R do not use a noseweight lower than the
minimum permissible trailer drawbar nose- weight.
When reversing the vehicle towards the
trailer, make sure there is nobody between
the trailer and the vehicle.
Couple and uncouple the trailer carefully. If
you do not couple the trailer to the towing
vehicle correctly, the trailer could become
detached.
Make sure that the following values are not
exceeded:
R the permissible trailer drawbar noseweight
R the permissible trailer load
R the permissible rear axle load of the towing
vehicle
R the maximum permissible gross vehicle
weight of both the towing vehicle and the
trailer
The applicable permissible values, which
must not be exceeded, can be found:
R in your vehicle documents
R on the identification plates of the trailer tow
hitch and the trailer
R on the vehicle identification plate
If the values differ, the lowest value applies.
You will find the values approved by the man-
ufacturer on the vehicle identification plates
and those for the towing vehicle under "Tech- nical data" (Y page 364).
When towing a trailer, your vehicle's handling
characteristics will be different in comparison to when driving without a trailer. The vehicle/trailer combination:
R is heavier
R is restricted in its acceleration and gradi-
ent-climbing capability
R has an increased braking distance
R is affected more by strong crosswinds
R demands more sensitive steering
R has a larger turning circle
This can impair the vehicle's handling char-
acteristics. Adapt your driving style accord-
ingly. Maintain a safe distance. Drive care-
fully.
When towing a trailer, always adjust your
speed to the current road and weather con-
ditions. Do not exceed the maximum permis- sible speed for your vehicle/trailer combina-
tion.
General notes X
When towing a trailer, set the tyre pressure
on the rear axle of the towing vehicle for a
maximum load; see the tyre pressure table in the fuel filler flap (Y page 330).
Please note that when towing a trailer, PARK-
TRONIC (Y page 188) and Blind Spot Assist
(Y page 203) availability is limited or not avail-
able at all.
i The height of the ball coupling changes
with the load of the vehicle. If necessary,
use a trailer with a height-adjustable draw- bar.
You will find fitting dimensions and loads
under "Technical data" (Y page 363).
Driving tips i
Observe the notes on ESP ®
trailer stabi-
lisation (Y page 71).
The maximum permissible speed for vehicle/
trailer combinations depends on the type of
trailer. Before beginning the journey, check
the trailer's documents to see what the max- imum permitted speed is. Observe the legally 208
Towing a trailerDriving and parking
Page 218 of 373
At high outside temperatures and when driv-
ing uphill, the coolant temperature may rise
to the end of the scale. Rev counter
! Do not drive in the overrevving range.
Doing so will damage the engine.
The red band in the rev counter indicates the
engine's overrevving range.
The fuel supply is interrupted to protect the
engine when the red band is reached. Outside temperature display
You should pay special attention to road con-
ditions when temperatures are around the
freezing point.
The outside temperature display is in the mul- tifunction display.
Changes in the outside temperature are dis-
played after a short delay. Speedometer with segments
The speedometer is divided into segments on
vehicles with DISTRONIC PLUS.
The segments in the speedometer indicate
which speed range is available.
R Cruise control activated (Y page 173):
The segments light up from the stored
speed to the maximum speed.
R Variable SPEEDTRONIC activated
(Y page 176):
The segments light up from the start of the
scale to the selected limit speed.
R DISTRONIC PLUS activated (Y page 178):
One or two segments in the set speed
range light up.
R DISTRONIC PLUS detects a vehicle in front:
The segments between the speed of the
vehicle in front and the stored speed light
up. Operating the on-board computer
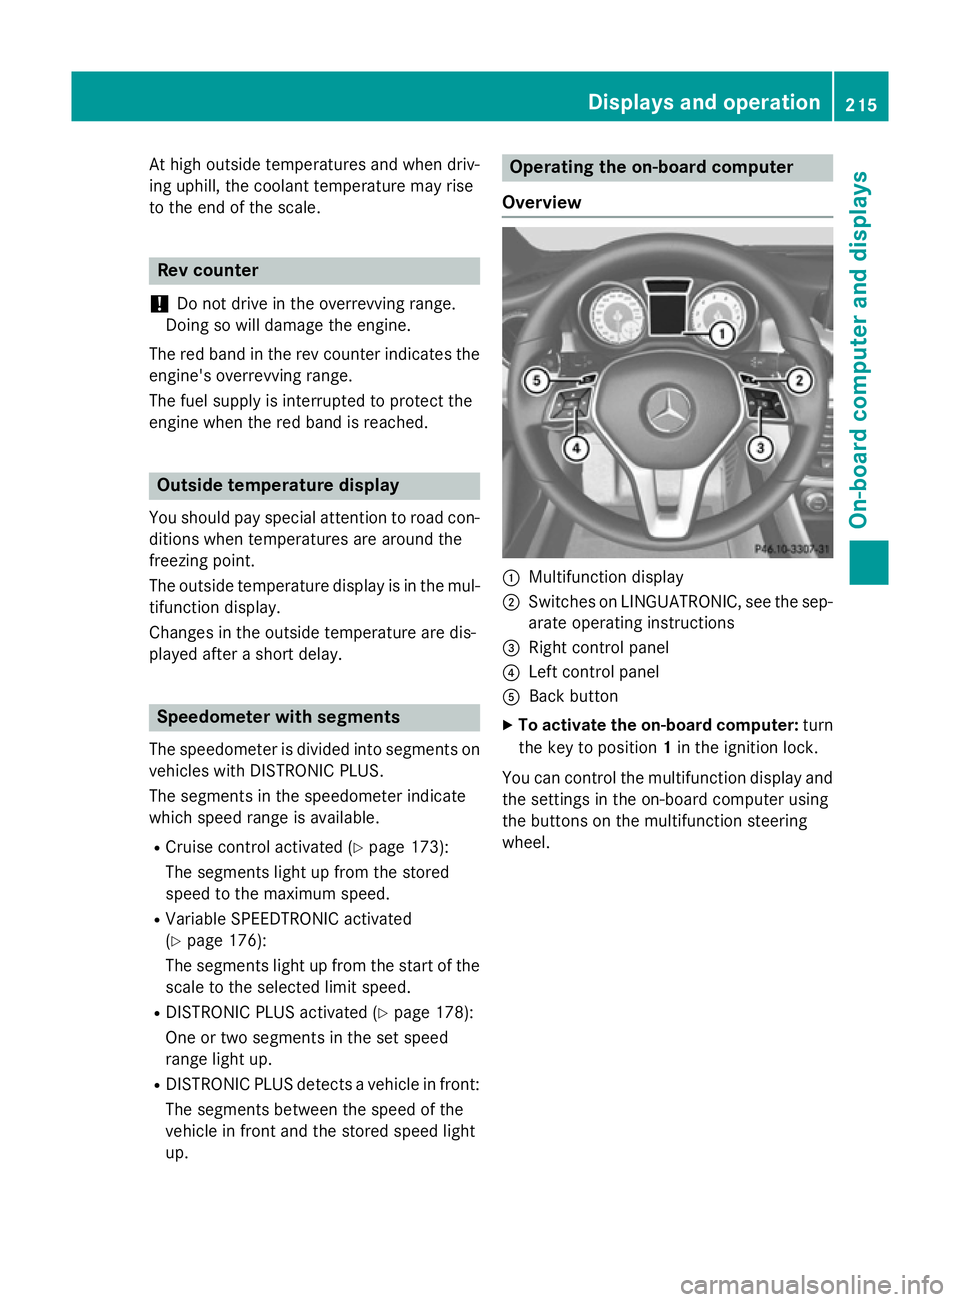
Overview :
Multifunction display
; Switches on LINGUATRONIC, see the sep-
arate operating instructions
= Right control panel
? Left control panel
A Back button
X To activate the on-board computer: turn
the key to position 1in the ignition lock.
You can control the multifunction display and
the settings in the on-board computer using
the buttons on the multifunction steering
wheel. Displays and operation
215On-board computer and displays Z
Page 220 of 373
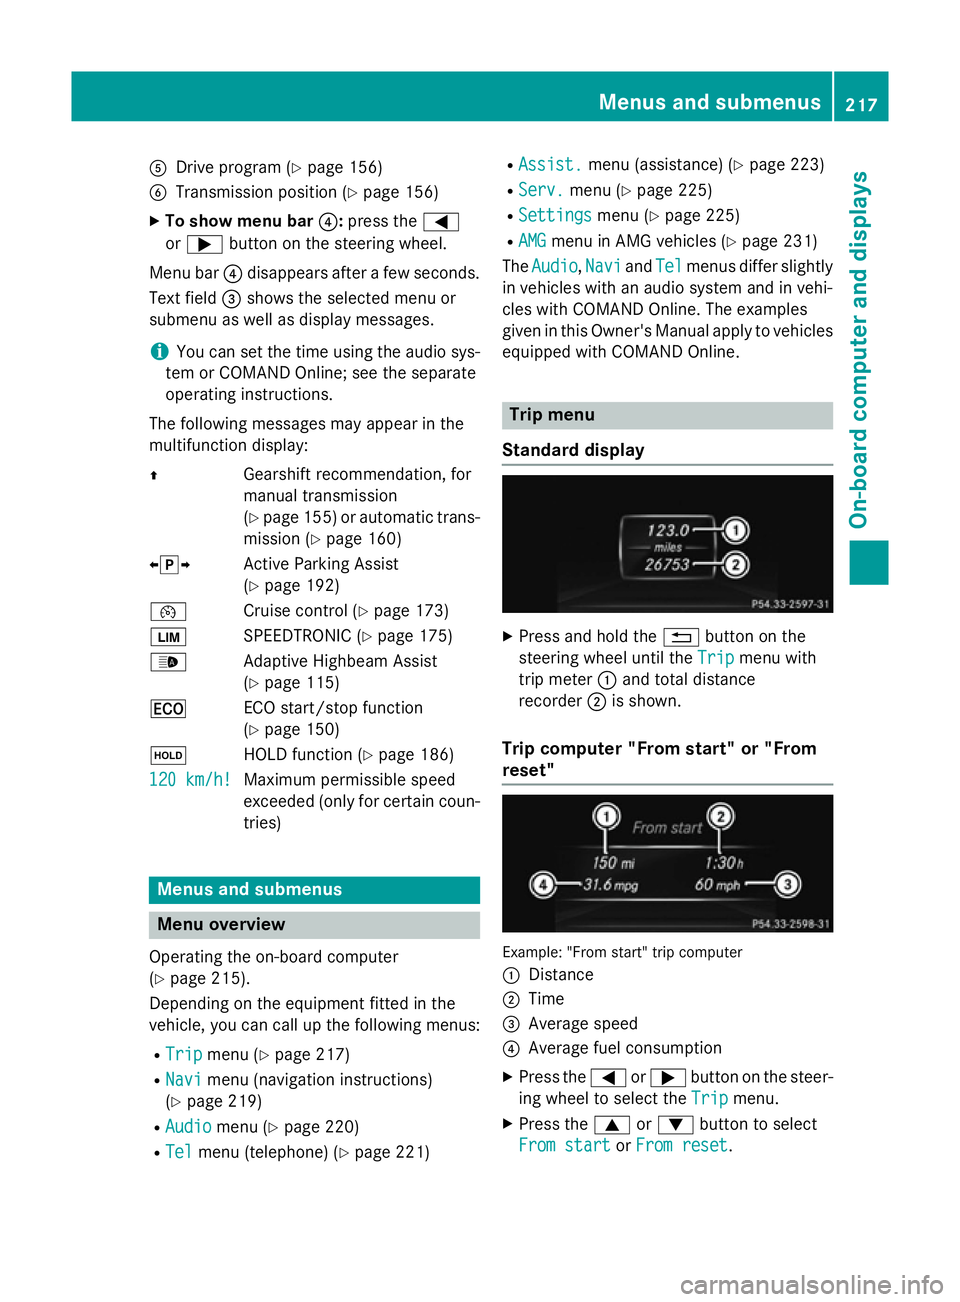
A
Drive program (Y page 156)
B Transmission position (Y page 156)
X To show menu bar ?:press the =
or ; button on the steering wheel.
Menu bar ?disappears after a few seconds.
Text field =shows the selected menu or
submenu as well as display messages.
i You can set the time using the audio sys-
tem or COMAND Online; see the separate
operating instructions.
The following messages may appear in the
multifunction display:
Z Gearshift recommendation, for
manual transmission
(Ypage 155 )or automatic trans-
mission (Y page 160)
XjY Active Parking Assist
(Ypage 192)
¯ Cruise control (Y page 173)
È SPEEDTRONIC (Y page 175)
_ Adaptive Highbeam Assist
(Ypage 115)
¤ ECO start/stop function
(Ypage 150)
ë HOLD function (Y page 186)
120 km/h!
120 km/h! Maximum permissible speed
exceeded (only for certain coun-
tries) Menus and submenus
Menu overview
Operating the on-board computer
(Y page 215).
Depending on the equipment fitted in the
vehicle, you can call up the following menus:
R Trip Trip menu (Y page 217)
R Navi
Navi menu (navigation instructions)
(Y page 219)
R Audio
Audio menu (Y page 220)
R Tel Tel menu (telephone) (Y page 221)R
Assist. Assist. menu (assistance) (Y page 223)
R Serv.
Serv. menu (Y page 225)
R Settings
Settings menu (Ypage 225)
R AMG
AMG menu in AMG vehicles (Y page 231)
The Audio
Audio, Navi
NaviandTel
Tel menus differ slightly
in vehicles with an audio system and in vehi-
cles with COMAND Online. The examples
given in this Owner's Manual apply to vehicles
equipped with COMAND Online. Trip menu
Standard display X
Press and hold the %button on the
steering wheel until the Trip Tripmenu with
trip meter :and total distance
recorder ;is shown.
Trip computer "From start" or "From
reset" Example: "From start" trip computer
:
Distance
; Time
= Average speed
? Average fuel consumption
X Press the =or; button on the steer-
ing wheel to select the Trip Tripmenu.
X Press the 9or: button to select
From start
From start orFrom reset
From reset. Menus and submenus
217On-board computer and displays Z
Page 225 of 373
You will see one of the following display mes-
sages in the multifunction display:
R Please
Please enter enterPIN
PIN: the mobile phone has
been placed in the mobile phone bracket
but the PIN has not been entered.
When you enter your PIN via the mobile
phone, LINGUATRONIC, the audio system
or COMAND Online, the mobile phone
searches for a network.
R Telephone ready Telephone ready or the name of the net-
work provider: the mobile phone has found a network and is ready to receive.
R Telephone No service
Telephone No service: there is no net-
work available or the mobile phone is
searching for a network.
i You can obtain further information about
suitable mobile phones and connecting
mobile phones via Bluetooth ®
:
R from any Mercedes-Benz Service Centre
R on the Internet at http://
www.mercedes-benz.com/connect
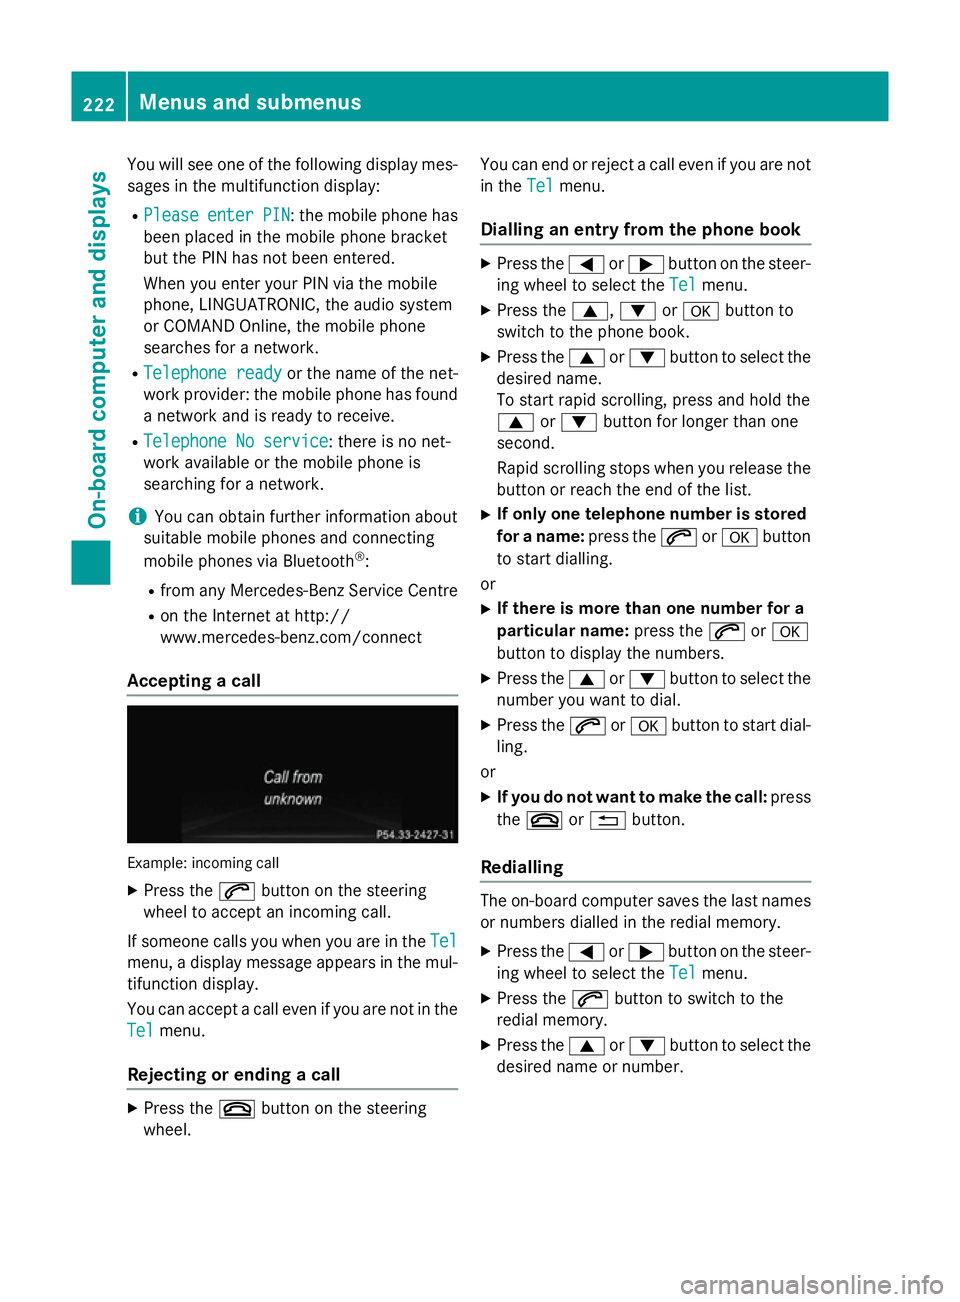
Accepting a call Example: incoming call
X Press the 6button on the steering
wheel to accept an incoming call.
If someone calls you when you are in the Tel Tel
menu, a display message appears in the mul- tifunction display.
You can accept a call even if you are not in the
Tel Tel menu.
Rejecting or ending a call X
Press the ~button on the steering
wheel. You can end or reject a call even if you are not
in the Tel Telmenu.
Dialling an entry from the phone book X
Press the =or; button on the steer-
ing wheel to select the Tel Telmenu.
X Press the 9,:ora button to
switch to the phone book.
X Press the 9or: button to select the
desired name.
To start rapid scrolling, press and hold the
9 or: button for longer than one
second.
Rapid scrolling stops when you release the button or reach the end of the list.
X If only one telephone number is stored
for a name: press the6ora button
to start dialling.
or
X If there is more than one number for a
particular name: press the6ora
button to display the numbers.
X Press the 9or: button to select the
number you want to dial.
X Press the 6ora button to start dial-
ling.
or
X If you do not want to make the call: press
the ~ or% button.
Redialling The on-board computer saves the last names
or numbers dialled in the redial memory.
X Press the =or; button on the steer-
ing wheel to select the Tel Telmenu.
X Press the 6button to switch to the
redial memory.
X Press the 9or: button to select the
desired name or number. 222
Menus and submenusOn-board computer and displays
Page 235 of 373
SETUP shows the drive program, the ESP
®
(Electronic Stability Program) mode and the
SPORT handling mode.
X Press the =or; button on the steer-
ing wheel to select the AMG
AMG menu.
X Press the 9button repeatedly until
SETUP is displayed.
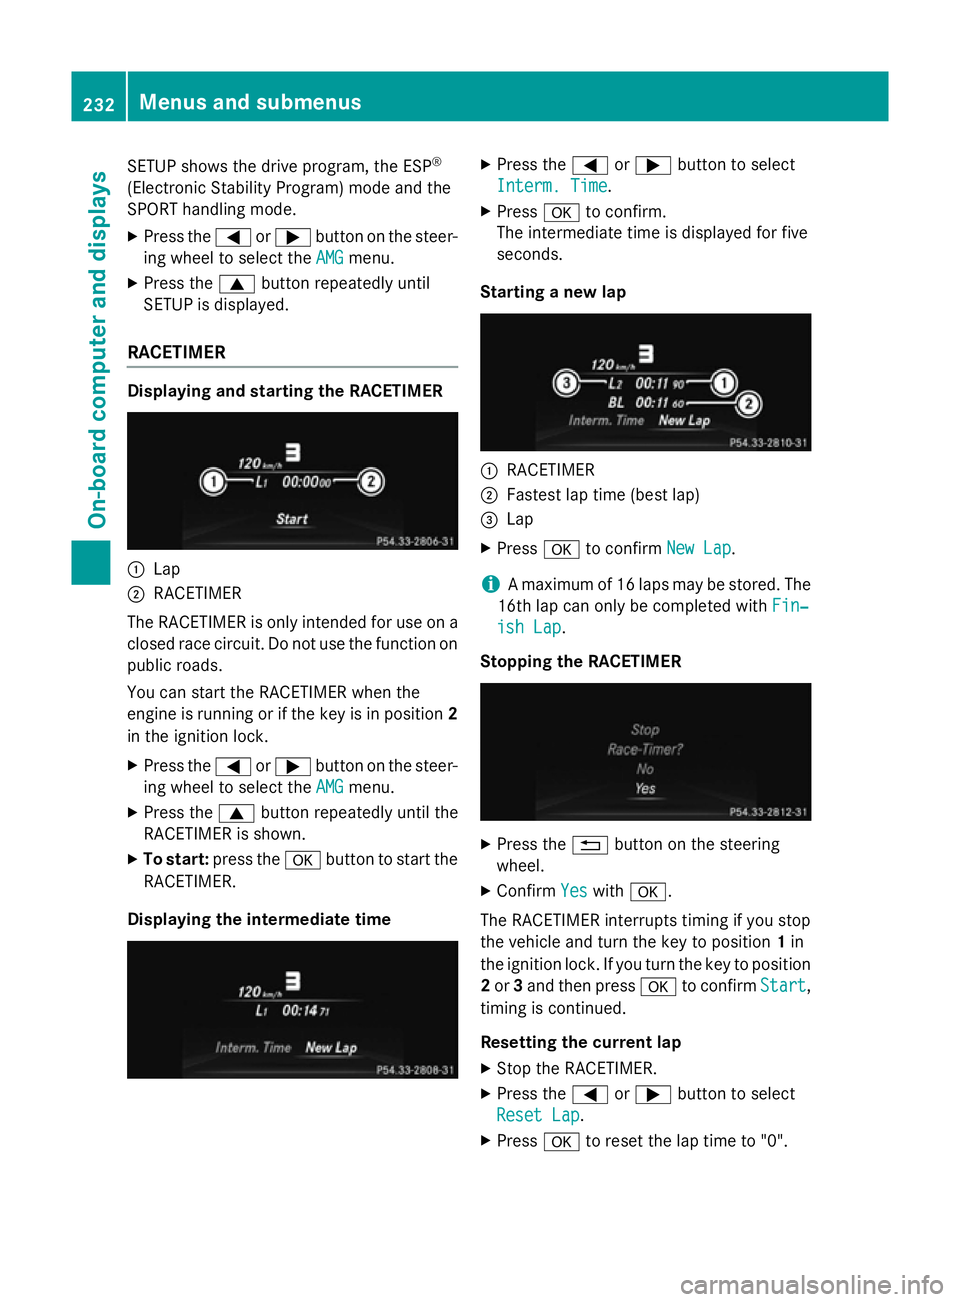
RACETIMER Displaying and starting the RACETIMER
:
Lap
; RACETIMER
The RACETIMER is only intended for use on a closed race circuit. Do not use the function on
public roads.
You can start the RACETIMER when the
engine is running or if the key is in position 2
in the ignition lock.
X Press the =or; button on the steer-
ing wheel to select the AMG
AMG menu.
X Press the 9button repeatedly until the
RACETIMER is shown.
X To start: press the abutton to start the
RACETIMER.
Displaying the intermediate time X
Press the =or; button to select
Interm. Time Interm. Time.
X Press ato confirm.
The intermediate time is displayed for five
seconds.
Starting a new lap :
RACETIMER
; Fastest lap time (best lap)
= Lap
X Press ato confirm New Lap New Lap.
i A maximum of 16 laps may be stored. The
16th lap can only be completed with Fin‐
Fin‐
ish Lap
ish Lap .
Stopping the RACETIMER X
Press the %button on the steering
wheel.
X Confirm Yes
Yeswith a.
The RACETIMER interrupts timing if you stop
the vehicle and turn the key to position 1in
the ignition lock. If you turn the key to position
2 or 3and then press ato confirm Start Start,
timing is continued.
Resetting the current lap
X Stop the RACETIMER.
X Press the =or; button to select
Reset Lap Reset Lap .
X Press ato reset the lap time to "0". 232
Menus and submenusOn-board computer and displays
Page 237 of 373
Display messages
General notes
Display messages appear in the multifunction display.
Display messages with graphic symbols are simplified in the Owner's Manual and may differ
from the symbols in the multifunction display.
Please respond in accordance with the display messages and follow the additional notes in this Owner's Manual.
Certain display messages are accompanied by an audible warning tone or a continuous tone.
When the ignition is switched off, all display messages are deleted apart from some high-
priority display messages. Once the causes of the high-priority display messages have been
rectified, the corresponding display messages are also deleted.
When you stop and park the vehicle, please observe the notes on the HOLD function
(Y page 186) and parking (Y page 167).Hiding display messages
X Press the aor% button on the steering wheel to hide the display message.
The display message is cleared.
The multifunction display shows high-priority display messages in red. Some high-priority dis- play messages cannot be hidden.
The multifunction display shows these messages continuously until the causes for the mes-
sages have been remedied. Message memory
The on-board computer saves certain display messages in the message memory. You can call
up the display messages:
X Press the =or; button on the steering wheel to select the Serv.
Serv. menu.
If there are display messages, the multifunction display shows 2 messages
2 messages, for example.
X Press the 9or: button to select the entry, e.g. 2 messages
2 messages.
X Press ato confirm.
X Press the 9or: button to scroll through the display messages. 234
Display
messagesOn-board computer and displays