2013 MERCEDES-BENZ CLA COUPE brake
[x] Cancel search: brakePage 122 of 373
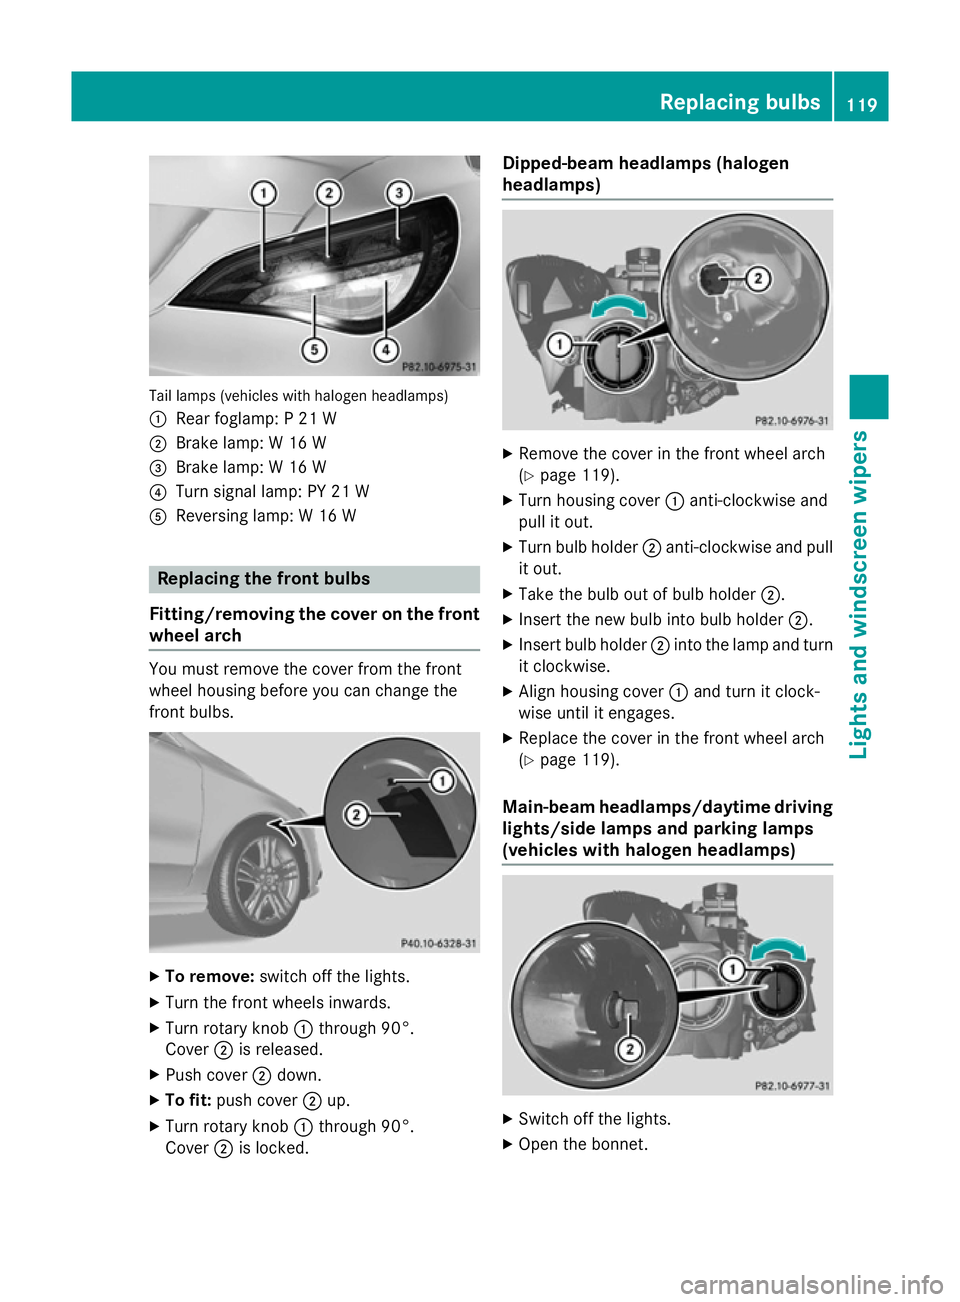
Tail lamps (vehicles with halogen headlamps)
: Rear foglamp: P 21 W
; Brake lamp: W 16 W
= Brake lamp: W 16 W
? Turn signal lamp: PY 21 W
A Reversing lamp: W 16 W Replacing the front bulbs
Fitting/removing the cover on the front wheel arch You must remove the cover from the front
wheel housing before you can change the
front bulbs. X
To remove: switch off the lights.
X Turn the front wheels inwards.
X Turn rotary knob :through 90°.
Cover ;is released.
X Push cover ;down.
X To fit: push cover ;up.
X Turn rotary knob :through 90°.
Cover ;is locked. Dipped-beam headlamps (halogen
headlamps) X
Remove the cover in the front wheel arch
(Y page 119).
X Turn housing cover :anti-clockwise and
pull it out.
X Turn bulb holder ;anti-clockwise and pull
it out.
X Take the bulb out of bulb holder ;.
X Insert the new bulb into bulb holder ;.
X Insert bulb holder ;into the lamp and turn
it clockwise.
X Align housing cover :and turn it clock-
wise until it engages.
X Replace the cover in the front wheel arch
(Y page 119).
Main-beam headlamps/daytime driving lights/side lamps and parking lamps
(vehicles with halogen headlamps) X
Switch off the lights.
X Open the bonnet. Replacing bulbs
119Lights and windscreen wipers Z
Page 124 of 373
X
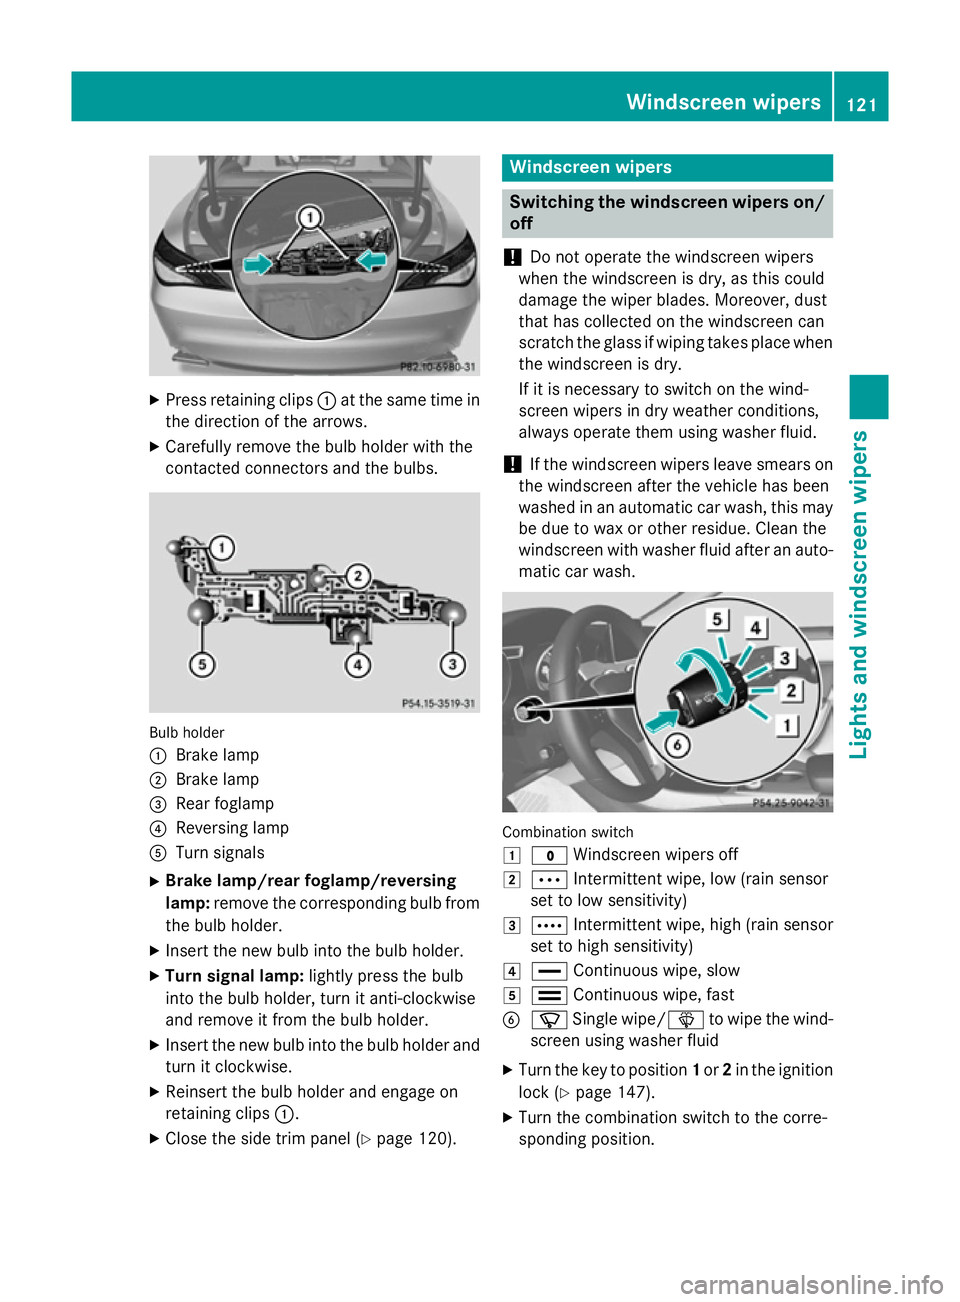
Press retaining clips :at the same time in
the direction of the arrows.
X Carefully remove the bulb holder with the
contacted connectors and the bulbs. Bulb holder
:
Brake lamp
; Brake lamp
= Rear foglamp
? Reversing lamp
A Turn signals
X Brake lamp/rear foglamp/reversing
lamp: remove the corresponding bulb from
the bulb holder.
X Insert the new bulb into the bulb holder.
X Turn signal lamp: lightly press the bulb
into the bulb holder, turn it anti-clockwise
and remove it from the bulb holder.
X Insert the new bulb into the bulb holder and
turn it clockwise.
X Reinsert the bulb holder and engage on
retaining clips :.
X Close the side trim panel (Y page 120). Windscreen wipers
Switching the windscreen wipers on/
off
! Do not operate the windscreen wipers
when the windscreen is dry, as this could
damage the wiper blades. Moreover, dust
that has collected on the windscreen can
scratch the glass if wiping takes place when the windscreen is dry.
If it is necessary to switch on the wind-
screen wipers in dry weather conditions,
always operate them using washer fluid.
! If the windscreen wipers leave smears on
the windscreen after the vehicle has been
washed in an automatic car wash, this may
be due to wax or other residue. Clean the
windscreen with washer fluid after an auto- matic car wash. Combination switch
1
$ Windscreen wipers off
2 Ä Intermittent wipe, low (rain sensor
set to low sensitivity)
3 Å Intermittent wipe, high (rain sensor
set to high sensitivity)
4 ° Continuous wipe, slow
5 ¯ Continuous wipe, fast
B í Single wipe/ îto wipe the wind-
screen using washer fluid
X Turn the key to position 1or 2in the ignition
lock (Y page 147).
X Turn the combination switch to the corre-
sponding position. Windscreen wipers
121Lights and windscreen wipers Z
Page 149 of 373
Useful information
i This Owner's Manual describes all mod-
els, series and optional equipment for your
vehicle that were available at the time of
going to press. National variations are pos- sible. Note that your vehicle may not be
equipped with all of the functions descri-
bed. This is also the case for systems and
functions relevant to safety.
i Read the information on qualified special-
ist workshops: (Y page 24). Running-in notes
Important safety notes
In certain driving and driving safety systems,
the sensors adjust automatically while a cer-
tain distance is being driven after the vehicle has been delivered or after repairs. Full sys-
tem effectiveness is not reached until the end
of this teach-in procedure.
Brake pads/linings and discs that are either
new or have been replaced only achieve opti- mum braking effect after several hundred kil-
ometres of driving. Compensate for the
reduced braking effect by applying greater
force to the brake pedal. The first 1500 km
If you treat the engine with sufficient care
from the very start, you will be rewarded with excellent performance for the remainder of
the engine's life.
R Drive at varying vehicle speeds and engine
speeds for the first 1500 km.
R Avoid overstraining the vehicle during this
period, e.g. driving at full throttle.
R Change gear in good time, before the rev
counter needle is Ôof the way to the red
area of the rev counter. R
Do not shift down a gear manually in order
to brake.
R Vehicles with automatic transmission:
try to avoid depressing the accelerator
pedal beyond the point of resistance (kick- down).
After 1500 km, you may gradually bring the
vehicle up to full road and engine speeds.
Additional running-in notes for AMG vehicles:
R Do not drive at speeds above 140 km/ hfor
the first 1,500 km.
R Only allow the engine to reach a maximum
engine speed of 4,500 rpm briefly.
i You should also observe these notes on
running-in if the engine or parts of the drive
train on your vehicle have been replaced. Driving
Important safety notes
G
WARNING
Objects in the driver's footwell may restrict
the clearance around the pedals or block a
depressed pedal. This jeopardises the oper-
ating and road safety of the vehicle. There is a risk of an accident.
Stow all objects securely in the vehicle so that
they do not get into the driver's footwell.
Always fit the floormats securely and as pre-
scribed in order to ensure that there is always sufficient room for the pedals. Do not use
loose floormats and do not place several floor-mats on top of one another. G
WARNING
Unsuitable footwear can hinder correct usage of the pedals, e.g.:
R shoes with thick soles
R shoes with high heels
R slippers
There is a risk of an accident.
Wear suitable footwear to ensure correct
usage of the pedals. 146
DrivingDriving and parking
Page 150 of 373
G
WARNING
If you switch off the ignition while driving,
safety-relevant functions are only available
with limitations, or not at all. This could affect, for example, the power steering and the brake
boosting effect. You will require considerably
more effort to steer and brake. There is a risk of an accident.
Do not switch off the ignition while driving. G
WARNING
If the parking brake has not been fully
released when driving, the parking brake can:
R overheat and cause a fire
R lose its hold function.
There is a risk of fire and an accident. Release
the parking brake fully before driving off.
! Warm up the engine quickly. Do not use
the engine's full performance until it has
reached operating temperature.
Only set the automatic transmission to the
respective drive positions when the vehicle
is stationary.
Where possible, avoid spinning the drive
wheels when pulling away on slippery
roads. Otherwise, you could damage the
drive train.
! AMG vehicles:
avoid full-load operation
and engine speeds greater than 5000 rpm
when the engine is cold. This helps to pro-
tect the engine and avoids uncomfortable
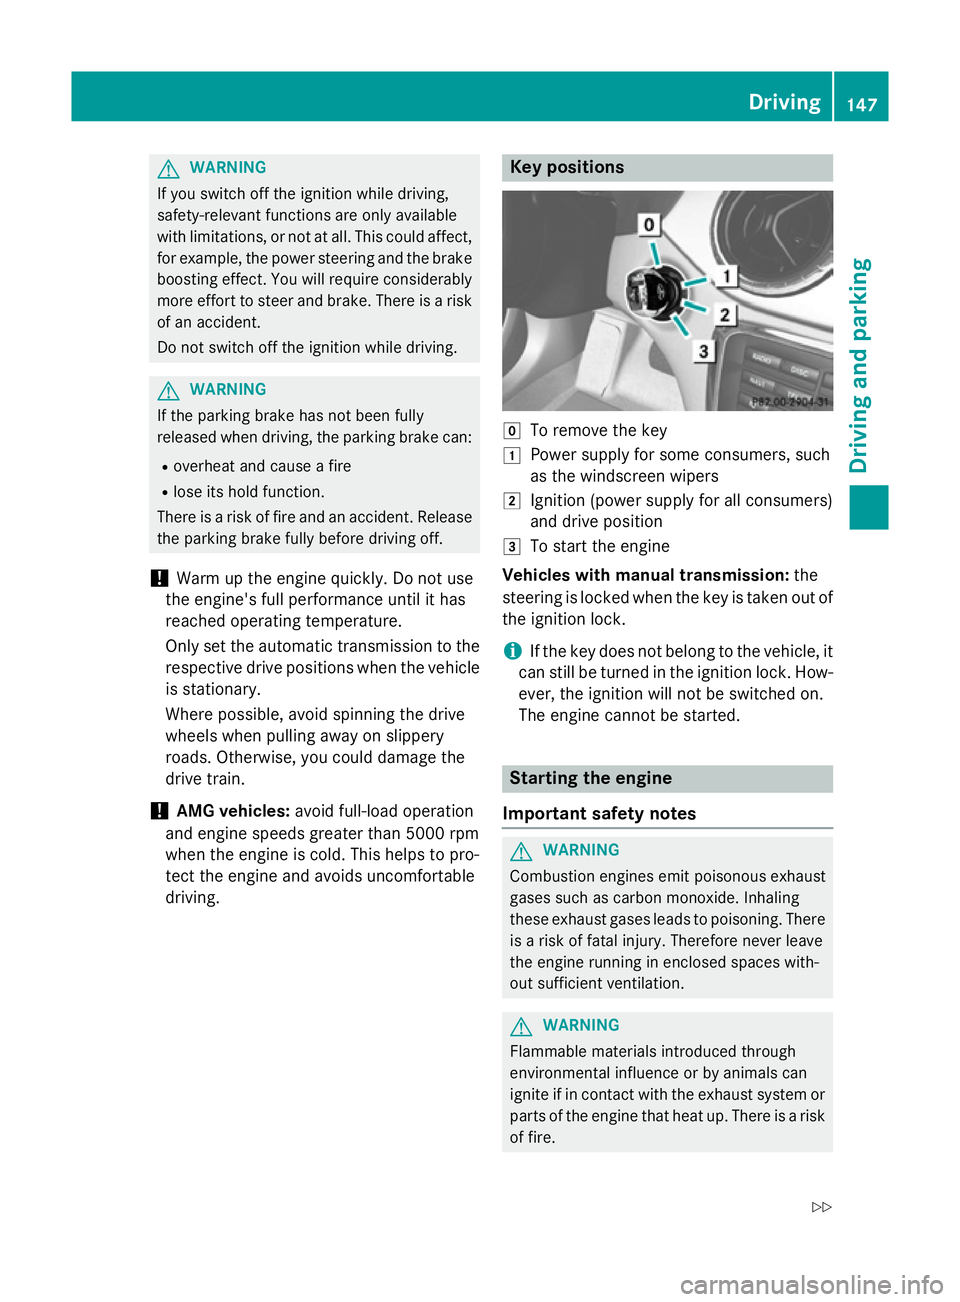
driving. Key positions
g
To remove the key
1 Power supply for some consumers, such
as the windscreen wipers
2 Ignition (power supply for all consumers)
and drive position
3 To start the engine
Vehicles with manual transmission: the
steering is locked when the key is taken out of
the ignition lock.
i If the key does not belong to the vehicle, it
can still be turned in the ignition lock. How- ever, the ignition will not be switched on.
The engine cannot be started. Starting the engine
Important safety notes G
WARNING
Combustion engines emit poisonous exhaust
gases such as carbon monoxide. Inhaling
these exhaust gases leads to poisoning. There is a risk of fatal injury. Therefore never leave
the engine running in enclosed spaces with-
out sufficient ventilation. G
WARNING
Flammable materials introduced through
environmental influence or by animals can
ignite if in contact with the exhaust system or parts of the engine that heat up. There is a risk
of fire. Driving
147Driving and parking
Z
Page 151 of 373
Carry out regular checks to make sure that
there are no flammable foreign materials in
the engine compartment or in the exhaust
system.
! Do not depress the accelerator when
starting the engine.
i Vehicles with a petrol engine:
the
engine runs at a higher engine speed during the cold start procedure so that the cata-
lytic converter can reach operating tem-
perature more quickly. The sound of the
engine may change as a result.
Manual transmission X
Depress the brake pedal and keep it
depressed.
X Depress the clutch pedal fully.
X Shift to neutral N.
i You can only start the engine when the
clutch pedal is fully depressed.
Automatic transmission X
Shift the transmission to position P.
Transmission position display Pis shown in
the multifunction display.
i When the transmission is in position
N,
you can also start the engine with the brake pedal depressed.
Starting procedure X
To start a petrol engine: turn the key to
position 3in the ignition lock (Y page 147)
and release it as soon as the engine is run-
ning.
X To start a diesel engine: turn the key to
position 2(Y page 147) in the ignition lock.
The % preglow indicator lamp in the
instrument cluster lights up.
X When the %preglow indicator lamp
goes out, turn the key to position
3 (Y page 147) and release it as soon as the
engine is running. i
You can start the engine without preglow
if the engine is warm. Pulling away
Manual transmission !
Change gear in good time and avoid spin-
ning the wheels. Otherwise, you could dam- age the vehicle.
X Depress the brake pedal and keep it
depressed.
X Depress the clutch pedal fully.
X Shift to either first gear or reverse gear R.
X Release the electric parking brake
(Y page 168).
X Release the brake pedal.
X Slowly release the clutch pedal and gently
depress the accelerator pedal.
i Follow the shift recommendations in the
multifunction display for an economical
driving style (Y page 155).
i The vehicle locks centrally once you have
pulled away. The locking knobs in the doors
drop down.
You can open the doors from the inside at
any time.
You can also deactivate the automatic lock- ing feature (Y page 229).
Automatic transmission i
It is only possible to shift the transmission
from position Pto the desired position if
you depress the brake pedal. Only then can
the parking lock be deactivated. If you do
not depress the brake pedal, the DIRECT
SELECT lever can still be moved but the
parking lock remains engaged.
i At transmission fluid temperatures below
Ò20 †, you can only shift out of position P
into another transmission position when
the engine is running. 148
DrivingDriving and parking
Page 152 of 373
X
Depress the brake pedal and keep it
depressed.
X Shift the transmission to position Dor R.
X Release the brake pedal.
X Carefully depress the accelerator pedal.
The electric parking brake is automatically
released (Y page 168).
The red !indicator lamp in the instru-
ment cluster goes out.
i The vehicle locks centrally once you have
pulled away. The locking knobs in the doors
drop down.
You can open the doors from the inside at
any time.
You can also deactivate the automatic lock- ing feature (Y page 229).
i Upshifts take place at higher engine
speeds after a cold start. This helps the
catalytic converter to reach its operating
temperature more quickly.
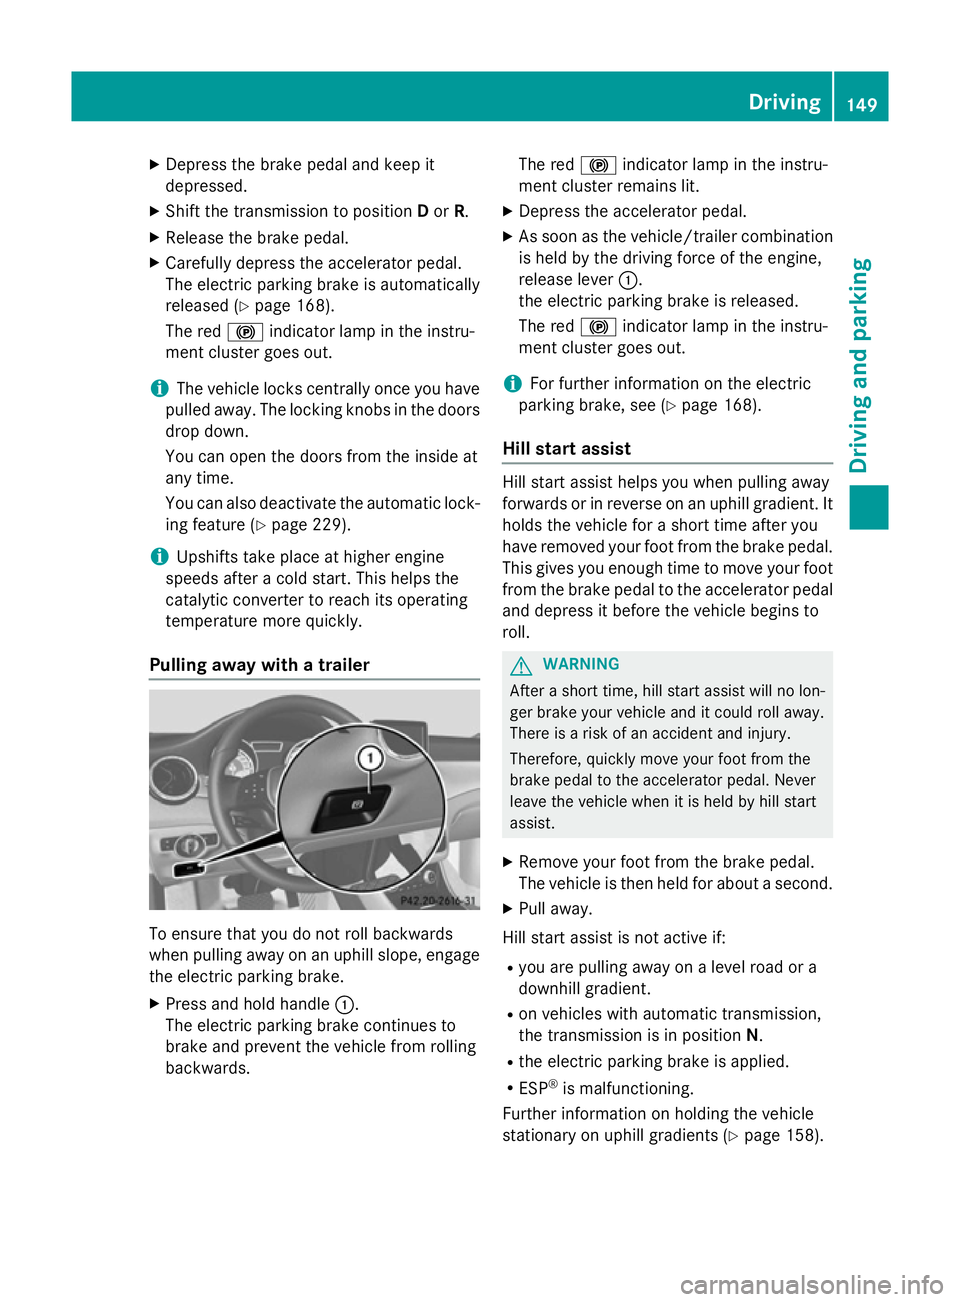
Pulling away with a trailer To ensure that you do not roll backwards
when pulling away on an uphill slope, engage
the electric parking brake.
X Press and hold handle :.
The electric parking brake continues to
brake and prevent the vehicle from rolling
backwards. The red
!indicator lamp in the instru-
ment cluster remains lit.
X Depress the accelerator pedal.
X As soon as the vehicle/trailer combination
is held by the driving force of the engine,
release lever :.
the electric parking brake is released.
The red !indicator lamp in the instru-
ment cluster goes out.
i For further information on the electric
parking brake, see (Y page 168).
Hill start assist Hill start assist helps you when pulling away
forwards or in reverse on an uphill gradient. It
holds the vehicle for a short time after you
have removed your foot from the brake pedal.
This gives you enough time to move your foot from the brake pedal to the accelerator pedal and depress it before the vehicle begins to
roll. G
WARNING
After a short time, hill start assist will no lon-
ger brake your vehicle and it could roll away.
There is a risk of an accident and injury.
Therefore, quickly move your foot from the
brake pedal to the accelerator pedal. Never
leave the vehicle when it is held by hill start
assist.
X Remove your foot from the brake pedal.
The vehicle is then held for about a second.
X Pull away.
Hill start assist is not active if: R you are pulling away on a level road or a
downhill gradient.
R on vehicles with automatic transmission,
the transmission is in position N.
R the electric parking brake is applied.
R ESP ®
is malfunctioning.
Further information on holding the vehicle
stationary on uphill gradients (Y page 158). Driving
149Driving an d parking Z
Page 154 of 373
X
Brake the vehicle.
X Engage neutral N(Y page 155) (follow
gearshift instruction :to engage neutral
N, if necessary).
X Release the clutch pedal.
The engine is switched off automatically.
Vehicles with automatic transmission
If the vehicle is braked to a standstill in Dor N,
the ECO start/stop function switches off the engine automatically.
i The HOLD function can be activated if the
engine has been switched off automati-
cally. It is then not necessary to continue
applying the brakes during the automatic
stop phase. When you depress the accel-
erator pedal, the engine starts automati-
cally and the braking effect of the HOLD
function is deactivated.
Automatic engine start General notes
The engine is started automatically if:
R you switch off the ECO start/stop function
by pressing the ECO button
R you engage reverse gear R
R you unfasten your seat belt or open the
driver's door
R the vehicle starts to roll
R the brake system requires this
R the temperature in the vehicle interior devi-
ates from the set range
R the system detects moisture on the wind-
screen when the air-conditioning system is
switched on
R the battery's charge status is too low Vehicles with manual transmission
! Only engage gear when the clutch pedal is
depressed.
The engine is started automatically if you: R depress the clutch pedal fully
R depress the accelerator pedal
Vehicles with automatic transmission
The engine is started automatically if you: R release the brake pedal in transmission
position Dor Nwhen the HOLD function is
not active
R depress the accelerator pedal
R move the transmission out of position P
i Shifting the transmission to position
P
does not start the engine.
i If you shift the transmission from
Rto D,
the ECO start/stop function is available
again once the ¤symbol reappears in
green in the multifunction display.
Deactivating/activating the ECO start/
stop function X
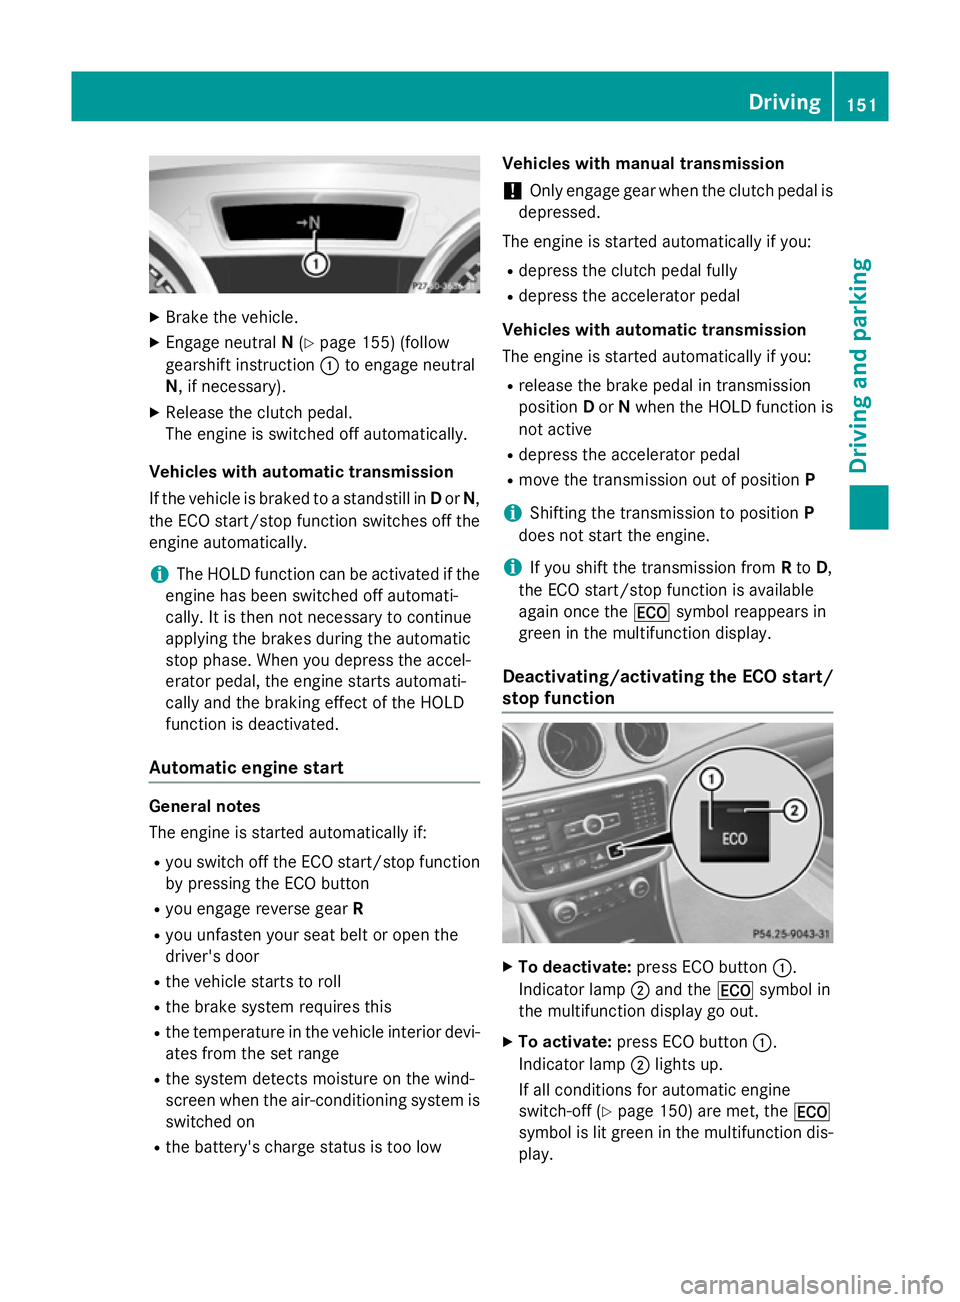
To deactivate: press ECO button :.
Indicator lamp ;and the ¤symbol in
the multifunction display go out.
X To activate: press ECO button :.
Indicator lamp ;lights up.
If all conditions for automatic engine
switch-off (Y page 150) are met, the ¤
symbol is lit green in the multifunction dis-
play. Driving
151Driving and parking Z
Page 157 of 373
Problem
Possible causes/consequences and
M
MSolutions Vehicles with a petrol
engine:
the engine is not run-
ning smoothly and is
misfiring. There is a malfunction in the engine electronics or in a mechanical
component of the engine management system.
X Only depress the accelerator pedal slightly.
Otherwise, non-combusted fuel may get into the catalytic con-
verter and damage it.
X Have the cause rectified immediately at a qualified specialist
workshop. The coolant tempera-
ture display is showing
more than 120 †. The
coolant warning lamp
may also be on and a
warning tone may
sound. The coolant level is too low. The coolant is too hot and the engine
is no longer being cooled sufficiently.
X Stop as soon as possible and allow the engine and the coolant to
cool down.
X Check the coolant level (Y page 294). Observe the warning
notes as you do so and top up the coolant if necessary. If the coolant level is correct, the engine radiator fan may be faulty.
The coolant is too hot and the engine is no longer being cooled
sufficiently.
X If the coolant temperature is below 120 †, you can continue
driving to the nearest qualified specialist workshop.
X Avoid heavy loads on the engine as you do so, e.g. driving in
mountainous terrain and stop-start traffic. Manual transmission
Gear lever
! Only engage gear when the clutch pedal is
depressed.
! When shifting to
5thand 6thgear, you
must press the shift lever to the right. Oth- erwise, you could shift unintentionally into
3rd or4th gear and damage the engine or
transmission.
If you shift down at too high a speed (trans-
mission braking), this can cause the engine
to overrev, leading to engine damage.
Do not use the clutch bite point to keep the vehicle stationary on uphill gradients.
There is otherwise a risk of damaging the
clutch.
! On long and steep downhill gradients,
especially if the vehicle is laden or towing a trailer, you must shift into gear
1, 2or3in
good time. This uses the engine's braking
effect. This relieves the load on the brake
system and prevents the brakes from over-
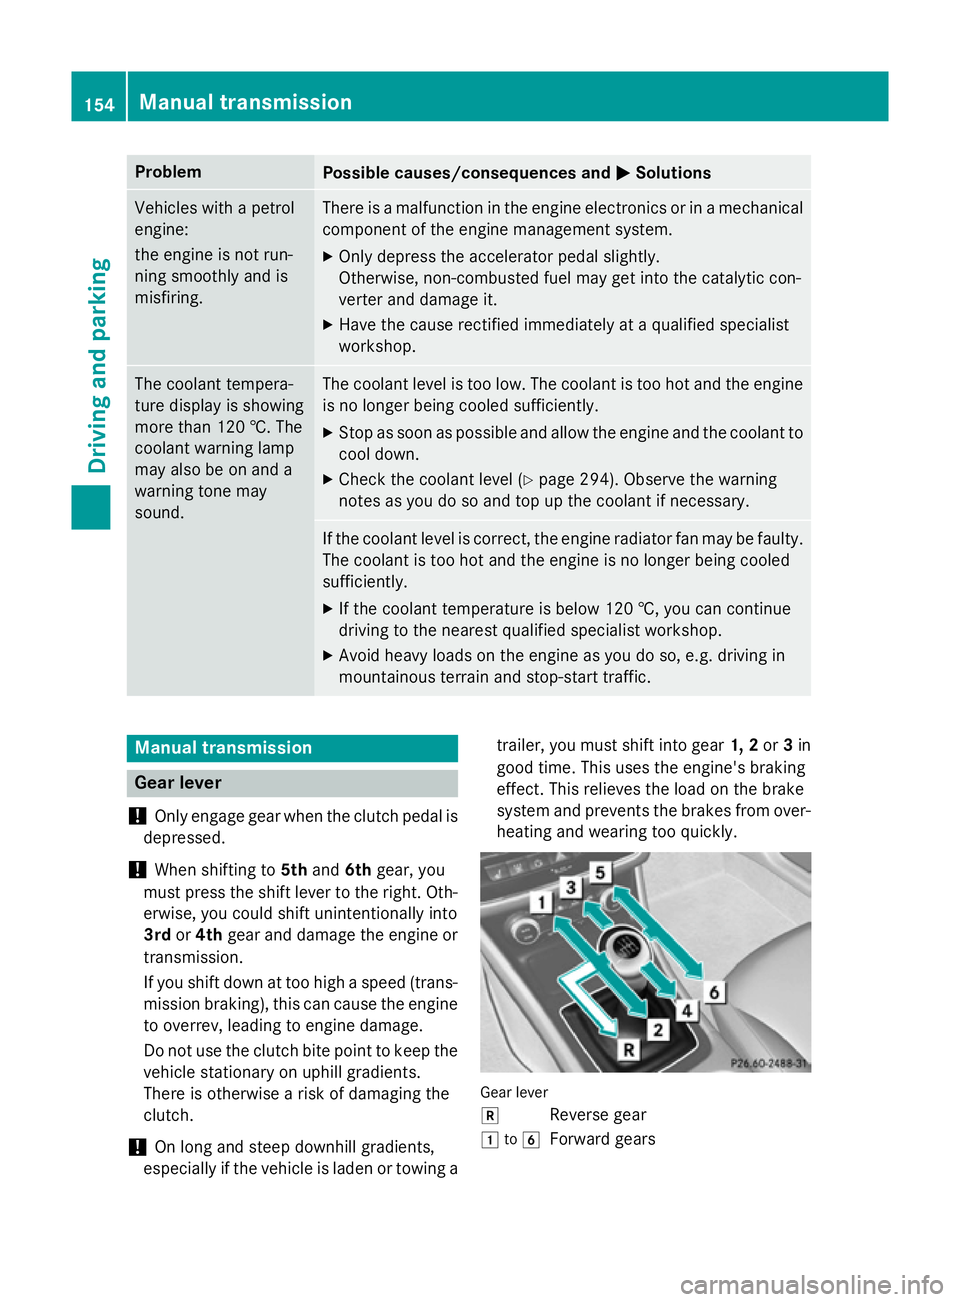
heating and wearing too quickly. Gear lever
k
Reverse gear
1 to6
Forward gears 154
Manual transmissionDriving and parking