2013 MERCEDES-BENZ CLA COUPE tyre pressure
[x] Cancel search: tyre pressurePage 167 of 373
on the ignition if you accidentally refuel
with the wrong fuel. Otherwise, the fuel will enter the fuel system. Even small amounts
of the wrong fuel could result in damage to the fuel system and the engine. The repair
costs are high. Notify a qualified specialist
workshop and have the fuel tank and fuel
lines drained completely.
! Do not use diesel to refuel vehicles with a
petrol engine. Do not switch on the ignition if you accidentally refuel with the wrong
fuel. Otherwise, fuel can enter the fuel sys- tem. Even small amounts of the wrong fuel
could result in damage to the fuel system
and the engine. Notify a qualified specialist workshop and have the fuel tank and fuel
lines drained completely.
! Overfilling the fuel tank could damage the
fuel system.
! Take care not to spill any fuel on painted
surfaces. You could otherwise damage the
paintwork.
! Use a filter when adding fuel from a fuel
can. The fuel lines and/or the diesel injec-
tion system could otherwise be blocked by particles from the fuel can.
Do not get into the vehicle again during the
refuelling process. Otherwise, electrostatic
charge could build up again.
If you overfill the fuel tank, some fuel may
spray out when you remove the fuel pump
nozzle.
Further information on fuel and fuel quality
(Y page 355). Refuelling
General notes The fuel filler flap is unlocked or locked auto-
matically when you open or close the vehicle
with the key.
The position of the fuel filler cap is displayed
æ in the instrument cluster. The arrow next to the filling pump indicates the side of
the vehicle.
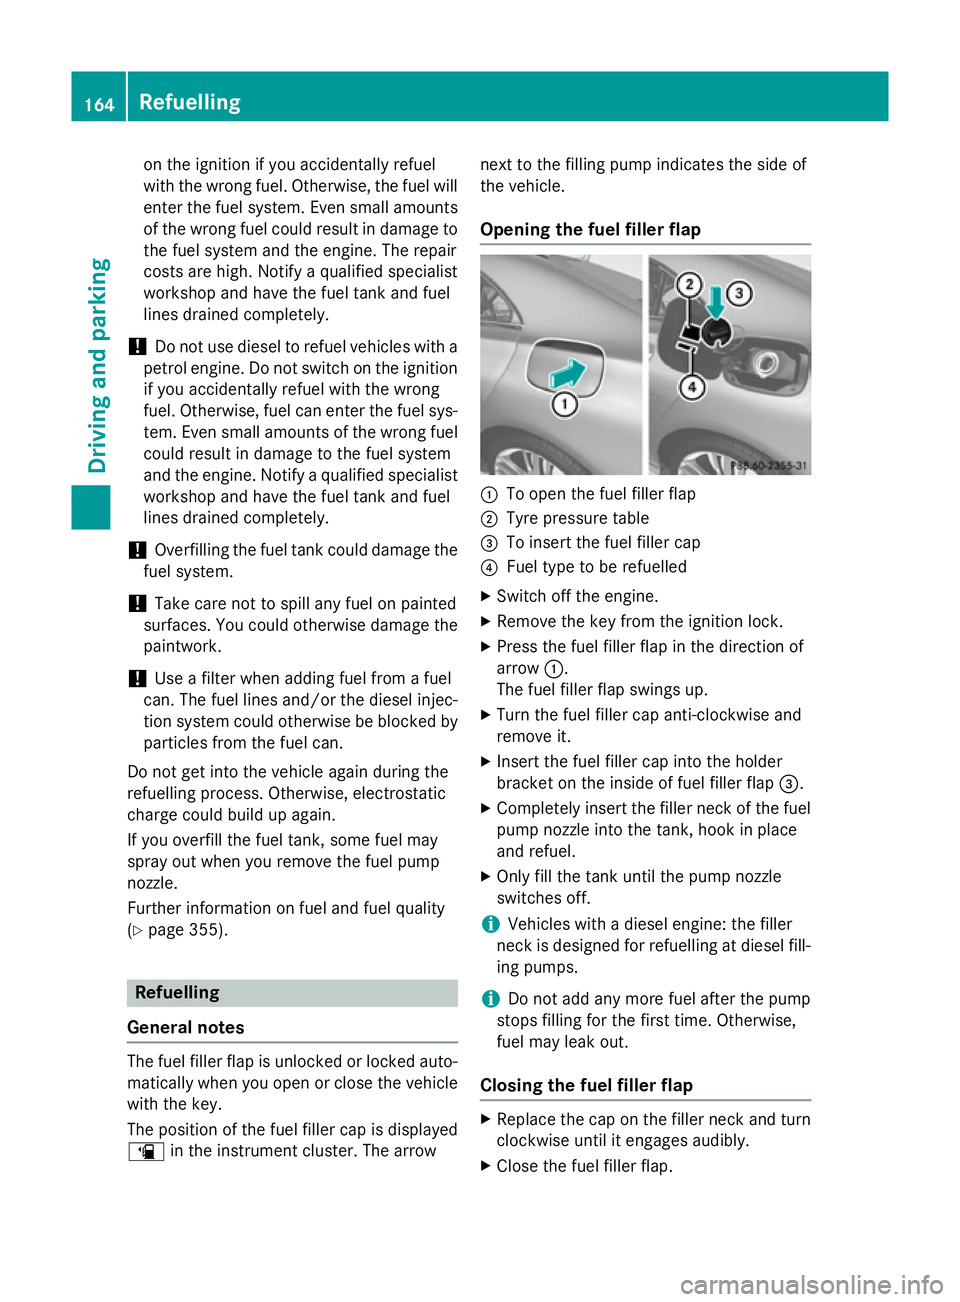
Opening the fuel filler flap :
To open the fuel filler flap
; Tyre pressure table
= To insert the fuel filler cap
? Fuel type to be refuelled
X Switch off the engine.
X Remove the key from the ignition lock.
X Press the fuel filler flap in the direction of
arrow :.
The fuel filler flap swings up.
X Turn the fuel filler cap anti-clockwise and
remove it.
X Insert the fuel filler cap into the holder
bracket on the inside of fuel filler flap =.
X Completely insert the filler neck of the fuel
pump nozzle into the tank, hook in place
and refuel.
X Only fill the tank until the pump nozzle
switches off.
i Vehicles with a diesel engine: the filler
neck is designed for refuelling at diesel fill-
ing pumps.
i Do not add any more fuel after the pump
stops filling for the first time. Otherwise,
fuel may leak out.
Closing the fuel filler flap X
Replace the cap on the filler neck and turn
clockwise until it engages audibly.
X Close the fuel filler flap. 164
RefuellingDriving and parking
Page 173 of 373
If you leave the vehicle parked up for longer
than six weeks, the vehicle may suffer dam-
age as a result of lack of use.
X Visit a qualified specialist workshop and
seek advice.
i You can obtain information about trickle
chargers from a qualified specialist work-
shop. Driving tips
General notes
G
WARNING
If you switch off the ignition while driving,
safety-relevant functions are only available
with limitations, or not at all. This could affect, for example, the power steering and the brake
boosting effect. You will require considerably
more effort to steer and brake. There is a risk of an accident.
Do not switch off the ignition while driving. ECO display
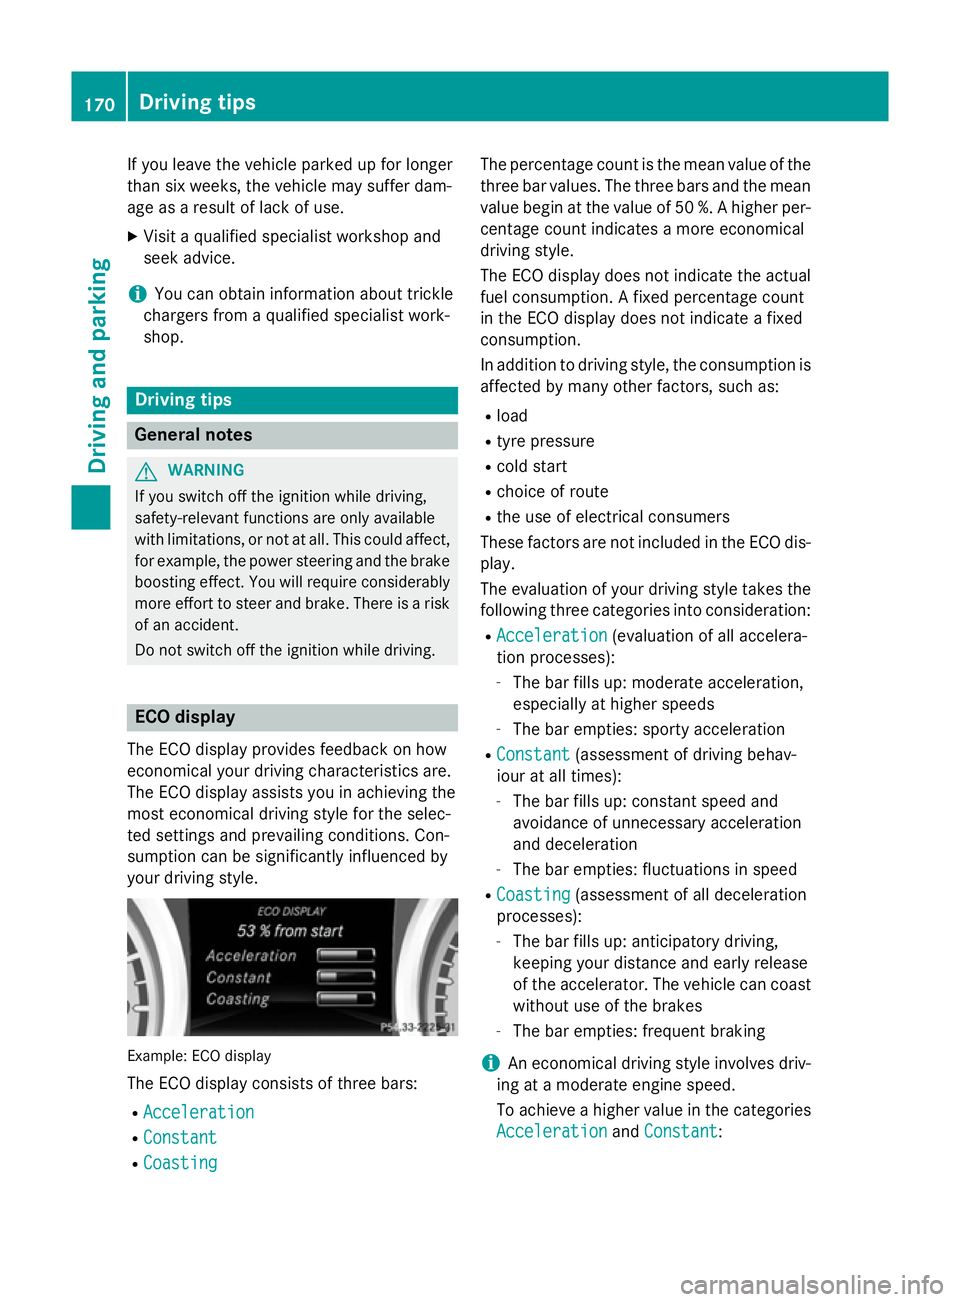
The ECO display provides feedback on how
economical your driving characteristics are.
The ECO display assists you in achieving the
most economical driving style for the selec-
ted settings and prevailing conditions. Con-
sumption can be significantly influenced by
your driving style. Example: ECO display
The ECO display consists of three bars:
R Acceleration Acceleration
R Constant
Constant
R Coasting
Coasting The percentage count is the mean value of the
three bar values. The three bars and the mean
value begin at the value of 50 %. A higher per- centage count indicates a more economical
driving style.
The ECO display does not indicate the actual
fuel consumption. A fixed percentage count
in the ECO display does not indicate a fixed
consumption.
In addition to driving style, the consumption is
affected by many other factors, such as:
R load
R tyre pressure
R cold start
R choice of route
R the use of electrical consumers
These factors are not included in the ECO dis-
play.
The evaluation of your driving style takes the
following three categories into consideration:
R Acceleration Acceleration (evaluation of all accelera-
tion processes):
- The bar fills up: moderate acceleration,
especially at higher speeds
- The bar empties: sporty acceleration
R Constant Constant (assessment of driving behav-
iour at all times):
- The bar fills up: constant speed and
avoidance of unnecessary acceleration
and deceleration
- The bar empties: fluctuations in speed
R Coasting Coasting (assessment of all deceleration
processes):
- The bar fills up: anticipatory driving,
keeping your distance and early release
of the accelerator. The vehicle can coast
without use of the brakes
- The bar empties: frequent braking
i An economical driving style involves driv-
ing at a moderate engine speed.
To achieve a higher value in the categories
Acceleration
Acceleration andConstant Constant: 170
Driving tipsDriving and parking
Page 181 of 373
160 km/h(e.g. for driving on winter tyres) and
the maximum speed (Y page 228).
Shortly before the stored speed is reached, it appears in the multifunction display.
Permanent SPEEDTRONIC remains active
even if variable SPEEDTRONIC is deactivated.
You cannot exceed the stored limit speed
even if you depress the accelerator pedal
beyond the pressure point (kickdown). DISTRONIC PLUS
General notes DISTRONIC PLUS regulates the speed and
automatically helps you maintain the dis-
tance to the vehicle detected in front. Vehi-
cles are detected with the aid of the radar
sensor system. DISTRONIC PLUS brakes
automatically so that the set speed is not
exceeded.
Change into a lower gear in good time on long and steep downhill gradients. Take particular
note of this when driving a laden vehicle. By
doing so, you will make use of the braking
effect of the engine. This relieves the load on
the brake system and prevents the brakes
from overheating and wearing too quickly.
If DISTRONIC PLUS detects that there is a risk of a collision, you will be warned visually and
acoustically. Without your intervention, DIS-
TRONIC PLUS cannot prevent a collision. An
intermittent warning tone will then sound and the distance warning lamp will light up in theinstrument cluster. Brake immediately to
increase the distance to the vehicle driving in
front, or take evasive action, provided it is
safe to do so.
DISTRONIC PLUS operates in the range
between 0 km/h and 200 km/h.
Do not use DISTRONIC PLUS while driving on roads with steep gradients. Important safety notes G
WARNING
DISTRONIC PLUS does not react to:
R people or animals
R stationary obstacles on the road, e.g. stop-
ped or parked vehicles
R oncoming and crossing traffic
As a result, DISTRONIC PLUS may neither give
warnings nor intervene in such situations.
There is a risk of an accident.
Always pay careful attention to the traffic sit- uation and be ready to brake. G
WARNING
DISTRONIC PLUS cannot always clearly iden- tify other road users and complex traffic sit-
uations.
In such cases, DISTRONIC PLUS may:
R give an unnecessary warning and then
brake the vehicle
R neither give a warning nor intervene
R accelerate unexpectedly
There is a risk of an accident.
Continue to drive carefully and be ready to
brake, in particular when warned to do so by
DISTRONIC PLUS. G
WARNING
DISTRONIC PLUS brakes your vehicle with up to 50% of the maximum possible deceleration.
If this deceleration is not sufficient, DIS-
TRONIC PLUS alerts you with a visual and
acoustic warning. There is a risk of an acci-
dent.
Apply the brakes yourself in these situations
and try to take evasive action. 178
Driving systemsDriving and parking
Page 196 of 373
Parking tips:
R on narrow roads, drive as closely as possi-
ble past the parking space.
R parking spaces that are littered or over-
grown might be identified or measured
incorrectly.
R parking spaces that are partially occupied
by trailer drawbars might not be identified
as such or be measured incorrectly.
R snowfall or heavy rain may lead to a parking
space being measured inaccurately.
R pay attention to the PARKTRONIC
(Y page 190) warning messages during the
parking procedure.
R you can intervene in the steering procedure
to correct it at any time. Active Parking
Assist will then be cancelled.
R when transporting a load which protrudes
from your vehicle, you should not use
Active Parking Assist.
R never use Active Parking Assist when snow
chains are fitted.
R make sure that the tyre pressures are
always correct. This has a direct influence
on the parking characteristics of the vehi-
cle.
Use Active Parking Assist for parking spaces
that are:
R parallel or at right angles to the direction of
travel
R on straight roads, not bends
R on the same level as the road, e.g. not on
the pavement
Detecting parking spaces Objects located above the height range of
Active Parking Assist will not be detected
when the parking space is measured. These
are not taken into account when the parking
procedure is calculated, e.g. overhanging
loads, tail sections or loading ramps of goods
vehicles. G
WARNING
If objects are located above the detection
range, Active Parking Assist may start to steer into the parking space too soon. As a result,
you could cause a collision. There is a risk of
an accident.
If objects are located above the detection
range, stop the vehicle and switch Active
Parking Assist off.
For further information on the detection
range (Y page 189).
Active Parking Assist does not support you
parking in spaces at right angles to the direc-
tion of travel if:
R two parking spaces are located directly
next to one another
R the parking space is directly next to a low
obstacle such as a low kerb stone
R you forward park
Active Parking Assist does not support you
parking in spaces that are parallel or at right
angles to the direction of travel if:
R the parking space is on a kerb stone
R the parking space appears to be blocked,
for example by foliage or grass paving
blocks
R the range of movement is too small
R the parking space is bordered by an obsta-
cle which is not clearly defined such as a
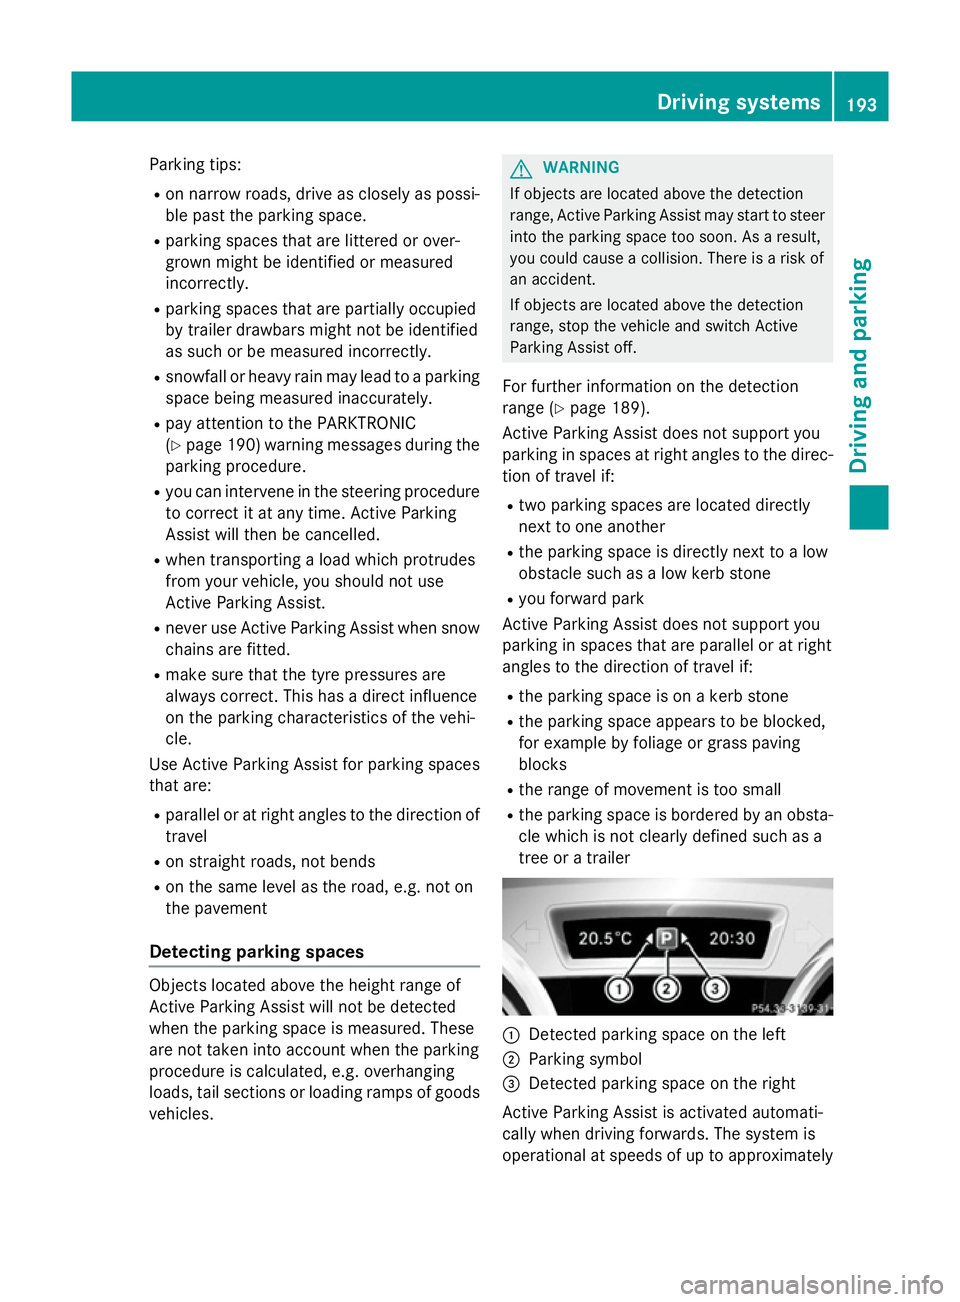
tree or a trailer :
Detected parking space on the left
; Parking symbol
= Detected parking space on the right
Active Parking Assist is activated automati-
cally when driving forwards. The system is
operational at speeds of up to approximately Driving systems
193Driving and parking Z
Page 211 of 373
To avoid hazardous situations:
R make sure to check the noseweight before
each journey.
R use a drawbar noseweight as close as pos-
sible to the maximum noseweight.
R do not exceed the maximum permissible
noseweight.
R do not use a noseweight lower than the
minimum permissible trailer drawbar nose- weight.
When reversing the vehicle towards the
trailer, make sure there is nobody between
the trailer and the vehicle.
Couple and uncouple the trailer carefully. If
you do not couple the trailer to the towing
vehicle correctly, the trailer could become
detached.
Make sure that the following values are not
exceeded:
R the permissible trailer drawbar noseweight
R the permissible trailer load
R the permissible rear axle load of the towing
vehicle
R the maximum permissible gross vehicle
weight of both the towing vehicle and the
trailer
The applicable permissible values, which
must not be exceeded, can be found:
R in your vehicle documents
R on the identification plates of the trailer tow
hitch and the trailer
R on the vehicle identification plate
If the values differ, the lowest value applies.
You will find the values approved by the man-
ufacturer on the vehicle identification plates
and those for the towing vehicle under "Tech- nical data" (Y page 364).
When towing a trailer, your vehicle's handling
characteristics will be different in comparison to when driving without a trailer. The vehicle/trailer combination:
R is heavier
R is restricted in its acceleration and gradi-
ent-climbing capability
R has an increased braking distance
R is affected more by strong crosswinds
R demands more sensitive steering
R has a larger turning circle
This can impair the vehicle's handling char-
acteristics. Adapt your driving style accord-
ingly. Maintain a safe distance. Drive care-
fully.
When towing a trailer, always adjust your
speed to the current road and weather con-
ditions. Do not exceed the maximum permis- sible speed for your vehicle/trailer combina-
tion.
General notes X
When towing a trailer, set the tyre pressure
on the rear axle of the towing vehicle for a
maximum load; see the tyre pressure table in the fuel filler flap (Y page 330).
Please note that when towing a trailer, PARK-
TRONIC (Y page 188) and Blind Spot Assist
(Y page 203) availability is limited or not avail-
able at all.
i The height of the ball coupling changes
with the load of the vehicle. If necessary,
use a trailer with a height-adjustable draw- bar.
You will find fitting dimensions and loads
under "Technical data" (Y page 363).
Driving tips i
Observe the notes on ESP ®
trailer stabi-
lisation (Y page 71).
The maximum permissible speed for vehicle/
trailer combinations depends on the type of
trailer. Before beginning the journey, check
the trailer's documents to see what the max- imum permitted speed is. Observe the legally 208
Towing a trailerDriving and parking
Page 228 of 373
Activating/deactivating ATTENTION
ASSIST X
Press the =or; button on the steer-
ing wheel to select the Assist.
Assist. menu.
X Press the 9or: button to select
ATTENTION ASSIST
ATTENTION ASSIST .
X Press the abutton.
The current selection is displayed.
X To activate/deactivate: press thea
button again.
When ATTENTION ASSIST is activated, the
À symbol appears in the assistance
graphic in the multifunction display.
For further information about ATTENTION
ASSIST, see (Y page 201).
Activating/deactivating Blind Spot
Assist X
Press the =or; button on the steer-
ing wheel to select the Assist. Assist.menu.
X Press the 9or: button to select
Blind Spot Assist
Blind Spot Assist .
X Press the abutton.
The current selection is displayed.
X To activate/deactivate: press thea
button again.
For further information about Blind Spot
Assist, see (Y page 203).
When the Blind Spot Assist Sensors Blind Spot Assist Sensors
deactivated
deactivated message is shown, the radar
sensors are deactivated.
X Switch on the radar sensor system
(Y page 229).
Activating/deactivating Lane Keeping
Assist X
Press the =or; button on the steer-
ing wheel to select the Assist. Assist.menu.
X Press the 9or: button to select
Lane Keeping Assist
Lane Keeping Assist .
X Press the abutton.
The current selection is displayed.
X Press ato confirm. X
Press the :or9 button to set Off
Off ,
Standard
Standard orAdaptive
Adaptive.
X Press the abutton to save the setting.
When Lane Keeping Assist is activated, the
multifunction display shows the lane mark-
ings as bright lines in the assistance
graphic.
For further information about Lane Keeping
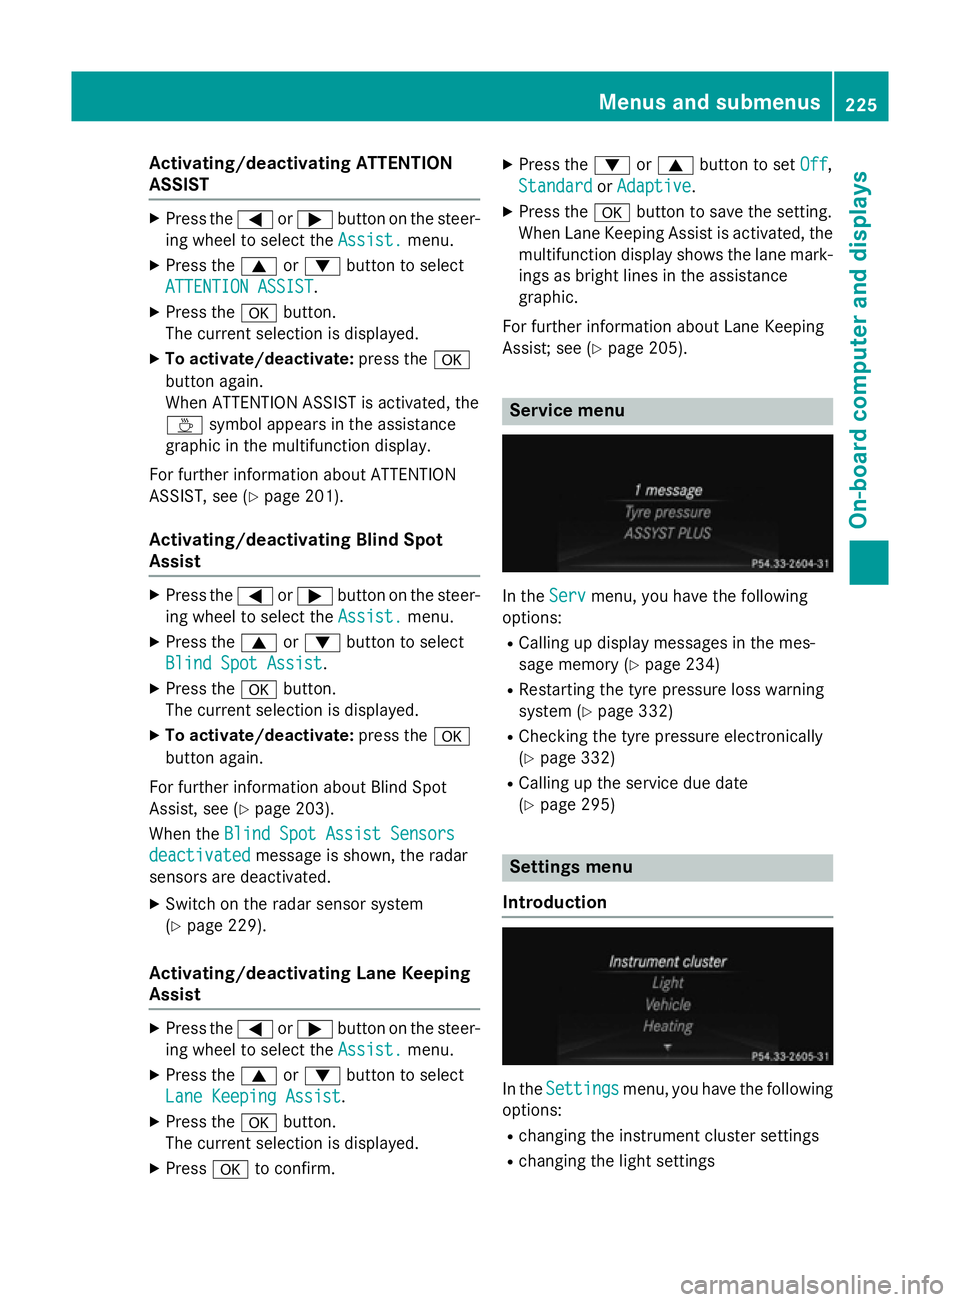
Assist; see (Y page 205). Service menu
In the
Serv Servmenu, you have the following
options:
R Calling up display messages in the mes-
sage memory (Y page 234)
R Restarting the tyre pressure loss warning
system (Y page 332)
R Checking the tyre pressure electronically
(Y page 332)
R Calling up the service due date
(Y page 295) Settings menu
Introduction In the
Settings Settings menu, you have the following
options:
R changing the instrument cluster settings
R changing the light settings Menus and sub
menus
225On-board computer and displays Z
Page 259 of 373
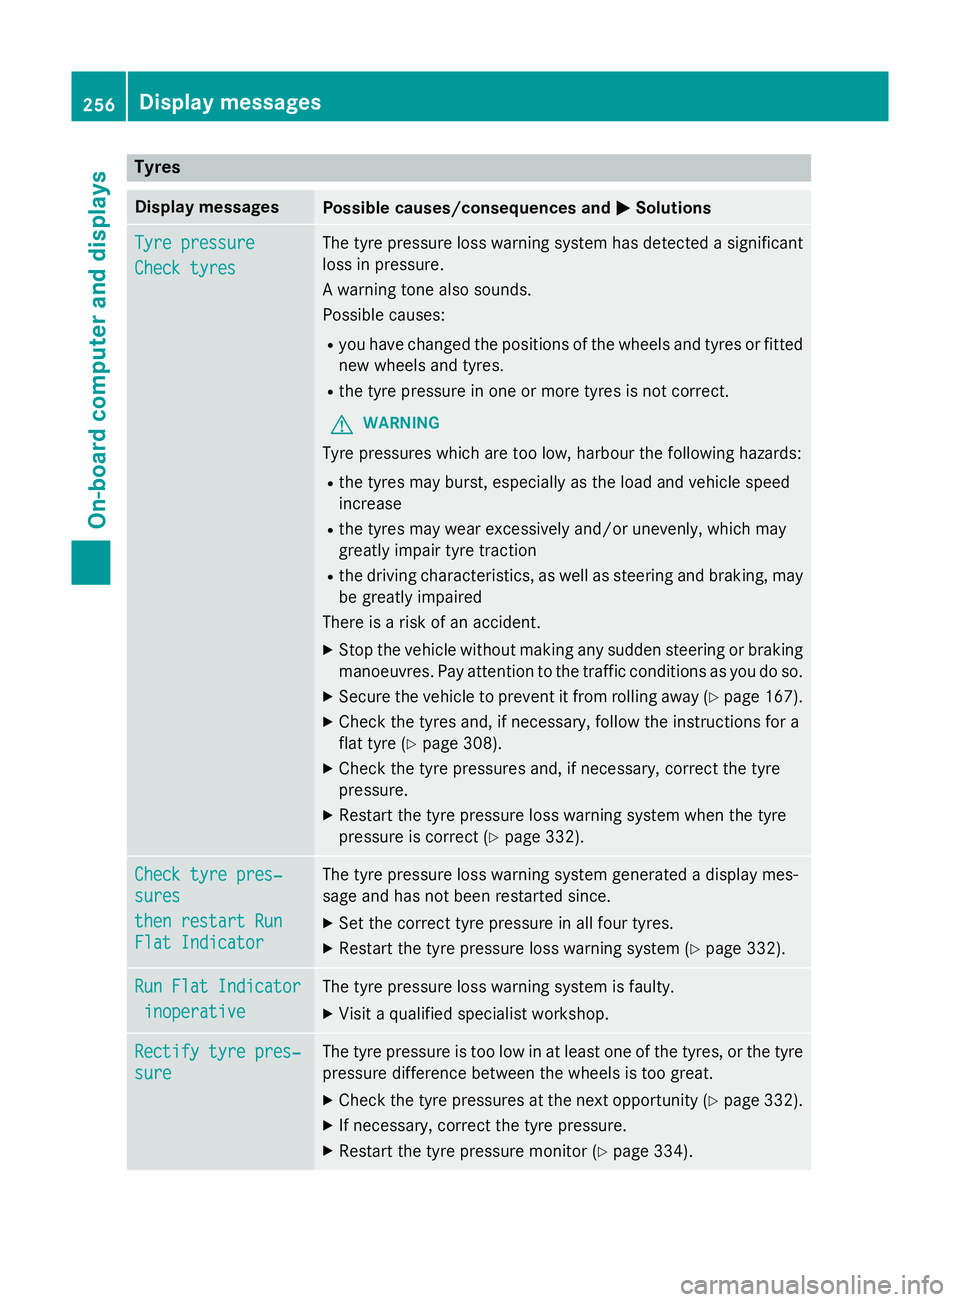
Tyres
Display messages
Possible causes/consequences and
M
MSolutions Tyre pressure
Tyre pressure
Check tyres Check tyres The tyre pressure loss warning system has detected a significant
loss in pressure.
A warning tone also sounds.
Possible causes:
R you have changed the positions of the wheels and tyres or fitted
new wheels and tyres.
R the tyre pressure in one or more tyres is not correct.
G WARNING
Tyre pressures which are too low, harbour the following hazards: R the tyres may burst, especially as the load and vehicle speed
increase
R the tyres may wear excessively and/or unevenly, which may
greatly impair tyre traction
R the driving characteristics, as well as steering and braking, may
be greatly impaired
There is a risk of an accident.
X Stop the vehicle without making any sudden steering or braking
manoeuvres. Pay attention to the traffic conditions as you do so.
X Secure the vehicle to prevent it from rolling away (Y page 167).
X Check the tyres and, if necessary, follow the instructions for a
flat tyre (Y page 308).
X Check the tyre pressures and, if necessary, correct the tyre
pressure.
X Restart the tyre pressure loss warning system when the tyre
pressure is correct (Y page 332).Check tyre pres‐ Check tyre pres‐
sures sures
then restart Run then restart Run
Flat Indicator Flat Indicator The tyre pressure loss warning system generated a display mes-
sage and has not been restarted since.
X Set the correct tyre pressure in all four tyres.
X Restart the tyre pressure loss warning system (Y page 332).Run Flat Indicator Run Flat Indicator
inoperative
inoperative The tyre pressure loss warning system is faulty.
X Visit a qualified specialist workshop. Rectify tyre pres‐
Rectify tyre pres‐
sure sure The tyre pressure is too low in at least one of the tyres, or the tyre
pressure difference between the wheels is too great.
X Check the tyre pressures at the next opportunity (Y page 332).
X If necessary, correct the tyre pressure.
X Restart the tyre pressure monitor (Y page 334).256
Display
messagesOn-board computer and displays
Page 260 of 373
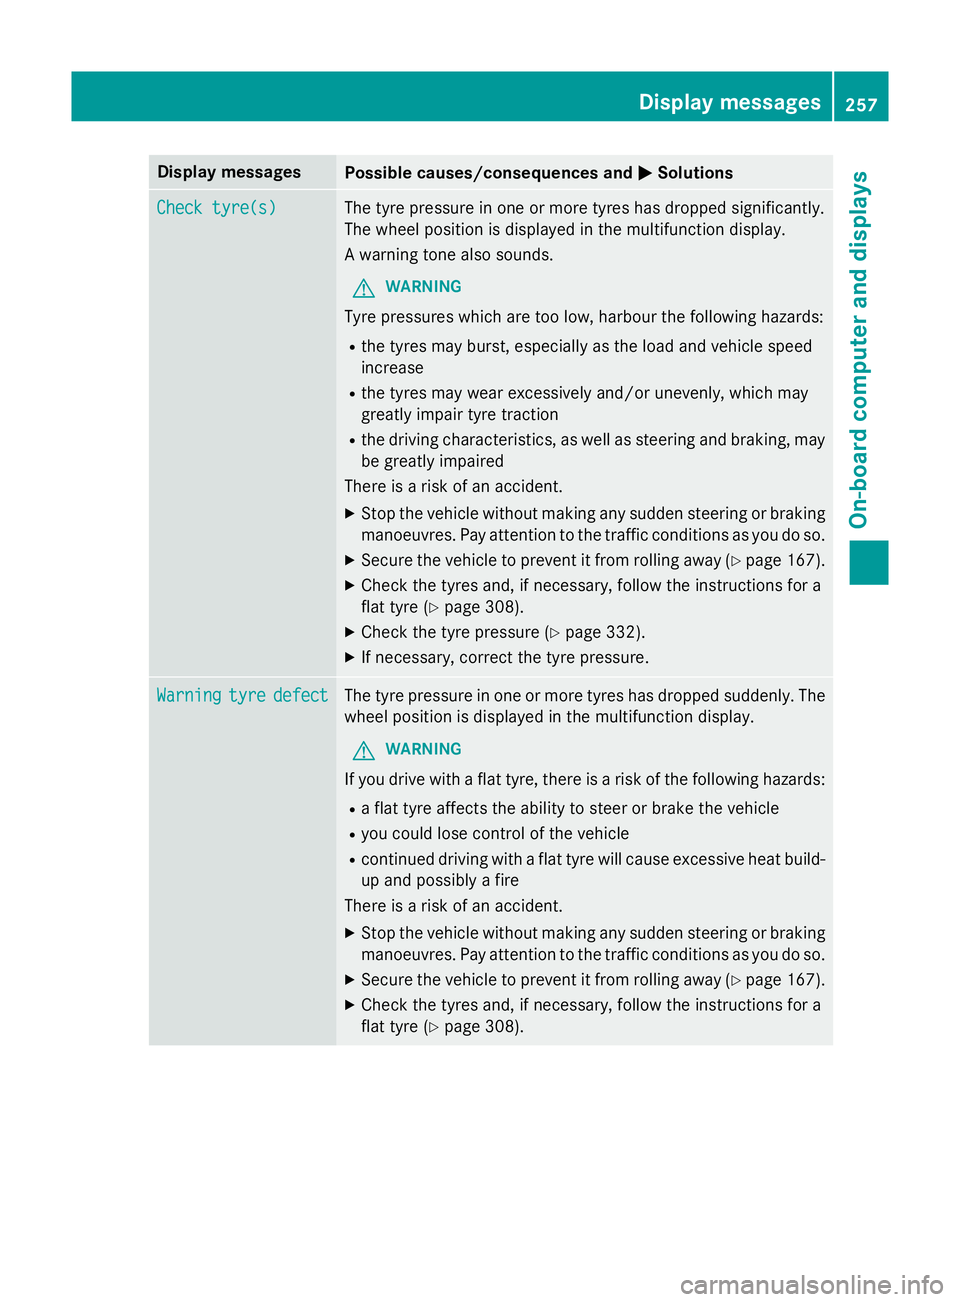
Display messages
Possible causes/consequences and
M
MSolutions Check tyre(s)
Check tyre(s) The tyre pressure in one or more tyres has dropped significantly.
The wheel position is displayed in the multifunction display.
A warning tone also sounds.
G WARNING
Tyre pressures which are too low, harbour the following hazards: R the tyres may burst, especially as the load and vehicle speed
increase
R the tyres may wear excessively and/or unevenly, which may
greatly impair tyre traction
R the driving characteristics, as well as steering and braking, may
be greatly impaired
There is a risk of an accident.
X Stop the vehicle without making any sudden steering or braking
manoeuvres. Pay attention to the traffic conditions as you do so.
X Secure the vehicle to prevent it from rolling away (Y page 167).
X Check the tyres and, if necessary, follow the instructions for a
flat tyre (Y page 308).
X Check the tyre pressure (Y page 332).
X If necessary, correct the tyre pressure. Warning Warning
tyre
tyredefect
defect The tyre pressure in one or more tyres has dropped suddenly. The
wheel position is displayed in the multifunction display.
G WARNING
If you drive with a flat tyre, there is a risk of the following hazards:
R a flat tyre affects the ability to steer or brake the vehicle
R you could lose control of the vehicle
R continued driving with a flat tyre will cause excessive heat build-
up and possibly a fire
There is a risk of an accident.
X Stop the vehicle without making any sudden steering or braking
manoeuvres. Pay attention to the traffic conditions as you do so.
X Secure the vehicle to prevent it from rolling away (Y page 167).
X Check the tyres and, if necessary, follow the instructions for a
flat tyre (Y page 308). Display
messages
257On-board computer and displays Z