2013 MERCEDES-BENZ CLA COUPE ECO mode
[x] Cancel search: ECO modePage 62 of 373
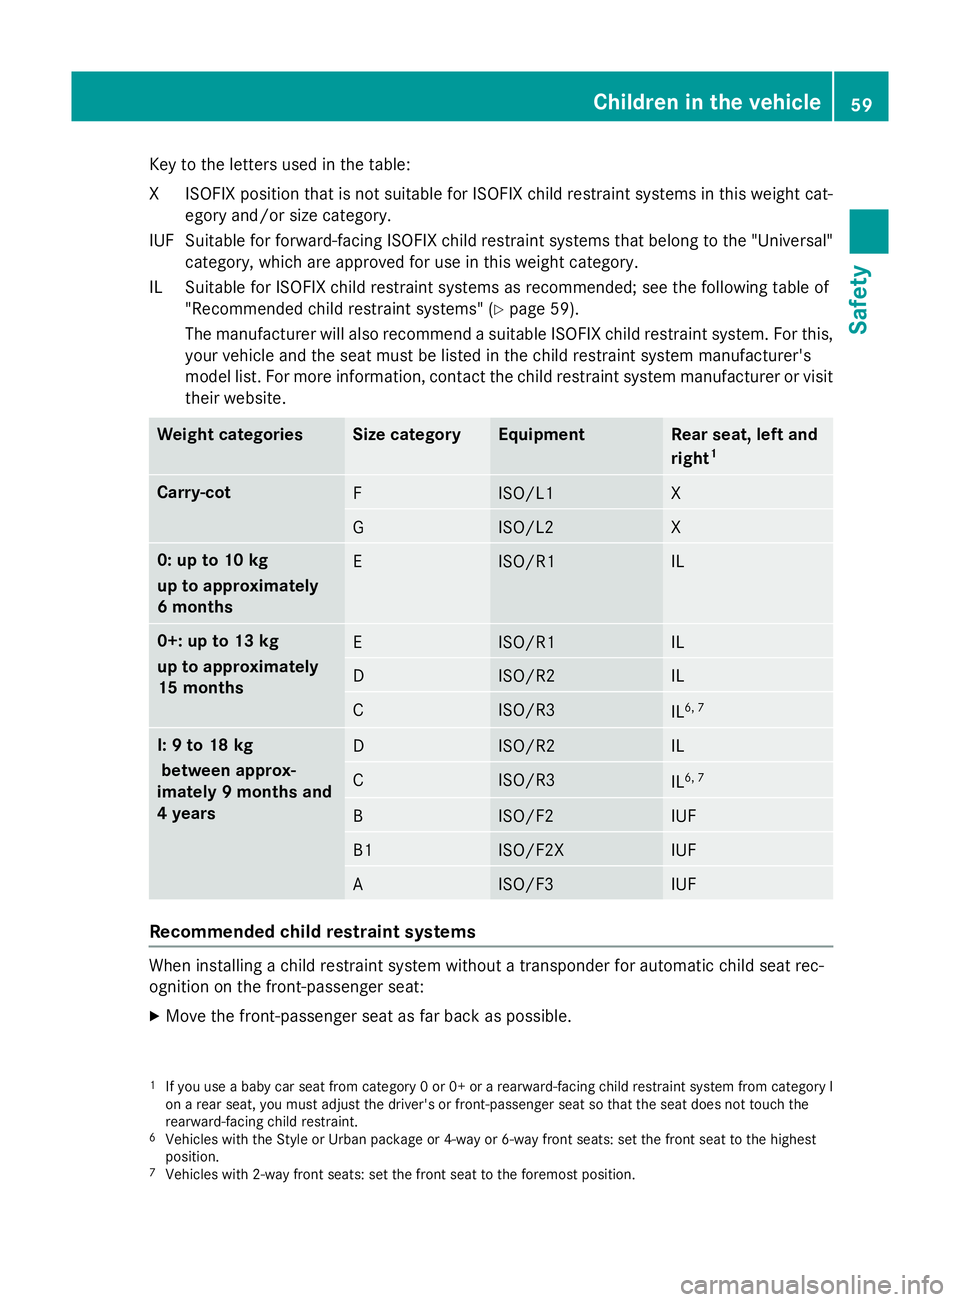
Key to the letters used in the table:
XI SOFIX position that is not suitable for ISOFIX child restraint systems in this weight cat-
egory and/or size category.
IUF Suitable for forward-facing ISOFIX child restraint systems that belong to the "Universal" category, which are approved for use in this weight category.
IL Suitable for ISOFIX child restraint systems as recommended; see the following table of "Recommended child restraint systems" (Y page 59).
The manufacturer will also recommend a suitable ISOFIX child restraint system. For this,
your vehicle and the seat must be listed in the child restraint system manufacturer's
model list. For more information, contact the child restraint system manufacturer or visit
their website. Weight categories Size category Equipment Rear seat, left and
right
1 Carry-cot
F ISO/L1 X
G ISO/L2 X
0: up to 10 kg
up to approximately
6 months
E ISO/R1 IL
0+: up to 13 kg
up to approximately
15 months
E ISO/R1 IL
D ISO/R2 IL
C ISO/R3
IL
6, 7 I: 9 to 18 kg
between approx-
imately 9 months and
4 years D ISO/R2 IL
C ISO/R3
IL
6, 7 B ISO/F2 IUF
B1 ISO/F2X IUF
A ISO/F3 IUF
Recommended child restraint systems
When installing a child restraint system without a transponder for automatic child seat rec-
ognition on the front-passenger seat:
X Move the front-passenger seat as far back as possible.
1 If you use a baby car seat from category 0 or 0+ or a rearward-facing child restraint system from category I
on a rear seat, you must adjust the driver's or front-passenger seat so that the seat does not touch the
rearward-facing child restraint.
6 Vehicles with the Style or Urban package or 4-way or 6-way front seats: set the front seat to the highest
position.
7 Vehicles with 2-way front seats: set the front seat to the foremost position. Children in the vehicle
59Safety Z
Page 113 of 373

Useful information
i This Owner's Manual describes all mod-
els, series and optional equipment for your
vehicle that were available at the time of
going to press. National variations are pos- sible. Note that your vehicle may not be
equipped with all of the functions descri-
bed. This is also the case for systems and
functions relevant to safety.
i Read the information on qualified special-
ist workshops: (Y page 24). Exterior lighting
General notes
For reasons of safety, Mercedes-Benz recom- mends that you drive with the lights switched
on even during the daytime. In some coun-
tries, operation of the headlamps varies due
to legal requirements and self-imposed obli-
gations. Driving abroad
General notes If your journey takes you to countries where
vehicles are driven on the opposite side of the
road to the country in which the vehicle is
registered, your headlamps must be switched to symmetrical dipped beam as soon as pos-
sible after crossing the border (only vehicles
with Intelligent Light System). This prevents
oncoming traffic from being dazzled. Sym-
metrical lights do not illuminate as large an
area of the edge of the carriageway.
Vehicles with bi-xenon and halogen
headlamps It is not necessary to switch your headlamps
to symmetrical dipped beam when driving in
countries where vehicles are driven on the
opposite side of the road to the country in
which the vehicle is registered. Legal require- ments are fulfilled without switching the
headlamps to symmetrical dipped beam.
Vehicles with Intelligent Light System X
Before crossing the border, set the head-
lamps to symmetrical dipped beam and
after returning back to asymmetrical
dipped beam via the "Dipped-beam head-
lamps for driving on the right/left" function in the on-board computer (Y page 227).
If the headlamps are converted to symmetri-
cal dipped beam, the "motorway mode" and
"extended range foglamps" functions are not
available. Setting the exterior lighting
Setting options Exterior lighting can be set using the:
R light switch
R headlamp range control (vehicles with hal-
ogen headlamps only) (Y page 112)
R combination switch (Y page 113)
R on-board computer (Y page 226)
Light switch Operation
1
W
Left-hand parking lamps
2 X
Right-hand parking lamps
3 T
Side lamps, licence plate and instru-
ment cluster lighting 110
Exterior lightingLights and windscreen wipers
Page 117 of 373
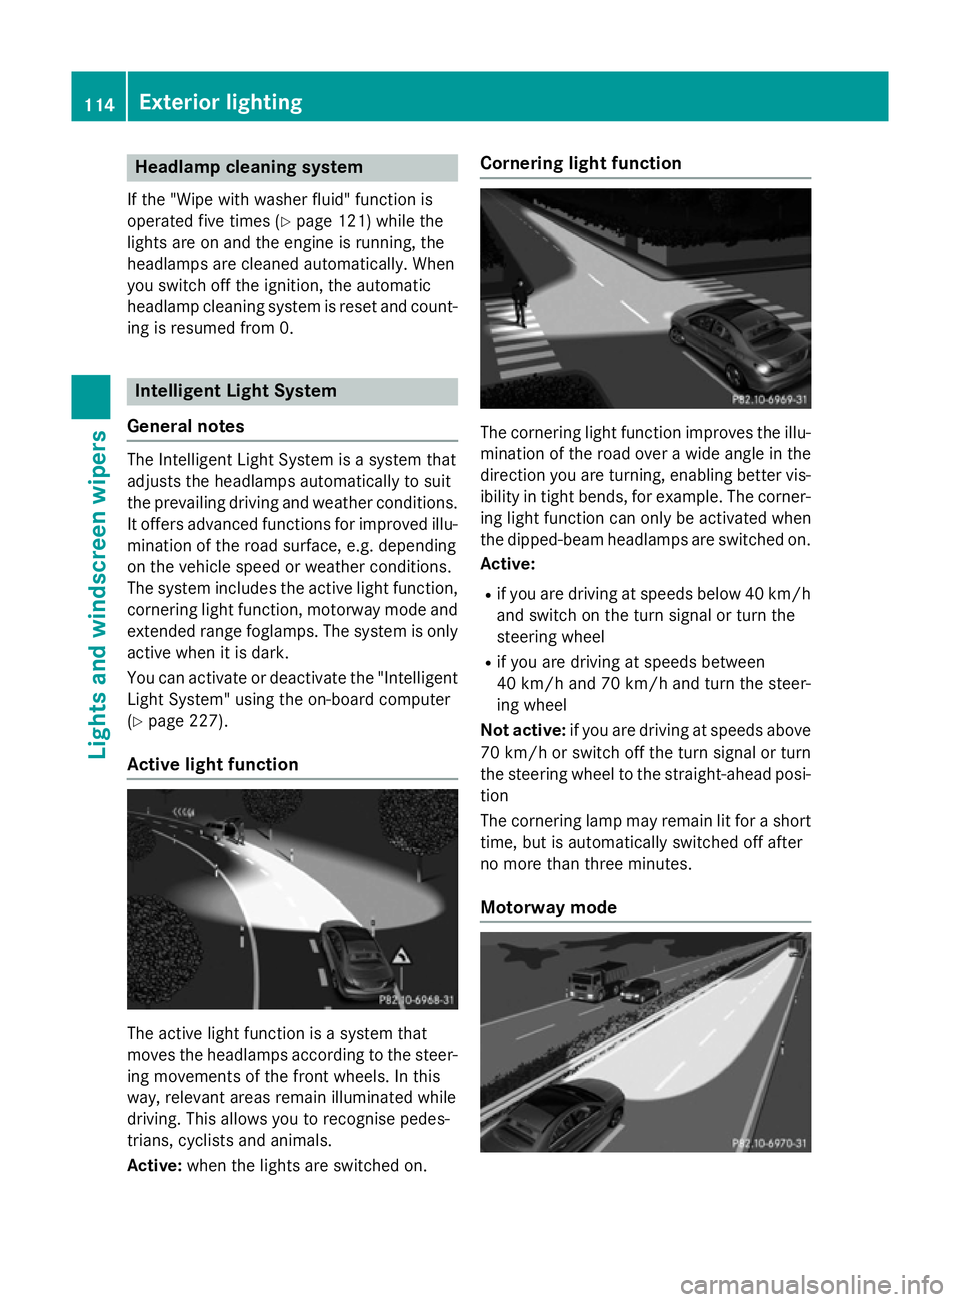
Headlamp cleaning system
If the "Wipe with washer fluid" function is
operated five times (Y page 121) while the
lights are on and the engine is running, the
headlamps are cleaned automatically. When
you switch off the ignition, the automatic
headlamp cleaning system is reset and count-
ing is resumed from 0. Intelligent Light System
General notes The Intelligent Light System is a system that
adjusts the headlamps automatically to suit
the prevailing driving and weather conditions.
It offers advanced functions for improved illu-
mination of the road surface, e.g. depending
on the vehicle speed or weather conditions.
The system includes the active light function, cornering light function, motorway mode and
extended range foglamps. The system is only active when it is dark.
You can activate or deactivate the "IntelligentLight System" using the on-board computer
(Y page 227).
Active light function The active light function is a system that
moves the headlamps according to the steer-
ing movements of the front wheels. In this
way, relevant areas remain illuminated while
driving. This allows you to recognise pedes-
trians, cyclists and animals.
Active: when the lights are switched on. Cornering light function
The cornering light function improves the illu-
mination of the road over a wide angle in the direction you are turning, enabling better vis-
ibility in tight bends, for example. The corner- ing light function can only be activated when
the dipped-beam headlamps are switched on.
Active:
R if you are driving at speeds below 40 km/h
and switch on the turn signal or turn the
steering wheel
R if you are driving at speeds between
40 km/h and 70 km/h and turn the steer-
ing wheel
Not active: if you are driving at speeds above
70 km/h or switch off the turn signal or turn
the steering wheel to the straight-ahead posi- tion
The cornering lamp may remain lit for a short
time, but is automatically switched off after
no more than three minutes.
Motorway mode 114
Exterior lightingLights and windscreen wipers
Page 118 of 373
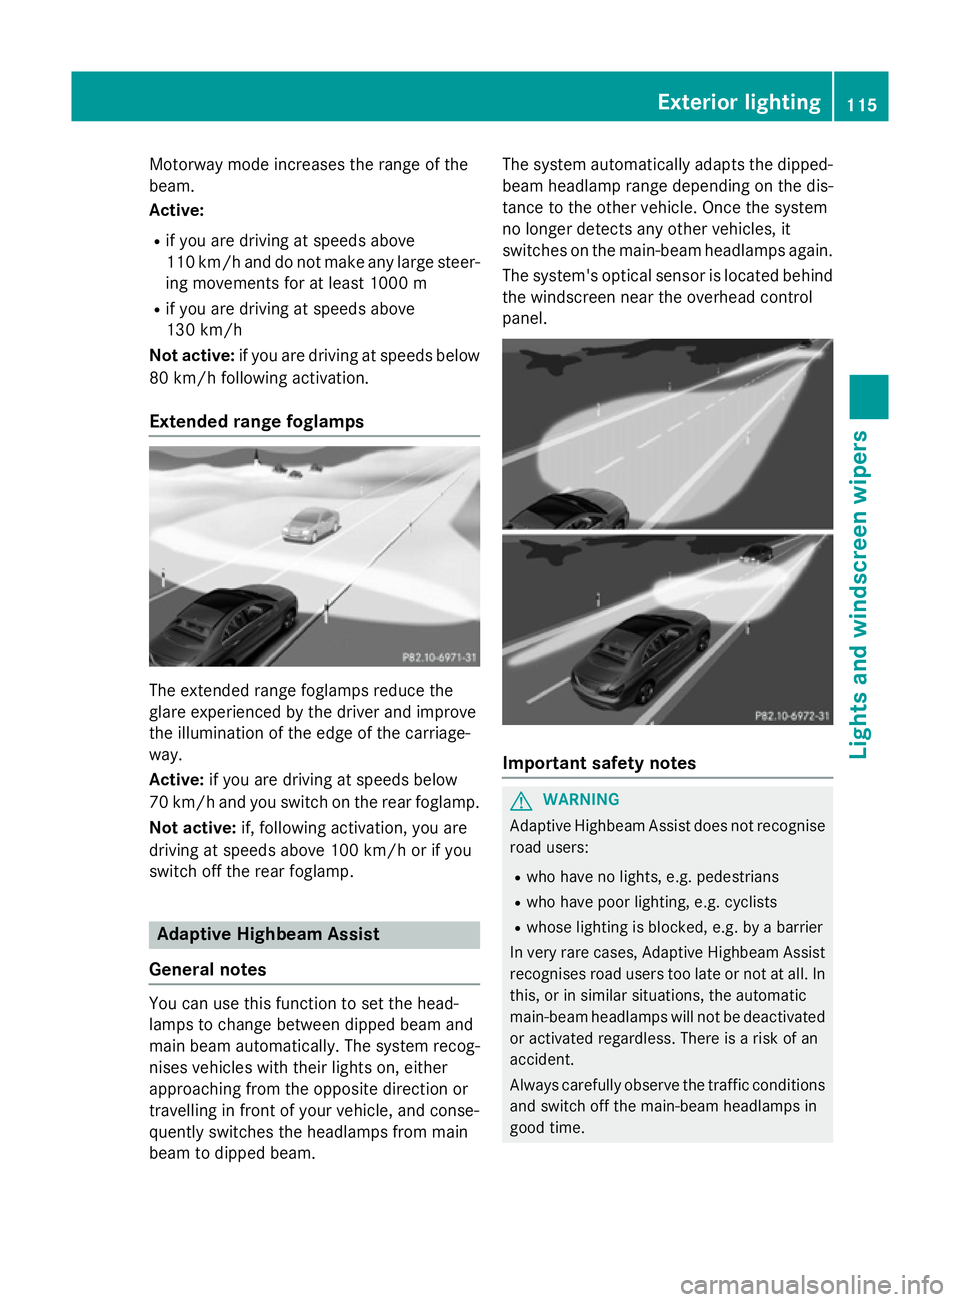
Motorway mode increases the range of the
beam.
Active:
R if you are driving at speeds above
110 km/h and do not make any large steer- ing movements for at least 1000 m
R if you are driving at speeds above
130 km/h
Not active: if you are driving at speeds below
80 km/h following activation.
Extended range foglamps The extended range foglamps reduce the
glare experienced by the driver and improve
the illumination of the edge of the carriage-
way.
Active: if you are driving at speeds below
70 km/h and you switch on the rear foglamp.
Not active: if, following activation, you are
driving at speeds above 100 km/h or if you
switch off the rear foglamp. Adaptive Highbeam Assist
General notes You can use this function to set the head-
lamps to change between dipped beam and
main beam automatically. The system recog-
nises vehicles with their lights on, either
approaching from the opposite direction or
travelling in front of your vehicle, and conse-
quently switches the headlamps from main
beam to dipped beam. The system automatically adapts the dipped-
beam headlamp range depending on the dis-
tance to the other vehicle. Once the system
no longer detects any other vehicles, it
switches on the main-beam headlamps again.
The system's optical sensor is located behind
the windscreen near the overhead control
panel. Important safety notes
G
WARNING
Adaptive Highbeam Assist does not recognise road users:
R who have no lights, e.g. pedestrians
R who have poor lighting, e.g. cyclists
R whose lighting is blocked, e.g. by a barrier
In very rare cases, Adaptive Highbeam Assist
recognises road users too late or not at all. In
this, or in similar situations, the automatic
main-beam headlamps will not be deactivated
or activated regardless. There is a risk of an
accident.
Always carefully observe the traffic conditions and switch off the main-beam headlamps in
good time. Exterior lighting
115Lights and windscreen wipers Z
Page 129 of 373
Useful information
i This Owner's Manual describes all mod-
els, series and optional equipment for your
vehicle that were available at the time of
going to press. National variations are pos- sible. Note that your vehicle may not be
equipped with all of the functions descri-
bed. This is also the case for systems and
functions relevant to safety.
i Read the information on qualified special-
ist workshops: (Y page 24). Overview of climate control systems
Important safety notes
Observe the settings recommended on the
following pages. The windows could other-
wise mist up.
To prevent the windows from misting up:
R switch off climate control only briefly
R switch on air-recirculation mode only
briefly
R switch on the cooling with air dehumidifi-
cation function
R switch on the "demist windscreen" function
briefly, if required
THERMATIC automatic climate control/
THERMOTRONIC automatic climate control
regulates the temperature and the humidity
of the vehicle interior and filters out undesir-
able substances from the air.
THERMATIC automatic climate control/
THERMOTRONIC automatic climate control is only operational when the engine is running.
Optimum operation is only achieved with the
side windows and panorama sliding sunroof
closed.
The residual heat function can only be acti-
vated or deactivated with the ignition
switched off (Y page 137).
Always keep the ventilation flaps behind the
side panelling clear (Y page 120). Otherwise,
the vehicle will not be ventilated correctly. i
Ventilate the vehicle for a brief period
during warm weather, e.g. using the con-
venience opening feature (Y page 90). This
will speed up the cooling process and the
desired interior temperature will be
reached more quickly.
i The integrated filter filters out most par-
ticles of dust and soot and completely fil-
ters out pollen. With THERMOTRONIC auto- matic climate control, gaseous pollutants
and odours will also be reduced. A clogged
filter reduces the amount of air supplied to
the vehicle interior. For this reason, you
should always observe the interval for
replacing the filter, which is specified in the Service Booklet. As this depends on envi-
ronmental conditions, e.g. heavy air pollu-
tion, the interval may be shorter than statedin the Service Booklet.
i It is possible that the residual heat func-
tion may be activated automatically an hour
after the key has been removed in order to
dry the automatic climate control. The vehi- cle is then ventilated for 30 minutes. 126
Overview of climate control systemsClimate control
Page 130 of 373
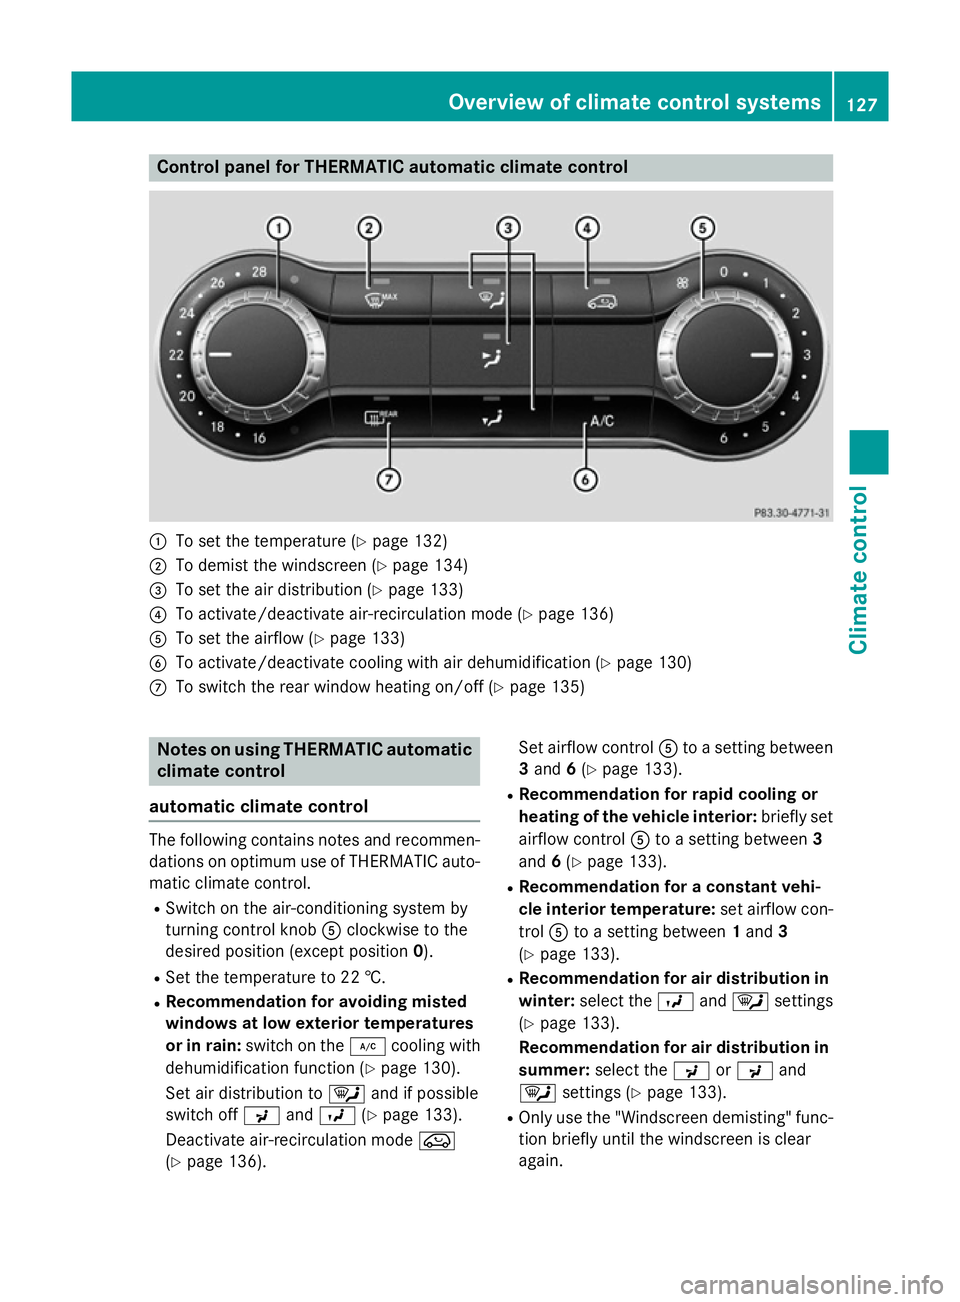
Control panel for THERMATIC automatic climate control
:
To set the temperature (Y page 132)
; To demist the windscreen (Y page 134)
= To set the air distribution (Y page 133)
? To activate/deactivate air-recirculation mode (Y page 136)
A To set the airflow (Y page 133)
B To activate/deactivate cooling with air dehumidification (Y page 130)
C To switch the rear window heating on/off (Y page 135)Notes on using THERMATIC automatic
climate control
automatic climate control The following contains notes and recommen-
dations on optimum use of THERMATIC auto-
matic climate control.
R Switch on the air-conditioning system by
turning control knob Aclockwise to the
desired position (except position 0).
R Set the temperature to 22 †.
R Recommendation for avoiding misted
windows at low exterior temperatures
or in rain: switch on the ¿cooling with
dehumidification function (Y page 130).
Set air distribution to ¯and if possible
switch off PandO (Ypage 133).
Deactivate air-recirculation mode e
(Y page 136). Set airflow control
Ato a setting between
3 and 6(Y page 133).
R Recommendation for rapid cooling or
heating of the vehicle interior: briefly set
airflow control Ato a setting between 3
and 6(Y page 133).
R Recommendation for a constant vehi-
cle interior temperature: set airflow con-
trol Ato a setting between 1and 3
(Y page 133).
R Recommendation for air distribution in
winter: select the Oand¯ settings
(Y page 133).
Recommendation for air distribution in
summer: select the PorP and
¯ settings (Y page 133).
R Only use the "Windscreen demisting" func-
tion briefly until the windscreen is clear
again. Overview of climate control systems
127Climate control
Page 131 of 373
R
Only use air-recirculation mode briefly, e.g.
if there are unpleasant outside odours or
when in a tunnel. The windows could oth-
erwise mist up as no fresh air is drawn into
the vehicle in air-recirculation mode.
R Vehicles with COMAND Online: if you
change the settings of the climate control
system, the climate status display appears for three seconds at the bottom of the
screen in the COMAND display. See also
the separate COMAND Online operating
instructions. You will see the current set-
tings of the various climate control func-
tions.
ECO start/stop function During automatic engine switch-off, the cli-
mate control only operates at a reduced capa-
city. If you require the full climate control out-
put, you can switch off the ECO start/stop
function by pressing the ECO button
(Y page 151). 128
Overview of climate control systemsClimate control
Page 133 of 373
R
Use the residual heat function if you want to
heat or ventilate the vehicle interior when
the ignition is switched off. The residual
heat function can only be activated or deac- tivated with the ignition switched off.
R Vehicles with COMAND Online: if you
change the settings of the climate control
system, the climate status display appears for three seconds at the bottom of the
screen in the COMAND display. See also
the separate COMAND Online operating
instructions. You will see the current set-
tings of the various climate control func-
tions.
ECO start/stop function During automatic engine switch-off, the cli-
mate control only operates at a reduced capa- city. If you require the full climate control out-
put, you can switch off the ECO start/stop
function by pressing the ECO button
(Y page 151). Operating the climate control system
Switching climate control on/off
General notes When the climate control is switched off, the
air supply and air circulation are also
switched off. The windows could mist up.
Therefore, only switch off climate control
briefly.
THERMATIC automatic climate control X
Turn the key to position 2in the ignition
lock (Y page 147).
X To switch on: turn controlAclockwise to
the desired position (except position 0)
(Y page 127).
X To switch off: turn controlAanti-clock-
wise to position 0(Y page 127). THERMOTRONIC automatic climate
control X
Turn the key to position 2in the ignition
lock (Y page 147).
X To activate: press theÃbutton.
The indicator lamp in the Ãbutton lights
up. Airflow and air distribution are set to
automatic mode.
or X Press the ^button.
The indicator lamp in the ^button goes
out. The previous settings are reactivated.
X To deactivate: press the^button.
The indicator lamp in the ^button lights
up.
i THERMOTRONIC automatic climate con-
trol: switch on climate control primarily
using the Ãbutton. Activating/deactivating the cooling
with air dehumidification function
General notes If you deactivate the "Cooling with air-dehu-
midification" function, the air inside the vehi-
cle will not be cooled. The air inside the vehi- cle will also not be dehumidified. The win-
dows can mist up more quickly. Therefore,
only deactivate the "Cooling with air-dehu-
midification" function briefly.
The "Cooling with air dehumidification" func-
tion is only available when the engine is run-
ning. The air inside the vehicle is cooled and
dehumidified according to the temperature
selected.
Condensation may drip from the underside of the vehicle when cooling mode is active. Thisis normal and not a sign that there is a mal-
function. 130
Operating the climate control systemClimate control