2013 MERCEDES-BENZ CLA-CLASS light
[x] Cancel search: lightPage 94 of 352
Opening and closing
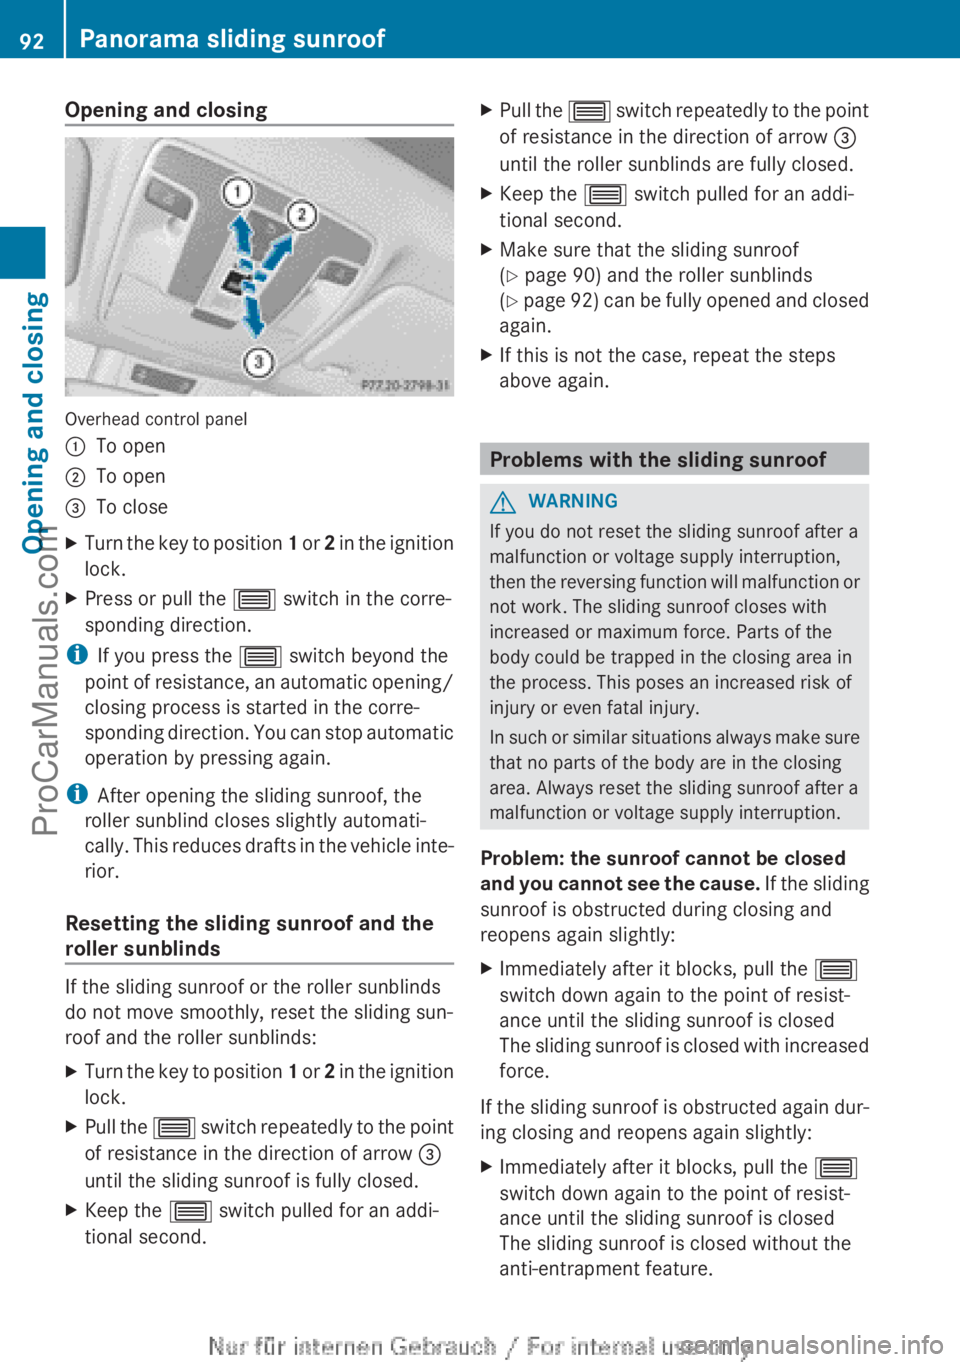
Overhead control panel
:To open;To open=To closeXTurn the key to position 1 or 2 in the ignition
lock.XPress or pull the 3 switch in the corre-
sponding direction.
i If you press the 3 switch beyond the
point of resistance, an automatic opening/
closing process is started in the corre-
sponding direction. You can stop automatic
operation by pressing again.
i After opening the sliding sunroof, the
roller sunblind closes slightly automati-
cally. This reduces drafts in the vehicle inte-
rior.
Resetting the sliding sunroof and the
roller sunblinds
If the sliding sunroof or the roller sunblinds
do not move smoothly, reset the sliding sun-
roof and the roller sunblinds:
XTurn the key to position 1 or 2 in the ignition
lock.XPull the 3 switch repeatedly to the point
of resistance in the direction of arrow =
until the sliding sunroof is fully closed.XKeep the 3 switch pulled for an addi-
tional second.XPull the 3 switch repeatedly to the point
of resistance in the direction of arrow =
until the roller sunblinds are fully closed.XKeep the 3 switch pulled for an addi-
tional second.XMake sure that the sliding sunroof
( Y page 90) and the roller sunblinds
( Y page 92) can be fully opened and closed
again.XIf this is not the case, repeat the steps
above again.
Problems with the sliding sunroof
GWARNING
If you do not reset the sliding sunroof after a
malfunction or voltage supply interruption,
then the reversing function will malfunction or
not work. The sliding sunroof closes with
increased or maximum force. Parts of the
body could be trapped in the closing area in
the process. This poses an increased risk of
injury or even fatal injury.
In such or similar situations always make sure
that no parts of the body are in the closing
area. Always reset the sliding sunroof after a
malfunction or voltage supply interruption.
Problem: the sunroof cannot be closed
and you cannot see the cause. If the sliding
sunroof is obstructed during closing and
reopens again slightly:
XImmediately after it blocks, pull the 3
switch down again to the point of resist-
ance until the sliding sunroof is closed
The sliding sunroof is closed with increased
force.
If the sliding sunroof is obstructed again dur-
ing closing and reopens again slightly:
XImmediately after it blocks, pull the 3
switch down again to the point of resist-
ance until the sliding sunroof is closed
The sliding sunroof is closed without the
anti-entrapment feature.92Panorama sliding sunroofOpening and closing
ProCarManuals.com
Page 96 of 352
Useful information
i This Owner's Manual describes all mod-
els, series and optional equipment for your
vehicle that were available at the time of
going to press. National variations are pos-
sible. Note that your vehicle may not be
equipped with all of the functions descri-
bed. This is also the case for systems and
functions relevant to safety.
i Read the information on qualified special-
ist workshops: ( Y page 24).
Correct driver's seat position
GWARNING
You could lose control of the vehicle while
driving if you:
R adjust the driver's seat, steering wheel or
mirrors
R fasten the seat belt
There is a risk of an accident.
Adjust the driver's seat, head restraint, steer-
ing wheel and mirrors and fasten your seat
belt before starting the engine.
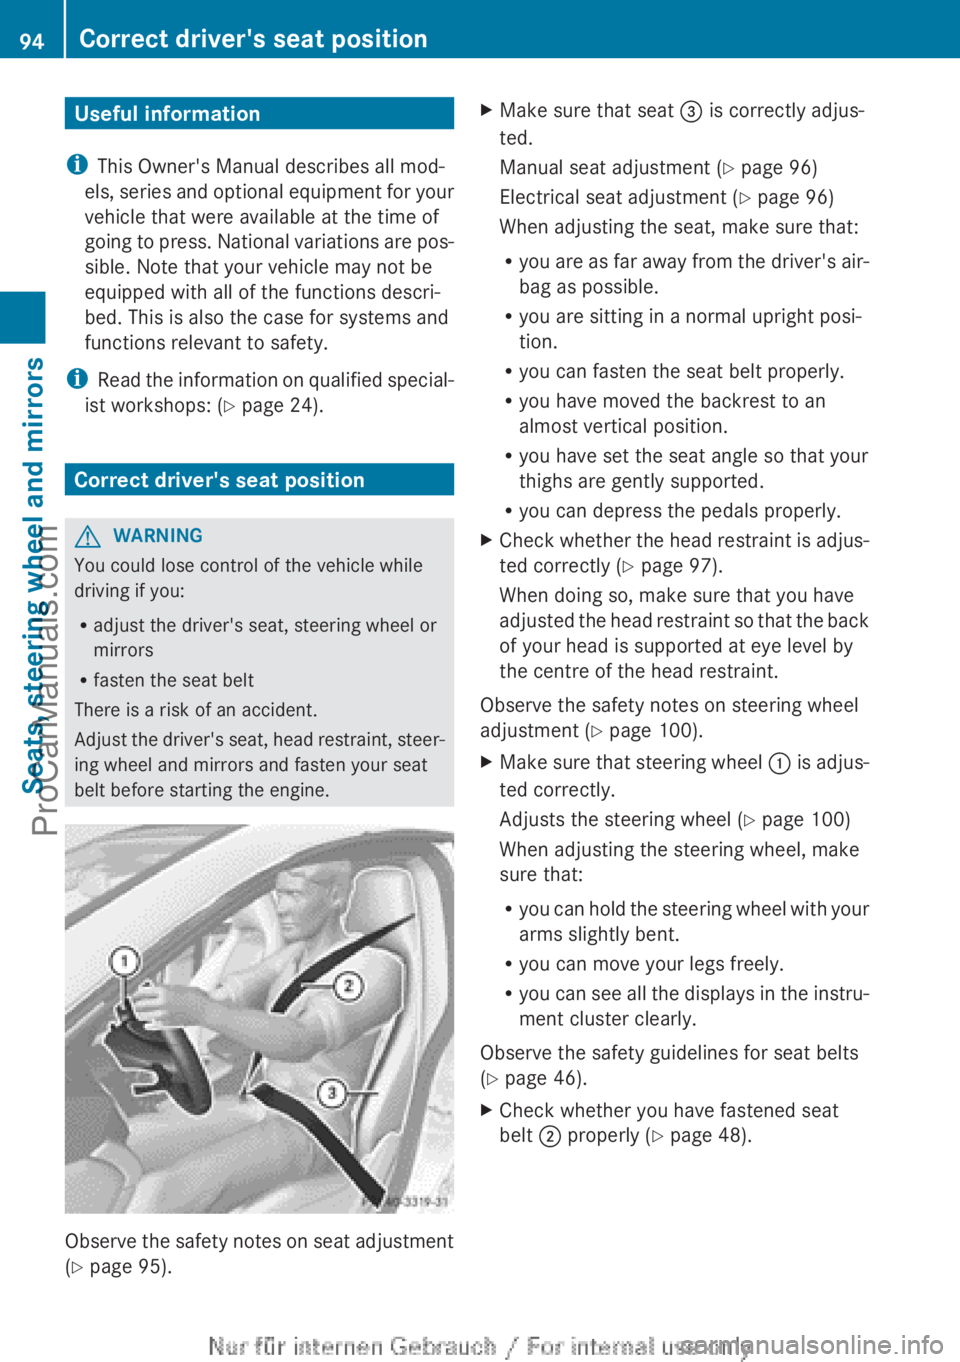
Observe the safety notes on seat adjustment
( Y page 95).
XMake sure that seat = is correctly adjus-
ted.
Manual seat adjustment ( Y page 96)
Electrical seat adjustment ( Y page 96)
When adjusting the seat, make sure that:
R you are as far away from the driver's air-
bag as possible.
R you are sitting in a normal upright posi-
tion.
R you can fasten the seat belt properly.
R you have moved the backrest to an
almost vertical position.
R you have set the seat angle so that your
thighs are gently supported.
R you can depress the pedals properly.XCheck whether the head restraint is adjus-
ted correctly ( Y page 97).
When doing so, make sure that you have
adjusted the head restraint so that the back
of your head is supported at eye level by
the centre of the head restraint.
Observe the safety notes on steering wheel
adjustment ( Y page 100).
XMake sure that steering wheel : is adjus-
ted correctly.
Adjusts the steering wheel ( Y page 100)
When adjusting the steering wheel, make
sure that:
R you can hold the steering wheel with your
arms slightly bent.
R you can move your legs freely.
R you can see all the displays in the instru-
ment cluster clearly.
Observe the safety guidelines for seat belts
( Y page 46).
XCheck whether you have fastened seat
belt ; properly ( Y page 48).94Correct driver's seat positionSeats, steering wheel and mirrors
ProCarManuals.com
Page 98 of 352
Rclean the seat covers as recommended;
see the "Interior care" section.
R do not transport heavy loads on the
seats. Do not place sharp objects on the
seat cushions, e.g. knives, nails or tools.
The seats should only be occupied by
passengers, if possible.
R when the seat heating is in operation, do
not cover the seats with insulating mate-
rials, e.g. blankets, coats, bags, seat cov-
ers, child seats or booster seats.
! Make sure that there are no objects in the
footwell or behind the seats when moving
the seat back. There is a risk that the seats
and/or the objects could be damaged.
i The head restraints in the front and rear
seats can be removed. 6
For more information, contact a qualified
specialist workshop.
i Further related subjects:
R Luggage compartment enlargement
(folding down the rear seats)
( Y page 271)
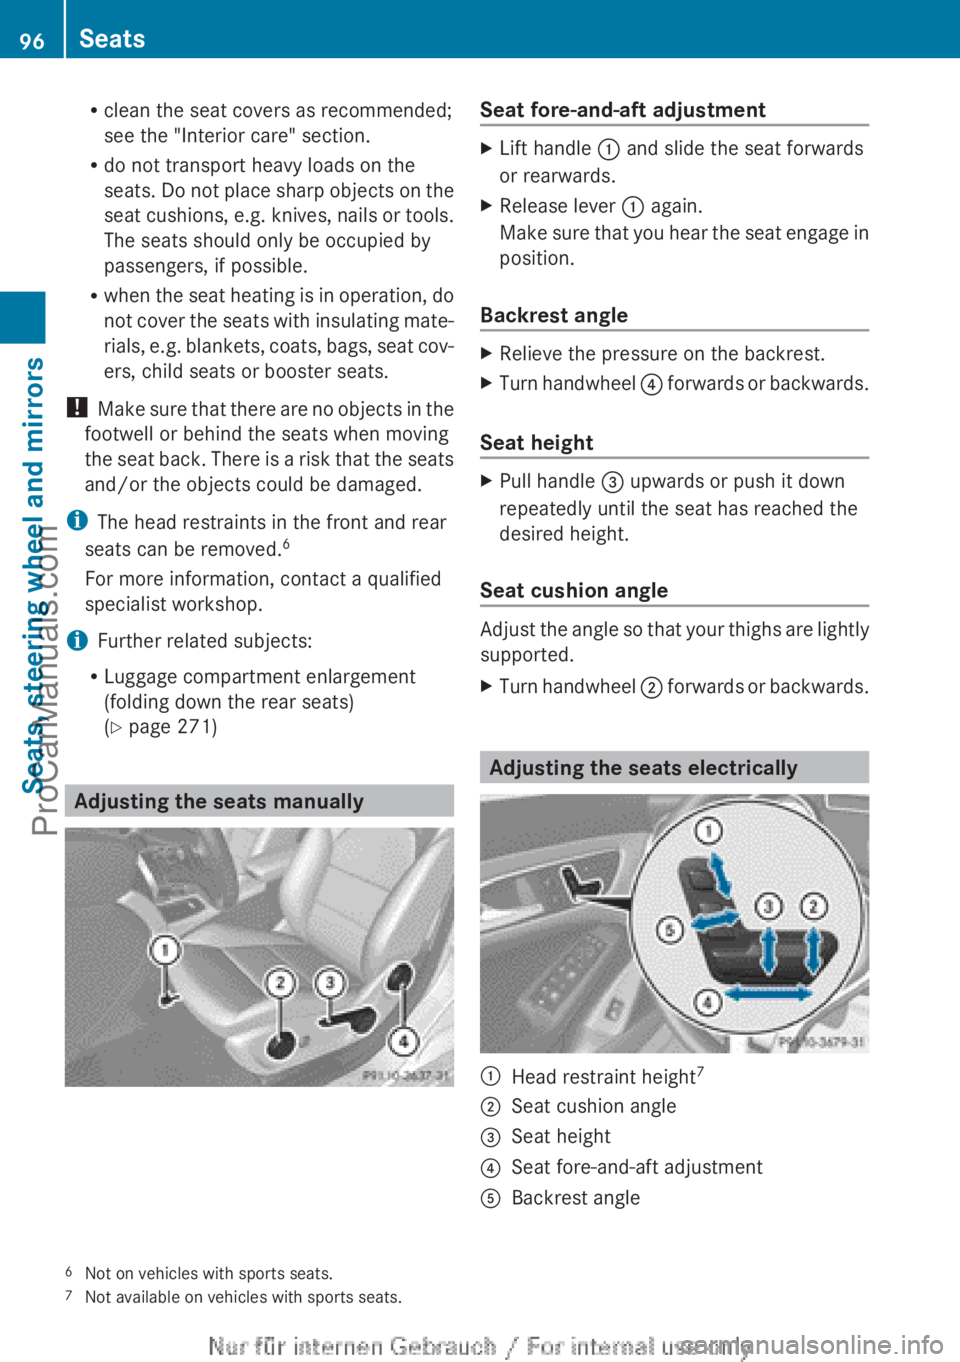
Adjusting the seats manually
Seat fore-and-aft adjustmentXLift handle : and slide the seat forwards
or rearwards.XRelease lever : again.
Make sure that you hear the seat engage in
position.
Backrest angle
XRelieve the pressure on the backrest.XTurn handwheel ? forwards or backwards.
Seat height
XPull handle = upwards or push it down
repeatedly until the seat has reached the
desired height.
Seat cushion angle
Adjust the angle so that your thighs are lightly
supported.
XTurn handwheel ; forwards or backwards.
Adjusting the seats electrically
:Head restraint height 7;Seat cushion angle=Seat height?Seat fore-and-aft adjustmentABackrest angle6
Not on vehicles with sports seats.
7 Not available on vehicles with sports seats.96SeatsSeats, steering wheel and mirrors
ProCarManuals.com
Page 100 of 352
that the head restraint is engaged in posi-
tion.
Adjusting the head restraints electri-
cally
XTo adjust the head restraint height: slide
the switch for head restraint adjustment
( Y page 96) up or down in the direction of
the arrow.
Rear seat head restraints
Adjusting the rear seat head restraint
height
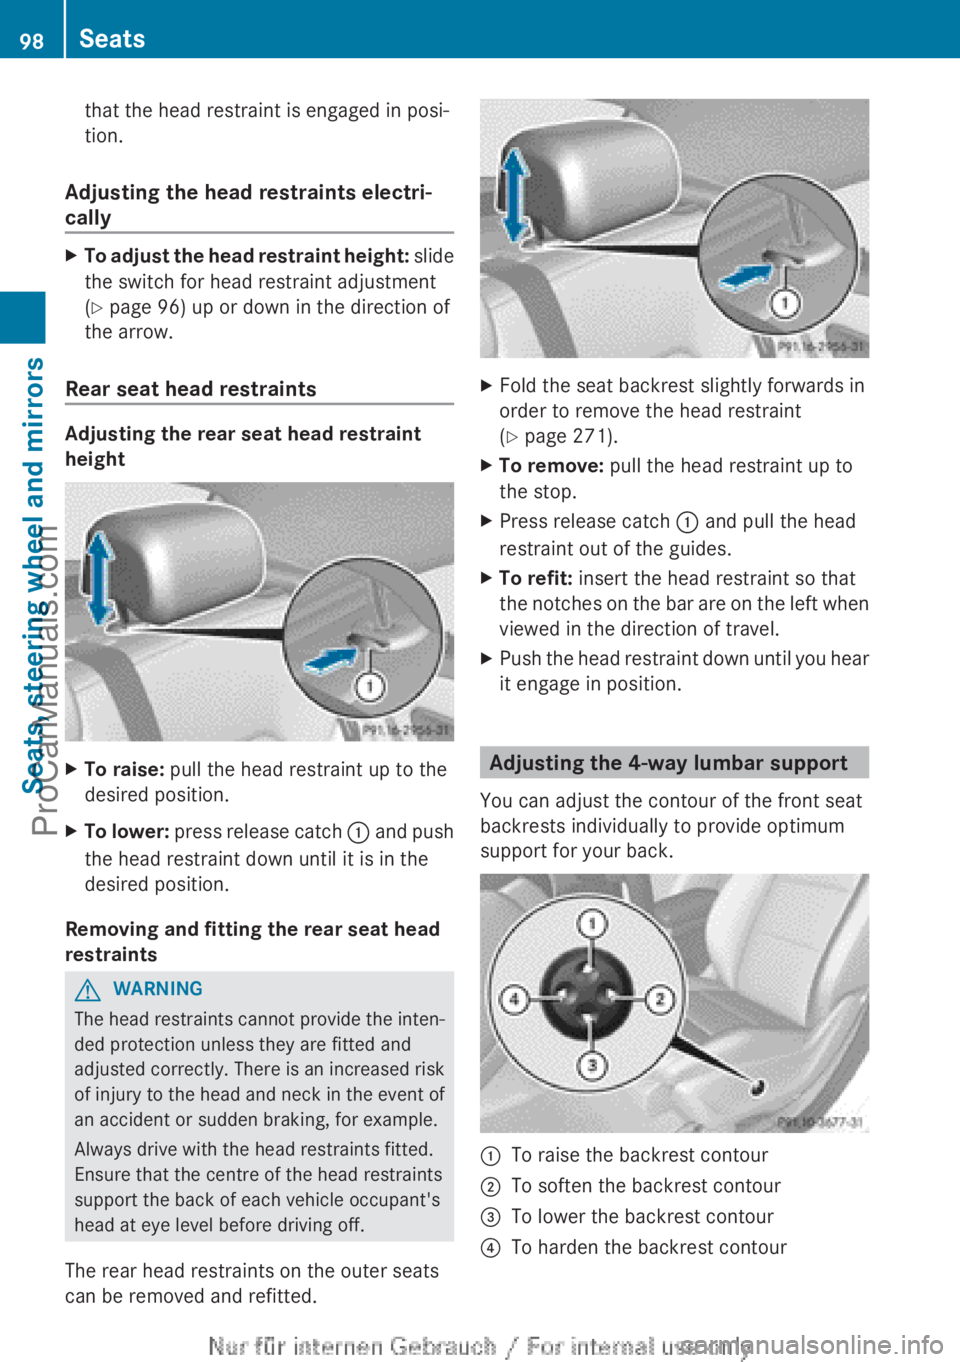
XTo raise: pull the head restraint up to the
desired position.XTo lower: press release catch : and push
the head restraint down until it is in the
desired position.
Removing and fitting the rear seat head
restraints
GWARNING
The head restraints cannot provide the inten-
ded protection unless they are fitted and
adjusted correctly. There is an increased risk
of injury to the head and neck in the event of
an accident or sudden braking, for example.
Always drive with the head restraints fitted.
Ensure that the centre of the head restraints
support the back of each vehicle occupant's
head at eye level before driving off.
The rear head restraints on the outer seats
can be removed and refitted.
XFold the seat backrest slightly forwards in
order to remove the head restraint
( Y page 271).XTo remove: pull the head restraint up to
the stop.XPress release catch : and pull the head
restraint out of the guides.XTo refit: insert the head restraint so that
the notches on the bar are on the left when
viewed in the direction of travel.XPush the head restraint down until you hear
it engage in position.
Adjusting the 4-way lumbar support
You can adjust the contour of the front seat
backrests individually to provide optimum
support for your back.
:To raise the backrest contour;To soften the backrest contour=To lower the backrest contour?To harden the backrest contour98SeatsSeats, steering wheel and mirrors
ProCarManuals.com
Page 102 of 352
Problems with the seat heatingProblemPossible causes/consequences and M SolutionsThe seat heating has
switched off prema-
turely or cannot be
switched on.The on-board voltage is too low because too many electrical con-
sumers are switched on.XSwitch off electrical consumers that you do not need, such as
the rear window heating or interior lighting.
Once the battery is sufficiently charged, the seat heating will
switch back on automatically.Steering wheel
Important safety notes
GWARNING
You could lose control of the vehicle while
driving if you:
R adjust the driver's seat, steering wheel or
mirrors
R fasten the seat belt
There is a risk of an accident.
Adjust the driver's seat, head restraint, steer-
ing wheel and mirrors and fasten your seat
belt before starting the engine.
GWARNING
Children could become trapped by the steer-
ing wheel if they adjust it. There is a risk of
injury.
When leaving the vehicle, always take the key
with you and lock the vehicle. Never leave
children unattended in the vehicle.
Adjusting the steering wheel
GWARNING
The steering wheel may move unexpectedly if
you adjust it while driving. This could cause
you to lose control of the vehicle. There is a
risk of an accident.
Make sure that the steering wheel is locked
before driving off. Never unlock the steering
wheel when the vehicle is in motion.
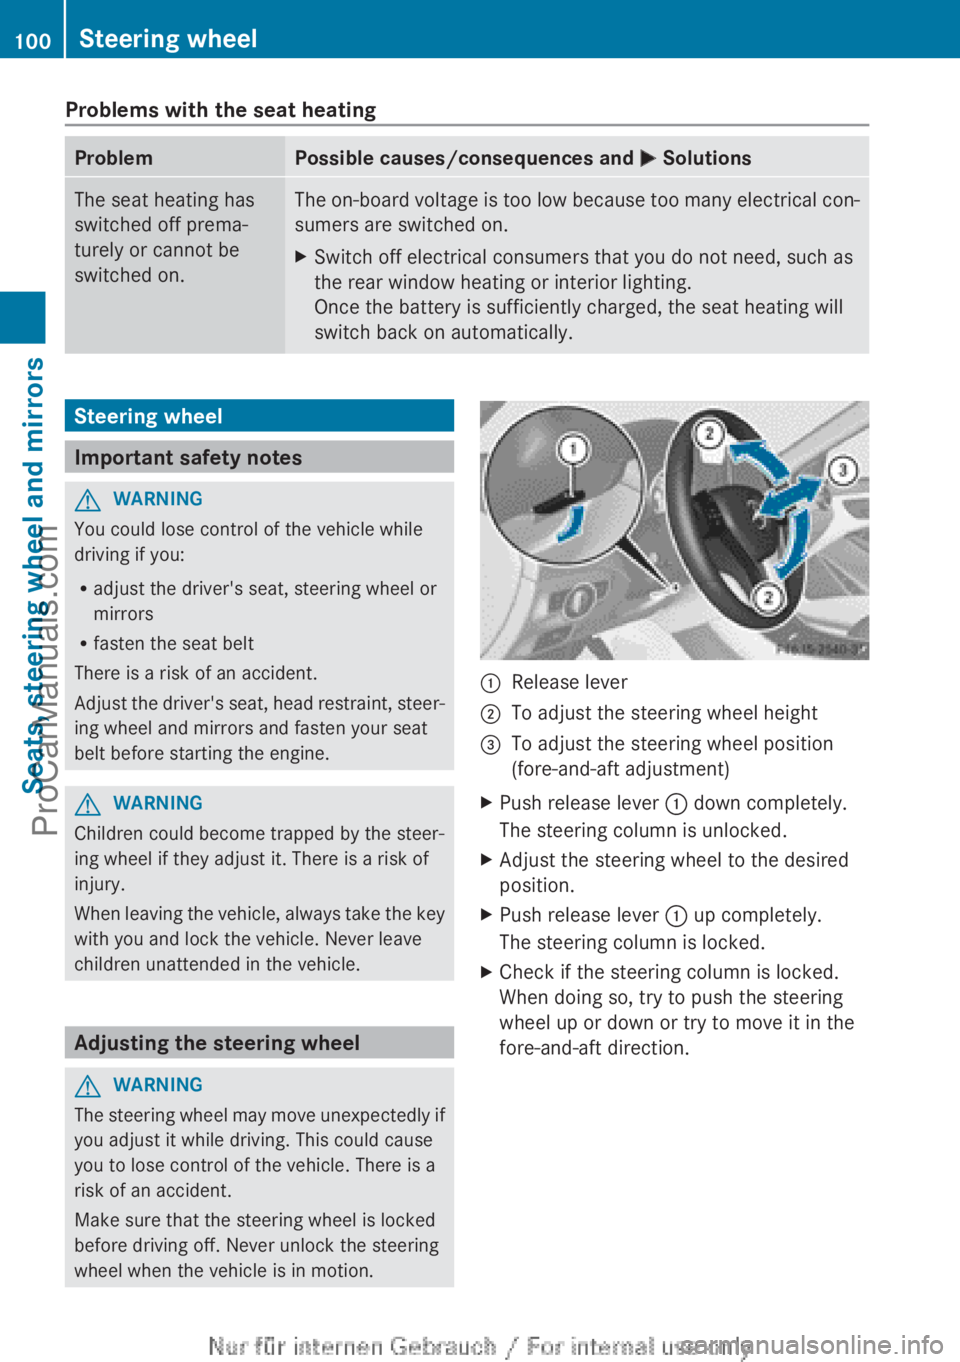
:Release lever;To adjust the steering wheel height=To adjust the steering wheel position
(fore-and-aft adjustment)XPush release lever : down completely.
The steering column is unlocked.XAdjust the steering wheel to the desired
position.XPush release lever : up completely.
The steering column is locked.XCheck if the steering column is locked.
When doing so, try to push the steering
wheel up or down or try to move it in the
fore-and-aft direction.100Steering wheelSeats, steering wheel and mirrors
ProCarManuals.com
Page 103 of 352
Mirrors
Rear-view mirror
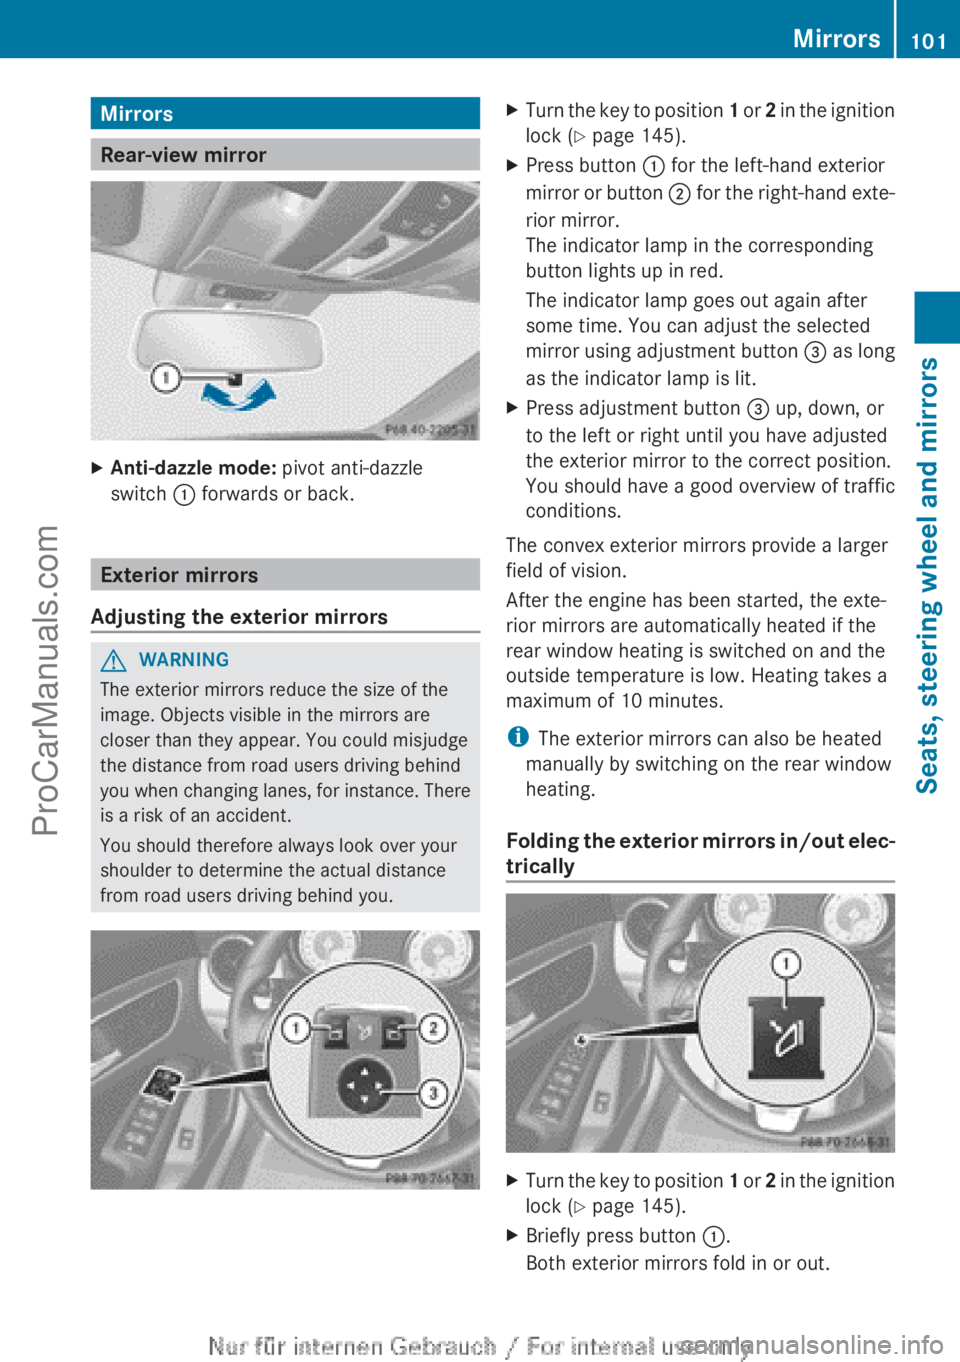
XAnti-dazzle mode: pivot anti-dazzle
switch : forwards or back.
Exterior mirrors
Adjusting the exterior mirrors
GWARNING
The exterior mirrors reduce the size of the
image. Objects visible in the mirrors are
closer than they appear. You could misjudge
the distance from road users driving behind
you when changing lanes, for instance. There
is a risk of an accident.
You should therefore always look over your
shoulder to determine the actual distance
from road users driving behind you.
XTurn the key to position 1 or 2 in the ignition
lock ( Y page 145).XPress button : for the left-hand exterior
mirror or button ; for the right-hand exte-
rior mirror.
The indicator lamp in the corresponding
button lights up in red.
The indicator lamp goes out again after
some time. You can adjust the selected
mirror using adjustment button = as long
as the indicator lamp is lit.XPress adjustment button = up, down, or
to the left or right until you have adjusted
the exterior mirror to the correct position.
You should have a good overview of traffic
conditions.
The convex exterior mirrors provide a larger
field of vision.
After the engine has been started, the exte-
rior mirrors are automatically heated if the
rear window heating is switched on and the
outside temperature is low. Heating takes a
maximum of 10 minutes.
i The exterior mirrors can also be heated
manually by switching on the rear window
heating.
Folding the exterior mirrors in/out elec-
trically
XTurn the key to position 1 or 2 in the ignition
lock ( Y page 145).XBriefly press button :.
Both exterior mirrors fold in or out.Mirrors101Seats, steering wheel and mirrorsZProCarManuals.com
Page 104 of 352

iMake sure that the exterior mirrors are
always folded out fully while driving. They
could otherwise vibrate.
i If you are driving faster than 47 km/h, you
can no longer fold in the exterior mirrors.
Setting the exterior mirrors
If the battery has been disconnected or com-
pletely discharged, the exterior mirrors must
be reset. The exterior mirrors will otherwise
not fold in when you select the "Fold in mir-
rors when locking" function in the on-board
computer ( Y page 225).
XTurn the key to position 1 in the ignition
lock ( Y page 145).XBriefly press button :.
Folding the exterior mirrors in/out
automatically
If the "Fold in mirrors when locking" function
is activated in the on-board computer
( Y page 225):
R the exterior mirrors fold in automatically as
soon as you lock the vehicle from the out-
side.
R the exterior mirrors fold out again automat-
ically as soon as you unlock the vehicle and
then open the driver's or front-passenger
door.
i If the exterior mirrors have been folded in
manually, they do not fold out.
Exterior mirror pushed out of position
If an exterior mirror has been pushed out of
position, proceed as follows.
XVehicles without electrically folding
exterior mirrors: move the exterior mirror
into the correct position manually.XVehicles with electrically folding exte-
rior mirrors: press and hold mirror-foldingbutton (Y page 101) until you hear a click
and then the mirror engage in position.
The mirror housing is engaged again and
you can adjust the exterior mirrors as usual
( Y page 101).
Automatic anti-dazzle mirrors
The "Automatic anti-dazzle mirrors" function
is only available if the vehicle is equipped with
the "Mirror package".
The rear-view mirror and the exterior mirror
on the driver's side automatically go into anti-
dazzle mode if:
R the ignition is switched on and
R incident light from headlamps strikes the
sensor in the rear-view mirror
The mirrors do not go into anti-dazzle mode if
reverse gear is engaged or if the interior light-
ing is switched on.
Parking position of the exterior mirror
on the front-passenger side
General notes
The "Parking position for the exterior mirror
on the front-passenger side" function is only
available if the vehicle is equipped with the
"Memory package".
Setting and storing the parking position
Using reverse gear
You can set the front-passenger side exterior
mirror so that you can see the rear wheel on
that side as soon as you engage reverse gear.
You can store this position.
102MirrorsSeats, steering wheel and mirrors
ProCarManuals.com
Page 107 of 352
Useful information ............................106
Exterior lighting ................................ 106
Interior lighting ................................. 113
Replacing bulbs ................................. 114
Windscreen wipers ...........................118105Lights and windscreen wipersProCarManuals.com