2013 MERCEDES-BENZ CLA-CLASS ESP
[x] Cancel search: ESPPage 120 of 352

XTo open: loosen side trim panel : at the
top and fold it down in the direction of the
arrow.XTo close: insert side panel :.
Tail lamps
XSwitch off the lights.XOpen the boot.XOpen the side trim panel ( Y page 117).XRelease and remove connector.XPress retaining clips : at the same time in
the direction of the arrows.XPull the bulb holder out with the bulbs.
Bulb holder
:Brake lamp;Brake lamp=Rear foglamp?Reversing lampATurn signalsXBrake lamp/rear foglamp/reversing
lamp: remove the corresponding bulb from
the bulb holder.XInsert the new bulb into the bulb holder.XTurn signal lamp: lightly press the bulb
into the bulb holder, turn it anti-clockwise
and remove it from the bulb holder.XInsert the new bulb into the bulb holder and
turn it clockwise.XReinsert the bulb holder and engage on
retaining clips :.XRe-establish contact with the connector.XClose the side trim panel ( Y page 117).
Windscreen wipers
Switching the windscreen wipers on/
off
! Do not operate the windscreen wipers
when the windscreen is dry, as this could
damage the wiper blades. Moreover, dust
that has collected on the windscreen can
scratch the glass if wiping takes place when
the windscreen is dry.
If it is necessary to switch on the wind-
screen wipers in dry weather conditions,
always operate them using washer fluid.
! If the windscreen wipers leave smears on
the windscreen after the vehicle has been
washed in an automatic car wash, this may
be due to wax or other residue. Clean the
windscreen with washer fluid after an auto-
matic car wash.
118Windscreen wipersLights and windscreen wipers
ProCarManuals.com
Page 133 of 352
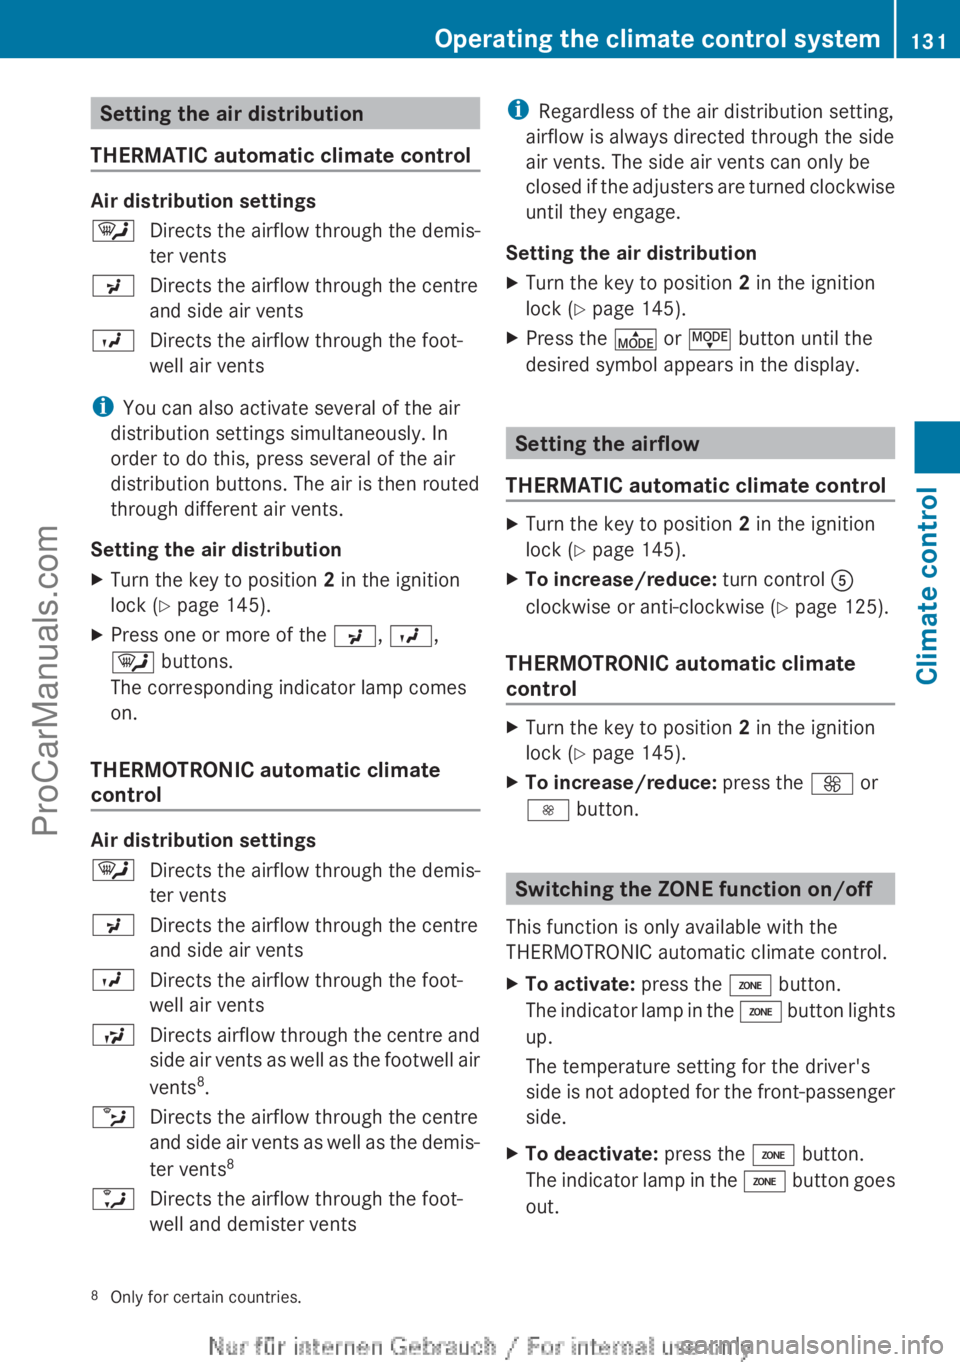
Setting the air distribution
THERMATIC automatic climate control
Air distribution settings
¯Directs the airflow through the demis-
ter ventsPDirects the airflow through the centre
and side air ventsODirects the airflow through the foot-
well air vents
i You can also activate several of the air
distribution settings simultaneously. In
order to do this, press several of the air
distribution buttons. The air is then routed
through different air vents.
Setting the air distribution
XTurn the key to position 2 in the ignition
lock ( Y page 145).XPress one or more of the P, O ,
¯ buttons.
The corresponding indicator lamp comes
on.
THERMOTRONIC automatic climate
control
Air distribution settings
¯Directs the airflow through the demis-
ter ventsPDirects the airflow through the centre
and side air ventsODirects the airflow through the foot-
well air ventsSDirects airflow through the centre and
side air vents as well as the footwell air
vents 8
.bDirects the airflow through the centre
and side air vents as well as the demis-
ter vents 8aDirects the airflow through the foot-
well and demister ventsi Regardless of the air distribution setting,
airflow is always directed through the side
air vents. The side air vents can only be
closed if the adjusters are turned clockwise
until they engage.
Setting the air distributionXTurn the key to position 2 in the ignition
lock ( Y page 145).XPress the É or Ë button until the
desired symbol appears in the display.
Setting the airflow
THERMATIC automatic climate control
XTurn the key to position 2 in the ignition
lock ( Y page 145).XTo increase/reduce: turn control A
clockwise or anti-clockwise ( Y page 125).
THERMOTRONIC automatic climate
control
XTurn the key to position 2 in the ignition
lock ( Y page 145).XTo increase/reduce: press the K or
I button.
Switching the ZONE function on/off
This function is only available with the
THERMOTRONIC automatic climate control.
XTo activate: press the á button.
The indicator lamp in the á button lights
up.
The temperature setting for the driver's
side is not adopted for the front-passenger
side.XTo deactivate: press the á button.
The indicator lamp in the á button goes
out.8 Only for certain countries.Operating the climate control system131Climate controlProCarManuals.com
Page 138 of 352
Auxiliary heating
Important safety notesGDANGER
If the exhaust pipe is blocked or sufficient
ventilation is not possible, toxic exhaust
fumes can enter the vehicle, especially car-
bon monoxide. This is the case, e.g. in
enclosed spaces, or if the vehicle is stuck in
snow. There is a risk of fatal injuries.
You should switch off the auxiliary heating in
enclosed spaces which do not have an extrac-
tion system, e.g. a garage. If the vehicle is
stuck in snow and you must leave the auxiliary
heating running, keep the exhaust pipe and
the area around the vehicle clear of snow. To
guarantee a sufficient supply of fresh air, open
a window on the side of the vehicle away from
the wind.
GWARNING
When the auxiliary heating is switched on,
parts of the vehicle can become very hot.
Flammable material such as leaves, grass or
twigs may ignite if they come into contact with
hot parts of the exhaust system for extended
periods. There is a risk of fire.
When the auxiliary heating is switched on,
make sure that no flammable material can
come into contact with hot vehicle compo-
nents.
! Operating the auxiliary heating/ventila-
tion draws on the vehicle battery. After you
have heated or ventilated the vehicle a
maximum of two times, drive for a longer
distance.
i Switch the auxiliary heating on regularly
once a month for about ten minutes.
The auxiliary heating heats the air in the vehi-
cle interior to the set temperature. This
occurs without using the heat of the running
engine. The auxiliary heating is operated
directly using the vehicle's fuel. For this rea-
son, the fuel tank must be at least ¼ full to
ensure that the auxiliary heating functions.
The auxiliary heating/ventilation automati-
cally adjusts to changes in temperature and
weather conditions. For this reason, the aux-
iliary heating could switch from ventilation
mode to heating mode or from heating mode
to ventilation mode.
The auxiliary heating switches off when the
engine is switched off. The auxiliary ventila-
tion switches off when you turn the key to key
position 2(Y page 145).
The auxiliary heating switches off automati-
cally after 30 minutes.
You cannot use the auxiliary ventilation to
cool the vehicle interior to a temperature
lower than the outside temperature.
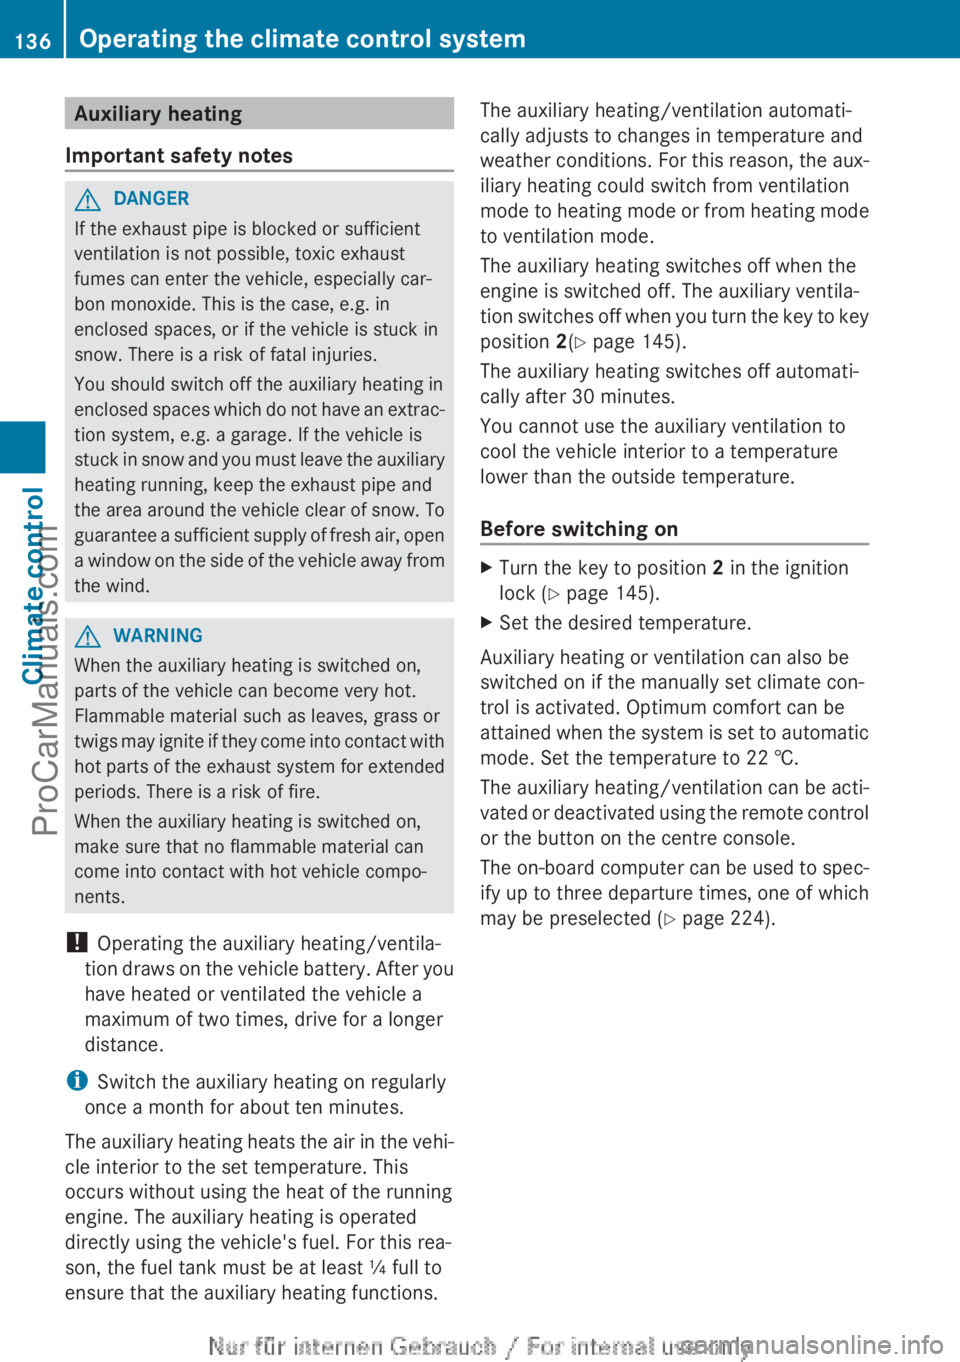
Before switching onXTurn the key to position 2 in the ignition
lock ( Y page 145).XSet the desired temperature.
Auxiliary heating or ventilation can also be
switched on if the manually set climate con-
trol is activated. Optimum comfort can be
attained when the system is set to automatic
mode. Set the temperature to 22 †.
The auxiliary heating/ventilation can be acti-
vated or deactivated using the remote control
or the button on the centre console.
The on-board computer can be used to spec-
ify up to three departure times, one of which
may be preselected ( Y page 224).
136Operating the climate control systemClimate control
ProCarManuals.com
Page 141 of 352
HEnvironmental noteBatteries contain pollutants.
It is illegal to dispose of them
with the household rubbish.
They must be collected sep-
arately and disposed of in an
environmentally responsible
recycling system.Dispose of batteries in an
environmentally responsible
manner. Take discharged
batteries to a qualified spe-
cialist workshop or to a col-
lection point for used batter-
ies.
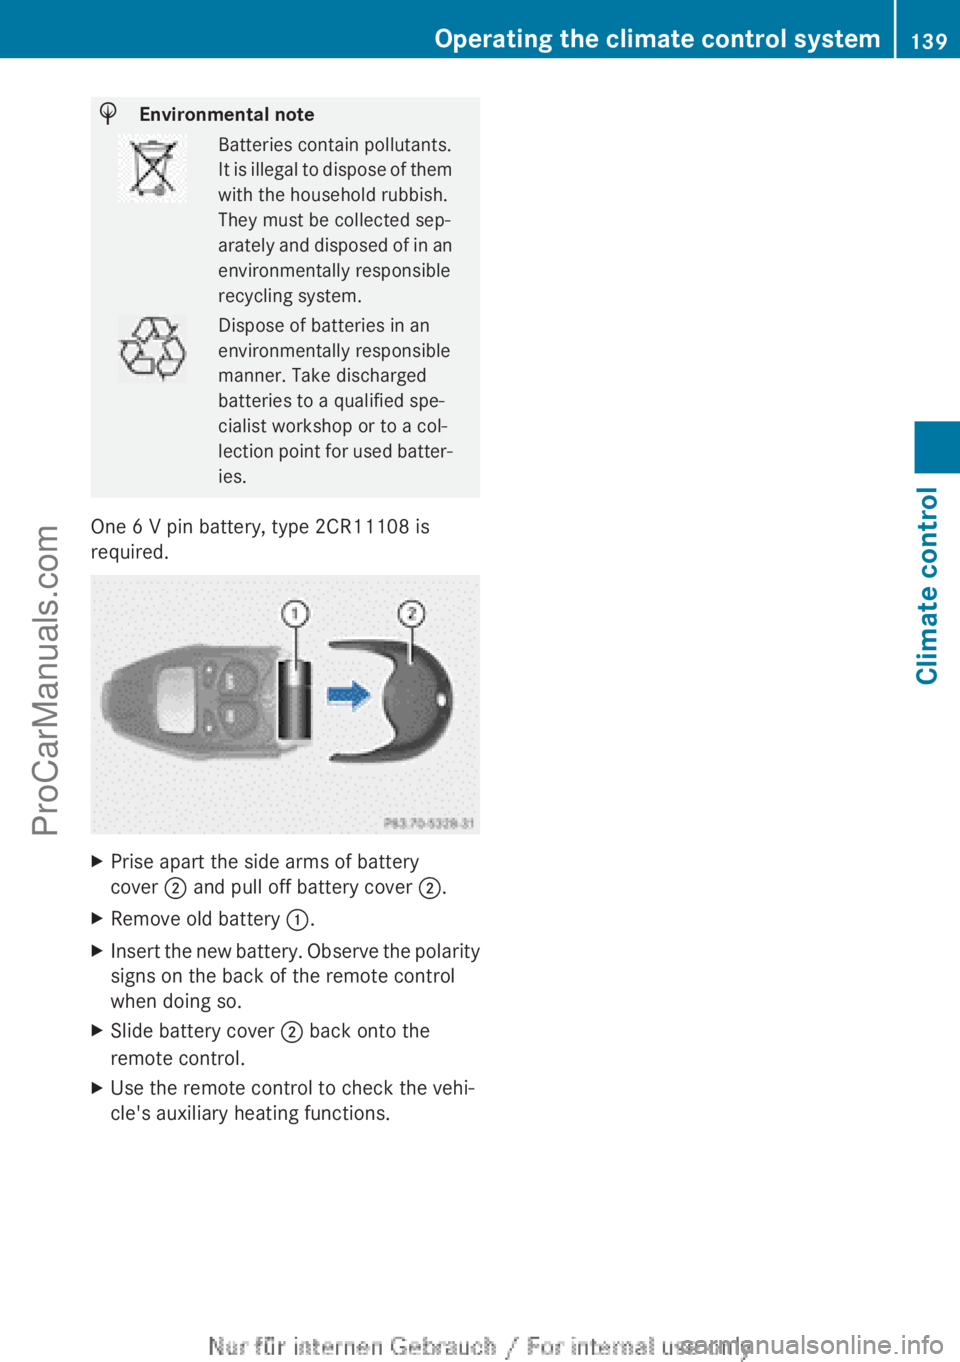
One 6 V pin battery, type 2CR11108 is
required.
XPrise apart the side arms of battery
cover ; and pull off battery cover ;.XRemove old battery :.XInsert the new battery. Observe the polarity
signs on the back of the remote control
when doing so.XSlide battery cover ; back onto the
remote control.XUse the remote control to check the vehi-
cle's auxiliary heating functions.Operating the climate control system139Climate controlZProCarManuals.com
Page 142 of 352
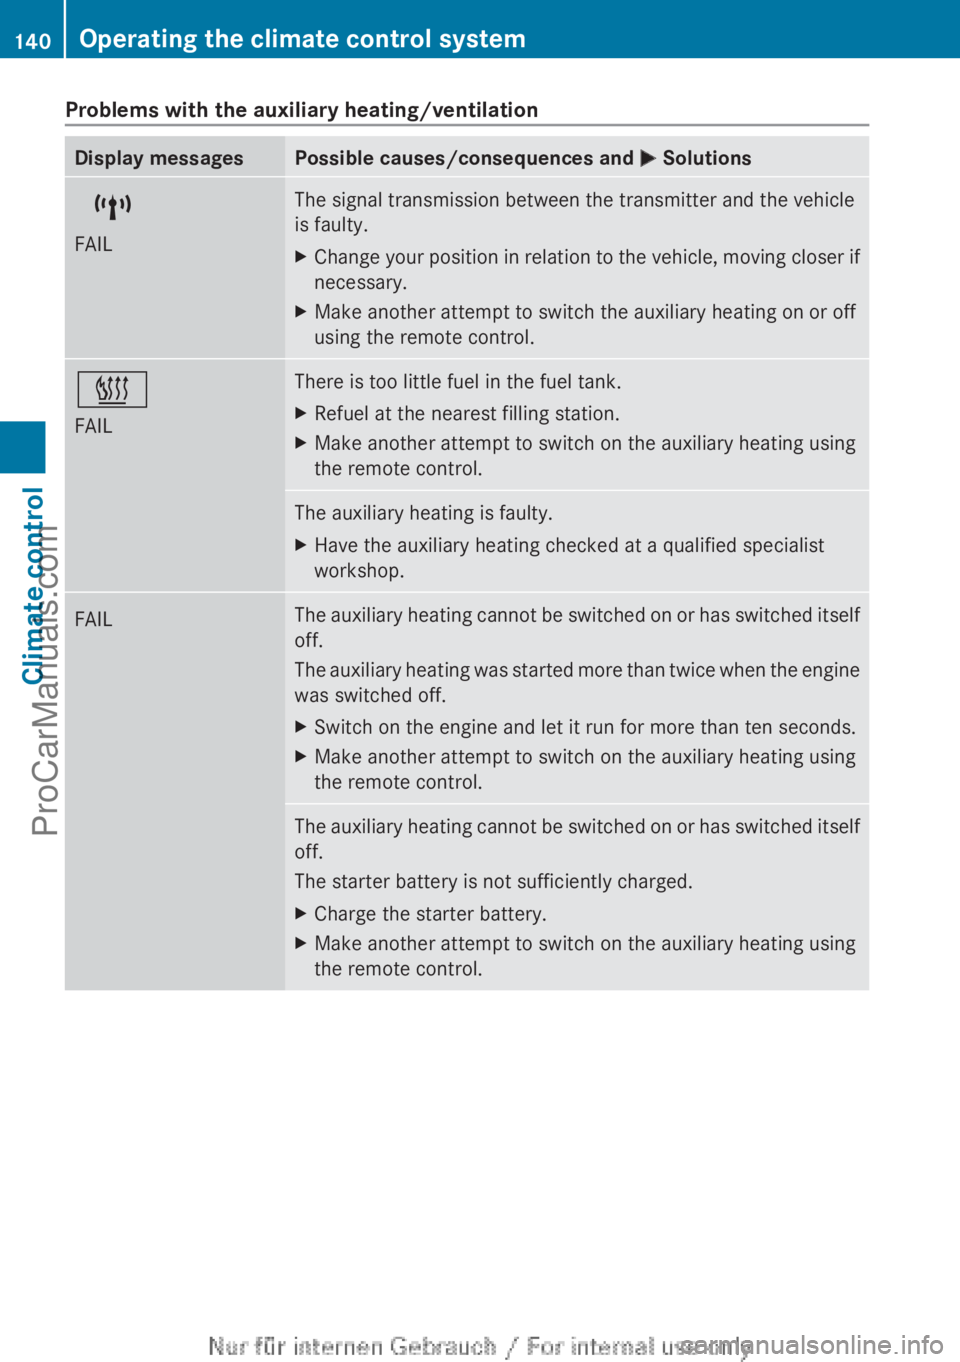
Problems with the auxiliary heating/ventilationDisplay messagesPossible causes/consequences and M Solutions$
FAILThe signal transmission between the transmitter and the vehicle
is faulty.XChange your position in relation to the vehicle, moving closer if
necessary.XMake another attempt to switch the auxiliary heating on or off
using the remote control.©
FAILThere is too little fuel in the fuel tank.XRefuel at the nearest filling station.XMake another attempt to switch on the auxiliary heating using
the remote control.The auxiliary heating is faulty.XHave the auxiliary heating checked at a qualified specialist
workshop.FAILThe auxiliary heating cannot be switched on or has switched itself
off.
The auxiliary heating was started more than twice when the engine
was switched off.XSwitch on the engine and let it run for more than ten seconds.XMake another attempt to switch on the auxiliary heating using
the remote control.The auxiliary heating cannot be switched on or has switched itself
off.
The starter battery is not sufficiently charged.XCharge the starter battery.XMake another attempt to switch on the auxiliary heating using
the remote control.140Operating the climate control systemClimate control
ProCarManuals.com
Page 143 of 352
Display messagesPossible causes/consequences and M SolutionsThe auxiliary heating cannot be switched on or has switched itself
off.
There is too little fuel in the fuel tank.XRefuel at the nearest filling station.XMake another attempt to switch on the auxiliary heating using
the remote control.The auxiliary heating cannot be switched on or has switched itself
off.
The auxiliary heating is faulty.XHave the auxiliary heating checked at a qualified specialist
workshop.Adjusting the air vents
Important safety notes
GWARNING
Very hot or very cold air can flow from the air
vents. This could result in burns or frostbite in
the immediate vicinity of the air vents. There
is a risk of injury.
Make sure that all vehicle occupants always
maintain a sufficient distance to the air out-
lets. If necessary, redirect the airflow to
another area of the vehicle interior.
In order to ensure the direct flow of fresh air
through the air vents into the vehicle interior,
please observe the following notes:
R keep the air inlet between the windscreen
and the bonnet free of blockages, such as
ice, snow or leaves.
R never cover the vents or ventilation grilles
in the vehicle interior.
i Move the adjusters for the air vents ver-
tically or horizontally, to set the direction of
the airflow.
i Optimal climate control function is ach-
ieved by opening the air vents fully and set-
ting the adjusters to the middle position.
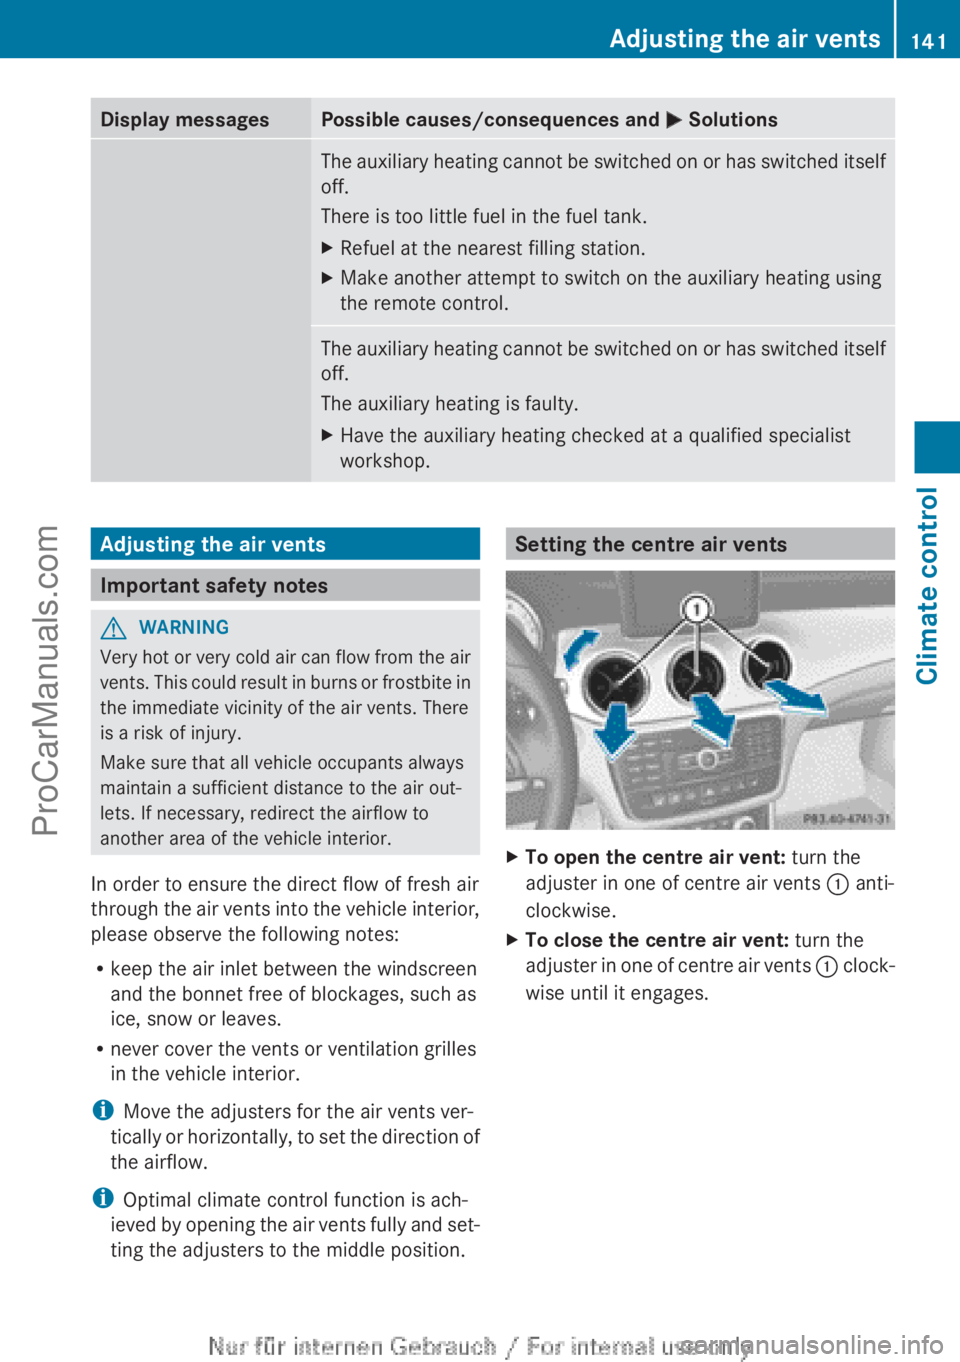
Setting the centre air ventsXTo open the centre air vent: turn the
adjuster in one of centre air vents : anti-
clockwise.XTo close the centre air vent: turn the
adjuster in one of centre air vents : clock-
wise until it engages.Adjusting the air vents141Climate controlZProCarManuals.com
Page 147 of 352
GWARNING
If the parking brake has not been fully
released when driving, the parking brake can:
R overheat and cause a fire
R lose its hold function.
There is a risk of fire and an accident. Release
the parking brake fully before driving off.
! Warm up the engine quickly. Do not use
the engine's full performance until it has
reached operating temperature.
Only set the automatic transmission to the
respective drive positions when the vehicle
is stationary.
Where possible, avoid spinning the drive
wheels when pulling away on slippery
roads. Otherwise, you could damage the
drive train.
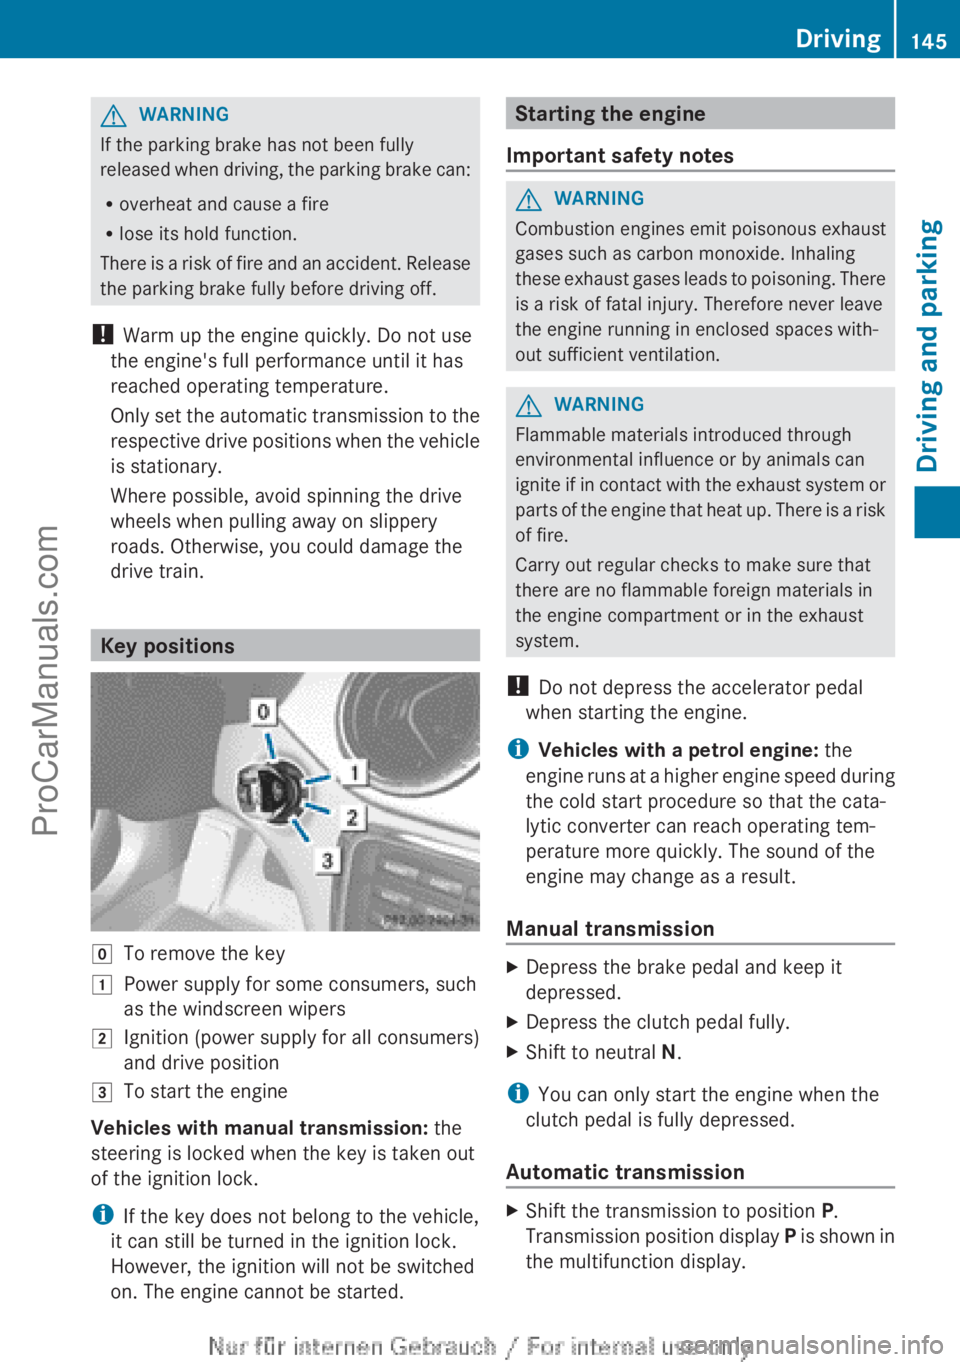
Key positions
gTo remove the key1Power supply for some consumers, such
as the windscreen wipers2Ignition (power supply for all consumers)
and drive position3To start the engine
Vehicles with manual transmission: the
steering is locked when the key is taken out
of the ignition lock.
i If the key does not belong to the vehicle,
it can still be turned in the ignition lock.
However, the ignition will not be switched
on. The engine cannot be started.
Starting the engine
Important safety notesGWARNING
Combustion engines emit poisonous exhaust
gases such as carbon monoxide. Inhaling
these exhaust gases leads to poisoning. There
is a risk of fatal injury. Therefore never leave
the engine running in enclosed spaces with-
out sufficient ventilation.
GWARNING
Flammable materials introduced through
environmental influence or by animals can
ignite if in contact with the exhaust system or
parts of the engine that heat up. There is a risk
of fire.
Carry out regular checks to make sure that
there are no flammable foreign materials in
the engine compartment or in the exhaust
system.
! Do not depress the accelerator pedal
when starting the engine.
i Vehicles with a petrol engine: the
engine runs at a higher engine speed during
the cold start procedure so that the cata-
lytic converter can reach operating tem-
perature more quickly. The sound of the
engine may change as a result.
Manual transmission
XDepress the brake pedal and keep it
depressed.XDepress the clutch pedal fully.XShift to neutral N.
i
You can only start the engine when the
clutch pedal is fully depressed.
Automatic transmission
XShift the transmission to position P.
Transmission position display P is shown in
the multifunction display.Driving145Driving and parkingZProCarManuals.com
Page 149 of 352
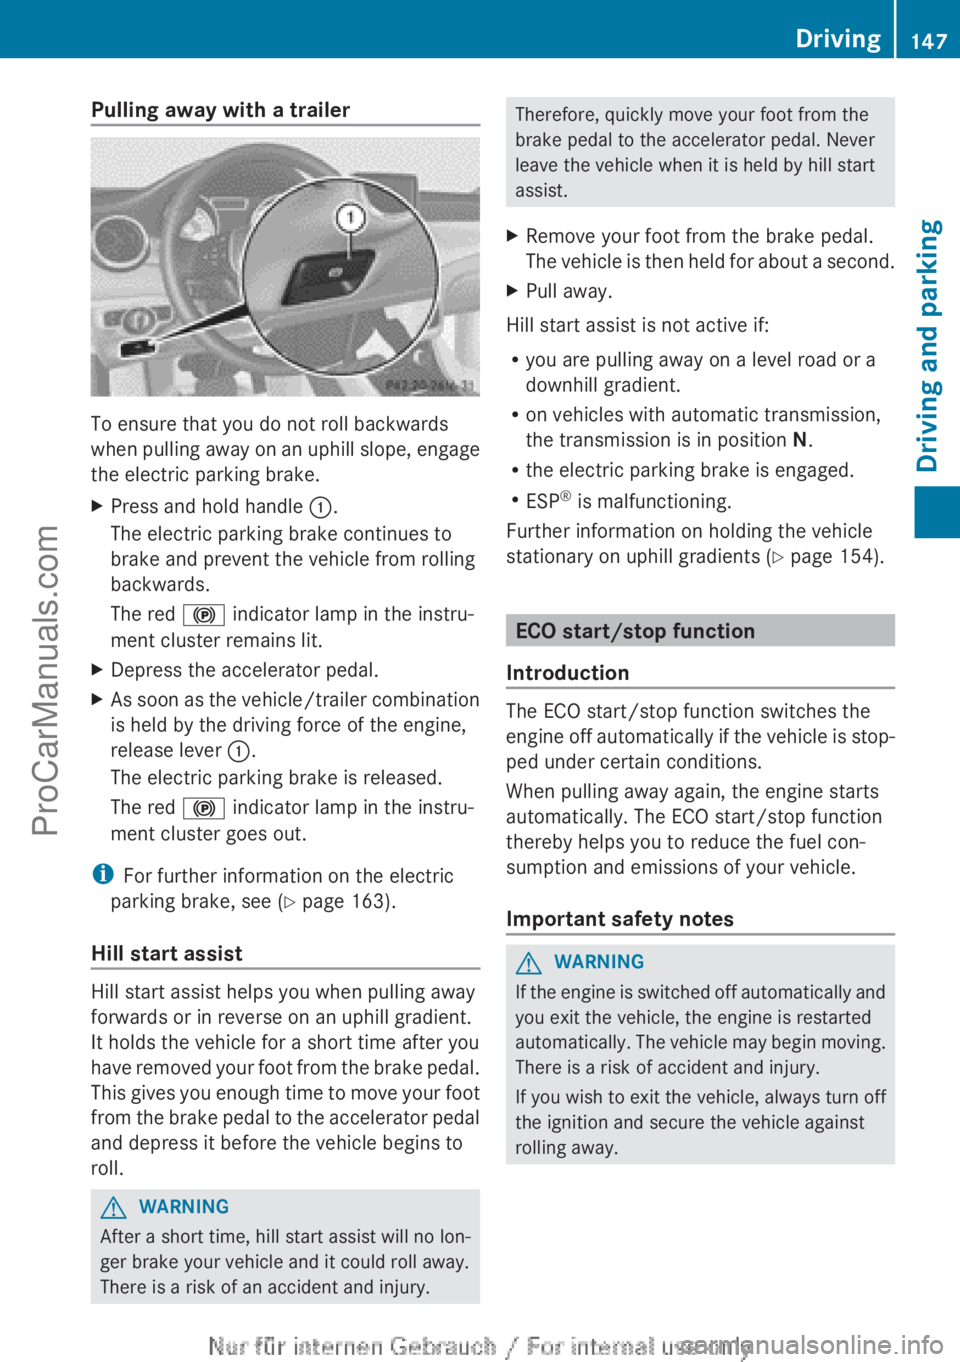
Pulling away with a trailer
To ensure that you do not roll backwards
when pulling away on an uphill slope, engage
the electric parking brake.
XPress and hold handle :.
The electric parking brake continues to
brake and prevent the vehicle from rolling
backwards.
The red ! indicator lamp in the instru-
ment cluster remains lit.XDepress the accelerator pedal.XAs soon as the vehicle/trailer combination
is held by the driving force of the engine,
release lever :.
The electric parking brake is released.
The red ! indicator lamp in the instru-
ment cluster goes out.
i For further information on the electric
parking brake, see ( Y page 163).
Hill start assist
Hill start assist helps you when pulling away
forwards or in reverse on an uphill gradient.
It holds the vehicle for a short time after you
have removed your foot from the brake pedal.
This gives you enough time to move your foot
from the brake pedal to the accelerator pedal
and depress it before the vehicle begins to
roll.
GWARNING
After a short time, hill start assist will no lon-
ger brake your vehicle and it could roll away.
There is a risk of an accident and injury.
Therefore, quickly move your foot from the
brake pedal to the accelerator pedal. Never
leave the vehicle when it is held by hill start
assist.XRemove your foot from the brake pedal.
The vehicle is then held for about a second.XPull away.
Hill start assist is not active if:
R you are pulling away on a level road or a
downhill gradient.
R on vehicles with automatic transmission,
the transmission is in position N.
R the electric parking brake is engaged.
R ESP ®
is malfunctioning.
Further information on holding the vehicle
stationary on uphill gradients ( Y page 154).
ECO start/stop function
Introduction
The ECO start/stop function switches the
engine off automatically if the vehicle is stop-
ped under certain conditions.
When pulling away again, the engine starts
automatically. The ECO start/stop function
thereby helps you to reduce the fuel con-
sumption and emissions of your vehicle.
Important safety notes
GWARNING
If the engine is switched off automatically and
you exit the vehicle, the engine is restarted
automatically. The vehicle may begin moving.
There is a risk of accident and injury.
If you wish to exit the vehicle, always turn off
the ignition and secure the vehicle against
rolling away.
Driving147Driving and parkingZProCarManuals.com