2013 MERCEDES-BENZ CLA-CLASS mirror
[x] Cancel search: mirrorPage 102 of 352
Problems with the seat heatingProblemPossible causes/consequences and M SolutionsThe seat heating has
switched off prema-
turely or cannot be
switched on.The on-board voltage is too low because too many electrical con-
sumers are switched on.XSwitch off electrical consumers that you do not need, such as
the rear window heating or interior lighting.
Once the battery is sufficiently charged, the seat heating will
switch back on automatically.Steering wheel
Important safety notes
GWARNING
You could lose control of the vehicle while
driving if you:
R adjust the driver's seat, steering wheel or
mirrors
R fasten the seat belt
There is a risk of an accident.
Adjust the driver's seat, head restraint, steer-
ing wheel and mirrors and fasten your seat
belt before starting the engine.
GWARNING
Children could become trapped by the steer-
ing wheel if they adjust it. There is a risk of
injury.
When leaving the vehicle, always take the key
with you and lock the vehicle. Never leave
children unattended in the vehicle.
Adjusting the steering wheel
GWARNING
The steering wheel may move unexpectedly if
you adjust it while driving. This could cause
you to lose control of the vehicle. There is a
risk of an accident.
Make sure that the steering wheel is locked
before driving off. Never unlock the steering
wheel when the vehicle is in motion.
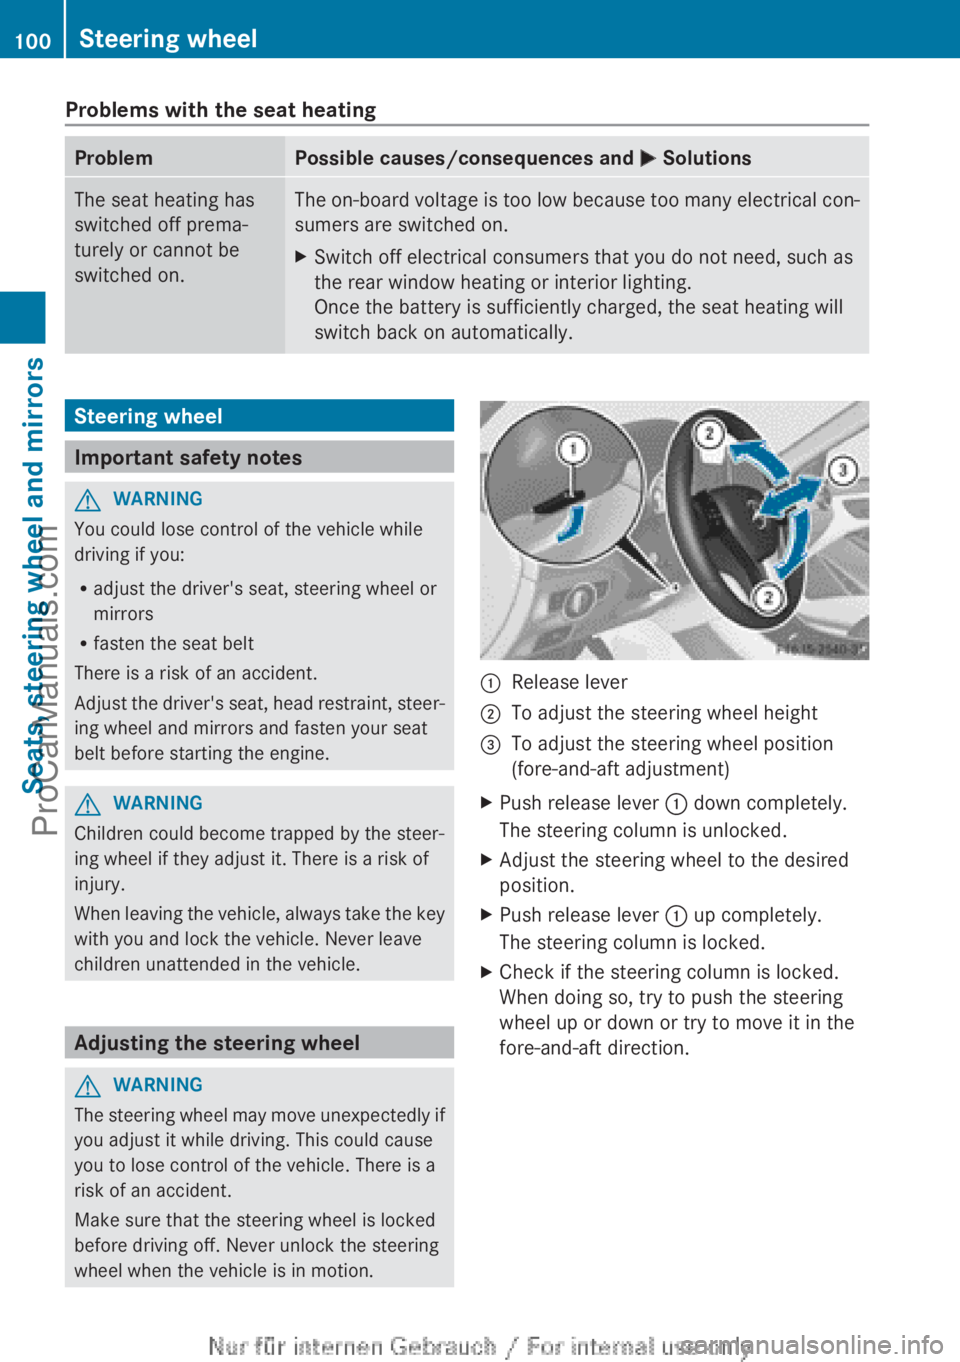
:Release lever;To adjust the steering wheel height=To adjust the steering wheel position
(fore-and-aft adjustment)XPush release lever : down completely.
The steering column is unlocked.XAdjust the steering wheel to the desired
position.XPush release lever : up completely.
The steering column is locked.XCheck if the steering column is locked.
When doing so, try to push the steering
wheel up or down or try to move it in the
fore-and-aft direction.100Steering wheelSeats, steering wheel and mirrors
ProCarManuals.com
Page 103 of 352
Mirrors
Rear-view mirror
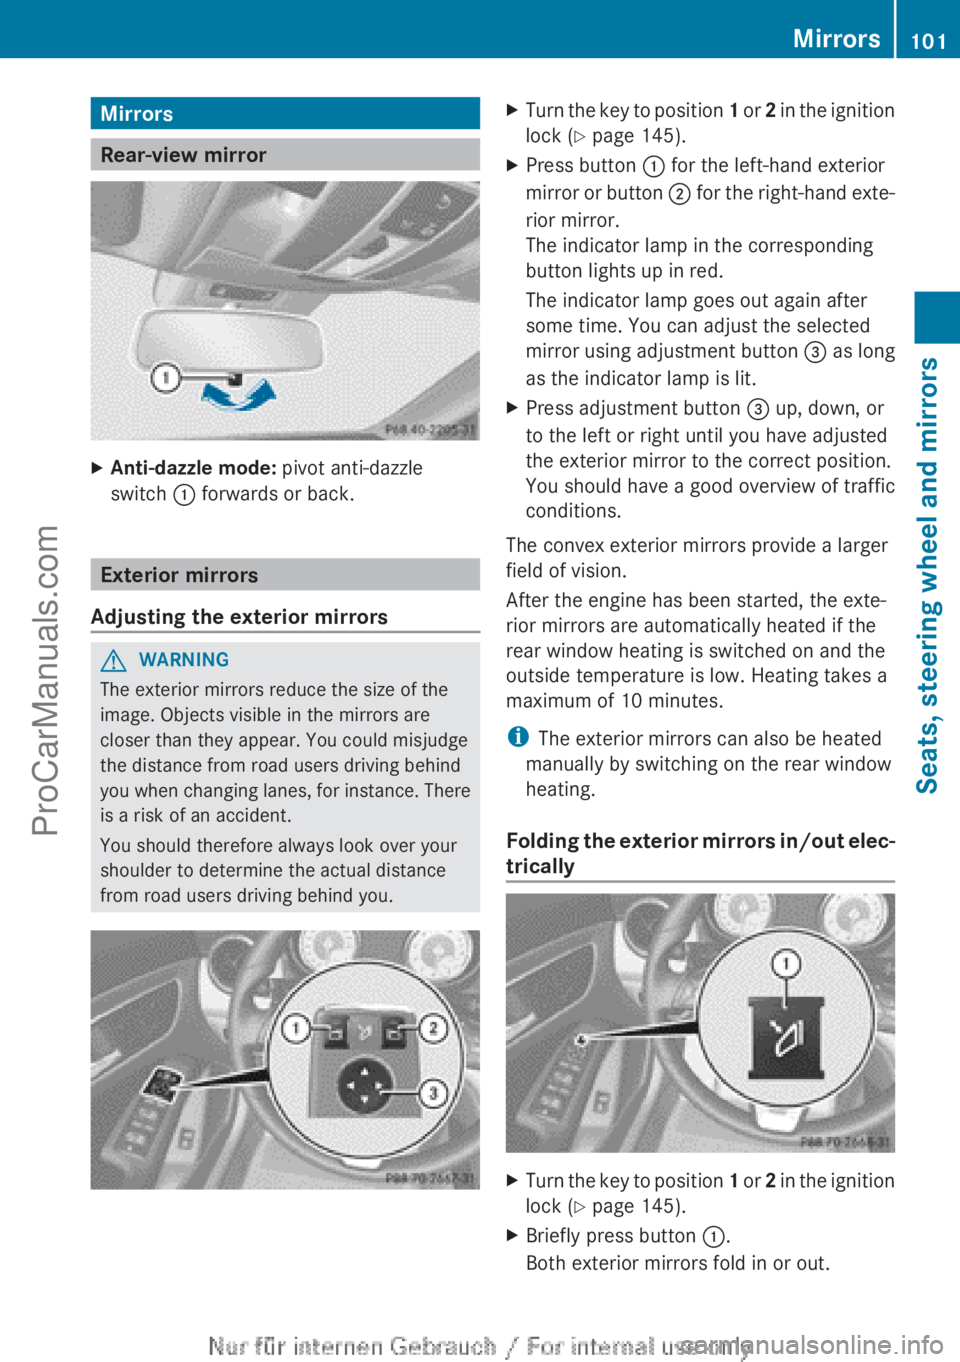
XAnti-dazzle mode: pivot anti-dazzle
switch : forwards or back.
Exterior mirrors
Adjusting the exterior mirrors
GWARNING
The exterior mirrors reduce the size of the
image. Objects visible in the mirrors are
closer than they appear. You could misjudge
the distance from road users driving behind
you when changing lanes, for instance. There
is a risk of an accident.
You should therefore always look over your
shoulder to determine the actual distance
from road users driving behind you.
XTurn the key to position 1 or 2 in the ignition
lock ( Y page 145).XPress button : for the left-hand exterior
mirror or button ; for the right-hand exte-
rior mirror.
The indicator lamp in the corresponding
button lights up in red.
The indicator lamp goes out again after
some time. You can adjust the selected
mirror using adjustment button = as long
as the indicator lamp is lit.XPress adjustment button = up, down, or
to the left or right until you have adjusted
the exterior mirror to the correct position.
You should have a good overview of traffic
conditions.
The convex exterior mirrors provide a larger
field of vision.
After the engine has been started, the exte-
rior mirrors are automatically heated if the
rear window heating is switched on and the
outside temperature is low. Heating takes a
maximum of 10 minutes.
i The exterior mirrors can also be heated
manually by switching on the rear window
heating.
Folding the exterior mirrors in/out elec-
trically
XTurn the key to position 1 or 2 in the ignition
lock ( Y page 145).XBriefly press button :.
Both exterior mirrors fold in or out.Mirrors101Seats, steering wheel and mirrorsZProCarManuals.com
Page 104 of 352

iMake sure that the exterior mirrors are
always folded out fully while driving. They
could otherwise vibrate.
i If you are driving faster than 47 km/h, you
can no longer fold in the exterior mirrors.
Setting the exterior mirrors
If the battery has been disconnected or com-
pletely discharged, the exterior mirrors must
be reset. The exterior mirrors will otherwise
not fold in when you select the "Fold in mir-
rors when locking" function in the on-board
computer ( Y page 225).
XTurn the key to position 1 in the ignition
lock ( Y page 145).XBriefly press button :.
Folding the exterior mirrors in/out
automatically
If the "Fold in mirrors when locking" function
is activated in the on-board computer
( Y page 225):
R the exterior mirrors fold in automatically as
soon as you lock the vehicle from the out-
side.
R the exterior mirrors fold out again automat-
ically as soon as you unlock the vehicle and
then open the driver's or front-passenger
door.
i If the exterior mirrors have been folded in
manually, they do not fold out.
Exterior mirror pushed out of position
If an exterior mirror has been pushed out of
position, proceed as follows.
XVehicles without electrically folding
exterior mirrors: move the exterior mirror
into the correct position manually.XVehicles with electrically folding exte-
rior mirrors: press and hold mirror-foldingbutton (Y page 101) until you hear a click
and then the mirror engage in position.
The mirror housing is engaged again and
you can adjust the exterior mirrors as usual
( Y page 101).
Automatic anti-dazzle mirrors
The "Automatic anti-dazzle mirrors" function
is only available if the vehicle is equipped with
the "Mirror package".
The rear-view mirror and the exterior mirror
on the driver's side automatically go into anti-
dazzle mode if:
R the ignition is switched on and
R incident light from headlamps strikes the
sensor in the rear-view mirror
The mirrors do not go into anti-dazzle mode if
reverse gear is engaged or if the interior light-
ing is switched on.
Parking position of the exterior mirror
on the front-passenger side
General notes
The "Parking position for the exterior mirror
on the front-passenger side" function is only
available if the vehicle is equipped with the
"Memory package".
Setting and storing the parking position
Using reverse gear
You can set the front-passenger side exterior
mirror so that you can see the rear wheel on
that side as soon as you engage reverse gear.
You can store this position.
102MirrorsSeats, steering wheel and mirrors
ProCarManuals.com
Page 105 of 352
XMake sure that the vehicle is stationary.XTurn the key to position 2 in the ignition
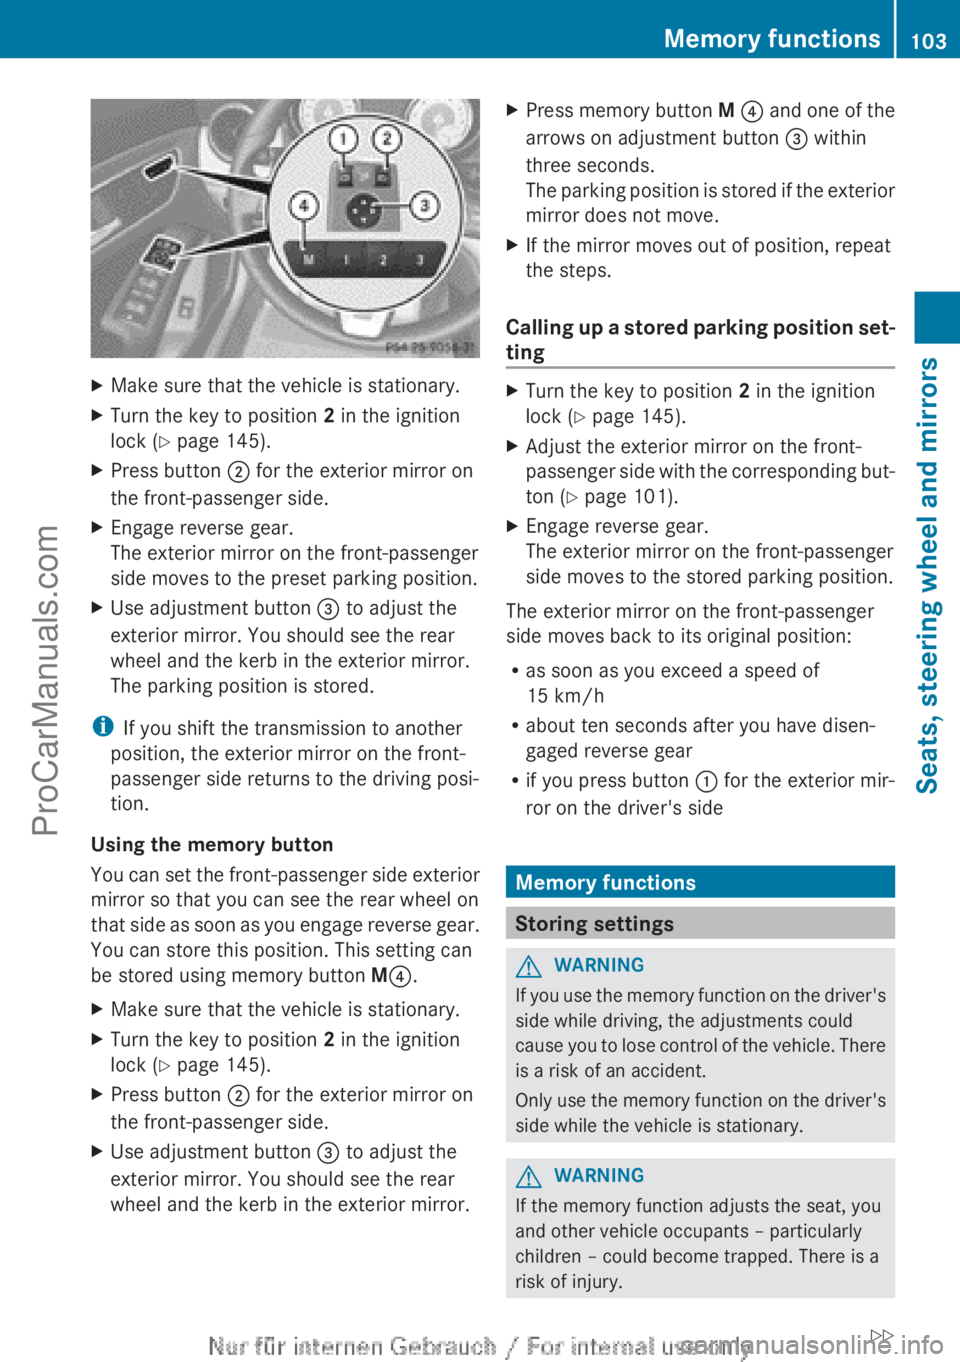
lock ( Y page 145).XPress button ; for the exterior mirror on
the front-passenger side.XEngage reverse gear.
The exterior mirror on the front-passenger
side moves to the preset parking position.XUse adjustment button = to adjust the
exterior mirror. You should see the rear
wheel and the kerb in the exterior mirror.
The parking position is stored.
i If you shift the transmission to another
position, the exterior mirror on the front-
passenger side returns to the driving posi-
tion.
Using the memory button
You can set the front-passenger side exterior
mirror so that you can see the rear wheel on
that side as soon as you engage reverse gear.
You can store this position. This setting can
be stored using memory button M? .
XMake sure that the vehicle is stationary.XTurn the key to position 2 in the ignition
lock ( Y page 145).XPress button ; for the exterior mirror on
the front-passenger side.XUse adjustment button = to adjust the
exterior mirror. You should see the rear
wheel and the kerb in the exterior mirror.XPress memory button M ? and one of the
arrows on adjustment button = within
three seconds.
The parking position is stored if the exterior
mirror does not move.XIf the mirror moves out of position, repeat
the steps.
Calling up a stored parking position set-
ting
XTurn the key to position 2 in the ignition
lock ( Y page 145).XAdjust the exterior mirror on the front-
passenger side with the corresponding but-
ton ( Y page 101).XEngage reverse gear.
The exterior mirror on the front-passenger
side moves to the stored parking position.
The exterior mirror on the front-passenger
side moves back to its original position:
R as soon as you exceed a speed of
15 km/h
R about ten seconds after you have disen-
gaged reverse gear
R if you press button : for the exterior mir-
ror on the driver's side
Memory functions
Storing settings
GWARNING
If you use the memory function on the driver's
side while driving, the adjustments could
cause you to lose control of the vehicle. There
is a risk of an accident.
Only use the memory function on the driver's
side while the vehicle is stationary.
GWARNING
If the memory function adjusts the seat, you
and other vehicle occupants – particularly
children – could become trapped. There is a
risk of injury.
Memory functions103Seats, steering wheel and mirrorsZProCarManuals.com
Page 106 of 352
While the memory function is making adjust-
ments, make sure that no one has any part of
their body within the sweep of the seat. If
someone becomes trapped, immediately
release the memory function position button.
The adjustment is stopped.GWARNING
If children activate the memory function, they
could become trapped, especially if they are
unattended. There is a risk of injury.
When leaving the vehicle, always take the key
with you and lock the vehicle. Never leave
children unattended in the vehicle.
With the memory function, you can store up
to three different settings, e.g. for three dif-
ferent people.
The following settings are stored as a single
memory preset:
R position of the seat, backrest and head
restraint
R driver's side: position of the exterior mir-
rors on the driver's and front-passenger
sides
XAdjust the seat ( Y page 96).XAdjust the exterior mirror on the driver's
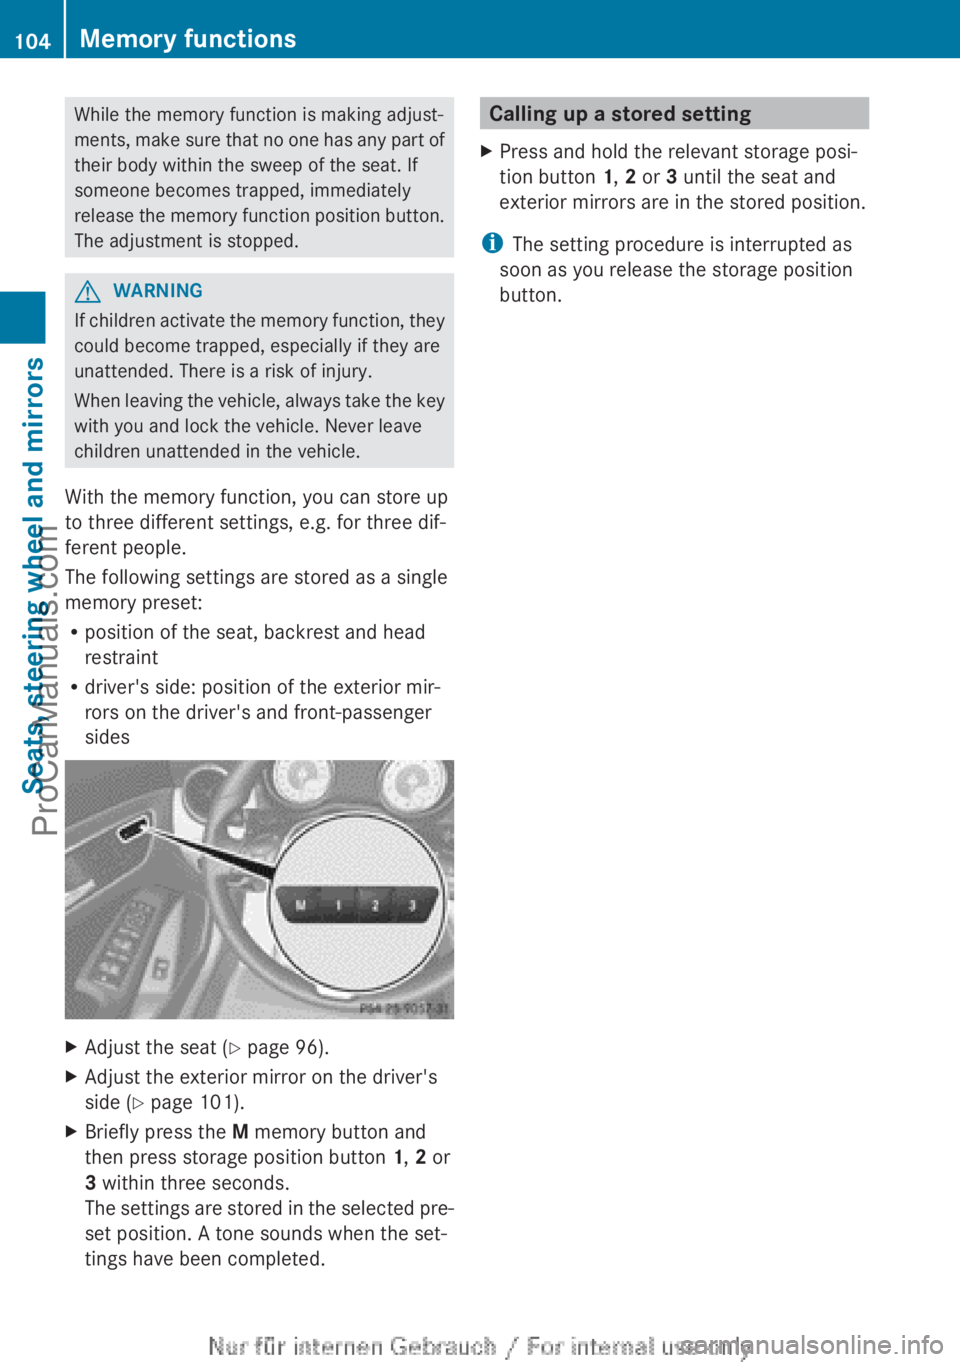
side ( Y page 101).XBriefly press the M memory button and
then press storage position button 1, 2 or
3 within three seconds.
The settings are stored in the selected pre-
set position. A tone sounds when the set-
tings have been completed.Calling up a stored settingXPress and hold the relevant storage posi-
tion button 1, 2 or 3 until the seat and
exterior mirrors are in the stored position.
i The setting procedure is interrupted as
soon as you release the storage position
button.
104Memory functionsSeats, steering wheel and mirrors
ProCarManuals.com
Page 193 of 352
A warning tone sounds. The parking symbol
disappears and the multifunction display
shows the Park Assist cancelled mes-
sage.
When Active Parking Assist is cancelled, you
must steer again yourself.
Towing a trailer
For vehicles with a trailer tow hitch, the min-
imum required length for parking spaces is
slightly increased.
If you have attached a trailer to your vehicle,
you should not use Active Parking Assist.
Once the electrical connection is established
between your vehicle and the trailer, Active
Parking Assist is no longer available. PARK-
TRONIC is deactivated for the rear area.
Reversing camera
General notes
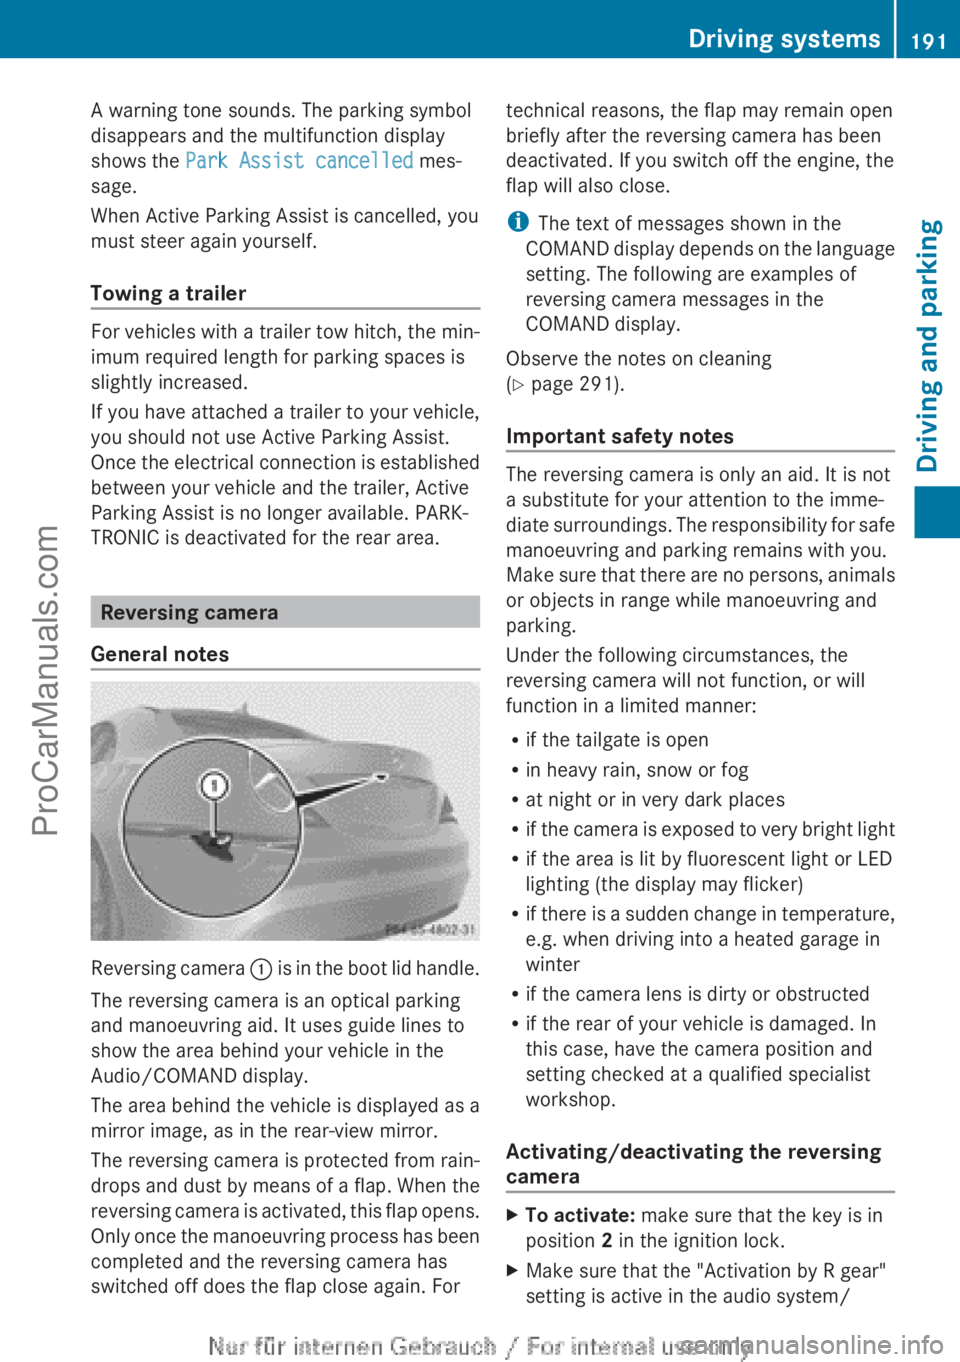
Reversing camera : is in the boot lid handle.
The reversing camera is an optical parking
and manoeuvring aid. It uses guide lines to
show the area behind your vehicle in the
Audio/COMAND display.
The area behind the vehicle is displayed as a
mirror image, as in the rear-view mirror.
The reversing camera is protected from rain-
drops and dust by means of a flap. When the
reversing camera is activated, this flap opens.
Only once the manoeuvring process has been
completed and the reversing camera has
switched off does the flap close again. For
technical reasons, the flap may remain open
briefly after the reversing camera has been
deactivated. If you switch off the engine, the
flap will also close.
i The text of messages shown in the
COMAND display depends on the language
setting. The following are examples of
reversing camera messages in the
COMAND display.
Observe the notes on cleaning
( Y page 291).
Important safety notes
The reversing camera is only an aid. It is not
a substitute for your attention to the imme-
diate surroundings. The responsibility for safe
manoeuvring and parking remains with you.
Make sure that there are no persons, animals
or objects in range while manoeuvring and
parking.
Under the following circumstances, the
reversing camera will not function, or will
function in a limited manner:
R if the tailgate is open
R in heavy rain, snow or fog
R at night or in very dark places
R if the camera is exposed to very bright light
R if the area is lit by fluorescent light or LED
lighting (the display may flicker)
R if there is a sudden change in temperature,
e.g. when driving into a heated garage in
winter
R if the camera lens is dirty or obstructed
R if the rear of your vehicle is damaged. In
this case, have the camera position and
setting checked at a qualified specialist
workshop.
Activating/deactivating the reversing
camera
XTo activate: make sure that the key is in
position 2 in the ignition lock.XMake sure that the "Activation by R gear"
setting is active in the audio system/Driving systems191Driving and parkingZProCarManuals.com
Page 194 of 352
COMAND Online; see the separate audio
system/COMAND Online operating
instructions.XEngage reverse gear.
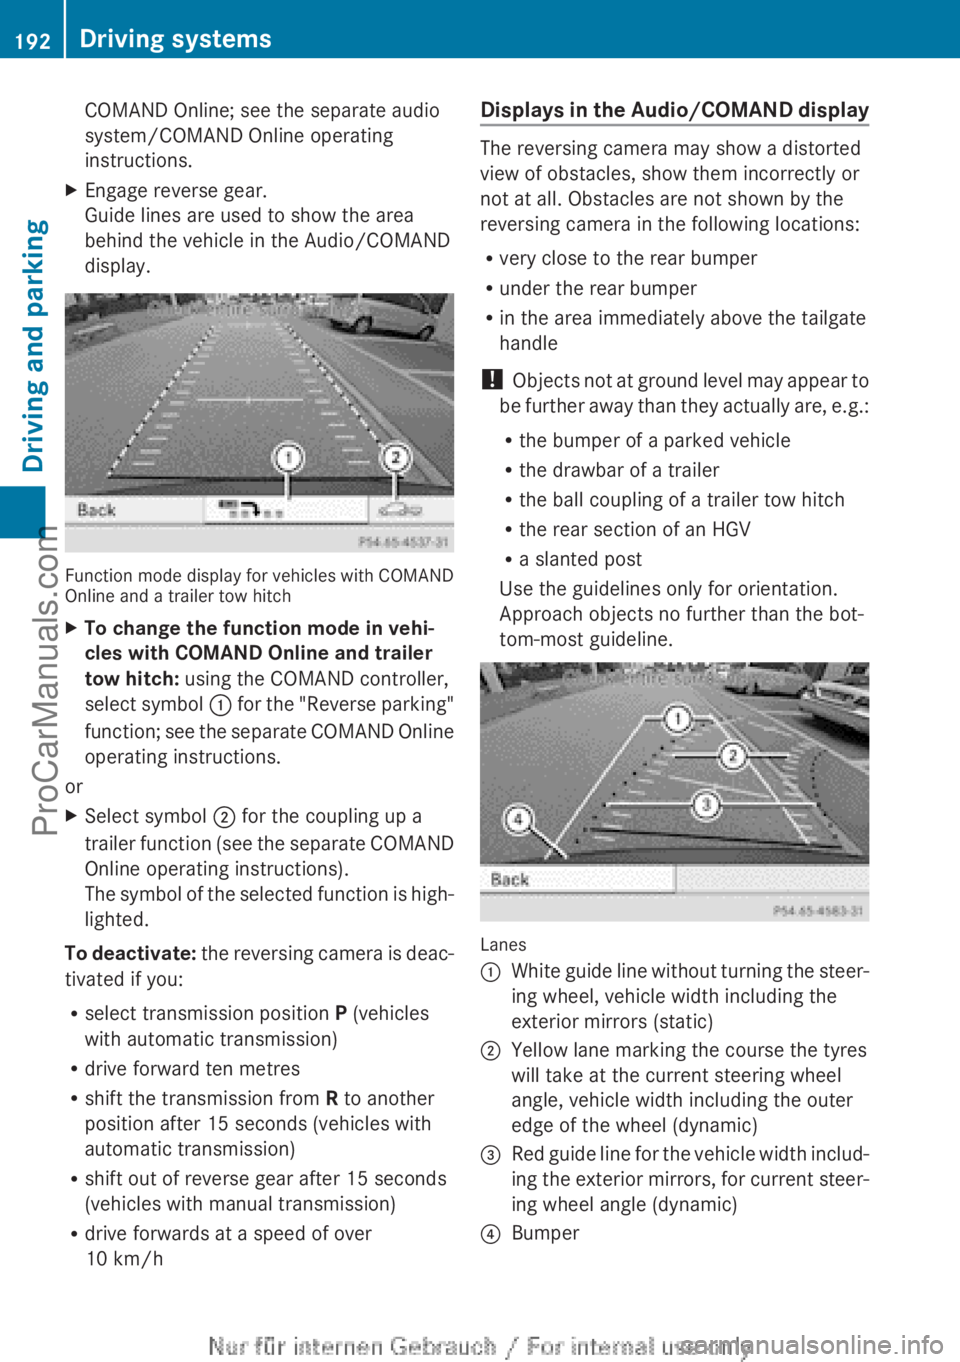
Guide lines are used to show the area
behind the vehicle in the Audio/COMAND
display.
Function mode display for vehicles with COMAND
Online and a trailer tow hitch
XTo change the function mode in vehi-
cles with COMAND Online and trailer
tow hitch: using the COMAND controller,
select symbol : for the "Reverse parking"
function; see the separate COMAND Online
operating instructions.
or
XSelect symbol ; for the coupling up a
trailer function (see the separate COMAND
Online operating instructions).
The symbol of the selected function is high-
lighted.
To deactivate: the reversing camera is deac-
tivated if you:
R select transmission position P (vehicles
with automatic transmission)
R drive forward ten metres
R shift the transmission from R to another
position after 15 seconds (vehicles with
automatic transmission)
R shift out of reverse gear after 15 seconds
(vehicles with manual transmission)
R drive forwards at a speed of over
10 km/h
Displays in the Audio/COMAND display
The reversing camera may show a distorted
view of obstacles, show them incorrectly or
not at all. Obstacles are not shown by the
reversing camera in the following locations:
R very close to the rear bumper
R under the rear bumper
R in the area immediately above the tailgate
handle
! Objects not at ground level may appear to
be further away than they actually are, e.g.:
R the bumper of a parked vehicle
R the drawbar of a trailer
R the ball coupling of a trailer tow hitch
R the rear section of an HGV
R a slanted post
Use the guidelines only for orientation.
Approach objects no further than the bot-
tom-most guideline.
Lanes
:White guide line without turning the steer-
ing wheel, vehicle width including the
exterior mirrors (static);Yellow lane marking the course the tyres
will take at the current steering wheel
angle, vehicle width including the outer
edge of the wheel (dynamic)=Red guide line for the vehicle width includ-
ing the exterior mirrors, for current steer-
ing wheel angle (dynamic)?Bumper192Driving systemsDriving and parking
ProCarManuals.com
Page 199 of 352
Rthe traffic signs are poorly illuminated
R there are ambiguous traffic signs, for
instance near roadworks or on multi-lane
roads
Information in the multifunction display
Briefly showing detected traffic signs in
the multifunction display
XActivate the Speed Limit Assist warning
function using the on-board computer
( Y page 218).
A traffic sign indicating a speed limit or the
end of a speed limit appears in the multi-
function display for around five seconds as
soon as it is detected. Any other informa-
tion in the multifunction display is hidden
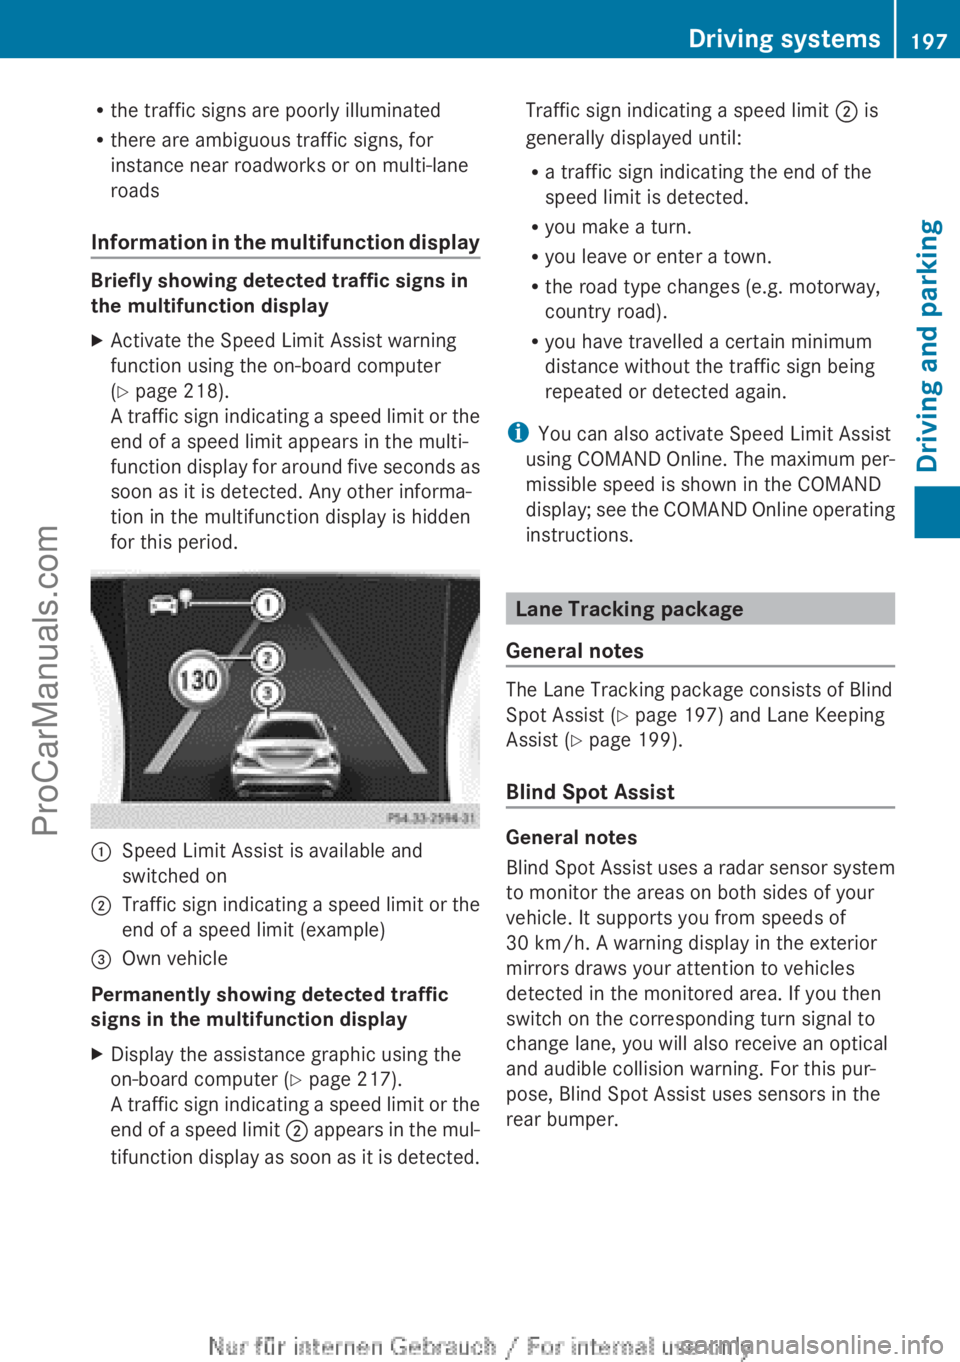
for this period.:Speed Limit Assist is available and
switched on;Traffic sign indicating a speed limit or the
end of a speed limit (example)=Own vehicle
Permanently showing detected traffic
signs in the multifunction display
XDisplay the assistance graphic using the
on-board computer ( Y page 217).
A traffic sign indicating a speed limit or the
end of a speed limit ; appears in the mul-
tifunction display as soon as it is detected.Traffic sign indicating a speed limit ; is
generally displayed until:
R a traffic sign indicating the end of the
speed limit is detected.
R you make a turn.
R you leave or enter a town.
R the road type changes (e.g. motorway,
country road).
R you have travelled a certain minimum
distance without the traffic sign being
repeated or detected again.
i You can also activate Speed Limit Assist
using COMAND Online. The maximum per-
missible speed is shown in the COMAND
display; see the COMAND Online operating
instructions.
Lane Tracking package
General notes
The Lane Tracking package consists of Blind
Spot Assist ( Y page 197) and Lane Keeping
Assist ( Y page 199).
Blind Spot Assist
General notes
Blind Spot Assist uses a radar sensor system
to monitor the areas on both sides of your
vehicle. It supports you from speeds of
30 km/h. A warning display in the exterior
mirrors draws your attention to vehicles
detected in the monitored area. If you then
switch on the corresponding turn signal to
change lane, you will also receive an optical
and audible collision warning. For this pur-
pose, Blind Spot Assist uses sensors in the
rear bumper.
Driving systems197Driving and parkingZProCarManuals.com