2013 MERCEDES-BENZ CLA-CLASS lights
[x] Cancel search: lightsPage 67 of 352
Important safety notes
iObserve the "Important safety notes" sec-
tion ( Y page 64).
GWARNING
If BAS is malfunctioning, the braking distance
in an emergency braking situation is
increased. There is a risk of accident.
In an emergency braking situation, depress
the brake pedal with full force. ABS prevents
the wheels from locking.
Braking
XKeep the brake pedal depressed firmly until
the emergency braking situation is over.
ABS prevents the wheels from locking.
The brakes will function as usual once you
release the brake pedal. BAS is deactivated.
COLLISION PREVENTION ASSIST
General notes
COLLISION PREVENTION ASSIST consists of
the adaptive Brake Assist and the distance
warning signal, which are described in the
following.
Distance warning function
Important safety notes
i Observe the "Important safety notes" sec-
tion for driving safety systems
( Y page 64).
GWARNING
The distance warning function does not react:
R to people or animals
R to oncoming vehicles
R to crossing traffic
R when cornering
Thus, the distance warning function cannot
provide a warning in all critical situations.
There is a risk of an accident.
Always pay careful attention to the traffic sit-
uation and be ready to brake.
The distance warning function cannot always
clearly identify objects and complex traffic
situations.
In such cases, the distance warning function
may:
R give an unnecessary warning
R not give a warning
Always pay careful attention to the traffic sit-
uation; do not rely on the distance warning
function alone.
FunctionXTo activate/deactivate: activate or deac-
tivate the distance warning function in the
on-board computer ( Y page 218).
If the distance warning function is not activa-
ted, the æ symbol appears in the assis-
tance graphics display.
The distance warning function can help you
to minimise the risk of a front-end collision
with a vehicle ahead or reduce the effects of
such a collision. If the distance warning func-
tion detects that there is a risk of a collision,
you will be warned visually and acoustically.
Without your intervention, the distance warn-
ing function cannot prevent a collision.
The distance warning function issues a warn-
ing at speeds:
R of around 30 km/h or more, if, over several
seconds, the distance maintained to the
vehicle travelling in front is insufficient. The
· distance warning lamp then lights up
in the instrument cluster.
R of around 7 km/h or higher, if you very
quickly approach a vehicle in front. An
intermittent warning tone will then sound,
and the · distance warning lamp will
light up in the instrument cluster.
Driving safety systems65SafetyZProCarManuals.com
Page 70 of 352

Rstrong radar reflections, for example, in
multi-storey car parks
R a narrow vehicle travelling in front, e.g. a
motorcycle
R a vehicle travelling in front on a different
line
Following damage to the front end of the vehi-
cle, have the configuration and operation of
the radar sensor checked at a qualified spe-
cialist workshop. This also applies to colli-
sions at slow speeds where there is no visible
damage to the front of the vehicle.
Adaptive brake lamps
Adaptive Brake Assist warns following traffic
in an emergency braking situation:
R by means of flashing brake lamps
R the hazard warning lamps are activated
If you brake sharply from a speed of more
than 50 km/h or if braking is assisted by BAS
or BAS PLUS, the brake lamps flash rapidly.
In this way, traffic travelling behind you is
warned in an even more noticeable manner.
If you brake sharply from a speed of more
than 70 km/h to a standstill, the hazard warn-
ing lamps are activated automatically. If the
brakes are applied again, the brake lamps
light up continuously. The hazard warning
lamps switch off automatically if you travel
faster than 10 km/h . You can also switch off
the hazard warning lamps using the hazard
warning button ( Y page 110).
ESP ®
(Electronic Stability Program)
General notes
i Observe the "Important safety notes" sec-
tion ( Y page 64).
ESP ®
monitors driving stability and traction,
i.e. power transmission between the tyres
and the road surface.
If ESP ®
detects that the vehicle is deviating
from the direction desired by the driver, one
or more wheels are braked to stabilise the
vehicle. The engine output is also modified to
keep the vehicle on the desired course within
physical limits. ESP ®
assists the driver when
pulling away on wet or slippery roads. ESP ®
can also stabilise the vehicle during braking.
ETS (Electronic Traction System)
i Observe the "Important safety notes" sec-
tion ( Y page 64).
ETS traction control is part of ESP ®
.
ETS brakes the drive wheels individually if
they spin. This enables you to pull away and
accelerate on slippery surfaces, for example
if the road surface is slippery on one side. In
addition, more drive torque is transferred to
the wheel or wheels with traction.
ETS remains active when you deactivate
ESP ®
.
Important safety notes
GWARNING
If ESP ®
is malfunctioning, ESP ®
is unable to
stabilise the vehicle. In addition, other driving
safety systems are switched off. This increa-
ses the risk of skidding and an accident.
Drive on carefully. Have ESP ®
checked at a
qualified specialist workshop.
! When testing the electric parking brake
on a braking dynamometer, switch off the
ignition. Application of the brakes by
ESP ®
may otherwise destroy the brake sys-
tem.
When towing your vehicle with the front axle
raised, observe the notes on
ESP ®
(Y page 310).
ESP ®
is deactivated if the å ESP®
OFF
warning lamp in the instrument cluster lights
up continuously when the engine is running.
If the ÷ ESP®
warning lamp and the
å ESP®
OFF warning lamp are lit contin-
uously, ESP ®
is not available due to a mal-
function.
68Driving safety systemsSafety
ProCarManuals.com
Page 71 of 352
Observe the information on warning lamps
( Y page 258) and display messages which
may be shown in the instrument cluster
( Y page 227).
i Only use wheels with the recommended
tyre sizes. Only then will ESP ®
function
properly.
Characteristics of ESP ®
General notes
If the ÷ ESP warning lamp goes out before
beginning the journey, ESP ®
is automatically
active.
If ESP ®
intervenes, the ÷ ESP®
warning
lamp flashes in the instrument cluster.
If ESP ®
intervenes:
XDo not deactivate ESP ®
under any circum-
stances.XWhen pulling away, only depress the accel-
erator pedal as far as is necessary.XAdapt your driving style to suit the prevail-
ing road and weather conditions.
ECO start/stop function
The ECO start/stop function switches the
engine off automatically if the vehicle stops
moving. When pulling away again, the engine
starts automatically. ESP ®
remains in its pre-
viously selected status. Example: if ESP®
was deactivated before the engine was
switched off, ESP ®
remains deactivated when
the engine is switched on again.
Deactivating/activating ESP ®
Important safety notes
i Observe the "Important safety notes" sec-
tion ( Y page 64).
You can select between the following states
of ESP ®
:
R ESP ®
is activated.
R ESP ®
is deactivated.
GWARNING
If you deactivate ESP ®
, ESP ®
no longer sta-
bilises the vehicle. There is an increased risk
of skidding and an accident.
Only deactivate ESP ®
in the situations descri-
bed in the following.
It may be best to deactivate ESP ®
in the fol-
lowing situations:
R when using snow chains
R in deep snow
R on sand or gravel
i Activate ESP ®
as soon as the situations
described above no longer apply. ESP ®
will
otherwise not be able to stabilise the vehi-
cle if the vehicle starts to skid or a wheel
starts to spin.
Deactivating/activating ESP ®
You can deactivate or activate ESP ®
via the
on-board computer.
XTo deactivate: (Y page 218).
The å ESP®
OFF warning lamp in the
instrument cluster lights up.XTo activate: (Y page 218).
The å ESP®
OFF warning lamp in the
instrument cluster goes out.
Characteristics when ESP ®
is deactivated
If ESP ®
is deactivated and one or more wheels
start to spin, the ÷ ESP®
warning lamp in
the instrument cluster flashes. In such situa-
tions, ESP ®
will not stabilise the vehicle.
If you deactivate ESP ®
:
R ESP ®
no longer improves driving stability.
R engine torque is no longer limited and the
drive wheels are able to spin.
The spinning of the wheels results in a cut-
ting action for better traction on loose sur-
faces.
R ETS is still active.
R ESP ®
still provides support when you
brake.
Driving safety systems69SafetyZProCarManuals.com
Page 74 of 352
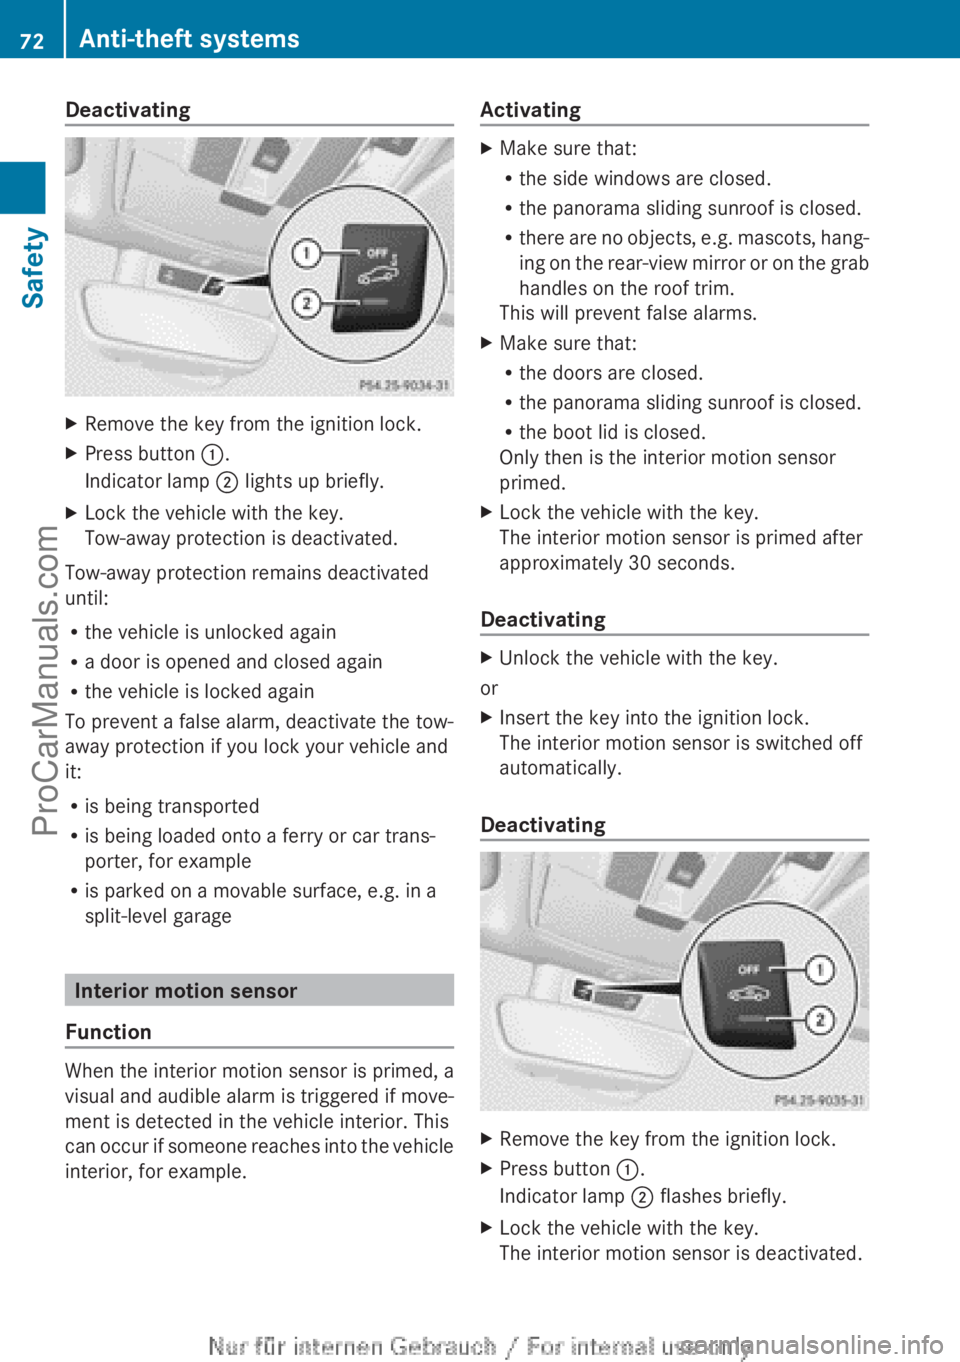
DeactivatingXRemove the key from the ignition lock.XPress button :.
Indicator lamp ; lights up briefly.XLock the vehicle with the key.
Tow-away protection is deactivated.
Tow-away protection remains deactivated
until:
R the vehicle is unlocked again
R a door is opened and closed again
R the vehicle is locked again
To prevent a false alarm, deactivate the tow-
away protection if you lock your vehicle and
it:
R is being transported
R is being loaded onto a ferry or car trans-
porter, for example
R is parked on a movable surface, e.g. in a
split-level garage
Interior motion sensor
Function
When the interior motion sensor is primed, a
visual and audible alarm is triggered if move-
ment is detected in the vehicle interior. This
can occur if someone reaches into the vehicle
interior, for example.
ActivatingXMake sure that:
R the side windows are closed.
R the panorama sliding sunroof is closed.
R there are no objects, e.g. mascots, hang-
ing on the rear-view mirror or on the grab
handles on the roof trim.
This will prevent false alarms.XMake sure that:
R the doors are closed.
R the panorama sliding sunroof is closed.
R the boot lid is closed.
Only then is the interior motion sensor
primed.XLock the vehicle with the key.
The interior motion sensor is primed after
approximately 30 seconds.
Deactivating
XUnlock the vehicle with the key.
or
XInsert the key into the ignition lock.
The interior motion sensor is switched off
automatically.
Deactivating
XRemove the key from the ignition lock.XPress button :.
Indicator lamp ; flashes briefly.XLock the vehicle with the key.
The interior motion sensor is deactivated.72Anti-theft systemsSafety
ProCarManuals.com
Page 80 of 352
If you unlock the vehicle using the emergency
key element, the fuel filler flap will not be
unlocked automatically.XTo unlock the fuel filler flap: insert the
key into the ignition lock.
Removing the emergency key element
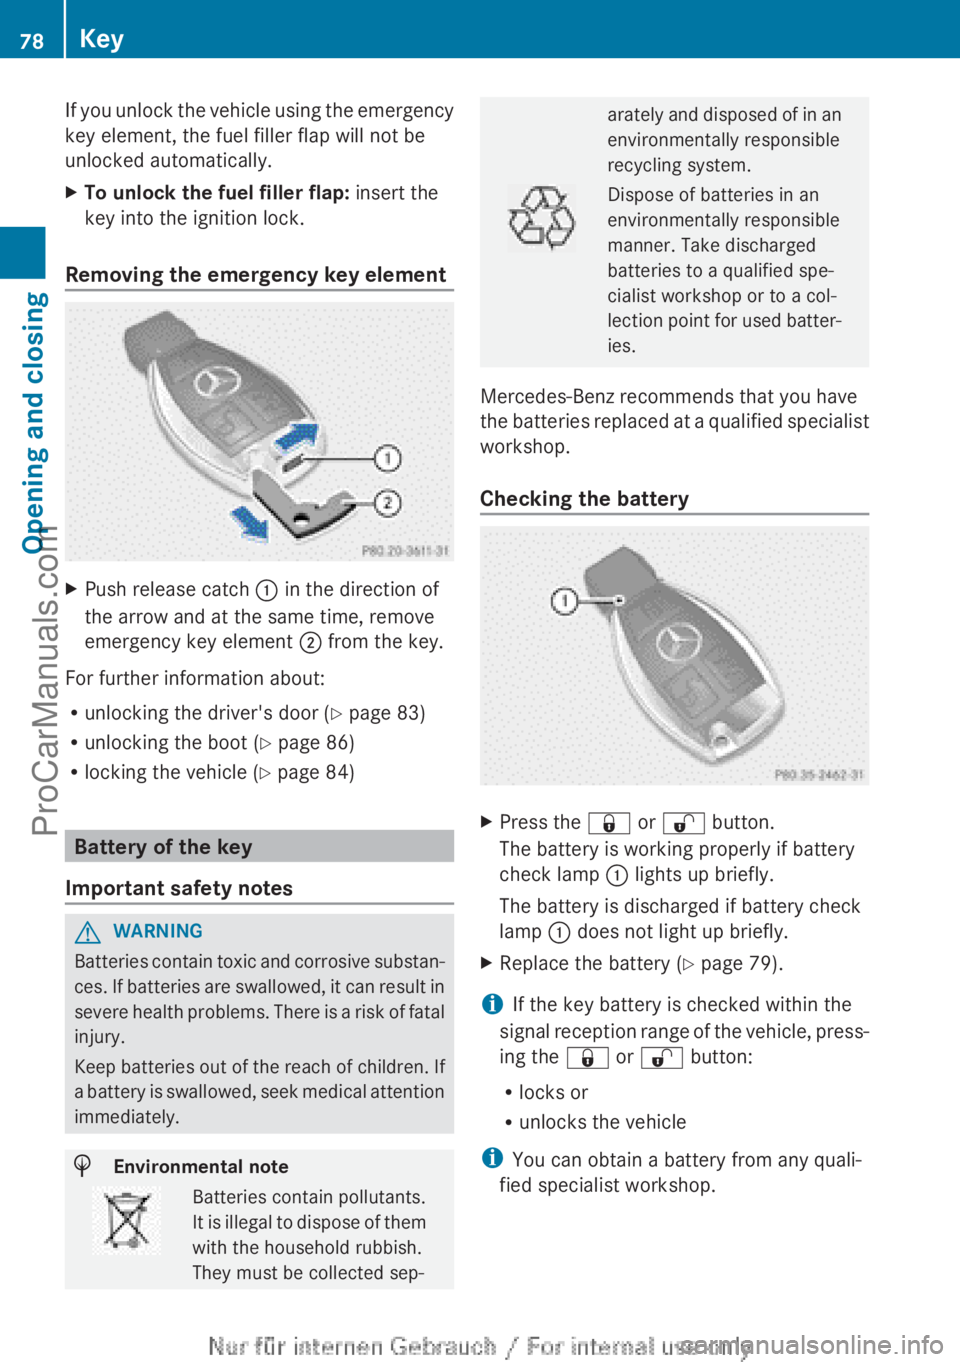
XPush release catch : in the direction of
the arrow and at the same time, remove
emergency key element ; from the key.
For further information about:
R unlocking the driver's door ( Y page 83)
R unlocking the boot ( Y page 86)
R locking the vehicle ( Y page 84)
Battery of the key
Important safety notes
GWARNING
Batteries contain toxic and corrosive substan-
ces. If batteries are swallowed, it can result in
severe health problems. There is a risk of fatal
injury.
Keep batteries out of the reach of children. If
a battery is swallowed, seek medical attention
immediately.
HEnvironmental noteBatteries contain pollutants.
It is illegal to dispose of them
with the household rubbish.
They must be collected sep-arately and disposed of in an
environmentally responsible
recycling system.Dispose of batteries in an
environmentally responsible
manner. Take discharged
batteries to a qualified spe-
cialist workshop or to a col-
lection point for used batter-
ies.
Mercedes-Benz recommends that you have
the batteries replaced at a qualified specialist
workshop.
Checking the battery
XPress the & or % button.
The battery is working properly if battery
check lamp : lights up briefly.
The battery is discharged if battery check
lamp : does not light up briefly.XReplace the battery ( Y page 79).
i If the key battery is checked within the
signal reception range of the vehicle, press-
ing the & or % button:
R locks or
R unlocks the vehicle
i You can obtain a battery from any quali-
fied specialist workshop.
78KeyOpening and closing
ProCarManuals.com
Page 103 of 352
Mirrors
Rear-view mirror
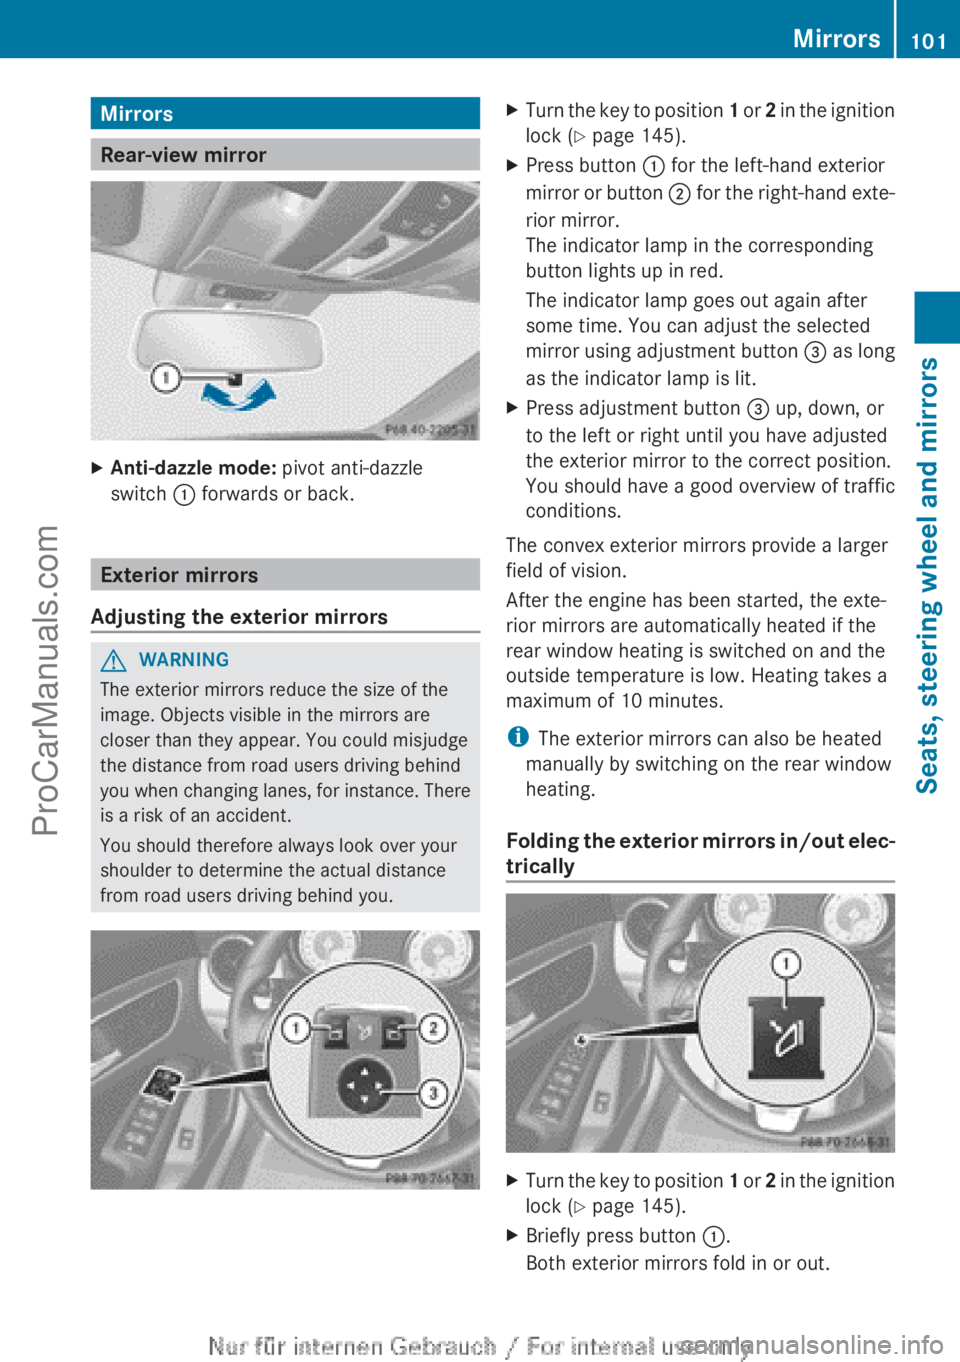
XAnti-dazzle mode: pivot anti-dazzle
switch : forwards or back.
Exterior mirrors
Adjusting the exterior mirrors
GWARNING
The exterior mirrors reduce the size of the
image. Objects visible in the mirrors are
closer than they appear. You could misjudge
the distance from road users driving behind
you when changing lanes, for instance. There
is a risk of an accident.
You should therefore always look over your
shoulder to determine the actual distance
from road users driving behind you.
XTurn the key to position 1 or 2 in the ignition
lock ( Y page 145).XPress button : for the left-hand exterior
mirror or button ; for the right-hand exte-
rior mirror.
The indicator lamp in the corresponding
button lights up in red.
The indicator lamp goes out again after
some time. You can adjust the selected
mirror using adjustment button = as long
as the indicator lamp is lit.XPress adjustment button = up, down, or
to the left or right until you have adjusted
the exterior mirror to the correct position.
You should have a good overview of traffic
conditions.
The convex exterior mirrors provide a larger
field of vision.
After the engine has been started, the exte-
rior mirrors are automatically heated if the
rear window heating is switched on and the
outside temperature is low. Heating takes a
maximum of 10 minutes.
i The exterior mirrors can also be heated
manually by switching on the rear window
heating.
Folding the exterior mirrors in/out elec-
trically
XTurn the key to position 1 or 2 in the ignition
lock ( Y page 145).XBriefly press button :.
Both exterior mirrors fold in or out.Mirrors101Seats, steering wheel and mirrorsZProCarManuals.com
Page 107 of 352
Useful information ............................106
Exterior lighting ................................ 106
Interior lighting ................................. 113
Replacing bulbs ................................. 114
Windscreen wipers ...........................118105Lights and windscreen wipersProCarManuals.com
Page 108 of 352

Useful information
i This Owner's Manual describes all mod-
els, series and optional equipment for your
vehicle that were available at the time of
going to press. National variations are pos-
sible. Note that your vehicle may not be
equipped with all of the functions descri-
bed. This is also the case for systems and
functions relevant to safety.
i Read the information on qualified special-
ist workshops: ( Y page 24).
Exterior lighting
General notes
For reasons of safety, Mercedes-Benz recom-
mends that you drive with the lights switched
on even during the daytime. In some coun-
tries, operation of the headlamps varies due
to legal requirements and self-imposed obli-
gations.
Driving abroad
General notes
If your journey takes you to countries where
vehicles are driven on the opposite side of the
road to the country in which the vehicle is
registered, your headlamps must be switched
to symmetrical dipped beam as soon as pos-
sible after crossing the border (exception:
vehicles with halogen headlamps). This pre-
vents oncoming traffic from being dazzled.
Symmetrical lights do not illuminate as large
an area of the edge of the carriageway.
Vehicles with halogen headlamps
It is not necessary to switch your headlamps
to symmetrical dipped beam when driving in
countries where vehicles are driven on the
opposite side of the road to the country in
which the vehicle is registered. Legal require-
ments are fulfilled without switching the
headlamps to symmetrical dipped beam.
Vehicles with bi-xenon headlampsXTurn protective cap : anti-clockwise and
remove it.XPush switchover lever ; down.XInsert protective cap : and turn it clock-
wise.
Convert the headlamps back to asymmetrical
dipped beam as soon as possible after return-
ing across the border.
Vehicles with Intelligent Light System
XBefore crossing the border, set the head-
lamps to symmetrical dipped beam and
after returning back to asymmetrical
dipped beam via the "Dipped-beam head-
lamps for driving on the right/left" function
in the on-board computer ( Y page 221).
If the headlamps are converted to symmetri-
cal dipped beam, the "motorway mode" and
"extended range foglamps" functions are not
available.
Setting the exterior lighting
Setting options
Exterior lighting can be set using the:
R light switch
R headlamp range control (vehicles with hal-
ogen headlamps only) ( Y page 108)
106Exterior lightingLights and windscreen wipers
ProCarManuals.com