2013 MERCEDES-BENZ CLA-CLASS key battery
[x] Cancel search: key batteryPage 138 of 352
Auxiliary heating
Important safety notesGDANGER
If the exhaust pipe is blocked or sufficient
ventilation is not possible, toxic exhaust
fumes can enter the vehicle, especially car-
bon monoxide. This is the case, e.g. in
enclosed spaces, or if the vehicle is stuck in
snow. There is a risk of fatal injuries.
You should switch off the auxiliary heating in
enclosed spaces which do not have an extrac-
tion system, e.g. a garage. If the vehicle is
stuck in snow and you must leave the auxiliary
heating running, keep the exhaust pipe and
the area around the vehicle clear of snow. To
guarantee a sufficient supply of fresh air, open
a window on the side of the vehicle away from
the wind.
GWARNING
When the auxiliary heating is switched on,
parts of the vehicle can become very hot.
Flammable material such as leaves, grass or
twigs may ignite if they come into contact with
hot parts of the exhaust system for extended
periods. There is a risk of fire.
When the auxiliary heating is switched on,
make sure that no flammable material can
come into contact with hot vehicle compo-
nents.
! Operating the auxiliary heating/ventila-
tion draws on the vehicle battery. After you
have heated or ventilated the vehicle a
maximum of two times, drive for a longer
distance.
i Switch the auxiliary heating on regularly
once a month for about ten minutes.
The auxiliary heating heats the air in the vehi-
cle interior to the set temperature. This
occurs without using the heat of the running
engine. The auxiliary heating is operated
directly using the vehicle's fuel. For this rea-
son, the fuel tank must be at least ¼ full to
ensure that the auxiliary heating functions.
The auxiliary heating/ventilation automati-
cally adjusts to changes in temperature and
weather conditions. For this reason, the aux-
iliary heating could switch from ventilation
mode to heating mode or from heating mode
to ventilation mode.
The auxiliary heating switches off when the
engine is switched off. The auxiliary ventila-
tion switches off when you turn the key to key
position 2(Y page 145).
The auxiliary heating switches off automati-
cally after 30 minutes.
You cannot use the auxiliary ventilation to
cool the vehicle interior to a temperature
lower than the outside temperature.
Before switching onXTurn the key to position 2 in the ignition
lock ( Y page 145).XSet the desired temperature.
Auxiliary heating or ventilation can also be
switched on if the manually set climate con-
trol is activated. Optimum comfort can be
attained when the system is set to automatic
mode. Set the temperature to 22 †.
The auxiliary heating/ventilation can be acti-
vated or deactivated using the remote control
or the button on the centre console.
The on-board computer can be used to spec-
ify up to three departure times, one of which
may be preselected ( Y page 224).
136Operating the climate control systemClimate control
ProCarManuals.com
Page 150 of 352
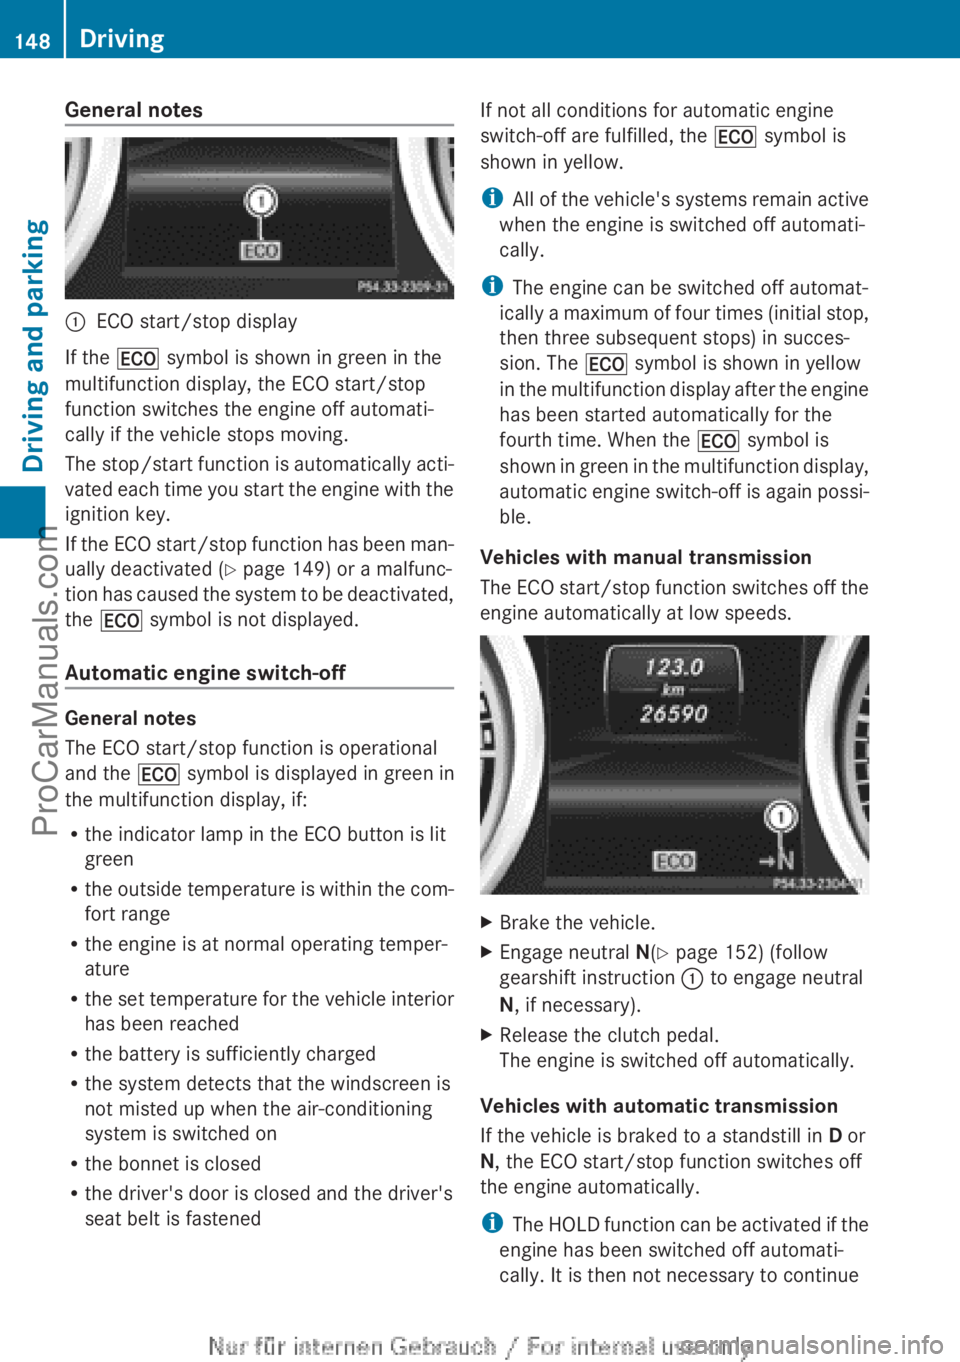
General notes:ECO start/stop display
If the ¤ symbol is shown in green in the
multifunction display, the ECO start/stop
function switches the engine off automati-
cally if the vehicle stops moving.
The stop/start function is automatically acti-
vated each time you start the engine with the
ignition key.
If the ECO start/stop function has been man-
ually deactivated ( Y page 149) or a malfunc-
tion has caused the system to be deactivated,
the ¤ symbol is not displayed.
Automatic engine switch-off
General notes
The ECO start/stop function is operational
and the ¤ symbol is displayed in green in
the multifunction display, if:
R the indicator lamp in the ECO button is lit
green
R the outside temperature is within the com-
fort range
R the engine is at normal operating temper-
ature
R the set temperature for the vehicle interior
has been reached
R the battery is sufficiently charged
R the system detects that the windscreen is
not misted up when the air-conditioning
system is switched on
R the bonnet is closed
R the driver's door is closed and the driver's
seat belt is fastened
If not all conditions for automatic engine
switch-off are fulfilled, the ¤ symbol is
shown in yellow.
i All of the vehicle's systems remain active
when the engine is switched off automati-
cally.
i The engine can be switched off automat-
ically a maximum of four times (initial stop,
then three subsequent stops) in succes-
sion. The ¤ symbol is shown in yellow
in the multifunction display after the engine
has been started automatically for the
fourth time. When the ¤ symbol is
shown in green in the multifunction display,
automatic engine switch-off is again possi-
ble.
Vehicles with manual transmission
The ECO start/stop function switches off the
engine automatically at low speeds.XBrake the vehicle.XEngage neutral N(Y page 152) (follow
gearshift instruction : to engage neutral
N , if necessary).XRelease the clutch pedal.
The engine is switched off automatically.
Vehicles with automatic transmission
If the vehicle is braked to a standstill in D or
N , the ECO start/stop function switches off
the engine automatically.
i The HOLD function can be activated if the
engine has been switched off automati-
cally. It is then not necessary to continue
148DrivingDriving and parking
ProCarManuals.com
Page 152 of 352
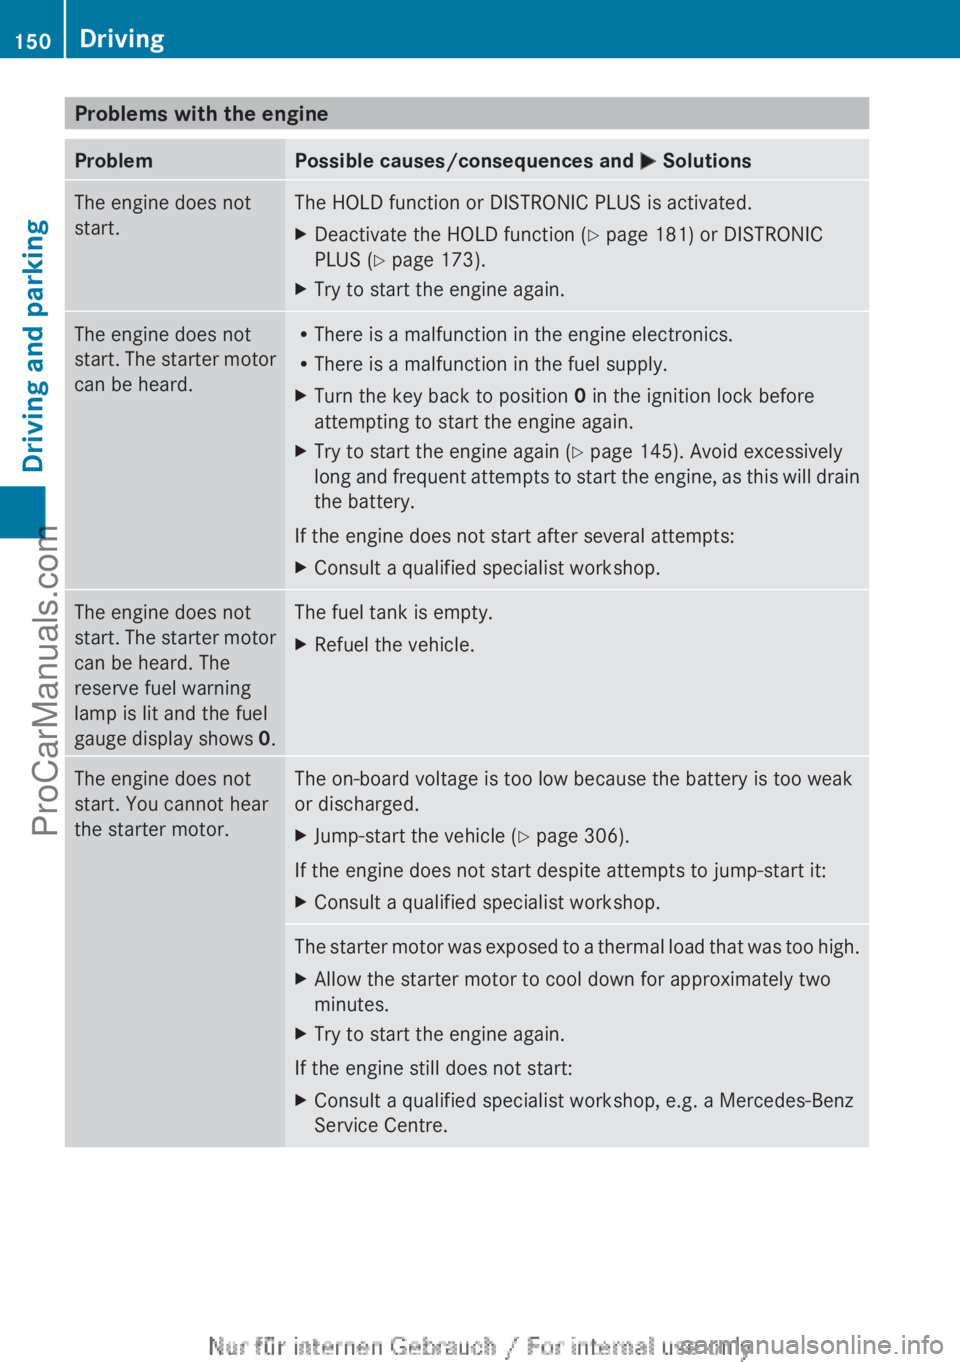
Problems with the engineProblemPossible causes/consequences and M SolutionsThe engine does not
start.The HOLD function or DISTRONIC PLUS is activated.XDeactivate the HOLD function ( Y page 181) or DISTRONIC
PLUS ( Y page 173).XTry to start the engine again.The engine does not
start. The starter motor
can be heard.R There is a malfunction in the engine electronics.
R There is a malfunction in the fuel supply.XTurn the key back to position 0 in the ignition lock before
attempting to start the engine again.XTry to start the engine again ( Y page 145). Avoid excessively
long and frequent attempts to start the engine, as this will drain
the battery.
If the engine does not start after several attempts:
XConsult a qualified specialist workshop.The engine does not
start. The starter motor
can be heard. The
reserve fuel warning
lamp is lit and the fuel
gauge display shows 0.The fuel tank is empty.XRefuel the vehicle.The engine does not
start. You cannot hear
the starter motor.The on-board voltage is too low because the battery is too weak
or discharged.XJump-start the vehicle ( Y page 306).
If the engine does not start despite attempts to jump-start it:
XConsult a qualified specialist workshop.The starter motor was exposed to a thermal load that was too high.XAllow the starter motor to cool down for approximately two
minutes.XTry to start the engine again.
If the engine still does not start:
XConsult a qualified specialist workshop, e.g. a Mercedes-Benz
Service Centre.150DrivingDriving and parking
ProCarManuals.com
Page 164 of 352
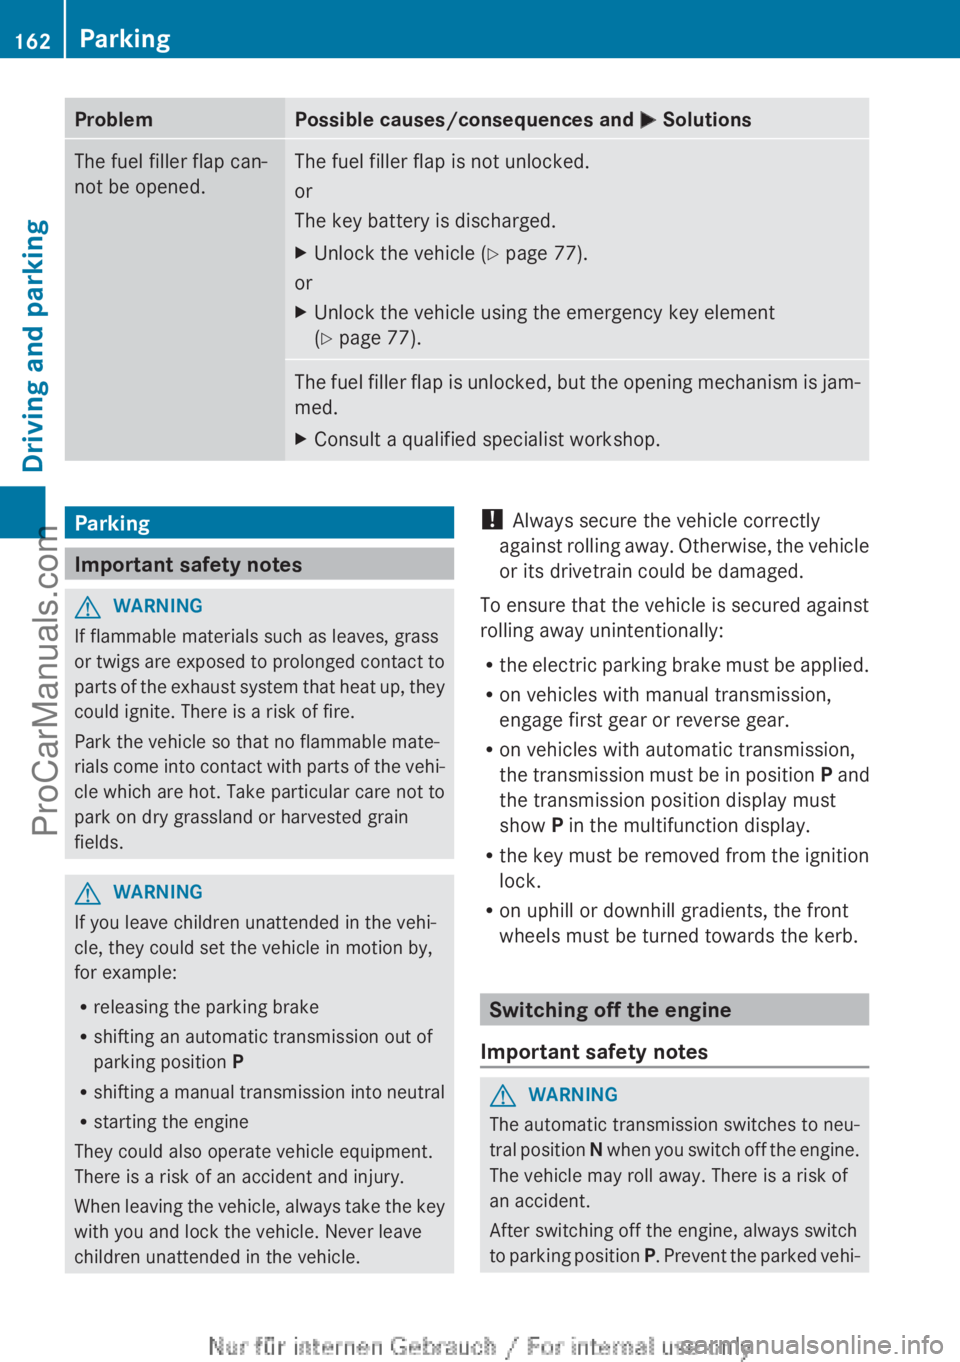
ProblemPossible causes/consequences and M SolutionsThe fuel filler flap can-
not be opened.The fuel filler flap is not unlocked.
or
The key battery is discharged.XUnlock the vehicle ( Y page 77).
or
XUnlock the vehicle using the emergency key element
( Y page 77).The fuel filler flap is unlocked, but the opening mechanism is jam-
med.XConsult a qualified specialist workshop.Parking
Important safety notes
GWARNING
If flammable materials such as leaves, grass
or twigs are exposed to prolonged contact to
parts of the exhaust system that heat up, they
could ignite. There is a risk of fire.
Park the vehicle so that no flammable mate-
rials come into contact with parts of the vehi-
cle which are hot. Take particular care not to
park on dry grassland or harvested grain
fields.
GWARNING
If you leave children unattended in the vehi-
cle, they could set the vehicle in motion by,
for example:
R releasing the parking brake
R shifting an automatic transmission out of
parking position P
R shifting a manual transmission into neutral
R starting the engine
They could also operate vehicle equipment.
There is a risk of an accident and injury.
When leaving the vehicle, always take the key
with you and lock the vehicle. Never leave
children unattended in the vehicle.
! Always secure the vehicle correctly
against rolling away. Otherwise, the vehicle
or its drivetrain could be damaged.
To ensure that the vehicle is secured against
rolling away unintentionally:
R the electric parking brake must be applied.
R on vehicles with manual transmission,
engage first gear or reverse gear.
R on vehicles with automatic transmission,
the transmission must be in position P and
the transmission position display must
show P in the multifunction display.
R the key must be removed from the ignition
lock.
R on uphill or downhill gradients, the front
wheels must be turned towards the kerb.
Switching off the engine
Important safety notes
GWARNING
The automatic transmission switches to neu-
tral position N when you switch off the engine.
The vehicle may roll away. There is a risk of
an accident.
After switching off the engine, always switch
to parking position P. Prevent the parked vehi-
162ParkingDriving and parking
ProCarManuals.com
Page 208 of 352
XPress the ball coupling in the direction of
the arrow until it engages behind the
bumper.
Indicator lamp ? goes out and the mes-
sage in the multifunction display disap-
pears.
Trailer power supply
! You can connect accessories with a
power rating of up to 240 W to the perma-
nent power supply and with a power rating
of up to 180 W to the power supply that is
switched on via the ignition lock.
The trailer battery may not be charged from
the power supply.
XTo switch the connected power supply
on or off: turn the key in the ignition lock
to position 2 or 0 respectively.
When it leaves the factory, your vehicle's
trailer socket is equipped with a permanent
power supply and a power supply that is
switched on via the ignition lock.
The permanent power supply is supplied via
trailer socket pin 9.
The power supply that is switched on via the
ignition lock is supplied via trailer socket pin
10.
The trailer's permanent power supply is
switched off in the event of low vehicle supply
voltage and after six hours at the latest.
You can find more information about instal-
ling the trailer electrics at a qualified special-
ist workshop.
Bulb failure indicator for LED lamps
i If LED lamps are fitted in the trailer, an
error message may appear in the multi-
function display even if there is no fault. The
reason for the error message could be that
the current has fallen below the minimum
of 50 mA.
To ensure reliable operation of the bulb failure
indicator, each LED chain in the trailer lighting
must be guaranteed a minimum current of
50 mA.
Trailer with 7-pin connector
General notes
Trailers with 7-pin connector: you can
make a connection to the 13-pin connector
on the ball coupling using an adapter plug or,
if necessary, an adapter cable. Both can be
obtained in a qualified specialist workshop.
Fitting the adapter
! Make sure that there is sufficient cable
play so that the cable cannot become
detached when cornering.
! Remove the installed adapter cable
before folding in the ball coupling. Other-
wise, damage may occur to the rear
bumper and the adapter cable.
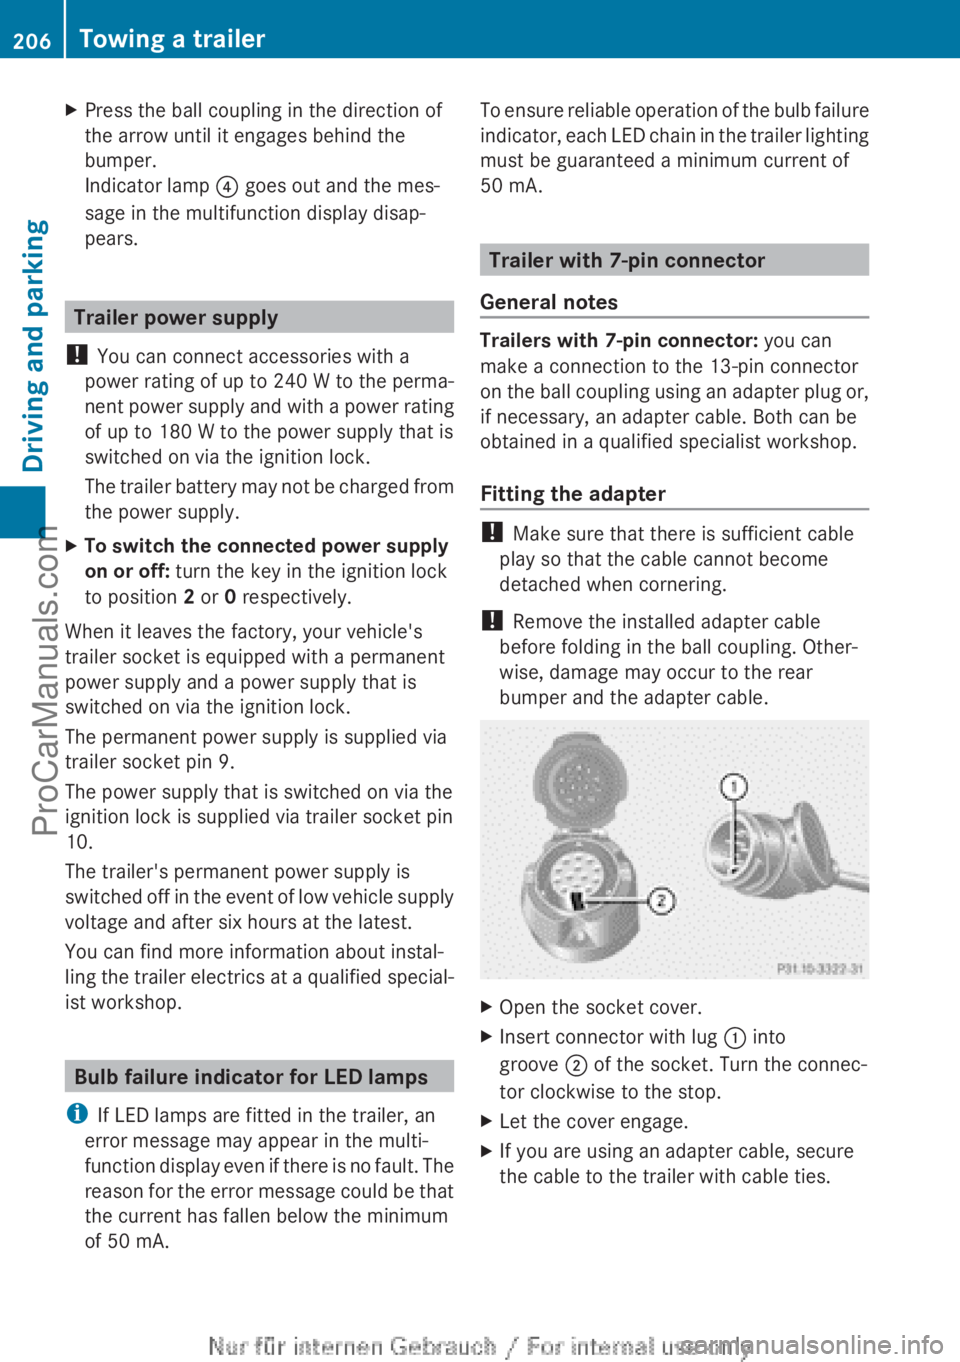
XOpen the socket cover.XInsert connector with lug : into
groove ; of the socket. Turn the connec-
tor clockwise to the stop.XLet the cover engage.XIf you are using an adapter cable, secure
the cable to the trailer with cable ties.206Towing a trailerDriving and parking
ProCarManuals.com
Page 234 of 352
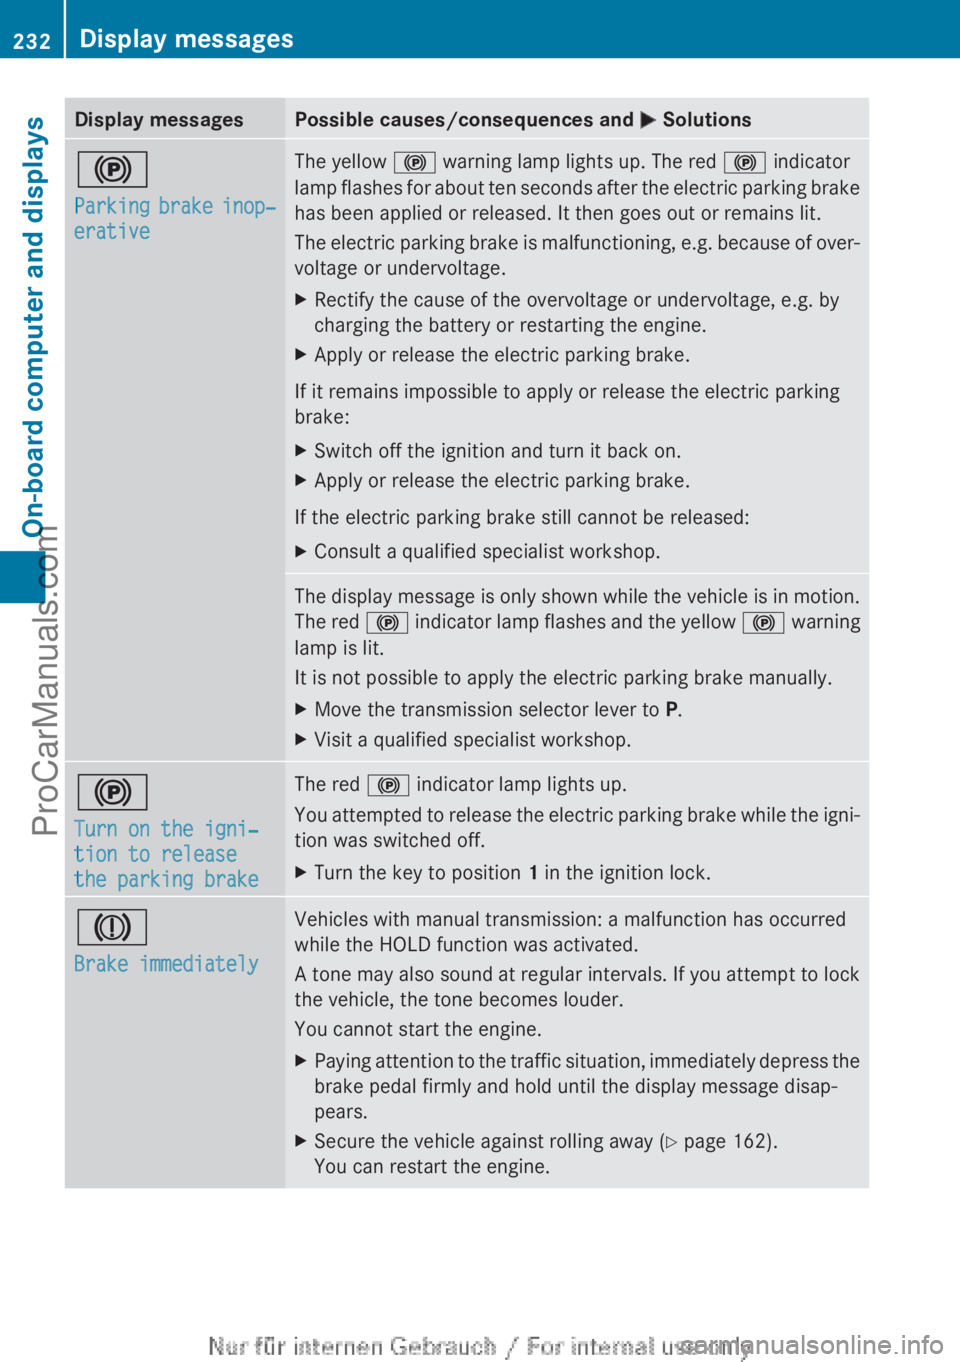
Display messagesPossible causes/consequences and M Solutions!
Parking brake inop‐
erativeThe yellow ! warning lamp lights up. The red ! indicator
lamp flashes for about ten seconds after the electric parking brake
has been applied or released. It then goes out or remains lit.
The electric parking brake is malfunctioning, e.g. because of over-
voltage or undervoltage.XRectify the cause of the overvoltage or undervoltage, e.g. by
charging the battery or restarting the engine.XApply or release the electric parking brake.
If it remains impossible to apply or release the electric parking
brake:
XSwitch off the ignition and turn it back on.XApply or release the electric parking brake.
If the electric parking brake still cannot be released:
XConsult a qualified specialist workshop.The display message is only shown while the vehicle is in motion.
The red ! indicator lamp flashes and the yellow ! warning
lamp is lit.
It is not possible to apply the electric parking brake manually.XMove the transmission selector lever to P.XVisit a qualified specialist workshop.!
Turn on the igni‐
tion to release
the parking brakeThe red ! indicator lamp lights up.
You attempted to release the electric parking brake while the igni-
tion was switched off.XTurn the key to position 1 in the ignition lock.J
Brake immediatelyVehicles with manual transmission: a malfunction has occurred
while the HOLD function was activated.
A tone may also sound at regular intervals. If you attempt to lock
the vehicle, the tone becomes louder.
You cannot start the engine.XPaying attention to the traffic situation, immediately depress the
brake pedal firmly and hold until the display message disap-
pears.XSecure the vehicle against rolling away ( Y page 162).
You can restart the engine.232Display messagesOn-board computer and displays
ProCarManuals.com
Page 279 of 352
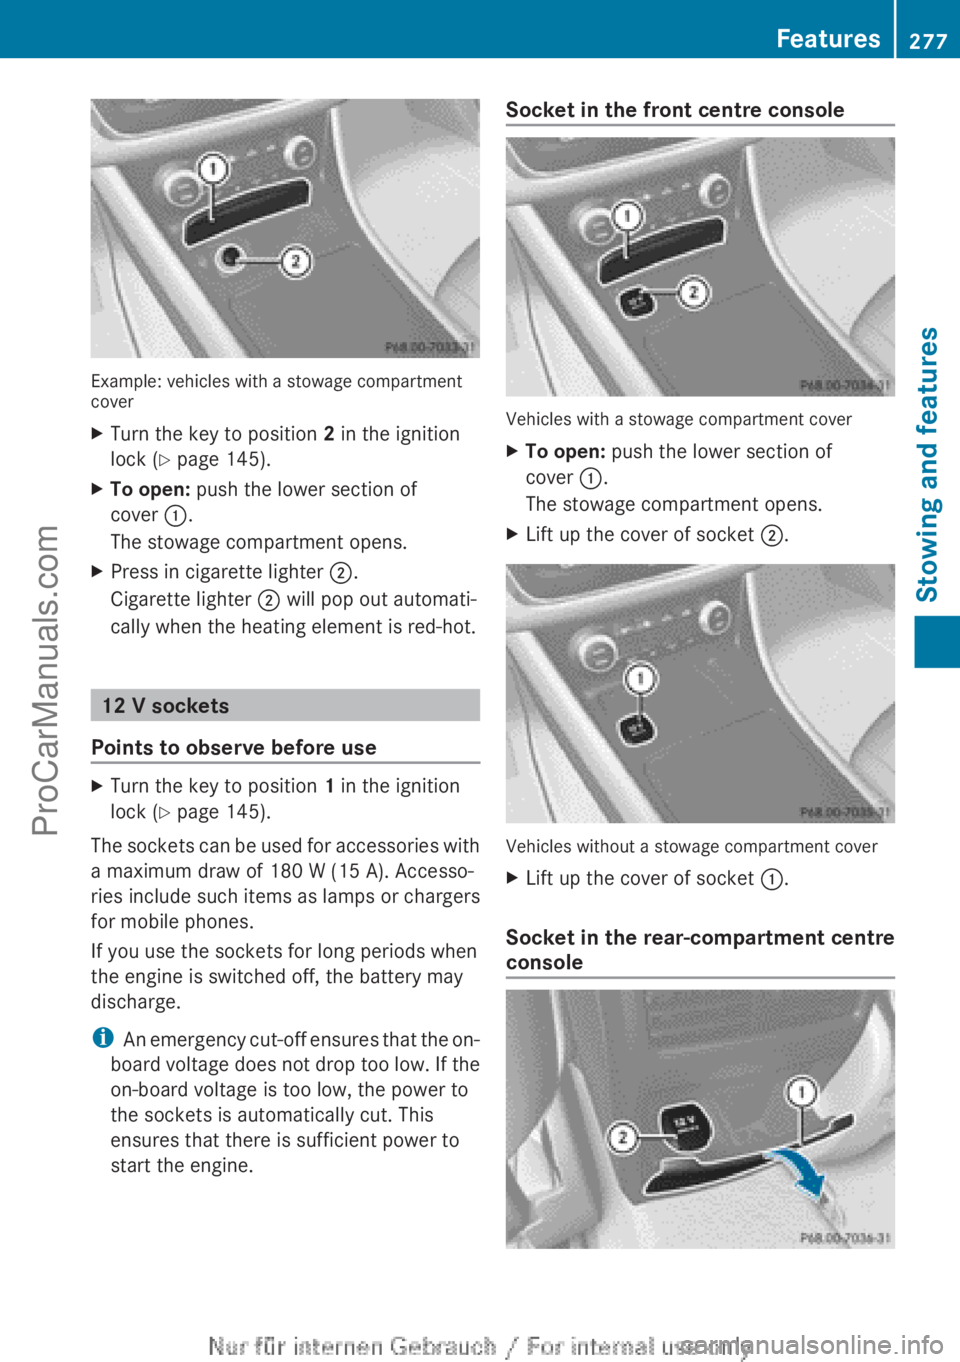
Example: vehicles with a stowage compartment
cover
XTurn the key to position 2 in the ignition
lock ( Y page 145).XTo open: push the lower section of
cover :.
The stowage compartment opens.XPress in cigarette lighter ;.
Cigarette lighter ; will pop out automati-
cally when the heating element is red-hot.
12 V sockets
Points to observe before use
XTurn the key to position 1 in the ignition
lock ( Y page 145).
The sockets can be used for accessories with
a maximum draw of 180 W (15 A). Accesso-
ries include such items as lamps or chargers
for mobile phones.
If you use the sockets for long periods when
the engine is switched off, the battery may
discharge.
i An emergency cut-off ensures that the on-
board voltage does not drop too low. If the
on-board voltage is too low, the power to
the sockets is automatically cut. This
ensures that there is sufficient power to
start the engine.
Socket in the front centre console
Vehicles with a stowage compartment cover
XTo open: push the lower section of
cover :.
The stowage compartment opens.XLift up the cover of socket ;.
Vehicles without a stowage compartment cover
XLift up the cover of socket :.
Socket in the rear-compartment centre
console
Features277Stowing and featuresZProCarManuals.com
Page 305 of 352
The highly flammable gas mixture is created
while the battery is charging and when jump-
starting.
Always make sure that neither you nor the
battery is electrostatically charged. Electro-
static charge is created, for example:
R by wearing synthetic fibre clothing
R due to friction between clothing and the
seat
R when you pull or push the battery across
carpet or other synthetic materials
R when you rub the battery with a clothGWARNING
During the charging process, a battery produ-
ces hydrogen gas. If a short circuit occurs or
sparks are created, the hydrogen gas can
ignite. There is a risk of an explosion.
R Make sure that the positive terminal of a
connected battery does not come into con-
tact with vehicle parts.
R Never place metal objects or tools on a bat-
tery.
R It is important that you observe the descri-
bed order of the battery terminals when
connecting and disconnecting a battery.
R When jump-starting, make sure that the
battery poles with identical polarity are
connected.
R It is particularly important to observe the
described order when connecting and dis-
connecting the jump leads.
R Never connect or disconnect the battery
terminals while the engine is running.
GWARNING
Battery acid is caustic. There is a risk of injury.
Avoid contact with the skin, eyes or clothing.
Do not inhale any battery gases. Do not lean
over the battery. Keep children away from
batteries. Wash battery acid immediately with
water and seek medical attention.
HEnvironmental noteBatteries contain pollutants.
It is illegal to dispose of them
with the household rubbish.
They must be collected sep-
arately and disposed of in an
environmentally responsible
recycling system.Dispose of batteries in an
environmentally responsible
manner. Take discharged
batteries to a qualified spe-
cialist workshop or to a col-
lection point for used batter-
ies.
! Have the battery checked regularly at a
qualified specialist workshop.
Observe the service intervals in the Service
Booklet or contact a qualified specialist
workshop for more information.
! Always have work on the battery carried
out at a qualified specialist workshop.
Should it, in exceptional circumstances, be
absolutely necessary to disconnect the bat-
tery yourself, please observe the following:
R switch off the engine and remove the
key. Check that all the indicator lamps in
the instrument cluster are off. Otherwise,
you may damage electronic components
such as the alternator, for example.
R first, disconnect the negative terminal
clamp, followed by the positive terminal
clamp. Never swap the terminal clamps.
The vehicle electronics may otherwise be
damaged.
R on vehicles with automatic transmission,
the transmission is locked in position P
after disconnecting the battery. The vehi-
cle is secured against rolling away. You
can then no longer move the vehicle.
The battery and the cover of the positive
terminal clamp must be fitted securely dur-
ing operation.
Battery (vehicle)303Breakdown assistanceZProCarManuals.com