2013 MERCEDES-BENZ CLA-CLASS height
[x] Cancel search: heightPage 97 of 352
The seat belt should:
R fit snugly across your body
R be routed across the middle of your
shoulder
R be routed in your pelvic area across the
hip jointsXBefore starting off, adjust the rear-view mir-
ror and the exterior mirrors ( Y page 101)
so that you have a good view of road and
traffic conditions.XVehicles with a memory function: save
the seat and exterior mirror settings
( Y page 103).
Seats
Important safety notes
GWARNING
If children adjust the seats, they could
become trapped, especially if they are unat-
tended. There is a risk of injury.
When leaving the vehicle, always take the key
with you and lock the vehicle. Never leave
children unattended in the vehicle.
GWARNING
You could lose control of the vehicle while
driving if you:
R adjust the driver's seat, steering wheel or
mirrors
R fasten the seat belt
There is a risk of an accident.
Adjust the driver's seat, head restraint, steer-
ing wheel and mirrors and fasten your seat
belt before starting the engine.
GWARNING
If you adjust the seat height carelessly, you or
other vehicle occupants could be trapped and
thereby injured. Children in particular could
accidentally press the electrical seat adjust-
ment buttons and become trapped. There is
a risk of injury.
While moving the seats, make sure that your
hands or other body parts do not get under
the lever assembly of the seat adjustment
system.GWARNING
When adjusting a seat, you or another vehicle
occupant could become trapped by the guide
rail of the seat, for instance. There is a risk of
injury.
Make sure that no one has any part of their
body within the sweep of the seat when
adjusting it.
GWARNING
The seat belt does not offer the intended level
of protection if the backrest is not in the
upright position. When braking or in the event
of an accident, you could slide underneath the
seat belt and sustain abdomen or neck inju-
ries, for example. This poses an increased risk
of injury or even fatal injury.
Adjust the seat properly before beginning
your journey. Always make sure that the seat
is in the upright position.
GWARNING
The head restraints cannot provide the inten-
ded protection unless they are fitted and
adjusted correctly. There is an increased risk
of injury to the head and neck in the event of
an accident or sudden braking, for example.
Always drive with the head restraints fitted.
Ensure that the centre of the head restraints
support the back of each vehicle occupant's
head at eye level before driving off.
! To avoid damage to the seats and the seat
heating, observe the following information:
R do not spill any liquids on the seats. If
liquid is spilled on the seats, dry them as
soon as possible.
R if the seat covers are damp or wet, do not
switch on the seat heating. The seat
heating should also not be used to dry
the seats.
Seats95Seats, steering wheel and mirrorsZProCarManuals.com
Page 98 of 352
Rclean the seat covers as recommended;
see the "Interior care" section.
R do not transport heavy loads on the
seats. Do not place sharp objects on the
seat cushions, e.g. knives, nails or tools.
The seats should only be occupied by
passengers, if possible.
R when the seat heating is in operation, do
not cover the seats with insulating mate-
rials, e.g. blankets, coats, bags, seat cov-
ers, child seats or booster seats.
! Make sure that there are no objects in the
footwell or behind the seats when moving
the seat back. There is a risk that the seats
and/or the objects could be damaged.
i The head restraints in the front and rear
seats can be removed. 6
For more information, contact a qualified
specialist workshop.
i Further related subjects:
R Luggage compartment enlargement
(folding down the rear seats)
( Y page 271)
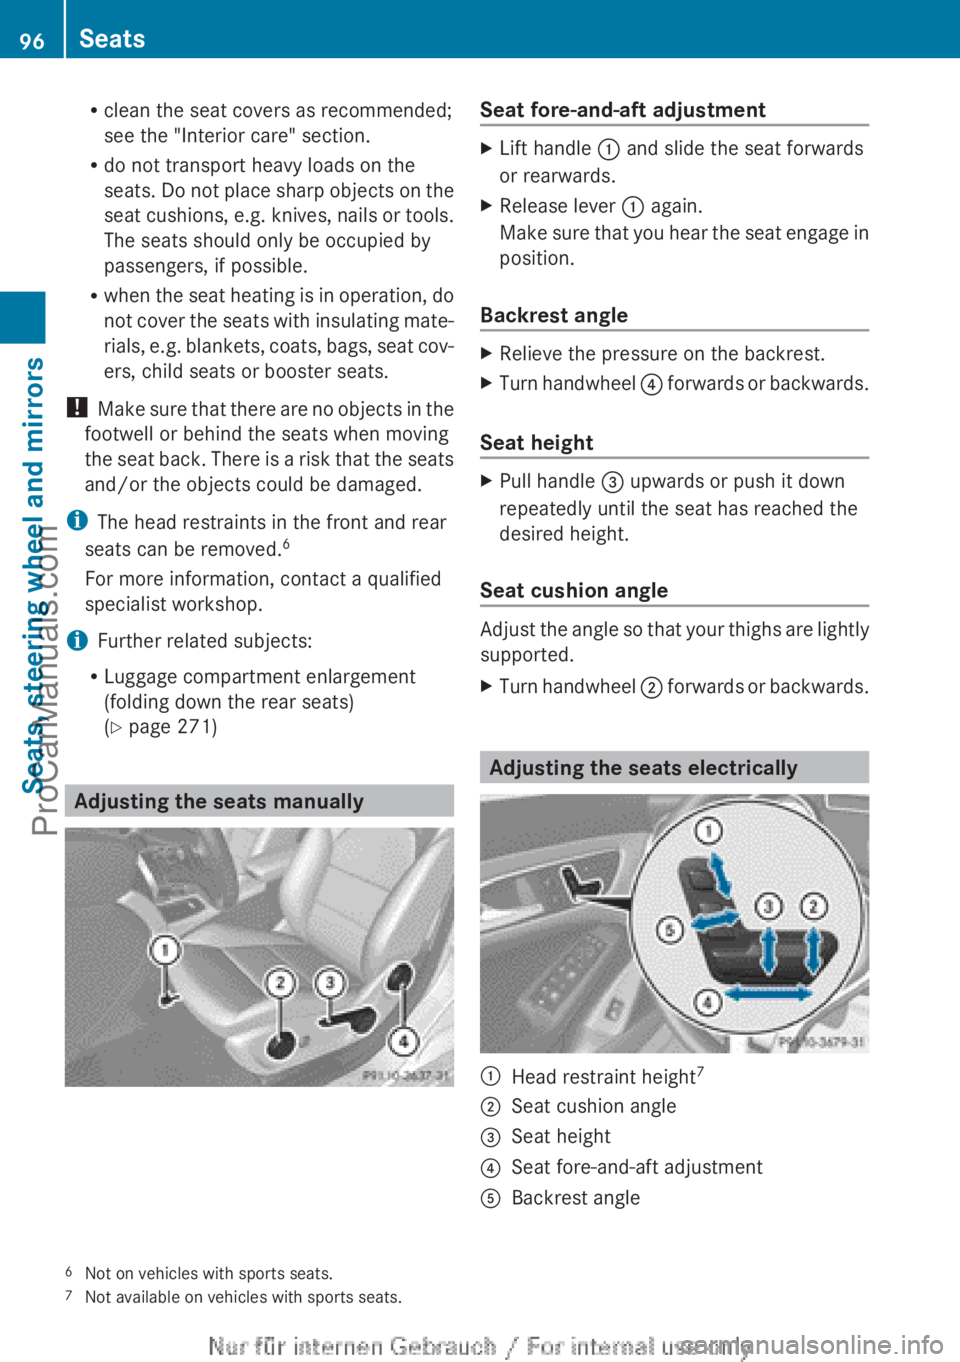
Adjusting the seats manually
Seat fore-and-aft adjustmentXLift handle : and slide the seat forwards
or rearwards.XRelease lever : again.
Make sure that you hear the seat engage in
position.
Backrest angle
XRelieve the pressure on the backrest.XTurn handwheel ? forwards or backwards.
Seat height
XPull handle = upwards or push it down
repeatedly until the seat has reached the
desired height.
Seat cushion angle
Adjust the angle so that your thighs are lightly
supported.
XTurn handwheel ; forwards or backwards.
Adjusting the seats electrically
:Head restraint height 7;Seat cushion angle=Seat height?Seat fore-and-aft adjustmentABackrest angle6
Not on vehicles with sports seats.
7 Not available on vehicles with sports seats.96SeatsSeats, steering wheel and mirrors
ProCarManuals.com
Page 99 of 352
iYou can store the seat settings using the
memory function ( Y page 103).
Adjusting the head restraints
GWARNING
You could lose control of the vehicle while
driving if you:
R adjust the driver's seat, steering wheel or
mirrors
R fasten the seat belt
There is a risk of an accident.
Adjust the driver's seat, head restraint, steer-
ing wheel and mirrors and fasten your seat
belt before starting the engine.
GWARNING
The head restraints cannot provide the inten-
ded protection unless they are fitted and
adjusted correctly. There is an increased risk
of injury to the head and neck in the event of
an accident or sudden braking, for example.
Always drive with the head restraints fitted.
Ensure that the centre of the head restraints
support the back of each vehicle occupant's
head at eye level before driving off.
General notes
For vehicles with sports seats, you cannot
adjust the head restraints or remove and fit
the rear head restraints.
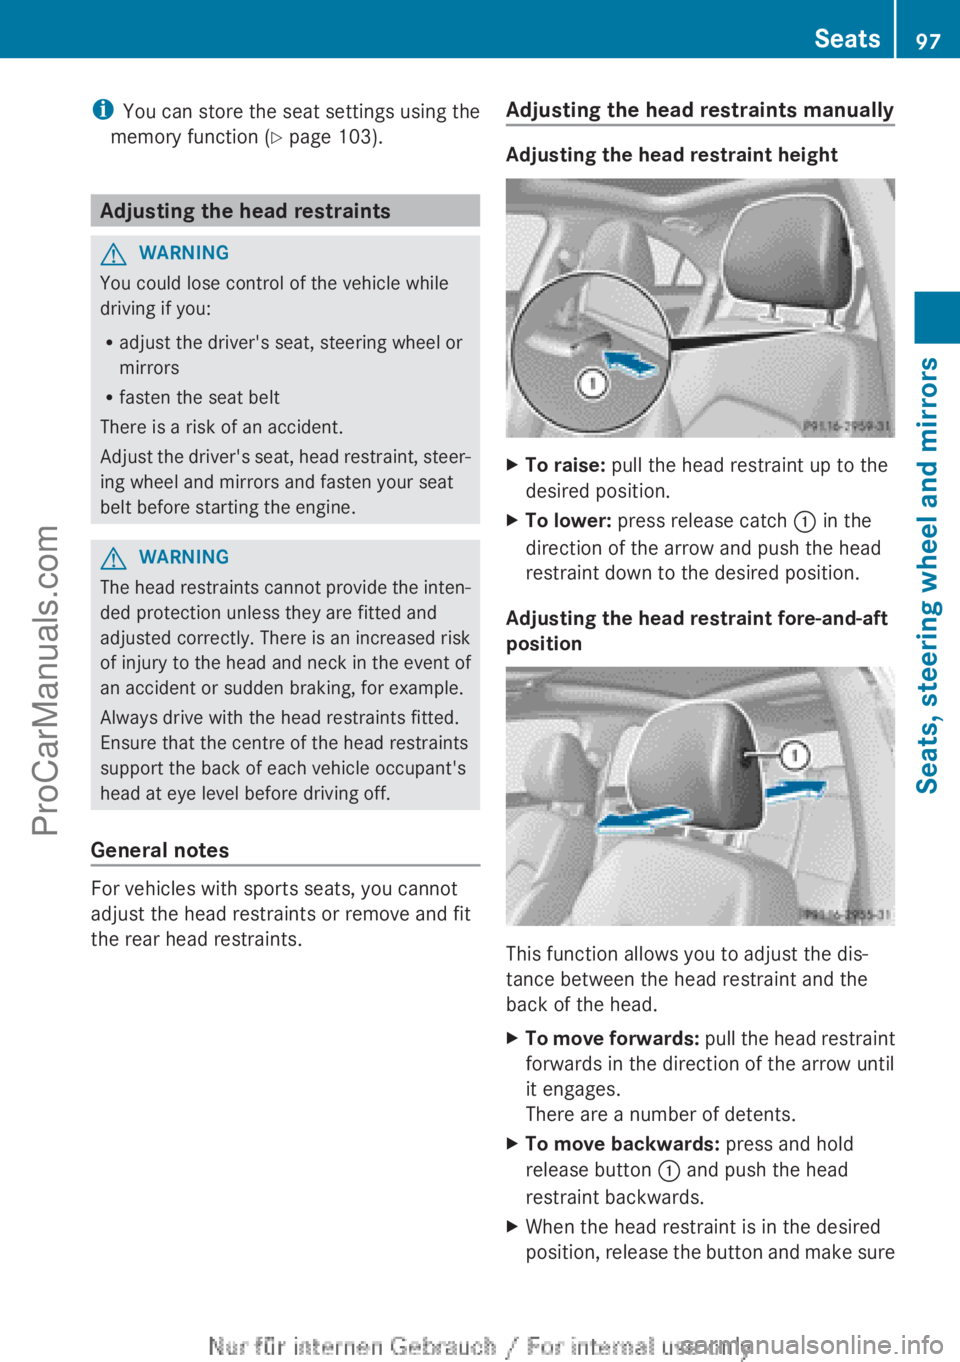
Adjusting the head restraints manually
Adjusting the head restraint height
XTo raise: pull the head restraint up to the
desired position.XTo lower: press release catch : in the
direction of the arrow and push the head
restraint down to the desired position.
Adjusting the head restraint fore-and-aft
position
This function allows you to adjust the dis-
tance between the head restraint and the
back of the head.
XTo move forwards: pull the head restraint
forwards in the direction of the arrow until
it engages.
There are a number of detents.XTo move backwards: press and hold
release button : and push the head
restraint backwards.XWhen the head restraint is in the desired
position, release the button and make sureSeats97Seats, steering wheel and mirrorsZProCarManuals.com
Page 100 of 352
that the head restraint is engaged in posi-
tion.
Adjusting the head restraints electri-
cally
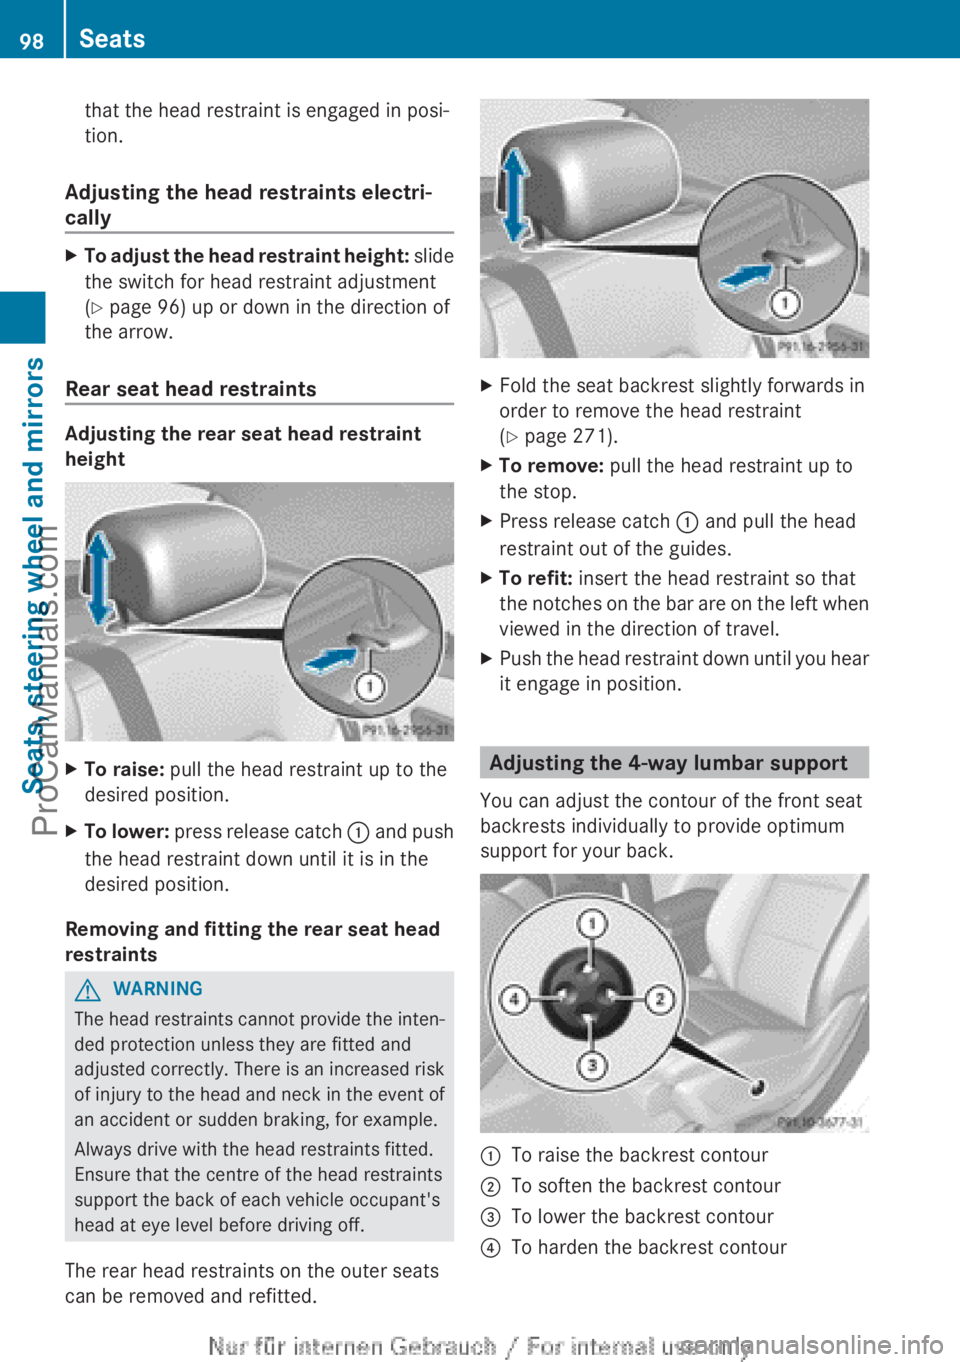
XTo adjust the head restraint height: slide
the switch for head restraint adjustment
( Y page 96) up or down in the direction of
the arrow.
Rear seat head restraints
Adjusting the rear seat head restraint
height
XTo raise: pull the head restraint up to the
desired position.XTo lower: press release catch : and push
the head restraint down until it is in the
desired position.
Removing and fitting the rear seat head
restraints
GWARNING
The head restraints cannot provide the inten-
ded protection unless they are fitted and
adjusted correctly. There is an increased risk
of injury to the head and neck in the event of
an accident or sudden braking, for example.
Always drive with the head restraints fitted.
Ensure that the centre of the head restraints
support the back of each vehicle occupant's
head at eye level before driving off.
The rear head restraints on the outer seats
can be removed and refitted.
XFold the seat backrest slightly forwards in
order to remove the head restraint
( Y page 271).XTo remove: pull the head restraint up to
the stop.XPress release catch : and pull the head
restraint out of the guides.XTo refit: insert the head restraint so that
the notches on the bar are on the left when
viewed in the direction of travel.XPush the head restraint down until you hear
it engage in position.
Adjusting the 4-way lumbar support
You can adjust the contour of the front seat
backrests individually to provide optimum
support for your back.
:To raise the backrest contour;To soften the backrest contour=To lower the backrest contour?To harden the backrest contour98SeatsSeats, steering wheel and mirrors
ProCarManuals.com
Page 102 of 352
Problems with the seat heatingProblemPossible causes/consequences and M SolutionsThe seat heating has
switched off prema-
turely or cannot be
switched on.The on-board voltage is too low because too many electrical con-
sumers are switched on.XSwitch off electrical consumers that you do not need, such as
the rear window heating or interior lighting.
Once the battery is sufficiently charged, the seat heating will
switch back on automatically.Steering wheel
Important safety notes
GWARNING
You could lose control of the vehicle while
driving if you:
R adjust the driver's seat, steering wheel or
mirrors
R fasten the seat belt
There is a risk of an accident.
Adjust the driver's seat, head restraint, steer-
ing wheel and mirrors and fasten your seat
belt before starting the engine.
GWARNING
Children could become trapped by the steer-
ing wheel if they adjust it. There is a risk of
injury.
When leaving the vehicle, always take the key
with you and lock the vehicle. Never leave
children unattended in the vehicle.
Adjusting the steering wheel
GWARNING
The steering wheel may move unexpectedly if
you adjust it while driving. This could cause
you to lose control of the vehicle. There is a
risk of an accident.
Make sure that the steering wheel is locked
before driving off. Never unlock the steering
wheel when the vehicle is in motion.
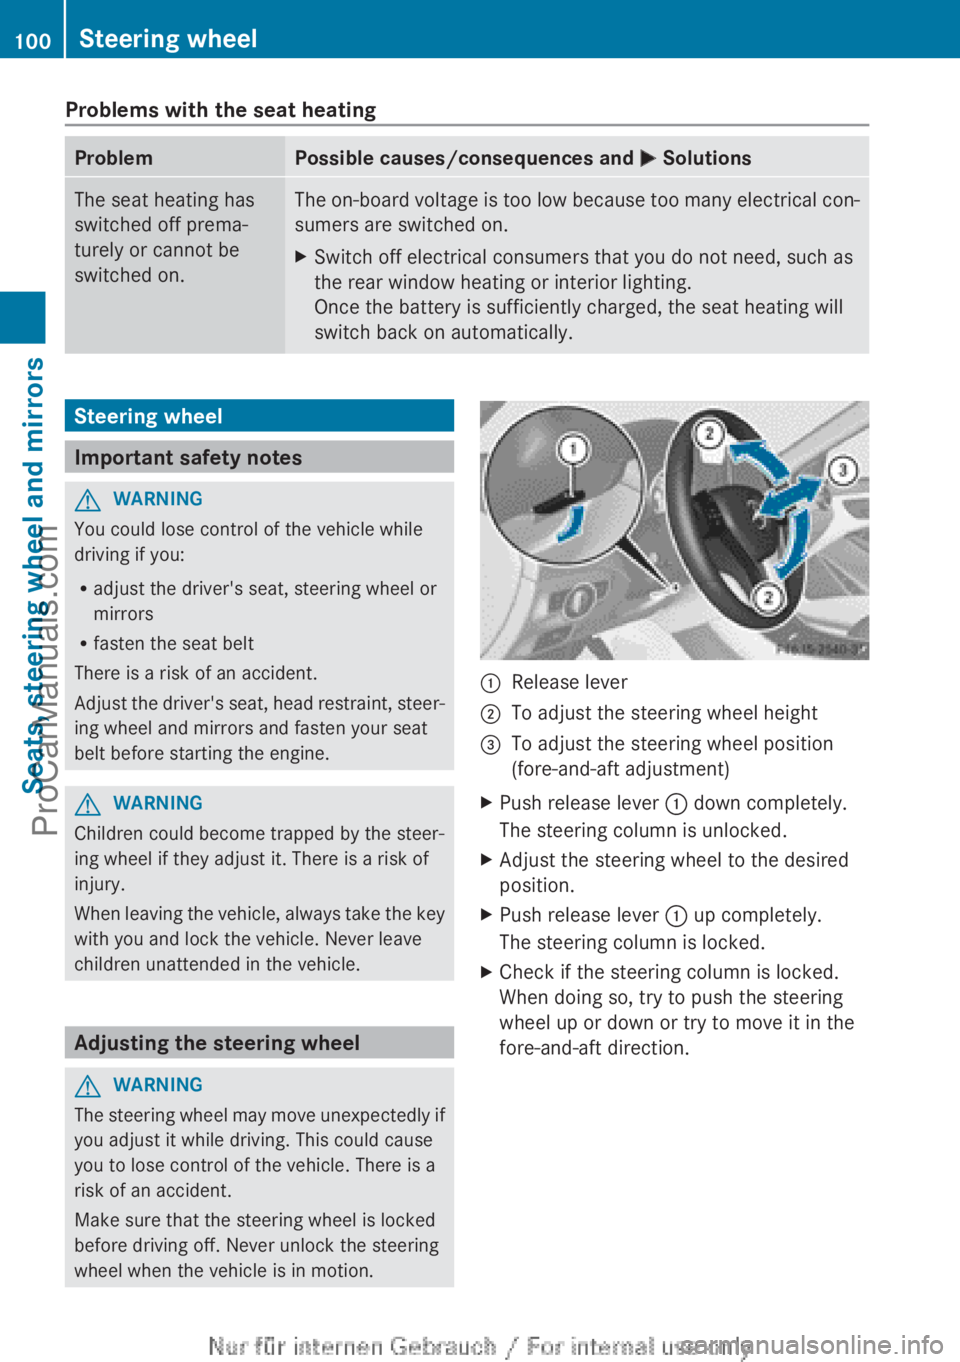
:Release lever;To adjust the steering wheel height=To adjust the steering wheel position
(fore-and-aft adjustment)XPush release lever : down completely.
The steering column is unlocked.XAdjust the steering wheel to the desired
position.XPush release lever : up completely.
The steering column is locked.XCheck if the steering column is locked.
When doing so, try to push the steering
wheel up or down or try to move it in the
fore-and-aft direction.100Steering wheelSeats, steering wheel and mirrors
ProCarManuals.com
Page 189 of 352
Parking tips:
R on narrow roads, drive as closely as possi-
ble past the parking space.
R parking spaces that are littered or over-
grown might be identified or measured
incorrectly.
R parking spaces that are partially occupied
by trailer drawbars might not be identified
as such or be measured incorrectly.
R snowfall or heavy rain may lead to a parking
space being measured inaccurately.
R pay attention to the PARKTRONIC
( Y page 184) warning messages during the
parking procedure.
R at any time, you can intervene in the steer-
ing procedure to correct it. Active Parking
Assist will then be cancelled.
R when transporting a load which protrudes
from your vehicle, you should not use
Active Parking Assist.
R never use Active Parking Assist when snow
chains are fitted.
R make sure that the tyre pressures are
always correct. This has a direct influence
on the parking characteristics of the vehi-
cle.
Use Active Parking Assist for parking spaces:
R that are parallel or at right-angles to the
direction of travel
R that are on straight roads, not bends
R that are on the same level as the road, e.g.
not on the pavement
Detecting parking spaces
Objects located above the height range of
Active Parking Assist will not be detected
when the parking space is measured. These
are not taken into account when the parking
procedure is calculated, e.g. overhanging
loads, tail sections or loading ramps of goods
vehicles.
GWARNING
If objects are located above the detection
range, Active Parking Assist may start to steer
into the parking space too soon. As a result,
you could cause a collision. There is a risk of
an accident.
If objects are located above the detection
range, stop the vehicle and switch Active
Parking Assist off.
For further information on the detection
range ( Y page 183).
Active Parking Assist does not support you
parking in spaces at right angles to the direc-
tion of travel if:
R two parking spaces are located directly
next to one another
R the parking space is directly next to a low
obstacle such as a low kerb stone
R you forward park
Active Parking Assist does not support you
parking in spaces that are parallel or at right
angles to the direction of travel if:
R the parking space is on a kerb stone
R the parking space appears to be blocked,
for example by foliage or grass paving
blocks
R the range of movement is too small
R the parking space is bordered by an obsta-
cle which is not clearly defined such as a
tree or a trailer
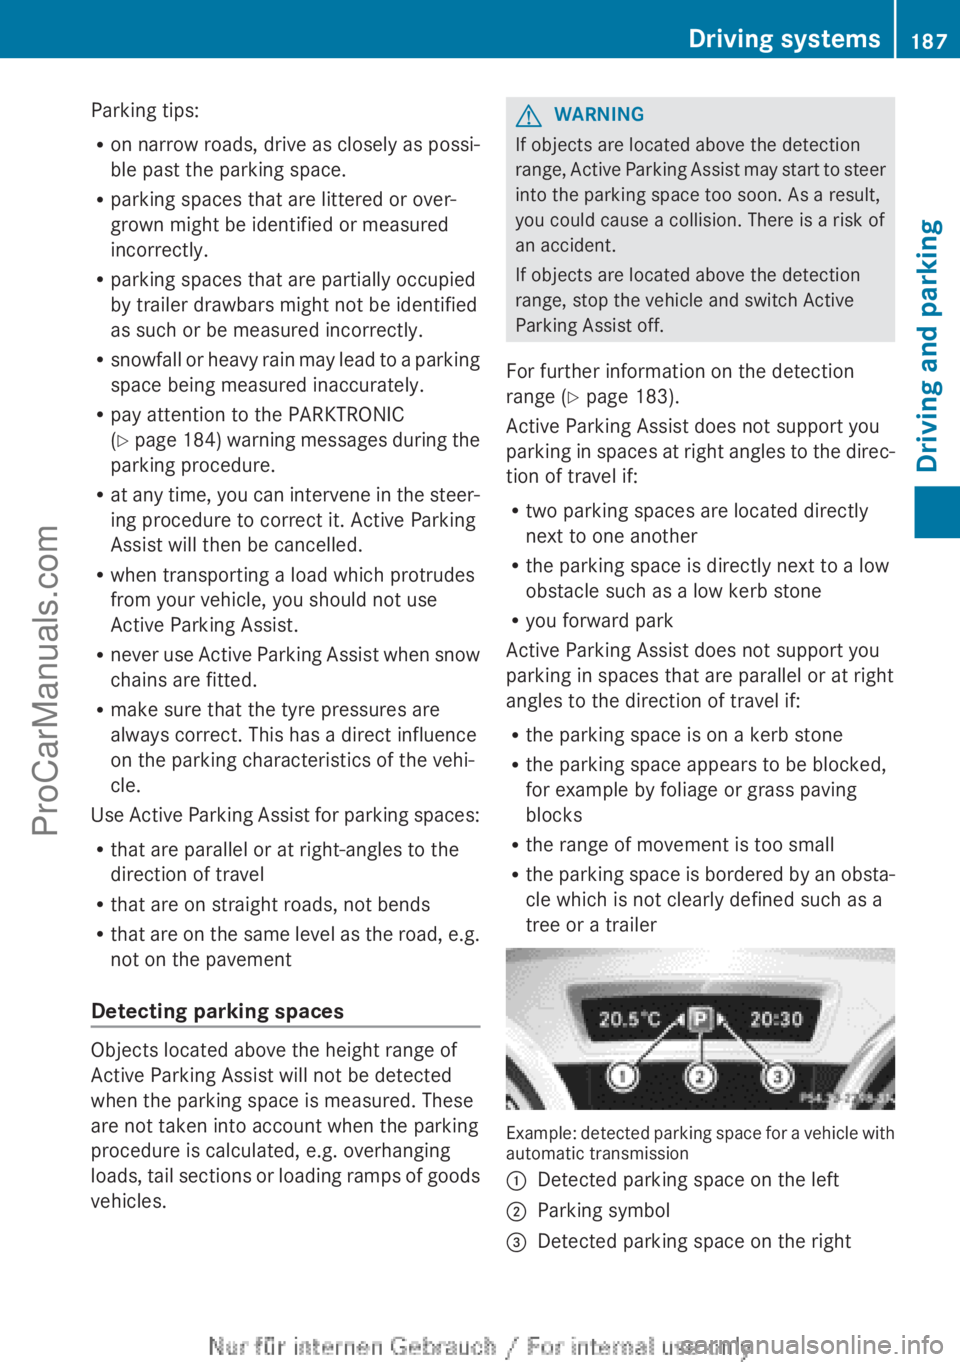
Example: detected parking space for a vehicle with
automatic transmission
:Detected parking space on the left;Parking symbol=Detected parking space on the rightDriving systems187Driving and parkingZProCarManuals.com
Page 197 of 352
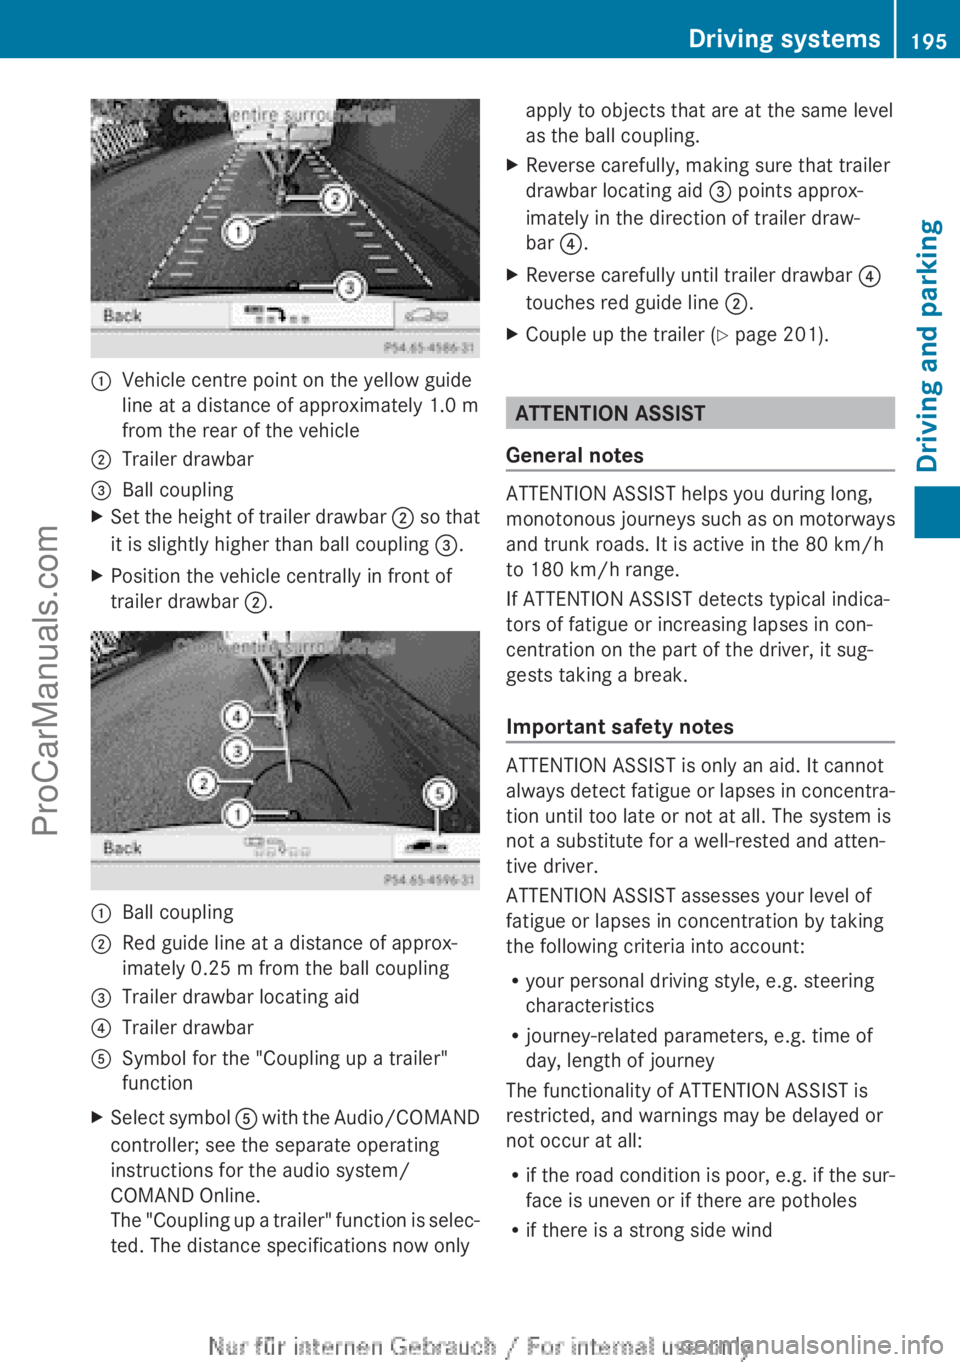
:Vehicle centre point on the yellow guide
line at a distance of approximately 1.0 m
from the rear of the vehicle;Trailer drawbar=Ball couplingXSet the height of trailer drawbar ; so that
it is slightly higher than ball coupling =.XPosition the vehicle centrally in front of
trailer drawbar ;.:Ball coupling;Red guide line at a distance of approx-
imately 0.25 m from the ball coupling=Trailer drawbar locating aid?Trailer drawbarASymbol for the "Coupling up a trailer"
functionXSelect symbol A with the Audio/COMAND
controller; see the separate operating
instructions for the audio system/
COMAND Online.
The "Coupling up a trailer" function is selec-
ted. The distance specifications now onlyapply to objects that are at the same level
as the ball coupling.XReverse carefully, making sure that trailer
drawbar locating aid = points approx-
imately in the direction of trailer draw-
bar ?.XReverse carefully until trailer drawbar ?
touches red guide line ;.XCouple up the trailer ( Y page 201).
ATTENTION ASSIST
General notes
ATTENTION ASSIST helps you during long,
monotonous journeys such as on motorways
and trunk roads. It is active in the 80 km/h
to 180 km/h range.
If ATTENTION ASSIST detects typical indica-
tors of fatigue or increasing lapses in con-
centration on the part of the driver, it sug-
gests taking a break.
Important safety notes
ATTENTION ASSIST is only an aid. It cannot
always detect fatigue or lapses in concentra-
tion until too late or not at all. The system is
not a substitute for a well-rested and atten-
tive driver.
ATTENTION ASSIST assesses your level of
fatigue or lapses in concentration by taking
the following criteria into account:
R your personal driving style, e.g. steering
characteristics
R journey-related parameters, e.g. time of
day, length of journey
The functionality of ATTENTION ASSIST is
restricted, and warnings may be delayed or
not occur at all:
R if the road condition is poor, e.g. if the sur-
face is uneven or if there are potholes
R if there is a strong side wind
Driving systems195Driving and parkingZProCarManuals.com
Page 205 of 352

(Y page 197) availability is limited or not avail-
able at all.
i The height of the ball coupling changes
with the load of the vehicle. If necessary,
use a trailer with a height-adjustable draw-
bar.
Driving tips
i Observe the notes on ESP ®
trailer stabi-
lisation ( Y page 70).
The maximum permissible speed for vehicle/
trailer combinations depends on the type of
trailer. Before beginning the journey, check
the trailer's documents to see what the max-
imum permitted speed is. Observe the legally
prescribed maximum speed in the relevant
country.
For certain Mercedes-Benz vehicles, the max-
imum permissible rear axle load is increased
when towing a trailer. Refer to the "Technical
data" section to find out whether this applies
to your vehicle. If you utilise any of the added
maximum rear axle load when towing a trailer,
the vehicle/trailer combination may not
exceed a maximum speed of 100 km/h for
reasons concerning the operating permit.
This also applies in countries in which the
permissible maximum speed for vehicle/
trailer combinations is above 100 km/h.
When towing a trailer, your vehicle's handling
characteristics will be different in comparison
to when driving without a trailer and it will
consume more fuel.
Change into a lower gear in good time on long
and steep downhill gradients. For vehicles
with automatic transmission, you need to
have selected manual drive program
M (Y page 156).
i This also applies if you have activated
cruise control, SPEEDTRONIC or DIS-
TRONIC PLUS.
This will use the braking effect of the engine,
so less braking will be required to maintain
vehicle speed. This relieves the load on the
brake system and prevents the brakes from
overheating and wearing too quickly. If you
need additional braking, depress the brake
pedal repeatedly rather than continuously.
i Briefly depressing the accelerator pedal
on downhill gradients while the manual
drive program M is temporarily activated
(vehicles with automatic transmission): the
automatic transmission may switch back to
the last active automatic drive program E
or S. The automatic transmission may shift
to a higher gear. This can reduce the
engine's braking effect.
Driving tips
If the trailer swings from side to side:
XDo not accelerate.XDo not countersteer.XBrake if necessary.
R Maintain a greater distance from the vehi-
cle in front than when driving without a
trailer.
R Avoid braking abruptly. If possible, brake
gently at first to allow the trailer to run on.
Then, increase the braking force rapidly.
R The values given for gradient-climbing
capabilities from a standstill refer to sea
level. When driving in mountainous areas,
note that the power output of the engine,
and consequently the vehicle's gradient-
climbing capability, decrease with increas-
ing altitude.
Folding out the ball coupling
GWARNING
If you release the ball coupling or it does not
engage correctly when folding in, it will swing
out. Within pivoting range of the ball coupling,
there is an increased risk of an accident and
injury.
Only release the ball coupling if the pivoting
range is unobstructed. Always make sure that
the ball coupling engages when folding in.
Towing a trailer203Driving and parkingZProCarManuals.com