2013 MERCEDES-BENZ CLA-CLASS tow
[x] Cancel search: towPage 290 of 352
be checked more frequently if the vehicle is
operated under increased loads. Further
information can be obtained at a qualified
specialist workshop, e.g. a Mercedes-Benz
Service Centre.
Driving abroad
An extensive Mercedes-Benz Service network
is also available in other countries. The
Service Hotline's current telephone numbers
for use when you are abroad are to be found
in the "Mercedes-Benz Service24h" section
of the Service Booklet.
Care
General notes
HEnvironmental note
Dispose of empty packaging and cleaning
cloths in an environmentally responsible man-
ner.
! For cleaning your vehicle, do not use any
of the following:
R dry, rough or hard cloths
R abrasive cleaning agents
R solvents
R cleaning agents containing solvents
Do not scrub.
Do not touch the surfaces or protective
films with hard objects, e.g. a ring or ice
scraper. You could otherwise scratch or
damage the surfaces and protective film.
! Do not park up the vehicle for an extended
period straight after cleaning it, particularly
after having cleaned the wheels with wheel
cleaner. Wheel cleaners could cause
increased corrosion of the brake discs and
brake pads/linings. For this reason, you
should drive for a few minutes after clean-
ing. Braking heats the brake discs and the
brake pads/linings, thus drying them. The
vehicle can then be parked up.
Regular care of your vehicle is a condition for
retaining the quality in the long term.
Use care products and cleaning agents rec-
ommended and approved by Mercedes-Benz.
Care of the exterior
Automatic car wash
GWARNING
Braking efficiency is reduced after the vehicle
has been washed. There is a risk of an acci-
dent.
After washing the vehicle, brake carefully
while paying attention to the traffic conditions
in order to restore full braking efficiency.
! If DISTRONIC PLUS or the HOLD function
is activated, the vehicle brakes automati-
cally in certain situations. To prevent dam-
age to the vehicle, deactivate DISTRONIC
PLUS and the HOLD function in the follow-
ing or other similar situations:
R when towing the vehicle
R in the car wash
! Make sure that the automatic transmis-
sion is in position N when washing your
vehicle in a tow-through car wash. The vehi-
cle could be damaged if the transmission is
in another position.
! Make sure that:
R the side windows and sliding sunroof are
closed completely.
R the blower for the ventilation/heating is
switched off (OFF button is depressed/
airflow control is turned to position 0).
R the windscreen wiper switch is at posi-
tion 0.
The vehicle could otherwise be damaged.
You can wash the vehicle in an automatic car
wash from the very start.
Wash off excess dirt before cleaning the vehi-
cle in an automatic car wash.
288CareMaintenance and care
ProCarManuals.com
Page 291 of 352
After using an automatic car wash, wipe off
wax from the windscreen and the wiper
blades. This will prevent smears and reduce
wiping noises caused by residue on the wind-
screen.
Washing by hand
In some countries, washing by hand is only
allowed at wash bays that are specially
designed for this purpose. Observe the legal
requirements for each individual country.
XDo not use hot water and do not wash the
vehicle in direct sunlight.XUse a soft sponge to clean.XUse a mild cleaning agent, such as a car
shampoo approved by Mercedes-Benz.XThoroughly hose down the vehicle with a
gentle jet of water.XDo not point the water jet directly towards
the air inlet.XUse plenty of water and rinse out the
sponge frequently.XRinse the vehicle with clean water and dry
thoroughly with a chamois.XDo not let the cleaning agent dry on the
paintwork.
When using the vehicle in winter, remove all
traces of road salt deposits carefully and as
soon as possible.
High-pressure cleaning equipment
GWARNING
The water jet of circular-jet nozzles (dirt grind-
ers) can cause damage not visible from the
outside to tyres or chassis components. Com-
ponents damaged in this way can unexpect-
edly fail. There is a risk of an accident.
Do not use high-pressure cleaners with circu-
lar-jet nozzles to clean the vehicle. Have dam-
aged tyres or chassis components replaced
immediately.
! Always maintain a distance of at least
30 cm between the vehicle and the high-
pressure cleaner nozzle. Information about
the correct distance is available from the
equipment manufacturer.
Move the high-pressure cleaner nozzle
around when cleaning your vehicle.
Do not aim directly at any of the following:
R tyres
R door gaps, roof gaps, joints etc.
R electrical components
R battery
R connectors
R lights
R seals
R trim elements
R ventilation slots
Damaged seals or electrical components
can lead to leaks or failures.
Cleaning the wheels
! Do not use acidic wheel cleaning products
to remove brake dust. This could damage
wheel bolts and brake components.
! Do not park up the vehicle for an extended
period straight after cleaning it, particularly
after having cleaned the wheels with wheel
cleaner. Wheel cleaners could cause
increased corrosion of the brake discs and
brake pads/linings. For this reason, you
should drive for a few minutes after clean-
ing. Braking heats the brake discs and the
brake pads/linings, thus drying them. The
vehicle can then be parked up.
Cleaning the paintwork
! Do not affix:
R stickers
R films
R magnetic plates or similar items
to painted surfaces. You could otherwise
damage the paintwork.
Care289Maintenance and careZProCarManuals.com
Page 294 of 352
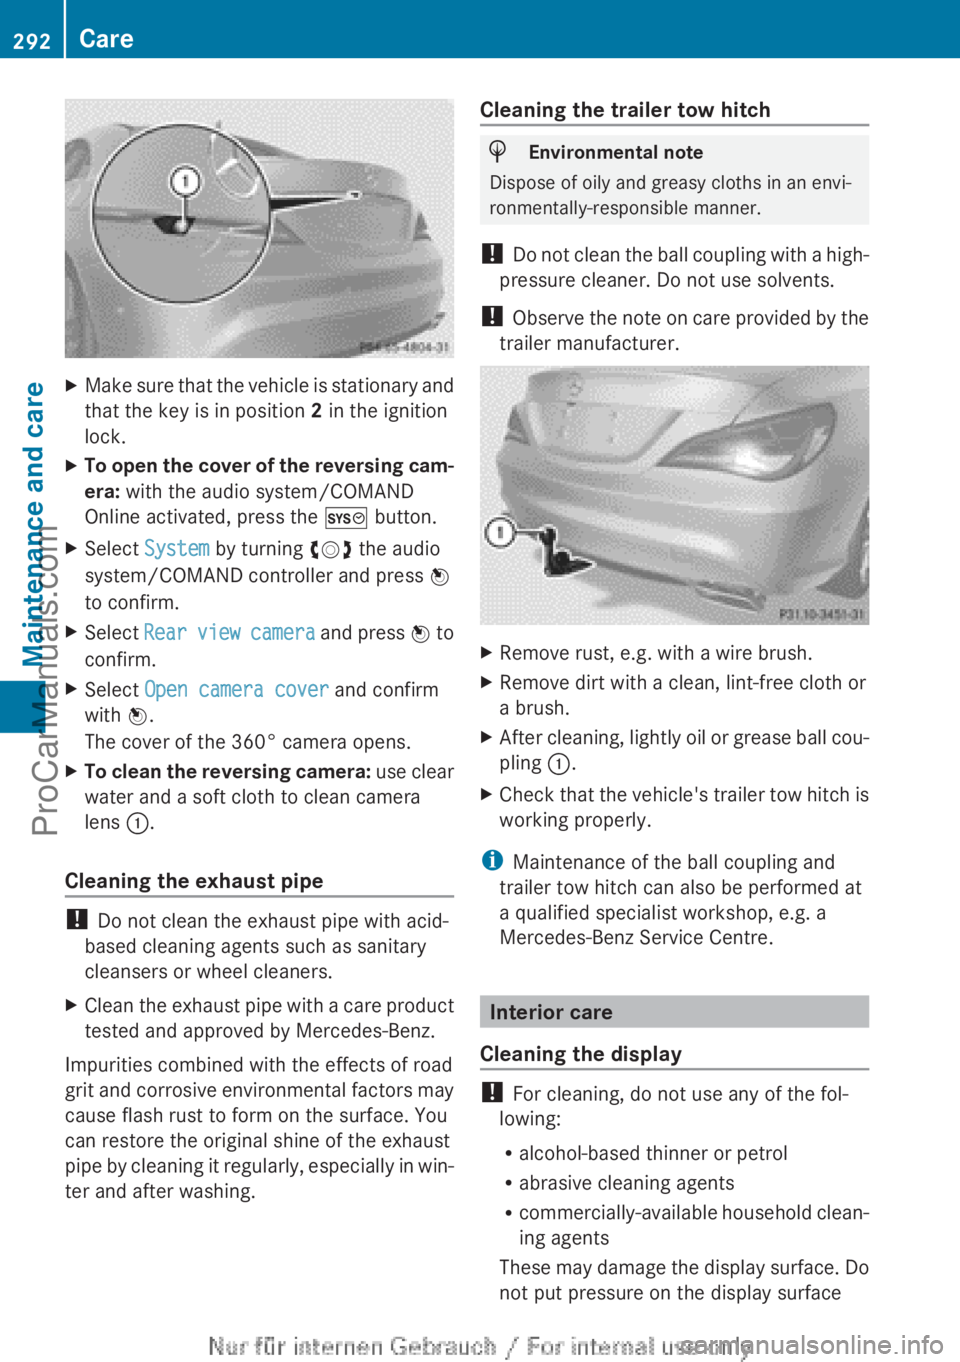
XMake sure that the vehicle is stationary and
that the key is in position 2 in the ignition
lock.XTo open the cover of the reversing cam-
era: with the audio system/COMAND
Online activated, press the W button.XSelect System by turning cVd the audio
system/COMAND controller and press W
to confirm.XSelect Rear view camera and press W to
confirm.XSelect Open camera cover and confirm
with W.
The cover of the 360° camera opens.XTo clean the reversing camera: use clear
water and a soft cloth to clean camera
lens :.
Cleaning the exhaust pipe
!
Do not clean the exhaust pipe with acid-
based cleaning agents such as sanitary
cleansers or wheel cleaners.
XClean the exhaust pipe with a care product
tested and approved by Mercedes-Benz.
Impurities combined with the effects of road
grit and corrosive environmental factors may
cause flash rust to form on the surface. You
can restore the original shine of the exhaust
pipe by cleaning it regularly, especially in win-
ter and after washing.
Cleaning the trailer tow hitchHEnvironmental note
Dispose of oily and greasy cloths in an envi-
ronmentally-responsible manner.
! Do not clean the ball coupling with a high-
pressure cleaner. Do not use solvents.
! Observe the note on care provided by the
trailer manufacturer.
XRemove rust, e.g. with a wire brush.XRemove dirt with a clean, lint-free cloth or
a brush.XAfter cleaning, lightly oil or grease ball cou-
pling :.XCheck that the vehicle's trailer tow hitch is
working properly.
i Maintenance of the ball coupling and
trailer tow hitch can also be performed at
a qualified specialist workshop, e.g. a
Mercedes-Benz Service Centre.
Interior care
Cleaning the display
! For cleaning, do not use any of the fol-
lowing:
R alcohol-based thinner or petrol
R abrasive cleaning agents
R commercially-available household clean-
ing agents
These may damage the display surface. Do
not put pressure on the display surface
292CareMaintenance and care
ProCarManuals.com
Page 297 of 352
Useful information ............................296
Where will I find...? ...........................296
Flat tyre ............................................. 298
Battery (vehicle) ................................ 302
Jump-starting .................................... 306
Towing and tow-starting ..................308
Electrical fuses ................................. 312295Breakdown assistanceProCarManuals.com
Page 299 of 352
Fire extinguisher
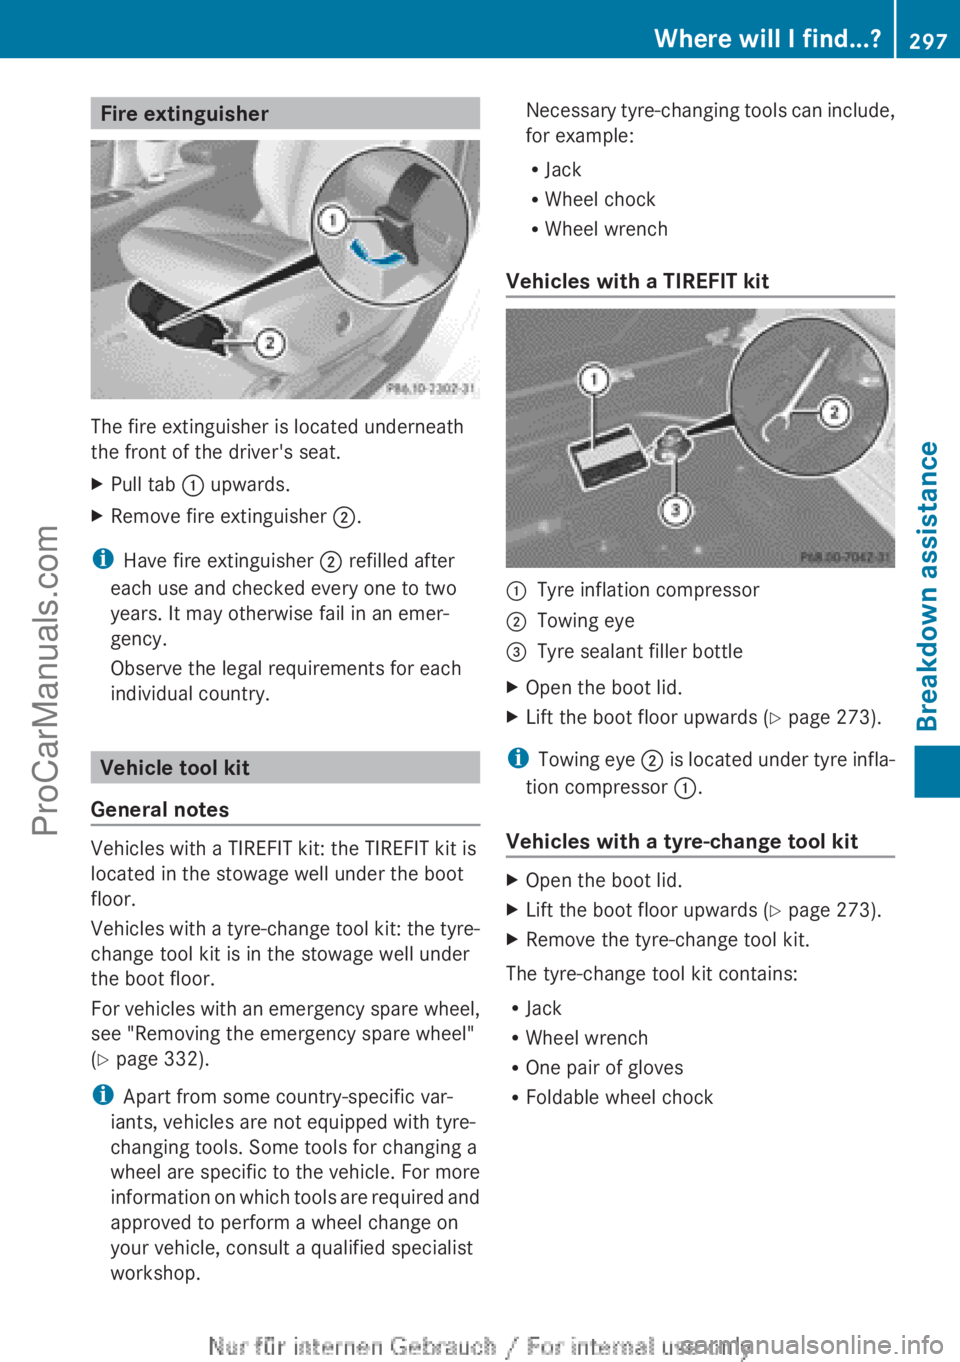
The fire extinguisher is located underneath
the front of the driver's seat.
XPull tab : upwards.XRemove fire extinguisher ;.
i
Have fire extinguisher ; refilled after
each use and checked every one to two
years. It may otherwise fail in an emer-
gency.
Observe the legal requirements for each
individual country.
Vehicle tool kit
General notes
Vehicles with a TIREFIT kit: the TIREFIT kit is
located in the stowage well under the boot
floor.
Vehicles with a tyre-change tool kit: the tyre-
change tool kit is in the stowage well under
the boot floor.
For vehicles with an emergency spare wheel,
see "Removing the emergency spare wheel"
( Y page 332).
i Apart from some country-specific var-
iants, vehicles are not equipped with tyre-
changing tools. Some tools for changing a
wheel are specific to the vehicle. For more
information on which tools are required and
approved to perform a wheel change on
your vehicle, consult a qualified specialist
workshop.
Necessary tyre-changing tools can include,
for example:
R Jack
R Wheel chock
R Wheel wrench
Vehicles with a TIREFIT kit:Tyre inflation compressor;Towing eye=Tyre sealant filler bottleXOpen the boot lid.XLift the boot floor upwards ( Y page 273).
i
Towing eye ; is located under tyre infla-
tion compressor :.
Vehicles with a tyre-change tool kit
XOpen the boot lid.XLift the boot floor upwards ( Y page 273).XRemove the tyre-change tool kit.
The tyre-change tool kit contains:
R Jack
R Wheel wrench
R One pair of gloves
R Foldable wheel chock
Where will I find...?297Breakdown assistanceProCarManuals.com
Page 302 of 352
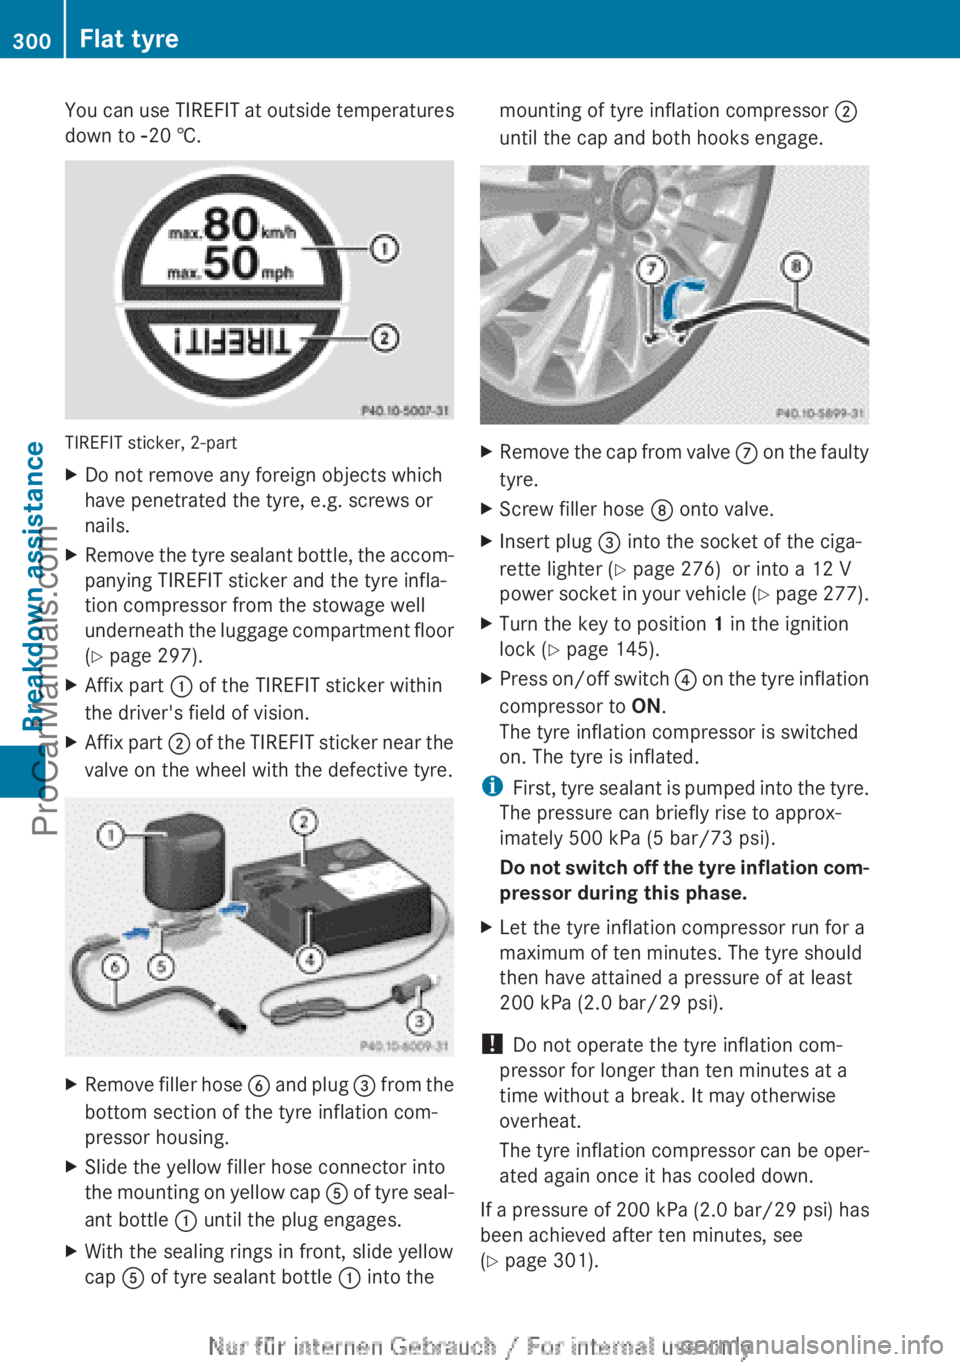
You can use TIREFIT at outside temperatures
down to Ò20 †.
TIREFIT sticker, 2-part
XDo not remove any foreign objects which
have penetrated the tyre, e.g. screws or
nails.XRemove the tyre sealant bottle, the accom-
panying TIREFIT sticker and the tyre infla-
tion compressor from the stowage well
underneath the luggage compartment floor
( Y page 297).XAffix part : of the TIREFIT sticker within
the driver's field of vision.XAffix part ; of the TIREFIT sticker near the
valve on the wheel with the defective tyre.XRemove filler hose B and plug = from the
bottom section of the tyre inflation com-
pressor housing.XSlide the yellow filler hose connector into
the mounting on yellow cap A of tyre seal-
ant bottle : until the plug engages.XWith the sealing rings in front, slide yellow
cap A of tyre sealant bottle : into themounting of tyre inflation compressor ;
until the cap and both hooks engage.XRemove the cap from valve C on the faulty
tyre.XScrew filler hose D onto valve.XInsert plug = into the socket of the ciga-
rette lighter ( Y page 276) or into a 12 V
power socket in your vehicle (Y page 277).XTurn the key to position 1 in the ignition
lock ( Y page 145).XPress on/off switch ? on the tyre inflation
compressor to ON.
The tyre inflation compressor is switched
on. The tyre is inflated.
i First, tyre sealant is pumped into the tyre.
The pressure can briefly rise to approx-
imately 500 kPa (5 bar/73 psi).
Do not switch off the tyre inflation com-
pressor during this phase.
XLet the tyre inflation compressor run for a
maximum of ten minutes. The tyre should
then have attained a pressure of at least
200 kPa (2.0 bar/29 psi).
! Do not operate the tyre inflation com-
pressor for longer than ten minutes at a
time without a break. It may otherwise
overheat.
The tyre inflation compressor can be oper-
ated again once it has cooled down.
If a pressure of 200 kPa (2.0 bar/29 psi) has
been achieved after ten minutes, see
( Y page 301).
300Flat tyreBreakdown assistance
ProCarManuals.com
Page 303 of 352
If a pressure of 200 kPa (2.0 bar/29 psi) has
not been achieved after ten minutes, see
( Y page 301).
i If the tyre sealant leaks out, allow it to dry.
It can then be removed like a layer of film.
If you get tyre sealant on your clothing,
have it cleaned as soon as possible with
perchloroethylene.
Tyre pressure not reached
If a pressure of 200 kPa (2.0 bar/29 psi) has
not been achieved after ten minutes:
XSwitch off the tyre inflation compressor.XUnscrew the filler hose from the valve of
the faulty tyre.XVery slowly drive forwards or reverse
approximately 10 m.XPump up the tyre again.
After a maximum of ten minutes, the tyre
pressure must be at least 200 kPa (2.0 bar /
29 psi).GWARNING
If the required tyre pressure is not reached
after the specified time, the tyre is too badly
damaged. The tyre sealant cannot repair the
tyre in this instance. Damaged tyres and a tyre
pressure that is too low can significantly
impair the vehicle's braking and driving char-
acteristics. There is a risk of accident.
Do not continue driving. Contact a qualified
specialist workshop.
Tyre pressure reached
GWARNING
A tyre temporarily sealed with tyre sealant
impairs the driving characteristics and is not
suitable for higher speeds. There is a risk of
accident.
You should therefore adapt your driving style
accordingly and drive carefully. Do not exceed
the specified maximum speed with a tyre that
has been repaired using tyre sealant.
! After use, excess tyre sealant may run out
of the filler hose. This could cause stains.
Therefore, place the filler hose in the plastic
bag that contained the TIREFIT kit.HEnvironmental note
Have the used tyre sealant bottle disposed of
professionally, e.g. at a qualified specialist
workshop.
If a tyre pressure of 200 kPa (2.0 bar/
29 psi) has been achieved after ten minutes:
XSwitch off the tyre inflation compressor.XUnscrew the filler hose from the valve of
the faulty tyre.XStow the tyre sealant bottle, the tyre infla-
tion compressor and the warning triangle.XPull away immediately .
The maximum speed for a tyre sealed with
tyre sealant is 80 km/h. The upper part of the
TIREFIT sticker must be affixed to the instru-
ment cluster where it will be easily seen by
the driver.
XStop after driving for approximately ten
minutes and check the tyre pressure with
the tyre inflation compressor.
The tyre pressure must now be at least
130 kPa (1.3 bar/19 psi).GWARNING
If the required tyre pressure is not reached
after driving for a short period, the tyre is too
badly damaged. The tyre sealant cannot
repair the tyre in this instance. Damaged tyres
and a tyre pressure that is too low can signif-
icantly impair the vehicle's braking and driv-
ing characteristics. There is a risk of accident.
Do not continue driving. Contact a qualified
specialist workshop.
i In your vehicle, you will find a sticker with
the Mercedes-Benz Service24h telephone
number, e.g. on the B-pillar on the driver's
side.
Flat tyre301Breakdown assistanceZProCarManuals.com
Page 304 of 352
XCorrect the tyre pressure if it is still at least
130 kPa (1.3 bar /19 psi) (see the fuel filler
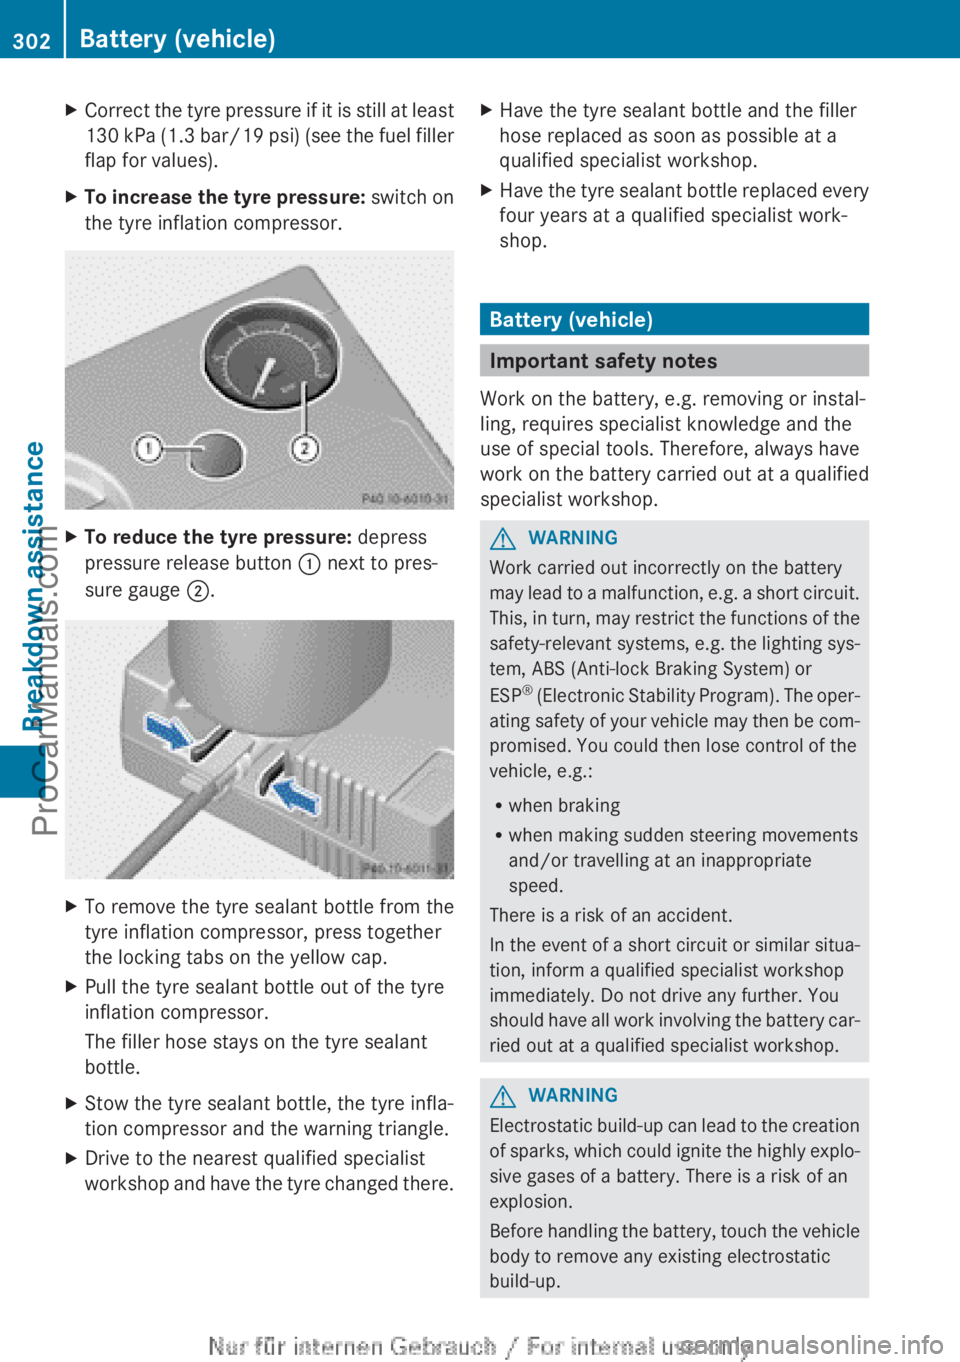
flap for values).XTo increase the tyre pressure: switch on
the tyre inflation compressor.XTo reduce the tyre pressure: depress
pressure release button : next to pres-
sure gauge ;.XTo remove the tyre sealant bottle from the
tyre inflation compressor, press together
the locking tabs on the yellow cap.XPull the tyre sealant bottle out of the tyre
inflation compressor.
The filler hose stays on the tyre sealant
bottle.XStow the tyre sealant bottle, the tyre infla-
tion compressor and the warning triangle.XDrive to the nearest qualified specialist
workshop and have the tyre changed there.XHave the tyre sealant bottle and the filler
hose replaced as soon as possible at a
qualified specialist workshop.XHave the tyre sealant bottle replaced every
four years at a qualified specialist work-
shop.
Battery (vehicle)
Important safety notes
Work on the battery, e.g. removing or instal-
ling, requires specialist knowledge and the
use of special tools. Therefore, always have
work on the battery carried out at a qualified
specialist workshop.
GWARNING
Work carried out incorrectly on the battery
may lead to a malfunction, e.g. a short circuit.
This, in turn, may restrict the functions of the
safety-relevant systems, e.g. the lighting sys-
tem, ABS (Anti-lock Braking System) or
ESP ®
(Electronic Stability Program). The oper-
ating safety of your vehicle may then be com-
promised. You could then lose control of the
vehicle, e.g.:
R when braking
R when making sudden steering movements
and/or travelling at an inappropriate
speed.
There is a risk of an accident.
In the event of a short circuit or similar situa-
tion, inform a qualified specialist workshop
immediately. Do not drive any further. You
should have all work involving the battery car-
ried out at a qualified specialist workshop.
GWARNING
Electrostatic build-up can lead to the creation
of sparks, which could ignite the highly explo-
sive gases of a battery. There is a risk of an
explosion.
Before handling the battery, touch the vehicle
body to remove any existing electrostatic
build-up.
302Battery (vehicle)Breakdown assistance
ProCarManuals.com